Vaco CanCa VHU03W User manual

User Instructions
Gebrauchsanweisung
Instrukcja obsługi dla użytkownika
Ultrasonic humidifier
Ultraschall-Luftbefeuchter
Ultradźwiękowy nawilżacz powietrza
VHU-UL-0303-X28W
CanCa VHU03W


CONTENTS
1. IMPORTANT SAFEGUARDS...............................................................................................................................................4
2. PRODUCT DESCRIPTION....................................................................................................................................................5
3. TOUCH CONTROL AND LED INDICATORS..............................................................................................................6
4. USE..................................................................................................................................................................................................7
5. CARE AND MAINTENANCE...............................................................................................................................................9
6. CONNECT WITH "tuya" APP ..........................................................................................................................................10
7. TROUBLE SHOOTING.........................................................................................................................................................14
INHALT
1. WICHTIGE SICHERHEITSVORKEHRUNGEN............................................................................................................15
2. GERÄTEBESCHREIBUNG...................................................................................................................................................16
3. TOUCH-STEUERUNG UND LED-ANZEIGEN.........................................................................................................17
4. VERWENDUNG......................................................................................................................................................................18
5. PFLEGE UND WARTUNG.................................................................................................................................................20
6. VERBINDUNG MIT DER „Tuya“-APP...........................................................................................................................21
7. FEHLERBEHEBUNG .............................................................................................................................................................25
SPIS TREŚCI
1. BEZPIECZEŃSTWO..............................................................................................................................................................26
2. OPIS URZĄDZENIA..............................................................................................................................................................27
3. PANEL DOTYKOWY I WSKAŹNIKI LED.....................................................................................................................28
4. OBSŁUGA..................................................................................................................................................................................29
5. CZYSZCZENIE I KONSERWACJA .................................................................................................................................31
6. ŁĄCZENIE Z APLIKACJĄ „tuya”.....................................................................................................................................32
7. ROZWIĄZYWANIE PROBLEMÓW...............................................................................................................................36

4
1. IMPORTANT SAFEGUARDS
• The humidifier is intended for indoor use only. Do not operate the humidifier outdoors.
• Always ensure that there is water in the water tank before operating the humidifier.
Use only clean, cool water to fill the water tank.
• Place the humidifier on a smooth, level, waterproof surface that is elevated off the
ground.
• Always handle the humidifier with dry hands to avoid electric shock.
• Do not install the humidifier near walls, furniture and electrical appliances. Keep out of
reach of children. Close supervision is necessary when this appliance is used by or near
children, elderly or disabled persons.
• Do not operate the humidifier with a damaged cord or plug. DO NOT use any
attachments not provided with the humidifier.
• DO NOT attempt to repair or modify the humidifier. Servicing must be performed by
professional or qualified personnel.
• ALWAYS unplug and empty the water tank when not in use for a long period of time.
ALWAYS unplug before removing, filling or emptying the water tank.
• Do not cover the mist outlet on the humidifier or insert objects into the mist outlet.
• Do not leave the humidifier in a closed room as the air could become saturated and
leave condensation on walls or furniture.
5
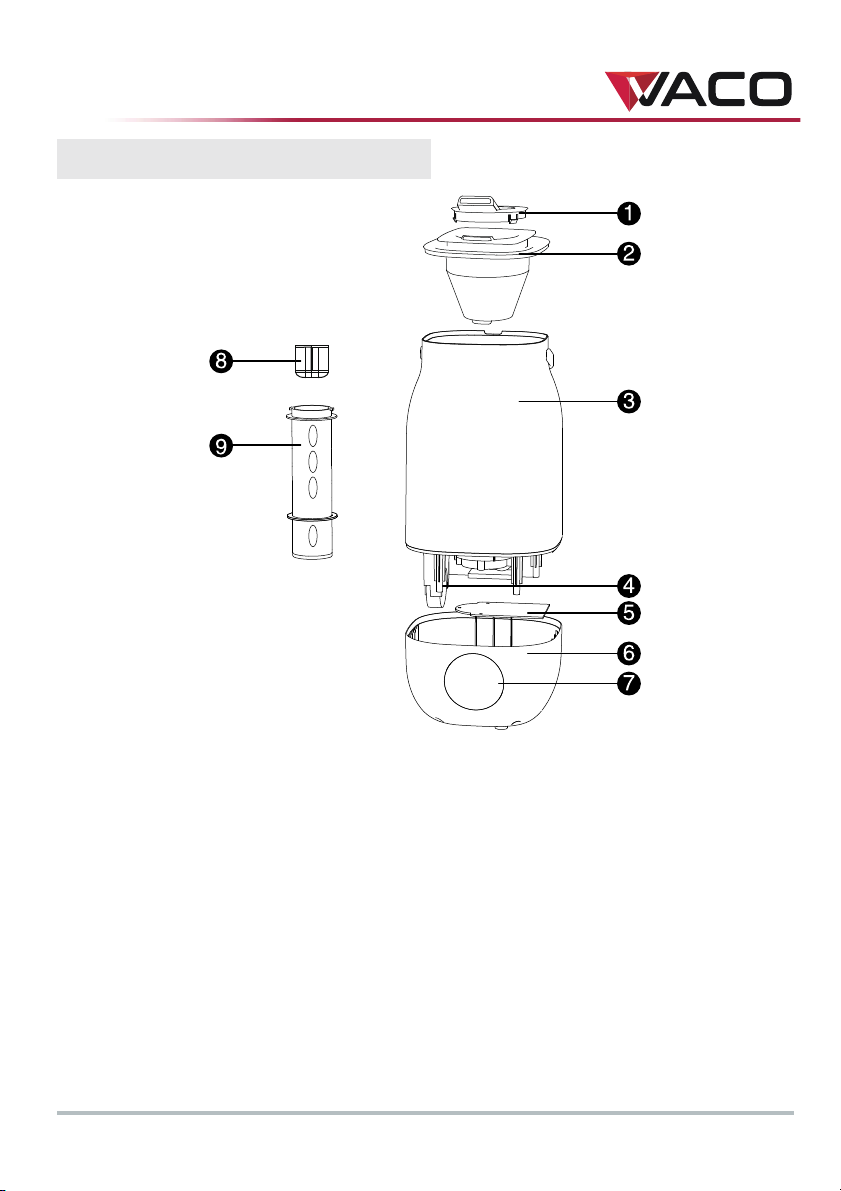
2. PRODUCT DESCRIPTION
TECHNICAL DATA
Operation voltage: 100-240 V
Rated power: 25-28 W
Rated frequency: 50/60 Hz
Humidifying capacity: max. 250 ml/h
Water volume: max. 3.0 L
PARTS DESCRIPTION
1. Mist outlet
2. Lid
3. Water tank
4. Fan
5. Electric circuit board
6. Base
7. Touch control panel
8. Filtering floater
9. Filtering floater tube

6
3. TOUCH CONTROL AND LED INDICATORS
Touch control
LED Indicator
•The LED illumination can indicate the current humidifying capacity. Three LED colors
are available to indicate different humidifying capacity.
1) Blue light: Maximum humidifying, for fast humidifying.
2) Green light: Medium humidifying, for everyday humidify control.
3) Red light: Minimum humidifying, ideal for night-time use.
•When connected to the power outlet, the blue LED light turns on for 2 seconds then
off, and the humidifier enters standby. Press the power button to start the humidifier
on medium humidifying.
Note on water shortage indication
•If the water tank has insufficient water, the LED indicator will flash for 1 minute then
the humidifier will automatically turn off.
•When connected with the app through WiFi, the app will send an alert message if the
water in the tank reaches the low limit.
Mist setting button
Power on/off button LED light on/off button
WiFi connection button
7
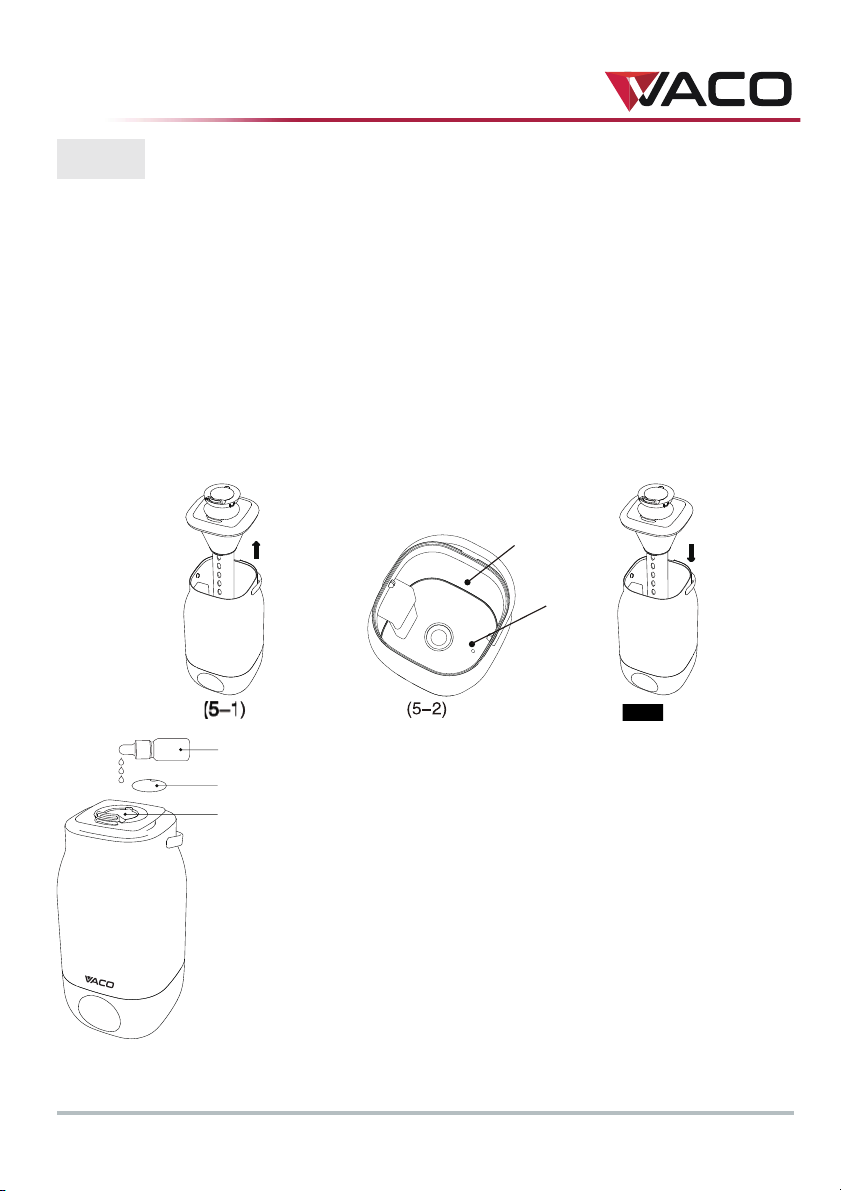
4. USE
1. Make sure the humidifier is powered off and unplug from the power outlet.
2. Remove the lid (Figure 5-1).
3. Add water to the water tank.
Important: Do not exceed the maximum water level marked, or do not let water
level lower than the height of the water shortage detector. This will cause no
mist release (Figure 5-2).
4. Replace the lid on the humidifier: align the lid with the top of the water tank for a
secure fix (Figure 5-3).
5. Connect the power plug to the power outlet, and turn the humidifier on. Use the
touch control panel for feature operation, such as setting mist and humidity level.
The humidifier has an aromatherapy function. You
can put an aromatherapy oil directly to mist outlet or
you can put a small non-woven fabrics in the mist
outlet, then drop aromatherapy oil. The humidified
mist will blow out the aromatherapy oil together.
Warning:
We suggest to clean the water tank and mist outlet
everyday if you use the aromatherapy oil.
Water tank
Water
shortage
detector
Aromatherapy oil
Cover of outlet
Mist outlet

8
Note on replacing filtering floater
If the amount of mist released by the humidifier decreases, or the humidifier emits
abnormal noises, this may indicate malfunction of the filtering floater. Check the
filtering floater, and if found necessary.
Before replacing the filtering floater, make sure the humidifier is turned off and
unplugged from the power outlet.
1. Remove the lid from the humidifier.
2. Remove the filtering floater tube from the lid by turning the tube clockwise.
3. Slide the filtering floater out of the tube. Then slide a new filtering floater into the
tube, while ensuring that the end of the floater with “UP” labeled faces towards the lid.
4. Re-attach the filtering floater tube to the lid: align the tabs on the tube with the slots
on the lid then turn the tube counter clockwise for a secure fix.

9
5. CARE AND MAINTENANCE
1. Turn off the humidifier and unplug
from the power outlet before
cleaning or maintenance.
2. Remove the lid.
3. To empty water, make sure the
orientation of the water tank is
correct.
4. Using a soft damp cloth, clean the
water tank, water shortage detector and
air outlet.
Water
shortage
detector
Air outlet

10
6. CONNECT WITH "tuya" APP
1. Download and install the "tuya" app. 2. Open the app. If you have an account,
click "Login with Existing Account" to
log in. If you do not have an account,
click "Register" then follow the on-
screen instructions to complete the
account registration.
3. Click "Add Devices" after login or
registration.
4. Click "Small Home Appliance" then
Click "Diffuser" in the following
interface.
Table of contents
Languages:
Other Vaco Humidifier manuals


