Vaco CanCa VHU03LW User manual

User Instructions
Gebrauchsanweisung
Instrukcja obsługi dla użytkownika
Ultrasonic humidifier
Ultraschall-Luftbefeuchter
Ultradźwiękowy nawilżacz powietrza
VHU-UL-0303-L28W
CanCa VHU03LW


CONTENTS
1. IMPORTANT SAFEGUARDS...............................................................................................................................................4
2. PRODUCT DESCRIPTION....................................................................................................................................................5
3. DISPLAY INDICATORS..........................................................................................................................................................6
4. TOUCH CONTROL..................................................................................................................................................................7
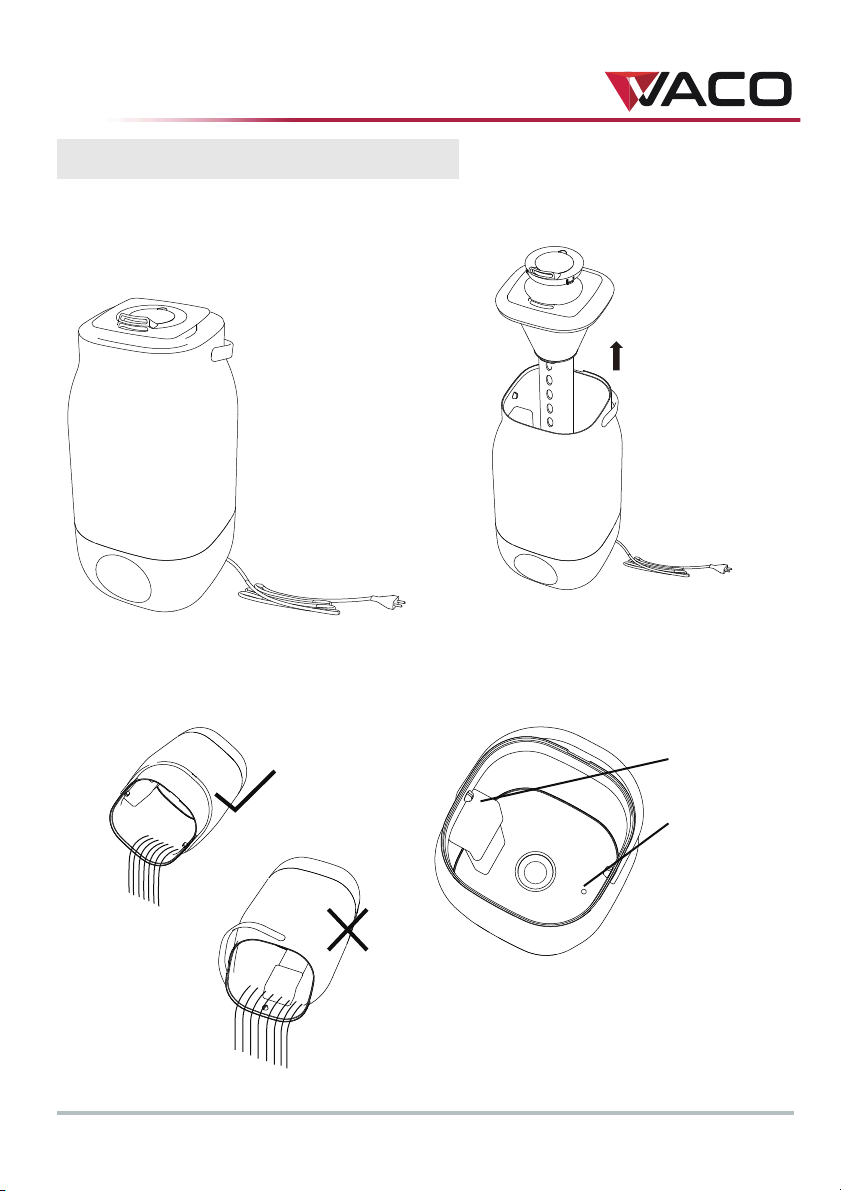
5. USE..................................................................................................................................................................................................8
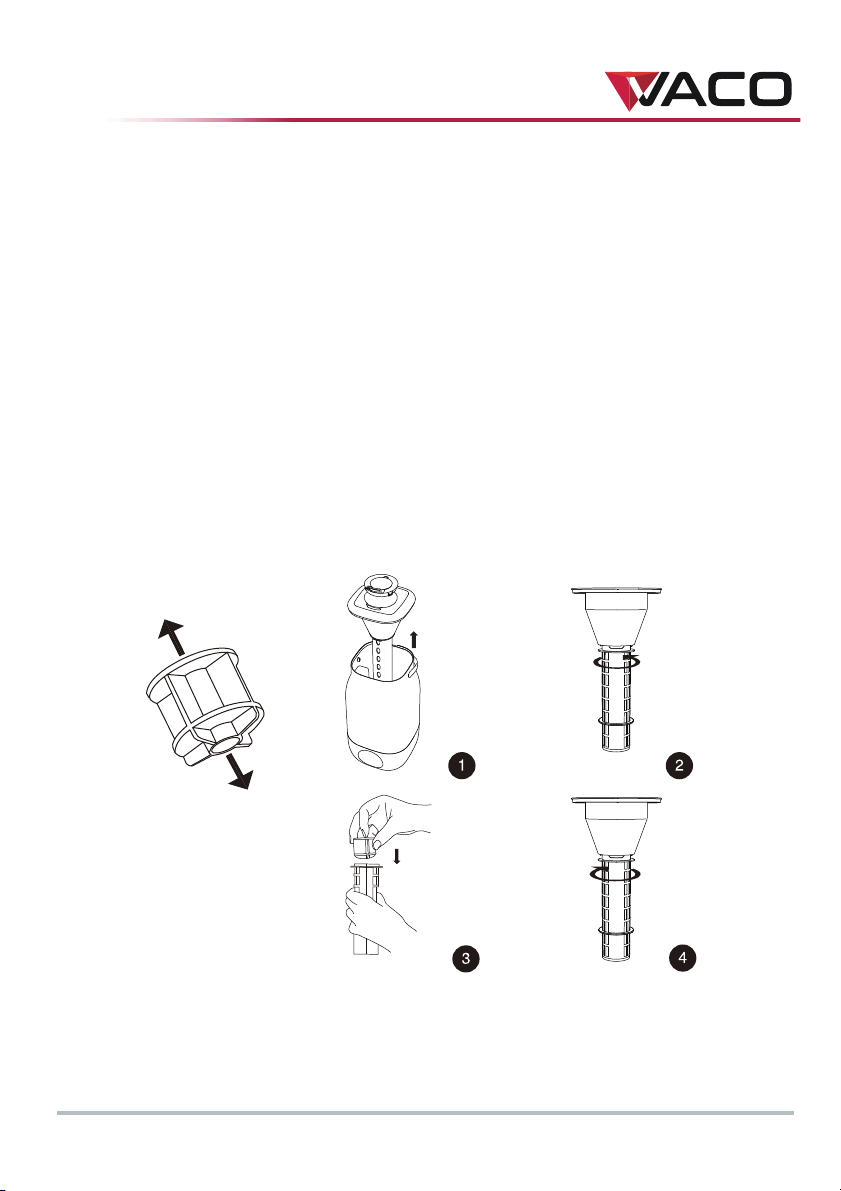
6. CARE AND MAINTENANCE............................................................................................................................................10
7. CONNECT WITH "tuya" APP ..........................................................................................................................................11
8. TROUBLE SHOOTING.........................................................................................................................................................15
INHALT
1. WICHTIGE SICHERHEITSVORKEHRUNGEN............................................................................................................16
2. GERÄTEBESCHREIBUNG...................................................................................................................................................17
3. ANZEIGEN................................................................................................................................................................................18
4. TOUCH-STEUERUNG .........................................................................................................................................................19
5. VERWENDUNG......................................................................................................................................................................20
6. PFLEGE UND WARTUNG.................................................................................................................................................22
7. VERBINDUNG MIT DER „Tuya“-APP...........................................................................................................................23
8. FEHLERBEHEBUNG .............................................................................................................................................................27
SPIS TREŚCI
1. BEZPIECZEŃSTWO..............................................................................................................................................................28
2. OPIS URZĄDZENIA..............................................................................................................................................................29
3. WSKAŹNIKI WYŚWIETLACZA........................................................................................................................................30
4. PANEL DOTYKOWY............................................................................................................................................................31
5. OBSŁUGA..................................................................................................................................................................................32
6. CZYSZCZENIE I KONSERWACJA .................................................................................................................................34
7. ŁĄCZENIE Z APLIKACJĄ „tuya”.....................................................................................................................................35
8. ROZWIĄZYWANIE PROBLEMÓW...............................................................................................................................39

4
1. IMPORTANT SAFEGUARDS
•The humidifier is intended for indoor use only. Do not operate the humidifier outdoors.
•Always ensure that there is water in the water tank before operating the humidifier.
Use only clean, cool water to fill the water tank.
•Place the humidifier on a smooth, level, waterproof surface that is elevated off the
ground.
•Always handle the humidifier with dry hands to avoid electric shock.
•Do not install the humidifier near walls, furniture and electrical appliances. Keep out of
reach of children. Close supervision is necessary when this appliance is used by or near
children, elderly or disabled persons.
•Do not operate the humidifier with a damaged cord or plug. DO NOT use any
attachments not provided with the humidifier.
•DO NOT attempt to repair or modify the humidifier. Servicing must be performed by
professional or qualified personnel.
•ALWAYS unplug and empty the water tank when not in use for a long period of time.
ALWAYS unplug before removing, filling or emptying the water tank.
•Do not cover the mist outlet on the humidifier or insert objects into the mist outlet.
•Do not leave the humidifier in a closed room as the air could become saturated and
leave condensation on walls or furniture.

5
2. PRODUCT DESCRIPTION
TECHNICAL DATA
Operation voltage: 100-240 V
Rated power: 25-28 W
Rated frequency: 50/60 Hz
Humidifying capacity: max. 250 ml/h
Water volume: max. 3.0 L
PARTS DESCRIPTION
1. Mist outlet
2. Lid
3. Water tank
4. Fan
5. Electric circuit board
6. Base
7. Touch control panel
8. Filtering floater
9. Filtering floater tube

6
3. DISPLAY INDICATORS
1. Water shortage indicator: If insufficient water level is detected by the
detector, the humidifier buzzes for 3 seconds and the indicator flashes
60 seconds then the humidifier automatically powers off.
2. WiFi indicator: If the humidifier is not connected with “tuya” app, the
indicator flashes continuously. If connected with the “tuya” app, the
indicator lights up solid.
3. Humidity level indicator: Display ambient/room humidity level; display
the set humidity level during humidity setting.
4. Mist/Time value indicator: Display the set mist level if mist is set;
display the set time if time is set.
5. MIST Mist indicator: Light up when a mist level is set.
6. TIME Time indicator: Light up when time is set.
MIST/WIFI
WIFI
HUMIDITY
TIME
HUMIDITY
TIMEMIST
LOW WATER
LOW WATER
WIFI
HUMIDITY

7
4. TOUCH CONTROL
1. Press to turn the humidifier on or off. Press and hold for 1 second to turn the
LED illumination on or off.
2. Press to toggle through 3 mist levels (“1”, “2” and “3”). Press and hold for
3seconds to disconnect or connect WiFi connection.
3. Press to set a timer from 1 to 8 hours, 1 hour increment upon each press.
4. Press to set a humidity level from 40-90% RH, 5% RH increment each press.
MIST/WIFI
WIFI
HUMIDITY
TIME
HUMIDITY
TIMEMIST
LOW WATER
MIST/WIFI
TIME
HUMIDITY

8
5. USE
1. Make sure the humidifier is powered off and unplug from the power outlet.
2. Remove the lid (Figure 5-1).
3. Add water to the water tank.
Important: Do not exceed the maximum water level marked, or do not let water
level lower than the height of the water shortage detector. This will cause no
mist release (Figure 5-2).
4. Replace the lid on the humidifier: align the lid with the top of the water tank for a
secure fix (Figure 5-3).
5. Connect the power plug to the power outlet, and turn the humidifier on. Use the
touch control panel for feature operation, such as setting mist and humidity level.
The humidifier has an aromatherapy function. You
can put an aromatherapy oil directly to mist outlet or
you can put a small non-woven fabrics in the mist
outlet, then drop aromatherapy oil. The humidified
mist will blow out the aromatherapy oil together.
Warning:
We suggest to clean the water tank and mist outlet
everyday if you use the aromatherapy oil.
Water tank
Water
shortage
detector
Aromatherapy oil
Cover of outlet
Mist outlet

9
Note on replacing filtering floater
If the amount of mist released by the humidifier decreases, or the humidifier emits
abnormal noises, this may indicate malfunction of the filtering floater. Check the
filtering floater, and if found necessary.
Before replacing the filtering floater, make sure the humidifier is turned off and
unplugged from the power outlet.
1. Remove the lid from the humidifier.
2. Remove the filtering floater tube from the lid by turning the tube clockwise.
3. Slide the filtering floater out of the tube. Then slide a new filtering floater into the
tube, while ensuring that the end of the floater with “UP” labeled faces towards the lid.
4. Re-attach the filtering floater tube to the lid: align the tabs on the tube with the slots
on the lid then turn the tube counter clockwise for a secure fix.

10
6. CARE AND MAINTENANCE
1. Turn off the humidifier and unplug
from the power outlet before
cleaning or maintenance.
2. Remove the lid.
3. To empty water, make sure the
orientation of the water tank is
correct.
4. Using a soft damp cloth, clean the
water tank, water shortage detector and
air outlet.
Water
shortage
detector
Air outlet

11
7. CONNECT WITH "tuya" APP
1. Download and install the "tuya" app. 2. Open the app. If you have an account,
click "Login with Existing Account" to
log in. If you do not have an account,
click "Register" then follow the on-
screen instructions to complete the
account registration.
3. Click "Add Devices" after login or
registration.
4. Click "Small Home Appliance" then
Click "Diffuser" in the following
interface.

12
5. Enter your WiFi password then click
"Next" in the following interface.
6. Click "Confirm indicator rapidly
blink" in the following interface.
7. Wi Fi connection progress is
displayed. The connection normally
takes 15-20 seconds.
8. After the connection, click "Done".

13
9. The control interface is displayed. This
allows you to control the humidifier
via the app.
Note:
For WiFi re-connection, press and hold
the MIST/WIFI button for 3 seconds until
the WIFI indicator flashes quickly, then
WiFi is connected successfully. The WIFI
indicator lights up solid from flashing.

14
If you want to connect your humidifier with the Tmall Genie or Dingdong app for function
control, follow the steps below.
1. In the control interface of the “tuya”
app, click the “Key” icon on the upper
right corner.
2. In the following interface, click "Tmall
Genie" for "Tmall Genie" app
connection; click "Dingdong" for
"Dingdong" app connection. Then
follow on-screen instructions to
complete connection.
Note:
If connected with the "Tmall Genie" or "Dingdong" app for function control, only
turning on and off of the humidifier is applicable.

15
8. TROUBLE SHOOTING
Problem Possible Cause Solution
No LED light/fan
operation/mist
release
Not power supply connected Connect to power supply.
The product not turned on Press the power button.
No filtering floater installed Install a filtering floater.
Some space between the lid and
the water tank
Press the lid to ensure no space
left.
Having LED light
and fan
operation, yet
without mist
release or with
bad smell
The filtering floater installed in a
wrong direction
Re-install the filtering floater for
correct direction.
The filtering floater tube placed
incorrectly
Adjust the filtering floater tube to
be in a correct place.
The broken atomizer Replace with a new atomizer.
A brand new product Open the water tank for smell-
removing ventilation.
The dirty water in water tank Clean the water tank and fill with
clean water.
Having LED
light, yet
without fan
operation and
mist release
Water exceeding the maximum
water mark
Dump the excess water
The broken fan Replace with a new fan.
Precipitation on atomizer surface Clean the atomizer surface

16
1. WICHTIGE SICHERHEITSVORKEHRUNGEN
•Dieser Luftbefeuchter ist nur für den Gebrauch in Innenräumen vorgesehen.
Verwenden Sie den Luftbefeuchter nicht im Freien.
•Stellen Sie immer sicher, dass sich Wasser im Wassertank befindet, bevor Sie den
Luftbefeuchter in Betrieb nehmen. Verwenden Sie nur sauberes, kühles Wasser, um
den Wassertank zu füllen.
•Stellen Sie den Luftbefeuchter auf eine glatte, ebene, wasserdichte und vom Boden
abgehobene Oberfläche.
•Fassen Sie den Luftbefeuchter immer mit trockenen Händen an, um einen
elektrischen Schlag zu vermeiden.
•Stellen Sie den Luftbefeuchter nicht in der Nähe von Wänden, Möbeln und
Elektrogeräten auf. Halten Sie das Gerät außerhalb der Reichweite von Kindern. Eine
genaue Überwachung ist erforderlich, wenn dieses Gerät von oder in der Nähe von
Kindern, älteren oder behinderten Personen verwendet wird.
•Betreiben Sie den Luftbefeuchter nicht mit einem beschädigten Kabel oder Stecker.
Verwenden Sie KEINE Zubehörteile, die nicht mit dem Luftbefeuchter geliefert wurden.
•Versuchen Sie NICHT, den Luftbefeuchter selbst zu reparieren oder zu modifizieren.
Die Wartung muss von professionellem und qualifiziertem Personal durchgeführt
werden.
•Ziehen Sie IMMER den Netzstecker und leeren Sie den Wassertank, wenn Sie ihn
längere Zeit nicht benutzen. Ziehen Sie IMMER den Netzstecker, bevor Sie den
Wassertank entfernen, füllen oder entleeren.
•Decken Sie den Nebelauslass des Luftbefeuchters nicht ab und führen Sie keine
Gegenstände in den Nebelauslass ein.
•Lassen Sie den Luftbefeuchter nicht in einem geschlossenen Raum, da die Luft
gesättigt werden und Kondenswasser an Wänden oder Möbeln hinterlassen kann.

17
2. GERÄTEBESCHREIBUNG
TECHNISCHE DATEN
Betriebsspannung: 100 - 240 V
Nennleistung: 25-28 W
Nennfrequenz: 50/60 Hz
Befeuchtungskapazität: max. 250 ml/h
Wasservolumen: max. 3,0 l
TEILEBESCHREIBUNG
1. Nebelauslass
2. Deckel
3. Wassertank
4. Gebläse
5. Elektrische
Leiterplatte
6. Sockel
7. Bedienfeld mit Touch-Funktion
8. Filterschwimmer
9. Filterschwimmerrohr

18
3. ANZEIGEN
1. Wassermangelanzeige: Wenn der Melder einen unzureichenden
Wasserstand erkennt, summt der Luftbefeuchter 3 Sekunden lang und
die Anzeige blinkt 60 Sekunden lang. Der Luftbefeuchter schaltet sich
dann automatisch aus.
2. WLAN-Anzeiger: Wenn der Luftbefeuchter nicht mit der „Tuya“-App
verbunden ist, blinkt die Anzeige kontinuierlich. Bei Verbindung mit
der „Tuya“-App leuchtet die Anzeige dauerhaft.
3. Feuchtigkeitsanzeige: Anzeige der Umgebungs-/Raumfeuchtigkeit;
zeigt die eingestellte Luftfeuchtigkeit während der
Feuchtigkeitseinstellung an.
4. Nebel-/Zeitwertanzeige: Zeigt die eingestellte Nebelstufe an, wenn
Nebel eingestellt ist. Zeigt die eingestellte Zeit an, wenn die Zeit
eingestellt ist.
5. MIST Nebelanzeige: Leuchtet auf, wenn eine Nebelstufe eingestellt ist.
6. TIME Timer-Anzeige: Leuchtet auf, wenn eine Zeit eingestellt ist.
MIST/WIFI
WIFI
HUMIDITY
TIME
HUMIDITY
TIMEMIST
LOW WATER
LOW WATER
WIFI
HUMIDITY

19
4. TOUCH-STEUERUNG
1. Drücken, um den Luftbefeuchter ein- oder auszuschalten. Drücken und 1
Sekunde halten, um die LED-Beleuchtung ein- oder auszuschalten.
2. Drücken, um zwischen 3 Nebelstufen („1“, „2“ und „3“) umzuschalten. Drücken
und 3 Sekunden halten, um die WLAN-Verbindung ein- oder auszuschalten.
3. Drücken, um einen Timer von 1 bis 8 Stunden in Schritten von 1 Stunde bei
jedem Drücken einzustellen.
4. Drücken, um eine Luftfeuchtigkeit von 40 - 90 % relativer Luftfeuchtigkeit und
5 % relativer Luftfeuchtigkeit mehr pro Druck einzustellen.
MIST/WIFI
WIFI
HUMIDITY
TIME
HUMIDITY
TIMEMIST
LOW WATER
MIST/WIFI
TIME
HUMIDITY

20
5. VERWENDUNG
1. Stellen Sie sicher, dass der Luftbefeuchter ausgeschaltet ist und ziehen Sie den
Netzstecker aus der Steckdose.
2. Nehmen Sie den Deckel ab (Abbildung 5 - 1).
3. Wasser in den Wassertank geben.
Wichtig: Überschreiten Sie den angegebenen maximalen Wasserstand nicht und
lassen Sie den Wasserstand nicht unter die Höhe des Wassermangelmelders fallen.
Dann wird kein Nebel mehr abgegeben (Abbildung 5 - 2).
4. Setzen Sie den Deckel wieder auf den Luftbefeuchter: Richten Sie den Deckel zur
sicheren Befestigung an der Oberseite des Wassertanks aus (Abbildung 5 - 3).
5. Schließen Sie den Netzstecker an die Steckdose an und schalten Sie den
Luftbefeuchter ein. Verwenden Sie das Touch-Bedienfeld für Funktionen wie das
Einstellen von Nebel und Luftfeuchtigkeit.
Der Luftbefeuchter verfügt über eine Aromatherapie-
Funktion. Sie können ein Aromatherapieöl direkt in
den Nebelauslass geben oder ein kleines Stück
Vliesstoff in den Nebelauslass geben und dann
Aromatherapieöl darauf träufeln. Der befeuchtete
Nebel wird dann zusammen mit dem Aromaöl
hinausgeblasen.
Warnung:
Wir empfehlen, den Wassertank und den
Nebelauslass täglich zu reinigen, wenn Sie ein
Aromaöl verwenden.
Wassertank
Wasserman
gelmelder
Aromatherapieöl
Abdeckung des
Auslasses
Nebelauslass
This manual suits for next models
1
Table of contents
Languages:
Other Vaco Humidifier manuals
Popular Humidifier manuals by other brands

BRAYER
BRAYER BR4910 instruction manual

Carad
Carad HUMIFIX SPACE OL12-009B instruction manual

Vincent Medical Manufacturing
Vincent Medical Manufacturing inspired VHB10A Operator's manual

Boneco
Boneco S450 Instructions for use

Honeywell
Honeywell ULTRA GLOW COOL MIST HUL530 Series manual

Gotie
Gotie GNA-351 manual