VAGKRI VA-HM02 User manual

Model: VA-HM02
User Manual
Ultrasonic
Warm & Cool Mist Humidier
Manufacturer: Shenzhen Guiyang Network Technology Co., Ltd
Address: 1404K3, East Block, Shengtang Commercial Building, Futian
District, Shenzhen, China
Made in China

CONTENTS
IMPORTANT SAFETY INSTRUCTIONS
LED Display
Control Panel
Control Functions
Additional Features
General Operation
General Cleaning
Deep Cleaning
Cleaning Aroma Box
USING YOUR HUMIDIFIER
EXPLORING YOUR HUMIDIFIER
CARE AND CLEANING
TROUBLESHOOTING
WARRANTY AND SERVICE
01
04
04
05
06
07
09
11
13
05
03
09
14
15

When using an electrical appliance, especially when children are present, basic
safety precautions should always be followed, including the following:
This appliance is not intended for use by persons (including children) with
reduced physical, senso or mental capabilities, or lack of experience and
knowledge, unless they have been given supeision or instruction concern-
ing the use of the appliance by person responsible for their safety.
Close supeision is necessa when any appliance is used by or near
children. Children should be supeised to ensure that they do not play with
the appliance.
NOT intended for industrial or commercial use. Use the appliance only for
intended household purposes as described in this User Manual.
READ ALL INSTRUCTIONS BEFORE USE AND SAVE FOR
FUTURE REFERENCE
INTENDED USE
IMPORTANT SAFETY INSTRUCTIONS
SAVE THESE INSTRUCTIONS
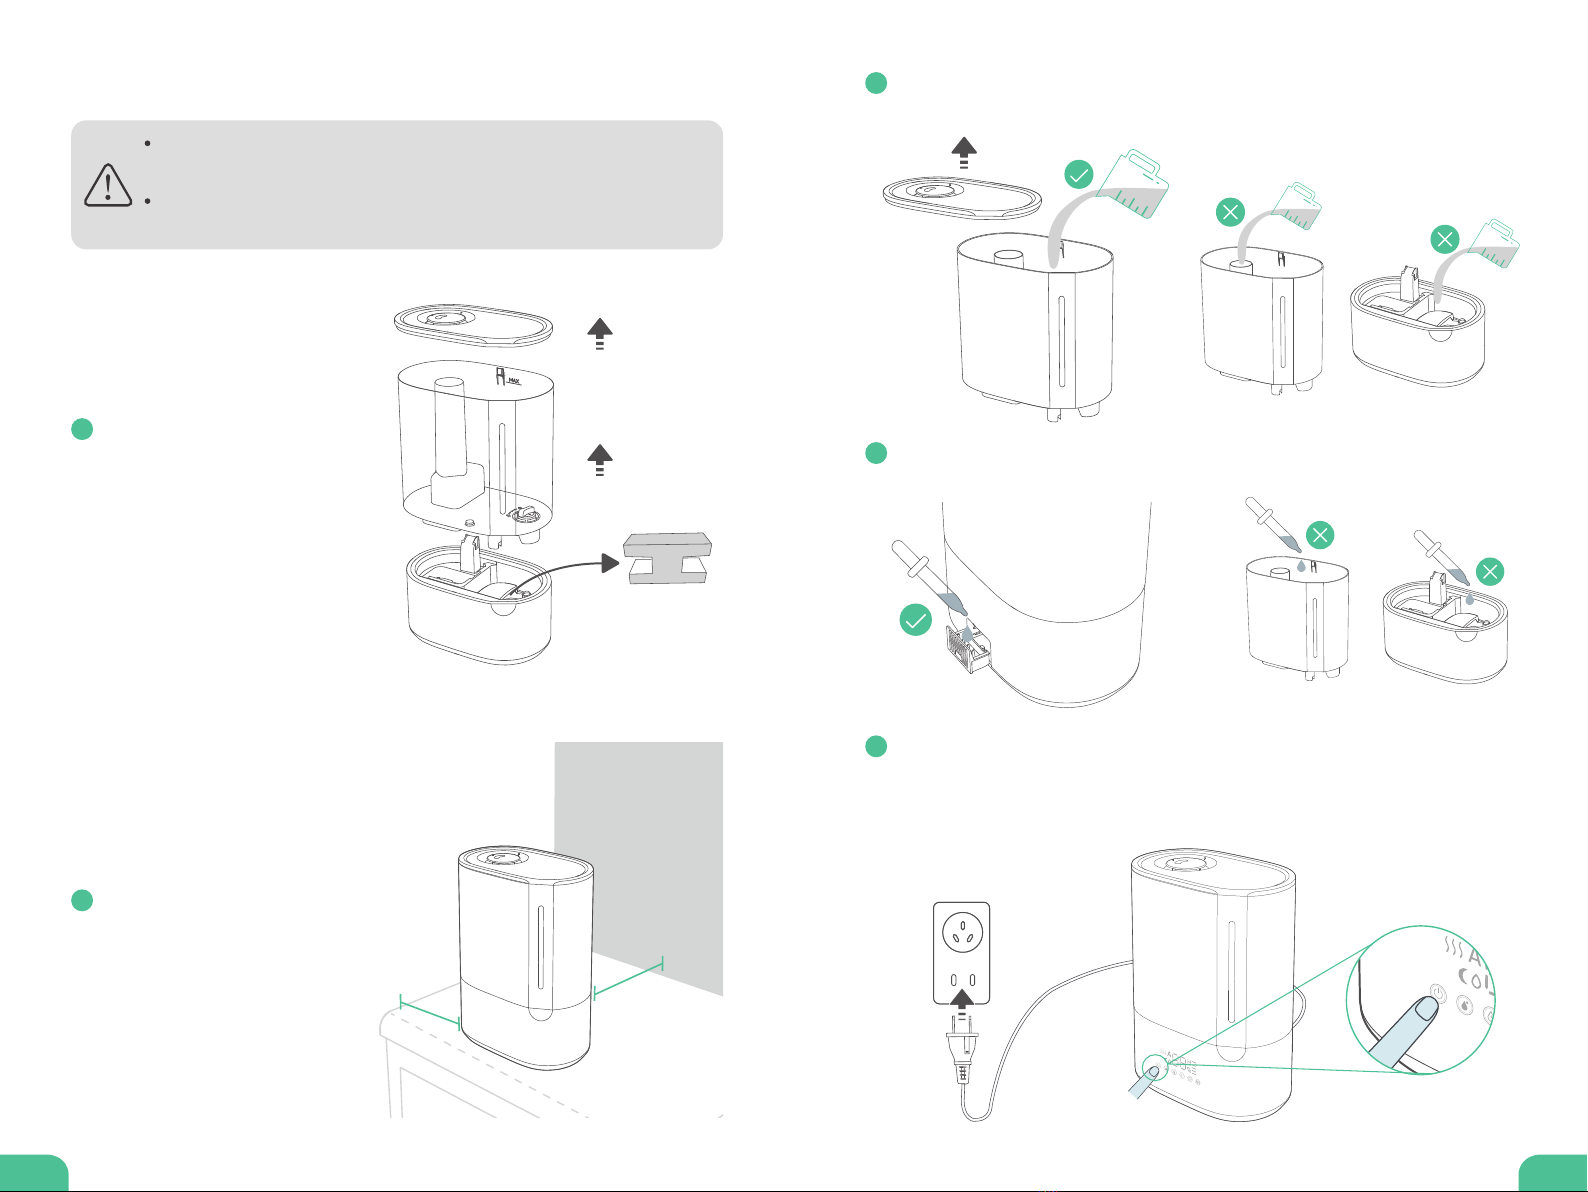
DO NOT immerse the base, power cord or plug in water or other liquid.
DO NOT operate the appliance with a damaged cord or plug or if the product
malfunctions, is dropped or damaged in any manner.
Always unplug the appliance before cleaning, making any repairs or seic-
ing, or whenever not in use. To disconnect, unplug power cord from electrical
outlet. Do not pull on cord.
IMPORTANT - This appliance has a polarized plug (one blade is wider than
the other). To reduce the risk of electric shock, this plug is intended to t in a
polarized outlet only one way. If the plug does not t fully in the outlet,
reverse the plug. If it still does not t, contact a qualied electrician. Do not
attempt to rig this safety feature.
ELECTRICITY SAFETY
DO NOT block or cover the nozzle while in operation.
DO NOT place on or near wet suaces, or heat sources such as stovetops,
ovens, or radiators.
DO NOT place on carpet or other suaces that may block the air inlet.
DO NOT attempt to disassemble, repair, modify or replace any pa of your
product. All seicing should be peormed by qualied personnel only.
Arrange the appliance and cord away from trac areas and where it will not
be knocked over.
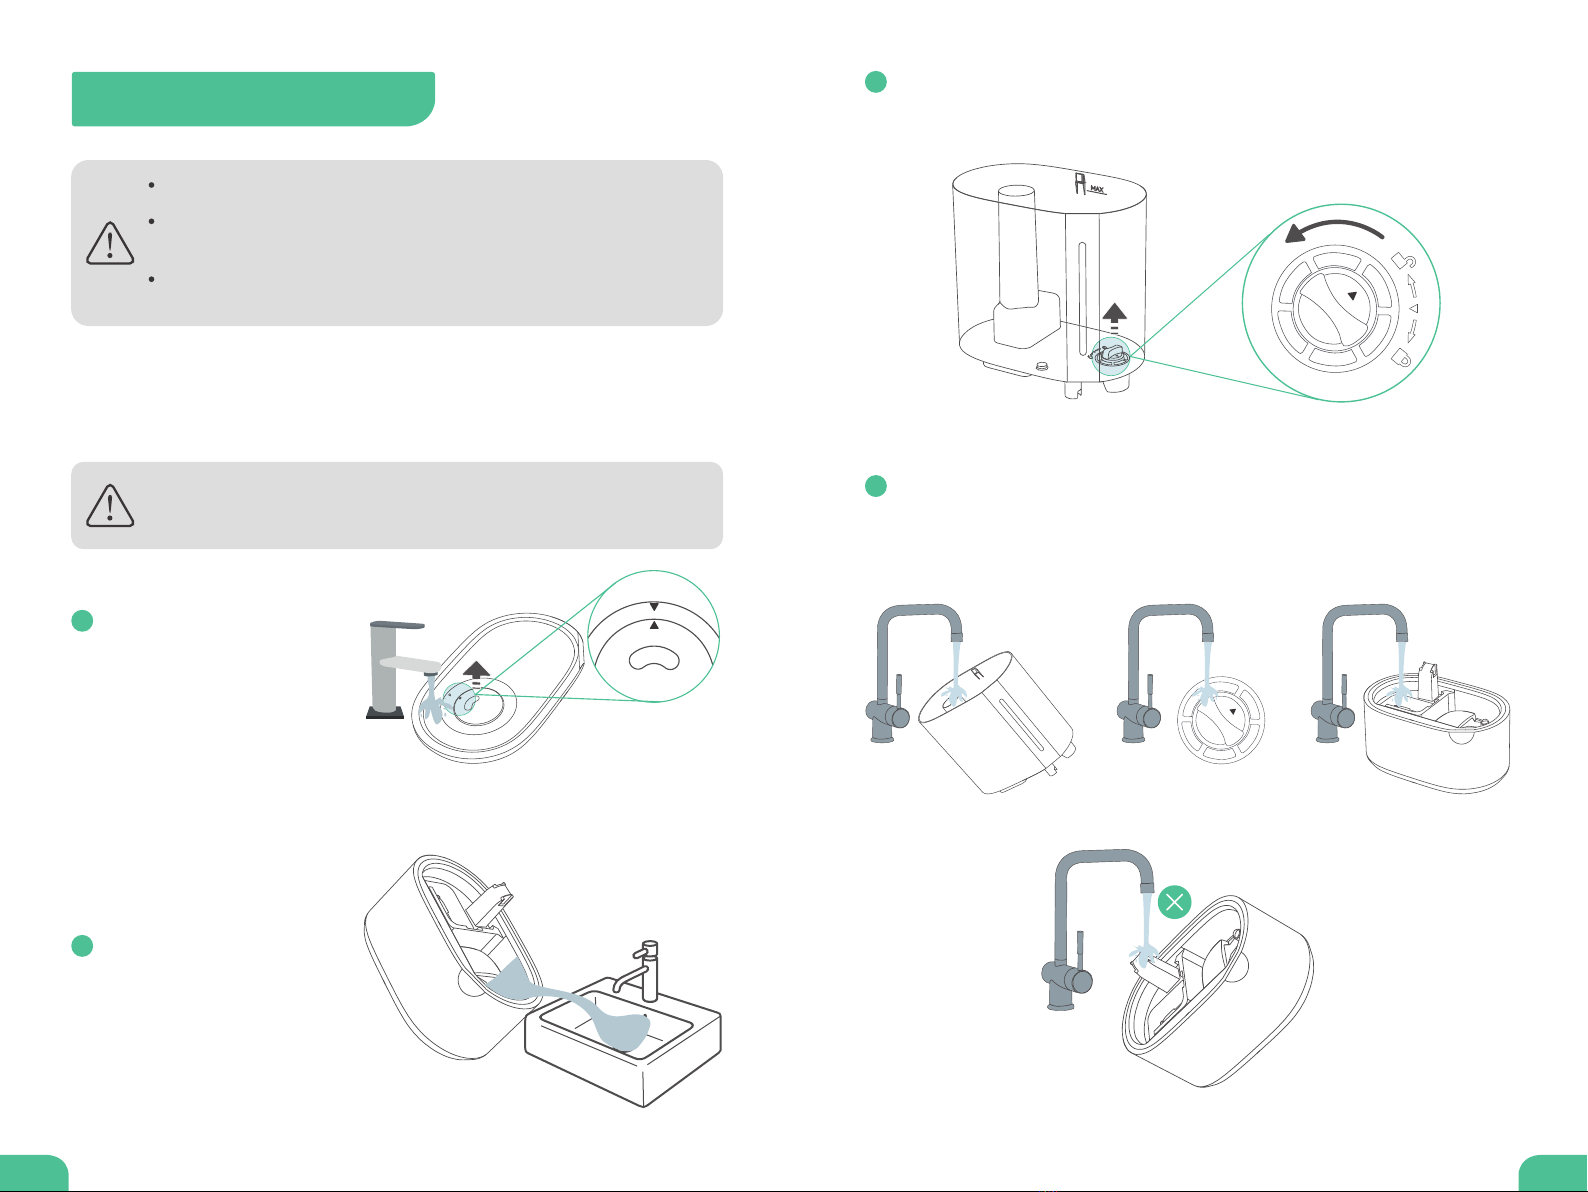
Always make sure to place the humidier on a at, level and secure suace
before operation.
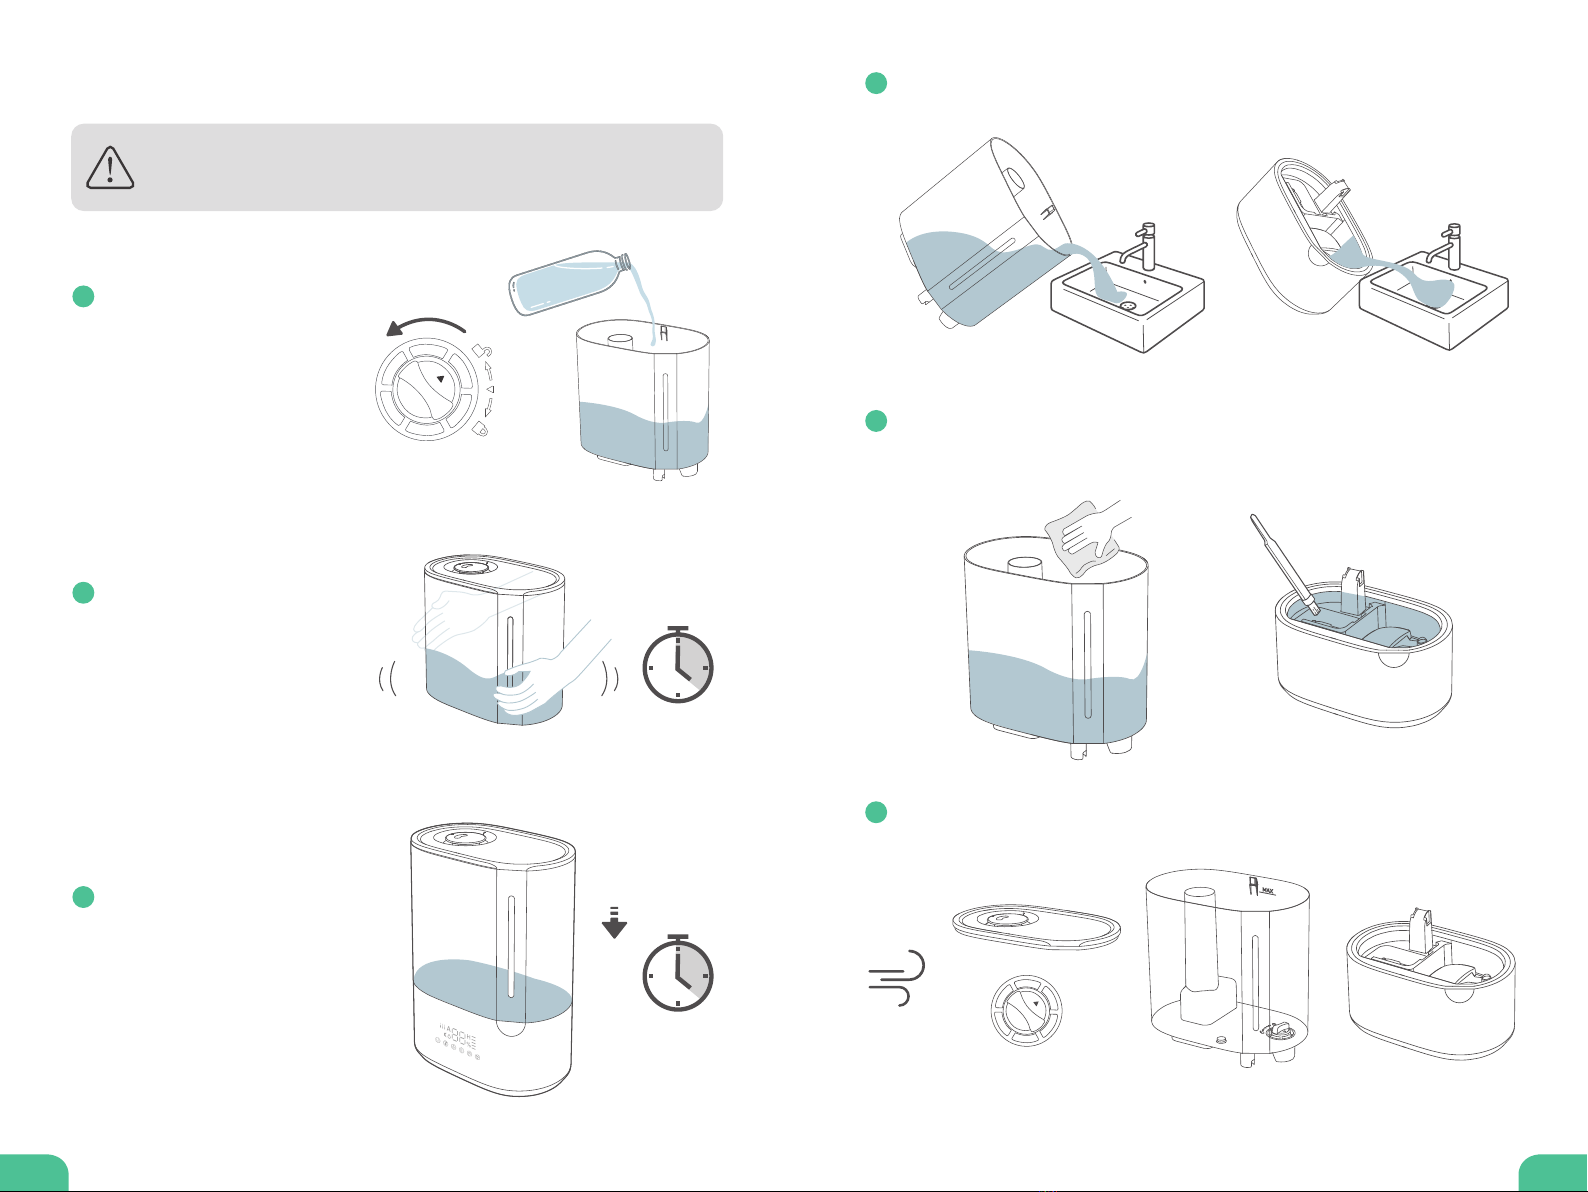
Fill the water tank with clean water only. Never ll with any other liquids.
RELATED TO USE
FOR HOUSEHOLD USE ONLY
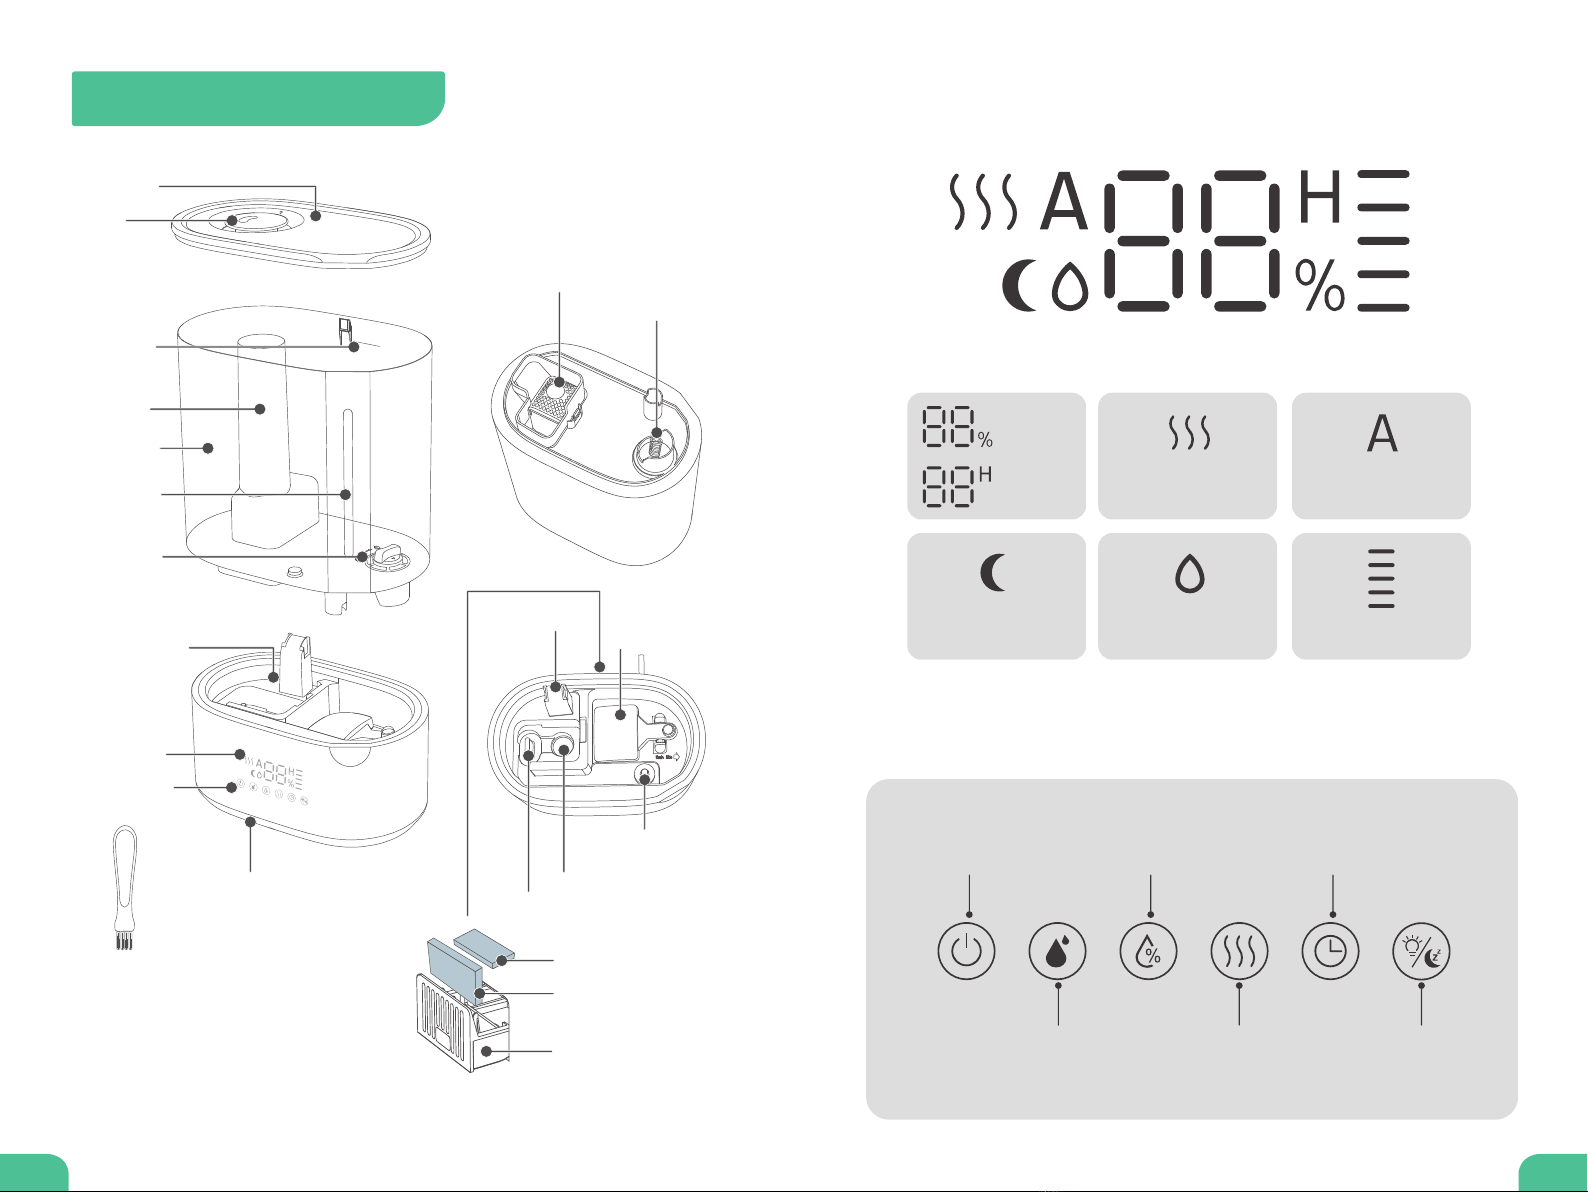
Specications
Input
Power
Water Tank Capacity
Cool Mist Output
Warm Mist Output
120V~ 60Hz
145W Max
1.59Gal / 6L
100-300mL/h
150-450mL/h
01 02
Run Time on a Full Tank 20-60 Hours (Cool Mist)
13.3-40 Hours (Warm Mist)
Noise Level <32dB (Cool Mist)
<36dB (Warm Mist)

MAX
03 04
Exploring Your Humidier LED Display
Accessories
Control Panel
Humidity
Level
Auto-OFF
Timer
Sleep Mode Low Water /
Tank Removed
Mist Level Setting
Button
Power ON/OFF
Button
Warm Mist
Button
Night Light/
Sleep Mode Button
Humidity Setting/
AUTO Mode Button
Timer Setting
Button
Warm Mist AUTO Mode
Mist Level (5 Levels)
Tank Cover
Noise Silencer
Water Outlet Valve
Air Outlet Water Float
Heating Element
Atomizer Transducer
Water Level
Detector
Nozzle
MAX Water
Line
Mist Tube
Water Tank
Water Level
Window
Water Filter
Water Reseoir
LED Display
Aroma Box
Dustproof Sponge
Aroma Pad
Control Panel
Night Light
2 x Aroma Pad (1 Pre-Installed)
2 x Dustproof Sponge (1 Pre-Installed)
1 x Cleaning Brush
Cleaning Brush

05 06
Using Your Humidier
Tap to turn ON or turn OFF (Standby mode).
Power ON/OFF
With unit on, tap repeatedly to cycle through 5 mist levels:
(level 1), (level 2), (level 3), (level 4), (level 5).
Mist Level Setting
With unit on, tap to turn on or o warm mist.
It may take about 5 minutes for the humidier to warm up before
producing warm mist.
Warm Mist
With unit on, tap once to enter Humidity Setting (digit ashes). Then
keep tapping to set humidity level (30%-80%). Wait until display stops
ashing to conrm your setting.
Once the set level is reached, the humidier will automatically stop misting.
It will sta again when the humidity drops to 5% below the set level.
Humidity Setting
With unit on, hold for 1.5s to turn on AUTO Mode (A lights up). The
humidier will automatically adjust the mist level or turn it o (Humidi-
ty>65%) to maintain a comfoable level of humidity.
Hold for 1.5s again to cancel AUTO Mode and enter Humidity Setting.
Mist level cannot be adjusted under AUTO mode. Tap will cancel
AUTO Mode.
AUTO Mode
With unit on, tap once to enter Timer Setting. Then keep tapping to set
Auto-O Timer (00-12H). Wait until display stops ashing to conrm
your setting.
To cancel, hold for 1.5s, or set timer to 00, or turn unit o.
Auto-O Timer Setting
Tap to turn on (low brightness), then tap repeatedly to cycle through
Med, High, OFF and Low brightness level.
When tapping this button under Sleep Mode to turn on night light, you
may need to turn it o manually.
Night Light
Control Functions
With unit on, hold for 1.5s to turn on or o Sleep Mode.
When Sleep Mode is on, only stays on (50% brightness) display, tap
any button to wake up the display. If no operation is done in 5s, the
display will turn o again.
Sleep Mode
Additional Features
If water tank is
removed from
base, will ash
red and the unit
will stop misting
automatically.
Place tank back
and it will resume
working.
Tank Lift-up
Protection
If there is no water
in the tank, will
ash red and the
unit will stop
misting automati-
cally. Rell with
water and it will
resume working.
Low Water
Protection
If power is not
disconnected, it
will always remem-
ber your last
settings of Mist
and Humidity Level
when turned back
on.
Memo Function

07 08
Do not add water through mist tube nor add directly into water
reseoir.
Do not add essential oils or any sanitizers into the water tank or
reseoir.
Remove all packaging. Take
water tank o base and
remove PE Foam on water
oat.
12 in/30cm
12 in/30cm
General Operation
1
Remove tank cover. Fill with puried or distilled room temperature water
below MAX line. Place cover back.
3
Optionally, push to pull out aroma box. Add several drops of pure essential to
the aroma pad.
4
Plug in the humidier. Tap Power Button to turn on. The humidier will sta
misting.
Tap other buttons to customize your settings. Tap Power Button to turn o
after using.
5
Locate on a hard, at suace
at least 12 inches away from
any walls. Direct mist away
from walls.
2

09 10
Care and Cleaning
General Cleaning
Always make sure the humidier is unplugged before cleaning.
Never immerse the base in water or any liquid. Do not place any
pa in a dishwasher nor clean with detergents.
If not using the humidier for a long period of time, do not leave
water inside. Clean and d the humidier.
To avoid bacteria growth, clean the water tank and reseoir at least
once eve week.
Unplug the humidier.
Remove the nozzle (by
aligning▲with▼) and tank
cover. Rinse both with
water.
1
Remove the water tank from
the base. Pour out any water
from the reseoir. Do not
allow liquid to enter the
air outlet.
2
Remove the water lter from the tank by rotating it counterclockwise and
lifting it out.
3
Rinse the tank, water lter and reseoir with room temperature water.
Clean with the brush if necessa.
Do not allow liquid to enter the air outlet.
4

11 12
Deep Cleaning (Descaling)
It is recommended to deep clean eve 2 weeks or if there is any
mold buildup inside the water tank or reseoir, or before and after
storing for a long period of time.
Remove the water lter from
the tank. Fill the tank with 3
cups of distilled white
vinegar with 3 cups of room
temperature water.
1
Place the tank cover back
and gently shake to coat all
sides of the tank. Allow it to
sit for 15 to 20 minutes.
2
Place the tank on the base,
vinegar mixture will drain
into the reseoir. Soak for
another 15 to 20 minutes.
3
Remove the tank from the base, and pour out any vinegar mixture from the
reseoir and tank.
4
Use a soft cloth and the cleaning brush to remove scale from all pas.
Rinse with room temperature water.
5
D all pas. Make sure all pas are completely d before reassembling or
storing.
6

13 14
Troubleshooting
Cleaning Aroma Box
Do not use liquid cleaners or detergents to clean the pads.
Push to pull out the aroma box. Remove the aroma pad and dustproof
sponge.
1
Rinse under warm, running water. Air d completely then place back to the
aroma box.
2
Replace the aroma pad or dustproof sponge if it is sti or diy even after
cleaning. Extra pad and sponge are included with the humidier. For more
replacement accessories, contact us at suppo@vagkrihome.com
3
The troubleshooting guide addresses the most common problems. If problems
persist, feel free to contact the Customer Suppo at
suppo@vagkrihome.com
The humidier does
not turn on or turns
o suddenly.
Make sure the humidier is connected to a working outlet.
Make sure the water tank is properly placed on the base with
enough water.
Check if AUTO Mode is turned on, the humidier will
automatically stop working once the relative humidity is over
65%.
The humidier will automatically stop working once the set
humidity level is reached.
Check if you have set Auto-o Timer, the humidier will
automatically power o once the time is nished.
Little or no mist
comes out.
Make sure the water tank is lled with enough water.
Make sure the nozzle and the water lter are not blocked or
clogged, clean the humidier regularly (see Care and
Cleaning).
Make sure the air inlet on the aroma box is not blocked. Avoid
placing the humidier on carpet or other suaces that may
block the air inlet.
Mineral build-up on the ultrasonic transducer, clean and
descale the humidier regularly.
Water visibly leaks
from the humidier.
Make sure to place the humidier on a at, level suace.
Avoid adding water above MAX water line.
Check the water tank for leaks. If there are leaks, contact our
Customer Suppo for help.
Do not add water through mist tube nor add directly into water
reseoir.
The humidier
makes a loud or
unusual noise.
Mineral build-up on the ultrasonic transducer, clean and descale
the humidier regularly.
The internal fan has staed to wear out for a couple of years of
use or using in a dusty environment, contact our Customer
Suppo for help.

15
Warranty and Seice
FCC Compliance
Thank you for choosing VAGKRI Warm & Cool Mist Humidier. This product
is covered with VAGKRI product and labor warranty for 12 months from the
date of its original purchase.
Accident, misuse, or repairs peormed by unauthorized personnel.
Any unit that has been tampered with or used for commercial purpose.
Normal wear and tear of wearable pas.
Use of force, damage caused by external inuences.
Damage caused by non-obseance of the User Manual, e.g. connection to
an unsuitable mains supply or non-compliance with the instructions.
Paially or completely dismantled appliances.
Defects caused by or resulting from damages from shipping or from repairs,
seice, or alteration to the product or any of its pas that have been
peormed by a repair person not authorized.
We can only provide after sales seice for products that are sold by VAGKRI or
VAGKRI authorized retailers and distributors. If you have purchased your unit
from a dierent place, please contact your seller for return and warranty issues.
This device complies with Pa 18 of the FCC Rules. Operation is subject to the
following two conditions: (1)this device may not cause harmful inteerence,
and (2)this device must accept any inteerence received, including inteerence
that may cause undesired operation.
Please have your invoice and order ID ready before contacting Customer
Suppo at suppo@vagkrihome.com
The warranty will not apply in cases of:
Rev_1.0_EN
Table of contents
Popular Humidifier manuals by other brands

Johnson Controls Unitary Products
Johnson Controls Unitary Products 8000 Residential Steam Humidifier Installation & maintenance instructions

Essick
Essick 821 000 Owner's care & use manual

Nordmann Engineering
Nordmann Engineering AT4 quick start guide

Vitek
Vitek VT-1764 BK Manual instruction

FRANCO
FRANCO UX Series Instruction manual for use and maintenance

Le Veil
Le Veil iCigar DCH-219 instructions