- 5 -
i
ATTENZIONE! L’allacciamento alla rete di
alimentazione deve avvenire ad una presa
di corrente con contatto di terra. Vedere dati
tecnici allegati.
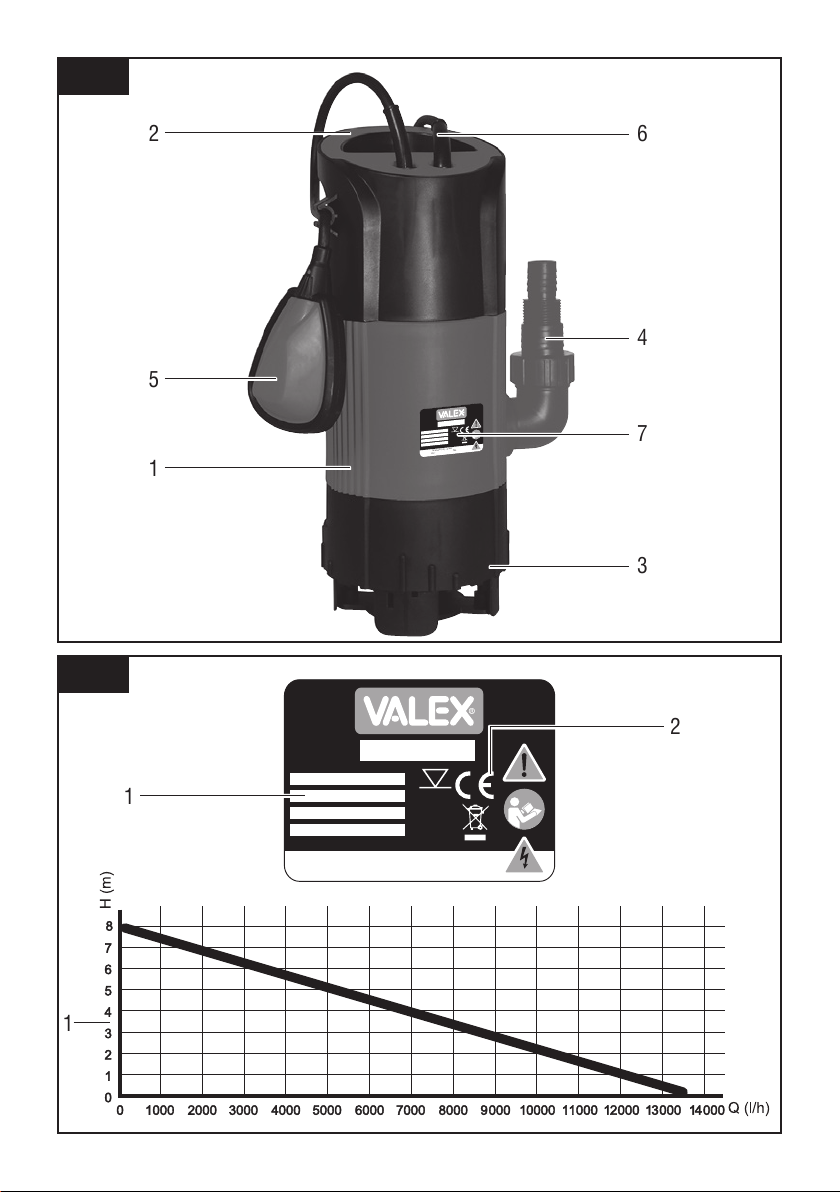
DESCRIZIONE MACCHINA (FIG. A)
1 Corpo pompa
2 Maniglia di aggancio
3 Base pompa con aspirazione liquido
4 Mandata
5 Galleggiante di avviamento
6 Cavo di alimentazione
7 Etichetta dati tecnici
8 Base regolabile
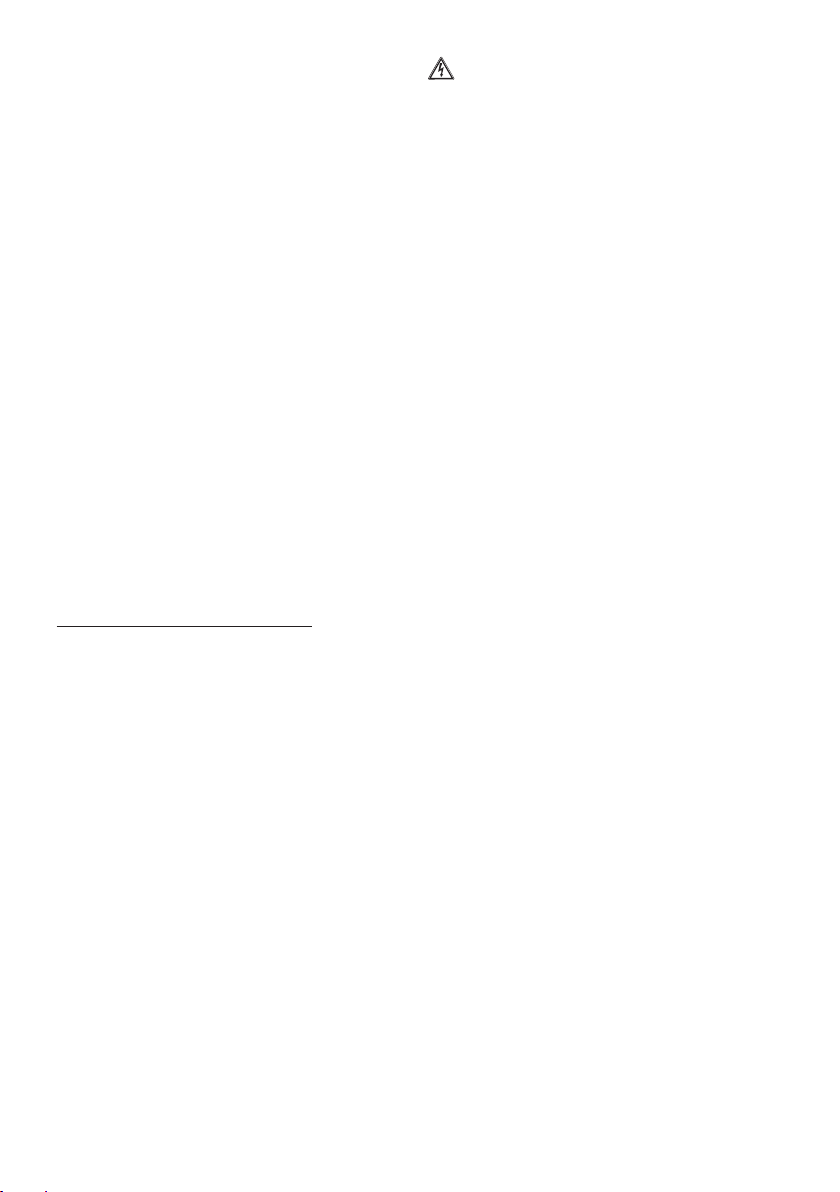
SIMBOLOGIA (FIG.B)
1 Dati tecnici
2 Doppio isolamento elettrico
3 Marcatura di cconformità CE
CAMPO DI IMPIEGO DELLA POMPA
Pompa per acque chiare e torbide
La pompa sommergibile è adatta ad aspirare
esclusivamente acqua dove è possibile immer-
gerla direttamente. Può essere usata in pozzetti,
vasche, contenitori ecc. dove non ci sia contatto
diretto tra le persone e l’acqua (non va usata
in piscine e similari, se non contrariamente
indicato). La pompa, tramite l’interruttore a gal-
leggiante, si avvia e si spegne automaticamente
in funzione del livello dell’acqua.
La pompa è dotata di base regolabile che per-
mette di aspirare acque chiare da un minimo di
1mm fino a 8 mm di altezza, acque torbide da
un minimo di 35 mm.
COLLEGAMENTO ALLA RETE ELETTRICA
La pompa è dotata di cavo e spina di collega-
mento. Collegare la spina ad una presa idonea
per forma e voltaggio, dotata tassativamente di
contatto di terra efficiente.
Accertatevi che la presa sia efficiente e che
possieda un dispositivo di protezione per le
sovracorrenti di almeno 6 A.
ATTENZIONE! Verificare sempre che il
cavo o la spina non siano danneggiati. Non
utilizzare la pompa con il cavo danneggiato!
Se il cavo di alimentazione è danneggiato,
deve essere sostituito dal produttore, dal suo
servizio assistenza o da personale qualificato
al fine di evitare pericoli.
ATTENZIONE! Norme per l’installazione
- Rispettate sempre i valori di ‘massima profon-
dità di immersione’ e ‘massima prevalenza’
riportati nei dati tecnici.
- Non aspirate liquidi aggressivi e con sostanze
abrasive in sospensione.
- Proteggete la pompa dal gelo.
- Non fate funzionare la pompa a secco.
- Non appendete mai la pompa per il tubo di
mandata dell’acqua per il cavo di alimentazione
o per il galleggiante.
- La pompa deve essere appoggiata sul fondo
o appesa per l’apposita maniglia, sempre in
posizione verticale.
- Per garantire il funzionamento ottimale della
pompa, il fondo del pozzetto deve essere pulito e
senza fango. Il fango, seccandosi all’interno, può
bloccare la girante impedendo il funzionamento
della pompa.
- Non utilizzare il cavo di alimentazione per il
sollevamento e il trasporto della pompa.
- La spina di alimentazione non deve essere
sommersa.
- Togliere tensione dalla pompa e staccare
l’eventuale spina dalla presa di alimentazione
prima di ogni operazione di manutenzione,
pulizia, spostamento.
- Usare guanti protettivi per ogni operazione sulla
pompa.
INSTALLAZIONE
- Avvitare il raccordo sulla mandata della pompa
(pos. 4).
- Fissare il tubo di mandata sul portagomma con
una fascetta inox.
- Immergere la pompa nel fluido da aspirare tramite
una fune inox fissata alla maniglia.
- Il cavo di alimentazione deve essere immerso
solo per il tratto necessario ma non deve essere
troppo teso. Fissate il cavo al tubo di mandata
con fascette il plastica a intervalli di 3 metri.
- Collegare il cavo di alimentazione alla presa di
corrente.
L’interruttore a galleggiante permette di avviare ed