Vape Engineering Herbie User manual

1
Read carefully before using the device and save these instructions
EN INSTURCTIONS FOR USE

2
Table of content
1 Before use........................................................................................................................................ 4
2 Product overview HERBIE................................................................................................................ 4
2.1 Scope of delivery ..................................................................................................................... 4
2.2 HERBIE functional elements.................................................................................................... 5
2.3 Exploded view of HERBIE......................................................................................................... 6
3 Safety recommendations ................................................................................................................ 6
3.1 Definition of terms .................................................................................................................. 7
3.2 Explanation of Symbols ........................................................................................................... 8
3.3 Safety Recommendations........................................................................................................ 9
4 Intended use.................................................................................................................................. 10
5 Overview of plants......................................................................................................................... 10
6 Factors influencing vaporization ................................................................................................... 10
7 The HERBIE Vaporizer.................................................................................................................... 11
7.1 Unpacking.............................................................................................................................. 11
7.2 Cleaning before first use ....................................................................................................... 11
7.3 Application and Operation .................................................................................................... 11
7.4 Storage .................................................................................................................................. 11
7.5 Disposal ................................................................................................................................. 11
8 Commissioning and operation ...................................................................................................... 12
8.1 Connecting to a box mod ...................................................................................................... 12
8.2 Mounting / Replacement the heat element ......................................................................... 12
8.3 Filling the herb chamber ....................................................................................................... 14
8.4 Adjusting the airflow ............................................................................................................. 15
8.5 Replacing the lower mesh..................................................................................................... 16
8.6 Replacing the upper mesh..................................................................................................... 17
8.7 Heating up ............................................................................................................................. 18
9 Application..................................................................................................................................... 18
10 Disassembling and cleaning....................................................................................................... 19
10.1 Disassembling the HERBIE Vaporizer .................................................................................... 19
10.2 Cleaning the HERBIE Vaporizer.............................................................................................. 27
11 Accessories ................................................................................................................................ 27
11.1 ByPass-Air-Kit ........................................................................................................................ 27
11.2 18.8 Top Cap.......................................................................................................................... 30

3
11.3 Chamber reduction................................................................................................................ 32
12 Technical specification .............................................................................................................. 35
13 CE Declaration of conformity .................................................................................................... 36
14 Warranty, Liability ..................................................................................................................... 36
14.1 Warranty................................................................................................................................ 36
14.2 Liability .................................................................................................................................. 36
14.3 Copyright ............................................................................................................................... 36

4
1Before use
Thank you for purchasing the Vape Engineering HERBIE. HERBIE is a product that bridges the gap
between dry herb vaporizers and E-cigarette hardware. We recommend you read over the definitions
of common terms for both the E-cigarette space and the dry herb vaporizer space at the end of these
instructions.
This manual is meant as a brief overview on the general functionality of the Vape Engineering Herbie.
If you have no experience using a rebuildable atomizer or creating coils, please consult your local
vendor. Further information and detailed video footage on assembly steps is available at
www.vapeengineering.com.
2Product overview HERBIE
2.1 Scope of delivery
Spare mesh
Spare heat elements
Slotted screwdriver
Hex screwdriver
User manual
Brush
HERBIE Vaporizer

5
Please check whether all components have been included. If not, please inform the Vape Engineering
UG. In the case of technical problems, questions about the device, warranty claims and disposal of the
device, customers should contact the following address:
Vape Engineering UG
Steinkirchnerstraße 2
82166 Gräfelfing, Germany
2.2 HERBIE functional elements
Drip tip /
Mouthpiece
Air control
Filling chamber
Heating element
510 connector

6
2.3 Exploded view of HERBIE
3Safety recommendations
Read the following safety recommendations thoroughly and carefully before using
the device. These Instructions for Use are a significant part of the Vaporizer and power
adapter and must be provided to the user. The instructions given in these Instructions
for Use must be strictly observed as they are extremely important to ensure safety
during installation, use and maintenance of the Vaporizer. Please keep this brochure in a safe place
for future reference. You may download the current Instructions for Use for the HERBIE on
www.vapeengineering.com.
Drip tip /
Mouthpiece
O-Rings
Top cap
Mesh
Upper mesh
clamp
Bottom mesh
clamp
Mesh
Shell
Air control
ring
O-Ring
Housing
Heating
element
Brackets
Einsatz
Insulator
Set screws
Base
Insulator
Pole screw
Connector
screw

7
3.1 Definition of terms
Box mod / mod: A box mod is a type of power source typically used for vaporizing E-juice, and has software
to intelligently restrict how much power is supplied to the atomizer. Atomizer is a catch-all term for box
mod attachments.
510 thread: A 510 thread is the common term for the universal connection featured on a majority of the
box mods on the market today. This port allows the box mod to connect with the + and - paths of the
atomizer.
Resistance: Resistance is a number representing how easily power can flow through the coil, or heating
element. Base resistance refers to the resistance value of the coil at room temperature. As the coil heats
up, it’s resistance changes accordingly. It is important for the box mod to have the correct base resistance,
as it uses this value to estimate the temperature of the coil at any point in time and adjust how much power
it supplies to the coil in order to maintain a specified temperature range.
TCR-Mode: TCR stands for Temperature Coefficient of Resistance. As stated above, resistance changes
relative to coil temperature, and the box mod can use this variable to regulate the overall temperature of
the coil and the air around it. A TCR value is essentially a math problem that the box mod calculates on the
fly to figure out if it needs to use more or less power to reach the desired temperature range.
Coil / Heat mesh: The coil / heat mesh is what heats up when the box mod is activated. Coils can be made
of different materials, different thicknesses, or different styles that all affect their resistance and
performance. Different coil materials include: Kanthal A1, nickel 200, stainless steel, and titanium. The ones
we provide you are made of stainless steel 316.
Convection: Convection is one of two main ways to vaporize herbs, the other being conduction. Convection
heating is when heated air is raised through the vapeable material, causing it to vaporize without burning.
Both of these methods have pro’s and con’s, but convection is generally regarded as the better choice in
respect to taste, efficiency, and convenience.
Conduction: Conduction is the other of the two main ways to vaporize herbs, as mentioned above.
Conduction heats up the chamber that holds the vapeable material causing the material to vaporize. Due
to the heating element (mesh or coil) the thermal energy is absorbed by the stainless steel. As known, metal
is good thermal conductor, so the thermal energy is conducted to the chamber where your vapeable
material is.
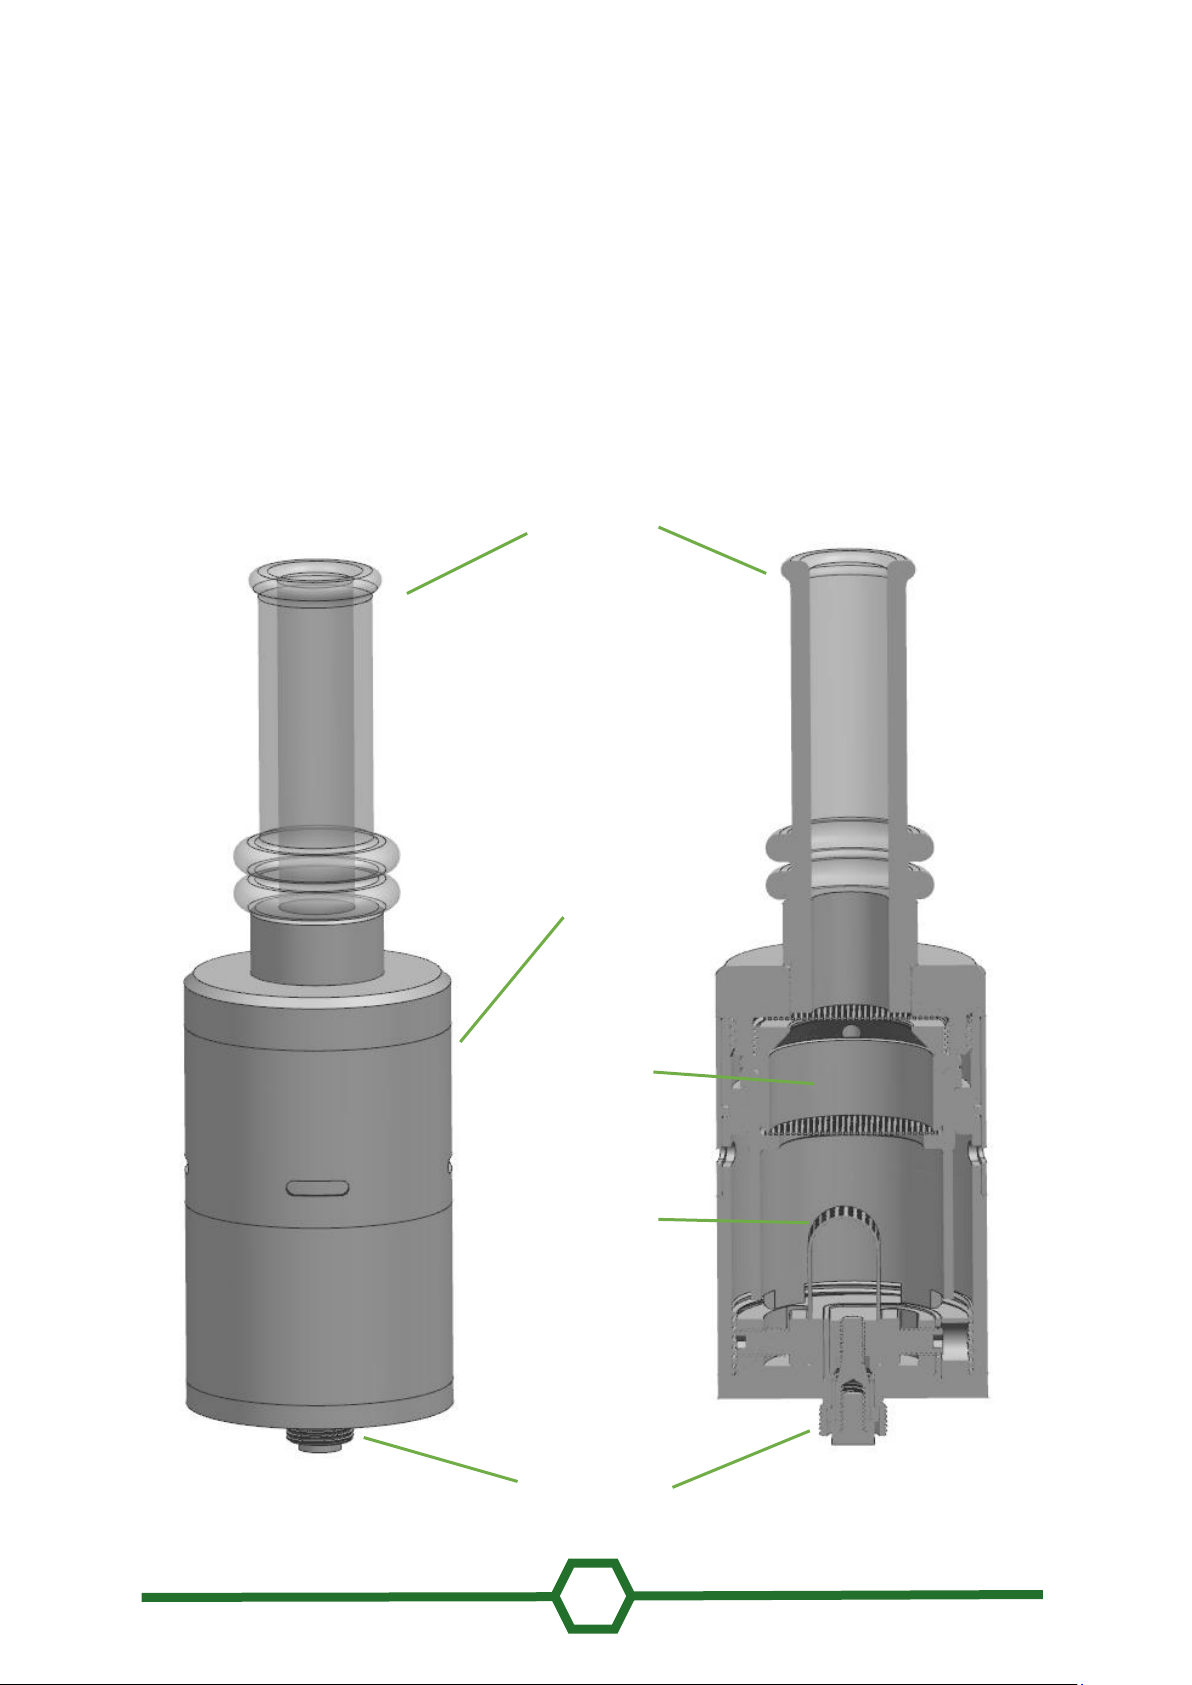
Hybrid-Verdampfer: Hybrid vaporizers use both methods (convection and conduction) of heating explained
above, to have the pros of every method. The Vape Engineering Herbie is a hybrid vaporizer
Drip tip / 810er Anschluss: A Drip Tip is the mouthpiece of an e-cigarette. It is placed on top of the atomizer
/ vaporizer and is usually made of plastic or metal. But there are also drip tips made of ceramics, wood,
glass or other materials. Generally, there are drip tips in all imaginable shapes and colors on the market. O-
rings at the lower end ensure a secure hold on the atomizer. At the drip tip, the e-cigarette consumer puts
his mouth directly on and pulls the vapor of the atomizer through it into his mouth. Depending on the length
and material of the drip tip, this can also affect the temperature of the steam.
There are two different sizes for drip tips, which are standardized. The 510 and 810 Drip Tips. At the Vape
Engineering Herbie there is an 810-drip tip connector, so you can choose your favorite drip tip.
21700 / 18650 battery: A battery is a common type of battery used for box mods. These batteries can
output a lot of power in a start and stop fashion, which makes them a good fit for many of the use cases of
a box mod. Make sure the batteries have a high enough output (25A+). 21700 and 18650 describe just the
dimensions of the battery.

8
3.2 Explanation of Symbols
Please follow these instructions carefully!
Safety recommendations!
In order to avoid injuries to persons and damage to the equipment, it is mandatory to
observe instructions marked with this symbol.
Note/Tip! This symbol always gives you technical information or useful tips regarding
the Vaporizer.
Symbol for the manufacturer - the manufacturer‘s name and address are next to the
symbol.
The device was introduced after 13 August 2005. It may not be disposed of in normal
household waste. The X on the trash can indicates the necessity of disposing of this
device separately. The device contains a built-in rechargeable lithium-ion battery that
must be discharged before disposal.
EU conformity symbol:
The manufacturer confirms with this symbol the compliance of the product with the
applicable European directives and standards.
Caution! Hot surfaces! Do not touch metal parts!
Protect from direct sunlight. Protect against moisture and humidity.
DC (direct current)

9
3.3 Safety Recommendations
•The packaging material (plastic bags, boxes etc.) must be kept out of the reach of children as
it is a potential source of danger.
•Check the packaging and the housing of the Vaporizer. In case the housing appears to be
damaged, please send back the Vaporizer immediately.
•People who require assistance must be supervised constantly during application.
•The device contains small parts, which can block the respiratory tract and lead to choking.
Therefore, make sure that you always keep the Vaporizer and the accessories out of the reach
of babies and infants.
•After use, the Vaporizer must be placed on a stable, flat surface. To be used only at a sufficient
distance away from heat sources (ovens, stoves, fireplaces), and in locations where the
ambient temperature cannot drop below +5°C (+41°F). Store the Vaporizer in a dry place
protected against the effects of weather and out of the reach of children or unqualified
persons. It cannot be used in damp locations (such as bathrooms, etc.).
•Do not operate the Vaporizer close to flammable objects such as curtains, tablecloths, or
paper.
•Keep the Vaporizer and power adapter away from pets (e.g. hamsters, mice) and other
animals.
•The customer may not repair the Vaporizer. Incorrectly performed repairs without the use of
original spare parts can prove dangerous to the user.
•Do not put any objects into the openings of the device.
•Do not leave the Vaporizer unattended while it is being operated. After use, switch off the
heater.
•The ventilation slots and the hot air outlet of the Vaporizer may not be closed, obstructed, or
blocked while the device is being used, nor while it is cooling down.
Caution! Hot surfaces!
•The Filling Chamber is made of metal; do not touch it when it is hot.
•Before cleaning, disconnect the vaporizer from the box mod. The Vaporizer should be cleaned
only with a dry cloth - or a damp cloth if absolutely necessary. Never immerse the Vaporizer
or the power adapter in water or any other liquid, nor clean it with direct jets of water or
steam.
•The Vaporizer must not be used in damp or wet conditions.
•Do not expose the Vaporizer to rain. Do not use in the bathroom or above water.
•Never touch the Vaporizer with wet or damp parts of the body.
•Never operate the Vaporizer when it is wet or damp. If the Vaporizer has become wet, it must
be dry (including the internal parts) before being put into operation again.
•Do not use in an atmosphere with risk of explosion or ignition.
•Never allow the Vaporizer to be used by children or unqualified persons.
•Only use original Vape Engineering accessories and spare parts.
The manufacturer is not responsible for any damage or personal injury caused by
inappropriate, incorrect or irresponsible use.

10
4Intended use
The HERBIE Vaporizer releases fragrances or aromas from the herbs and other plant materials listed
below. These aromatic substances are released through vaporization by heated air, and may be directly
inhaled. The device may only be used with the recommended vaporizing media. The use of other
substances can present a health risk. The HERBIE Vaporizer is not FDA approved.
5Overview of plants
Below is an overview of the plants that are suitable for vaporization in the HERBIE Vaporizer. The
aromas and fragrances from the plant materials listed below may be vaporized.
Any other use is inappropriate and potentially dangerous.
Plant name
Botanical name
Portion of the plant
used
Temperature
Thyme
Thymus vulgaris
The herb
190°C (374°F)
Sage
Salvia officinalis
The leaves
190°C (374°F)
Lemon balm
Melissa officinalis
The leaves
142°C (288°F)
Lavender
Lavandula angustifolia
The blossoms
130°C (266°F)
Chamomile
Matriarca chamomilla
The blossoms
190°C (374°F)
Hops
Humulus lupulus
The cones
154°C (309°F)
Eucalyptus
Eucalyptus globulus
The leaves
130°C (266°F)
WARNING:
Please consult your doctor or pharmacist if you have any medical concerns. It is possible
that some plants may cause allergic reactions for the user. If this occurs, it is urgently
recommended to refrain from further use of such plants. Only use the plant parts which
are found in this list and which have been verified according to the regulations of the European or any
other pharmacopoeia with regard to genuineness, purity and pathogenic germs. You can purchase
such plants or plant parts in pharmacies.
It is important to observe the following instructions in order to set the HERBIE Vaporizer with the plant
material in the best possible way for your personal requirements. The HERBIE Vaporizer is not FDA
approved.
6Factors influencing vaporization
The amount of aromas and fragrances released can be influenced by the following factors:
1. Quality: The amount of aroma or fragrance contained in the respective plant material that can
be vaporized.
2. Quantity: The amount of vaporization material in the Filling Chamber.
3. Surface: The finer the plant is ground, the greater the surface and the more aromas and
fragrances can be released during the vaporization cycle.
4. Temperature: The higher the temperatures, the more aromas and fragrances will be released
at once.
Please note: Increasing the temperature should be the last resort, because plant material tastes more
roasted when using higher temperature. Since the plant ingredients are released in a gentle manner,

11
the vaporization cycle may be repeated with the same contents in the Filling Chamber. Depending on
the four factors described above, the Filling Chamber contents may be reused multiple times until the
aromas and fragrances are released completely. If no more vapor is produced at the highest
temperature, then the vaporization material is completely exhausted and must be replaced with new
material. However, for the best aroma results it is advisable to replace the vaporization material before
this point.
7The HERBIE Vaporizer
7.1 Unpacking
The box contains all components as well as the Instructions for Use. Keep the Instructions for Use for
future reference. Remove the Vaporizer and the accessories from the box. Immediately after
unpacking, check whether the Vaporizer and the accessories are all included in the delivery and work
properly. If you notice any defects, inform the seller or the delivery agent immediately.
The packing material (plastic bags, boxes etc.) must be kept out of the reach of children as it is a
potential source of danger. Please dispose of the packing material in a proper and environmentally
friendly manner.
7.2 Cleaning before first use
The HERBIE evaporator is delivered clean of all manufacturing residues. However, it is recommended
to clean all stainless steel parts / the mouthpiece before first use and regularly by rinsing with warm
water. Make sure to dry all parts afterwards.
WARNING: Do not use the vaporizer when it is wet. Water can cause a short circuit and/or
malfunction of the vaporizer.
7.3 Application and Operation
This Vaporizer was developed for vaporizing the plant materials listed in the plant overview. Any other
use is inappropriate and potentially dangerous. The user should always follow the instructions listed
here for use and maintenance.
If you have any concerns, or if there are any problems immediately switch off the box mod and
disconnect the Vaporizer. Do not try to remedy the defect yourself. Let the Vaporizer cool down after
use before packing them away.
7.4 Storage
Store the Vaporizer in a dry place protected against the effects of weather and out of the reach of
children or unqualified persons.
7.5 Disposal
If the Vaporizer or the power adapter has been irreparably damaged after the warranty period, please
do not simply throw them away. As they are made of high quality, completely recyclable component
parts, they should be brought to a material recycling center in your neighborhood.

12
8Commissioning and operation
The device must not be operated unattended. Only place the HERBIE Vaporizer on a heat-
resistant, flat, stable and firm surface; never on soft or easily combustible surfaces. The
manufacturer will not accept any responsibility if this accident prevention measure is not
observed. For complete separation from the electrical circuit, please disconnect the
vaporizer from the battery support.
Before each use, check the housing and the mouthpiece of the vaporizer for intactness.
The vaporizer and the mouthpiece must not be used if they are damaged.
The Vape Engineering Herbie’s intended use is for coils with a minimum resistance of 0.3 ohm and an
electric input from 10 watts to maximum 70 watts. Please use the vaporizer responsibly, the coils
you’ve created at your own risk and check your batteries for the required power output (25A+). Make
sure that after connecting the vaporizer to your box mod, these values are recognized by your mod.
8.1 Connecting to a box mod
To connect the Vape Engineering HERBIE to a Mod, line up the threads at the bottom of vaporizer with
the female threads of the box mod. Turn clockwise until firm.
Look at the screen of your box mod to ensure that it reads the Vape Engineering HERBIE’s resistance.
The preinstalled stainless steel mesh should read a resistance of 0.2-0.3 Ohms.
Be sure that the Vape Engineering HERBIE is at room temperature when installing on to the box mod
or the base resistance reading may be off. In this case, unscrew the vaporizer from the mod until it
reaches room temperature. Click the fire button on the mod and be sure it says a message such as “no
atomizer found” or “no coil” to ensure the mod has cleared out the previous resistance reading. Then
reinstall the vaporizer and observe the resistance. If resistance is still off, take the body off of the base
and inspect the mesh for breaks or damage.
8.2 Mounting / Replacement the heat element
A heating element is made of resistance mesh. As soon as current is applied, it starts to heat up. The
heating element must be replaced at regular intervals.
Caution! Hot surfaces!
Only change the heating element once the Vaporizer has cooled down. Disconnect the
Vaporizer from the box mod.

13
Remove the housing from the base. Now the heating element is visible.
Loosen the two set screws on the sides of the base. The used heating element can now be removed.
Replace it with a new heating element. Use only the original Vape Engineering heating elements. These
are available as accessories.
Make sure that the heating element is securely clamped in the positions provided. Once you have
replaced the old heating element with the new one, the housing can be remounted on the base.
Now reconnect the HERBIE Vaporizer to the box mod. (This is the only way to avoid burnings)
Caution! Hot surfaces!
Make sure that your box mod recognizes the resistance of the new heating element. The
resistance of the heating element should be between 0.20 - 0.30 Ohm.

14
8.3 Filling the herb chamber
To fill the filling chamber with your favorite herbs, unscrew the top cap. There you can see the lower
net of your herb chamber.
This is the place where your herbs should be placed. Fill the chamber with your preferred amount, but
only up to the upper edge of the lower screen clamp.
CAUTION! Fill the chamber only up to the upper edge of the lower mesh clamp and make
sure that there are no herbs at the upper edge of the lower mesh clamp.
Always fill the filling chamber completely up to the edge with crushed plant material. Do not compress
the plant material too much so that the airflow is not unnecessarily impeded. Remove any excess plant
material left around on the edge of the lower mesh clamp so that the lid can be screwed on properly.

15
Tip: If the Filling Chamber is only partially filled, then the vaporization material may shift
around; the hot air then bypasses the vaporization material, so that no vaporization can
occur.
If the filling chamber should not be completely filled, we recommend the Vape Engineering chamber
reduction. This is available as an accessory.
Take care that the meshes are not obstructed with plant material. To guarantee optimal results, we
recommend cleaning the meshes after each vaporization cycle with the enclosed cleaning brush. The
upper mesh especially can become clogged with plant material and so make inhaling difficult. In this
case, remove the Screen as described in Chapter. “Replacing the upper mesh”.
Then screw the top cap of the Vaporizer back on. As soon as the lower filling chamber mesh is clogged
or deposits appear on the filling chamber walls, the filling chamber must be cleaned. After cleaning, a
new mesh must be inserted.
8.4 Adjusting the airflow
After the HERBIE Vaporizer is installed on the box mod, rotate the housing of the Vape Engineering
HERBIE in any direction to adjust the airflow. The less of the intake ventilation visible, the more
restricted the draw will become and vice versa. A more restricted draw results in denser and slightly
hotter vapor whereas wide open airflow will have cooler but more airy vapor. You can adjust the
airflow between draws to your preference.
CAUTION! Never use the Vaporizer with the ventilation completely closed. This leads to a
combustion of your plant material.
Fully open ~ 1/3 open

16
8.5 Replacing the lower mesh
As already described in chapter "Filling the herb chamber", it is necessary to replace the meshes of the
filling chamber from time to time.
CAUTION! Hot surfaces!
Always disconnect the Vaporizer from the box mod each time you disassemble it! Let the
Vaporizer cool down before disassembly!
Remove the top cap and disconnect the base from the housing.
Now the shell with the mesh and the lower mesh clamp can be removed from the housing.

17
Remove the lower mesh clamp. Now the mesh can be replaced by a new one.
Only use original Vape Engineering parts. Meshes are available as accessories.
Once the new screen is inserted into the shell, the lower mesh clamp can be reinstalled. Now
reassemble the shell with the housing. Reassemble the housing on the base and screw the top cap to
the housing.
Now connect the Vaporizer to the box mod again.
8.6 Replacing the upper mesh
As already described in chapter "Filling the herb chamber", it is necessary to replace the meshes of the
filling chamber from time to time.
CAUTION! Hot surfaces!
Always disconnect the Vaporizer from the box mod each time you disassemble it! Let the
Vaporizer cool down before disassembly!
Unscrew the top cap.

18
On the bottom side of the top cap you can see the mesh clamp ring which holds the upper mesh of the
filling chamber. Use the supplied 1.5 mm Allen wrench to get into one of the holes of the mesh clamp
ring. The ring is unscrewed and the upper mesh of the filling chamber can be replaced.
Use only original Vape Engineering parts. Meshes are available as accessories.
Once the new mesh is inserted into the top cap, the mesh clamp ring can be screwed back in using the
1.5mm Allen wrench. Then the top cap is mounted again on the housing.
Now connect the vaporizer to the box mod again.
8.7 Heating up
The HERBIE evaporator is an on demand Vaporizer. The Vaporizer does not require any heating time.
The vaporizer must never be used without airflow, as there is a risk of burning the material
to be vaporized. This means that as soon as the vaporizer is in operation, you must pull on
it to ensure an airflow.
9Application
When using HERIE in wattage mode, start at a low wattage such as 30 watts (on the included mesh)
and go up 2-3 watts at a time until you feel the ramp up speed of the heater is optimal. Since the box
mod is not calculating temperature in wattage mode, vapor is produced by balancing the heater’s ramp
up speed (determined by wattage) with the users inhale speed. This technique takes a bit of practice
to master, but can produce powerful results. After 5-7 seconds, a steady stream of vapor will begin to
become more and more thick, at which time the user can either speed up their draw to decrease the
ramp up in vapor and avoid combustion, maintain their inhale speed, or slow their inhale speed to
allow vapor to ramp up faster. Experiment with different wattages, different resistance of the heat
mesh, airflow configurations, and inhale speeds to achieve best results. Find your personal sweet spot.

19
To use, place the mouthpiece between your lips. Keep the fire button pressed and start inhaling. Inhale
slowly at first and accelerate the inhalation if you feel that the vapor production increases. Release the
button, then breathe out and adjust the settings accordingly. Please note the following with regard to
vapor production: The more intense the vapor, the more the taste is affected.
CAUTION! Hot surfaces!
Do not touch the filling chamber as long as it has not cooled down after use with the
HERBIE Vaporizer.
CAUTION! A very high intensity (density) of the vapor can lead to irritation of the
respiratory passages from the concentration of the aromas and fragrances. In this
case, the temperature should be lowered, so that the intensity of the vapors is
reduced. The temperature can be reduced on the one hand by reducing the power
(watts) at the box mod or by opening the air inlet completely.
CAUTION! The device is not to be used, if the user has respiratory tract or lung
conditions. Depending on the density, the vapor could irritate respiratory tracts or
lungs, which can lead to coughing.
TIP: Inhale only half of air you can normally manage. Hold your breath for a few seconds
and exhale slowly. It is advisable to deliberately concentrate on your breathing process.
After vaporization, turn off the HERBIE Vaporizer / the box mod.
10 Disassembling and cleaning
When the plant parts are vaped, a small part of them inevitably condenses on the surfaces inside the
vaporizer.
The parts of the vaporizer must be thoroughly cleaned regularly to ensure proper functioning and a
clean taste.
For hygienic reasons, it is also necessary to clean these components when the Vaporizer is to be used
by a different person.
10.1 Disassembling the HERBIE Vaporizer
The following is a step-by-step description of how to disassemble the HERBIE Vaporizer.
Remove all plant parts from the filling chamber before disassembling.
CAUTION! Hot surfaces!
Always disconnect the Vaporizer from the box mod each time you disassemble it! Let the
Vaporizer cool down before disassembly!

20
Step 1: The mouthpiece is held in the 810 connection by two O-rings only. This can be pulled out. The
two O-rings each sit in a groove in the drip tip. They can be removed from the mouthpiece using the
slotted screwdriver supplied.
Step 2: The top cap can now be screwed off the housing.
Table of contents