Electronic Cigarettes Australia Pty Ltd AUSSIE BLUE ENDURANCE User manual

Electronic
Cigarettes
Australia Pty Ltd
AUSSIE BLUE
ENDURANCE
USER
MANUAL
www.ecigs.net.au
Email:
Congratulations
Thank you for purchasing the Aussie Blue Endurance Starter
Kit.
We pride ourselves on quality and hope that you enjoy using
our product and continue to come to us for all of your
"Vaping" needs for years to come!
In this manual you will find the information that you need to
make the switch to modern vaping straight away. If you
have any questions or need some help, please contact us at
This manual covers the following information:
• How to charge your E-Batteries with the E-Pack
• How to assemble your ecig
• How to Vape with your ecig
• How to clean your E-Atomiser
Product Features
Your Endurance ecig is nearly the exact same size as an ac-
tual tobacco cigarette and performs similarly. It was de-
signed to make your transition to vaping as easy as possible
and it looks, feels and tastes just like the real thing without
all the problems posed by tobacco.
Our kit includes the E-Pack, which is a portable charging
case PCC that enables you to store and charge your E-
Battery and components on the go. The E-Pack can charge
your E-Batteries up to 6 times on the go without needing to
be recharged.
The included E-atomiser is a state-of-the-art atomiser with
the largest bridge on the market in its class and the lowest
operating resistance possible to maximize vapour produc-
tion. A strict cleaning regimen will keep your atomiser in top
working order. The standard break-in period for the E-
atomiser is 2-3 days. After this time you will sense increased
vapour production and performance. Our E-Cartridges have
the largest bucket for their class and hold enough liquid to
provide vapour equivalent to 6 standard cigarettes. Depend-
ing on your vaping style this could be more or less.
Electronic Cigarettes
Australia Pty Ltd
Phone: 0457 295 812
Web: www.ecigs.net.au
E-mail: ecigs@ecigs.net.au
PO Box 150
Dapto NSW 2530

Charging the E-Pack via
Wall Adapter
Plug the supplied mini
USB cable into the side of the E-Pack and then plug the
other end of the USB cable into the wall adapter. Plug the
wall adapter into the standard power out let to charge.
Charging
To start the charging process, you must hold down the
button located directly below the LCD screen “on the right
side” for 3-5 seconds. The tip of the E-Battery will blink
several times indicating that it has started the charging
process and the LCD screen colour will change from blue
to red to indicate the E-Pack is charging the E-Battery.
On average it takes about 30-45 minutes to completely
charge a depleted E-Battery. As long as the screen is still
red, the E-Battery is still charging. As soon as the screen
turns back to blue, the charging process is completed and
your E-Battery is ready for use.
How to charge your E-Batteries
with the E-Pack
Step 1 —Remove the E-Cartridge
and E-Atomiser from the E-Pack.
Step 2 —Find the charging recepta-
cle in the E-Pack. This will be the
last hole on the right-front. Insert the
E-Battery into the hole and insert it
all the way into the hole.
Step 3 —Once it connects with the
charging receptacle, screw the battery
into the E-Pack by turning it clockwise
until it is fully screwed in (do not over-
tighten).
How to charge your E-Batteries
with the E-Pack
Viewing the E-Pack’s battery meter
Your E-Pack comes fully equipped with a
LCD screen that will show you how
much charge the pack is currently holding. To view the battery
meter simply click the button directly below the LCD screen
“on the right side”.
Using the E-Pack’s LED flashlight
Your E-Pack also comes fully equipped with a
LED flashlight that will help you find your
way around in dark spaces. To use the LED
flashlight, simply click and hold the button located just below
the LCD screen “on the left hand side”. Click again to turn off.
Hold the button down for 3 seconds to keep it on.
Charging the E-Pack via
USB power source:
Plug the supplied mini USB
cable into the side of the E-
Pack and then plug into the USB power source such as your
computer.
Features

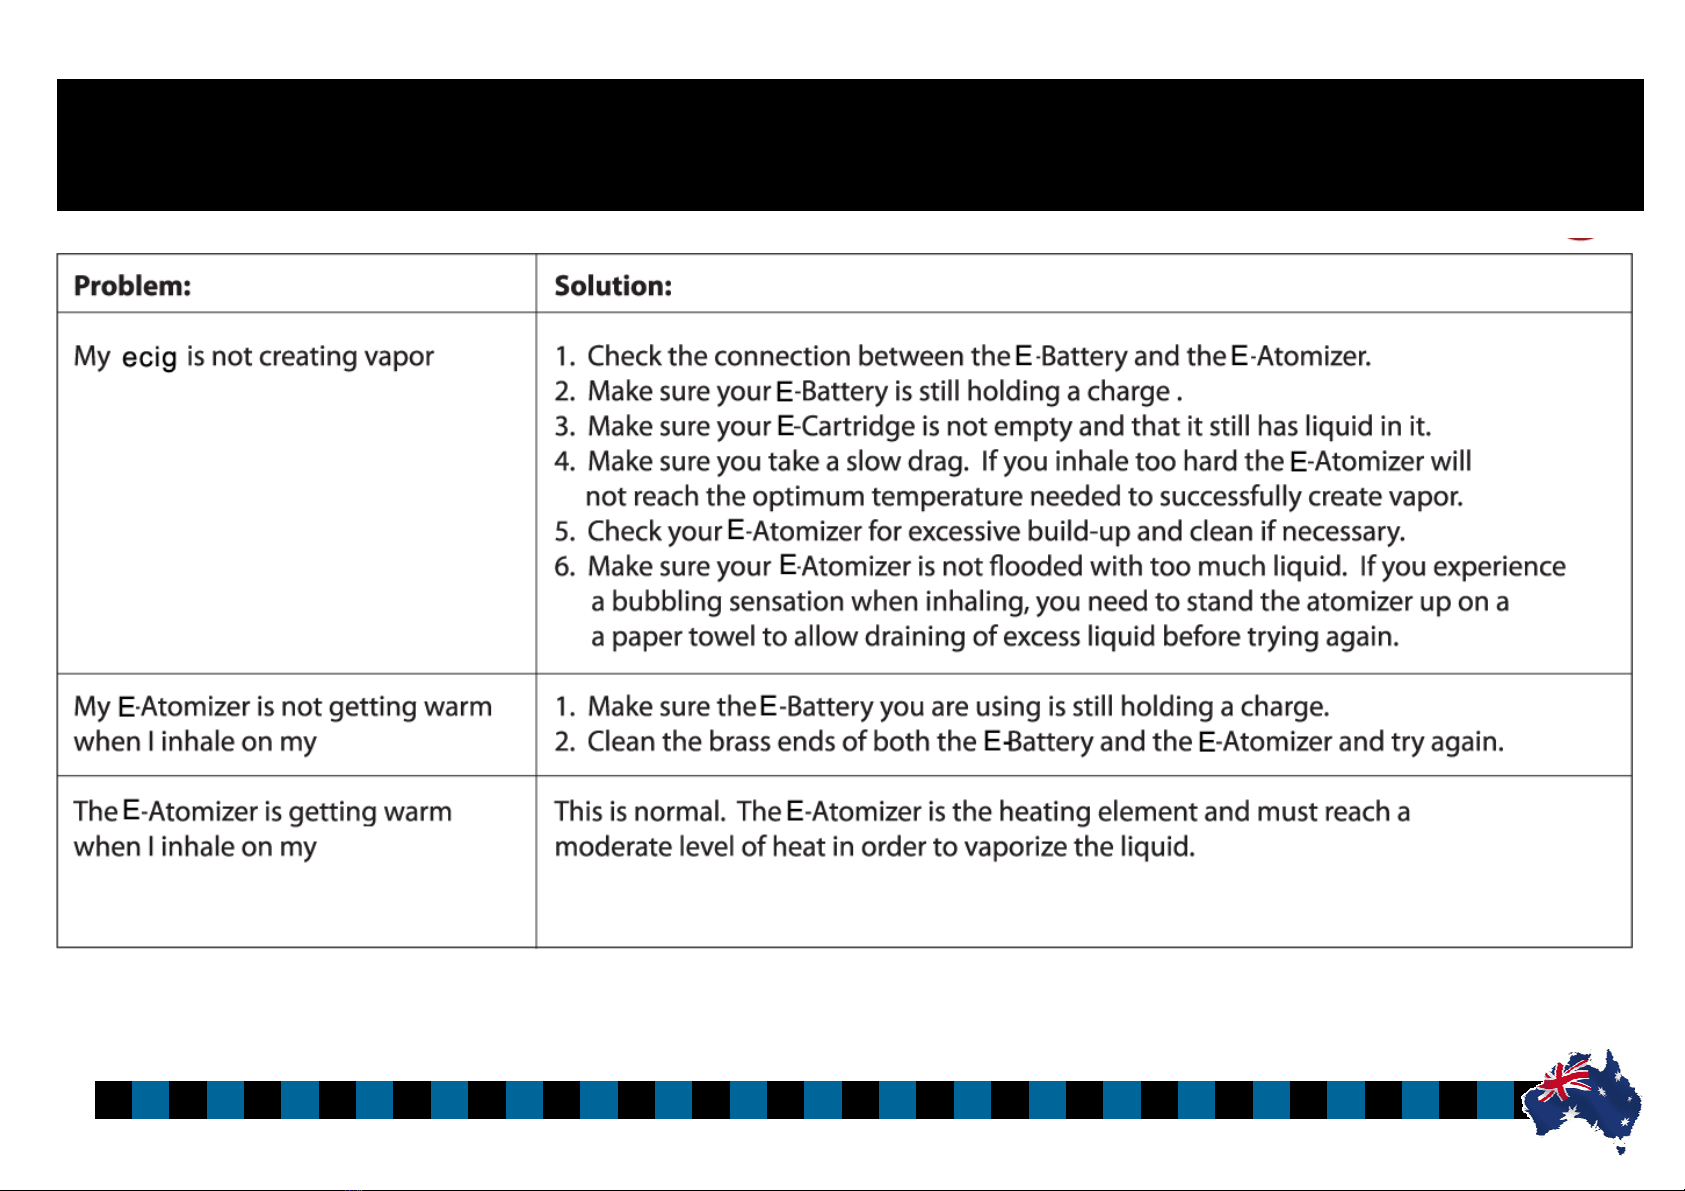
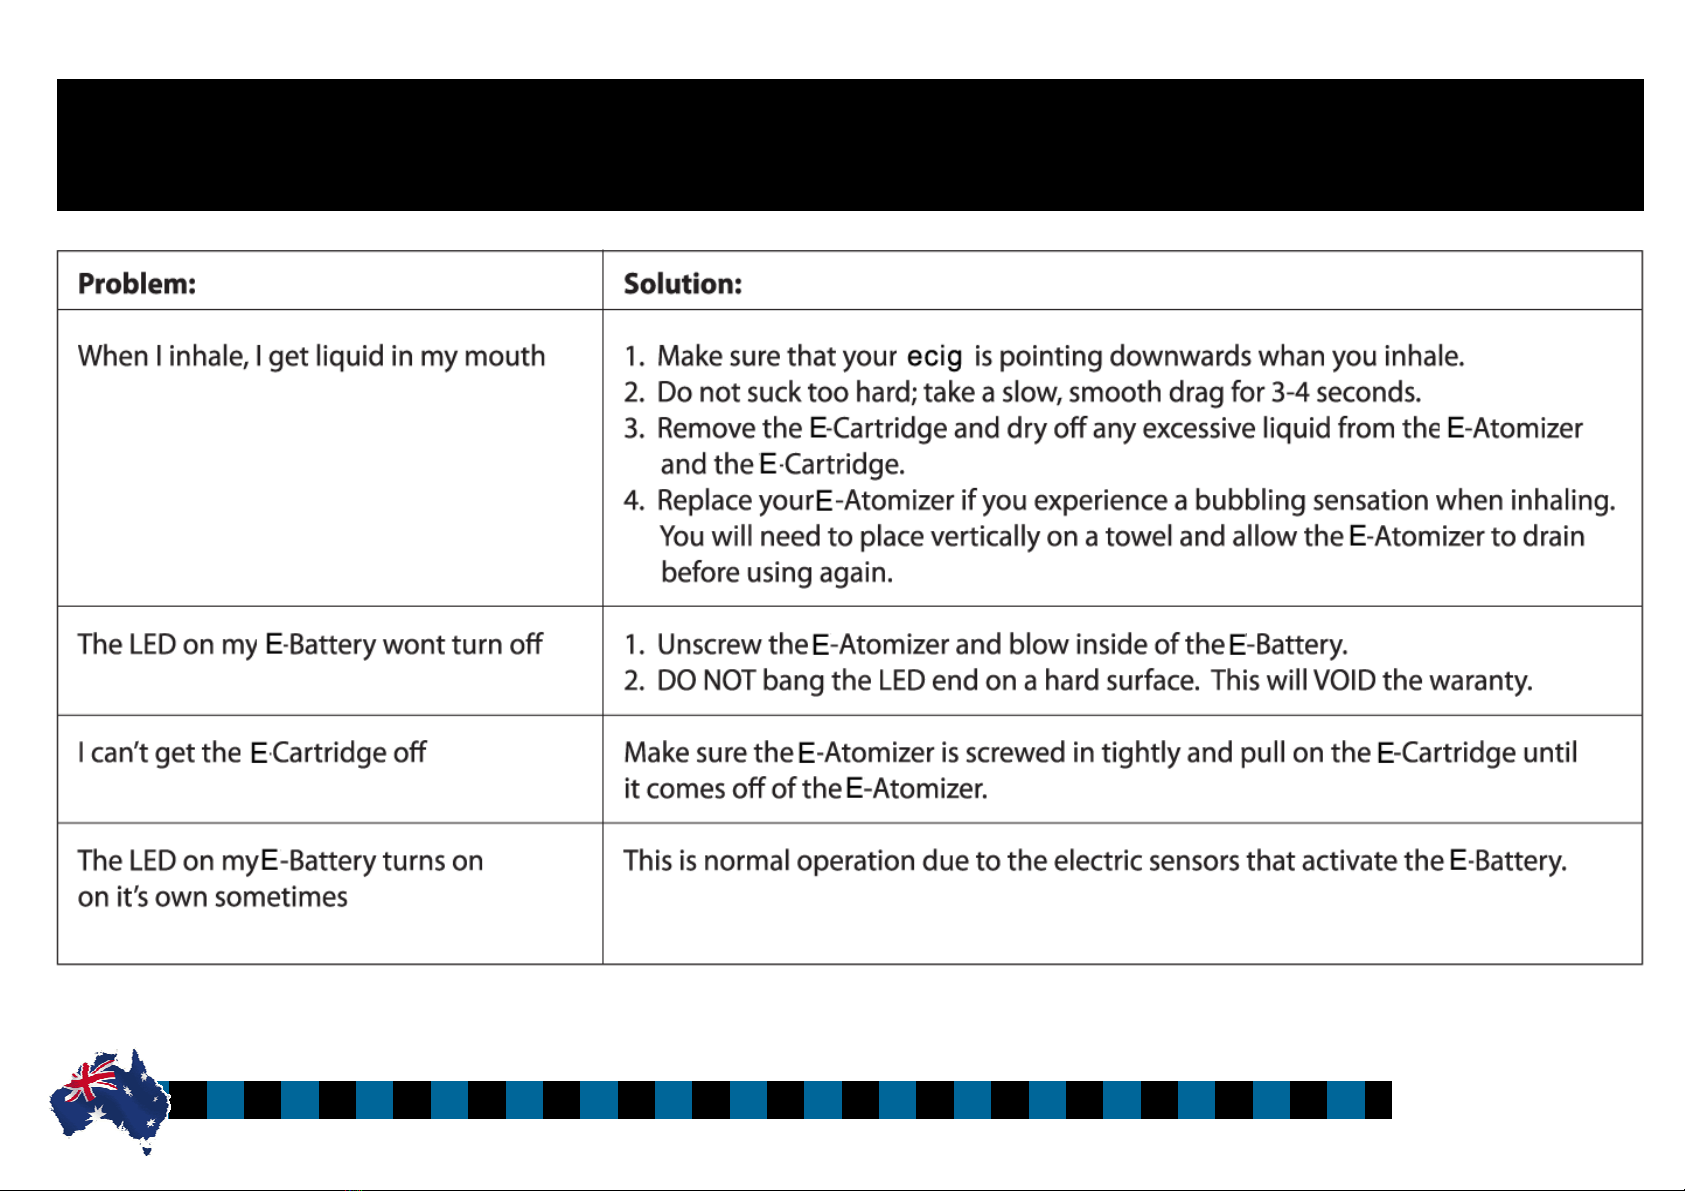
Vaping from your Endurance Ecig is very similar to smoking
traditional tobacco cigarettes. It’s as simple as pressing a fully
assembled ecig to your lips and inhaling. However, over time
you will find that there are some subtle differences. Due to the
fact that your ecig is an electronic component that uses a heating
element to vapourise the liquid, it is important to use a couple of
techniques to maximize vapour production which we will out
line below:
• Make sure that your ecig is either pointing down or does
not pass horizontal to prevent the liquid being sucked
through the cartridge and into your mouth when taking a
drag.
• When using your ecig for the first time or after an ex-
tended period of time of non use, you should take a few
primer puffs to pull the liquid onto the atomiser to prime
it.
• When taking a drag suck lightly and for a longer time
than you normally would when smoking a normal ciga-
rette. (this helps the atomiser reach optimal temperature
for vapour production). If you draw too hard for too
short a period of time, the ecig will not produce optimal
results. The longer you draw on the ecig the more vapour
it will produce.
In order to keep your E-Atomiser in top working order, we en-
courage you to manually clean it as soon as you start to see a
build up on it. Also, if you have mistakenly flooded the E-
Atomiser with too much e-liquid you can use the following
guideline to clean it and get it back to top form.
To clean your E-Atomiser you will need the following items.
• Rubbing alcohol/vinegar (solvent)
• Water
• Paper towel
Completely submerge the atomiser in the solvent of your choice
and let it soak for 15 minutes. After letting it soak, remove the
atomiser and either thoroughly rinse it in a cup of warm water
or run it under a tap to completely remove the solvent. Leave
the atomiser standing on end on a dry paper towel overnight to
drain and air-dry.
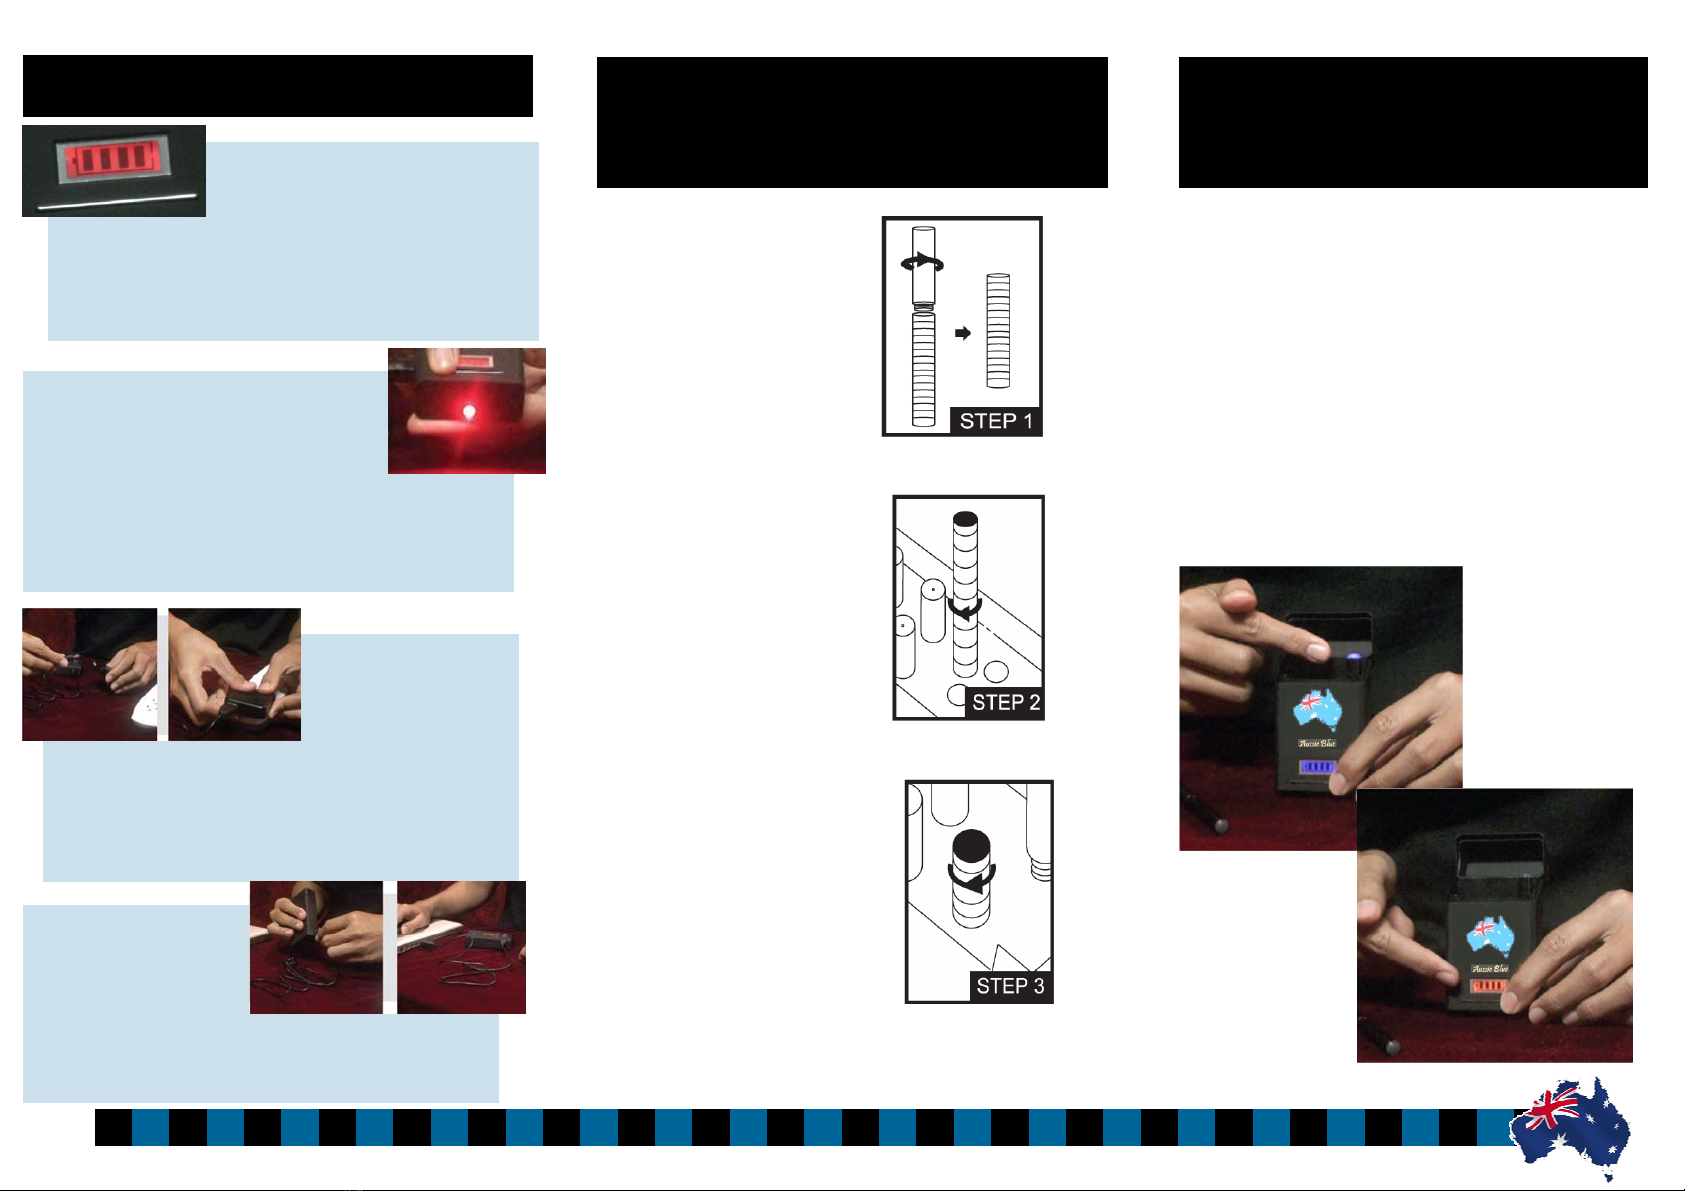
To assemble your ecig start by connecting the E-
Atomiser to the E-Battery. The E-Atomiser comes en-
cased in the transport cartridge (blank cartridge) that will
need to be removed. To do this, screw the E-Atomiser
and the E-Battery together ad remove the transport car-
tridge as shown:
Next replace the empty cartridge with a prefilled E-
Cartridge. Slide it over the E-Atomser and firmly press it
on to puncture the tin-foil seal. Next, twist the E-
Cartridge clockwise 3 times to create a solid connection
with the E-Atomiser. This will allow the juice to flow
down onto the E-Atomiser.
And that’s it! You are now read to vape. It’s a good idea
to remove any tin-foil remnants that may be left on the
E-Atomiser after placing a new E-Cartridge on your ecig.
To do this, simply remove the E-Cartridge and scrape the
tinfoil remnants off the bridge of the E-Atomiser then
reapply the E-Cartridge.
How to assemble your ecig How to Vape with your ecig How to clean your E-Atomiser

Troubleshooting

Troubleshooting
Electronic Cigarettes
Australia Pty Ltd
Phone: 0457 295 812
Web: www.ecigs.net.au
E-mail: ecigs@ecigs.net.au
PO Box 150
Dapto NSW 2530
Table of contents