Varia Brew Different User manual

BEFORE USING
YOUR VARIA
Please ensure you
read and understand
our Brew Guide and
Safety Instructions.

Welcome to your Varia
Varia has been designed to be flexible,
whether brewing coffee for yourself
or for your friends and family.
Varia is able to brew coffee or tea to
everyone’s taste.
Our passion is to educate people
about coffee and to help you improve
your coffee brewing skills. Becoming
part of the Varia family will take you
on a coffee journey in the hands of
coffee masters.
Seamless transitions allow you
to choose between six functions,
allowing you to have multiple flavour
experiences with coffee or tea,
increasing your knowledge.
02

Filter
French Press / Cold Brew
Moka Pot / Kettle / Tea
Filter
Cold Brew
French Press
Moka Pot
Kettle
Tea
03

Varia is designed to deliver the
highest quality brewing experience,
durability and aesthetics crafted from
stainless steel,
BPA-free materials and silicone.
Varia has been designed as a brewer
that you can depend on. We have
used the highest quality materials
to ensure your Varia will continue to
make the best coffee everyday.
Every coffee is unique, so we
partnered with coffee masters from
around the globe to design a brewer
that allows you to explore the word
of coffee and tea in your home like
never before.
04

05

3 cup
Brew water (95°-97°): 333mls / 333g
Coffee dose: 20g freshly ground coffee
Grind: medium / Paper filter
Total brew time: 3:30 - 4 mins
6 cup
Brew water (95°-97°): 500mls / 500g
Coffee dose: 30g freshly ground coffee
Grind: medium / Paper filter
Total brew time: 4:00 – 6 mins
If your coffee brews faster or slower than what
is suggested in the recipe, try adjusting the
grind (finer if too fast or coarser if too slow).
Filter
06

Our Brew Guides are
also available as video
walk-throughs on
www.variabrewing.com
Brew Guide
Attach the jug to the basecap and tighten to secure,
place filter cone on top of jug.
Place the filter paper in the filter cone and rinse
thoroughly (300mls of hot water). Remove the filter
cone to tip out the rinse water, then return onto jug,
ensuring the paper is evenly placed. This also pre-
heats the jug
Place the desired coffee dose into the filter paper and
start your timer. Pour just enough water to cover
the grounds. The hot water will react with the fresh
grounds and bloom (expand)
Now slowly add the remaining water, pouring in
small circles over the centre of the grounds. Try to
add the water in one continuous pour, keeping the
water level topped up until it has all been added,
being careful not to overfill.
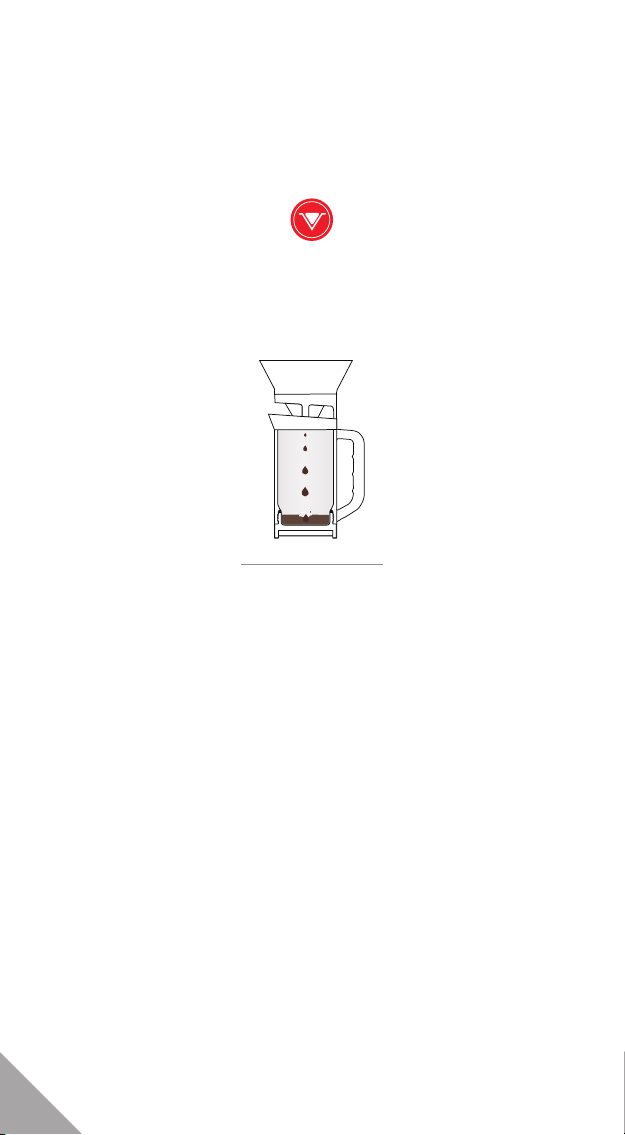
Once the filter has stopped dripping, the coffee is
brewed. Remove the filter cone and replace with the
server lid.
1
2
3
4
5
Tips:
• Do your best to maintain the correct water temperature throughout
the whole brewing process – this will help ensure an even extraction.
• When brewing is finished, let the filter cool for a minute as it drains.
Then hold the jug handle firmly in one hand, use your other hand to
remove the filter cone carefully and discard the filter paper/coffee
grounds.
CAUTION:
• When brewing, take care not to overfill the filter cone. Ensure the
fill level is below the top rim of the cone. (some filter papers maybe
taller than the Varia filter cone).
We have included with your Varia, a pack of 50 filter papers which can
be replenished online at www.variabrewing.com
likewise any V-02 paper will be compatible.
Our consumable pack also includes a 12 month supply of
replacement seals to ensure your Varia - Brew Different experience
continues uninterrupted.
07

3 cup
Brew water (95˚-97˚): 250mls / 250g
Coffee dose: 15g freshly ground coffee
Grind: medium
Total brew time: 3 -4 mins
6 cup
Brew water (95˚- 97˚): 500mls / 500g
Coffee dose: 30g freshly ground coffee
Grind: medium
Total brew time: 4 - 5 mins
French Press
08

Our Brew Guides are
also available as video
walk-throughs on
www.variabrewing.com
Brew Guide
Attach the jug to the basecap and tighten to
secure.
Place the desired coffee dose into the basecap.
Carefully add half of the required water, ensuring
the coffee grounds are saturated and start your
timer.
Now slowly add the remaining water, pouring
in small circles over the centre of the grounds.
Try to add the water in one continuous pour,
keeping the water level topped up until it has all
been added. (Be careful to not overfill). Insert the
French Press filter plunger assembly.
Once the total brew time has been reached
for your brew size, begin to plunge the coffee
grounds and immediately serve the finished
brew into cups.
1
2
3
4
5
Tip:
• Before you remove the base cap please rinse out the jug with
cold water to remove and coffee or coffee grounds.
CAUTION:
• Do not over-pressure the plunger as this could result in HOT coffee
erupting through the lid.
• When finished brewing and with the press still down, pour out
any remaining coffee. Take care when removing the press, as the
contents will still be hot.
• When removing the French Press filter plunger assembly, take
care especially as you near the top of jug, as the seal will release
from the jug wall with a sudden loss of resistance and may result
in hot coffee being dispersed.
09

2 cup
Brew water (lukewarm): 250mls /250g
Coffee dose: 10g freshly ground coffee
Grind: medium
Total brew time: 2:30 - 3 mins
4 cup
Brew water (lukewarm): 330mls / 330g
Coffee dose: 15g freshly ground coffee
Grind: medium
Total brew time: 2:30 - 4 mins
Moka Pot
10

Our Brew Guides are
also available as video
walk-throughs on
www.variabrewing.com
Brew Guide
Fill the boiler with lukewarm water to the required
brewline, ensuring the water level does not surpass
the safety valve.
Grind your coffee to a medium/fine setting.
Add the desired coffee dose to the Moka Pot basket
and gently level the grounds so that the rim of the
basket is clean of grounds.
Next, connect your Moka Pot funnel with the basket
and place into the boiler, ensuring the parts sit flat and
snug into the boiler. Then carefully thread the jug onto
the assembled Moka Pot and firmly tighten to secure.
Position on the heat source over a medium heat.
When brewed, turn off the heat source immediately
and serve.
1
2
3
4
5
Tips:
• Once the brewing begins to flow through the funnel and into the jug,
adjust the heat as required. Varia will make a steaming noise and a
audible splutter when the water has been extinguished from the boiler.
Remove from heat immediately at this point.
• Some induction cooktops are zone sensitive and require a minimum
diameter of pot size to activate the heat zone. If your induction cooktop
fails to activate with Varia, try off setting a small pot of water to one
side of Varia over the heat zone.
CAUTION:
• Keep hands and face well clear of device while brewing. Never at any
time look directly into Moka Pot jug while brewing, hot coffee may erupt
from funnel and result in scalding or burning skin.
• Never exceed a power rating of over 1,000 W on an induction heat
source or use a ‘high’ gas mark setting.
• Do not heat the boiler when it is empty.
• The Moka Pot boiler will remain hot after brewing – never place on heat-
sensitive surfaces without a heat resistant pad. Leave to cool before
cleaning.
• Do not reheat any coffee that has remained in jug by placing boiler back
onto a heat source.
• The pressure relief safety valve should always be visible (inside the
boiler) after water is added.
• Always use the handle to ‘pick-up’ device, as the boiler and jug could
burn if handled while hot.
11

3 cup
Brew water (room temp): 333mls / 333g
Coffee dose: 30g freshly ground coffee
Grind: medium
Total brew time: 10 -12 hours
6 cup
Brew water (room temp): 500mls / 500g
Coffee dose: 60g freshly ground coffee
Grind: medium
Total brew time: 10 -12 hours
Cold Brew
12

Our Brew Guides are
also available as video
walk-throughs on
www.variabrewing.com
Brew Guide
Attach the jug to the basecap and tighten to
secure.
Grind your coffee to a medium setting.
Place the desired coffee dose into the basecap
and begin to add the brew water.
When all the brew water has been added, be
sure to give the coffee and water a stir in order to
saturate all of the coffee grounds.
Place the serving lid onto the jug and refrigerate
the brew for the desired brew time.
Once the brew time has elapsed, connect the filter
basket to the French press filter and gently plunge
the grounds. Once strained, serve immediately
over ice.
1
2
3
4
5
Tip:
• If you want a cleaner brew, pass the cold brew through a rinsed
paper filter prior to serving.
13

Kettle
Tea
14

Our Brew Guides are
also available as video
walk-throughs on
www.variabrewing.com
Brew Guide
Kettle
Attach the jug to the boiler and firmly tighten to secure.
3/4 fill with water and place over a medium heat until
required water temperature is reached.
1
2
1
2
3
Tea
Follow steps 1 and 2 above.
Place tea leaves into the filter basket and attach to
the French press filter arm, connect and make sure
the basket is sealed.
Once the water is at the required temperature, insert
the filter basket into the water to begin brewing.
During the brewing time, agitate the tea gently by
pulling the filter basket up and pushing down.
Tip:
• Some induction cooktops are zone sensitive and require a minimum
diameter of pot size to activate the heat zone. If your induction
cooktop fails to activate with Varia, try off setting a small pot of water
to one side of Varia over the heat zone.
CAUTION:
• Never exceed a power rating of over 1,000 W on an induction heat
source – and never use a ‘high’ gas mark setting.
• If using boiler and jug assembly as a kettle, do not overfill as this could
result in hot water over-boiling from the jug spout. Kettle will remain
hot after use – never place on any heat-sensitive surfaces without a
heat resistant pad.
• Always use the handle to ‘pick-up’ device, as the boiler and jug could
burn if handled while hot.
CAUTION:
• If using boiler and jug assembly to make tea, do not overfill as this
could result in hot water over-boiling from the jug spout. The device
will remain hot after use – never place on any heat-sensitive surfaces
without a heat resistant pad.
• Always use the handle to ‘pick-up’ device, as the boiler and jug could
burn if handled while hot.
• Never exceed a power rating of over 1,000 W on an induction heat
source – and never use a ‘high’ gas mark setting.
15

We have designed our basecap and
jug with approximate volumetric
guidelines, or as we like to call them
‘brewlines’. These are designed to
help you brew without the need
for a scale if you want to be more
precise with your coffee and brew
water ratio.
The basecap and jug feature small
indentations at the half fill measure
and the top of the stainless steel
wall in the jug marks the maximum
fill line and the top of the stainless
steel cup in the basecap marks the
maximum fill line.
When brewing, you can choose
between a half measure or a full
measure.
• The half measure ratio is 15 grams
of coffee (basecap)
and 250 grams/ml of water (jug).
• The full measure ratio is 30 grams of coffee (basecap)
and 500 grams/ml of water (jug).
Brewlines
Décor bands
A selection of décor bands (coloured) are supplied with Varia which are intended
for personal customisation. The décor bands do not require replacement.
When changing out a décor band ensure you refit with the ‘flat side’ facing
downwards on either the base cap or boiler.
1
2
The décor band must be
fitted (to either base cap or
boiler) with the flat surface
facing downwards
Stretch décor band over
threads, once fitted, use your
finger to firmly press seal into
place all around collar
Ensure flat
surface of décor
band faces
downwards
16

Safety:
Varia is hot when in use. Use caution to
avoid burns or scalds and always allow
the device to cool before emptying
contents.
Never exceed a power rating of over
1,000 W on an induction heat source or
use a ‘high’ gas mark setting.
When using the Moka Pot or Kettle on
an open heat source, ensure the flame
is no larger than the boiler diameter.
This ensures that no flame will flare up
the side and will not make contact with
the handle or your hand. When the
Moka Pot is finished brewing, turn off
the heat source immediately once you
hear the noise of the boiler emptying
and there is a audible splutter.
Each boiler is fitted with a pressure
relief valve, this has been calibrated
by the manufacturer. (Caution: Do not
attempt to replace or adjust this valve.
Any attempt to do so will void the
manufacturer’s warranty).
When brewing Moka Pot the safety
valve should always be visible
(inside the boiler) after water is added.
Do not allow children to operate or
handle this device unless supervised
by an adult. Remember that brewed
coffee or tea are hot and will scald.
Do not leave unattended in reach of
children.
Moka Pot boiler will remain hot after
brewing or heating water – never place
on any heat-sensitive surfaces.
Cleaning and Maintenance:
After each use, rinse the coffee residue
and wipe off the residual oil with a
cloth. If used frequently Varia can be
cleaned once a month with a mild
neutral detergent. (Not recommended
for washing in a dishwasher).
Filter: The metal filter is easy to clean
and disassemble. If there is coffee
residue attached to it, the seal ring
can be removed and immersed in
water to remove the residue.
Moka Pot funnel: Over time coffee
residue may build up inside the funnel
pipe - immerse in water to remove the
residue before further use.
After brewing rinse out coffee and use a
cloth to wipe out any coffee oil residue
and dry all parts with a soft towel.
We also recommend a soft warm
wash with a gentle detergent
once a month if Varia is used daily.
(We do not recommend putting Varia
in a dishwasher).
Important information:
Seal care and replacement:
Our seals are designed to last up to
3 months with regular use. If you
notice any deterioration of seals,
this indicates that replacement is
required. You will find a guide to seal
replacement on the following pages.
Please follow these instructions
carefully.
Each Varia is supplied with a set of
replacement seals (black) that will
ensure a 12 month replacement
programme. If you require additional
replacement seals, these will be
available for purchase through our
website www.variabrewing.com
If you notice that any of the seals
have distorted or are not fitting
correctly, do not proceed with
any brewing process until you
have referred to the our ‘Seal
Replacement Guide’ to ensure the
seals are correctly fitted or replaced
accordingly. Use only Varia Brewing
replacement seals, the use of a
non-branded seal will result in the
device malfunctioning, which has
the potential to cause personal harm
or injury.
When replacing seals, use only your
hands to fit seals and be careful not
to over stretch or alter in any way in
order to fit.
Product Warranty and Liability:
Varia Brewing Limited warrants
to the Buyer that the product is
free from defects in material and
workmanship for a period of 12
months from the date of purchase.
A full replacement product will be
honoured by Varia Brewing Limited
provided the warranty has not been
voided. Should you need to return
your Varia, please visit our www.
variabrewing.com and review our
returns/refund policy.
Any attempt to replace or adjust the
pressure relief valve on the boiler unit
will void the manufacturer’s warranty.
If this part requires servicing or
replacement, please return the unit
to your point of purchase.
Varia Brewing Limited will not be
liable for any personal harm or injury
caused as a result of operating Varia
outside our prescribed Brewing and/
or Safety Guidelines, or if any attempt
is made to replace or adjust the
pressure relief value, at any time
during the product lifetime.
17

Tips:
• Seals will fit easier if slightly wet, especially when inserting a fitted ‘seal and
filter’ – as these may be difficult to align into the Moka Pot funnel or basket.
• All seals should fit snuggly and without any distortion. Only fit seals by using
your hands - never use a sharp/metal instrument. This may cause damage
to a seal and potential failure of Varia.
• Identify the correct replacement seal by matching it with the retired seal.
• Prior to re-fitting any seal - please clean any coffee residue off metal parts.
• Please dispose of your retired seals responsibly - while there is nothing about
silicone chemically that would prevent it from being recycled, curbside recycling
programs rarely accept it. However there are ‘online’ mail-in recyclers which will
provide a zero waste solution.
Seal replacement guide
French Press:
There are TWO seals to replace for this brewing method.
• Plunger seal • Basket seal
1
Pinch seal
firmly into
place -
continue
pinching into
place as you
rotate plunger
a full rotation.
2
French Press plunger seal
French Press basket seal
1 2 3
Place one part of the replacement
seal into channel and hold with
thumb, then gently stretch the
remaining seal around basket,
allowing it to locate within channel.
Once seal is in place – pinch
firmly to ensure a correct
fit within channel, continue
pinching into place as you
rotate basket a full rotation.
Roll existing seal out
of channel – away
from basket, clean any
residue from channel.
Seals will wear out over time and with regular use. We recommend changing
your seals every 2/3months to ensure optimum brewing performance.
Plunger seal
Basket seal
Your compilmentary replacement seal & filter pack contains the following:
2 x French Press plunger seal (75mmø)
2 x French Press basket seal (63mmø)
2 x Moka Pot gasket (80mmø)
2 x Moka Pot basket connection seal (55mmø)
2 x Moka Pot funnel/filter seal (53mmø)
2 x Moka Pot basket/filter seal (45mmø)
1 x Moka Pot Funnel filter disk (48mmø)
50 x V-02 filter papers
These consumbles are also available online at www.variabrewing.com
Ensure seal wings
are located on top
of filter plate.
18

1 2
Ensure gasket
seal bevel is
sloping upwards
before fitting.
Once fitted, use your thumb
to firmly press the gasket
seal into place all around
funnel collar.
Moka Pot gasket seal
✗✔
Moka Pot basket/filter seal
Moka Pot basket connection seal
1
Remove existing seal
and clean any residue
from channel.
Gently stretch the
replacement basket
connection seal over
channel and press
into place.
2
Check that small
external fin on seal is
facing outwards after
seal is fitted.
Moka Pot funnel/filter seal
1 2
Remove the
filter disk by
pulling the tab
upwards and
outwards from
the basket.
Clean any
residue from
within the
funnel.
Expand the seal off the
filter disk by pulling tab
outwards, gently ease
filter disk off seal.
3
Locate the slot on
the inside face of the
replacement seal
- partly insert filter
disk into the slot then
slowly work around disk
stretching remaining
seal into place.
Check seal is fitting by
gently rolling on a flat
surface.
Gasket seal
Basket
connection seal
3
Check bevel is
sloping upwards
after seal is fitted.
3
Funnel
filter disk
Funnel filter seal
Moka Pot:
There are FOUR seals to replace for this brewing method.
•
Gasket seal •
Basket connection seal •
Funnel/filter seal •
Basket/filter seal
1
Remove the
basket filter disk
by pulling the
tab upwards and
outwards from
the basket.
2
Next, follow steps 2 and 3 of Moka Pot
funnel/filter seal instructions (above).
Please note the basket/filter seal (53mmø)
is larger than the funnel/filter seal (45mmø).
Both are similar in appearance.
19

OCTOBER 2019
@variabrewing
www.variabrewing.com
Table of contents