Vector VREF12-LB-RGD Operation manual

Operation and Service Manual
Vector Lab Products
Refrigerators and Freezers
01381983R00
801 Church Lane • Easton, PA 18040, USA
Toll free 1-855-686-5592
www.vectorlabproducts.com
Following installation, please forward this manual
totheappropriate operations person.

2Vector Lab Products Refrigerators and Freezers
Contents
Welcome to Vector ............................................................................. 3
Before you begin............................................................................... 3
Ambients ..................................................................................... 4
Clearances ................................................................................... 4
Electrical Specications......................................................................... 4
Refrigeration Specications ..................................................................... 4
Installation .................................................................................... 5
Install shelves (if equipped) and power up......................................................... 5
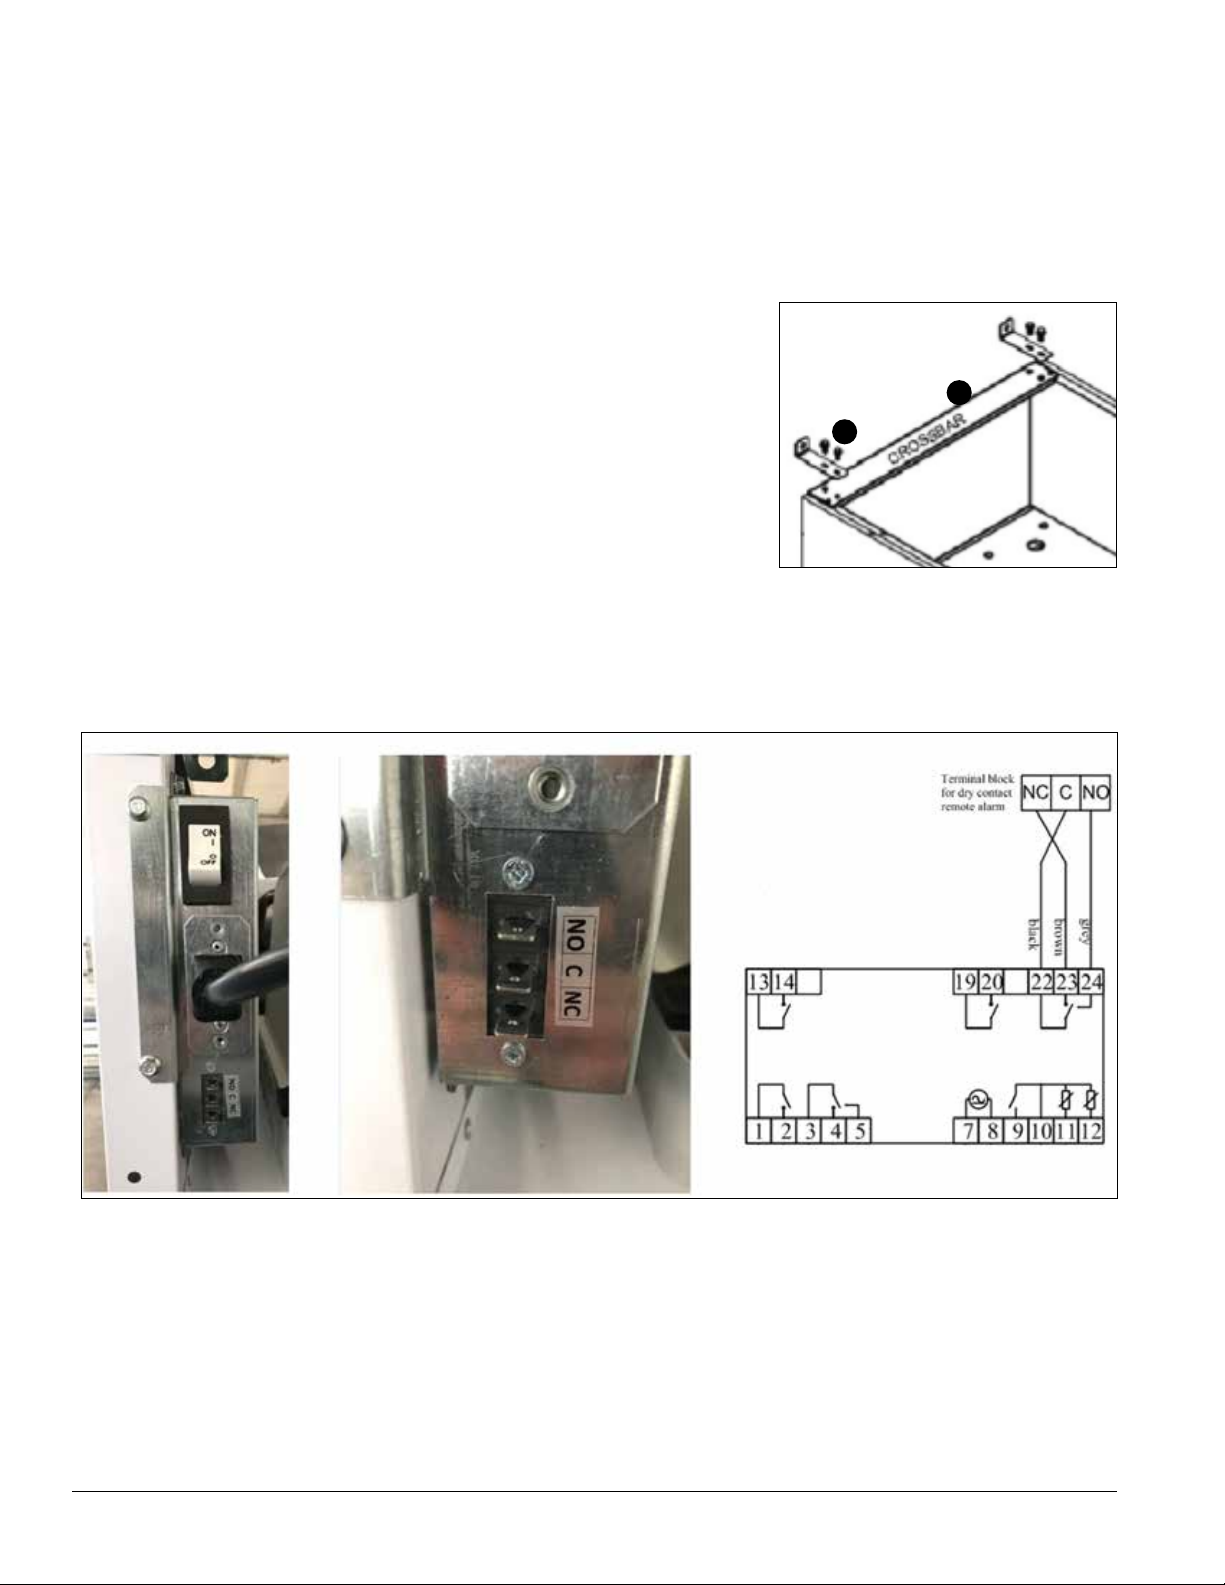
Power the Unit .............................................................................. 5
Stabilizer Bracket Details ...................................................................... 6
Remote Alarm Connection ..................................................................... 6
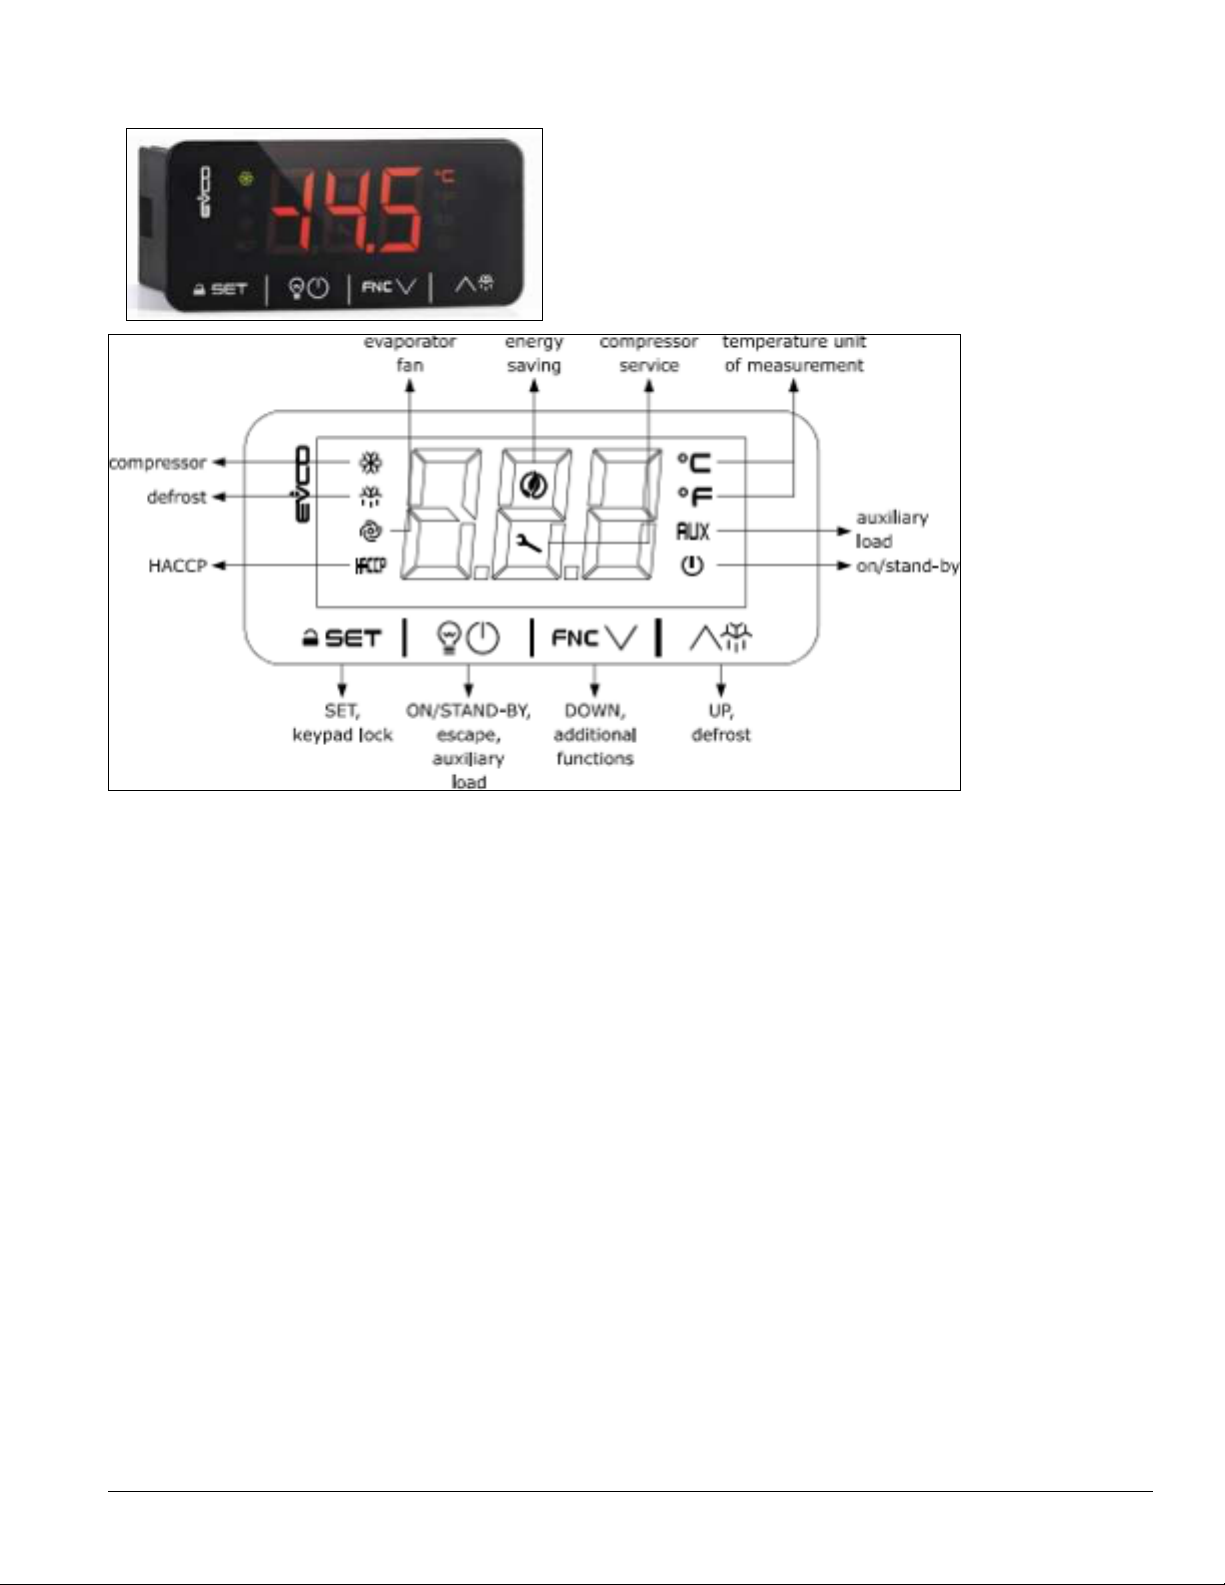
Controller Operation ........................................................................... 7
Locking/Unlocking of the Keypad ................................................................ 8
Viewing/Adjusting the Set Point ................................................................. 8
Powering the Equipment ON.................................................................... 8
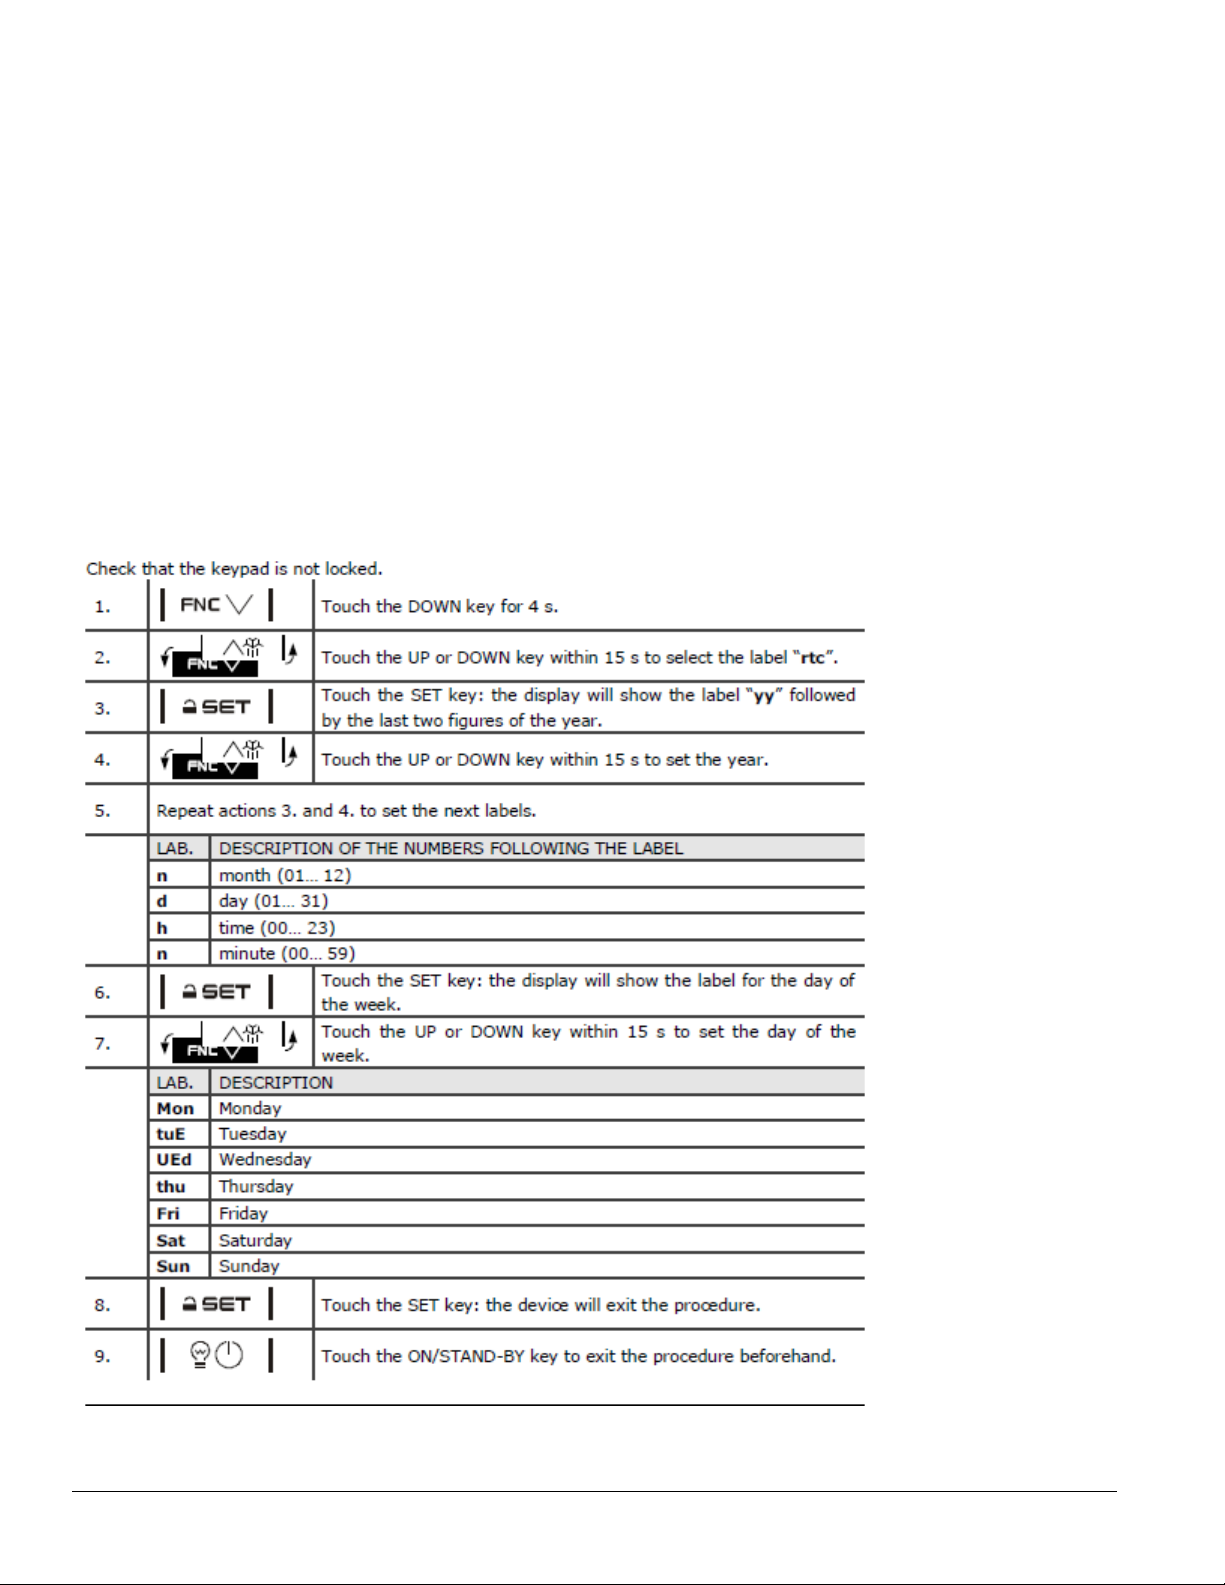
Controller Set Up ............................................................................ 8
Defrosting .................................................................................. 9
Door Switch ................................................................................ 9
Cleaning ......................................................................................11
Interior Cleaning .............................................................................11
Exterior Cleaning ............................................................................11
Annual Cleaning ............................................................................11
Refrigeration System .........................................................................11
Refrigeration Diagram - Refrigerators............................................................. 12
Refrigeration Diagram - Freezers................................................................. 12
Facade Removal .............................................................................. 13
Controller Replacement ........................................................................ 13
Door Gasket Replacement ...................................................................... 14
Modular Refrigeration System ................................................................... 14
Wiring Diagram - Glass Door.................................................................... 15
Wiring diagram - Solid Door .................................................................... 16

Vector Lab Products Refrigerators and Freezers 3
Welcome to Vector Lab Products
Vector Lab Products equipment enjoys a well-deserved reputation for excellent performance, long-term reliability
and outstanding after-the-sale support. To ensure that this product delivers that same degree of service, we ask
that you take a moment to review this manual before beginning the installation. Should you have any questions or
require technical help at any point, please call our technical service group at 1-855-686-5592.
Before you begin
Do not tilt unit further than 30° off vertical during uncrating or installation. After uncrating and removing all packing
material, inspect the equipment for concealed shipping damage. If damage is found, notify the shipper immediately
and contact Vector Lab Products so that we can help in the ling of a claim, if necessary.
Check your paperwork to determine which conguration you have. Vector Lab Products conguration numbers are
designed to provide information about the type of refrigerator you are receiving. Following is an explanation of the
different item numbers.
Model Number Width
(inches)
Depth
(inches)
Height
(inches)
Ref. Volume
(cu.ft.)
Set Point
Temp.
Elec.
V/Ph/Hz
Cooling
Capacity
Absorbed
Power
VREF12-LB-RGD
VREF12-LB-SGD 23 5⁄8 23 5⁄8 71 23⁄32 12 4 C 120/1/60 699 BTU 260 W
VREF12-LB-RSD 23 5⁄8 23 5⁄8 71 23⁄32 12 4 C 120/1/60 699 BTU 260 W
VREF25-LB-RSD 28 11⁄32 31 1⁄2 79 3⁄16 25 4 C 120/1/60 1467 BTU 290 W
REF25-LB-RGD
REF25-LB-LGD 28 11⁄32 31 1⁄2 79 3⁄16 25 4 C 120/1/60 1467 BTU 290 W
VFZR25-LB-RSD
VFZR25-LB-LSD 28 11⁄32 31 1⁄2 79 3⁄16 25 –20 C 120/1/60 1774 BTU 500 W
VREFCR30-RGD 32 9⁄32 37 31⁄64 81 5⁄32 30 4 C 120/1/60 1774 BTU 500 W
VREF30-LB-RSD 32 9⁄32 37 31⁄64 81 5⁄32 30 4 C 120/1/60 1774 BTU 500 W
VREF30-LB-RSD
VREF30-LB-LSD 32 9⁄32 37 31⁄64 81 5⁄32 30 4 C 120/1/60 1774 BTU 500 W
VREF49-LB-SGD 56 11⁄16 31 1⁄2 79 3⁄16 49 4 C 120/1/60 1774 BTU 470 W
VFZR49-LB-OSD 56 11⁄16 31 1⁄2 79 3⁄16 49 –20 C 120/1/60 2501 BTU 750 W
VREF49-LB-OSD 56 11⁄16 31 1⁄2 79 3⁄16 49 4 C 120/1/60 1842 BTU 470 W
VREF49-LB-OGD 56 11⁄16 31 1⁄2 79 3⁄16 49 4 C 120/1/60 1842 BTU 470 W
VREF72-LB-RSD 85 3⁄64 31 1⁄2 79 3⁄16 72 4 C 120/1/60 2*1467 BTU 600 W
VREF72-LB-RGD 85 3⁄64 31 1⁄2 79 3⁄16 72 4 C 120/1/60 2*1467 BTU 600 W

4Vector Lab Products Refrigerators and Freezers
Ambients
Intended for indoor use where ambient temperature does not exceed 104 F (40C) and ambient relative humidity
does not exceed 65% RH.
Clearances
The top of the unit must have 15 inches of clear space above the refrigerator to ensure proper ventilation of the
refrigeration system.
The back of the refrigerator should have 2 inches of clearance to allow for power cord clearance and ventilation on
unit.
Electrical Specications
§115 V, 60 Hz, 1 phase
§Minimum circuit ampacity: 15A
§Maximum size of branch circuit overcurrent device: 15A circuit
§Vector Lab Products recommends circuit be protected by GFCI breaker
§Does not require dedicated circuit
Refrigeration Specications
§Refrigerant R290
§VREF 12: 2.5 oz
§VREF25: 3.2 oz
§VREF30: 3.5 oz
§VREF49: 3.5 oz
§VREF72: 3.2 oz (2 cooling units)
§VFZR25: 3.9 oz
§VFZR49: 3.5 oz

Vector Lab Products Refrigerators and Freezers 5
Installation
DANGER
• Do not tilt any unit further than 30° off vertical during uncrating or
installation
• Refrigeration module area contains mechanical, moving parts. Keep
hands and arms clear of this area at all times. If access to this area is
required, power to unit must be disconnected rst.
The equipment must be transported and handled exclusively in upright position, in observance of the instructions
printed on the packing. This precaution is necessary to avoid contamination of the refrigerant circuit with
compressor lube oil with resulting valve and heat exchanger coil failure and problems starting the electric motor or
the risk of gas leak. The manufacturer is not responsible for any problems due to transport executed in conditions
other than those specied herewith. The equipment is secured to a wooden pallet base, wrapped in a plastic lm
and packaged into a three waves carton box. The equipment must be handled using a fork lift truck or a pallet
truck with suitable forks (fork length at least equal to 2/3 length of unit).
1. Remove packing material.
2. Remove accessories from inside the unit.
3. Carefully slide the cabinet off the skid.
4. Use gloves when handling the carton box or the wooden base to
protect the hands from splinters.
5. Position the equipment with the help of a level. Remove the
protective PVC lm from the external surfaces of the unit.
Install shelves (if equipped) and power up
Fig. 1
1. If refrigerator is equipped with shelves, remove bag containing shelf
supports and position them in desired locations on each pilaster
and insert shelves (Fig. 1).
2. Plug refrigerator into a 115 V 60 Hz 15A outlet.
Power the Unit
1. Plug in unit and press power button located on rear, right-hand
corner.
2
1
3

6Vector Lab Products Refrigerators and Freezers
Stabilizer Bracket Details
Warning:To offset any potential for unit tipping, the unit must not be used or loaded for use
without being secured to the wall with the wall bracket included. To mount the unit to the
bracket and wall, please procure the proper screw and anchor type suitable for the wall
material.
Installation
1. Each Scientic model has a galvanized iron crossbar at the top rear
side (Fig. 2.1).
2. The galvanized iron bracket will be used to attach the unit to the
wall.
3. Attach the brackets to the crossbar using the two bolts provided
and torque to 3 N-m (Fig. 2.2).
4. Attach wall anchor brackets to wall using appropriate hardware and
installation method suitable to application and local codes.
Fig. 2
1
2
Remote Alarm Connection
These units are equipped with a remote alarm plug for the connection to a remote alarm network.
The remote alarm plug is installed at the back of the cabinet near the main power plug enclosure and it is wired
through a connection cable to the controller board.
Fig. 3
The Remote alarm contact is a Dry contact (low voltage: max 24VAc/VDc, 1A, SELV) and consist of three outputs:
C (Common)/N.O. (Normally Opened Circuit)/N.C. (Normally Closed Circuit).
For the external network connection, fasten directly the pins according to the remote alarm network conguration.
When an alarm occurs the contact relay switches from the N.C. position to N.O.

Vector Lab Products Refrigerators and Freezers 7
Controller Operation
In normal operation, the controller will display temperature in degrees Celsius. To change from Celsius to
Fahrenheit requires a programming key. Contact Vector Products Parts Department at 1-855-686-5592 for
part numbers and pricing.
CAUTION! Vector Lab Products does not authorize changing any critical operating parameters
as it can cause improper system operation and/or severe mechanical damage.Changing
operating parameters may result in Vector Lab Products voiding equipment warranty.
Refrigerators come pre-programmed with a 4 C (39.2 F) set point. Standard operating temperature at default is
4C to 6 C (39.2 F to 42.8 F)
If desired, the refrigerator’s set point can be adjusted within a 1 C to 12 C (33.8 F to 53.6F) range.
Freezers are pre-programmed with a –25 C (–13 F) set point. If desired, the freezer’s set point can be adjusted
within a –23 C to –10 C (-13 F to 14 F) range
All set points have a +2 C (+3.6 F) differential (r0 setting on the controller). The 2.2 C (3.6 F) differential means that
with a 4 C (39.2 F) set point, the compressor will turn off at 4 C (39.2 F) and turn on when it reaches 6C (42.8 F).
It is important to understand that the set point equals the compressor cut out.

8Vector Lab Products Refrigerators and Freezers
Locking/Unlocking of the Keypad
The temperature controller is defaulted to lock out after 30 seconds without a key being pressed and will display
“Loc”. To unlock the controller press the SET key for 1 second until “UnL” is displayed. The controller is now
unlocked.
Viewing/Adjusting the Set Point
With the controller unlocked, press and release the SET key. The current Set Point will populate. Use the UP &
DOWN arrows to the desired Set Point and again press the SET key to store.
Powering the Equipment ON.
Locate the power switch to the left of the controller and place in the ON position (I).
Controller Set Up
Upon power up your controller will alarm RTC. This is instructing you to program the TIME/DATE.
Press and release any key to silence the alarm.
Check that the controller is not locked (LOC). If locked press and hold any key for 1 second and (UNL) will
DISPLAY.

Vector Lab Products Refrigerators and Freezers 9
Controllers are preprogrammed to alarm at the following temperature:
REF: High alarm: 9 C (48.2 F), Low: 2 C (35.6 F)
FZR: High alarm: –15 C (5 F), Low: –35 C (–32 F)
All alarm points operate off of a set SP +/- (A1/LOW, A4/HIGH) strategy.
Alarms will automatically clear when the temperature rises above/below the alarm value plus the A11 parameter
value (Alarm offset) of 3. In the case of a refrigerator, which low alarms at 2 C, the alarm will clear once the
temperature rises to +2 C. Adversely, a refrigerator that enters into a high alarm at 9 C, will have the alarm clear
once the temperature reaches 6 C.
AL on the controller screen reports a Low Temperature Alarm.
AH on the controller screen reports a High Temperature Alarm.
Defrosting
Vector Lab Products refrigerators and freezers do not require manual defrost as they utilize a hot gas defrost cycle
to keep the evaporator coil frost free. The defrost cycle is typically always terminated when the evaporator probe
(Pb2) reads 8 C.
If the defrost probe (Pb2) experiences a failure, or is out of spec, the MAX time the unit will stay in a defrost cycle
is 15 minutes. If this occurs a dFd alarm will appear.
Upon termination of the defrost cycle, the compressor, condenser fan, and evaporator fan will remain off for
60seconds to allow for the melted frost to drip away from the evaporator coil.
Refrigerators enable an automatic defrost cycle every 10 hours
Freezers enable an automatic defrost every 6 hours.
Seeing as the cooling and defrost system are external to the cabinet, the stored product and cabinet temperature
should experience a minimal rise during the defrost cycle.
Door Switch
Each refrigerator and freezer door is equipped with a normally opened mechanical switch that recognizes when
the door is opened or closed. When the controller senses an interruption in the continuity of the door switch circuit,
the evaporator fan(s) and compressor will power down. If the door remains open for longer than 2 minutes the
controller will alternate between the temperature and an audible and visual (id) alarm will appear. Once the circuit
is closed the alarm will clear. If an (id) alarm appears with all doors closed troubleshoot the switch circuit.

10 Vector Lab Products Refrigerators and Freezers
Alarms

Vector Lab Products Refrigerators and Freezers 11
Cleaning
Use non chlorine-based cleaners. Cleaners containing chlorine can cause staining and pitting of the stainless
steel.
Disconnect power to unit by turning the power switch off, located on the rear, right hand corner, and removing the
power cord from the receptacle.
The appliance is designed for medications, vaccines and laboratory product storage so it is important to keep
it clean. The equipment is thoroughly cleaned at the factory before being shipped. We recommend, however, to
clean the interior cabinet before the rst start up of the appliance.
Interior Cleaning
Using a sponge or soft cloth, clean unit with a non-abrasive, non-chlorinated, all-purpose detergent. Note: The
air plenum can be removed to clean it, as well as behind it. In addition, the shelves and slides should be cleaned
aswell.
Exterior Cleaning
Wipe stainless steel exterior with a soft cloth in the direction of grain as needed. Stainless steel polish may be
used to enhance the nish of the unit. The glass door and exterior parts may be cleaned with a soft cloth, window
cleaner or other non-abrasive cleaner.
Annual Cleaning
Removal of dust and other particulates from air intake areas and the condenser is important for proper operation.
Environments with large amounts of dust may require more frequent cleaning.
1. Disconnect power to unit by turning power switch off and removing power cord from receptacle.
2. The condenser can be accessed from rear for cleaning.
3. Inspect drain pan for any debris or obstruction in condensate pan.
4. Use a vacuum cleaner with brush attachment to clean condenser, compressor and related parts.
Refrigeration System
The Vector Lab Products refrigeration system is designed to give many years of trouble-free service. Except for
routine cleaning of the air-cooled condenser and related parts, the refrigeration system requires no service or
maintenance. Refrigerator utilize a capillary tube metering device while freezers utilize a thermal expansion valve.
Both systems are critically charged. Access ttings are not provided. Temporary piercing valves are required to work
on the refrigeration system. Due to the small charge size contained within these products, Vector Lab Products
does not recommend accessing the refrigeration system. If a sealed system failure is suspected, Vector Lab
Products recommends replacing the cooling system in its entirety.

12 Vector Lab Products Refrigerators and Freezers
Refrigeration Diagram - Refrigerators
HIGH PRESSURE VAPOR
HIGH PRESSURE LIQUID
LOW PRESSURE LIQUID
LOW PRESSURE VAPOR
FILTER-DRIER
COMPRESSOR HOT GAS
SOLENOID
HOT GAS
LINE
EVAPORATOR
CAPILLARY TUBE
CONDENSER
Refrigeration Diagram - Freezers
DRYER
HIGH PRESSURE VAPOR LOW PRESSURE VAPORHIGH PRESSURE LIQUID LOW PRESSURE LIQUID
COMPRESSOR
FAN
10oz. Charge
High Psi
Liquid
Low Psi
Liquid
High Psi
Vapor
Low Psi
Vapor
EVAPORATOR FAN
EVAPORATOR/DEFROST UNIT CONDENSING UNIT
EVAPORATOR
TXV
HOT GAS
SOLENOID
HOT GAS LINE

Vector Lab Products Refrigerators and Freezers 13
Component Details
Model Gas Type Gas
Charge
Low side
pressure at
70°F
High side
pressure at
70°F
Compressor Windings
at 77°F
Locked
Rotor (A)
VFZR25-LB-RSD
VFZR25-LB-LSD
R290 3.9 oz
(0.110 kg)
2.9 psig
(0.2 barg)
149.39 psig
(10.3 barg)
Start winding = 5.99 Ω
Run winding = 1.10 Ω
40
VFZR49-LB-RSD R290 4.2 oz
(0.120 kg)
4.35 psig
(0.3 barg)
150.84 psig
(10.4 barg)
Start winding = 2.66 Ω
Run winding = 0.43 Ω
55
VREF12-LB-RGD
VREF12-LB-LGD
R290 2.5 oz
(0.070kg)
29 psig
(2 barg)
146.5 psig
(10.1 barg)
Start winding = 6 Ω
Run winding = 3.7 Ω
16.7
VREF12-LB-RSD R290 2.5 oz
(0.070 kg)
29 psig
(2 barg)
146.5 psig (10.1
barg)
Start winding = 13.35 Ω
Run winding = 4.89 Ω
19.6
VREF25-LB-RGD
VREF25-LB-LGD
VREF25-LB-RSD
R290 3.2 oz
(0.09kg)
37.71 psig
(2.6 barg)
156.64 psig
(10.8 barg)
Start winding = 13.35 Ω
Run winding = 4.89 Ω
19.6
VREF30-LB-RGD
VREF30-LB-LGD
VREF30-LB-RSD
R290 3.5 oz
(0.100kg)
24.65 psig
(1.7barg)
165.4psig
(11.4barg)
Start winding = 7.19 Ω
Run winding = 1.57 Ω
30
VREFCR30-RGD
VREF49-LB-OGD
VREF49-LB-OSD
VREF49-LB-SGD
R290 3.5 oz
(0.100 kg)
17.40 psig
(1.2 barg)
149.39 psig
(10.3 barg)
Start winding = 7.19 Ω
Run winding = 1.57 Ω
30
VREF72-LB-RSD
VREF72-LB-RGD
R290 2 x 3.2 oz
(2 x 0.090 kg)
2 x 37.71
(2 x 2.6 barg)
2 x 156.64 psig
(2 x 10.8barg)
Start winding = 13.35 Ω
Run winding = 4.89 Ω
19.6

14 Vector Lab Products Refrigerators and Freezers
Accessing Controls Behind Facade Fig. 4
The controls located behind the facade are accessed by loosening the
screws and then the front panel can swing upward. If the facade will be
completely removed, the electrical plugs should be disconnected.
Note: Be sure to reinstall the ground wire.
Controller Replacement
CAUTION
• Controller is susceptible to electrostatic discharge. Care should be
exercised when handling and installing the controller.
Required equipment:
§Replacement Ev3294 Controller
§Programming key (see Replacement Parts section)
§#2 Phillips screwdriver
§Flat blade jeweler’s screwdriver
§(6) 6” wire ties
1. Turn off power to unit and unplug.
2. Remove façade hold down screws, rotate façade, and set safety latch.
3. Disconnect (+) terminal from back up battery.
4. Carefully cut wire ties to provide slack in control wires.
5. Press the release button on controller retainer clips (one on each side) and slide back to remove.
6. Carefully pull controller through the façade far enough to remove wires.
7. Removing ONE AT A TIME, transfer wiring from the original controller to the replacement controller
ensuring each wire is secured at the same location from which it was removed.
8. Carefully reinsert controller into façade and reattach retainer clips.
9. Secure wires with wire ties.
10. Reconnect (+) terminal to back up battery.
11. Remove safety latch, rotate façade, and reinstall hold down screws.
12. Plug in unit, power on, and ensure proper operation.

Vector Lab Products Refrigerators and Freezers 15
Controller EV3294- Programming by programming-key
Dowload the parameters from the programming-key to the controller
1. Firstly make sure that the main switch is turned off and the controller is not powered. The controller has
removable screw-connection terminals blocks so unscrew at the maximum openings the screw connectors
n. 11-12-13 where the temperature probes are wired and remove the cables.
2. Insert the programming key in the controller terminals n.10-11-12:

16 Vector Lab Products Refrigerators and Freezers
3. Once the programming-key is plugged, press and release the Copy-key button. The Signal leds will start
ashing red for few seconds then they’ll turn rmly into green if the programming has been correctly
accomplished.
4. If the programming fails, the signal leds will turn rmly red instead of green. In this case, repeat the
procedure making sure that the programming key is correctly inserted into the controller terminal blocks.
Copy the parameters from the controller to the programming key
1. After the above steps. 1&2: Press and hold the Copy-key button until the signal leds light rmly red, then
press the Enter key: he Signal leds will start ashing red for few seconds then they’ll turn rmly into green
if the programming has been correctly accomplished.
2. If the programming fails, the signal leds will turn rmly red instead of green. In this case, repeat the
procedure making sure that the programming key is correctly inserted into the controller terminal blocks.

Vector Lab Products Refrigerators and Freezers 17
Door Gasket Replacement Fig. 5
1. Remove existing gasket from mounting track (Fig. 5).
2. Verify mounting track is free of any remaining gasket material.
3. Align new gasket with mounting track and press rmly in place.
4. Open and close door, checking for proper gasket seal without
pinching against refrigerator.
Modular Refrigeration System
Vector Lab Products’ Modular Refrigeration System allows technicians to
remove the entire unit from the refrigerator top.
1. Remove rear support column using 5/16" nut driver.
2. Remove incoming power supply assembly.
3. Remove bolts securing unit cooler to refrigerator top.
4. Gently lift off cooler.

18 Vector Lab Products Refrigerators and Freezers
Chromatography Unit VREFCR30-RGD
Chromatography units provide a 115vac GFCI power outlet to the interior of the cabinet. This allows for the
operation of scientic equipment in climate controlled (refrigerated) conditions.
Since the cabinet is a closed environment, we use a R290 gas monitor to ensure that the interior atmosphere Is
below the Lower Explosive Limit (LEL) PRIOR to energizing the power outlet.
1. To install the gas detector, simply connect each of the three CANNON Plugs to it’s corresponding mate.

Vector Lab Products Refrigerators and Freezers 19
2. Connect the air sample tube to the factory installed connection.

20 Vector Lab Products Refrigerators and Freezers
3. To energize the unit, press the main power switch (shown below) and verify the 4-amp breaker is not
tripped.
4. A green and orange indicator will illuminate.
5. Push the reset button, the orange indicator light will turn off. The Green light will remain on signifying
power at the outlet.
This manual suits for next models
16
Table of contents
Other Vector Refrigerator manuals
Popular Refrigerator manuals by other brands

Danby
Danby Designer DCR122BSLDD Owner's use and care guide

GE
GE GTM18GBEES Energy guide

Elmira Stove Works
Elmira Stove Works Northstar 1950 Energy guide

Electrolux
Electrolux ER 7347b Installation and instruction manual

Indel B
Indel B CRUISE 65 DRAWER DTNA Instructions for use

KitchenAid
KitchenAid Architect Series II KURG24LWBS Energy guide