Vega RV32M1-VEGA User manual

RV32M1-VEGA Quick Start Guide
1. Introduction
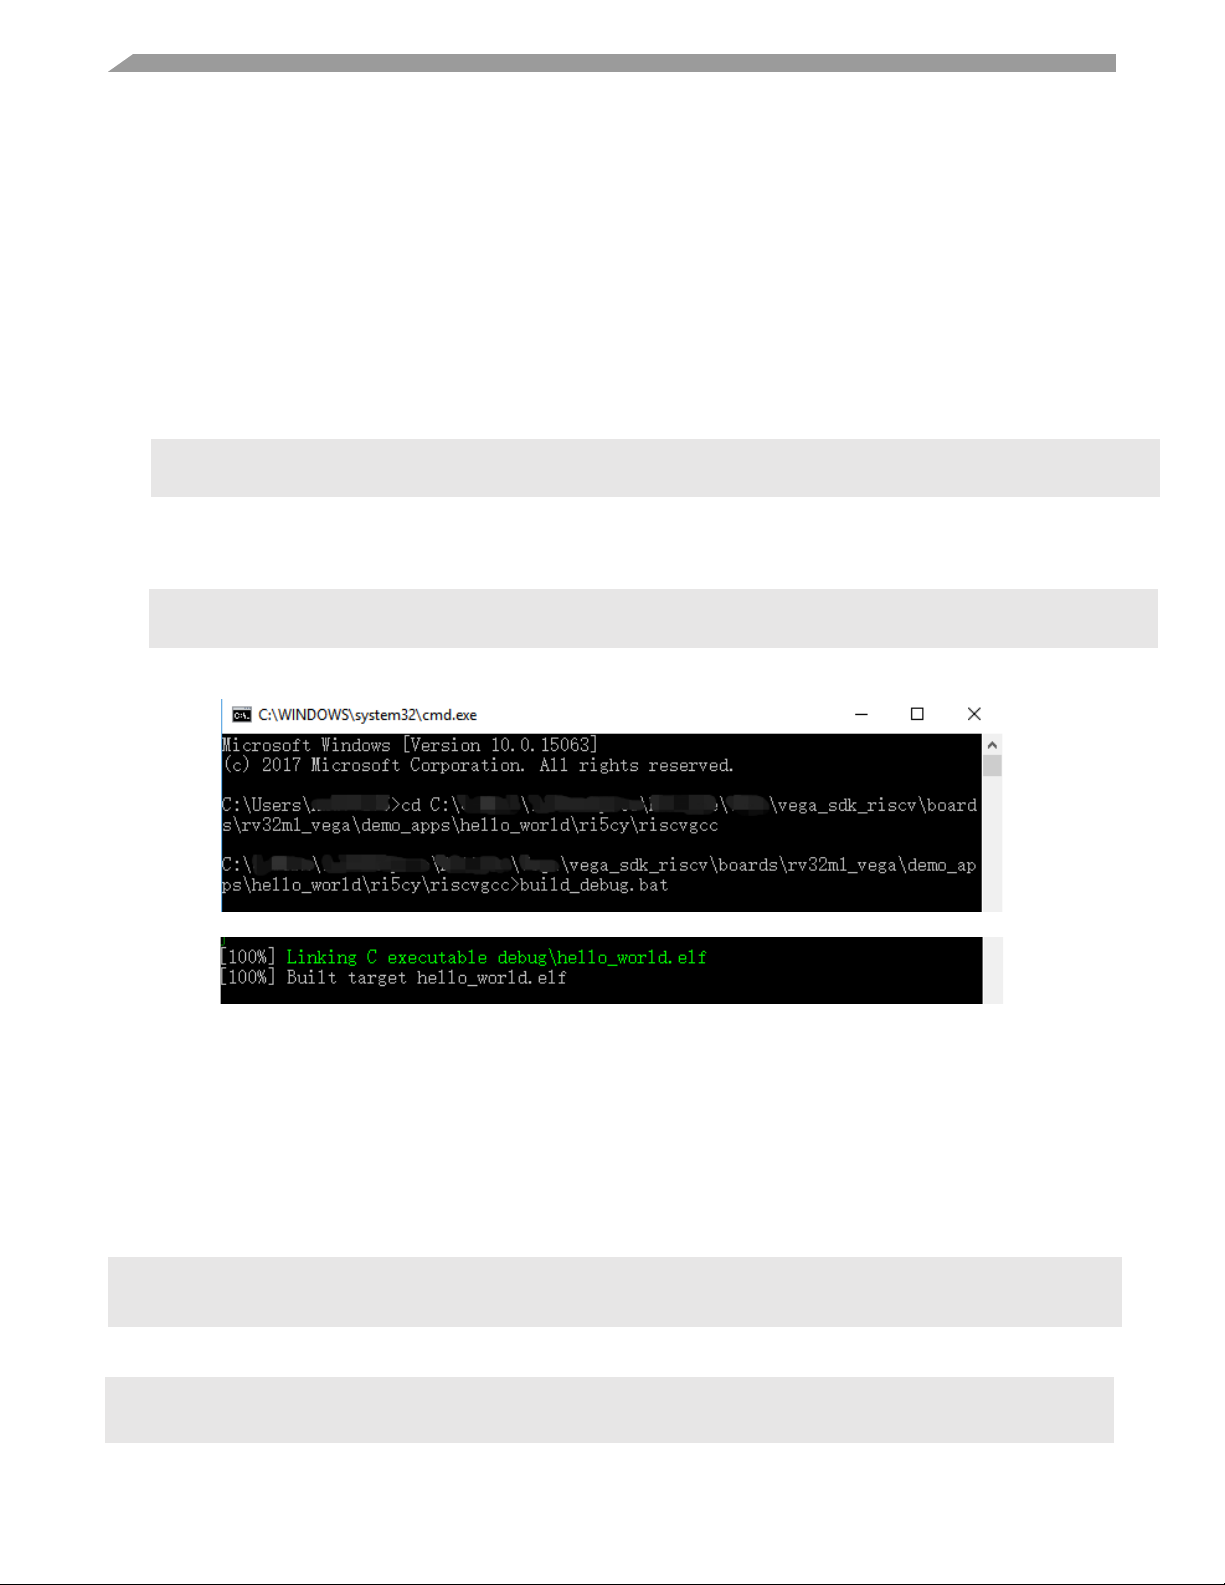
This guide describes the detailed steps to build and
run an example in the SDK of RV32M1-VEGA on
Windows operation system.
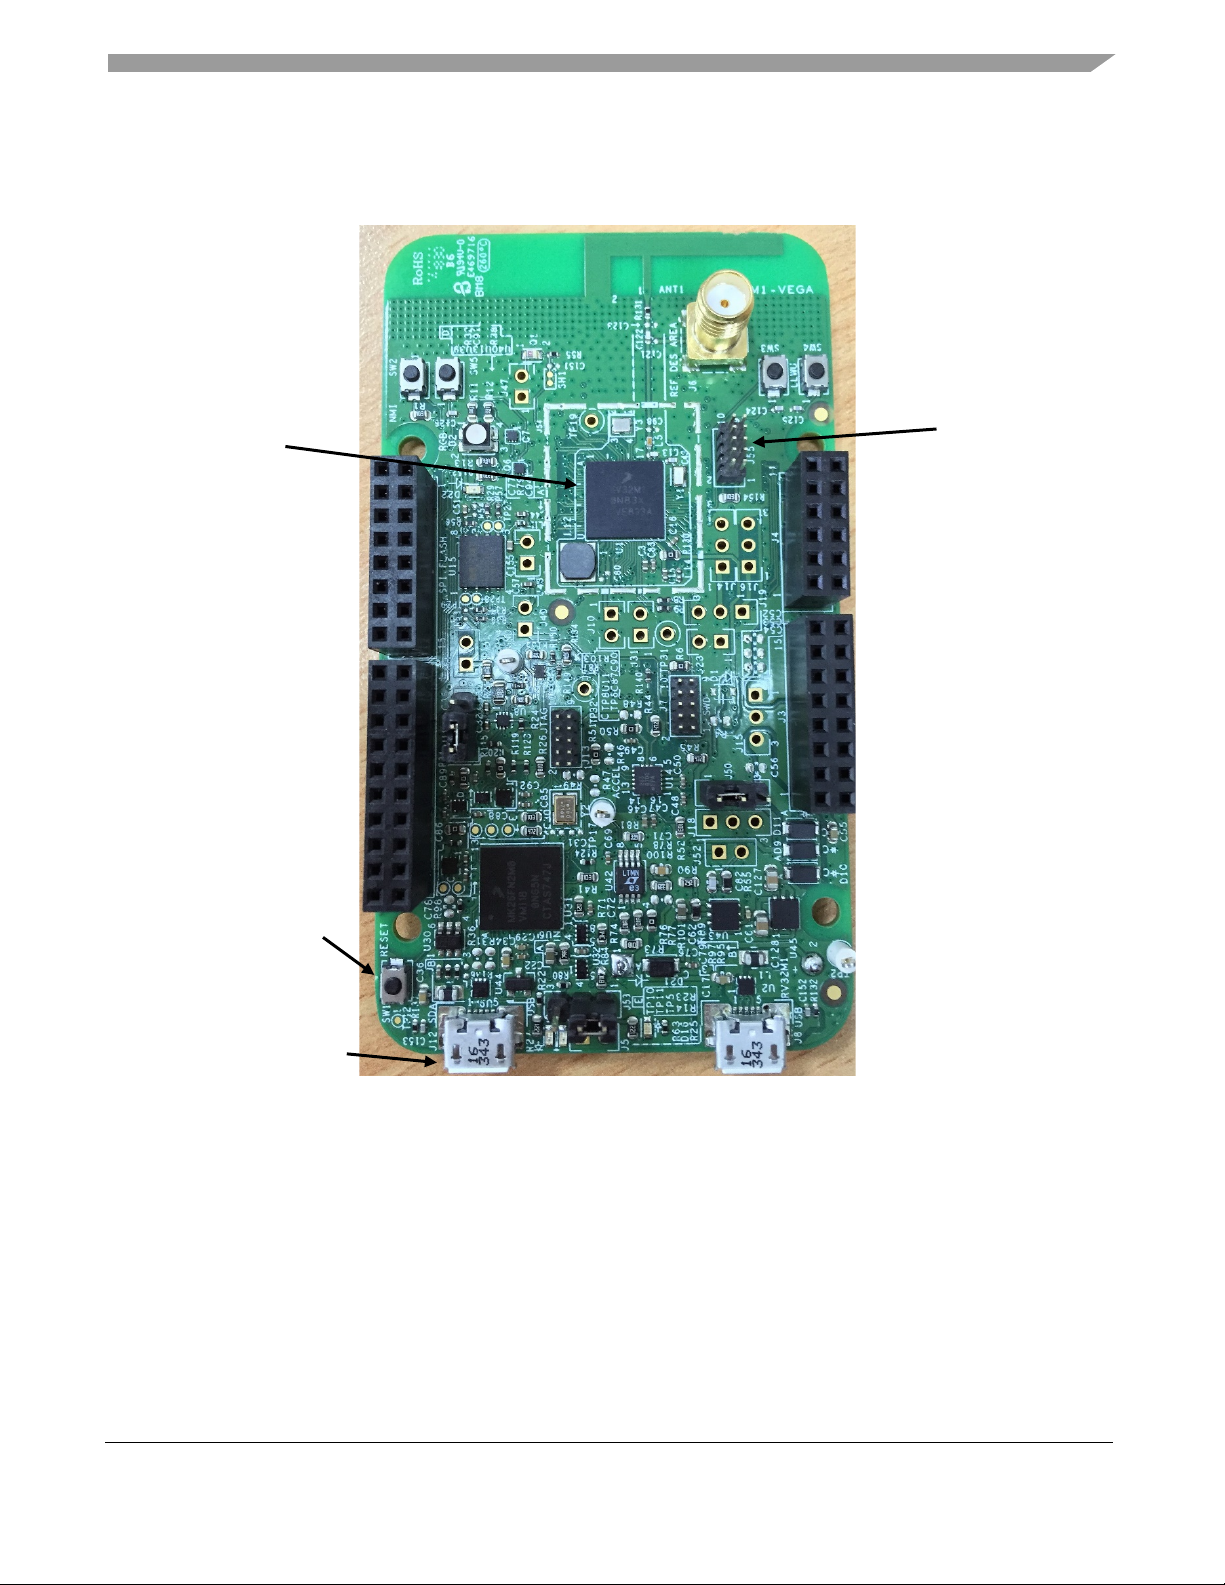
The RV32M1-VEGA development board is a small,
low-power, and cost-effective evaluation and
development board for application prototyping and
demonstration of the RV32M1 device.
The RV32M1 device integrates quad cores: a RISC-V
RI5CY core, a RISC-V ZERO-RISCY core, an ARM
CortexM4 core and an ARM Cortex-M0+ core. For
detailed information on the RV32M1 device, see
RV32M1RM document. www.open-isa.org now only
support RI5CY core and RISC-V ZERO_RISCY core
with software.
For run an example on RV32M1-VEGA board, the
following hardware tools are required:
PC
J-Link Debugger
Micro-USB cable
RV32M1-VEGA board
WWW.OPEN-ISA.ORG
RM32M1-
VEGA
User’s Guide
Contents
1. Introduction ........................................................................1
2. Preparation .........................................................................2
2.1 Development Environment Setup............................ 2
2.2 Download SDK for RV32M1-VEGA ..................... 2
2.3 RV32M1-VEGA Development Board Introduction 2
3. Boot Configuration.............................................................3
4. Run an example by Eclipse ................................................5
4.1 Build an example application .................................. 5
4.2 Run an example application ....................................6
5. Run an Application by Command Line ..............................8
5.1 Build an example application .................................. 8
5.2 Run an Application by OpenOCD + telnet.............. 8
5.3 Run an Application by OpenOCD + GDB ............10
6. References .........................Error! Bookmark not defined.
7. Revision history................................................................11

Preparation
RV32M1-VEGA Quick Start Guide, User’s Guide, Rev. 0
2 www.open-isa.org
2. Preparation
The section describes the steps of preparation before to run an example application on RV32M1-VEGA.
2.1 Development Environment Setup
Follow the guide Setting Up RISC-V Development Environment for RV32M1-VEGA from www.open-
isa.org website to install bellow software and tools on Windows.
Windows Telnet Client
Eclipse IDE
GNU MCU Eclipse Windows Build Tools (Optional)
RV32M1 GNU GCC Toolchain
OpenOCD
If prefer to use command line to run an application, need to install below additional software tools:
CMake
MinGW
2.2 Download SDK for RV32M1-VEGA
Download the latest SDK from the www.open-isa.org website. And Unzip the downloaded package at a
place of your choice.
2.3 RV32M1-VEGA Development Board Introduction
The RV32M1-VEGA development board is the most diverse reference design containing the RV32M1
device and all necessary I/O connections for use as a stand-alone board or connected to an application.
The user guide of RV32M1-VEGA development board can be downloaded from the www.open-isa.org
website.
Figure 1 shows the main headers and components of RV32M1-VEGA board. The main headers used in
this guide are RISC-V JTAG(J55), Reset Button (SW1) and OpenSDA USB (J12).

Boot Configuration
RV32M1-VEGA Quick Start Guide, User’s Guide, Rev. 0
www.open-isa.org 3
Figure 1. RV32M1-VEGA component placement
3. Boot Configuration
RV32M1-VEGA will boot from RI5CY core by default. The boot mode configuration can be changed
by configurating the FOPT setting, see RV32M1 reference manual for details about FOPT settings.
If the boot mode configuration of RV32M1-VEGA had been changed, follow below steps to change the
boot mode configuration to make it boot from RI5CY core.
Note: The entire flash is erased after the boot configuration was changed.
1. Connect J-Link debugger to target board through RISC-V JTAG header(J55).
RISC-V JTAG (J55)
RISC-V MCU
Reset Button (SW1)
OpenSDA USB (J12)

Boot Configuration
RV32M1-VEGA Quick Start Guide, User’s Guide, Rev. 0
4 www.open-isa.org
2. Plug Micro-USB cable into J12.
3. Open cmd.exe, type below command to connect the target board by OpenOCD.
Note: <install_dir> is related to the installation directory of RV32M1-VEGA SDK.
4. Open a new cmd.exe and type below command to open a telnet window.
5. Press and hold the reset button(SW1), meanwhile type below command in the telnet window.
6. When finished, release the reset button. Then press and release it again to make the new
configuration takes effect.
7. In the step 6, other commands such as zero_boot , cm4_boot , and cm0_boot could be used for
different configurations.
Openocd -f <install_dir>/boards/rv32m1_vega/vega_ri5cy.cfg
telnet localhost 4444
ri5cy_boot

Run an example by Eclipse
RV32M1-VEGA Quick Start Guide, User’s Guide, Rev. 0
www.open-isa.org 5
4. Run an example by Eclipse
This section describes the steps required to build and run an example provided in the RV32M1 SDK by
Eclipse IDE. The hello_world demo is used as an example, although these steps can be applied to any
example. In the same way, all these steps can used to run an example of RISC-V ZERO-RISCY core.
4.1 Build an example application
The Eclipse project of RI5CY core is in the below folder:
<install_dir> \boards\rv32m1_vega\demo_apps\hello_world\ri5cy\riscveclipse
In this section, the hello_world will be used as example.
1Import the project to Eclipse workspace. Click "File -> Import". In the import window, select
"General ->Existing Project into Workspace". Then click "Next".
2Browse the hello_world folder, and select the project to import, then click "Finish".

Run an example by Eclipse
RV32M1-VEGA Quick Start Guide, User’s Guide, Rev. 0
6 www.open-isa.org
3Click "Project -> Build project" to build the project.
4.2 Run an example application
1. When build finished, Connect J-Link debugger to target board through RISC-V JTAG header(J55).
2. Plug Micro-USB cable into J12
3. Click "Run -> Debug Configurations", select the target. And then click "Debug".
4. Open a serial port tool and set baud rate to 115200. Find the number of the virtual serial port
provided by OpenSDA from Windows Device Manager.

Run an example by Eclipse
RV32M1-VEGA Quick Start Guide, User’s Guide, Rev. 0
www.open-isa.org 7
5. When download finished, click "Run->Resume" to run. Or different debug command to debug the
application. Then "hello world" were printed on the serial port tool.

Run an Application by Command Line
RV32M1-VEGA Quick Start Guide, User’s Guide, Rev. 0
8 www.open-isa.org
5. Run an Application by Command Line
This section describes the steps required to build and run an example provided in the RV32M1 SDK by
command line. The hello_world demo is used as an example, although these steps can be applied to any
example. In the same way, all these steps can used to run an example of RISC-V ZERO-RISCY core.
5.1 Build an example application
1. Open cmd.exe, then change the directory to the example application project directory, which has a
path like following:
2. type "build_debug.bat" in cmd.exe, or double click on the "*.bat" file in Windows Explorer. Then
the executable file "hello_world.elf" is created in "debug" folder.
5.2 Run an Application by OpenOCD + telnet
1When build finished, Connect J-Link debugger to target board through RISC-V JTAG header(J55).
2Plug Micro-USB cable into J12
3Open cmd.exe, then type below command to change the directory to the executable file directory.
4
5Type below command to connect to target board through OpenOCD
cd <install_dir>\boards\rv32m1_vega\demo_apps\hello_world\ri5cy\riscvgcc
build_debug.bat
cd <install_dir>\boards\rv32m1_vega\demo_apps\hello_world\ri5cy\riscvgcc\debug
Openocd -f <install_dir>\boards\rv32m1_vega\vega_ri5cy.cfg

Run an Application by Command Line
RV32M1-VEGA Quick Start Guide, User’s Guide, Rev. 0
www.open-isa.org 9
For RISC-V ZERO-RISCY core, need to use "vega_zero_riscy.cfg".
6Open a new cmd.exe and type below command to open a telnet window.
7In telnet window, type below command to program the executable file and to download the image to
flash.
8Open a serial port tool and set baud rate to 115200. Find the number of the virtual serial port
provided by OpenSDA from Windows Device Manager.
9Type "reset" in telnet window, the MCU will reset and run. Then "hello world" were printed on the
serial port tool.
There are some other commands used for debug:
•"reset halt": Reset the MCU and halt at the first instruction.
•"halt": Halt the core.
•"resume": Resume to run.
•"step": Step run.
•"reg [reg_name]": Read register values, the valid reg_name include: ra, sp, gp, tp, t0-t6, s0-s11, s0-
s7, npc (the next pc value), ppc (the previous pc value), ustatus, utvec, uhartid, uepc, ucause,
mstatus, mtvec, mepc, mcause, mhartid, privlv. Only use these when the core is halt.
•"reg reg_name value": Set register values. Only use this when the core is halt.
•"mw<w|h|b> addr value": Write word|half_word|byte value to the address.
•"md<w|h|b> addr [count]": Read word|half_word|byte value from the address.
telnet localhost 4444
program hello_world.elf
reset

Run an Application by Command Line
RV32M1-VEGA Quick Start Guide, User’s Guide, Rev. 0
10 www.open-isa.org
5.3 Run an Application by OpenOCD + GDB
1When build finished, Connect J-Link debugger to target board through RISC-V JTAG header(J55).
2Plug Micro-USB cable into J12
3Open cmd.exe, type below command to connect to the target board through OpenOCD.
4Open a new cmd.exe and type below command to change the directory to the executable file
directory.
5Type below command to start GDB.
6Type the below command to connect to OpenOCD.
Openocd -f <install_dir>\boards\rv32m1_vega\vega_ri5cy.cfg
cd <install_dir>\boards\rv32m1_vega\demo_apps\hello_world\ri5cy\riscvgcc\debug
riscv32-unknown-elf-gdb hello_world.elf
target remote localhost:3333

Revision history
RV32M1-VEGA Quick Start Guide, User’s Guide, Rev. 0
www.open-isa.org 11
7Type the below command to load the binary to flash.
8Open a serial port tool and set baud rate to 115200. Find the number of the virtual serial port
provided by OpenSDA from Windows Device Manager.
9Type the below command to reset. Then "hello world" were printed on the serial port tool.
There are some other commands used for debug:
•"monitor resume": Resume the core.
•"monitor halt": Halt the core.
6. References
Following references are available on www.open-isa.org:
•RV32M1-VEGA-SCH: Schematics
•RV32M1-VEGA-LAYOUT: Layout
•RV32M1_VEGA_Board_User_Guide
•RV32M1RM: Reference Manual
•RV32M1DS: Datasheet
•RV32M1_Vega_Develop_Environment_Setup
7. Revision history
Rev.
Date
Substantive change(s)
0
11/2018
Initial release
load

.
Other manuals for RV32M1-VEGA
2
Table of contents
Other Vega Motherboard manuals