manuals.online logo
Brands
  1. Home
  2. •
  3. Brands
  4. •
  5. Velux
  6. •
  7. Cables And Connectors
  8. •
  9. Velux ZZZ 241CM User manual

Velux ZZZ 241CM User manual

Popular Cables And Connectors manuals by other brands

StarTech.com ST124HD20 quick start guide

StarTech.com

StarTech.com ST124HD20 quick start guide

Philips SWV4543S/10 Features

Philips

Philips SWV4543S/10 Features

Larson Electronics 10-50C instruction manual

Larson Electronics

Larson Electronics 10-50C instruction manual

Grip MEK-PM Assembly and operating manual

Grip

Grip MEK-PM Assembly and operating manual

Ultra Products Travel Pack #3 ULT31436 Specifications

Ultra Products

Ultra Products Travel Pack #3 ULT31436 Specifications

Surpass QCH-F Operation manual

Surpass

Surpass QCH-F Operation manual

Philips SWA6310 Specifications

Philips

Philips SWA6310 Specifications

StarTech.com CRJ4550PK quick start guide

StarTech.com

StarTech.com CRJ4550PK quick start guide

Nohau EMUL-IP2K-PC user guide

Nohau

Nohau EMUL-IP2K-PC user guide

Foxun SX-SP144E-HD4K2K operating instructions

Foxun

Foxun SX-SP144E-HD4K2K operating instructions

Philips SWA3305W Specifications

Philips

Philips SWA3305W Specifications

opticis Stretch DVIM1-1P0x user manual

opticis

opticis Stretch DVIM1-1P0x user manual

Volkswagen VAS 6558A operating manual

Volkswagen

Volkswagen VAS 6558A operating manual

NEXIBO N-13 user manual

NEXIBO

NEXIBO N-13 user manual

CYP PU-1H3HBTL Operation manual

CYP

CYP PU-1H3HBTL Operation manual

Allen-Bradley 1784-u2dhp installation instructions

Allen-Bradley

Allen-Bradley 1784-u2dhp installation instructions

Global Caché Flex Link Blaster quick start

Global Caché

Global Caché Flex Link Blaster quick start

Hauppauge USB-Live2 Quick installation guide

Hauppauge

Hauppauge USB-Live2 Quick installation guide

manuals.online logo
manuals.online logoBrands
  • About & Mission
  • Contact us
  • Privacy Policy
  • Terms and Conditions

Copyright 2025 Manuals.Online. All Rights Reserved.

VAS 454224-2021-02
ZZZ 241CM
ENGLISH: Wire Extension Kit for Curb Mounted Skylight VCS
ESPAÑOL: Juego de cables de extensión para tragaluz VCS montado en brocal
FRANÇAIS : Kit d'extension de fil pour puits de lumière VCS monté sur cadre
2 VELUX®
1
2
1
1
23
1
2
ENGLISH: Remove solar panel:
1 Remove screws (retain for re-installation).
2Lift off.
3 Unplug.
ESPAÑOL: Retire el panel solar:
1 Quite los tornillos (guárdelos para la reinsta-
lación).
2Levante el panel.
3 Desconéctelo.
FRANÇAIS : Retirez le panneau á énergie solaire :
1 Retirez les vis (les retenez pour la réinstalla-
tion).
2Enlevez.
3 Débranchez.
ENGLISH: Temporarily remove skylight:
1 Remove screws.
2Lift off skylight and rotate upside down on a
scratch free surface.
ESPAÑOL: Retire el tragaluz temporalmente:
1 Quite los tornillos.
2Levante el tragaluz y colóquelo boca abajo
sobre una superficie que no raye.
FRANÇAIS : Retirez temporairement le puits de
lumière :
1 Retirez les vis.
2Soulevez le puits de lumière et faites tourner à
l'envers sur une surface non abrasif.
VELUX®3
4
3
2
1
1
2
2
ENGLISH: Install wire:
1 Connect wires.
2 Route wire into “J” channel along bottom and
side of skylight as shown.
ESPAÑOL: Instale el cable:
1 Conecte los cables.
2 Coloque el cable por dentro del canal en "J" a lo
largo de la parte inferior y lateral del tragaluz,
como se indica.
FRANÇAIS : Installez le fil :
1 Connectez les fils.
2 Faites passer le fil dans la rainure le long du
fond et du côté du puits de lumière, comme
illustré.
ENGLISH: Replace skylight:
1 Secure screws.
2Apply downward pressure to the top of the
skylight frame while securing the screws.
ESPAÑOL: Vuelva a colocar el tragaluz:
1 Ajuste los tornillos.
2Aplique presión sobre el marco del tragaluz
mientras ajusta los tornillos.
FRANÇAIS : Remplacez le puits de lumière :
1 Fixez les vis.
2Appliquez une pression descendante sur la
partie supérieure du puits de lumière lors de
l’installation des vis.
5
6
2
1
1
1
2
3
XX
� 9/64”
(⌀3,5 mm)
1/4”
(6 mm)
AU: VELUX Australia Pty. Ltd.
1300 859 856
www.velux.com.au
CA: VELUX Canada Inc.
1 800 88-VELUX (888-3589)
www.velux.ca
JP: VELUX-Japan Ltd.
0570-00-8141
www.velux.co.jp
KR: VELUX International (VELUX A/S)
+45 7632 9240
www.velux.co.kr
NZ: VELUX New Zealand Ltd.
0800 650 445
www.velux.co.nz
US: VELUX America LLC
1-800-88-VELUX
www.veluxusa.com
www.velux.com
INSTALLATION INSTRUCTIONS FOR ZZZ 241CM. ©2017, 2021 VELUX GROUP ®VELUX, VELUX INTEGRA AND THE VELUX LOGO ARE REGISTERED TRADEMARKS USED UNDER LICENSE BY THE VELUX GROUP
INSTRUCTIONS D'INSTALLATION POUR ZZZ 241CM. ©2017, 2021 VELUX GROUP ®VELUX, VELUX INTEGRA ET LE LOGO VELUX SONT DES MARQUES DE COMMERCE DÉPOSÉES ET EMPLOYÉES SOUS LICENCE DE VELUX GROUP
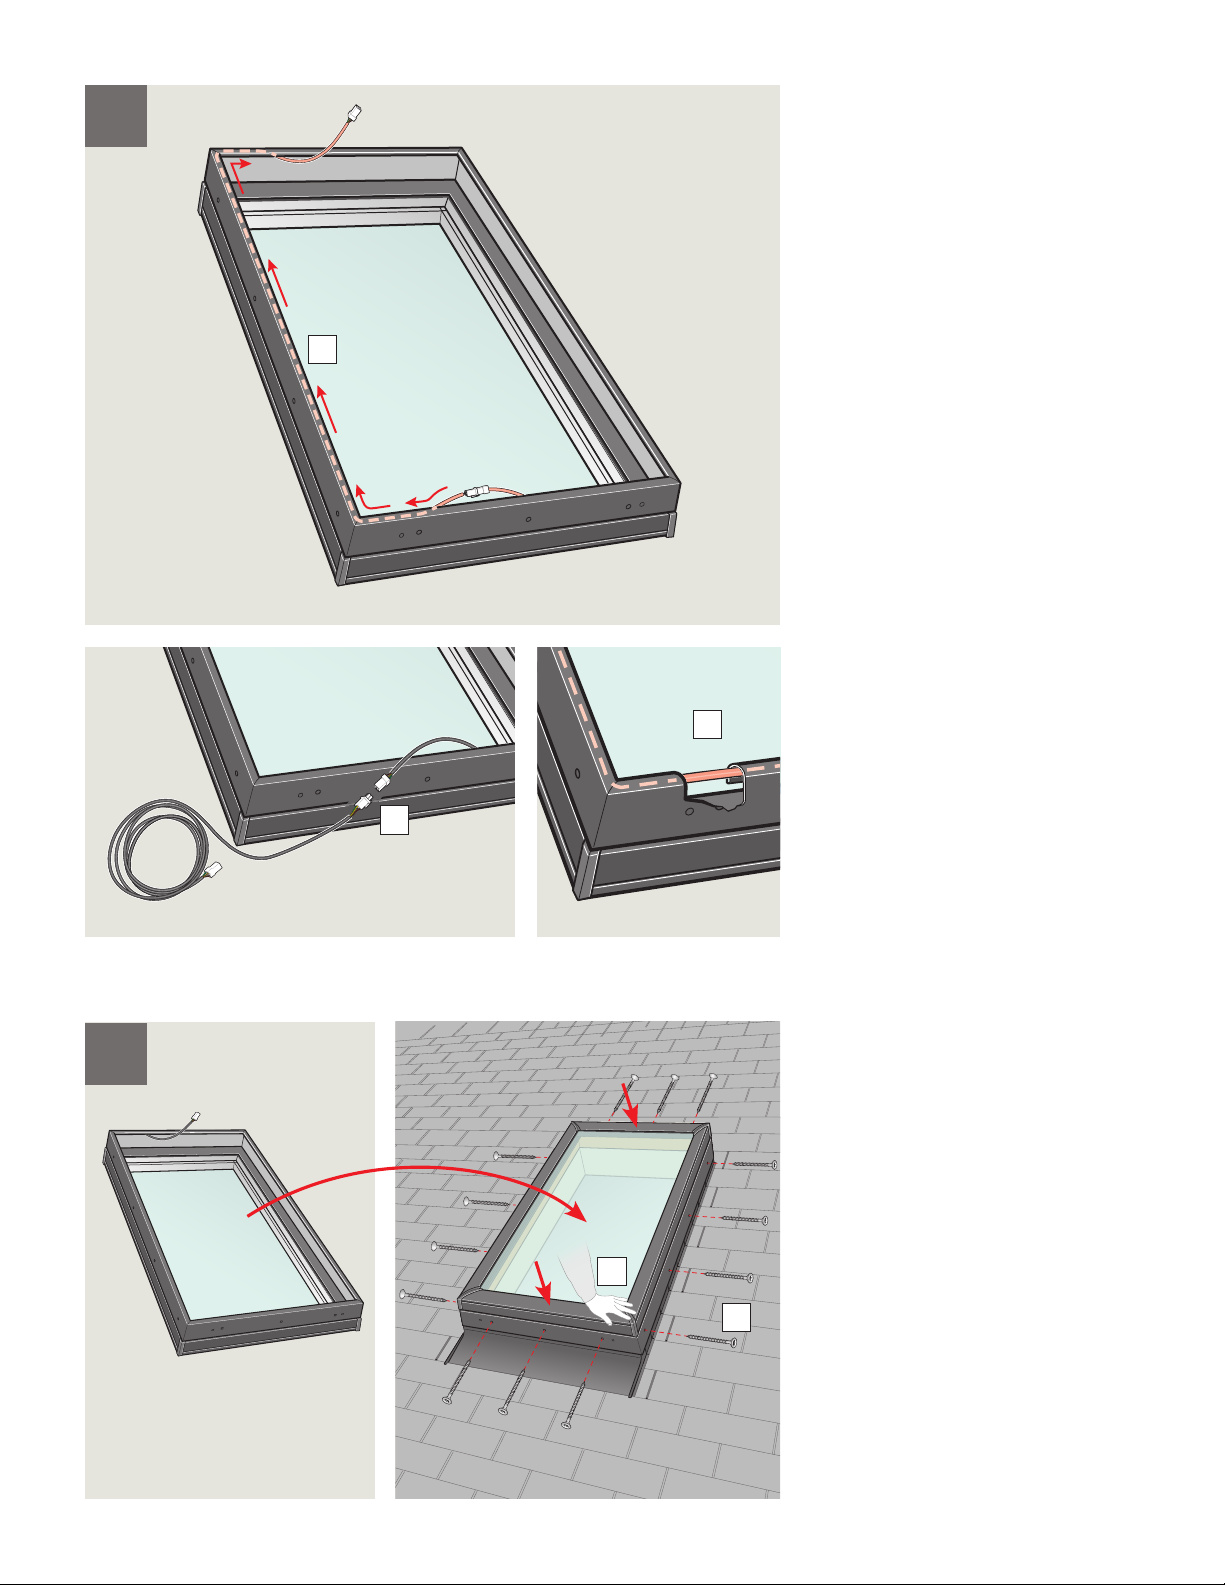
ENGLISH: Plug, install and secure solar panel:
1 Connect plug connectors.
2Install solar panel over screws and tighten
screws.
ESPAÑOL: Conecte, instale y sujete el panel solar:
1 Enchufe los conectores.
2Instale el panel solar sobre los tornillos y ajuste
los tornillos.
FRANÇAIS : Branchez, installez et fixez le pan-
neau à énergie solaire :
1 Branchez les connecteurs.
2Installez le panneau à énergie solaire par-
dessus les vis et serrez les vis.
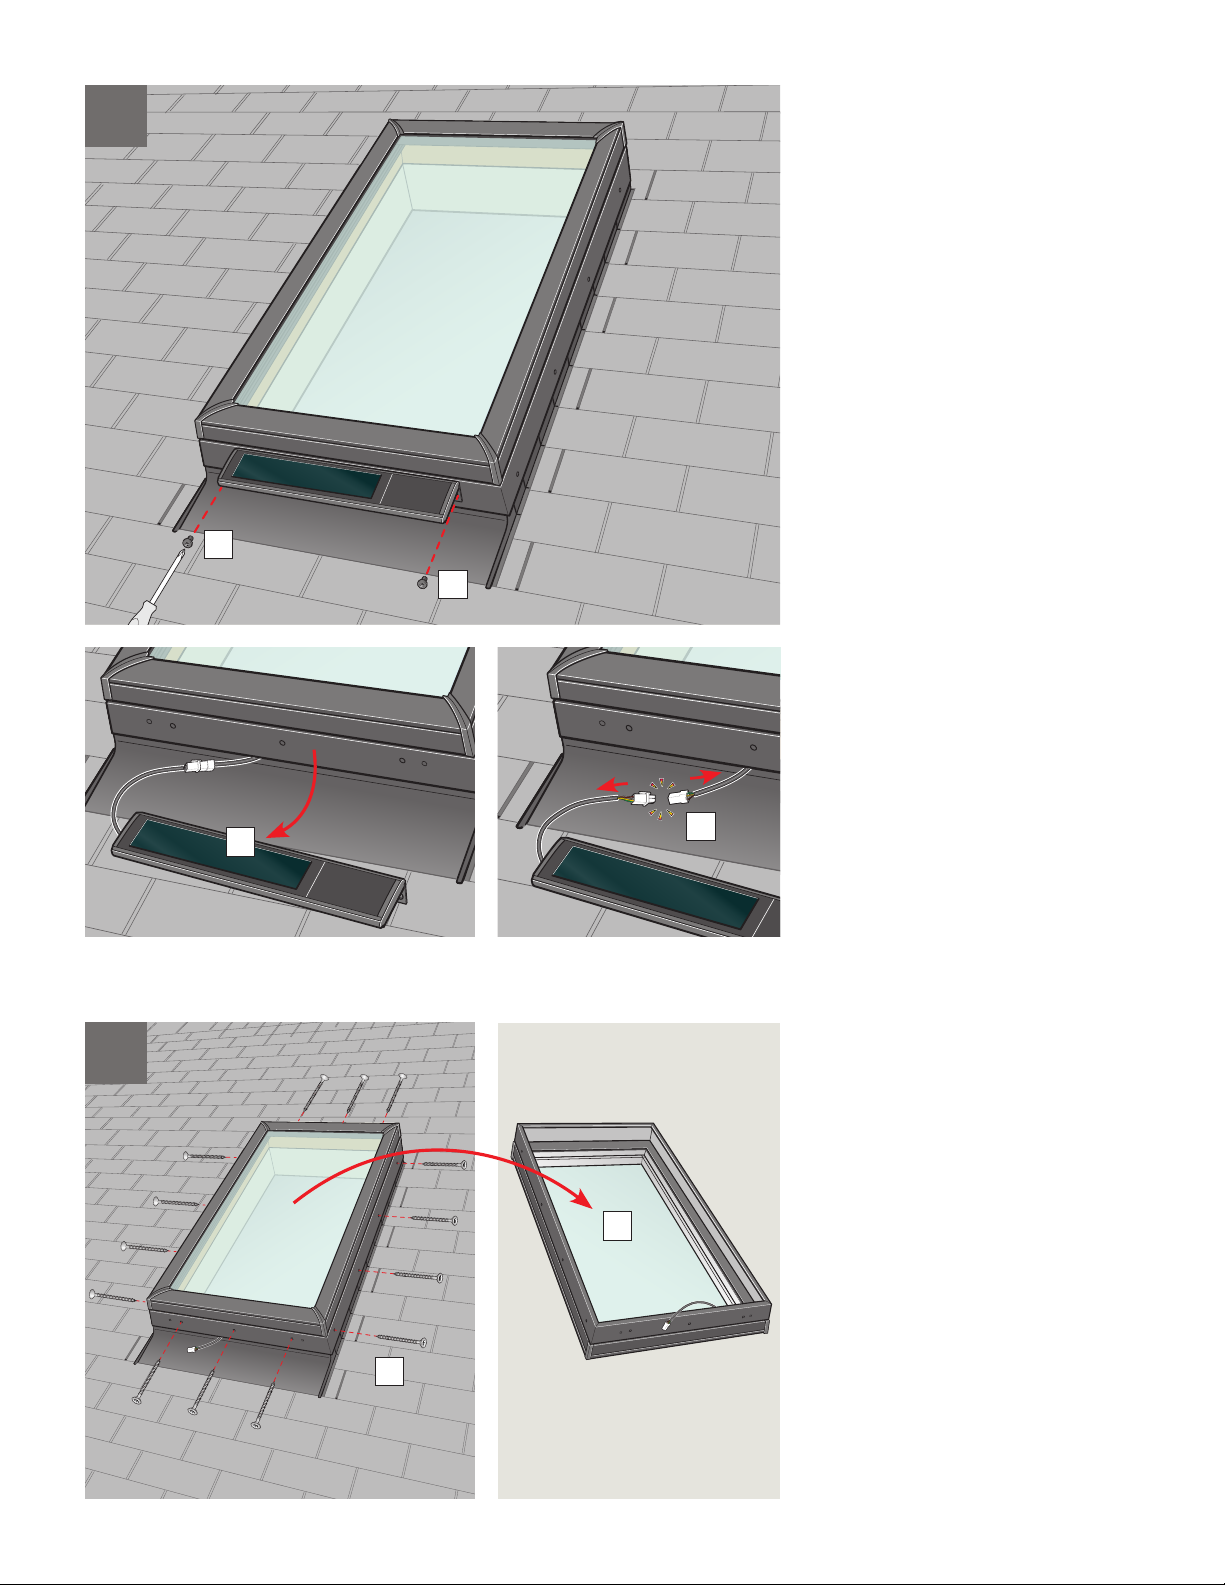
ENGLISH: Mount original screws at top of
skylight:
1Place solar panel as shown and mark holes.
2Drill holes Ø 9/64" (3.5 mm) and only ¼"
(6 mm) deep. Do not penetrate the flashing!
3Insert original screws leaving room for installa-
tion of solar panel.
ESPAÑOL: Coloque los tornillos originales en el
tragaluz:
1Coloque el panel solar como se indica y marque
los orificios.
2Perfore orificios de Ø 9/64" (3.5 mm) y solo ¼"
(6 mm) de profundidad. ¡No perfore el tapajun-
tas!
3Inserte los tornillos originales y deje espacio
para instalar el panel solar.
FRANÇAIS : Montez les vis originales à la partie
supérieure du puits de lumière :
1Placez le panneau à énergie solaire comme
illustré et marquez les trous.
2Percez les trous Ø 9/64 po. (3,5 mm) et seule-
ment ¼ po. (6 mm) de profondeur. Ne pas
pénétrez le solin !
3Insérez les vis originales en laissant la place
pour l'installation du panneau à énergie solaire.