Ventamatic WDV12 User manual

For models / Para modelos:
12 & 16 gallon Wet/Dry Vacs
User Manual
Aspiradoras Seco-Mojado
de 12 y 16 galones
Manual de uso
Read all instructionsbefore using this wet/dry vacuum.
Antes deoperar este aparato, lea cuidadosamente las instrucciones deuso.
You have just purchased a wet/dry vacuum. Please read this manual carefully before operating the
machine. Model and serial number may be found on the back of your unit. You should record
both model and serial numbers and keep them in a safe place for future use. Keep this manual.
Acaba de adquirir una aspiradora. Favor de leer detenidamente este manual antes de operar esta
máquina. Los números de modelo y serie se pueden encontrar en la parte posterior de la aspiradora.
Ud. debe anotar ambos números y guardarlos en un lugar seguro para futura referencia.
Conserve este manual.
Congratulations!
Felicidades!
WDV12 120 V~
10 A 60 Hz
WDV16 120 V~ 11 A 60 Hz
LR 85271
WDV12-WDV16 12012017
CONTACT US
Please contact us with questions or
concerns using the following methods:
Phone: 1-800-433-1626
Online : www.bvc.com
for LiveChat and Knowledgebase articles
Our office hours
for live help are
MONDAY - FRIDAY
8:00 AM to 5:00 PM
(Central Time)

When using an electric wet/dry vac, basic precautions should be followed:
This vacuum cleaner is for domestic use only; it may be used for vacuuming wet
or dry materials and as a blower.
Please refer tovacuum dry material or vacuum liquids operation in this manual.
WARNING
Do not use to pick up flammable or combustible liquids, such as gasoline or use in areas
where such items may be present.
Use products only as described in this manual, use only manufacturer’s recommended
attachments.
Do not pick up anything that is burning or smoking; such as cigarettes, matches or hot ashes.
Do not leave vacuum plugged in. Unplug from outlet when not in use and before servicing.
Turn unit off before unplugging.
Do not put any object into openings. Do not use with any opening blocked. Keep free of dust,
lint, hair and anything that may reduce airflow.
Do not use without filters in place.
Do not allow vacuum to be used as a toy, or to run unattended at any time. If used by
children or near them, close supervision is necessary.
Do not store outdoors.
Do not use with a damaged cord or plug. If vacuum is not working as it should, or if it has
been dropped, damaged, or submerged into water, return it to an authorized service
center.
Do not pull or carry by cord, use cord as a handle, close a door on cord or pull cord around
sharp edges or corners, do not run vacuum over cord. Keep away from heated surfaces.
Do not unplug by pulling on cord. To unplug, grasp the plug, not the cord.
Do not unplug or vacuum with wet hands. Use extra care when cleaning stairs.
Keep hair, loose clothing, fingers and all parts of body away from openings and moving
parts.
Never use vacuum cleaner as a pump.
If the line cord is damaged, it must be replaced by the manufacturer or an authorized service
center.
Connect to a properly grounded outlet only. See grounding instructions.
Do not use without filter in place. See filter instructions
Do not pick up soot, cement, plaster or drywall dust. These are very fine particles that may
pass through the filter and affect te performance of the motor or be exhausted back into
the air.
Use special care when emptying heavily loaded tanks.
WARNING! Do not use this vacuum cleaner to vacuum lead paint debris because this may
disperse fine lead particles into the air.
1.
2.
3.
4.
5.
6.
7.
8.
9.
10.
11.
12.
13.
14.
15.
16.
17.
18.
19.
20.
21.
2
IMPORTANT SAFETY INSTRUCTIONS
CONTENTS
Save these instructions for future references.
Read all instructions before
using this wet/dry vacuum.
Important safety instructions.............................2
Grounded outlet ...............................................3
Product description ...........................................4
Vacuum assembly.............................................4
Caster / Caster foot assembly...........................4
Debris removal .................................................5
To vacuum dry material.....................................5
Blowing features................................................5
To vacuum liquids..............................................6
Filter maintenance.............................................6
Storage.......................................................7
General maintenance........................................7
Troubleshooting..............................................7
Warranty............................................................8
15

Use grounded instructions for models WDV12 and WDV16
Antes de guardar la aspiradora, el depósito de polvo se debe vaciar y limpiar.
Los accesorios pueden ser almacenados en la charola porta accesorios. La vida útil
de los accesorios o cepillos depende de su uso, por lo que el desgaste natural no
se considera defecto de fábrica.
La aspiradora debe guardarse en lugares cerrados. Para mantener la aspiradora
con el mejor aspecto posible, limpie el exterior con un paño húmedo y jabón
suave.
ENGLISH
14 3
correcta.
en el puerto de
ALMACENAMIENTO
PROBLEMAS Y SOLUCIONES
GROUNDED OUTLET
WARNING
No tiene tapón de
desague Coloque el tapón de desague en el tanque.

Extension wands
Large Capacity
Hose with positive lock
Drain Valve
Rugged Casters
Floor tool with squeegee
Pick up tool
Crevice tool
Accessory
storage slots
Heavy Duty
line cord
Blowing port
(not visible)
Vacuum Port
Muffler
Pleated Filter
To assamble the casters on the unit:
1. Turn dust drum upside down on the floor.
2. Insert plastic caster foot into the bottom of drum.
3. Push until it is flush, with bottom of the dust drum.
4. Turn drum upright.
Caster
Plastic
Caster
Foot
Hole
13
LIMPIEZA DEL FILTRO
LIMPIEZA
Not all accessories are included with all models.
Check panel on box for more information.
2. To connect the hose push on the vacuum port while inserting.
3. To release the hose, pull out.
4. Plug power cord.
5. To turn unit on, use switch on motor head.
6. Familiarize yourself with the control and
features of your vacuum cleaner.
and lower the head. Snap the latches into place Figure 1.
Figure 1
CASTER/CASTER FOOT ASSEMBLY
4
PRODUCT DESCRIPTION
VACUUM ASSEMBLY
Model
Tank capacity
Peak H.P.
Accessories
WDV12
12 gallon
5.5
6
WDV16
16 gallon
6.5
6
abra
LIMPIEZA DEL TANQUE
PRECAUCIÓN: Siempre desconecte la aspiradora de la toma de corriente,
antes de realizar cualquier mantenimiento.
PRECAUCIÓN: Siempre desconecte la aspiradora de la toma de corriente,
antes de realizar cualquier mantenimiento.

Unlock the side latches.
Unplug power cord.
5.
1. Slide over cage until the filter
stops against the lid. 2. Assemble, motor head and the
vacuum cleaner is ready to use.
TO VACUUM DRY MATERIAL
BLOWING FEATURES
Never blow up WITHOUT FILTER
in place, this will void the warranty.
Never pick up solids WITHOUT FILTER
in place, this will void the warranty.
To use vacuum cleaner with filter:
12 5
DEBRIS REMOVAL
CAUTION: Unplug power cord before performing any maintenance on it.
Nunca aspire líquidos con el filtro plisado puesto.
3. Coloque la cabeza
en su lugar.
1. Quite la cabeza. 2. Quite el filtro de papel plisado.
Nota:Los accesorios pueden
variar dependiendo el modelo.
soplador:
utilizarla como soplador.
PARA ASPIRAR SÓLIDOS
Nunca aspire sólidos SIN EL FILTRO, ésto dañará la máquina
e invalida la garantía.
SISTEMA DE EXPULSIÓN DE AIRE
Nunca expulse aire SIN EL FILTRO, ésto dañará la máquina
e invalida la garantía.
PARA ASPIRAR LÍQUIDOS
Nunca aspire líquidos CON EL FILTRO COLOCADO, ésto dañará el filtro
e invalida la garantía.
1. Coloque el filtro plisado en la jaula, empuje
el filtro hasta que el hule de abajo pase el
escalón inferior de la jaula.
2. Coloque la cabeza en su lugar.
La aspiradora está lista para usarse.
This wet/dry vacuum also functions as an air blower. It has the capability
to blow sawdust and other debris. It is excellent to use to blow dust and debris out
of garages or off patios and driveways.

Tubos
Tanque de
gran capacidad
Manguera extra larga
Vávula de desague
Ruedas reforzadas
Accesorio pisos con Jalador
Boquilla Multiusos
Accesorio Esquinero
Ranuras para
almacenamiento
Cable de línea
reforzado
Puerto de succión
Filtro plisado
Mofle
3. Assemble motor head
1. Remove motor head 2. Remove filter
TO VACUUM LIQUIDS
Never pick up liquids WITH FILTER
in place, this will void the warranty.
Never pick up liquids with the filter in place.
No todos los modelos
incluyen todos los accesorios.
Vea el panel lateral en la caja para mayor información
611
Introduzca el extremo de la manguera en el puerto de succión,
presionando el seguro.
Cierre los seguros de la parte lateral de la cabeza de la
aspiradora con las pestañas a los costados del tanque Figura 1.
Figura 1.
Coloque el accesorio deseado en el otro extremo
de la manguera.
Accione el botón de encendido y la aspiradora
estará lista para su uso.
COMPONENTES DE LA ASPIRADORA
ENSAMBLE DE LA ASPIRADORA:
1. Coloque el tanque boca abajo sobre una
superficie plana o el piso.
2. Inserte en el orificio los soportes de plástico.
3. Coloque el tanque boca arriba.
Rueda
Soporte de
plástico
Tanque
ENSAMBLE DE LAS RUEDAS
Modelo
Capacidad del tanque
Peak H.P.
Accesorios
WDV12
12 gallon
5.5
6
WDV16
16 gallon
6.5
6
PRECAUCIÓN: Siempre desconecte la aspiradora de la toma de corriente,
antes de realizar cualquier mantenimiento.
FILTER MAINTENANCE
This setup should be only used for collecting dry debris and dirt. Do not use to
vacuum toxic materials. Change frequently, Do not use vacuum with a broken filter.

Before storing your wet/dry vacuum, the dust tank should
be emptied and cleaned. Accessories may be
stored on the tool caddy. The vacuum should be
stored indoors.
Missing drain cap Screw drain cap
in place
Utilice instrucciones de clavijas aterrizados
para los modelos: WDV12 y WDV16.
Una conexión inapropiada puede provocar riesgo de choque eléctrico, revise por
medio de un electricista capacitado que el contacto que se utilizará esté debidamente
polarizado. No modifique la clavija de la máquina, si la clavija no ajusta en el contac-
to, instale uno llamando a un electricista capacitado.
Puede utilizar un adaptador como se ve en la figura B, asegurese de que el
adaptador este fijo al contacto.
ADVERTENCIA
GENERAL MAINTENANCE
STORAGE
MODELO ATERRIZADO
10 7
CAUTION: Unplug power cord before performing any maintenance on it.
motor head seats
properly on the tank.
TROUBLESHOOTING
FIGURA. A
FIGURA. B
Adaptador
Asegurese de
colocar el tornillo
de metal
Clavija
Aterrizada

Para reducir el riesgo de fuego, choque eléctrico o heridas:
No utilice su aspiradora cerca de o para recoger líquidos flamables o combustibles,como la
gasolina.
No deje la aspiradora sola cuando esté conectada. Cuando no esté en uso y antes de darle
servicio, apague y desconecte su aspiradora.
Cuando utilice su aspiradora cerca de los niños, favor de tener extremo cuidado.
Este aparato no se destina para utilizarse por personas (incluyendo niños) cuyas capacidades
físicas, sensoriales o mentales sean diferentes o estén reducidas, o carezcan de experiencia
o conocimiento, a menos que dichas personas reciban una supervisión o capacitación para el
funcionamiento del aparato por una persona responsable de su seguridad.
Los niños deben supervisarse para asegurar que ellos no empleen los aparatos como juguete.
Utilícela solo como se indica en el manual. Use únicamente accesorios recomendados por el
fabricante.
No se use con el cordón o clavija dañados. Si la aspiradora no está trabajando como debiera,
si se ha caído, dañado, dejado a la intemperie o le ha caído agua, envíela a un centro de servicio
antes de usarse.
No cargue o jale el cordón sobre orillas o esquinas filosas y manténgalo alejado de superficies
calientes.
Nunca utilice la aspiradora para bombear.
Apague todos los controles antes de desconectar.
No guarde la aspiradora a la intemperie.
No maneje la aspiradora o clavija con las manos mojadas.
No ponga ningún objeto en las aberturas de la aspiradora, ni se utilice con alguna abertura
bloqueada. Mantenga la aspiradora libre de polvo, cabello, pelusa o cualquier cosa que pueda
reducir el paso del aire.
No recoja nada que esté encendido o humeando como cigarros, cerillos o cenizas calientes.
Tenga especial cuidado al aspirar escaleras.
No desconecte su aspiradora jalándola por el cable. Para desconectarla, jálela de la clavija.
Si el cordón de alimentación es dañado, éste debe ser reemplazado por el fabricante, su agente
de servicio o personal calificado para evitar riesgo.
Cuide el producto de insectos, roedores o elementos extraños ya que éstos podrían causarle
daños al equipo.
Las variaciones en el voltaje suministrado pueden provocar daños en su equipo.
No la utilice sin colocarle antes los filtros correspondientes.
No recoja hollín, cemento, yeso, o polvo de muro de mampostería. Éstas son partículas muy
finas que pueden pasar a través del filtro y afectar el funcionamiento del motor o ser expelidas
nuevamente al aire.
Tenga especial cuidado al vaciar los depósitos excesivamente cargados.
¡ADVERTENCIA! No utilice esta aspiradora para aspirar residuos de pintura con plomo dado
que, al hacerlo, se podrían dispersar partículas delgadas de plomo en el aire.
1.
2.
3.
4.
5.
6.
7.
8.
9.
10.
11.
12.
13.
14.
15.
16.
17.
18.
19
20.
21.
22.
23.
8
ESPAÑOL
9
WARRANTY
Al utilizar su aspiradora, se deben seguir las siguientes precauciones:
Antes de operar esta aspiradora, lea cuidadosamente las instrucciones de uso.
Esta aspiradora es para uso doméstico.
Se puede utilizar para aspirar material seco o mojado y como explulsor de aire.
Consulte las secciones sobre aspirado de sólidos o aspirado de líquidos de este manual.
CONTENIDO
Advertencias.....................................................9
Modelo aterrizado...........................................10
Componentes de la aspiradora.......................11
Ensamble de la aspiradora..............................11
Ensamble de las ruedas ................................11
Para aspirar sólidos.........................................12
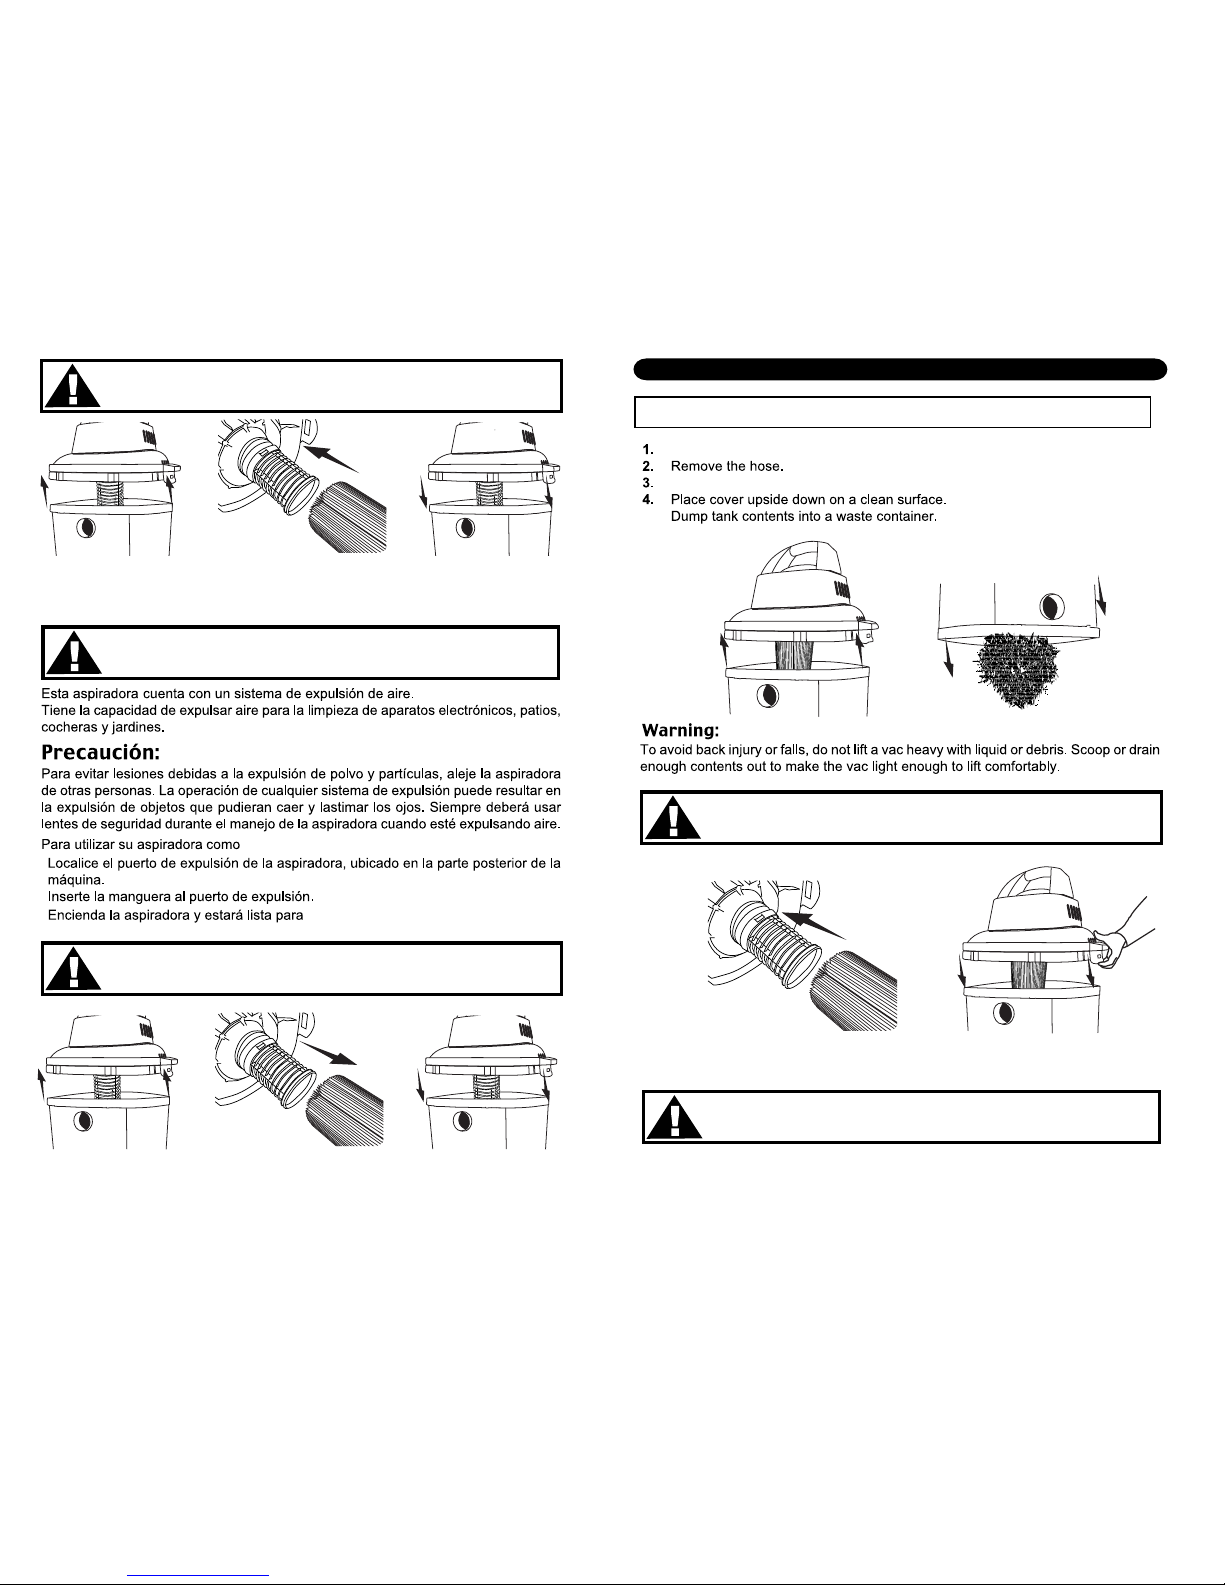
Sistema de expulsión de aire..........................12
Para aspirar líquidos........................................12
Limpieza del tanque........................................13
Limpieza del filtro.............................................13
Almacenamiento.....................................14
Problemas y soluciones...................................14
ADVERTENCIAS
(Valid only in the United States)
Ventamatic, Ltd. extends this warranty to the original retail purchaser of its model.
No subsequent purchaser of the unit is entitled to any of the benefits of this warranty.
This product is warranted against defects in materials and workmanship for a period of
one (1) year from the date of the original retail purchase of the unit.
In the event of a defect or malfunction, we will replace or repair the defective part or component
only and return the new or repaired part to you freight prepaid. You must bear all other expenses
incurred in obtaining repairs, including labor required for field repair or replacement, and the cost
of shipping the defective part to us. You must also bear the cost of repair to or replacement of
any part or component and the shipping charges incurred for the repair or replacement and
return to you of any part or component not covered by this warranty, including parts or
components damaged by you.
The company reserves the right to demand and receive written evidence of the date of purchase
before undertaking to perform its obligations under this warranty. You should, therefore, retain
your sales slip and attach a copy of it to the warranty claim.
In order to obtain the repair or replacement of this unit, you must select one of the
following methods:
Return to factory.
Return postage prepaid only the part or component which you believe to be defective to the
following address:
Ventamatic, Ltd.
100 Washington Street
Mineral Wells, TX 76067
*Complete and enclose a written claim and attach a copy of your sales slip or other
proof of purchase.
Return to retail dealer.
If the retail dealer from whom you purchased this unit stocks replacement parts or components,
you may return a part or component which you believe to be defective to that dealer
for replacement.
Caution: Only a limited number of our retail dealers stock replacement parts. If your dealer
does not, you must return the part to the factory following the procedure described in paragraph
“A” above.
There is no informal dispute settling mechanism available in the event of a controversy involving
this warranty. Any and all implied warranties which may exist terminate upon the expiration of
this warranty one (1) year from the date of the original retail purchase. Some states do not allow
limitation on how long an implied warranty last, so this limitation may not apply to you.
Ventamatic, Ltd. is not liable to you for incidental or consequential damages arising out of a
defect or malfunction of a unit or its installation or out of any alleged breach of this warranty.
Some states do not allow the exclusion or limitation of incidental or consequential damages,
so this limitation may not apply to you. This warranty gives you specific legal rights and you
may also have other rights which may vary from state to state.
This manual suits for next models
1
Table of contents