VENTRA BCR-400 User manual

BCR-400
HD Body Worn Camera
User Guide
Please read and follow all instructions
and features before use. Save for future
reference.
For latest update and specs, please visit
www.ventrainc.co
Ver 08 17

TABLE OF CONTENTS
1. Introduction
•Product Overview
•Syste includes
2. Technical Specifications
3. S stem Overview
4. Feature Overview / Screen Displa Overview
5. Main Settings Menu
5.1 - Power On / Off
5.2
-
Video Recording
5.2
-
Video Recording
5.3 - Audio Recording
5.4 - Infrared LED Feature
5.5 - Take Snapshot I age
5.6 - Take Snapshot I age while Recording Video
5.7 - Motion Detection
5.8 - Book ark Recordings
5.9 - Device / User ID
5.10 - Ti e Setting
6. Pla back – File Viewing
6.1 - Playback directly on BCR-400
6.2 - Playback via PC
6.3 - Playback via GPS Player
7. LIMITED Warrant / Terms / RMA

1. Introduction
Product Overview
Ventra BCR-400 Body Ca era is a full-featured body worn ca era designed for various
application in both private and public sector. It features vivid 1080P HD video recording and
high resolution egapixel still i age capture.
The BCR-400 also features e bedded 32GB storage for extended recording capacity. A high
capacity built-in Li-Ion battery provides continuous recording of up to 6 hours and long standby
ti e. An e bedded Passive GPS which when in outdoor environ ent and acquires signal, will
record the coordinates onto the video*.
BCR-400 does not require special software. Si ply record and playback directly on the ca era,
or connect it to a PC via USB cable and view recordings via standard edia player.
For convenience, a charging dock is included which connects to the 5V power supply or PC via
USB cable**.
*The BCR ust be outdoors and within satellite signal range in order to receive and record the
coordinates. Satellite signal acquisition ay vary widely dependent upon environ ent,
location and other factors.
Ti e to acquire signal can range anywhere fro 1 inute to 10 inutes. So while the video is
recording when outdoors, the BCR ay not have acquired the signal and or recorded the
coordinates.
**The charging dock is currently used solely for charging. Optional syste connection to PC for
file access ay be offered or developed in the future at Ventra’s discretion.

S stem Includes:
•Body Ca era BCR-400
•Charging Dock
•USB Cable
•5V Power Adapter
•Rotatable Clip (on BCR)
•User Manual
•Shoulder clip
•Car Charger
Support
For the latest infor ation about BCR-400, visit: www.Ventrainc.com

2. Technical Specifications
Camera
I ageSensor 5MPCMOS
WideAngle 140°wide anglelens
Video
Video Co pression H.264 / MPEG4
Video Resolution 2304 x 1296, 1920 x 1080, 1440 x 1080, 1280 x 720
848 x 480, 720 x 480
Fra eRate 30fps @ all resolution, 60fps on 1280 x 720 / 848 x 480
Audio Built-in Microphone
Audio For at AAC2 / MP3
Audio Playback Yes
Water ark Device ID, User ID, Ti e & Date, GPS Coordinates e bedded into Video
PasswordProtection Password for video playback, setting change and prevent video deletion
Pre-Record Up to 30s pre-record
VideoQuality SuperFine / Fine / Nor al
Video Seg ent Duration 5 in / 10 in / 15 in / 30 in / 45 in
Snap Shot
I age 32MPMax (Digitally Enhanced)
I ageFor at JPEG
Burst 2 / 3 / 4 / 10 / 15 / 20 snap shots
Video/ImageReview
LCDScreen 2in TFT-LCD High-Resolution Color Display
Audio Playback Yes
Video
Output
HDMI
1.3
Port
Video
Output
HDMI
1.3
Port
Video Transfer USB2.0
General
IRLEDs 4
IR LEDFunction Manual / Auto / OFF (Progra able)
IRDistance 25 ft
IRWavelength 850n
Built-In Storage
32GB E bedded
1080P @ 30fps = approxi ately 8 Hours
720P @ 30fps = approxi ately 13 Hours
480P @ 30fps = approxi ately 16 Hours
WhiteLED Flash Light Yes
WeatherResistance IP65
Passive GPS Yes
Battery Built-in 2900 Ah Lithiu Ion
Battery Charge Ti e / Life Cycle 3.5 Hours Full Charge / 600 Charges
Recording BatteryLife -Continuous
Continuous Recording Ti e Based on Full Charge
1080P @ 30fps = approxi ately 6 Hours
720P @ 30fps = approxi ately 9 Hours
480P @ 30fps = approxi ately 11 Hours
OperatingTe perature 14°F -122°F
StorageTe perature -4°F ~158°F
Di ensions 3.54" x 2.17" x1.10"
Weight 6.17 oz without clip
Accessories Short Clip, Charging Dock, USB Cable, USB Power Adapter, Car Charger, Manual, Epaulet Clip
Certificates CE,RoHS

3. S stem Overview

3. S stem Overview

4. Feature Overview
Item Description
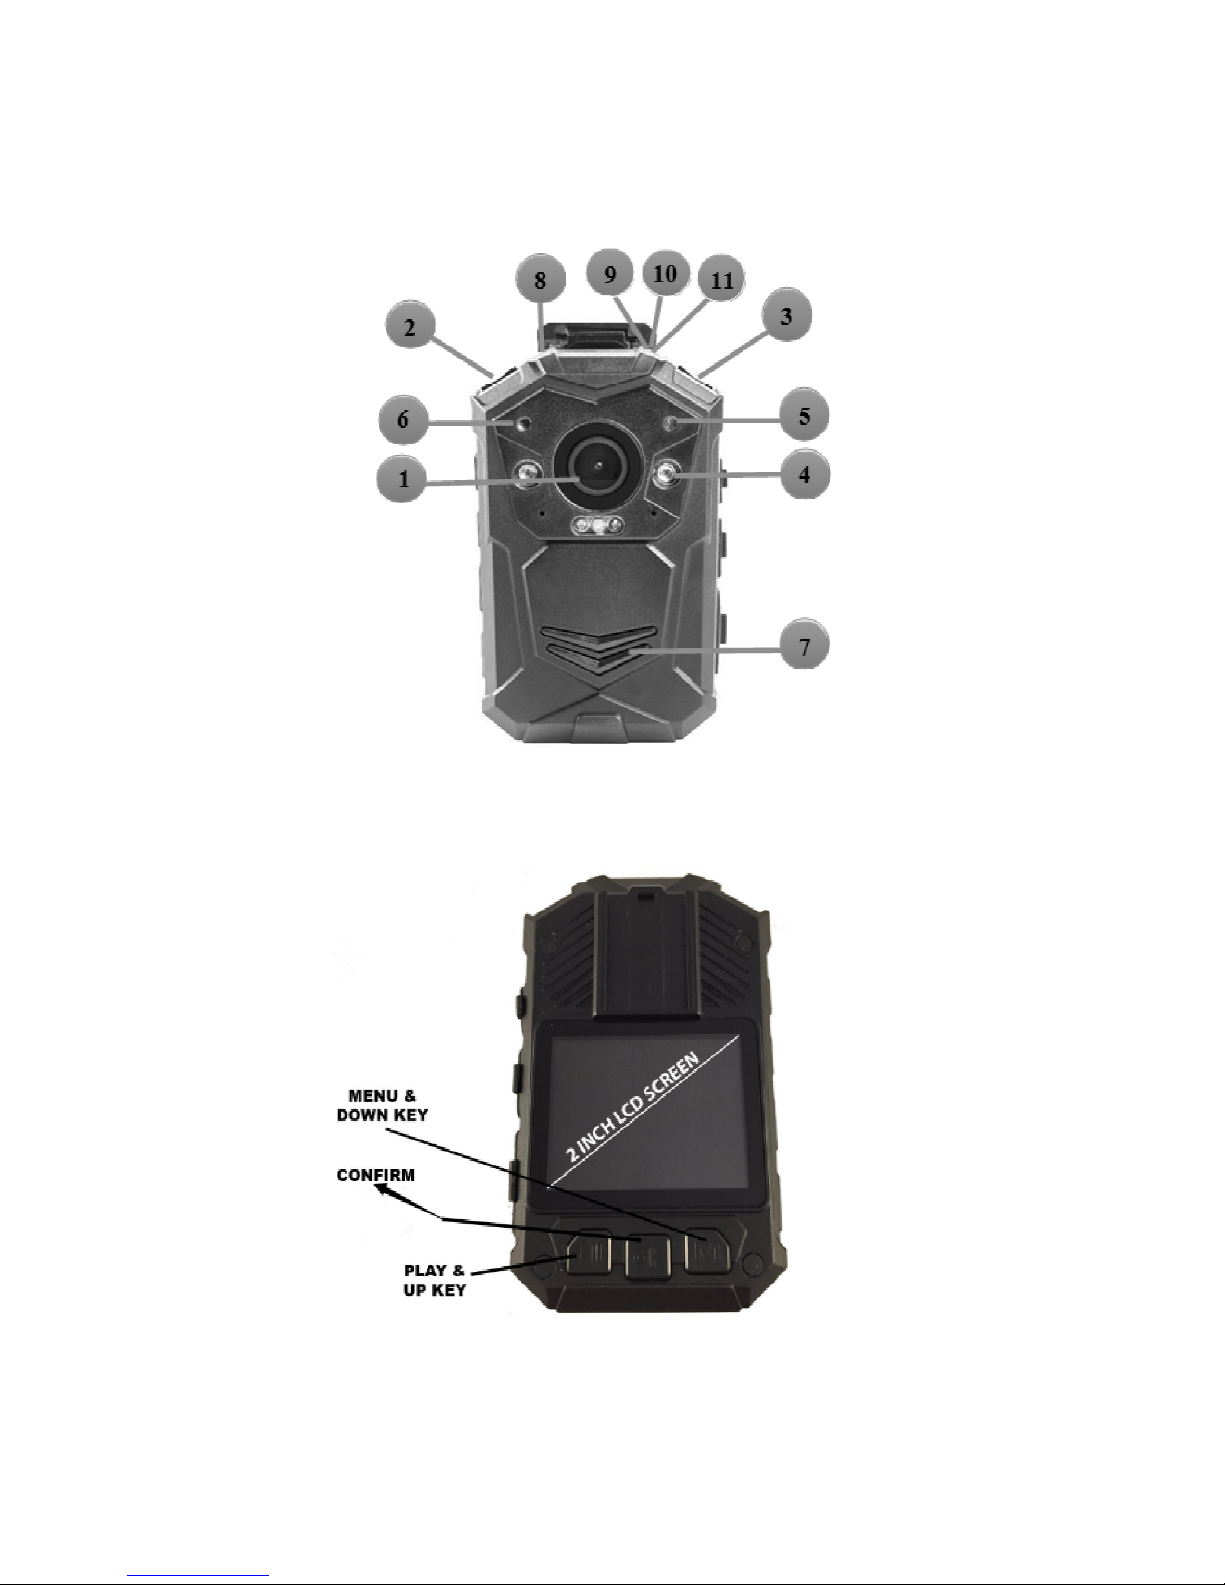
1.Camera Lens High Definition Ca era
2. Power Button
a). Press to turn ca era on; Hold for 3 seconds to turn off ca era
b). Press to enter or exit screen saver when ca era is on
c). Press to return to previous enu when in settings or playback ode
3.IR/White Light button a). Press to turn IR light on/off;
b). Hold to turn on/off white light
4.Infrared LEDs Records clear i age in low light condition- up to 30 feet
5.Light Sensor Detect changes in light and auto activate IR for low-light recording
7.Speaker Built-in speaker
8. Indicator LED Blue: Charging Status
Green: ca era is powered on and in standby ode
9.10.11. Status Indicator LED
Green: ca era is powered up and in standby ode, not recording
Flashing Red: ca era is recording video
Flashing Yellow: ca era is recording audio only
PLAY & UP KEY
a). Press to scroll up in enu ode
b). In play ode, hold to zoo out
c). In play ode, press to rewind video
CONFIRM KEY
a). Press to ake a selection in enu ode
b). In play ode, press to pause/resu e video or audio
playback
CONFIRM KEY
b). In play ode, press to pause/resu e video or audio
playback
c). In standby ode, press to review files
MENU & DOWN KEY
a). Press to enter into enu ode
b). Press to scroll down in enu ode
c). In play ode, hold to zoo out the playing i age
d). In play ode, press to fast forward video
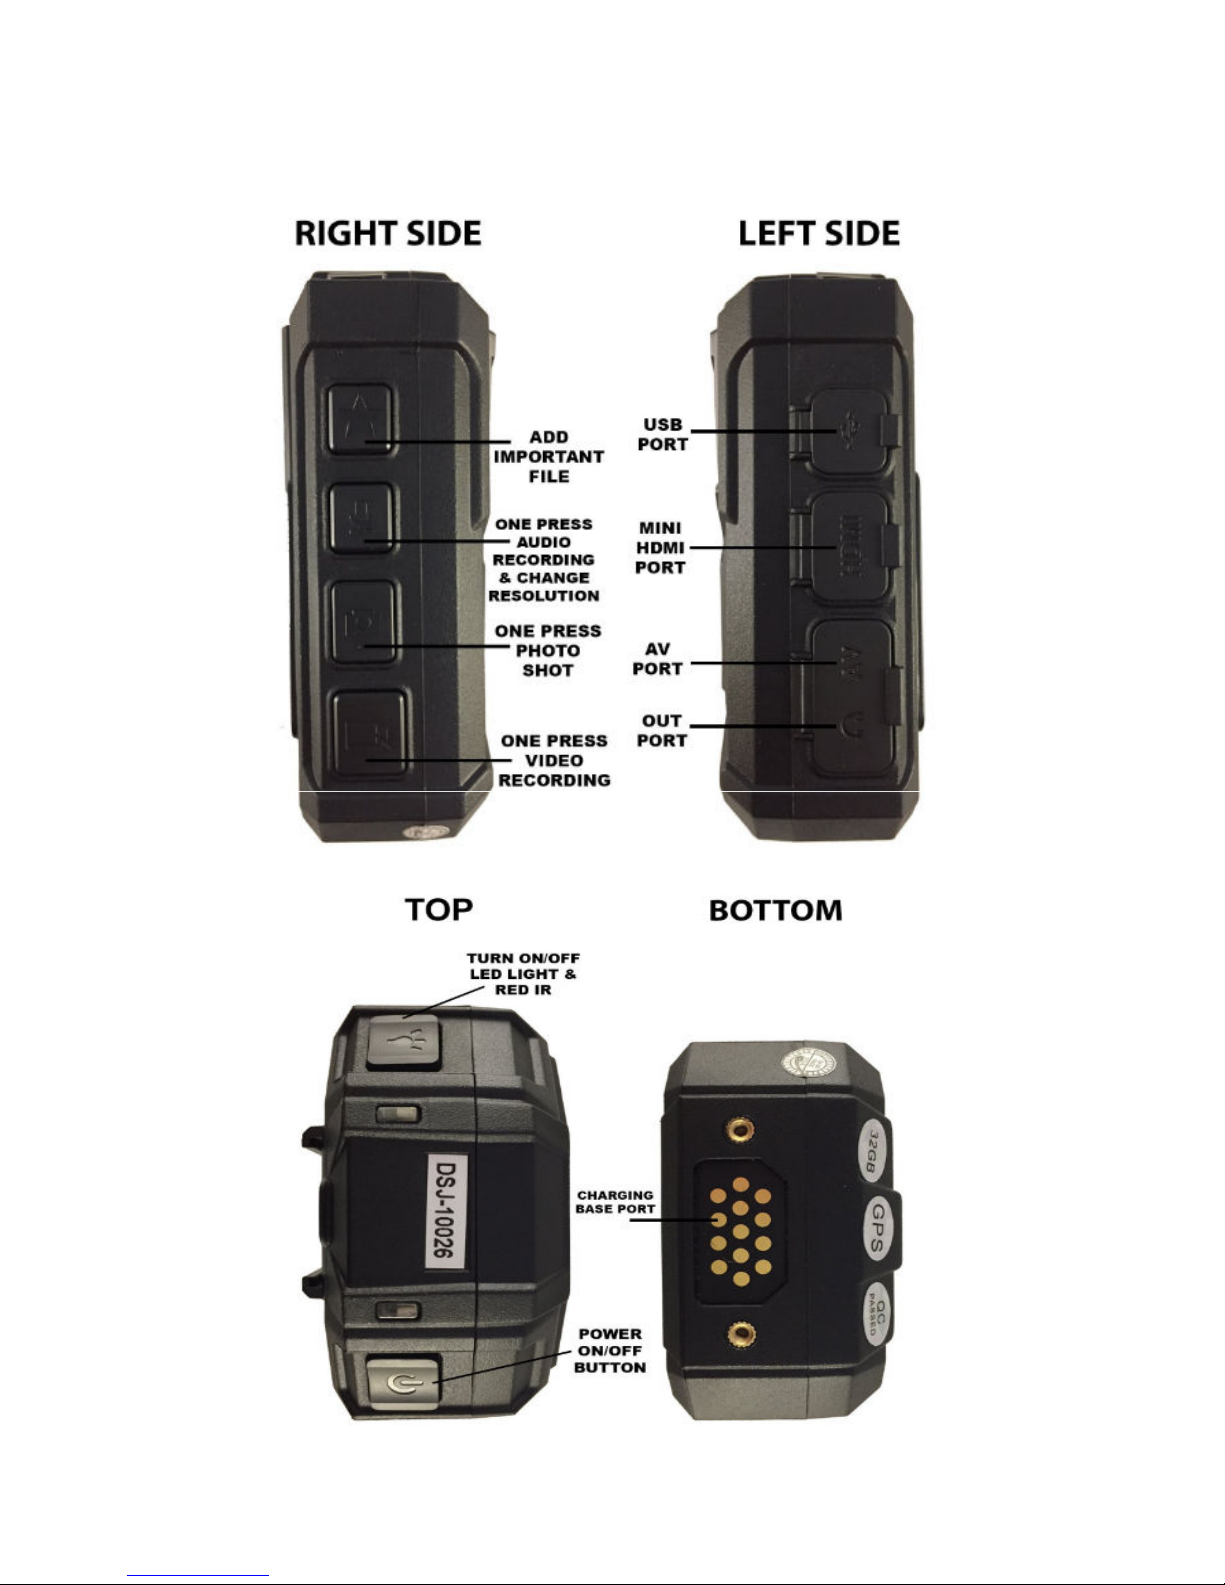
ADD IMPORTANT FILE Press to tag i portance to audio/video file when ca era is recording
ONE PRESS AUDIO RECORDING & CHANGE RESOLUTION
a). Press to record audio when not in video-recording ode
b). Press to ute/un ute video when ca era is on video recording
c). Hold to change resolution between 480P and 720P
ONE PRESS PHOTO SHOT a). Press to take pictures in standby ode
b). Press to take a single snapshot i age while in video recording
ONE PRESS VIDEO RECORDING a). Press to start/stop recording
b). Hold to power up ca era and start video recording i ediately when ca era is powered off
USB PORT Connects to USB cable for charging or connection to PC
HDMI PORT Connects to 1.3 HDMI cable for video playback only
CHARGING BASE PORT Connect to charging dock to charge the ca era

4. Screen Displa Overview
Record Status Red blinking record status icon indicates ca era is recording, white solid is standby ode
Video Recording Time Recorded ti e of current clip
Batter Charge Current battery level
Camera and Officer ID Assigned ca era and User ID
Remaining Time Esti ated recording hours re aining
SD Card Memor Internal SD Card capacity: Free space/Total capacity

5. Main Setting Menu
To enter the settings menu:
1. Press Menu ( ) button on the rear of the BCR and enter the password
2. Enter the password by using the following co ands:
•Press Scroll Up ( ) button to change the character to the previous letter or nu ber
•Press Menu ( ) button to change the character to the next letter or nu ber
•Press OK ( ) button to ove to the next character
The default password is 000000
3. After selecting the last character, press OK ( ) button to enter the setting enu
To navigate the settings menu:
1. Press Menu ( ) button to select next setting or option
2. Press Scroll Up ( ) button to select the previous setting or option
3. Press OK ( ) button to ove to confir your selection or enter the sub- enu
4. Press Power ( ) button to return to the previous enu without changing anything

5. Main Setting Menu
Setting Description Options
Resolution The i age resolution for video
2304×1296 30P
1920×1080 30P
1440×1080 30P
1280×720 60P
1280×
××
×720 30P
848×480 60P
848×480 30P
720×480 30P
Megapixels The i age resolution for photos
32M (7600×4275 16:9) 30M (7304×4104 16:9)
28M (7056×3968 16:9)
25M (6664×3752 16:9) 23M (6480×3648 16:9)
21M (6144×3456 16:9) 20M (5960×3352 16:9)
16M (5336×3000 16:9)
12M (4608×2592 16:9)
10M (4384×2466 16:9)
8M (3456×1944 16:9)
5M (3008×
××
×1688 16:9)
Burst The nu ber of i ages captured when taking a snapshot
i age Off, 2, 3, 5, 10, 15, 20
The a ount of ti e the ca era waits to take a photo after
Bold Denotes Default Setting
Self Timer
The a ount of ti e the ca era waits to take a photo after
pressing Snapshot button. Off, 5 sec, 10 sec
Continuous shooting
When on, pressing the Snapshot button will activate
continuous shooting during which the ca era will
auto atically taking a picture at regular intervals. Press this
button again to stop shooting. When off, this feature will be
disabled.
Off, 5 sec, 10 sec
Qualit The quality of the i age for video and photo files. S. Fine, Fine, Nor al
Pre-record
When on, any video you record will include 30 seconds prior
to pressing the Record button (stored in the ca era buffer);
When off, any video you record will include only video and
audio fro the point after you press the Record button.
Off, On
Dela Record The a ount of the ti e the ca era waits to stop recording
video after you press the Record button. Off, 5 sec, 1 inute, 10 inutes
Car DVR Mode
When on, ca era will power up auto atically and start video
recording when it is charged. Ca era will power off as it
nor ally does when it is disconnected fro the power source.
Off, On
Loop Recording
When on, ca era will overwrite the oldest video file with the
ost current video file once its e ory is full. This setting
can be selected only when car DVR ode is on.
Off, On
Split Time While recording video, the ca era will auto atically split its
recording into files of this length. 3 in, 5 in, 10 in, 15 min, 30 in, 45 in
Slides Show When on, viewing photo file will start a slideshow where each
photo will be shown for around 5 seconds. Off, on

Infrared
When set to anual, user will need to hold Snapshot button
to turn IR LEDs on/off. When set to Auto, these lights will
activate auto atically based on the light sensor's reading.
Manual, Auto, off
White Led White Led Flash Light Off, On
Motion Detect When on, ca era will start recording when front ove ent
is detected by the lens. Off, On
Recording warning When on, you will hear a voice confir ation when you start
recording. When off, voice confir ation is disabled. Off, On
GPS
When GPS is on and BCR is outdoor and acquires signal,
coordinates will be recorded and can be reviewed by GPS
player.
Off, On
Time Zone Adopt local ti e in ti e zone. -12 to +12
Language The language of the text in ca era interface. Englsih, 繁體中文, Pусский, Jezyk Polski, French,
日本語, Portuguese
Screen Saver The a ount of the ti e the ca era can be idle before
deactivating the display to conserve power. Off, 30 sec, 1 min, 3 in, 5 in
LCD Brightness Brightness of LCD screen Low, High
Auto Power off The a ount of the ti e the ca era can be idle before
powering off. Off, 30 sec, 1 in, 3 in, 5 in
LED Light
When
on, indicator LED will tell the status of the ca era;
On
, Off
5. Main Setting Menu
LED Light
When
on, indicator LED will tell the status of the ca era;
When off, ca era is entering covert ode.
On
, Off
Ke Tone When on, ca era will play a tone each ti e you press a
button.; When off, tone is disabled. On, Off
Volume
The volu e of ca era speaker. This affects the loudness of
video playback, audio playback, the key tone, record warning,
and any other sounds played by ca era. This doesn't affect
the volu e of the recorded video or audio files the selves.
0-12 (10)
ID setting User can set Device SN and Person SN Alphanu eric characters
Change Password Password can be set or changed Alphanu eric characters
Time Setup Adjust ti e and date yyyy/ /dd __:__
Default setting Use this to return ca era to its original settings. This does not
erase the recordings. O (Yes), X (No)

5. Operation
5.1 Power on/off
1) Power on: when ca era is off, press ( ) button, ca era will power up and enter standby ode;
•Boot up screen
•Working status LED indicator turns green
•Boot up tone
•Ca era vibrates
•Ca era voice “beeps” when [Record Warning] is ON
2) Power off: press and hold power ( ) button for 2 seconds to turn off working-status ca era:
•Save video/audio files before power-off
•Working status indicator turns off
•
Power off i age
•
Power off i age
•Power off tone
•Ca era vibrates
5.2 Video Recording
In standby ode, PRESS record ( ) button, indicator LED flashes Alternate Red and Green, then
ca era “beep” and vibrates. If the video recording alert announce ent is on, ca era will start video
recording with indication sound. PRESS record ( ) button again, video recording stops and ca era
switches to standby ode, working status indicator changes to green.
One Touch Recording Mode
When BCR is powered off, HOLD Record ( ) button for 3 seconds, ca era will power on and start
video recording i ediately. Pre-record feature is not available in the One Touch ode as the BCR was
not previously powered on and no video buffer were stored.

5. Operation
5.3 Audio Recording
In standby ode, PRESS Audio ( ) button, with a beep and ca era vibration, LED indicator turn yellow
and flashes, audio recording started. PRESS Audio ( ) button again to stop audio recording.
5.4 Infrared Night Vision
While under low light conditions, infrared LED will provide additional light to record i age or video.
In standby ode, PRESS Menu ( ) button to navigate. Find option【Infrared】, PRESS OK ( ) button
to enter sub- enu: Manual & Auto, press OK ( ) button to select.
1) Auto Infrared Mode:
In low light situations (3 Lux), IR LEDs will activate auto atically, ca era switches on infrared filter lens,
video i age turns to black and white. When syste detects sufficient lighting, IR LED turns off, and i age
auto atically reverts to color.
2) Manual Infrared Mode:
When night vision is needed, PRESS IR light button to switch to Infrared ode, IR LEDs will be turned on.
PRESS IR Light button again to turn off IR LEDs, i age revert to color.
5.5 Take Snapshot Image
In standby, PRESS snapshot ( ) button to take a snapshot, with a sound “Click”, LED working status
indicator will flash green once, and the photo stored. The photo resolution and quality can be set in the
settings enu.
5.6 Take Snapshot Image While Recording Video
While ca era is video recording, PRESS snapshot ( ) to take a snapshot. On the LCD display, there will
be a flashing green icon, which indicates that a photo has been taken while video is recording.

5. Operation
5.7 Motion Detection
In settings, find [Motion Detect] option. PRESS OK ( ) button to select.
Sub options: ON/OFF
PRESS record ( ) button to activate otion detection, any ove ents detected, ca era will start
recording. If there are no ove ents for 10 seconds, ca era will stop recording. Once any ove ent is
detected, ca era will start video recording again.
5.8 Tag / Bookmark Important File
In audio or video recording, PRESS Tag / Book ark ( ) button, ca era vibrates. The audio or video file
will be book arked with a yellow icon ( ) displayed on the top right corner of the LCD screen.
5.9 Device ID / User ID
In standby ode, PRESS Menu ( ) button to enter settings. Find [ID setting], PRESS OK ( ) button to
select. Enter the password, the default password is: 00000. After password entered, the Device & Person SN
interface is displayed. 5 characters for Device ID and 6 characters for User ID.
PRESS scroll-Up ( ) button or Scroll-down ( ) button to highlight a character, then PRESS OK ( )
button to select. When co pleted, press ( ) button to save and exit.
5.10 Time Setting
In standby ode, PRESS Menu ( ) button to enter settings. Find Ti e setting option, adjust accordingly -
for exa ple, 2017/07/31 07:40.
Press Scroll-Up ( ) button or Scroll-down ( ) button to highlight a character, the PRESS OK ( )
button to select.

6.1 Pla back directl on BCR– Video, Snapshot, Audio
To enter playback ode, PRESS ( ) for 3 seconds while ca era is in standby ode. Enter password and
PRESS OK ( ).
Select files to view - Video, Photo or Audio
1) In Pla back Mode: PRESS OK ( ) to pause/resu e playback; PRESS Scroll-Up ( ) button to rewind,
PRESS Scroll-down ( ) button to fast forward, then PRESS OK ( ) to play nor ally. Forward or Rewind
Speed = 2x, 4x, 8x, 16x, 32x, 64x, 128x.
2) Exit the Pla back mode:
In Playback ode, PRESS Record ( ) button to return to standby ode step by step.
6.2 Pla back via PC
6. Pla back – File Viewing
For enhanced security, the BCR is password protected which requires a code to view
or accessed by a PC. Without the password, the PC will NOT detect the BCR when
connected to the co puter.
•To view or download recordings via PC, connect USB cable to BCR
•Password enu pro pts for password
•Upon successful login, the PC will display the BCR as a Drive

6.2 Pla back via PC
Pla back via PC Continued
•Select Drive and Folder to view recordings
•Recorded files ay be viewed via standard Media Player such as Windows Media Player
•Files ay be anually downloaded or deleted to a PC or Server accordingly

6.3 Pla back of BCR Location Histor – GPS Pla er
When the BCR is outdoors and can acquire coordinates via the built-in Passive GPS, these data are recorded
into the syste . An open source viewing software is included to view the location history of the syste .
•Select GPS Player, unzip file
•Select Player.exe
•The GPS software viewer will auto atically populate the recorded files
•When selecting a large file, it ay take so e ti e to load the recordings and route history
IMPORTANT NOTICE
The BCR ust be outdoors and within satellite signal range in order to receive and record the coordinates.
Satellite signal acquisition ay vary widely dependent upon environ ent, location and other factors.
Ti e to acquire signal can range anywhere fro 1 inute to 10 inutes. So while the video is recording
while outdoors, the BCR ay not have acquired the signal and or recorded the coordinates.
The GPS Player is an open source software provided for convenience. Ventra is not responsible for the
accuracy, reliability, features, aintenance or update of the software.

6.3 Pla back of BCR Location Histor

Ventra Technology Inc warrants the BCR-400 against defects in material and workmanship for a period of
one
oneone
one (
((
(1
11
1)
))
) year
yearyear
year from the date of original p rchase. D ring this period, Ventra’s liability for any defective
prod ct, or any prod ct part, shall be limited to the repair or replacement of the prod ct, at Ventra’s sole
discretion.
This warranty does not apply to defects or damages res lting from mishandling, accident, ab se,
negligence, lightning, water/liq id, power s rges, improper interfacing, operation o tside of design limits,
misapplication, improper repair, or na thorized modification.
The term "Ventra Prod ct" is limited to the hardware components and req ired firmware. It DOES NOT
incl de software applications or programs, non-Ventra prod cts or peripherals. To the extent permitted by
local law, all non-Ventra prod cts or non-Ventra branded peripherals - s ch as external storage SD card are
provided, the respective man fact rer's own warranties directly to yo , and are not covered by this Limited
Warranty.
To obtain service within the warranty period, please contact Ventra at (888) 418 3833 or
tech@ventrainc.com for assistance. If prod ct repair or replacement is necessary, a Ret rn Merchandise
A thorization (RMA) will be iss ed. The C stomer will be solely responsible for shipping charges,
ins rance and proper packaging to prevent breakage in transit, whether or not the prod ct is covered by this
warranty. All shipments of repaired or replaced prod cts by Ventra will be F.O.B. California.
Limited Warranty / RMA / TERMS
Limited Warranty / RMA / TERMSLimited Warranty / RMA / TERMS
Limited Warranty / RMA / TERMS
VENTRA
VENTRAVENTRA
VENTRA MAKES
MAKESMAKES
MAKES NO
NONO
NO OTHER
OTHEROTHER
OTHER WARRANTIES,
WARRANTIES,WARRANTIES,
WARRANTIES, EXPRESS
EXPRESSEXPRESS
EXPRESS OR
OROR
OR IMPLIED,
IMPLIED,IMPLIED,
IMPLIED, AS
ASAS
AS TO
TOTO
TO MERCHANTABILITY
MERCHANTABILITYMERCHANTABILITY
MERCHANTABILITY OR
OROR
OR
FITNESS
FITNESSFITNESS
FITNESS FOR
FORFOR
FOR A
AA
A PARTICULAR
PARTICULARPARTICULAR
PARTICULAR PURPOSE
PURPOSEPURPOSE
PURPOSE OF
OFOF
OF ANY
ANYANY
ANY PRODUCT
PRODUCTPRODUCT
PRODUCT SOLD
SOLDSOLD
SOLD UNDER
UNDERUNDER
UNDER THIS
THISTHIS
THIS CONTRACT
CONTRACTCONTRACT
CONTRACT.
..
. UNDER
UNDERUNDER
UNDER
NO
NONO
NO CIRCUMSTANCES
CIRCUMSTANCESCIRCUMSTANCES
CIRCUMSTANCES SHALL
SHALLSHALL
SHALL VENTRA
VENTRAVENTRA
VENTRA BE
BEBE
BE LIABLE
LIABLELIABLE
LIABLE FOR
FORFOR
FOR ANY
ANYANY
ANY INDIRECT,
INDIRECT,INDIRECT,
INDIRECT, INCIDENTAL,
INCIDENTAL,INCIDENTAL,
INCIDENTAL, SPECIAL,
SPECIAL,SPECIAL,
SPECIAL,
PUNITIVE
PUNITIVEPUNITIVE
PUNITIVE OR
OROR
OR CONSEQUENTIAL
CONSEQUENTIALCONSEQUENTIAL
CONSEQUENTIAL DAMAGES
DAMAGESDAMAGES
DAMAGES INCLUDING,
INCLUDING,INCLUDING,
INCLUDING, WITHOUT
WITHOUTWITHOUT
WITHOUT LIMITATION,
LIMITATION,LIMITATION,
LIMITATION, INFRINGEMENT
INFRINGEMENTINFRINGEMENT
INFRINGEMENT OF
OFOF
OF
THIRD
THIRDTHIRD
THIRD PARTY
PARTYPARTY
PARTY RIGHTS,
RIGHTS,RIGHTS,
RIGHTS, LOST
LOSTLOST
LOST GOODWILL,
GOODWILL,GOODWILL,
GOODWILL, LOST
LOSTLOST
LOST REVENUES
REVENUESREVENUES
REVENUES OR
OROR
OR PROFITS,
PROFITS,PROFITS,
PROFITS, WORK
WORKWORK
WORK STOPPAGE,
STOPPAGE,STOPPAGE,
STOPPAGE, DATA
DATADATA
DATA
LOSS,
LOSS,LOSS,
LOSS, SYSTEM
SYSTEMSYSTEM
SYSTEM FAILURE,
FAILURE,FAILURE,
FAILURE, IMPAIRMENT
IMPAIRMENTIMPAIRMENT
IMPAIRMENT OF
OFOF
OF OTHER
OTHEROTHER
OTHER GOODS,
GOODS,GOODS,
GOODS, COSTS
COSTSCOSTS
COSTS OF
OFOF
OF REMOVAL
REMOVALREMOVAL
REMOVAL AND
ANDAND
AND
REINSTALLATION
REINSTALLATIONREINSTALLATION
REINSTALLATION OF
OFOF
OF THE
THETHE
THE SYSTEM,
SYSTEM,SYSTEM,
SYSTEM, LOSS
LOSSLOSS
LOSS OF
OFOF
OF USE,
USE,USE,
USE, INJURY
INJURYINJURY
INJURY TO
TOTO
TO PERSONS
PERSONSPERSONS
PERSONS OR
OROR
OR PROPERTY
PROPERTYPROPERTY
PROPERTY ARISING
ARISINGARISING
ARISING
OUT
OUTOUT
OUT OR
OROR
OR RELATED
RELATEDRELATED
RELATED TO
TOTO
TO THE
THETHE
THE SYSTEM
SYSTEMSYSTEM
SYSTEM WHETHER
WHETHERWHETHER
WHETHER BASED
BASEDBASED
BASED ON
ONON
ON BREACH
BREACHBREACH
BREACH OF
OFOF
OF WARRANTY,
WARRANTY,WARRANTY,
WARRANTY, BREACH
BREACHBREACH
BREACH OF
OFOF
OF
CONTRACT,
CONTRACT,CONTRACT,
CONTRACT, TORT
TORTTORT
TORT OR
OROR
OR OTHERWISE
OTHERWISEOTHERWISE
OTHERWISE.
..
. IN
ININ
IN NO
NONO
NO EVENT
EVENTEVENT
EVENT SHALL
SHALLSHALL
SHALL VENTRA’s
VENTRA’sVENTRA’s
VENTRA’s LIABILITY
LIABILITYLIABILITY
LIABILITY EXCEED
EXCEEDEXCEED
EXCEED THE
THETHE
THE
ACTUAL
ACTUALACTUAL
ACTUAL PURCHASE
PURCHASEPURCHASE
PURCHASE PRICE
PRICEPRICE
PRICE OF
OFOF
OF THE
THETHE
THE SYSTEM
SYSTEMSYSTEM
SYSTEM WITH
WITHWITH
WITH RESPECT
RESPECTRESPECT
RESPECT TO
TOTO
TO WHICH
WHICHWHICH
WHICH ANY
ANYANY
ANY CLAIM
CLAIMCLAIM
CLAIM IS
ISIS
IS MADE
MADEMADE
MADE.
..
.
The information in this specification sheet reflects the c rrent technical specifications at the time of
print. Ventra
VentraVentra
Ventra reserve
reservereserve
reserve the
thethe
the right
rightright
right to
toto
to change
changechange
change the technical or physical specifications and feat res witho t prior
notification.
Ventra
VentraVentra
Ventra reserve
reservereserve
reserve the
thethe
the right
rightright
right to
toto
to change
changechange
change the warranty terms witho t prior notification.
While every effort has been made to ens re the acc racy of the information, certain specifications are
based on approximate fig res.
All trademarks, service marks, trade names, prod ct names and logos are the property of their respective owners.
Ver. 08 17
Table of contents