VentureCraft SounDroid VALOQ User manual

User
s Guide
High End Music Player
Equipped with upsampling function
Supports DSD audio source playback
Thank you very much for purchasing the VentureCraft product. Please read this
User
s Guide thoroughly before using the device, and make sure to update the
rmware rst.
Store this in a safe location so it can be referenced when necessary.
CONTENTS
Overview of This Product _________________________________2
Name and Function of Each Part ___________________________3
Charging ______________________________________________4
Home Screen __________________________________________4
Connecting to a PC (Copying Music) ________________________ 5
Listening to Music ______________________________________6
Playing back _______________________________________ 6
Play screen ________________________________________ 6
Playlist________________________________________________7
Options Menu List ______________________________________8
Player controls _____________________________________ 8
Audio settings _____________________________________ 8
Other settings _____________________________________ 9
Language setting ___________________________________ 9
Connecting with Headphones/Earphones __________________10
Standard headphones/earphones _____________________ 10
Headphones/earphones supporting the balance connection
__ 10
Connecting with an External Device _______________________10
Line output ______________________________________ 10
Connecting with an External Device (Cont.) _________________11
Optical digital output_______________________________ 11
Updating the Firmware _________________________________11
Return to Factory Default________________________________11
Troubleshooting ______________________________________12
Error screen of the internal drive is displayed_____________ 12
The power does not turn on _________________________ 12
Power cannot be turned o __________________________ 12
Pop noise sounds when turning on the power ___________ 12
Major Specications ____________________________________12
Cautions on Use _______________________________________13
Product Support_______________________________________15
Trademarks and Registered Trademarks ____________________15
2
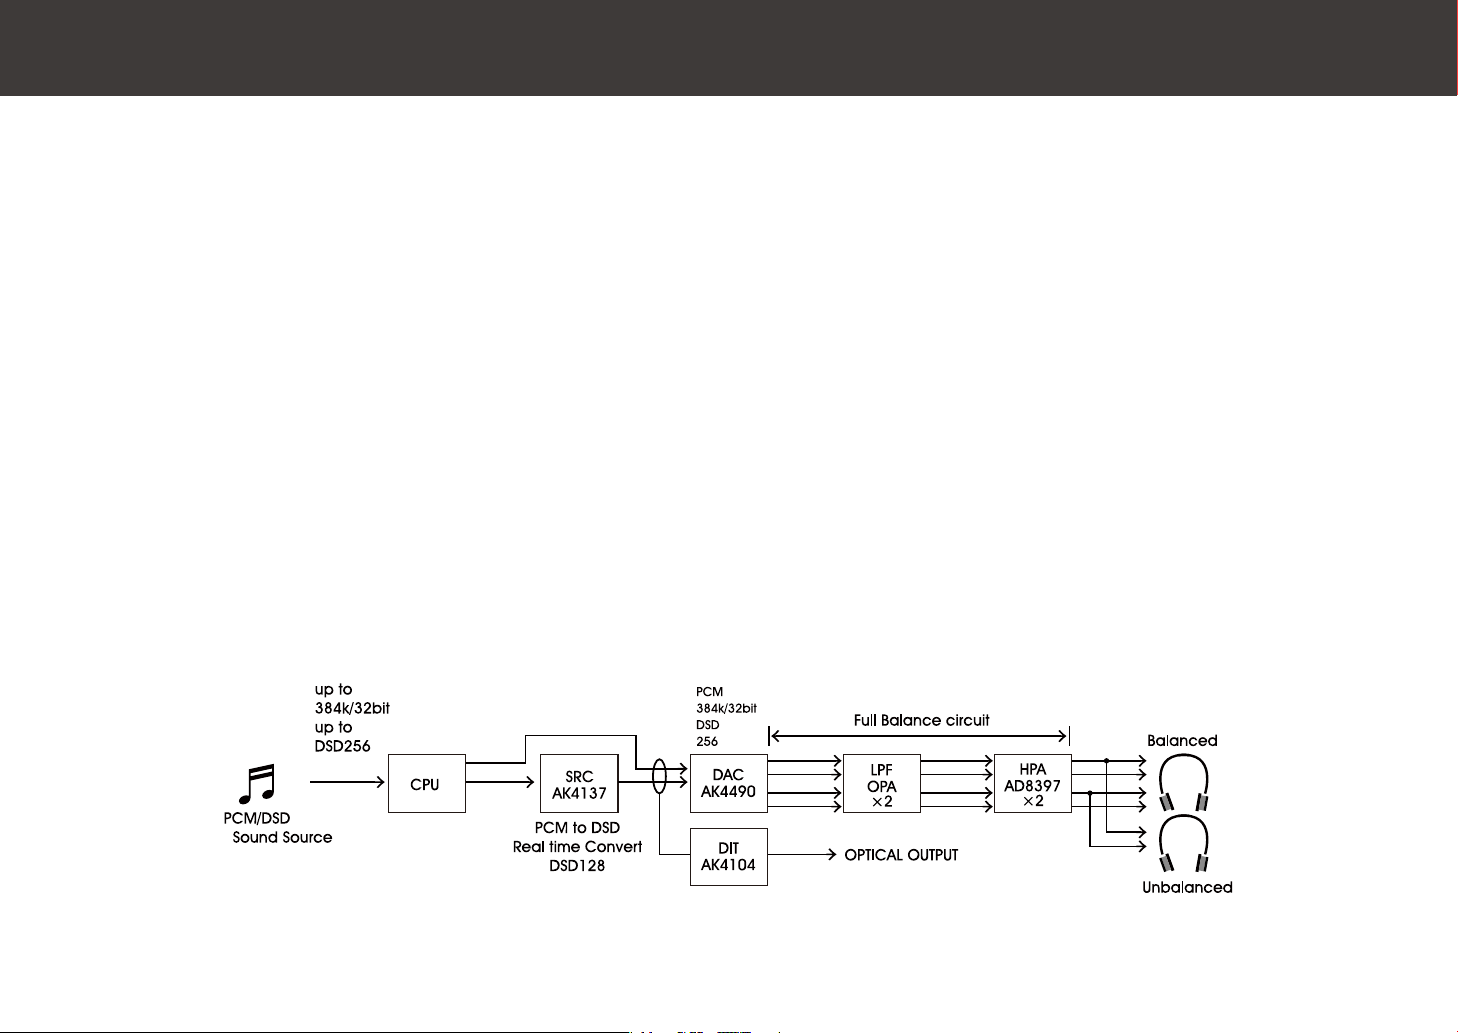
SounDroid VALOQ is a high quality and high end music player
by VentureCraft, that can provide a realistic sound close to the
original sound by converting the PCM audio source in various
formats to DSD128 or PCM maximum 384k/32 bits within the
player in real time, and supports DSD256 native playback and
playback of the PCM maximum 384k/32 bits.
It has realized an amazing cross talk, signal to noise ratio, and
expansion and low distortion of the dynamic range by adopting
the VERITA AK4137 by Asahi Kasei Microdevices for the real time
conversion SRC, which is the key function of this device, and
also by adopting VERITA AK4490, the flagship new generation
32 bit premium DAC by Asahi Kasei Microdevices, for the DAC.
The analog circuit of SounDroid VALOQ is full of passion that
cannot be found in the other portable players.
Overview of This Product
The analog circuit after the DAC is designed in full balance, us-
ing the VISHAY MELF for all the resistors in the signal circuit and
RUBYCON PML for the lm capacity for ltering, realizing smooth
audio quality by reducing heat noise and senses of peak and
noise.
New Japan Radio MUSES8820D is equipped as standard for the
operational amplier for LPF of DAC.
Also, the LPF operational amplier for DAC is designed to be re-
placeable, so it is designed to set the operational amplier that
the user prefers.
* Replacement is to be performed with the responsibility of the user.
A newly developed charge pump power supply is adopted for
the headphone amplier power supply, driving at ±7V.
It has realized high power and high audio quality, even though
it is a portable player, by adopting the Analog Devices AD8397
that secures sucient drive voltage and can drive large load in
superior linearity to the headphone amplier.

3
Name and Function of Each Part The appearance, print, and embossing may be changed depending on the model.
PHONE/OPT.OUT
terminal
Connect the normal headphones/earphones
(3.5mm stereo mini plug).
It is also possible to connect the optical digital ca-
ble (S/PDIF: Round 3.5mm mini) to play the track
saved on this device on an external device.
Volume/power dial
Turn the dial to switch the power
on/o and adjust the volume.
Back button
Returns to the previous menu/screen.
Returns to the Home screen by pressing and holding.
Lock switch
The operation of the Shuttle switch, Back button, and vol-
ume are locked by sliding it upward.
microUSB terminal
This is used to connect this device to
a PC or to charge this device.
Shuttle switch
Turn Upward: Fast reverse,
Downward: Fast forward
Click Selection, playback/pause
Double-click Play next track
Triple-click Play previous track
BAL
terminal
Connect the headphones/earphones supporting the
balance audio connection (2.5 mm 4-pole stereo).
LCD panel
PCM/DSD
lamp
The sampling frequency of the audio source be-
ing played back or the status of this device is noti-
ed by the LED lamp.
Power on
Power o
Volume max
Volume min
microSD card slot
The microSD card is inserted to access
the les in the microSD card.
* Recommended manufacturer:
SanDisk, Transcend, Silicon Power,
Toshiba, Samsung
Contents of this product set
●VALOQ main unit
●microUSB cable (USB2.0 compliant)
(A connector - microB connector type) x 1
●User card/warranty
When playing
back audio
source
●Red light 44.1kHz to 96kHz
●Green light 176.4kHz/192kHz
●Blue light 352.8kHz/384kHz
●Purple light DSD 64
●Orange light DSD128
●White light DSD256
When power
is on
●O When LCD is on
●Aqua blink When LCD is o
●Yellow blink SD card is formatting
When power
is o
●Aqua blink Ending
●Orange blink Charging
●Green blink Charge completed
Booting ●Aqua Normal boot
Booting ●Red blink (blink
for few seconds) Not enough battery.
Charge the device.
R-
R+
L+
L-
Supported
plug shape

4
Charge by connecting with a PC or the AC charger using the
supplied microUSB cable.
The commercially available AC charger (USB charging adapter)
is required to perform the AC charging.
Charging Home Screen
The battery is not suciently charged at the time of purchase.
Use the device after fully charging it.
Caution
●Orange blink Charging
●Green blink Charge completed
microUSB terminal
PCM/DSD
lamp
The
PCM/DSD
lamp will blink in orange while charging. Hierarchy display
(sub-menu, folder name,
artist name, etc.)
Select the item in the list by turning the Shuttle switch up or
down, and select by pressing the Shuttle switch.
The play screen is displayed by se-
lecting [Now playing] in the Home
screen while a track is being played.
To display the track being played back
Home screen Folder screen
microUSB cable
(supplied)
The page forward icon is displayed at
the top of the screen when the num-
ber of tracks to display has exceeded
200, so 201st and subsequent tracks
are displayed by selecting this and
turning the Shuttle button downward.
Page forward icon

5
Connecting to a PC (Copying Music)
Turn on the power of this device and the PC.
Drag and drop the music le inside the PC to the internal
drive (SDP-1) or the microSD card (removable disc or the
drive named as
NO NAME
) to copy.
Connect the microUSB terminal on the bottom of this de-
vice with the USB terminal on the PC using the supplied
microUSB cable.
Select [Player controls] - [Enter USB MSC mode] from the
Home screen of this device.
The conrmation screen is displayed, so select [Yes].
It will be connected to the PC and the drives for this device
and the microSD card are displayed on the PC.
1
5
2
3
4
It is necessary to format the microSD card in Fat32 to be
used on the external drive.
It will be Fat32 format when the drive format function in this
device is used.
Point
microUSB
terminal
Display example for Windows
(The drive letter will differ
depending on the used PC)
Display example for Mac
The le formats that can be played back with this device are
as follows.
WAV, AIFF, mp3, AAC, ALAC, FLAC, Ogg Vorbis, DXD, DSDIFF, DSF
(DSD256/SD (DSD128 when USB_DAC*))
* Supported after updated.
Make sure to make a backup in advance when transfer-
ring audio les to the internal drive or when updating the
rmware.
Caution

6
Listening to Music
Playing back
Select [Player controls] from the
[Options] list in the Home screen.
Set [Shue] or [Repeat] to [On].
An icon is displayed at the top
of the screen when the shuffle
function or the repeat function is
turned on.
Shue function/repeat function
Sub-menu
Playback will start by selecting a track from the list and selecting
it by pressing the Shuttle switch.
1
2
Shue icon
Play screen
Repeat icon
Gapless mode
icon (scheduled to
be installed)
Operation in the Play screen
The following operations can be performed with the shuttle
Switch during playback.
Turn Upward: Fast reverse, Downward: Fast forward
Click Switch playback/pause
Double-click Play next track
Triple-click Play previous track
Play time Remaining time
Track name display
EQ icon SRC output mode icon
(OFF/PCM192/
PCM384/DSD128)
Playback/pause icon
Album name
display
Format of file
being played
Format of the SRC
output
Current number/total number of tracks in list
(Number of tracks will change depending on
the selected folder, album, playlist, etc.)
The sub-menu is displayed by press-
ing and holding the Shuttle button
while the Play screen is displayed.
SRC output mode Switches the setting for
the internal sampling rate
converter.
Output PCM bit
depth
Switches the setting for the
bit depth for the internal
sampling rate converter.
Filter mode Switches the setting for
the DAC digital lter.
Open this folder
Displays the folder that
contains the track being
played.
Open this album
Displays the album that con-
tains the track being played.
Add this to a playlist
Adds the track being
played to a playlist.
7
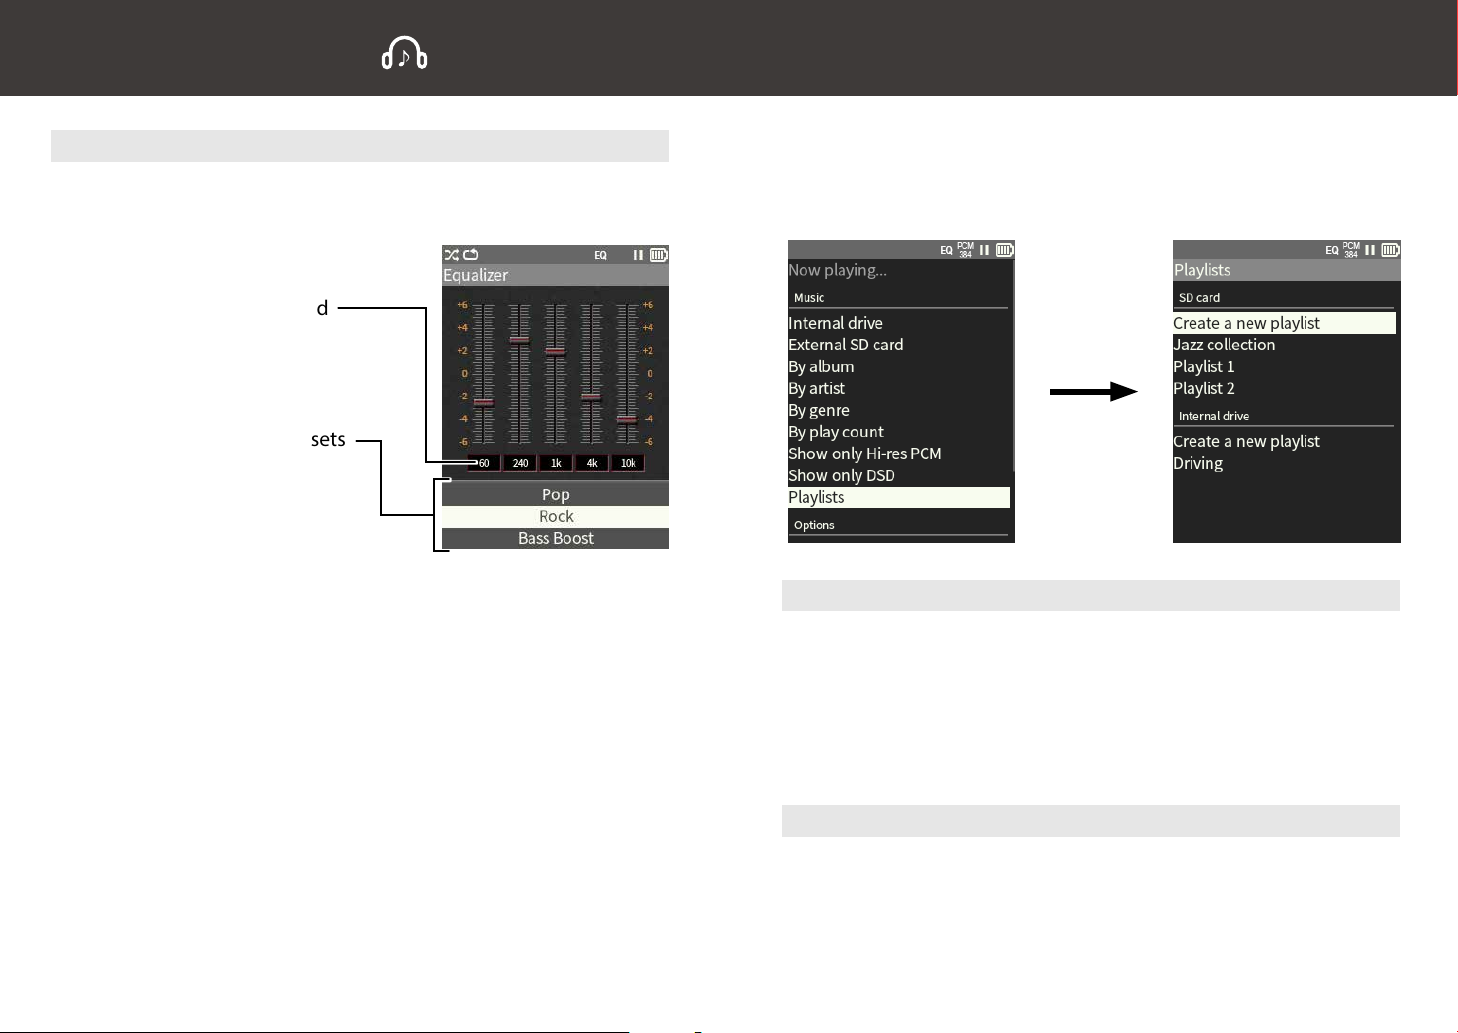
Playlist
Creating a new playlist
Connect a PC to this device, and change the name of the play-
list le on the PC.
Playlist 1 is created by selecting [Create a new playlist] in
the SD card or the internal drive and the Shuttle switch is
pressed.
A file named
Playlist 1
is displayed in the Playlists by
pressing the Back button.
1
2
Changing the name of the playlist
The Playlist menu is displayed when [Playlist] is selected in the
Home screen.
Home screen Playlist menu
Equalizer setting
Select [Audio settings] - [Equalizer] from the [Options] list in
the Home screen.
Each range can be selected
and set.
It can be set from the presets
by selecting the item.
off/Classic/Dance/Jazz/Pop/
Rock/Bass Boost/Treble Boost/
User setting
The band and gain setting values for the user setting are record-
ed in the internal memory even when the power is turned o,
so the setting values are applied after the power is turned on
again.
The equalizer is not applied when [o] is selected, and the au-
dio source is output without any change.
Listening to Music (Cont.)

8
Analog output settings
Audio quality
Options Menu List
Player controls
Setting item Selection item Description
Shue O, On Shues tracks.
Repeat O, 1 track,
All tracks
Repeats 1 track or all the
tracks.
Click interval 300 to 600ms Sets the time until the op-
eration after pressing the
Shuttle switch. (ms = 1/1000
seconds)
Enter USB MSC mode
-
Connects this device with a PC.
Setting item Selection item Description
Equalizer
o, Classic, Dance,
Jazz, Pop, Rock,
Bass Boost,
Treble Boost,
User setting
Sets the equalizer.
→7p
Audio settings
Setting item Selection item Description
SRC output mode Bypass,
PCM176.4/192KHz,
352.8/384KHz,
DSD128
Switches the setting for the
internal sampling rate con-
verter.
* The SRC output will be DSD128
output only if the playback le is
DSD64 when DSD128 is set.
* PCM conversion is not per-
formed if the playback file is
DSD when PCM is set.
Playlist (Cont.)
Adding/deleting a track to the playlist
Select a playlist from the Playlists and press and hold the
Shuttle switch.
The sub-menu is displayed.
Select either [Add music to this playlist] or [Remove this
playlist] and press the Shuttle switch.
1
1
2
2
3
When adding a playlist, select the track and press the Shuttle
switch.
To add the track being played
Press and hold the Shuttle
switch while the Play screen is
displayed.
The sub-menu is displayed, so
select [Add this to a playlist].
Select [Create a new playlist]
or an existing playlist.

9
Other settings
Setting item Selection item Description
Language Japanese,
English
Sets the language to display.
Language setting
Setting item Description
Updates the internal software.
Format a drive Formats the internal drive/SD card.
Format and update
Options Menu List (Cont.)
Setting item Selection item Description
Backlight brightness 20 to 100% Sets the brightness of the
backlight.
Time to dim
backlight
Sets the time to dim the
backlight.
backlight backlight.
power.
LCD and power settings
Setting item Description
Legal notices Displays license information, etc.
About VALOQ Displays version information, etc.
Information
Setting item Selection item Description
Gain 0 to -30dB
(1 dB steps)
Sets the gain of the head-
phones or the earphones.
L/R Balance
L12 to Center to R12
(0.5 dB steps)
Sets the gain balance be-
tween left and right.
Touch locks Volume
knob
The volume is also locked
when the Lock switch is set
to the lock position.
Volume settings
Setting item Selection item Description
SRC output mode Bypass,
PCM176.4/192kHz
Switches the optical digital
output.
Digital output settings
Setting item Selection item Description
Output PCM bit
depth
16, 24, 32 Switches the setting for the
bit depth for the internal
sampling rate converter.
* Bit depth cannot be se-
lected when the SRC output
mode is DSD128.
Filter mode Super slow,
Slow,
Fast,
Switches the setting for the
* Filter setting cannot be se-
lected when the SRC output
mode is DSD128.
Line output mode Switches to the headphone
output or the line output.
10
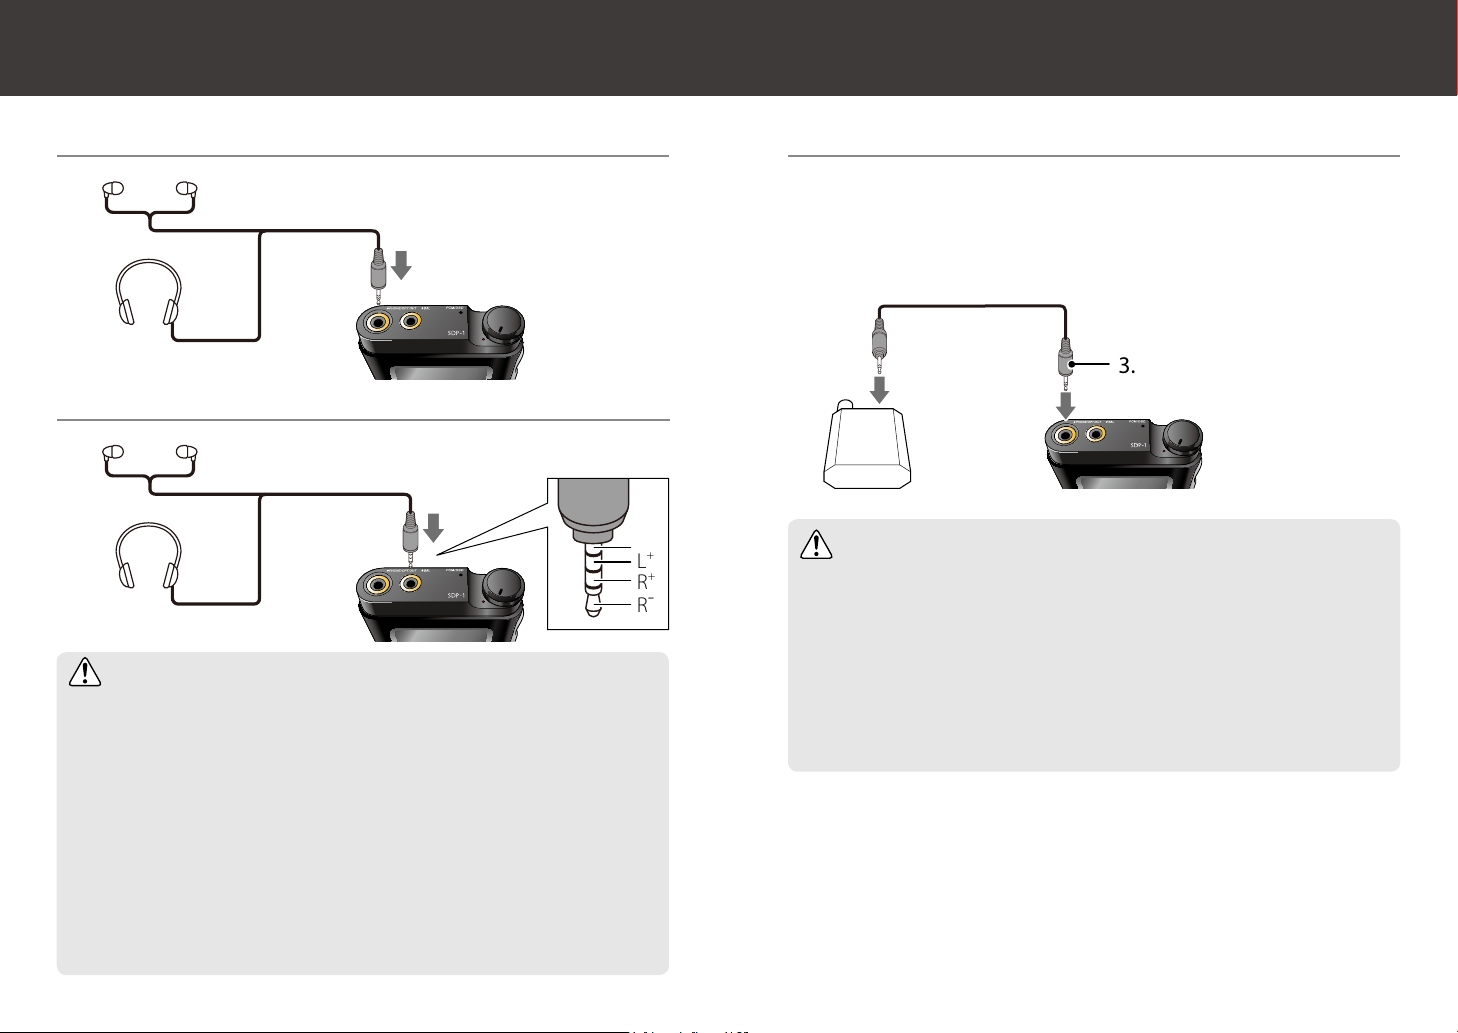
Connecting with Headphones/Earphones
Standard headphones/earphones
Headphones/earphones supporting the balance connection
Connect to the
PHONE/
OPT.OUT
terminal
Connect the
PHONE/OPT.OUT
terminal with the line input ter-
minal of the destination.
Set [Audio settings] - [Analog output settings] - [Line output
mode] to [On] when performing line output.
Connect to the
BAL
terminal
R-
R+
L+
L-
●Connecting anything other than the above plug may cause
malfunction by shorting, etc.
●Do not connect the earphones/headphones to both
PHONE/OPT.OUT
terminal and the
BAL
terminal simul-
taneously. It may cause malfunction due to power con-
sumption and high load.
●Replacement of the connection plug or modication of the
cable may be required when connecting earphones/head-
phones to the
BAL
terminal. VentureCraft is not liable for
any damage, etc., of the device caused by modication.
Caution
Caution
Connecting with an External Device
Line output
3.5mm stereo mini plug
●Do not connect the earphones or headphones when set to
line output mode.
Make sure that the earphone or headphone plug is discon-
nected when setting [Line output mode] to [On].
It is played back at the maximum output level (2Vrms) re-
gardless of the volume position when [Line output mode]
is set to [On].

11
Updating the Firmware
Return to Factory Default
Download the update file (update.bin) from the Venture-
Craft software download site and save on the microSD card.
1
Insert the microSD card with the update file saved into
the microSD card slot of this device.
* Insert while the power is turned o.
2
Turn on the power of this device.
3
Select [General settings] - [Misc] - [Update the firmware]
from the Home screen of this device.
4
Update following the instruction on the screen.
5
Select [General settings] - [Misc] - [Format a drive] from
the Home screen of this device.
1
Select [Internal drive].
2
Select either [Cancel] or [Yes].
All the data in the drive will be lost when [Yes] is selected.
3
Connecting with an External Device (Cont.)
Optical digital output
Connects to the
PHONE/OPT.OUT
terminal in the same way as
the 3.5mm stereo mini plug cable.
●The optical output of this device can be set to either Bypass
or 176.4/192kHz 24bit. (Set in [Audio settings] - [Digital out-
put settings] - [SRC output mode])
●The optical output is PCM converted during DSD playback.
●Use the optical cable supporting 176.4/192kHz.
S/PDIF round 3.5mm
mini plug
Make sure to make a backup in advance when transfer-
ring audio les to the internal drive or when updating the
rmware.
Caution
12
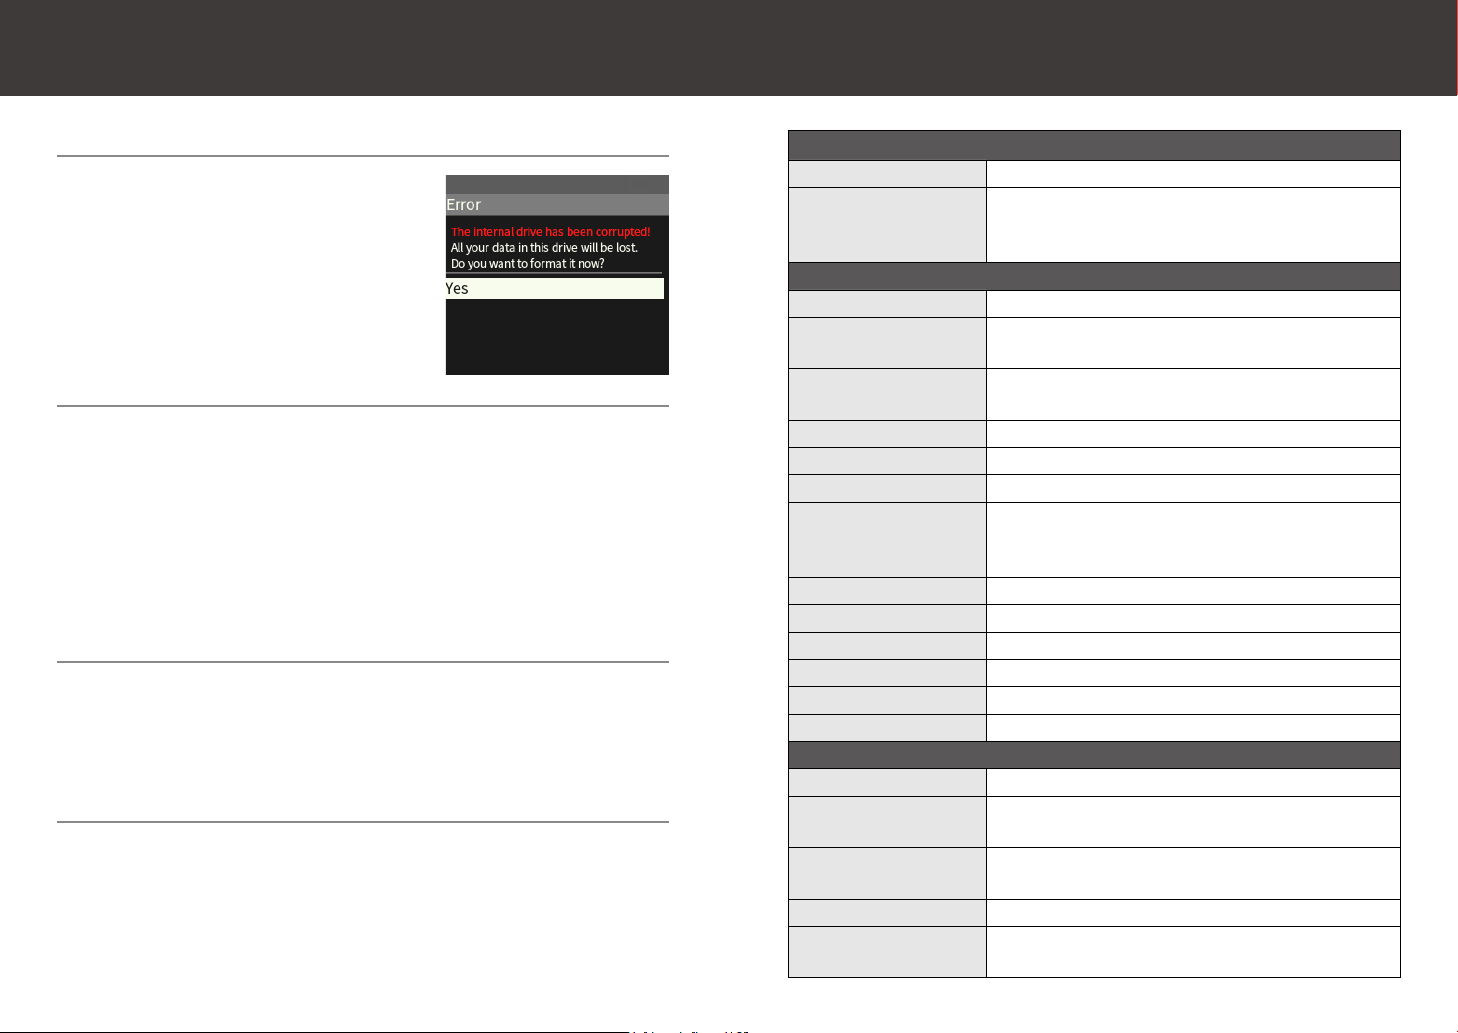
Troubleshooting
Error screen of the internal drive is displayed
Select [Yes] when the screen to the
right is displayed to format the drive.
The power does not turn on
(1) Turn o the power switch.
(2) Disconnect the microUSB cable.
(3) Turn on the power switch.
(4) If the power still does not turn on, charge for approximately
30 minutes, and try again from (1).
If the power still does not turn on, perform steps (1) to (3) for
Power cannot be turned o.
Power cannot be turned o
(1) Turn o the power switch.
(2) Disconnect the microUSB cable.
(3) Press and hold the Shuttle switch and the Back button for 10
seconds.
Pop noise sounds when turning on the power
To prioritize the audio quality, this device only uses a minimal
muting circuit and it is not equipped with a semiconductor
switch, etc.
Therefore, some pop noises may sound, but this is not a mal-
function.
Major Specications
Memory media
Internal memory Approx. 6GB
External slot microSD card x 1: SDHC/XC
* SDXC will support up to 2TB (4GB per le) by for-
matting with this device
Music playback
Continuous playback Approx. 7 hours (FLAC/44.1k/16bit)
File format WAV, AIFF, mp3, AAC, ALAC, FLAC, Ogg Vorbis, DXD,
DSDIFF, DSF (DSD256/SD (DSD128 when USB_DAC*))
Sampling rate PCM: 44.1/48/88.2/96/176.4/192/352.4/384kHz
DSD: DSD64/DSD128/DSD256
Quantization bit rate 16/24/32 bit
Folder management ○
Tag information ○
Database management
Music (all/by how many times played/playlist), by al-
bum, by artist, by genre, show only hi-res PCM, show
only DSD
Resume function ○*
Album art display ○
Playlist function ○
Repeat mode Repeat, 1 track repeat, shue
EQ function 5 band EQ
Gapless playback ○(on/o ) *
Electrical performance
Headphone output 125mW+125mW at 32Ω(Unbalance/Balance)
Line output level 2Vrms (with no load, during line output mode)
(Unbalance/Balance)
Frequency property 10Hz-80kHz (PCM384kHz, +0.5dB/-3dB)
(Unbalance/Balance)
S/N ratio 113dB or higher (A-weighted) (Unbalance/Balance)
THD+N 0.001% or less (1kHz/-6dBFs, PCM 44.1kHz 24bit, with
no load) (Unbalance/Balance)
13
Major Specications (Cont.)
Display language
Japanese, English, Chinese (Traditional, Simplied), others *
Power supply
Battery Internal lithium ion polymer (3000mAh/3.7 V)
Auto o function Auto power off (user setting possible), back-
light o (user setting possible), sleep timer
Charging method
Charging only (when power is off ), charging &
playback, charging & data transfer
Charging time Approx. 6 hours (with 500mA charging)
USB type
Shape microUSB (B)
Interface USB2.0 High speed
USB class USB mass storage
Screen
Display resolution 2.4 inches TFT color LCD QVGA (W320 x H240
dots)
Size/weight
Size W70mm x H107mm x T20mm
Weight Approx. 160g
The specifications and appearance of the device may be changed
without prior notice.
* Supported after updated.
Cautions on Use
In order to use this product safely and prevent accidents, please take the follow-
ing cautions.
■In order to avoid risks such as re and electric shock, do not use in high-hu-
midity environments or where this product may come in contact with water.
■Do not use, charge, or leave this product in locations exposed to direct sun-
light such as car dashboards and window sills. Also, do not use, charge, or
leave in high-temperature environments such as inside vehicles parked in
the sun or near heat sources such as heaters and stoves.
■Do not use to play music, etc. while driving a vehicle, riding a bicycle, or walk-
ing.
■If liquid that has been leaked from the battery makes contact with your skin
or cloths, wash under running water immediately. Also, if such liquid enters
your eyes, wash under running water immediately without rubbing and con-
sult a doctor.
■Do not disassemble, modify, or repair this product by yourself.
■If this product does not get fully charged after the specied charging time,
cease charging and arrange for inspection/repairs to be performed.
■Use a soft cloth to clean this product. Do not directly apply water, dust spray,
solvent, polisher, cleaning agent, etc.
■The battery has a life duration. The usable duration will become shorter due
to aging degradation. Do not keep charging for a long period of time. Always
disconnect the microUSB cable each time when charging is completed.
■Any damage or malfunction (including stripped screw) regarding the re-
placement of OPAMP is responsible of the user, and VentureCraft is not liable
even if it is still under the warranty period.
■The screw may be stripped when using an inappropriate screwdriver.
The screwdriver recommended to be used is the VESSEL T5 No. 5400TX Pow-
er Grip TORX screwdriver.
* Even if there was a problem using the screwdriver recommended by Ventu-
reCraft, opening/closing of the screw is a disassembly, so VentureCraft is not
liable.
Battery Disposal and Recycle
When disposing of this product, do so in accordance with
the laws and regulations applicable in the area you live.
This product has a built-in battery therefore can not be
disposed of together with general household waste.
Li-ion
14
有毒或
有害物质
零部件
电路板 附件
铅 (Pb) ○ ○
汞 (Hg) ○ ○
镉 (Cd) ○ ○
六价铬 (Cr6+) ○ ○
多溴联苯 (PBB) ○ ○
多溴二苯醚 (PBDE) ○ ○
○ 表示该有毒有害物质在该部件所有均质材料中的含量均在 SJ/T 11363-2006 标
准规定的限量要求以下。
× 表示该有毒有害物质至少在该部件的某一均质材料中的含量超出 SJ/T11363-
2006 规定的限量要求。
根据中国电子行业标准 SJ/T11364-2006 和相关的中国政府法规,本产品及其某
些内部或外部组件上可能带有环保使用期限标识。取决于组件和组件制造商,
产品及其组件上的使用期限标识可能有所不同。组件上的使用期限标识优先于
产品上任何与之相冲突的或不同的环保使用期限标识。
This symbol means that according to local laws and regulations
your product and its battery should be recycled separately from
household waste. When this product reaches its end of life, take
it to a collection point designated by local authorities for the
recycling of electronic product. The improper disposal of waste
electronic product from the consumer may be subject to nes.
The separate collection and recycling of your product and its
European Union - Electronics and Battery
Disposal Information:
Cautions on Use (Cont.)
About China RoHS Compliance
有毒有害物质或元素含有表
battery at the time of disposal will help conserve natural re-
sources and ensure that it is recycled in a manner that protects
human health and the environment.

15
Venturecraft Inc. Gadget Business Division
http://www.go-dap.com/
4F Showa No. 8 Kanda Bldg., 2-12-5 Uchikanda, Chiyoda-ku,
Tokyo, 101-0047 JAPAN
The system names and device names described in this User
s
Guide are generally registered trademarks or trademarks of
each development manufacturer. The ® and ™ marks are not de-
scribed in the body text.
© 2015.12 Venture Craft Inc. SDP-1
Disclaimer
●VentureCraft is not liable for any damage caused by earthquake,
thunder, wind or water disaster, fire not responsible of Venture-
Craft, accident caused by the action of a third party or other caus-
es, deliberate or oversight misuse by the customer, or caused by
any other abnormal conditions.
●VentureCraft is not liable for changing or loss of recorded con-
tents, loss of business prot, or damage associating with discon-
tinuance of the business caused by using or being unable to use
this device.
●VentureCraft is not liable to the damage caused by not following
the description of this User
Guide.
Product Support Trademarks and Registered Trademarks
Hour of operation: Weekdays 10:00 to 17:00
(closed on Sat, Sun, holidays)
Contact: [email protected]
FAX: +81-3-3525-8417
Table of contents
Popular MP3 Player manuals by other brands

Creative
Creative TRAVELSOUND I50 - QUICKSTART FRONT quick start guide

YURAKU
YURAKU YUR.BEAT MEDIAX - instruction manual

Clas Ohlson
Clas Ohlson BM366 instruction manual

Polaroid
Polaroid P2 quick start guide

ENERGY SISTEM
ENERGY SISTEM ENERGY MP3 Running quick guide

Philips
Philips SA3SDV00DN/02 quick start guide


