Ventus WT816 User manual

Trådløst overvågningskamera.
1
WT813 indoor
WT816 Outdoor
Manual
Wireless IP Camera WT813 / WT816

2
Contents
1 General Description.................................................................................................................................................3
1.1 Product Reviews..........................................................................................................................................3
1.2 Description before use.................................................................................................................................3
1.2.1 Features..........................................................................................................................................................3
1.2.2 Packing List......................................................................................................................................3
1.3 Hardware Description ..................................................................................................................................4
2 How to Use Camera.................................................................................................................................................5
2.1 Hardware Connection..................................................................................................................................5
2.2 WEB TerminateAccess IPCam....................................................................................................................6
3 How to use IE Operation Interview use ....................................................................................................................8
3.1 Pan Tilt Control Area ...................................................................................................................................8
3.2 Operation Tools Area...................................................................................................................................9
3.3 Video Adjust Area........................................................................................................................................9
4 Device Parameter Setting......................................................................................................................................10
4.1 Device Basic Information...........................................................................................................................10
4.1.1 Device Basic Information...............................................................................................................10
4.1.2 Device Name Setting.....................................................................................................................10
4.1.3 Device Clock Setting .....................................................................................................................10
4.1.4 Local Record Route........................................................................................................................11
4.1.5 SD Card Plan .................................................................................................................................11
4.2 Alarm Setting.............................................................................................................................................12
4.2.1 Alarm Setting.................................................................................................................................12
4.2.2 Email Setting.................................................................................................................................13
4.2.3 FTP Setting ...................................................................................................................................14
4.2.4 Alarm Blog.......................................................................................................................................14
4.3 Device Network Setting..............................................................................................................................15
4.3.1 Basic Network Setting....................................................................................................................15
4.3.2 Wifi LAN Setting ............................................................................................................................15
4.3.3 DDNS Setting..................................................................................................................................16
4.3.4 Docking NVR Function................................................................................................................................16
4.4 PTZ Setting ................................................................................................................................................17
4.5 Users and Device Management.................................................................................................................18
4.5.1 Multi-devices Settings....................................................................................................................18
4.5.2 Users Setting................................................................................................................................. 19
4.5.3 Maintain......................................................................................................................................... 19
5Back ...................................................................................................................................................................... 19
6 FAQ .......................................................................................................................................................................20
7 Specification...............................................................................................................................................................21
8.Obtaining Tech Support..............................................................................................................................................22
WT813 / WT816

3
1 General Description
1.1 Product Reviews
Thank you for using our IP camera products.The IP camera designed for network video surveillance,adopted high performance and powerful
single SOC chip media processor to integrate audio and video capture,compression and transmission.Standard H.264 Main Profile coding
ensures clearer and smoother video transmission effect. Built-in Web Server allows users to easily perform real-time monitoring and remote
control over front-end cameras via IE browser.
1.2 Description Before Using
1.2.1 Features
HD 720P video(SOC chipset and microcontroller processor)
UP to 10m IR
Multi-platform for client software application
Support P2P,WiFi
Support ONVIF 2.0 protocol
PT control
Monitor and talkback
Switching dual IR-Cut filter automatically
Motion detection alarm
TF card circulate record
Rotate lens and focus
1.2.2 Packing List
Untie the pack and check the items contained against the following list:
●IP Camera X1
●Wi-Fi Antenna X1 (only available for wireless model)
●User Manual X1
●DC Power Supply X1
●Network Cable X1
●Mounting bracket X1
NOTE:Please contact us immediately in case of any damaged or short of contents.
WT813 / WT816

4
1.3 Hardware Description
Front View
Figure 1.1
Indoor Camera
1.Sensitive Hole:For light sensitive
2. Infrared LED:10 LEDs
3.LENS:CMOS sensor with fixed focus lens. (Default is 3.6mm, 6mm optional)
4. Network Indicator LED:If there is network activity, the LED will blink
5. Microphone:Build-in microphone
6. Speaker:Build-in speaker
7. Wireless Antenna:WI-FI Antenna
Outdoor Camera:
1. Lens:Default is 3.6mm
2.Infrared LED:4 LEDs
3.Sensitive Hole
Rear Panel
Figure 1.2
LAN:RJ-45/10-100 base T
Power:DC 5V/2A power supply
Network Light:The green LED will on when connect to the network, the yellow LED will blink when data transferred
Audio Output:The jack is used to plug external speaker
WT813 / WT816

5
Bottom View
Figure 1.3
Original IPCAM have some stickers at the bottom, such as MAC address sticker, QC sticker etc.
RESET
Press and hold the RESET BUTTON for 10 seconds,then the IPCAM will be reset back to
the factory default Parameter.(Please keep the power on when do RESET)
2 How to Access to IP Camera
2.1 Hardware Connection
Figure: 2.1
Follow the steps below to set up your camera hardware.Make sure to follow each step carefully to ensure that
the camera operates properly
1. Install the Wi-Fi antenna
2. Plug the power adaptor into camera
3. Plug the network cable into camera and router/switch
4. It takes approx 30 seconds to boot up the camera,then you will find the IP address from
“IP Camera Tool” (Figure:2.1)
5. When the power on and network cable connected,the green led of the real panel will keep on,
6. The yellow led will keep flash,and the Indicator led at the front of the camera will flash.(The indicator LED can be controlled by software).
WT813 / WT816
6
2.2 Access IP Camera from web terminate.
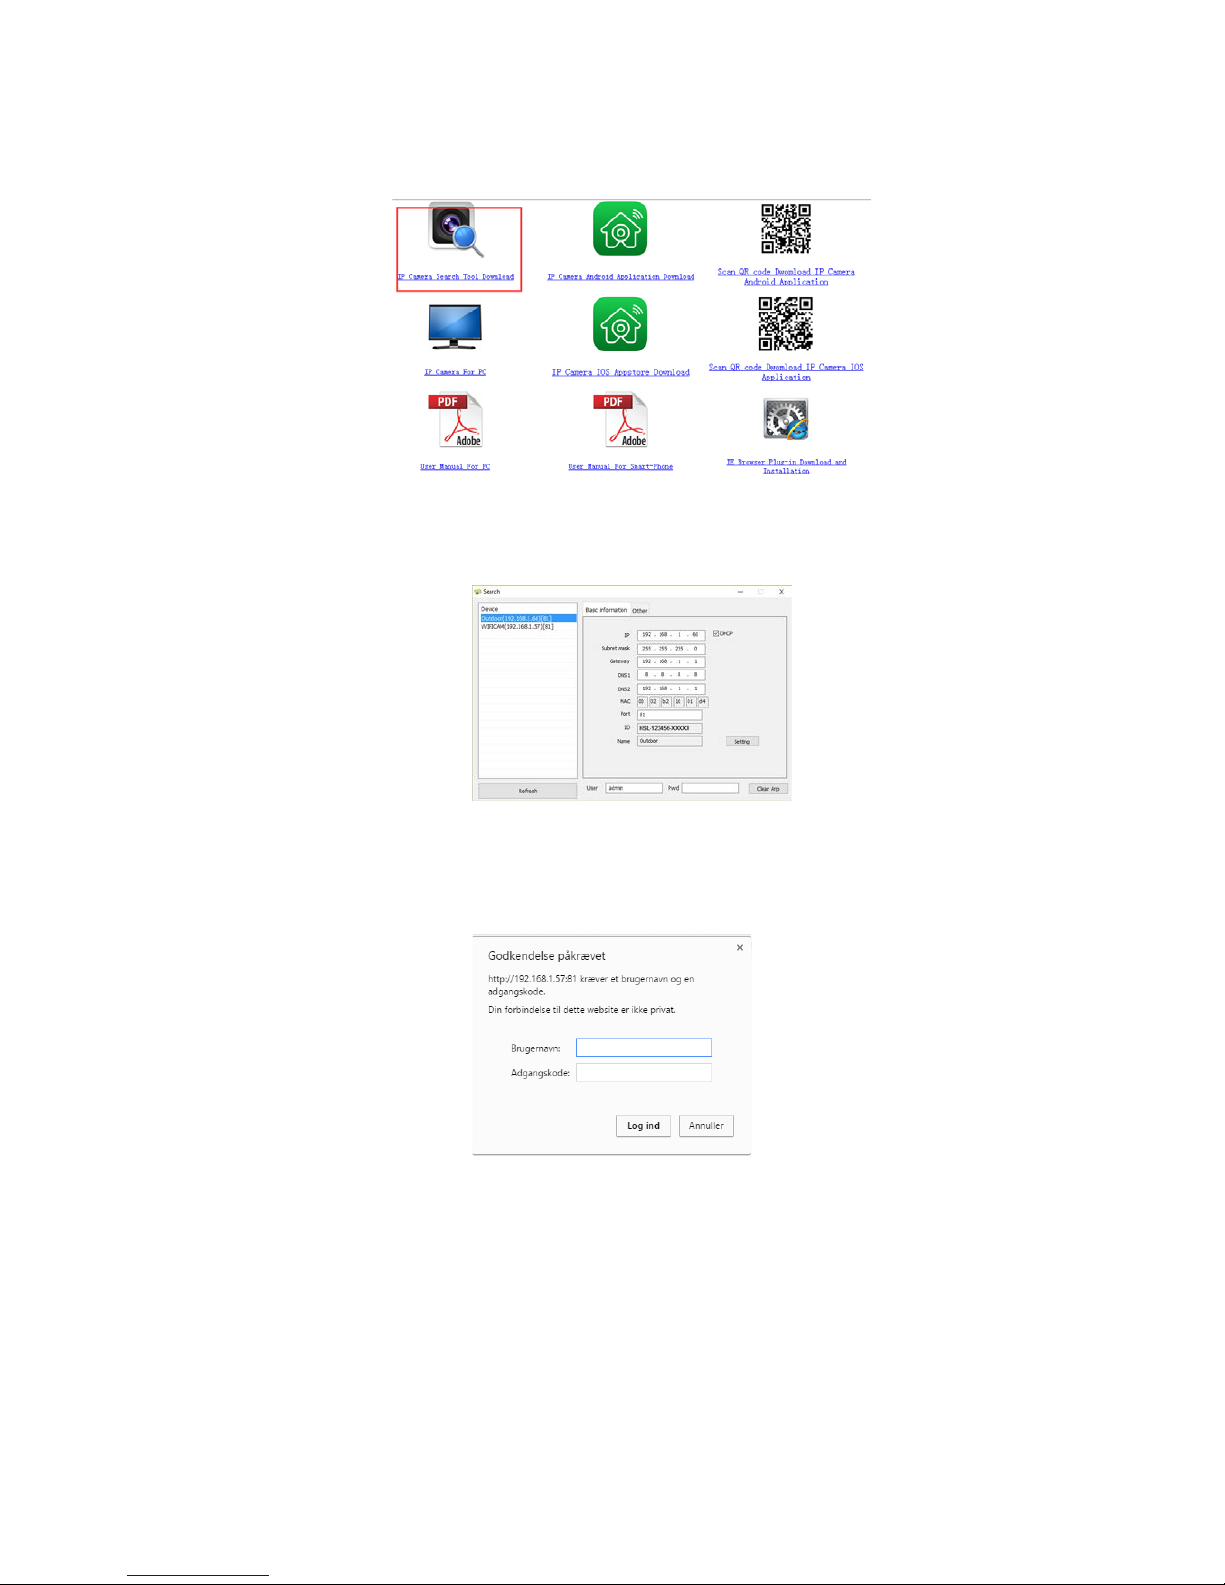
Login http://www.netcam360.com/ to download “IP Camera Search Tool”(support windows OS)
Figure 2.2
2.After downloading software,please open “IP Camera Search Tool”,enter the web page(Figure 2.3):
Figure 2.3
3.Click refresh button,search connected device,then double click device picked,enter web access,input default user name “admin”and psw is
none,then click confirm.
Figure 2.4
WT813 / WT816
7
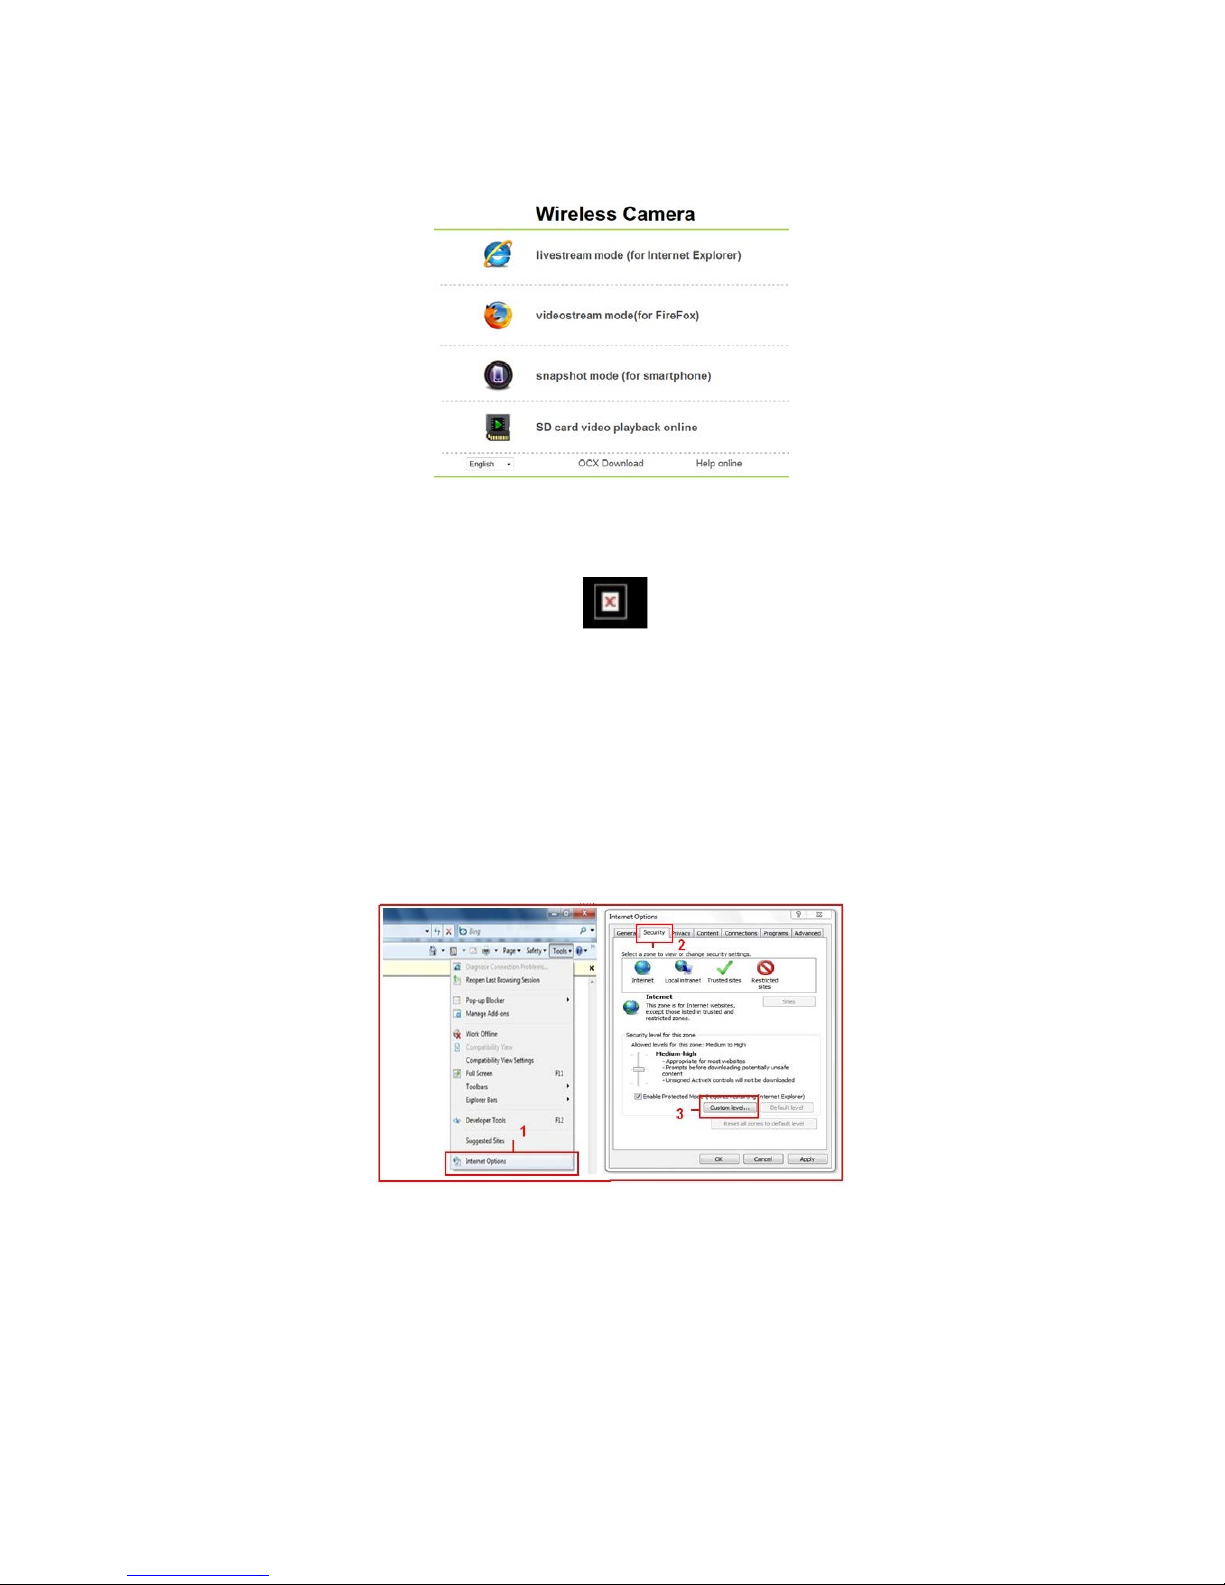
4 Select language and entry mode:Support IE,Firefox,Smartphone and SD card record.
Figure 2.5
4.1 The first time login the camera,maybe get ActiveX prompt,please click the prompt and choose Run Add-on,refresh and login the camera
again,then will see live video.
Note: If there is still no live video after run ActiveX,and a red cross ,showed in the center of the screen,
or even just a black screen, please try to enable theActiveX options of IE security settings.
Please do the follow steps:
1. Close the firewall of your computer.
2. Change the ActiveX settings, “IE” browser > “Tool” > “Internet Options” > “Security”> “Custom Level” >
“ActiveX control and Plug-ins”, all the ActiveX options set to be “Enable”:
Especially:
Enable:Download unsigned ActiveX controls
Enable:Initialize and script ActiveX controls not marked as safe
Enable:Run ActiveX controls and plug-ins
Figure 2.6
WT813 / WT816

8
Figure 2.7
In addition: you can also click “Start” menu->“Internet Explorer”, choose “Internet attributes “ to enter, or via
If you allowed theActiveX running, but still could not see live video, only a Red Cross
“Control Panel” ->“Internet Explorer”, enter to Security setting.
3 How to use IE Operation Interview use
IE Operation Interface,see below picture:
Figure 3.1
3.1 Pan Tilt Control Area
Figure 3.2
WT813 / WT816

9
3.2 Operation Tool Area
Figure 3.3
3.3 Video Control Area
Figure 3.4
Figure 3.5
4 Device Parameter Setting
Click icon to entry management interface of device parameter,see below:
Figure 4.1
WT813 / WT816
10
4.1 Device Basic Information
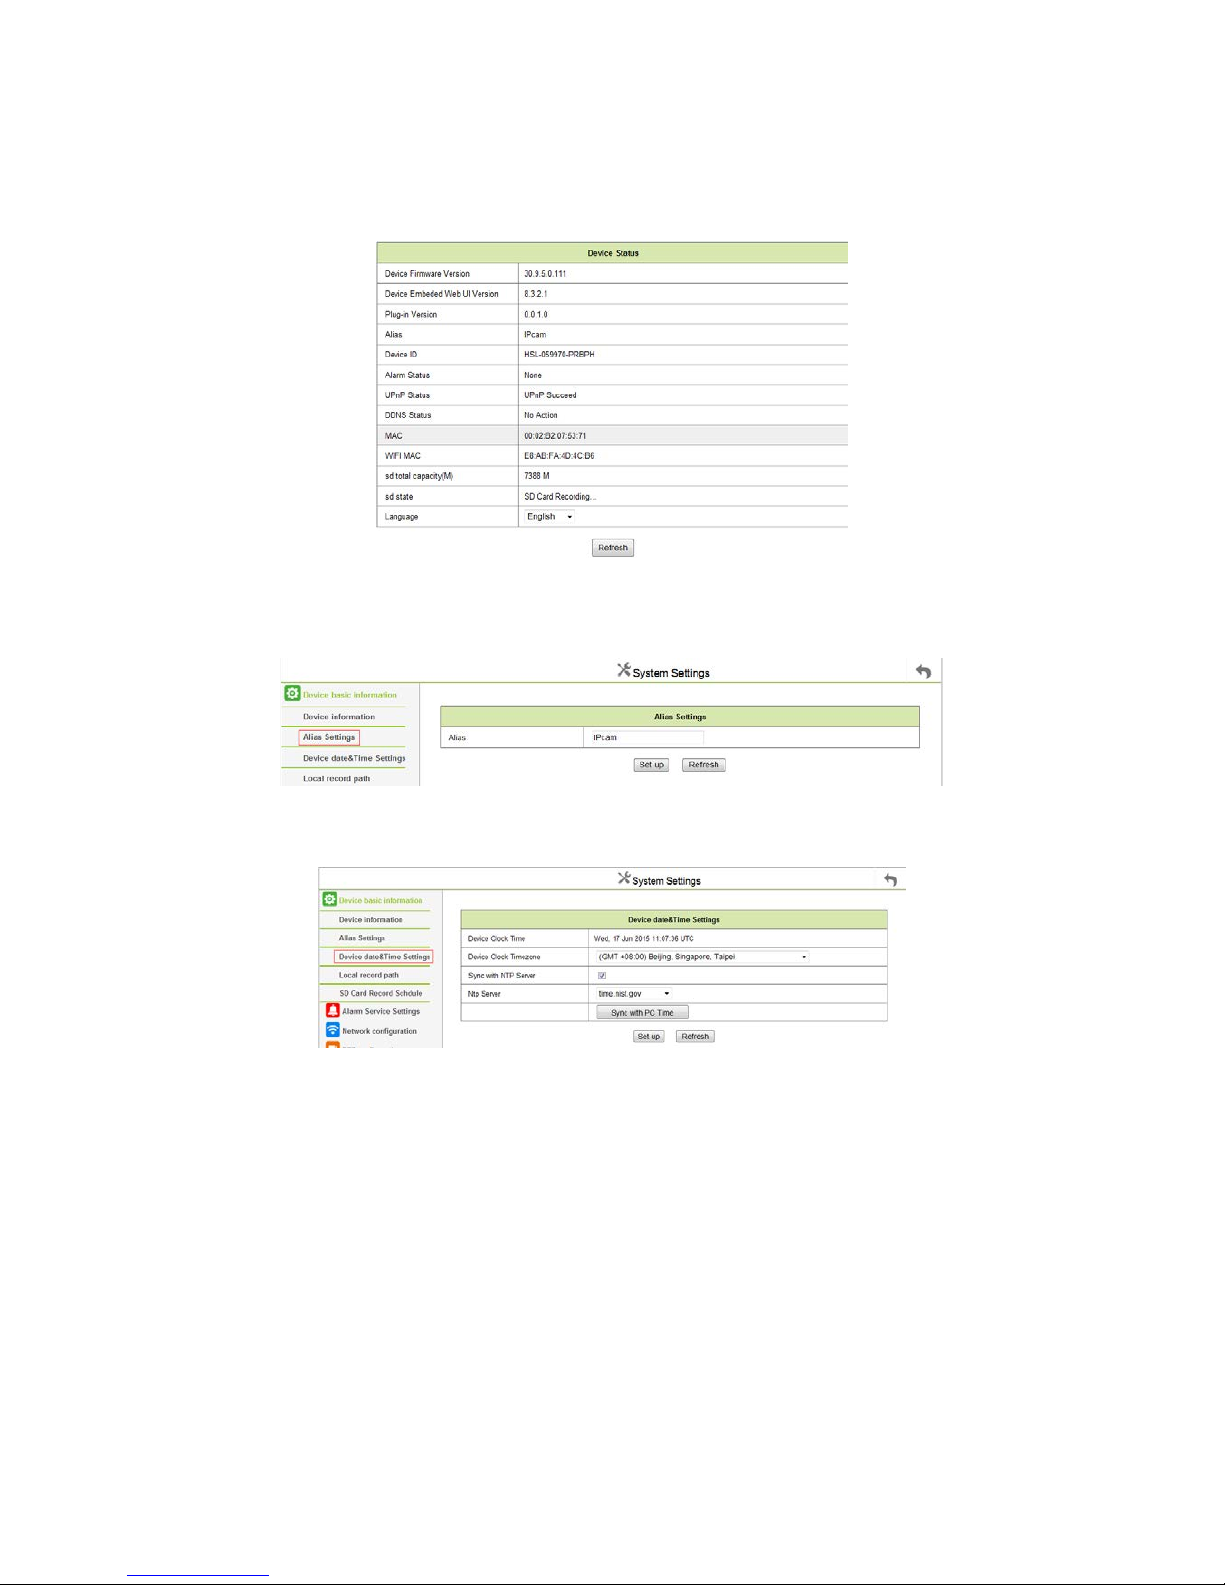
4.1.1 Device Information
Below is device information interface:
Figure 4.2
4.1.2 Device Alias Settings
Setting Device Alias
Figure 4.3
4.1.3 Date &Time Settings
Figure 4.5
Set the date and time for your camera.
Choose the Clock Time zone of your country.
You can choose Sync with NTP Server (Figure 8.3) or Sync with PC Time.
WT813 / WT816
This manual suits for next models
1
Table of contents


