Vermeiren scooterpac User manual

Canopy user manual
Mode d'emploi protection de pluie
Gebruikershandleiding regenscherm
Gebrauchsanweisung wetterschutzdach
Istruzioni per l'uso cappottina
Manual de instrucciones capota
Instrukcja obsługi dachu
®

Come rain or shine
its fine out with
ScooterPac.
Take a read
of this manual
to get the most
out of your
folding canopy.

Contents
1 Warnings and safety notes
2 Using the canopy
3 Introduction to the canopy
5 Quick start guide
7 Contents delivery
9 Tools you will need
10 Technical specifications
11 Mounting the canopy to the scooter
19 Detailed guide to using the canopy
20
brighten
your day
37 How to care for the Scooterpac canopy
30
How to use the canopy
Folding the canopy away
UK

It is strongly recommended that you read this section carefully before using the canopy.
These warnings and safety notes will ensure that you enjoy many years safe use of the
canopy. Keep this manual for future reference. ScooterPac cannot accept liability
for any injury which is caused by misuse or failure to follow this manual.
All images in this manual are representative and your canopy may differ from that shown.
ScooterPac reserves the right to amend or change this user manual without notice.
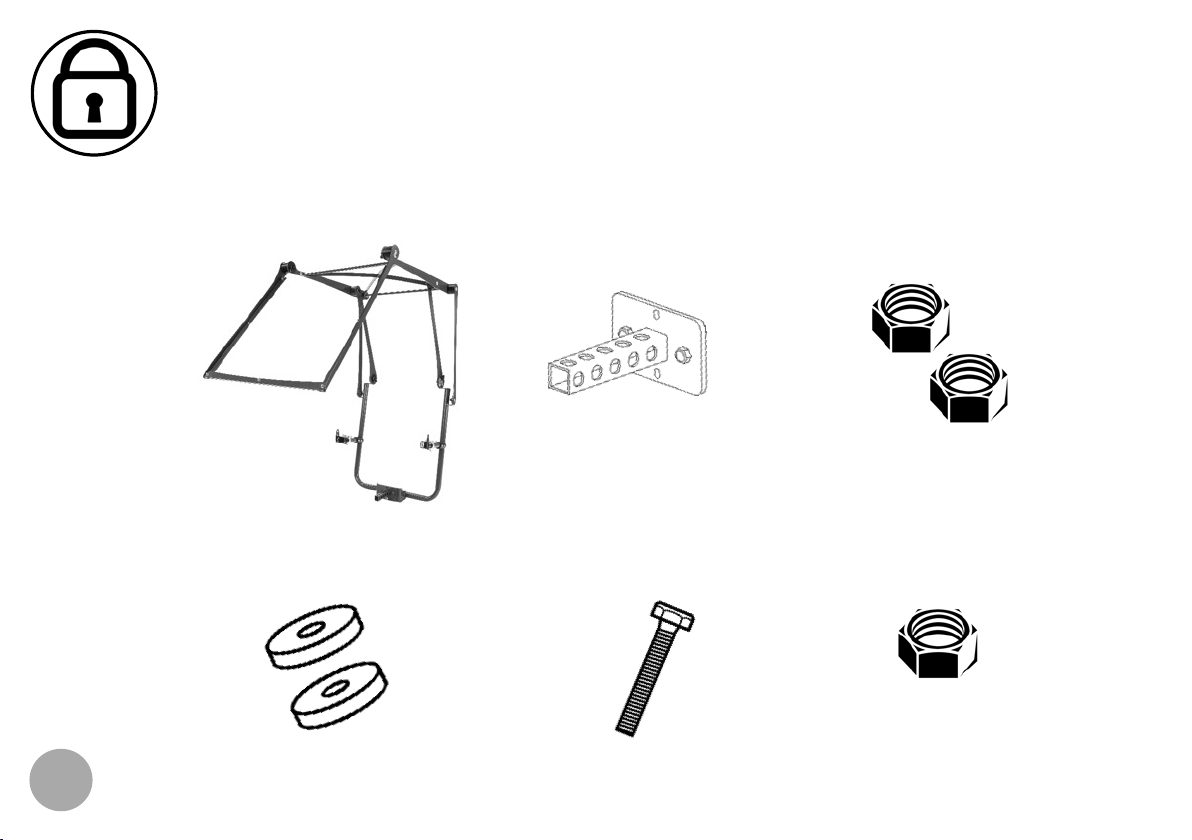
The canopy is only to be fitted by an able bodied person, using the tools specified.
In fitting the canopy to your scooter, you accept that the scooter has suitable securing
points. ScooterPac cannot accept liability for any loss, damage or personal injury to yourself
or others which occurs due to an unsuitable fitting point on the scooter, or due to the canopy
not being securely and safely secured to the scooter.
Warnings and safety notes
1

Using the canopy
-Ensure the canopy is correctly fixed to the scooter and that all installation steps have been
completed.
- Keep fingers away from moving parts and only operate from handling points listed in
this manual.
- Ensure the canopy is used appropriately and that both doors are fully closed when
being used.
- Only use the canopy on scooters which have all the necessary fixing points.
- Check all fixings are secure and do not use if damaged or faulty parts are found before use.
- To order spare parts for the canopy contact your local ScooterPac dealer.
- The canopy should only be used in the fully unfolded position or fully closed up with the
protective bag covering it.
- Do not try to fold or unfold the canopy while sitting on the scooter.
- Do not use the canopy folded out in winds above 25mph.
- The canopy is designed for pavement and road use only.
2

3
Introduction to the canopy
Basket fixing access
Luxury Perspex screen
Large access zips
Colour coded Velcro

4
Locking mechanism
Universal mounting bracket
Mounting spigot

Quick start guide
Assemble
the canopy
onto your
scooter as
per instructions
in this manual
Tip: Ask your local dealer to fit the canopy or see page 11
for detailed step by step instructions
Next fold out
the frame of
the canopy
15 mins
30 secs

Unfold the
sides
Lastly zip up
the sides for
total protection!
6
30 secs 30 secs

7
Contents Delivery
What's in the box?
2. Spigot x 1 3. M8 Nyloc nuts x 2
4. M8 washers x 2
1. Frame x 1
10. M6 Hex bolt x 1 11. M6 Nyloc nut x 1
Warning contains small parts. Not suitable for children under 3 years.

8
12. M6 washers x 2
8. M8 x 45mm bolts x 3
9. Velcro
5. Cover x 1 4. Bag x 1
7. M10 x 45mm bolt x 1 9. Fixing pack

Tools you will need
Allen key(s)
(4mm/5mm/6mm)
Spanner(s)
(10/13mm)
Tools you may need
Socket wrench
(10mm/13mm)
Scissors

10
Technical specifications
Product Size Height Length Width
Antares 3/4 M 1500 mm 610 mm
Venus 3V/4V M1500 mm 610 mm
Venus 4 sport M 1500 mm 610 mm
Ceres 3/4 DL M1630 mm 1500 mm 610 mm
Carpo 2 L
Mercurius 4 LTD L

Step 1. Attach the spigot to the mounting plate on the frame by sliding it on.
Then insert the M6 bolt but do not tighten yet.
Next tighten the M8 nuts.
Lastly tighten the M6 nut.
Mounting the canopy to the scooter

Step 3. A) Slide the spigot into the accessory bar then insert a 45mm M8 bolt (supplied)
onto the nut on the accessory bar and tighten up.
B) If there is no nut on the accessory bar you may need to bolt right through
(this may involve drilling an 8 mm hole through the accessory bar and spigot).
AB
12Tip: open out the universal mounting brackets on the frame first.

Step 4. Remove the bolts on the scooter armrests.
Tip: if the armrests are attached directly to the seat remove
the top bolt - see figure 1. Figure 1.

Step 5. N.B. refer to page 15 before attempting this step.
Loosen the quick release clamps (A) on the mounting bracket and loosen the allen
key bolts on the plastic clamps (B). Now attach the brackets to the armrests using
the bolts you removed earlier or the 45mm bolts supplied if required. Ensure any
Nyloc nuts have the bolt protruding by at least 2mm.
The brackets must be as near to level as possible and the allen bolts on the plastic
sleeves tightened.
14
Tip: the mounting bracket ends can be orientated up or down, whichever fits
your scooter best.
A
B

If you are unable to complete the previous step due to a lack of suitable bolts, or suitable fixing
points strong velcro straps are supplied to accommodate this. Feed the straps through the
brackets (Figure 2) and tightly strap around the scooter seat arms. Ensure the straps are tight so
there is no movement.
(Figure 2)
15

Step 6. Once assembled the plastic clamp should be pushed up the main
frame before being tightened with the 3 allen bolts (figure 3).
Ensure the frame is held tightly and securely so there is no movement.
There must also be sufficient length of the telescopic arm within the outer tube to ensure
adequate clamping with the quick release clamp.
The canopy must be level when viewed from behind (figure 4), ensure this is so before
continuing. If necessary adjust the arms by loosening the allen bolts and sliding up or down.
(Figure 3)
X
(Figure 4)

Step 7. You can now unfold your canopy frame and fit the weatherproof cover.
Lay the weatherproof cover on the roof of the frame, and unfold.
Zip up the sides of the canopy while positioning the velcro around the windscreen to ensure
correct placement.
Secure to the frame using all 6 velcro straps provided. (Open the left hand cover door to
secure the securing straps on the right side and vice versa).
You may need to slide your seat slightly forward and reposition or remove the mirrors
to avoid them colliding with the sides of the canopy.
Table of contents
Languages:
Popular Tent manuals by other brands

SoulPad
SoulPad 4000-lite instruction manual

Wild Land Drivers
Wild Land Drivers Lite Cruiser manual

T.A. Plastic
T.A. Plastic Evolution installation guide

Wanderer
Wanderer Goliath II Tent 10P Assembly instructions

Black Diamond Equipment
Black Diamond Equipment MESA manual

Dometic
Dometic Sunshine AIR Pro 300 Installation and operating manual