Wyłącznie do użytku weterynaryjnego.
VETEXPERT
BG Vet
URZĄDZENIE MONITORUJĄCE
STĘŻENIE GLUKOZY WE KRWI
PSÓW I KOTÓW.
CATS & DOGS
Ważne informacje
Przed użyciem prosimy zapoznać się z treścią ulotki.
Kompletny zestaw do pomiaru stężenia glukozy we krwi zwierząt VETEXPERT BG Vet składa się z trzech
elementów: urządzenia monitorującego stężenie glukozy (glukometru), pasków testowych izestawu płynów
kontrolnych. Tylko oryginalne produkty zapewniają precyzyjny, wiarygodny pomiar.
Wszystkie elementy sprzedawane są osobno.
Glukometr VETEXPERT BG Vet należy stosować wyłącznie z dedykowanymi paskami VetExpert.
Zastosowanie
Urządzenie monitorujące (glukometr) VETEXPERT BG Vet służy do ilościowego pomiaru stężenia glukozy
w świeżo pobranych próbkach krwi pełnej - we krwi włośniczkowej, pobranej przez nakłucie opuszki palco-
wej lub małżowiny usznej bądź we krwi żylnej, pobranej według standardowych procedur.
Jeśli konieczne jest zastosowanie antykoagulantu zalecamy zastosowanie heparyny. Nie zaleca się ba-
dania próbek zawierających EDTA oraz NaF. Może to powodować zafałszowanie wyniku.
Glukometr VETEXPERT BG Vet umożliwia pomiar stężenia glukozy wświeżo pobranych próbkach krwi peł-
nej zwierząt, zarówno przez lekarza weterynarii w gabinecie jak i przez Właściciela w warunkach domowych,
w ramach monitoringu skuteczności leczenia cukrzycy u psów i kotów. Pojedynczy pomiar glukozy nie po-
winien być stosowany jako jedyny element diagnostyki cukrzycy oraz badań przesiewowych. Urządzenie
mierzy poziom glukozy i wyświetla wyniki pomiaru wmiligramach na decylitr (mg/dL) lub w milimolach na
litr (mmol/L).
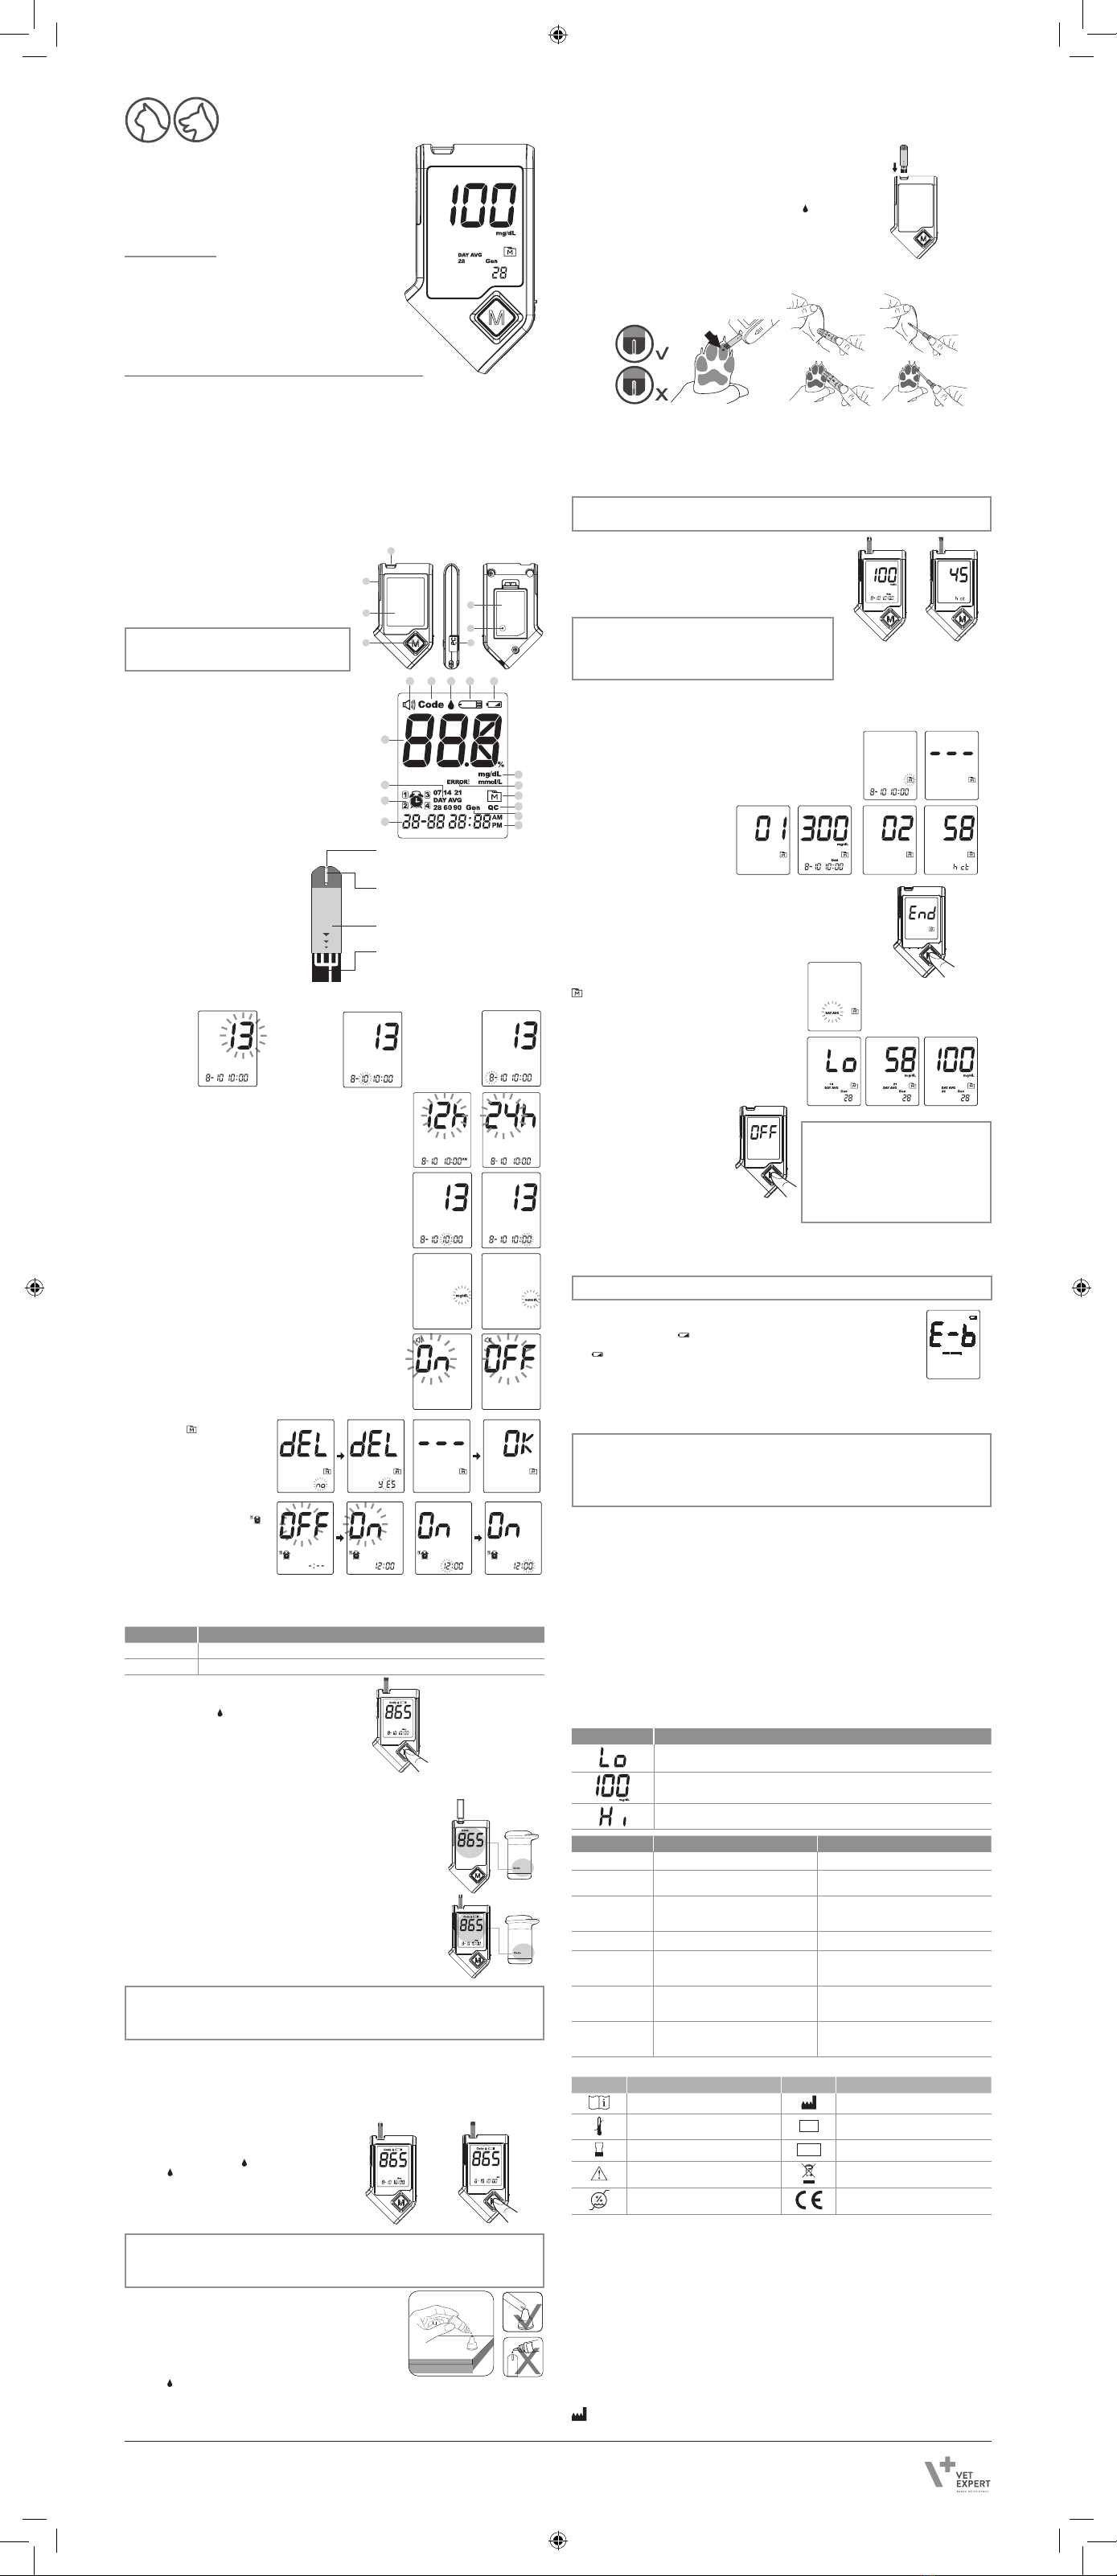
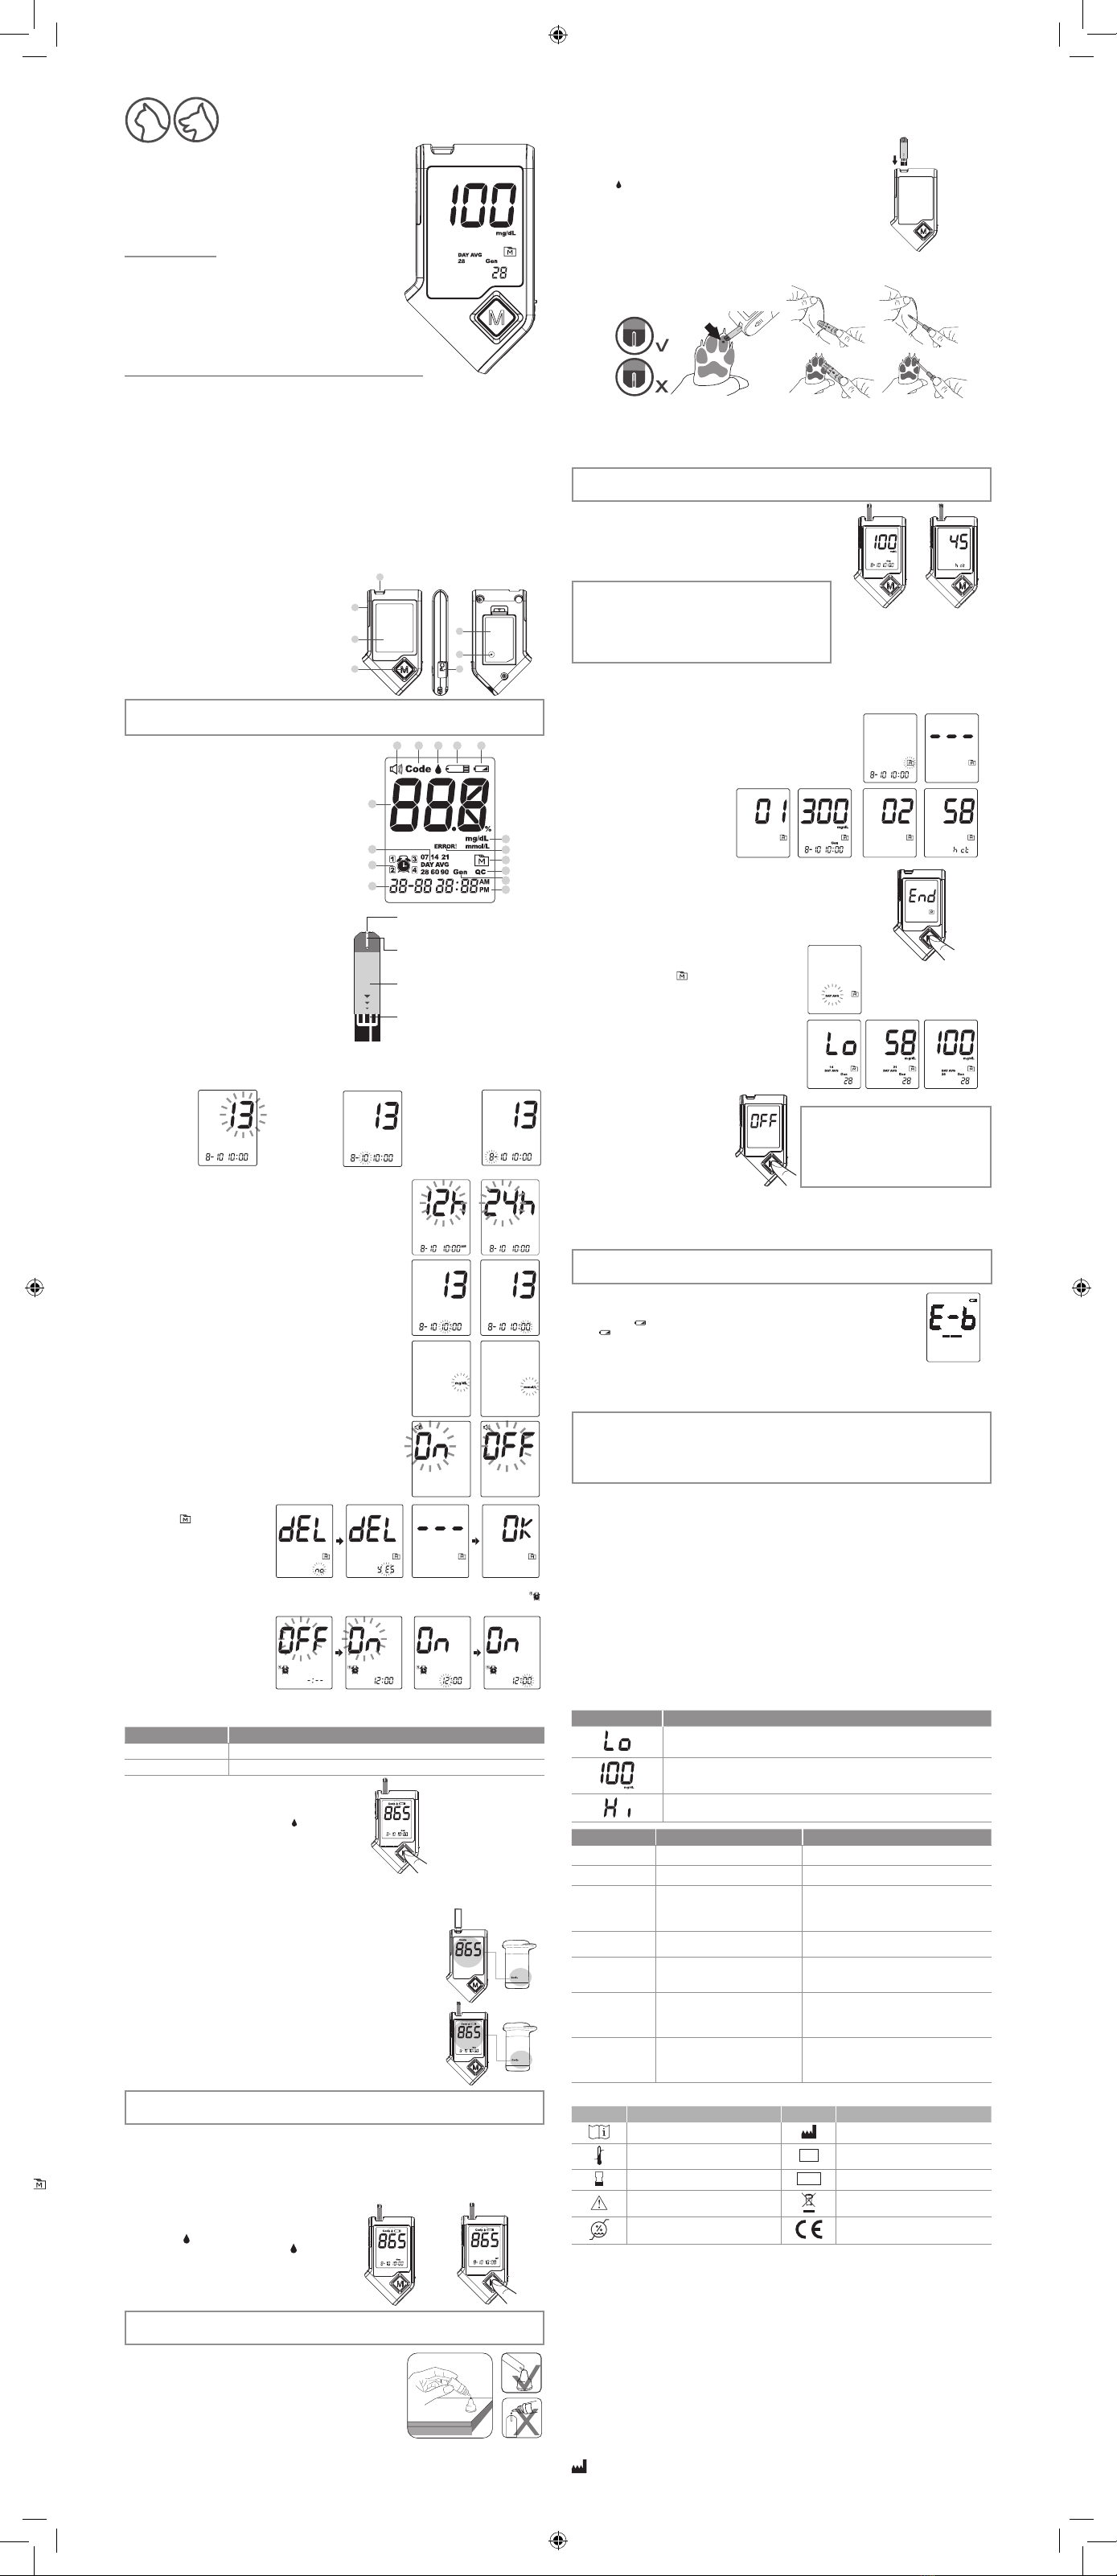
BUDOWA I PODSTAWOWE FUNKCJE
GLUKOMETRU
1. otwór na pasek testowy
2. przycisk wysuwania paska
3. wyświetlacz
4. przycisk M
5. port PC
6. przycisk S do zmiany ustawień
7. gniazdo baterii
UWAGA
Glukometr wyłącza się automatycznie po 180 sekundach bezczynności; można go również wy-
łączyć przez przytrzymanie przez 3 sekundy przycisku M.
WYŚWIETLACZ
1. niski poziom baterii
2. symbol paska testowego
3. symbol kropli krwi
4. kod
5. ustawienia dźwięku
6. wynik pomiaru
7. średnia wartość dziennego pomiaru
8. symbol alarmu
9. data
10. godzina
11. tryb pomiarowy (Gen)
12. tryb kontrolny (QC)
13. ustawienia pamięci
14. komunikat o wystąpieniu błędu
15. jednostka pomiarowa
PASKI TESTOWE VETEXPERT BG Vet
Glukometr mierzy stężenie glukozy we krwi pełnej.
Próbkę krwi należy przyłożyć do okienka chłonnego
paska; zostanie ona automatycznie wchłonięta w miej-
sce, gdzie zachodzi właściwa reakcja chemiczna.
Pasek testowy składa się z następujących elementów:
USTAWIENIA POCZĄTKOWE
GLUKOMETRU I KASOWANIE
PAMIĘCI
Kongurację należy rozpocząć, gdy glukometr będzie
wyłączony (nie będzie w nim żadnego paska testowe-
go). Wciśnij S.
KROK 1. Ustawienia daty
Gdy na wyświe-
tlaczu pojawi
się odpowiednie
pole, wciśnij M
iprzytrzymaj, aż
pojawi się właści-
wy rok. Potwierdź
przyciskiem S.
Gdy na wyświe-
tlaczu pojawi
się odpowiednie
pole, wciśnij M
i przytrzymaj,
aż pojawi się
właściwy mie-
siąc. Potwierdź
przyciskiem S.
Gdy na wyświe-
tlaczu pojawi
się odpowiednie
pole, wciśnij M
i przytrzymaj,
aż pojawi się
właściwy dzień.
Potwierdź przyci-
skiem S.
KROK 2. Ustawienia formatu czasu.
Wciśnij M, aby wybrać format 12- lub 24-godzinny. Potwierdź przyci-
skiem S.
KROK 3. Ustawienia godziny
Gdy na wyświetlaczu pojawi się odpowiednie pole, wciśnij M i przytrzy-
maj, aż pojawi się właściwa godzina. Potwierdź przyciskiem S.
Gdy wyświetli się odpowiednie pole, wciśnij M i przytrzymaj, aż pojawi
się właściwa liczba minut. Potwierdź przyciskiem S.
KROK 4. Ustawienia jednostki pomiarowej
Aby zmienić jednostkę z mg/dL na mmol/L lub odwrotnie, wciśnij M.
Potwierdź przyciskiem S.
KROK 5. Ustawienia dźwięku
Aby zmienić tryb z włączonego („On”) na wyłączony („OFF”) lub
odwrotnie, wciśnij M. Potwierdź przyciskiem S.
KROK 6. Kasowanie pamięci
Gdy na ekranie wyświetlą się symbo-
le “dEL” oraz “ ”, wciśnij przycisk M
i wybierz „no” („nie”), aby zachować
wyniki w pamięci, a następnie wy-
bierz S, aby przejść dalej.
Aby usunąć wszystkie wyniki, wciśnij
M i wybierz „yes” („tak”). Cała pamięć
zostanie skasowana.
KROK 7. Ustawienia alarmu przypomnienia
Urządzenie wyposażono w cztery sygnały alarmowe. Na ekranie wyświetlą się oznaczenia „OFF” oraz “ ”.
Jeżeli nie chcesz ustawić żadnego przypomnienia, wciśnij S, aby pominąć ten krok.
W przeciwnym razie wciśnij M, aż wy-
świetli się tryb „On”; wybór potwierdź
przyciskiem S. Gdy na ekranie pokażą
się kolejno migające symbole godziny/
minuty, wciśnij M, aby wybrać pra-
widłową godzinę/minutę. Potwierdź
przyciskiem S i przejdź do następnego
przypomnienia.
WYBÓR TRYBU POMIAROWEGO
Urządzenie wykonuje pomiary w dwóch trybach: ogólnym i kontrolnym.
TRYB KIEDY ZASTOSOWAĆ?
Gen (ogólny) o dowolnej porze dnia bez względu na czas, jaki upłynął od ostatniego posiłku
QC (kontrolny) w przypadku przeprowadzania testu z użyciem płynu kontrolnego
Z jednego trybu w drugi można przechodzić wnastępujący
sposób:
1. Wyłącz glukometr. Wprowadź pasek testowy, aby
ponownie go uruchomić. Na ekranie wyświetli się kod,
oznaczenie „Gen”, i migoczący symbol “ ”.
2. Wciśnij M, aby przejść do trybu kontrolnego (QC).
PRZED PRZYSTĄPIENIEM DO BADANIA
Kalibracja
Przed pierwszym użyciem nowego zestawu pasków testowych urządzenie należy każdorazowo skalibrować
za pomocą odpowiedniego kodu. Jeżeli kod na wyświetlaczu nie zgadza się z numerem podanym na etykie-
cie olki z paskami, wyniki badania mogą być nieprawidłowe.
Wykonanie kalibracji
1. Gdy urządzenie jest wyłączone wprowadź odpowiedni pasek kodujący
ipoczekaj aż na ekranie pojawi się kod.
UWAGA: upewnij się, że kod na wyświetlaczu, pasku kodującym
i olce pasków testowych jest taki sam.
2. Wyjmij pasek. Na ekranie wyświetli się napis „OK”. Oznacza to, że
urządzenie zostało prawidłowo zakodowane i jest gotowe do użycia.
Sprawdzanie kodu
Przed przystąpieniem do badania prosimy upewnić się, że kod na ekranie urzą-
dzenia zgadza się z numerem podanym na olce pasków testowych. Jeżeli
numery są zgodne, możesz przystąpić do pomiaru.
Jeżeli nie, należy wstrzymać badanie i powtórzyć procedurę kalibracji. Jeżeli
problem się powtarza, prosimy o kontakt z odpowiednim działem VetExpert.
UWAGA: Kod na wyświetlaczu przedstawionym powyżej został wybrany
w celach ilustracyjnych. Może nie być zgodny z kodem glukometru.
OSTRZEŻENIE
Przed rozpoczęciem testu należy upewnić się, że kod na wyświetlaczu glukometru zgadza się
zkodem na olce pasków testowych. W przeciwnym razie wynik badania może być nieprecyzyjny.
SPRAWDZANIE ZESTAWU ZA POMOCĄ PŁYNU KONTROLNEGO
Dedykowane do zestawu płyny kontrolne zawierają znany poziom glukozy, która reaguje z paskiem testo-
wym. Porównując wynik testu przeprowadzonego z użyciem płynu, z zakresem referencyjnym podanym na
olce, można ocenić czy glukometr i paski działają prawidłowo, a test został przeprowadzony poprawnie.
Aby mieć pewność, żeglukometr podaje wiarygodne wyniki, warto regularnie kontrolować urządzenie.
W jaki sposób przeprowadzić test kontrolny?
KROK 1. Wprowadzenie paska testowego
Wsuń pasek testowy do otworu glukometru zgodnie zkie-
runkiem strzałek i dociśnij. Glukometr włączy się automa-
tycznie i wyświetli numer kodu, oznaczenie „Gen” i migo-
czący symbol “ ”:
Gdy na ekranie wyświetli się symbol „ ”, przytrzymaj
przycisk M, aż pojawi się „QC”. Pozwoli to zachować wy-
nik pomiaru kontrolnego w pamięci glukometru. Jeżeli nie
zdecydujesz się na przeprowadzenie testu kontrolnego, po-
nownie wciśnij M, aż oznaczenie „QC” zniknie.
UWAGA
Pamiętaj o ustawieniu trybu “QC”, każdorazowo przy wykonywaniu badania kontrolnego.
Uniemożliwi to wymieszanie wyników kontrolnych z pomiarowymi.
KROK 2. Wprowadzanie płynu kontrolnego
Przed użyciem wstrząśnij olką z płynem.
Delikatnie wyciśnij i odrzuć pierwszą kroplę płynu kontrolnego;
następnie wyciśnij kolejną iumieść ją na czubku nakrętki. Nachyl
urządzenie w sposób umożliwiający wchłonięcie kropli przez
okienko chłonne paska. Gdy okienko kontrolne całkowicie wypełni
się płynem, urządzenie rozpocznie odliczanie. Aby zapobiec zanie-
czyszczeniu płynu kontrolnego, nie aplikuj płynu bezpośrednio na
pasek.
KROK 3. Odczytywanie i porównywanie wyników
Gdy urządzenie skończy odliczać czas pomiaru, na ekranie wyświetli się wynik badania kontrolnego. Porównaj
uzyskany wynik z zakresem referencyjnym podanym na olce pasków testowych. Powinien mieścić się w jego
granicach.
Wyniki wykraczające poza normę
Jeżeli wyniki wykraczają poza zakres referencyjny podany na olce pasków testowych, możliwe, że gluko-
metr lub paski testowe nie działają prawidłowo. Nie należy dokonywać dalszych pomiarów stężenia glukozy.
Prosimy o kontakt z odpowiednim działem VetExpert.
BADANIE PRÓBKI KRWI
KROK 1. Aby włączyć glukometr, wprowadź pasek testowy
Poczekaj, aż na wyświetlaczu pojawi się kod, oznaczenie „Gen” i migoczą-
cy symbol “ ”.
KROK 2. Przyciskiem M wybierz właściwy tryb pomiarowy
Szczegółowe instrukcje można znaleźć w podpunkcie „WYBÓR TRYBU
POMIAROWEGO”
KROK 3. Wprowadź próbkę krwi
Użyj lancetu lub sterylnej, jednorazowej igły iniekcyjnej, aby nakłuć powierzchnię skóry małżowiny usznej
lub opuszki palcowej. Pobierz próbkę oobjętości co najmniej 1,0 μL. Można także aplikować krew używając
sterylnej, jednorazowej strzykawki z igłą.
Delikatnie przybliż krew do okienka chłonnego paska testowego pod niewielkim kątem. Jeżeli objętość prób-
ki jest wystarczająca, okienko kontrolne powinno całkowicie wypełnić się krwią. Jeżeli urządzenie rozpocz-
nie odliczanie zanim okienko chłonne całkowicie wypełni się krwią, nie należy dodawać więcej krwi. Pasek
testowy należy wyrzucić, a test rozpocząć od nowa. Jeżeli problemy z wypełnieniem paska testowego będą
się powtarzać, zalecamy kontakt z lekarzem weterynarii lub odpowiednim działem VetExpert.
UWAGA
Jeżeli nie wprowadzisz próbki krwi w ciągu 3 minut, urządzenie automatycznie się wyłączy. Aby roz-
począć test, należy usunąć zużyty pasek i wprowadzić nowy.
KROK 4. Odczytaj wynik
Wynik pomiaru stężenia glukozy zostanie automatycznie zapisany
wpamięci urządzenia.
KROK 5. Wyświetl hematokryt (HCT)
Aby wyświetlić hematokryt, wciśnij M. Wartość zostanie zapisana
wpamięci urządzenia.
OSTRZEŻENIE
1. NIE należy wprowadzać jakichkolwiek zmian w leczeniu
zwierzęcia woparciu o wyniki testu bez uprzedniej kon-
sultacji z lekarzem weterynarii.
2. Urządzenie wyłącza się przez usunięcie paska testowe-
go. Zużyty pasek i lancet/igłę należy wyrzucić z zacho-
waniem właściwych środków ostrożności i w zgodzie
zodpowiednimi przepisami.
PAMIĘĆ URZĄDZENIA
Pamięć urządzenia przechowuje wyniki 400 najświeższych pomiarów stężenia glukozy wraz z poziomem
hematokrytu (HCT), datą igodziną wykonania testu. Wyniki można przeglądać w następujący sposób:
Przeglądanie wyników
KROK 1. Wejście do trybu pamięciowego
Wyłącz urządzenie i dwukrotnie wciśnij przycisk M. Wyświetlą się
pierwsze wyniki; oznacza to, żeznajdujesz się w pamięci glukometru.
Jeżeli korzystasz z urządzenia po raz pierwszy lub jego pamięć
została uprzednio wykasowana, na ekranie pojawi się symbol „---”
sygnalizujący brak zapisanych danych.
KROK 2. Przeglądanie wyników
Ponownie wciśnij M; na ekranie pojawi
się poziom hematokrytu dla pierwszego
wyniku. Wciskając M, można kolejno
przejrzeć rezultaty ostatnich 400
pomiarów.
KROK 3. Wyjście z trybu pamięciowego
Po wyświetleniu ostatniego zapisanego wpamięci
wyniku, po raz ostatni wciśnij M. Na ekranie wyświetli
się symbol „End”, aurządzenie się wyłączy.
Sprawdzenie średniej wartości dziennej
KROK. 1 Wejście do trybu wyniku średniego
Wyłącz urządzenie i jednokrotnie wciśnij M. Gdy na
ekranie pojawi się symbol “ ”, przytrzymaj przycisk
M dwie sekundy, aż wyświetli się wartość średnia
wykonanych danego dnia pomiarów.
KROK 2. Wyświetlanie poprzednich średnich wyników
Na początku wyświetli się średni wynik pomiarów
wykonanych w ciągu ostatnich 7 dni. Przyciśnij M, aby
zobaczyć wynik z ostatnich 14, 21, 28, 60 i 90 dni.
KROK 3. Wyjście z trybu pamięciowego
Przytrzymaj przycisk M trzy sekundy,
aby wyłączyć urządzenie.
PRZENOSZENIE WYNIKÓW
DO PAMIĘCI KOMPUTERA
Przesyłanie danych za pomocą kabla
Glukometru można używać w połączeniu z kablem RS232 (nie jest dołączony) i odpowiednim oprogramowa-
niem, co pozwoli na przeglądanie wyników badań na komputerze. Aby uzyskać więcej informacji lub zakupić
kabel RS232, prosimy o kontakt z odpowiednim działem VetExpert.
OSTRZEŻENIE
W chwili gdy glukometr jest podłączony do komputera, nie należy wykonywać pomiaru stę-
żenia glukozy we krwi.
BATERIA
Glukometr obsługiwany jest przez jedną baterię litową 3V CR2032. Gdy na ekranie po-
jawi się symbol “ ”, oznacza to, że poziom baterii jest zbyt niski inależy ją wymienić.
Jeżeli „ ” wyświetli się wraz z oznaczeniem „E-b”, „Error” lub „low”, to znak poziom
baterii nie wystarcza do przeprowadzenia testu. Baterię należy wymienić natychmiast.
Wymiana baterii
Przed wymianą baterii, upewnij się, że urządzenie jest wyłączone.
1. Naciśnij na brzeg pokrywki baterii, lekko ją unieś izdejmij.
2. Wyjmij starą baterię i zastąp ją nową litową baterią 3V CR2032.
3. Zamknij wieczko. Jeżeli bateria została wprowadzona poprawnie, usłyszysz krótki sygnał dźwiękowy.
UWAGA
• Wymiana baterii nie ma wpływu na zapisane w pamięci wyniki.
• Baterie powinny być bezwzględnie przechowywane poza zasięgiem dzieci. W razie połknięcia
należy natychmiast skontaktować się zlekarzem.
• Z długo nieużywanych baterii mogą wyciekać szkodliwe substancje chemiczne. Jeżeli nie planu-
jesz korzystać z urządzenia przez 3 miesiące lub dłużej, usuń z niego baterie.
• Baterie utylizuj zgodnie z obowiązującymi przepisami ochrony środowiska.
KONSERWACJA
Jak dbać o glukometr?
Czyszczenie
1. Aby wyczyścić obudowę glukometru, przetrzyj ją delikatnie szmatką zwilżoną wodą lub łagodnym
środkiem czyszczącym, a następnie dokładnie osusz powierzchnię. NIE polewaj urządzenia wodą.
2. Do czyszczenia glukometru NIE należy stosować rozpuszczalników organicznych.
Przechowywanie
• Warunki otoczenia: -20°C do 60°C, przy względnej wilgotności poniżej 95%.
• Urządzenie należy przechowywać i przewozić wyłącznie w oryginalnym etui.
• Unikaj upuszczania glukometru i uderzeń ciężkimi przedmiotami.
• Unikaj bezpośredniego nasłonecznienia i wysokiej wilgotności.
Utylizacja
Zużyty glukometr należy traktować jako materiał potencjalnie zakaźny. Baterie zużytego urządzenia należy
usunąć, a glukometr wyrzucić w zgodzie z obowiązującymi przepisami. Zużyty lancet lub igła oraz pasek
testowy stanowią potencjalne zagrożenie biologiczne. Należy usunąć je z zachowaniem środków ostrożno-
ści iwzgodzie z obowiązującymi przepisami. Urządzenie nie podlega Dyrektywie 2002/96/WE Parlamentu
Europejskiego i Rady w sprawie zużytego sprzętu elektrotechnicznego ielektronicznego (WEEE).
KOMUNIKATY I PRZEWODNIK ROZWIĄZYWANIA PROBLEMÓW
Poniżej przygotowano zestawienie możliwych komunikatów, które mogą się pojawić na wyświetlaczu urzą-
dzenia. Jeżeli wyświetli się komunikat o błędzie, należy postępować zgodnie z podanymi w tabeli instruk-
cjami. Jeżeli mimo to problem będzie się powtarzał, prosimy o kontakt z odpowiednim działem VetExpert.
KOMUNIKAT ZNACZENIE
< 10 mg/dL (0,5 mmol/L)
10 do 600 mg/dL (0,5 mmol/L do 33,3 mmol/L)
> 600 mg/dL (33,3 mmol/L)
KOMUNIKAT ZNACZENIE SPOSÓB POSTĘPOWANIA
E-b Poziom baterii jest zbyt niski. Należy wymienić baterię.
E-U Wprowadzono zużyty pasek testowy. Należy powtórzyć test zużyciem nowego paska.
E-t Temperatura otoczenia jest zbyt ni-
ska lub zbyt wysoka wstosunku do
operacyjnego zakresu urządzenia.
Urządzenie działa wtemperaturze od 10°C do
40°C. Należy wykonać test ponownie, gdy tem-
peratura glukometru i paska testowego odpo-
wiednio się obniży.
E-2 Minął termin przydatności kodu. Należy powtórzyć test z użyciem nowego ze-
stawu pasków testowych.
E-C Wprowadzono niewłaściwy pasek
kodowy lub wystąpił inny błąd ko-
dowania.
Należy wprowadzić właściwy pasek kodowy.
Jeżeli problem się powtarza, prosimy okontakt
z odpowiednim działem VetExpert.
E-0, E-A, E-E Problem z urządzeniem. Powtórz test z użyciem nowego paska testo-
wego. Jeżeli urządzenie wciąż nie działa pra-
widłowo, prosimy o kontakt z odpowiednim
działem VetExpert.
E-F Pasek testowy usunięto podczas
odliczania glukometru lub wprowa-
dzono niewystarczającą objętość
krwi.
Przeczytaj ponownie instrukcję i powtórz test
z użyciem nowego paska testowego. Jeżeli
problem się powtarza, prosimy o kontakt zod-
powiednim działem VetExpert.
STOSOWANE OZNACZENIA
Symbol Referent Symbol Referent
Prosimy o zapoznanie się z instrukcją Producent
Ograniczenia temperatury SN Numer seryjny
Termin przydatności/EXP LOT Kod partii
Uwaga - prosimy o zapoznanie się
zzałączoną dokumentacją Odbiór zużytego sprzętu elektrycz-
nego i elektronicznego
Humidity limitation Oznaczenie CE
SPECYFIKACJA PRODUKTU
Model: VETEXPERT BG Vet
Wymiary i waga: 96 (dł.) x 49 (szer.) x 14 (wys.) mm, 42 g
Zasilanie: jedna bateria litowa 3V CR2032
Wyświetlacz: LCD
Pamięć: 400 wyników z datą i godziną wykonania testu
Łącze: kabel do portu RS232
Automatyczne wykrywanie elektrod paska
Automatyczne wykrywanie próbki
Automatyczne odliczanie czasu reakcji
Automatyczne wyłączanie urządzenia po 3 minutach bezczynności
Ostrzeżenie o przekroczeniu dopuszczalnej temperatury
Zakres operacyjny urządzenia: 10°C do 40°C, wilgotność względna poniżej 85% (niekondensująca)
Warunki przechowywania/przewożenia urządzenia: -20°C do 60°C, wilgotność względna poniżej 95%
Warunki przechowywania/przewożenia pasków testowych: 2°C do 30°C, wilgotność względna poniżej 85%
Jednostka pomiarowa: mg/dL lub mmol/L
Zakres wyników: 10 do 600 mg/dL (0,5 mmol/L do 33,3 mmol/L)
Oczekiwany okres eksploatacji: 5 lat
Urządzenie zgodne jest z następującymi normami i wymogami bezpieczeństwa: IEC/EN 61010-1, IEC/EN
61010-2-101, EN 61326-1, IEC/EN 61326-2-6.
BDO 000021702
Made in Taiwan
INSTRUKCJA OBSŁUGI
UWAGA
• Aby opuścić tryb pamięciowy przed wy-
świetleniem ostatniego wyniku, przytrzy-
maj przycisk M przez 3 sekundy.
• Gdy zabraknie miejsca w pamięci, najstar-
szy wynik zostanie zastąpiony najnowszym.
• W pamięci przechowywane są wyniki po-
miarów z użyciem krwi i płynu kontrolnego.
Contact Bars
Insert this end of the test strip into the meter.
Push it in firmly until it will go no further.
Test Strip Handle
Hold this part to insert the test strip into the slot.
Absorbent Hole
Apply a drop of blood here.
The blood will be automatically absorbed.
Confirmation Window
This is where you confirm if enough blood has
been applied to the absorbent hole in the strip.
865
568
45 3 2 1
6
15
13
12
11
10
14
9
8
7
4 5
2
3
6
7
1
865
Styki kontaktowe
Pasek testowy należy umieścić w otworze
urządzenia stroną, na której znajdują się styki
i wcisnąć do oporu.
Uchwyt paska testowego
Służy do przytrzymania paska przed włożeniem
do urządzenia.
Okienko chłonne
W tym miejscu należy przyłożyć kroplę krwi.
Zostanie ona automatycznie wchłonięta.
Okienko kontrolne
Pozwala stwierdzić, czy do okienka chłonnego
wprowadzono dostateczną objętość krwi.
Contact Bars
Insert this end of the test strip into the meter.
Push it in firmly until it will go no further.
Test Strip Handle
Hold this part to insert the test strip into the slot.
Absorbent Hole
Apply a drop of blood here.
The blood will be automatically absorbed.
Confirmation Window
This is where you confirm if enough blood has
been applied to the absorbent hole in the strip.
865
568
45 3 2 1
6
15
13
12
11
10
14
9
8
7
4 5
2
3
6
7
1
865
Contact Bars
Insert this end of the test strip into the meter.
Push it in firmly until it will go no further.
Test Strip Handle
Hold this part to insert the test strip into the slot.
Absorbent Hole
Apply a drop of blood here.
The blood will be automatically absorbed.
Confirmation Window
This is where you confirm if enough blood has
been applied to the absorbent hole in the strip.
865
568
45 3 2 1
6
15
13
12
11
10
14
9
8
7
4 5
2
3
6
7
1
865
ulotka glukometr_220x540_20191031.indd 1 31.10.2019 14:13