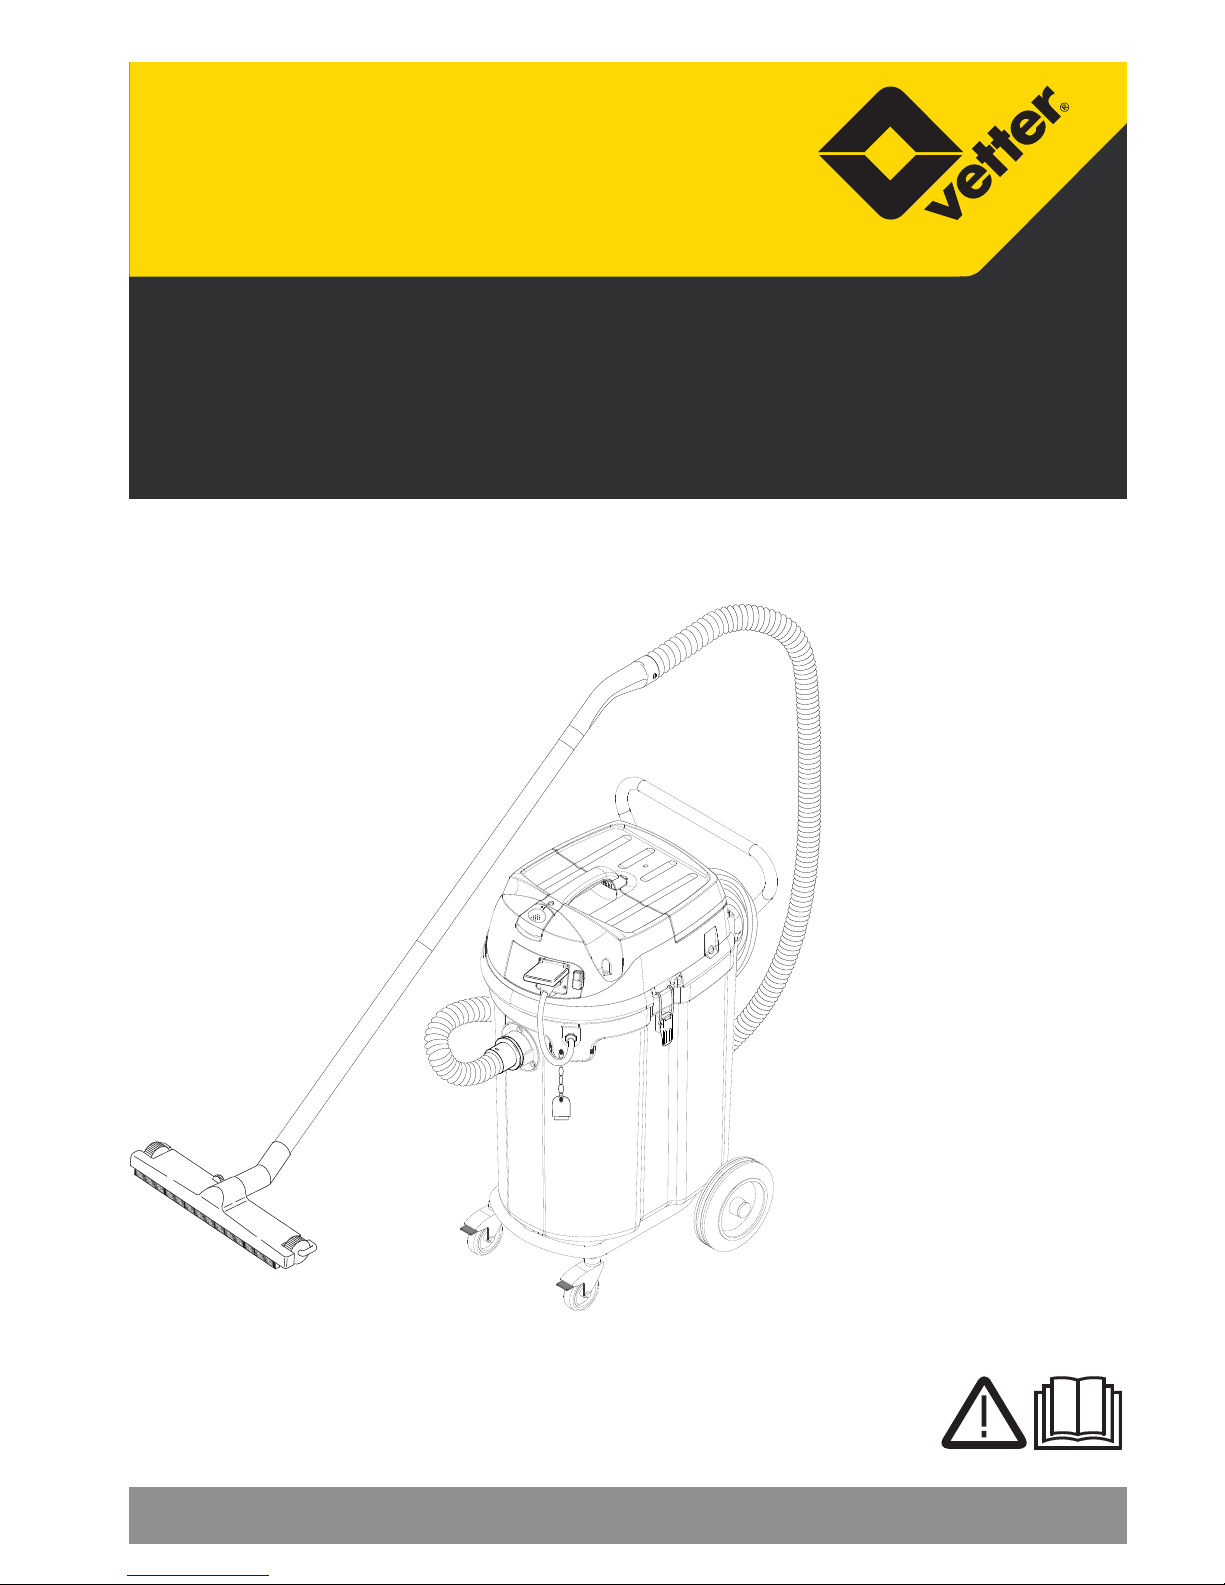
Vetter MPS 2.0 MWF User manual

Emergency Pneumatics.
Operating Instructions
VETTER Mini Permanent Aspirator MPS 2.0 MWF
Art.-Nr. 9987054300 | © Vetter GmbH I 02/13 I Änderungen und Irrtümer vorbehalten.
59659470 02/13
Deutsch 5
English 12
Français 19
Italiano 26
Nederlands 33
Español 40
Português 47
Dansk 54
Norsk 61
Svenska 67
Suomi 74
Ελληνικά 81
Türkçe 88
Русский 95
Magyar 103
Čeština 110
Slovenščina 117
Polski 124
Româneşte 131
Slovenčina 138
Hrvatski 145
Srpski 152
Български 159
Eesti 166
Latviešu 173
Lietuviškai 180
Українська 187

23
24
26
27
1
31
18
5
6
7
11
13
14
16
19
29
25
17 3
12
15
28
21
20
30
4
3
2
10
22
89
2

1
2
1
1
1
22
2
2x
“Click”
3
4
5
6
3

1.
2.
A
2.1.
B
C
1.
2.
D
E
1.
2.
F
G
H
4

– 1
Lesen Sie vor der ersten Benut-
zung Ihres Gerätes diese Origi-
nalbetriebsanleitung, handeln Sie danach
und bewahren Sie diese für späteren Ge-
brauch oder für Nachbesitzer auf.
–Vor erster Inbetriebnahme beiliegende
Sicherheitshinweise für Nass-/Trocken-
sauger unbedingt lesen!
–Bei Nichtbeachtung der Betriebsanlei-
tung und der Sicherheitshinweise kön-
nen Schäden am Gerät und Gefahren
für den Bediener und andere Personen
entstehen.
–Bei Transportschaden sofort Firma Vet-
ter GmbH, 53909 Zülpich informieren.
Gefahr
Für eine unmittelbar drohende Gefahr, die
zu schweren Körperverletzungen oder zum
Tod führt.
몇Warnung
Für eine möglicherweise gefährliche Situa-
tion, die zu schweren Körperverletzungen
oder zum Tod führen könnte.
Vorsicht
Für eine möglicherweise gefährliche Situa-
tion, die zu leichten Verletzungen oder zu
Sachschäden führen kann.
몇Warnung
Das Gerät ist nicht für die Absaugung ge-
sundheitsschädlicher Stäube geeignet.
–Dieser Sauger ist zur kontinuierlichen
Entsorgung von großen Flüssigkeits-
mengen (Hochwasserschäden, Aus-
saugen von Behältern, Becken oder
Tanks usw.), sowie zur Nass- und Tro-
ckenreinigung von Boden- und Wand-
flächen bestimmt.
–Dieses Gerät ist für den gewerblichen
Gebrauch geeignet, z.B. im Handwerk,
Gewerbe, bei Feuerwehren und Tech-
nischen Hilfswerken.
Inhaltsverzeichnis
Umweltschutz. . . . . . . . . . . DE . . .1
Symbole in der Betriebsanlei-
tung . . . . . . . . . . . . . . . . . . DE . . .1
Bestimmungsgemäße Verwen-
dung . . . . . . . . . . . . . . . . . . DE . . .1
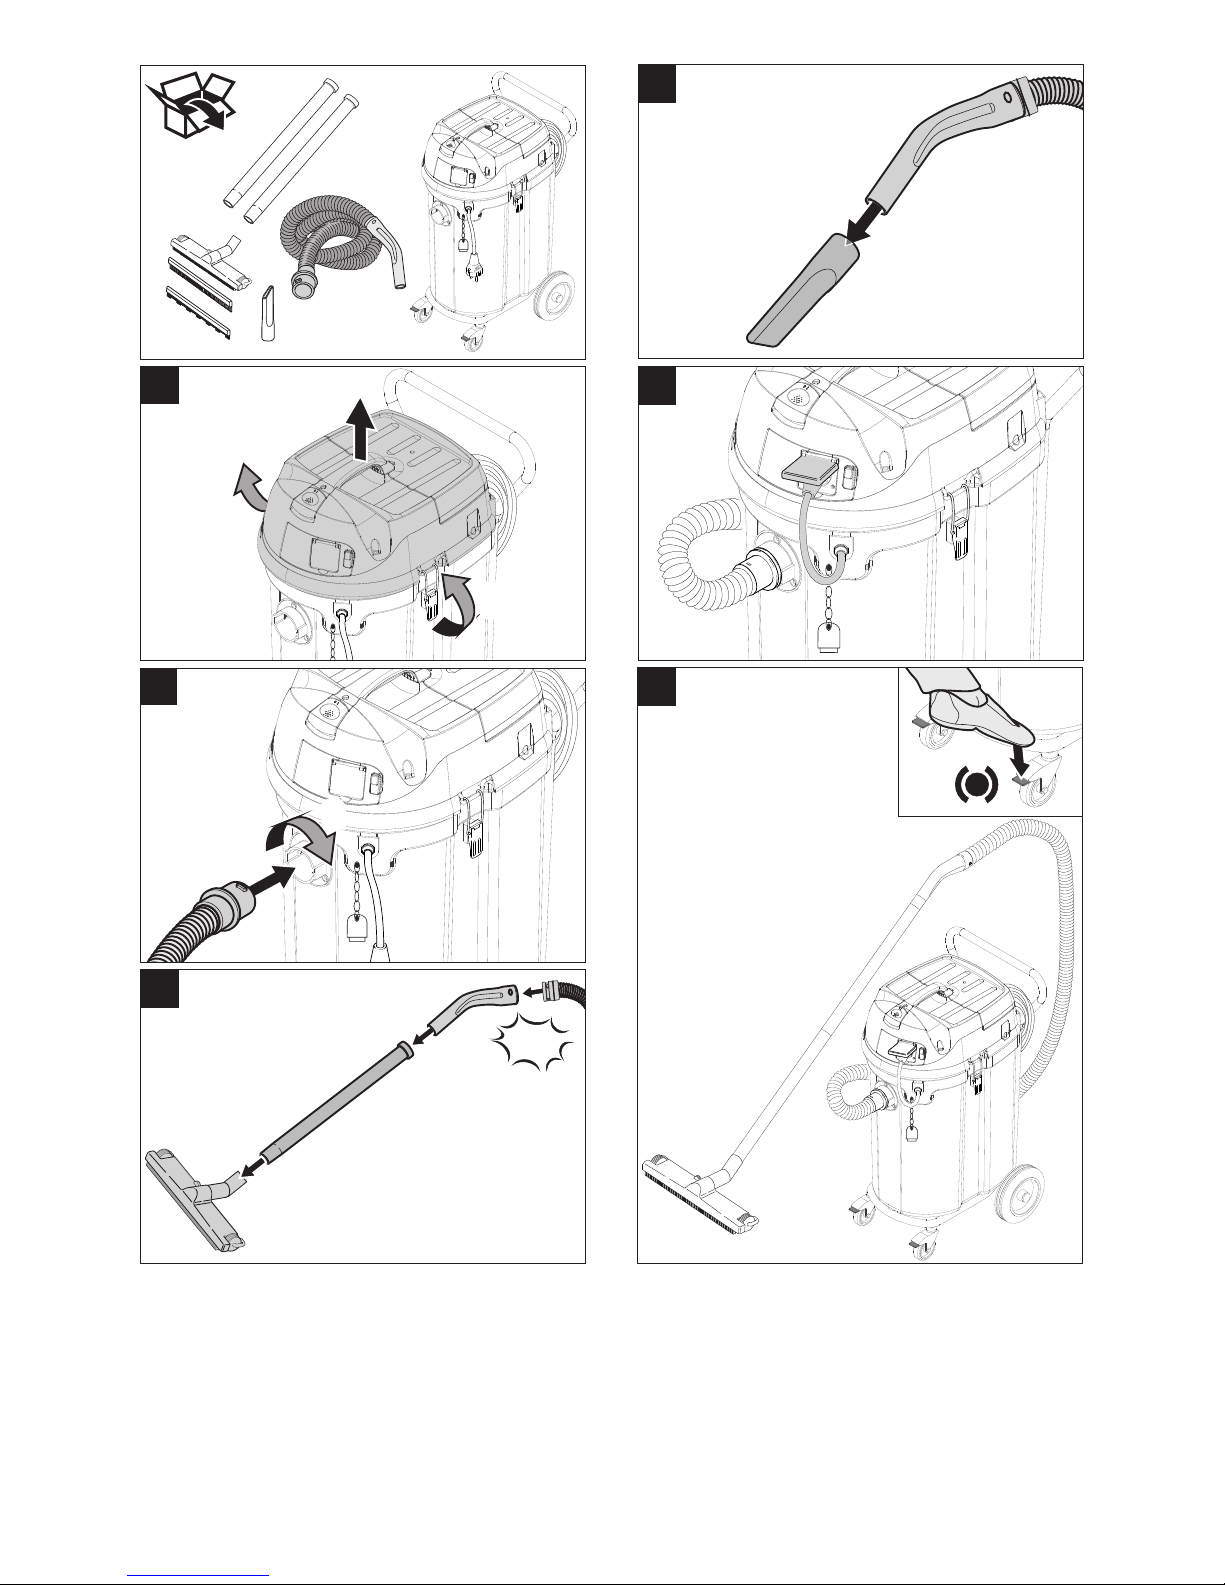
Geräteelemente . . . . . . . . . DE . . .2
Inbetriebnahme . . . . . . . . . DE . . .2
Bedienung . . . . . . . . . . . . . DE . . .3
Transport . . . . . . . . . . . . . . DE . . .4
Lagerung . . . . . . . . . . . . . . DE . . .4
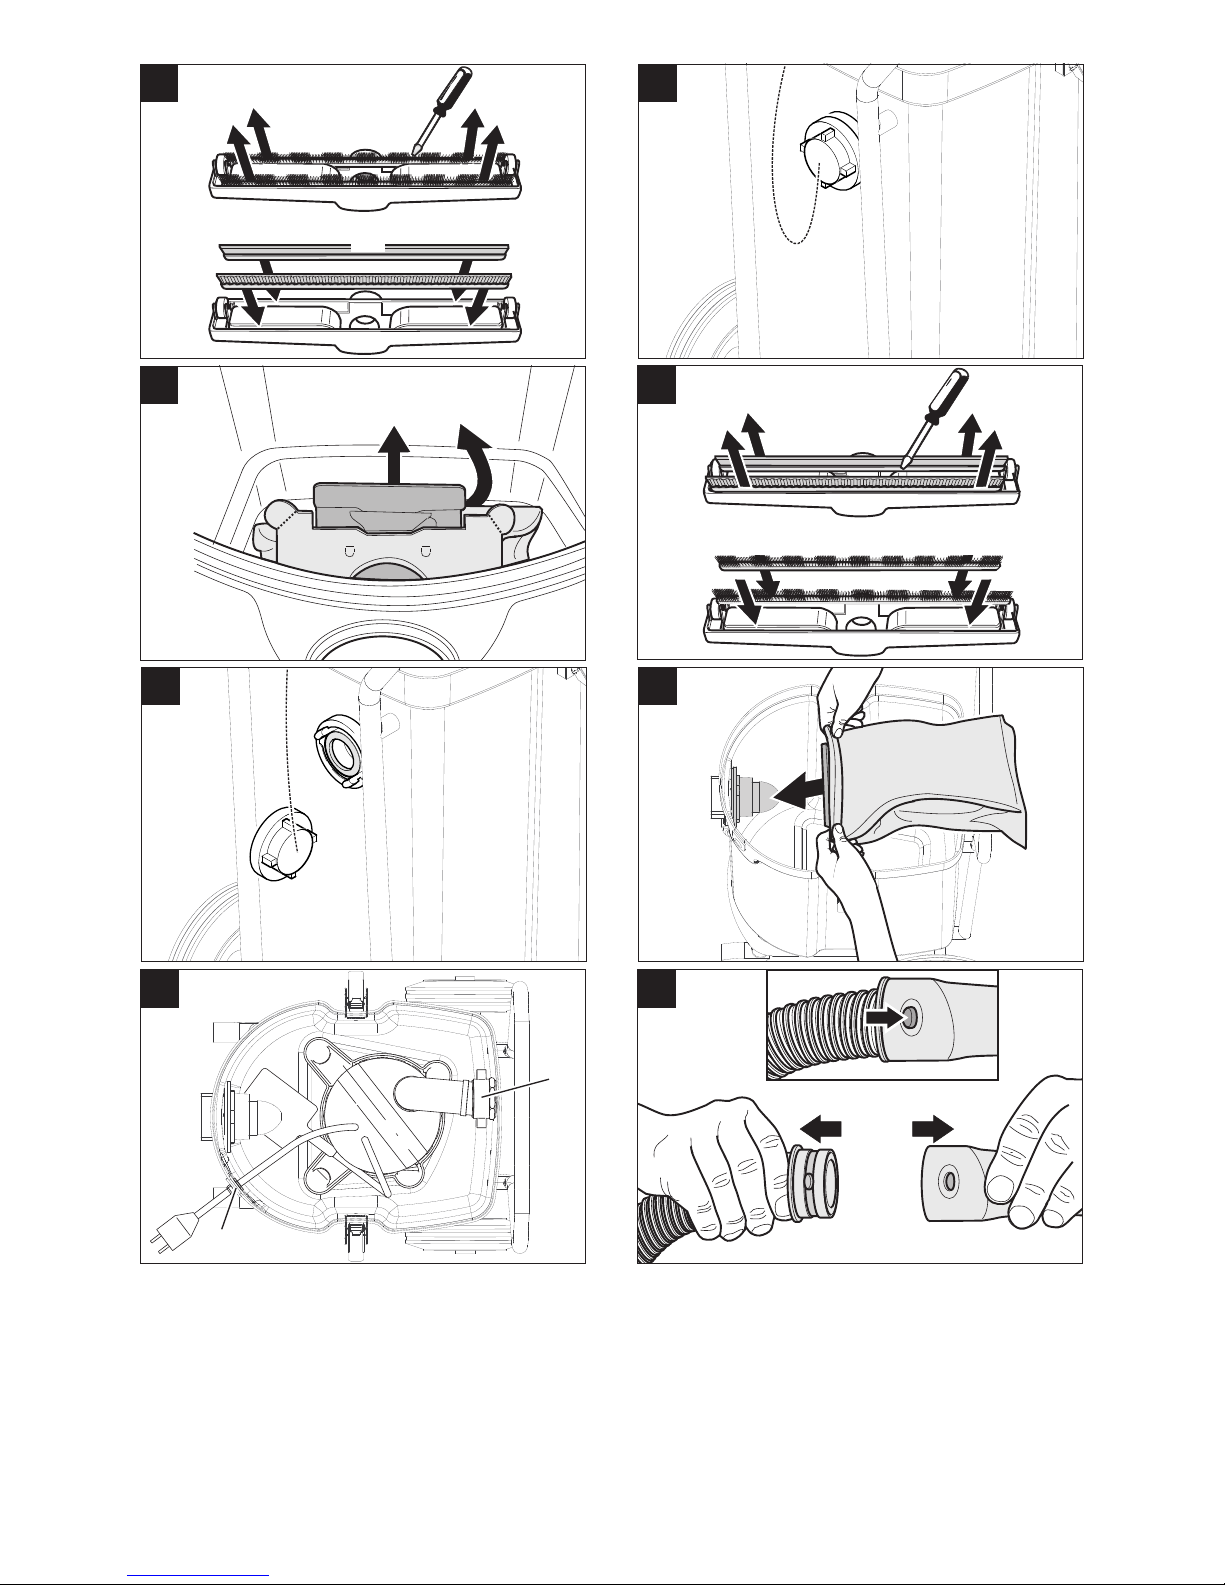
Pflege und Wartung . . . . . . DE . . .4
Hilfe bei Störungen. . . . . . . DE . . .4
Garantie . . . . . . . . . . . . . . . DE . . .5
Zubehör und Ersatzteile . . . DE . . .5
EG-Konformitätserklärung . DE . . .6
Technische Daten. . . . . . . . DE . . .7
Umweltschutz
Die Verpackungsmaterialien
sind recyclebar. Bitte werfen Sie
die Verpackungen nicht in den
Hausmüll, sondern führen Sie
diese einer Wiederverwertung
zu.
Altgeräte enthalten wertvolle re-
cyclingfähige Materialien, die ei-
ner Verwertung zugeführt
werden sollten. Batterien, Öl
und ähnliche Stoffe dürfen nicht
in die Umwelt gelangen. Bitte
entsorgen Sie Altgeräte deshalb
über geeignete Sammelsyste-
me.
Symbole in der Betriebsanlei-
tung
Bestimmungsgemäße Ver-
wendung
5DE

– 2
1 Schwimmer
2 Netzstecker des Gerätes
3 Netzkabel
4 Saugschlauch
5 Verriegelung des Saugkopfs
6 Schmutzbehälter
7 Rad
8 Kabelhalterung der Entsorgungspumpe
9 Verschlussplatte
10 Lenkrolle mit Feststellbremse
11 Bodendüse
12 Höhenverstellung der Bodendüse
13 Saugrohr
14 Saugstutzen
15 Saugkopf
16 Tragegriff
17 Filterabdeckung
18 Schubbügel
19 Krümmer
20 Entsorgungspumpe
21 Überwurfmutter der Entsorgungspumpe
22 Schwimmerschalter der Entsorgungs-
pumpe
23 Netzstecker der Entsorgungspumpe
24 Schalter „Entsorgungspumpe AUS“
25 Steckdose
26 Schalter „Entsorgungspumpe EIN“
27 Hauptschalter
28 Abluftfilter
29 Grobschmutzfilter/Flachfaltenfilter
30 Verschlusskappe (Feuerwehr C-Kupp-
lung)
31 Typenschild
Das Gerät erlaubt 3 Betriebsarten:
1 Nasssaugen mit Entsorgungspumpe
2 Nasssaugen ohne Entsorgungspumpe
3 Trockensaugen
Hinweis: Nasssaugbetrieb ist auch bei
ausgeschalteter oder ausgebauter Entsor-
gungspumpe möglich. Entsorgungspumpe
ausbauen, siehe Trockensaugen.
Abbildung
Bürstenstreifen ausbauen.
Gummilippen einbauen.
Hinweis: Die strukturierte Seite der Gum-
milippen muss nach außen zeigen.
Abbildung
Saugkopf entriegeln und abnehmen.
Papierfiltertüte (Sonderzubehör) nach
hinten herausziehen.
Saugkopf aufsetzen und verriegeln.
–Beim Aufsaugen von Nassschmutz
muss immer die Papierfiltertüte (Son-
derzubehör) entfernt werden.
Filterabdeckung öffnen.
Flachfaltenfilter herausnehmen.
Grobschmutzfilter einbauen.
Filterabdeckung schließen, muss hör-
bar einrasten.
Abbildung
Verschlusskappe (Feuerwehr C-Kupp-
lung) entfernen.
Entsorgungsschlauch anschließen
(Nennweite 3/4“ oder größer).
Vorsicht
Beim Saugen darf niemals der Grob-
schmutzfilter entfernt werden.
–Bei Erreichen des max. Flüssigkeits-
stands schaltet das Gerät automatisch
ab.
–Nach Beendigung des Nasssaugens:
Schwimmer, Behälter und gegebenen-
falls Entsorgungspumpe mit einem
feuchten Tuch reinigen und trocknen.
Geräteelemente
Inbetriebnahme
Nasssaugen
Einbau Gummilippen
Papierfiltertüte entfernen
Grobschmutzfilter einbauen
Entsorgungsschlauch anschließen
Allgemein
6 DE

– 3
Vorsicht
Vor dem Trockensaugen: Entsorgungs-
pumpe ausbauen und Flachfaltenfilter ein-
bauen.
Hinweis: Beim Trockensaugen muss ge-
nerell ein Flachfaltenfilter verwendet wer-
den.
Vorsicht
Beim Saugen darf niemals der Flachfalten-
filter entfernt werden.
–Beim Aufsaugen von Feinstaub kann
zusätzlich eine Papierfiltertüte (Sonder-
zubehör) verwendet werden.
Netzstecker der Entsorgungspumpe
ausstecken.
Saugkopf entriegeln und abnehmen.
Abbildung
Überwurfmutter der Entsorgungspum-
pe abschrauben.
Kabelhalterung der Entsorgungspumpe
herausnehmen und durch Verschluss-
platte ersetzen.
Entsorgungspumpe und Kunststoffein-
satz aus dem Behälter herausnehmen.
Abbildung
Verschlusskappe anstelle des Entsor-
gungsschlauchs anbringen.
Saugkopf aufsetzen und verriegeln.
Hinweis: Ein Flachfaltenfilter ist nicht im
Lieferumfang enthalten.
Filterabdeckung öffnen.
Grobschmutzfilter herausnehmen.
Flachfaltenfilter einbauen.
Filterabdeckung schließen, muss hör-
bar einrasten.
Abbildung
Gummilippen ausbauen.
Bürstenstreifen einbauen.
Abbildung
Saugkopf entriegeln und abnehmen.
Papierfiltertüte (Sonderzubehör) auf-
stecken.
Saugkopf aufsetzen und verriegeln.
Einstellschraube im Uhrzeigersinn dre-
hen: Hohe Stellung der Bodendüse
Einstellschraube gegen den Uhrzeiger-
sinn drehen: Tiefe Stellung der Boden-
düse
Abbildung
Der Saugschlauch ist mit einem Clip-Sys-
tem ausgestattet. Alle C-40/C-DN-40 Zube-
hörteile können angeschlossen werden.
Gefahr
Verletzungs- und Beschädigungsgefahr!
Die Steckdose ist nur zum direkten An-
schluss der Entsorgungspumpe an den
Sauger bestimmt. Jeder andere Gebrauch
der Steckdose ist nicht zulässig.
Netzstecker des Gerätes einstecken.
A Einschalttaste
B Ausschalttaste/Test-Taste
C Schutzschalter
D Rote Kontrolllampe
Trockensaugen
Allgemein
Entsorgungspumpe ausbauen
Flachfaltenfilter einbauen
Bürstenstreifen einbauen
Papierfiltertüte einbauen
Höhenverstellung der Bodendüse
Clipverbindung
Bedienung
Gerät einschalten
ON
I
TEST
O
A
D
BC
7DE

– 4
Einschalttaste drücken (Rote Kontroll-
lampe leuchtet). Schutzschalter ist be-
triebsbereit.
Ausschalttaste/Test-Taste des Schutz-
schalters drücken (Rote Kontrolllampe
erlischt). Schutzschalter schaltet ab.
Einschalttaste drücken (Rote Kontroll-
lampe leuchtet). Schutzschalter ist be-
triebsbereit.
Gerät am Hauptschalter einschalten.
Große Flüssigkeitsmengen kontinuier-
lich entsorgen: Entsorgungspumpe ein-
schalten.
Flüssigkeiten kontinuierlich entsorgen
bzw. Reinigung durchführen.
Gegebenenfalls Entsorgungspumpe
ausschalten.
Gerät am Hauptschalter ausschalten.
Ausschalttaste/Test-Taste des Schutz-
schalters drücken (Rote Kontrolllampe
erlischt). Schutzschalter schaltet ab.
Netzstecker des Gerätes ziehen.
Behälter entleeren.
Gerät innen und außen durch Absau-
gen und Abwischen mit einem feuchten
Tuch reinigen.
Netzkabel um den Schubbügel wickeln.
Saugschlauch um den Schubbügel wi-
ckeln.
Gerät in einem trockenen Raum abstel-
len und vor unbefugter Benutzung si-
chern.
Vorsicht
Verletzungs- und Beschädigungsgefahr!
Gewicht des Gerätes beim Transport be-
achten.
Gerät zum Tragen am Tragegriff und
am Saugrohr fassen.
Beim Transport in Fahrzeugen Gerät
nach den jeweils gültigen Richtlinien
gegen Rutschen und Kippen sichern.
Vorsicht
Verletzungs- und Beschädigungsgefahr! Ge-
wicht des Gerätes bei Lagerung beachten.
Dieses Gerät darf nur in Innenräumen gela-
gert werden.
Gefahr
Vor allen Arbeiten am Gerät, Gerät aus-
schalten und Netzstecker ziehen.
Filterabdeckung öffnen.
Grobschmutzfilter/Flachfaltenfilter oder
Abluftfilter wechseln.
Filterabdeckung schließen, muss hör-
bar einrasten.
Saugkopf entriegeln und abnehmen.
Schwimmer mit einem feuchten Tuch
reinigen.
Saugkopf aufsetzen und verriegeln.
Gefahr
Vor allen Arbeiten am Gerät, Gerät aus-
schalten und Netzstecker ziehen.
Entsorgungs- bzw. Reinigungsbe-
trieb
Gerät ausschalten
Nach jedem Betrieb
Gerät aufbewahren
Transport
Lagerung
Pflege und Wartung
Grobschmutzfilter/Flachfaltenfilter
oder Abluftfilter wechseln
Schwimmer reinigen
Hilfe bei Störungen
8 DE

– 5
Steckdose der Stromversorgung durch
eine Elektro-Fachkraft überprüfen las-
sen.
Netzstecker des Gerätes an eine ande-
re Steckdose eines anderen Stromkrei-
ses anschließen.
Kundendienst benachrichtigen.
Steckdose und Sicherung der Strom-
versorgung überprüfen.
Netzkabel und Netzstecker des Gerä-
tes überprüfen.
Einschalttaste des Schutzschalters drü-
cken.
Gerät einschalten.
Schwimmer überprüfen.
Entsorgungspumpe einschalten.
Verstopfungen aus Saugdüse, Saug-
rohr, Saugschlauch oder Grobschmutz-
filter/Flachfaltenfilter entfernen.
Papierfiltertüte (Sonderzubehör) wech-
seln.
Filterabdeckung richtig einrasten.
Flachfaltenfilter wechseln.
Korrekte Einbaulage des Flachfaltenfil-
ters überprüfen.
Korrekte Einbaulage des Grobschmutz-
filters überprüfen.
Flachfaltenfilter einbauen.
Korrekte Einbaulage des Flachfaltenfil-
ters überprüfen.
Flachfaltenfilter wechseln.
Steckdose des Gerätes überprüfen.
Eingeklemmten Schwimmerschalter im
Behälter freimachen.
Festgeklemmtes Pumpenlaufrad in der
Pumpe freimachen.
Entsorgungsschlauch knickfrei verle-
gen.
Entsorgungsschlauch auf Verstopfung
überprüfen.
–Laden Sie sich hierzu unsere Allgemei-
nen Geschäftsbedingungen von unse-
rer Website herunter: www.vetter.de
–Im Garantiefall wenden Sie sich bitte
mit Kaufbeleg an Ihren Händler oder an
die Vetter GmbH, 53909 Zülpich.
–Es dürfen nur Zubehör und Ersatzteile
verwendet werden, die vom Hersteller
freigegeben sind. Original-Zubehör und
Original-Ersatzteile bieten die Gewähr
dafür, dass das Gerät sicher und stö-
rungsfrei betrieben werden kann.
–Eine Auswahl der am häufigsten benö-
tigten Ersatzteile finden Sie am Ende
der Betriebsanleitung.
–Bei Fragen zu Ersatzteilen wenden Sie
sich bitte an:
Vetter GmbH
Blatzheimer Str. 10 - 12
53909 Zülpich
Tel. Deutschland: +49 (0) 2252/300850
Tel. International: +49 (0) 2252/300860
Schutzschalter lässt sich nicht ein-
schalten
Schutzschalter schaltet beim Ein-
schalten des Saugers wiederholt ab
Saugturbine läuft nicht
Saugturbine schaltet ab
Saugkraft lässt nach
Staubaustritt beim Trockensaugen
Entsorgungspumpe läuft nicht
Entsorgungspumpe fördert wenig
Garantie
Zubehör und Ersatzteile
9DE

– 6
Hiermit erklären wir, dass die nachfolgend
bezeichnete Maschine aufgrund ihrer Kon-
zipierung und Bauart sowie in der von uns
in Verkehr gebrachten Ausführung den ein-
schlägigen grundlegenden Sicherheits-
und Gesundheitsanforderungen der EG-
Richtlinien entspricht. Bei einer nicht mit
uns abgestimmten Änderung der Maschine
verliert diese Erklärung ihre Gültigkeit.
Vetter GmbH
Blatzheimer Str. 10 - 12
53909 Zülpich
Zülpich, 08.11.2012
EG-Konformitätserklärung
Produkt: VETTER Mini-Permanent-
Sauger
Typ: MPS 2.0 MWF
Einschlägige EG-Richtlinien
2006/42/EG (+2009/127/EG)
2004/108/EG
Angewandte harmonisierte Normen
EN 55014–1: 2006+A1: 2009+A2: 2011
EN 55014–2: 1997+A1: 2001+A2: 2008
EN 60335–1
EN 60335–2–69
EN 61000–3–2: 2006+A1: 2009+A2: 2009
EN 61000–3–3: 2008
EN 62233: 2008
Angewandte nationale Normen
-
10 DE

– 7
Technische Daten
VETTER
MPS 2.0 MWF
Netzspannung V 230
Frequenz Hz 1~ 50
Max. Leistung W 2350
Leistung (tot.) W 2000
Nennleistung W 1200
Leistung der Entsorgungspumpe W 800
Behälterinhalt l 60
Füllmenge Flüssigkeit l 47
Luftmenge (max.) l/s 56
Unterdruck (max.) kPa (mbar) 23,5 (235)
Schutzart -- IPX4
Schutzklasse -- I
Saugschlauchanschluss (C-DN/C-ID) mm 40
Länge x Breite x Höhe mm 520 x 430 x 840
Typisches Betriebsgewicht kg 28,0
Umgebungstemperatur (max.) °C +40
Ermittelte Werte gemäß EN 60335-2-69
Schalldruckpegel LpA dB(A) 63
Unsicherheit KpA dB(A) 1
Hand-Arm Vibrationswert m/s2<2,5
Unsicherheit K m/s20,2
11DE

– 1
Please read and comply with
these original instructions prior
to the initial operation of your appliance and
store them for later use or subsequent own-
ers.
–The enclosed safety information for
wet/dry vacuum cleaners must be read
prior to initial commissioning!
–The non-compliance of the operating
and safety instructions may lead to
damages of the appliance and to dan-
gers for the operator and other persons.
–In case of transport damage, immedi-
ately inform the company Vetter GmbH,
53909 Zülpich.
Danger
Immediate danger that can cause severe
injury or even death.
몇Warning
Possible hazardous situation that could
lead to severe injury or even death.
Caution
Possible hazardous situation that could
lead to mild injury to persons or damage to
property.
몇Warning
The appliance is not suitable for vacuuming
dust which endangers health.
–This vacuum cleaner is intended for the
continuous disposal of large volumes of
liquid (flood damage, vacuuming con-
tainers, basins or tanks, etc.), as well as
for the wet and dry cleaning of floor or
wall surfaces.
–This appliance is suited for the commer-
cial use, e.g. for handymen, business-
es, for the fire brigade and the
Technical Relief Society.
Contents
Environmental protection . . EN . . .1
Symbols in the operating in-
structions . . . . . . . . . . . . . . EN . . .1
Proper use . . . . . . . . . . . . . EN . . .1
Device elements. . . . . . . . . EN . . .2
Start up. . . . . . . . . . . . . . . . EN . . .2
Operation . . . . . . . . . . . . . . EN . . .3
Transport . . . . . . . . . . . . . . EN . . .4
Storage. . . . . . . . . . . . . . . . EN . . .4
Maintenance and care . . . . EN . . .4
Troubleshooting . . . . . . . . . EN . . .4
Warranty. . . . . . . . . . . . . . . EN . . .5
Accessories and Spare Parts EN . . .5
EC Declaration of Conformity EN . . .6
Technical specifications . . . EN . . .7
Environmental protection
The packaging material can be
recycled. Please do not throw
the packaging material into
household waste; please send
it for recycling.
Old appliances contain valua-
ble materials that can be recy-
cled; these should be sent for
recycling. Batteries, oil, and
similar substances must not
enter the environment. Please
dispose of your old appliances
using appropriate collection
systems.
Symbols in the operating in-
structions
Proper use
12 EN

– 2
1 Float
2 Mains plug of the appliance
3 Power cord
4 Suction hose
5 Suction head lock
6 Dirt receptacle
7 Wheel
8 Cable holder of the disposal pump
9 Lock plate
10 Steering roller with fixed position brake
11 Floor nozzle
12 Height adjustment of the floor nozzle
13 Suction tube
14 Suction support
15 Suction head
16 Carrying handle
17 Filter cover
18 Push handle
19 Bender
20 Disposal pump
21 Acorn nut of the disposal pump
22 Float switch of the disposal pump
23 Mains plug of the disposal pump
24 Switch "Disposal pump OFF"
25 Socket
26 Switch "Disposal pump ON"
27 Main switch
28 Exhaust filter
29 Coarse dirt filter/flat fold filter
30 Closing cap (fire service C-coupling)
31 Nameplate
The appliance allows 3 operating modes:
1 Wet vacuuming with disposal pump
2 Wet vacuuming without disposal pump
3 Dry vacuum cleaning
Note: You can wet vacuum if the disposal
pump is turned off or has been removed.
Removal of disposal pump, see dry vacu-
uming.
Illustration
Remove the brush strips.
Install the rubber lips.
Note: The structured side of the rubber lips
must point outwards.
Illustration
Release and remove the suction head.
Pull the paper filter bag (optional) out
towards the rear.
Insert and lock the suction head.
–To suck wet dirt, first remove the paper
filter bag (optional).
Open filter door.
Take out the flat folded filter.
Install the coarse dirt filter.
Close the filter door, it must lock into
place.
Illustration
Remove closing cap (fire service C-
coupling).
Connect the disposal hose (nominal
width 3/4" or larger).
Caution
The coarse dirt filter must never be re-
moved during vacuuming.
–If the maximum liquid level is reached
the appliance will turn off automatically.
–After the wet vacuuming: Clean the
floater, container and the disposal
pump if necessary, using a damp rag
and dry them.
Device elements
Start up
Wet vacuum cleaning
Inserting the rubber lips
Remove the paper filter bag
Coarse dirt filter installation
Connection of disposal pump
General
13EN

– 3
Caution
Prior to dry vacuuming: Remove the dis-
posal pump and install the flat fold filter.
Note: You must use a flat fold filter during
dry vacuuming.
Caution
The flat pleated filter must always be in
place while vacuuming.
–To vacuum fine dust, you can also use
an additional paper filter bag (optional).
Unplug the mains plug of the disposal
pump.
Release and remove the suction head.
Illustration
Unscrew the acorn nut of the disposal
pump.
Remove the cable holder of the dispos-
al pump and replace it with a locking
cap.
Remove the disposal pump and the
plastic insert from the container.
Illustration
Install the locking cap instead of the dis-
posal hose.
Insert and lock the suction head.
Note: The flat fold filter is not included in
the delivery.
Open filter door.
Take out the coarse dirt filter.
Install the flat fold filter.
Close the filter door, it must lock into
place.
Illustration
Remove the rubber lips.
Install the brush strip.
Illustration
Release and remove the suction head.
Insert the paper filter bag (optional).
Insert and lock the suction head.
Turn the adjustment screw in a clock-
wise direction: High position of the floor
nozzle
Turn the adjustment screw in an anti-
clockwise direction: Low position of the
floor nozzle
Illustration
The suction hose is equipped with a clip
system. All C-40/C-DN-40 accessories can
be connected.
Danger
Risk of injury and damage! The socket out-
let is intended only for the direct connection
of the disposal pump. Any other use of the
socket outlet is not permitted.
Plug in the mains plug of the appliance.
A Switch on button
B Switch off button/test key
C Circuit breaker
D Red indicator lamp
Press the switch on button (the red indi-
cator lamp is ON). The protection
switch is now ready for operation.
Dry vacuum cleaning
General
Removal of the disposal pump
Installation of flat fold filter
Install the brush strip
Inserting the paper filter bag
Height adjustment of the floor nozzle
Clip connection
Operation
Turning on the Appliance
ON
I
TEST
O
A
D
BC
14 EN

– 4
Press the switch off button/test button
of the protection switch (Indicator lamp
goes off). The protection switch shuts
off.
Press the switch on button (the red indi-
cator lamp is ON). The protection
switch is now ready for operation.
Switch on the appliance at the main
switch.
Continuously dispose of large volumes
of liquid: Switch on the disposal pump.
Continuously dispose of liquids or
clean.
Shut off the disposal pump if necessary.
Switch off the appliance at the main
switch.
Press the switch off button/test button of
the protection switch (Indicator lamp goes
off). The protection switch shuts off.
Unplug the mains plug of the appliance.
Empty the container.
Vacuum and wipe the appliance inside
and outside with a damp cloth.
Wrap the mains connection cable
around the slider.
Wind the suction hose around the slid-
ing bow.
Place the appliance in a dry room and
secure it from unauthorized use.
Caution
Risk of injury and damage! Observe the
weight of the appliance when you transport it.
Hold the appliance at the handle and at
the suction pipe to transport it.
When transporting in vehicles, secure
the appliance according to the guide-
lines from slipping and tipping over.
Caution
Risk of injury and damage! Note the weight
of the appliance in case of storage.
This appliance must only be stored in inte-
rior rooms.
Danger
First pull out the plug from the mains before
carrying out any tasks on the machine.
Open filter door.
Replace the coarse dirt filter/flat-fold fil-
ter or the exhaust filter.
Close the filter door, it must lock into
place.
Release and remove the suction head.
Clean the floater with a moist cloth.
Insert and lock the suction head.
Danger
First pull out the plug from the mains before
carrying out any tasks on the machine.
Have the socket of the power supply
checked by an electrician.
Connect the mains plug of the appli-
ance to another socket of a different cir-
cuit.
Inform Customer Service
Disposal or cleaning operation
Turn off the appliance
After each operation
Storing the Appliance
Transport
Storage
Maintenance and care
Replacing the coarse dirt filter/flat-
fold filter or the exhaust filter
Cleaning the floater
Troubleshooting
Protection switch cannot be
switched on
Protection switch shuts off
repeatedly when the vacuum clean-
er is turned on
15EN

– 5
Check the receptacle and the fuse of
the power supply.
Check the power cable and the power
plug of the device.
Press the switch on button of the pro-
tection switch.
Turn on the appliance.
Check the swimmer.
Switch on the disposal pump.
Remove obstructions from the suction
nozzle, suction tube, suction hose, or
coarse dirt filter/flat-fold filter.
Replace the paper filter bag (optional).
Ensure the filter cover properly locks
into place.
Replace the flat pleated filter.
Check for proper installation of the flat
pleated filter.
Check the proper installation of the
coarse dirt filter.
Install the flat fold filter.
Check for proper installation of the flat
pleated filter.
Replace the flat pleated filter.
Check the socket of the appliance.
Free the stuck floater switch in the con-
tainer.
Release the stuck pump impeller in the
pump.
Route the disposal hose without kinks.
Check the disposal hose for obstruc-
tions.
–For this purpose, download our general
terms and conditions from our website:
www.vetter.de
–In the event of a warranty claim, please
contact your distributor or the Vetter
GmbH, 53909 Zülpich presenting your
proof of purchase.
–Only use accessories and spare parts
which have been approved by the man-
ufacturer. The exclusive use of original
accessories and original spare parts
ensures that the appliance can be oper-
ated safely and trouble free.
–At the end of the operating instructions
you will find a selected list of spare parts
that are often required.
–For questions concerning spare parts,
please contact:
Vetter GmbH
Blatzheimer Str. 10 - 12
53909 Zülpich
Tel. Germany: +49 (0) 2252/300850
Tel. international: +49 (0) 2252/300860
Suction turbine does not run
Suction turbine turns off
Suction capacity decreases
Dust escapes during dry vacuuming
Disposal pump is not running
Disposal pump does not produce
much volume
Warranty
Accessories and Spare Parts
16 EN

– 6
We hereby declare that the machine de-
scribed below complies with the relevant
basic safety and health requirements of the
EU Directives, both in its basic design and
construction as well as in the version put
into circulation by us. This declaration shall
cease to be valid if the machine is modified
without our prior approval.
Vetter GmbH
Blatzheimer Str. 10 - 12
53909 Zülpich
Zülpich, 08.11.2012
EC Declaration of Conformity
Product: VETTER Mini Permanent
Aspirator
Type: MPS 2.0 MWF
Relevant EU Directives
2006/42/EC (+2009/127/EC)
2004/108/EC
Applied harmonized standards
EN 55014–1: 2006+A1: 2009+A2: 2011
EN 55014–2: 1997+A1: 2001+A2: 2008
EN 60335–1
EN 60335–2–69
EN 61000–3–2: 2006+A1: 2009+A2: 2009
EN 61000–3–3: 2008
EN 62233: 2008
Applied national standards
-
17EN

– 7
Technical specifications
VETTER
MPS 2.0 MWF
Mains voltage V 230
Frequency Hz 1~ 50
Max. performance W 2350
Power (tot.) W 2000
Rated power W 1200
Capacity of the disposal pump W 800
Container capacity l 60
Filling quantity (liquid) l 47
Air volume (max.) l/s 56
Negative pressure (max.) kPa (mbar) 23,5 (235)
Type of protection -- IPX4
Protective class -- I
Suction hose connection (C-DN/C-ID) mm 40
Length x width x height mm 520 x 430 x 840
Typical operating weight kg 28,0
Max. ambient temperature °C +40
Values determined to EN 60335-2-69
Sound pressure level LpA dB(A) 63
Uncertainty KpA dB(A) 1
Hand-arm vibration value m/s2<2,5
Uncertainty K m/s20,2
18 EN

– 1
Lire ces notice originale avant la
première utilisation de votre ap-
pareil, se comporter selon ce qu'elles re-
quièrent et les conserver pour une
utilisation ultérieure ou pour le propriétaire
futur.
–Lire impérativement les consignes de
sécurité jointes pour l'aspirateur de
poussières / humide avant la première
mise en service !
–En cas de non-respect des instructions
de service et des consignes de sécuri-
té, l'appareil risque de subir des dom-
mages matériel et l'utilisateur ainsi que
toute tierce personne sont exposés à
des dangers potentiels.
–En cas de dommage dû au transport,
informer immédiatement la société Vet-
ter GmbH, 53909 Zülpich.
Danger
Pour un danger immédiat qui peut avoir
pour conséquence la mort ou des bles-
sures corporelles graves.
몇Avertissement
Pour une situation potentiellement dange-
reuse qui peut avoir pour conséquence des
blessures corporelles graves ou la mort.
Attention
Pour une situation potentiellement dange-
reuse qui peut avoir pour conséquence des
blessures légères ou des dommages maté-
riels.
몇Avertissement
Cet appareil n'est pas conçu pour aspirer
des poussières nocives.
–Cet aspirateur est destiné à l'élimina-
tion permanente de grandes quantités
de liquides (inondations, aspiration de
récipients, bassins ou réservoirs, etc.),
ainsi qu'au nettoyage humide et à sec
de sols et murs.
–Cet appareil convient à un usage pro-
fessionnel, par ex. pour les artisans, les
commerçants, pompiers et oeuvres
d'assistance technique.
Table des matières
Protection de l’environnement FR . . .1
Symboles utilisés dans le mode
d'emploi . . . . . . . . . . . . . . . FR . . .1
Utilisation conforme . . . . . . FR . . .1
Éléments de l'appareil . . . . FR . . .2
Mise en service . . . . . . . . . FR . . .2
Utilisation . . . . . . . . . . . . . . FR . . .3
Transport . . . . . . . . . . . . . . FR . . .4
Entreposage. . . . . . . . . . . . FR . . .4
Entretien et maintenance . . FR . . .4
Assistance en cas de panne FR . . .5
Garantie . . . . . . . . . . . . . . . FR . . .6
Accessoires et pièces de re-
change . . . . . . . . . . . . . . . . FR . . .6
Déclaration de conformité CE FR . . .6
Caractéristiques techniques FR . . .7
Protection de
l’environnement
Les matériaux constitutifs de
l’emballage sont recyclables.
Ne pas jeter les emballages
dans les ordures ménagères,
mais les remettre à un système
de recyclage.
Les appareils usés contiennent
des matériaux précieux recy-
clables lesquels doivent être ap-
portés à un système de
recyclage. Il est interdit de jeter
les batteries, l'huile et les subs-
tances similaires dans l'environ-
nement. Pour cette raison,
utiliser des systèmes de collecte
adéquats afin d'éliminer les ap-
pareils hors d'usage.
Symboles utilisés dans le
mode d'emploi
Utilisation conforme
19FR

– 2
1 Flotteur
2 Fiche secteur de l'appareil
3 Câble d’alimentation
4 Flexible d’aspiration
5 Verrouillage de la tête d'aspiration
6 Récipient collecteur
7 Roue
8 Support de câble de la pompe d'élimi-
nation
9 Plaque de fermeture
10 Roulettes pivotantes et frein de station-
nement
11 Buse pour sol
12 Réglage en hauteur de la buse de sol
13 Tuyau d'aspiration
14 Consoles d'aspiration
15 Tête d'aspiration
16 Poignée de transport
17 Recouvrement du filtre
18 Guidon de poussée
19 Coude
20 Pompe d'élimination
21 Écrou raccord de la pompe d'élimination
22 Commutateur à flotteur de la pompe
d'élimination
23 Fiche de secteur de la pompe d'élimina-
tion
24 Interrupteur « Pompe d'élimination
ARRÊT »
25 Prise de courant
26 Interrupteur « Pompe d'élimination
MARCHE »
27 Interrupteur principal
28 Filtre d'air évacué
29 Filtre pour impuretés grossières/filtre à
plis plats
30 Capuchon de fermeture (raccord C
pompiers)
31 Plaque signalétique
3 modes de service sont possibles avec
l'appareil :
1 aspiration humide avec la pompe d'éli-
mination
2 aspiration humide sans la pompe d'éli-
mination
3 Aspiration de poussières
Remarque : l'aspiration humide est égale-
ment possible lorsque la pompe d'élimina-
tion est coupée ou démontée. Pour la
dépose de la pompe d'élimination, voir l'as-
piration à sec.
Illustration
Démonter les bandes de brosse
Monter les lèvres en caoutchouc.
Remarque : la face structurée des lèvres
en caoutchouc doit être dirigée vers l'exté-
rieur.
Illustration
Déverrouiller et retirer la tête d'aspiration.
Sortir le sac de filtrage en papier (ac-
cessoire en option) par l'arrière.
Positionner la tête d'aspiration et la ver-
rouiller.
–En cas d'aspiration de saletés humides,
il convient de toujours démonter le sac
de filtrage en papier (accessoire en op-
tion).
Ouvrir le recouvrement du filtre.
Extraire le filtre à plis plats.
Monter le filtre d'impuretés grossières.
Fermer le recouvrement du filtre, il faut
l'entendre s'enclencher.
Illustration
Retirer le capuchon de fermeture (rac-
cord C pompiers).
Raccorder le flexible d'élimination (lar-
geur nominale de 3/4“ ou plus).
Éléments de l'appareil Mise en service
Aspiration humide
Montage des lèvres en caoutchouc
Retirer le sachet filtre en papier.
Monter le filtre d'impuretés grossières
Raccorder le flexible d'élimination
20 FR
Table of contents
Languages: