Viand PRO Aria User manual

Aria Ceiling Hood Fitting Instructions and Operation
Aria Ceiling Hood
Installation And User’s Manual
VP-CH93WHTSS.2
VP-CH93BLKSS.2
VP-CH93WHT.2
VP-CH93BLK.2

Aria Ceiling Hood Fitting Instructions and Operation

Aria Ceiling Hood Fitting Instructions and Operation
Dear Customer,
Congratulations on purchasing this equipment. Please read this
manual carefully and take care of the following hints to avoid
damages. Any failure caused by ignoring the items and cautions
mentioned in the instruction manual is not covered
by our
warranty and any liability.
Content
Contents 3
Safety Instructions 4
Installation 6
Recirculation Mode 8
Changing the Filter 8
Operation 9
Remote Control 10
Technical Data 11
Trouble shooting 12
Cleaning And Care 13
Hints On Disposal 13
Declaration of conformity
This product is conform to the following
European
Directives:
2014/30/EU (EMC)
2014/35/EU (LVD)
2011/65/EU (RoHS)
2009/125/EC (ErP)

Aria Ceiling Hood Fitting Instructions and Operation
Safety instructions
Thank you for purchasing this cooker hood. Please read the instruction manual
carefully before you use the cooker hood, and keep it in a safe place.
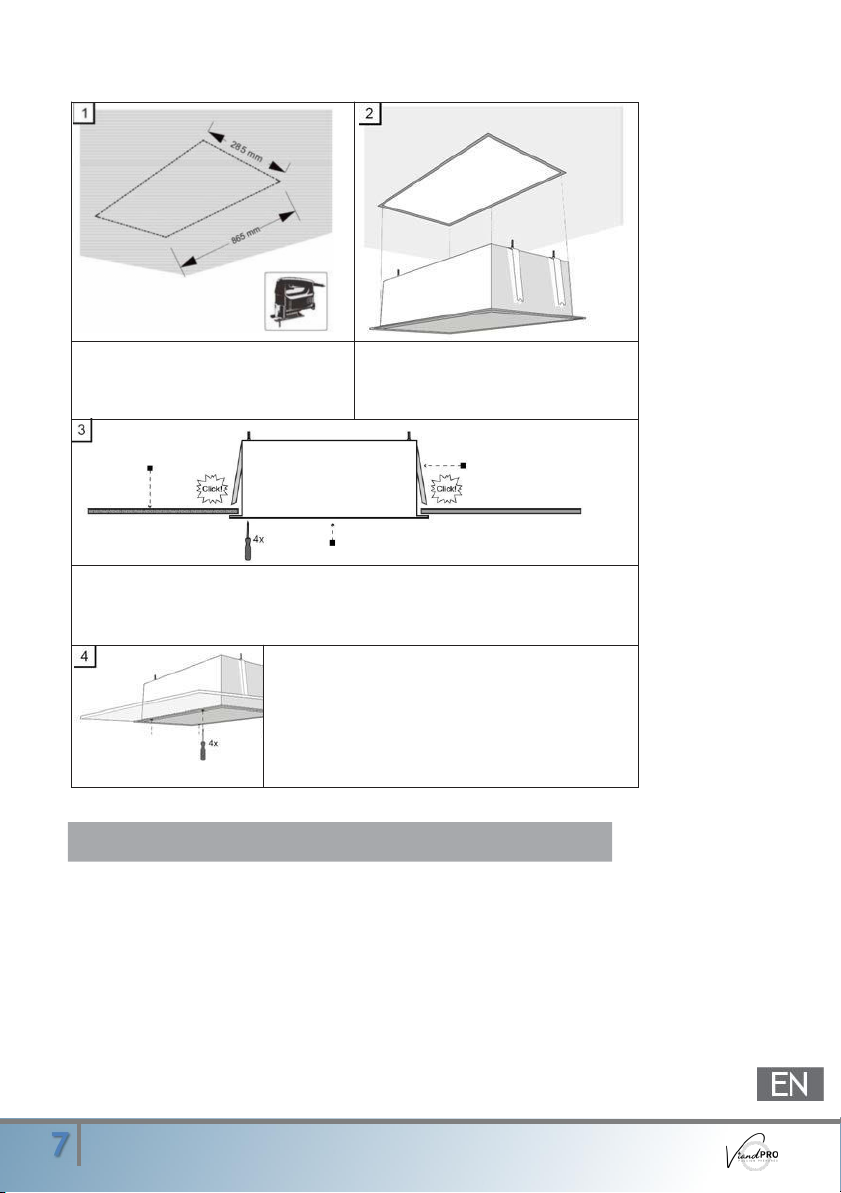
The installation work must be carried out by a qualified electrician or
competent person. Before you use the cooker hood, make sure that the
voltage (V) and the frequency (Hz) indicated on the cooker hood are exactly
the same as the voltage
(V) and the frequency (Hz) in your home.
The manufacturer and the agent will not bear any responsibility for the damage
caused by inappropriate installation and usage.
Never let children operate the cooker hood.
The cooker hood is for home use only. It is not suitable for barbecues, Roast
shop
and commercial purposes.
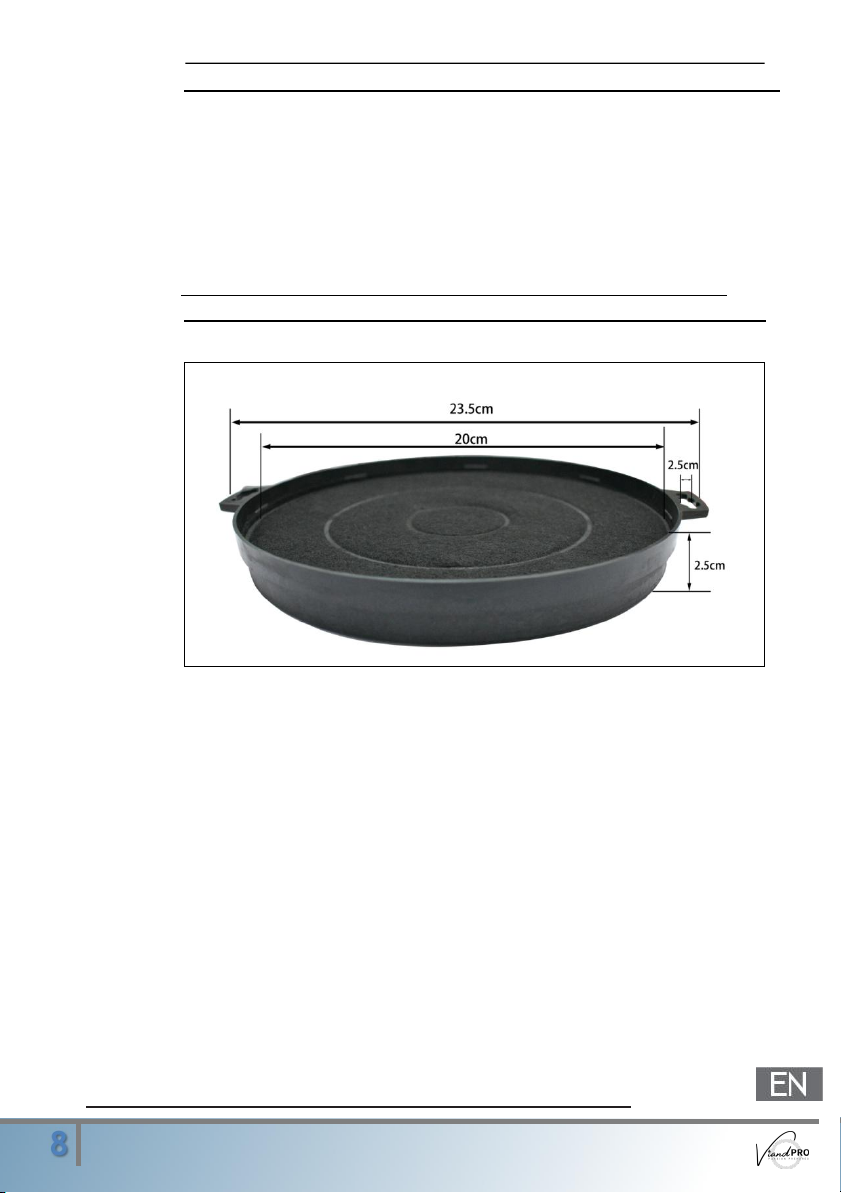
The cooker hood and its filter mesh should be cleaned regularly in order to
keep it
in good working order.
Before cleaning, switch the power off at the main supply.
Clean the cooker hood according to the instruction manual and keep the
cookerhood from the danger of burning.
Prohibit putting the cooker hood by fire.
If there is any fault with the appliance, please call the service department to
request
a service engineer.
This appliance can be used by children aged from 8 years and above and
persons with reduced physical, sensory or mental capabilities or lack of
experience and knowledge if they have been given supervision or
instruction concerning use of the appliance in a safe way and understand
the hazards involved. Children shall not play with the appliance. Cleaning and
user maintenance shall not be made by
childrenwithoutsupervision.
If the supply cord is damaged, it must be replaced by the manufacturer, its
service agent or similarly qualified persons in order to avoid a hazard.
The instructions shall state the substance of the following: there shall be
adequate ventilation of the room when the range hood is used at the same
time as appliances burning gas or other fuels (not applicable to appliances
that only discharge the air
back into the room).
Do not flambé under the range hood. Accessible parts may become hot
when used
withcookingappliances.
Important Hints on Installation
The air must not be discharged into a flue that is used for exhausting fumes from
appliances burning gas or other fuels (not applicable to appliances that only
discharge the air back into the room).
Regulations concerning the discharge of air have to be fulfilled.

Aria Ceiling Hood Fitting Instructions and Operation
Importan
t
notes
about
the
extractio n
mode
WARNING
Risk of poisoning from exhaust gases sucked back. Never
operate the device in extraction mode simultaneously
with an open flue appliance when there is not adequate
airflow guaranteed.
Open flue combustion equipment (for example, gas, oil, wood or
coal-fired heaters, tankless water heaters, water heaters) pulls
combustion air from the room and run it through an exhaust pipe
or chimney to the outside. In the extraction mode, indoor air is
removed from the kitchen and the adjacent rooms - without
sufficient air intake this creates a vacuum. Toxic gases from the
chimney or extraction flue can thereby be sucked back into the
living spaces.
Always ensure that a sufficient supply of fresh air is
guaranteed and that the air can circulate.
An air supply / extractor box alone does not ensure
compliance with the limit value.
Safe operation is only possible when the negative pressure in the
room where the appliance is located does not exceed 4 Pa (0.04
mbar). This can be achieved when the air required for combustion
can flow through openings that are not closable,
For example in doors, windows, in conjunction with an air supply/
extractor box or through other technical measures. In any case,
consult a qualified chimney sweep who can assess the entire
ventilation of your house and propose appropriate measures for
adequate ventilation.
If the hood is used exclusively in the recirculation mode,
unrestricted operation is possible.
WARNING
Fire hazard from flying sparks. Only install equipment on
a fireplace for solid fuels (for example, wood or coal), if
a closed, non-removable cover is
available.

Aria Ceiling Hood Fitting Instructions and Operation
Note: 'When the range hood and appliance supplied with energy other
than electricity are simultaneously in operation, the negative pressure in
the room must be
not exceed 4 Pa (4 x 10·
5
Bar).
Installation
Preparation
If you have an outlet to the outside, your cooker hood can
be connected as below picture by means of an extraction
duct (enamel, aluminum, flexible pipe or inflammable
material with an interior diameter of 150mm)
Before installation, turn the unit off and unplug it from
the outlet.
The cooker hood should be placed at a distance of
65 - 150cm above the cooking plane for best effect.
Installation (Vent outside)
Dimensions

Aria Ceiling Hood Fitting Instructions and Operation
Note
: The ventilation pipe must be installed after adjusting the extractor
hood.
Ceiling Installation
Saw a hole in the ceiling
according to
the dimensions of
the extractor hood.
Slide the extractor hood into the
opening.
Ceiling Brackets
Hood
Push the extractor hood upwards until the brackets engage in the false
ceiling. If youdo not engage, use a screwdriver to pierce the four holes
in the lower corners of the
hood.
The brackets should be adjusted so that the
lower edge of the extractor hood is flush
with the ceiling. Screw four screws through
the four holes in the lower corners of the
hood.
When mounting a non-return valve, it must be ensured that the
valve can be opened freely. If the valve cannot be opened
freely, it can reduce the suction power and increase the
noise from the extractor hood.
Note: The hood uses 220mm x 90mm rectangular ducting.
Please ensure that you use this or 150mm round. If reducing the
size, the minimum size is 125mm round. Using anything smaller will
invalidate the warranty.

Aria Ceiling Hood Fitting Instructions and Operation
Recirculation Mode
If the hood is to be installed as a recirculation hood, the air needs
to return to the kitchen once cleaned by the charcoal filter. The
vent back into the kitchen should be 1.5m minimum from the
hood to ensure adequate airflow.
Follow the previous installation instructions for mounting the hood
with the addition of the ducting to carry the air to the ceiling vent.
Adding/Changing the carbon filter
Open up the hinged door on the hood.
Remove the grease filters.
Plug the activated carbon filter into the unit and turn it in
clockwise direction.
Repeat the same on the other side. Make sure the filter is
securely locked.
When activated carbon filter attached, the suction power will be
lower.
Replace the filter every 3-4 months for optimum operation.
If the extractor hood is used for recirculation and there is no
external ventilation (exhaust air), it is important that the ventilation
is not blocked or impaired, as this can damage the extractor hood,
reduce capacity and increase noise. In addition, no non-return
valve can be installed in recirculation mode.

Aria Ceiling Hood Fitting Instructions and Operation
Operation
Control Panel and Button Functions
Switch the engine on and off.
The motor runs at low speed.
The motor runs at medium speed.
The motor runs at high speed.
Switch the light on and off.
Setting the Lighting Colour
In standby mode, press and hold the LIGHT button to adjust the illumination color.
Use the button (3) to adjust one of the following light colors. The lights will show the
corresponding number (L1-L9):
Display
Colour
Display
Colour
L1
White
L6
Purple
L2
Red
L7
Orange
L3
Green
L8
Cyan
L4
Blue
L9
Yellow-green
L5
Yellow

Aria Ceiling Hood Fitting Instructions and Operation
Remote Control
1
Press button (1) to switch the motor
on or off.
2
Press button (2) to decrease power
or speed.
3
Press button (3) to increase power or
speed.
4
Press the button (4) to turn the light
on or off.
5
Press the key (5) when the power is
on to activate the timer mode. The
pre-set time for the timer is 5
minutes. When the timer has
expired, the cooker hood will
automatically turn off.
To calibrate the remote control
In standby mode, long press the on/off button on the hood panel for 3 seconds till it
flashes, then immediately press the on/off button on the remote control to complete
If the calibration was successful, an acoustic signal sounds.
If the calibration was not successful, the cooker hood switches to
standby mode.

Aria Ceiling Hood Fitting Instructions and Operation
TECHNICAL DATA
Type
Ceiling Cooker Hood
Material
Stainless Steel & Glass
Installation width mm
900
Ceiling Installation
Control Type
Touch & Remote
Recirculation
Optional
Annual energy consumption
51.4 kW/h
(AEChood) Energy efficiency category
D
Fluid dynamical efficiency (FDEhood)
9.7
Fluid dynamical efficiency category
E
Lighting efficiency (LEhood)
4.0 lux/W
Lighting efficiency category
G
Grease separation
69.1%
Grease separation category
D
Air flow
317.2m³/hr – 411.1m³/hr
Maximum air flow Qmax
411.1m³/h
Airflow at boost setting
N/A
A-rated noise emission
54dB – 59dB
Power consumption off (Po)
0.4W
Power consumption standby (Ps) Power
0.38W
Consumption lighting system (W)
10.0W
Connected load
85W
Illuminant
/ LED
Power consumption per illuminant unit
2 * 5W
Voltage / frequency
220 – 240 V AC /50Hz
Height Adjustment in mm
200
Grease filter / material / dishwasher safe
2 / aluminium /
Carbon filter
Optional
Installation material
Instruction manual
Dimension appliance HxWxD mm
207 x 320 x 900
Weight net / gross kg
15.3 / 17.9

Aria Ceiling Hood Fitting Instructions and Operation
Troubleshooting
Fault
Cause
Solution
Light on, but fan
does not work
The fan blade is jammed.
Switch of the unit and
Repair by qualified service
personnel only.
The motor is damaged.
Both light and fan
do not work
Light bulb burned out.
Replace the bulb with
correct rating.
Power cord loose
Plugin to the power supply
again.
Serious vibration of
the unit
The fan blade is
damaged.
Switch of the unit and
Repair by qualified service
personnel only.
The fan motor is not fixed
tightly.
The unit is not hung
properly on the bracket.
Takedown the unit and
check whether the
bracket is in proper
location.
Suction
performance not
good
Too long distance
between the unit and the
cooking plane
Readjust the distance to
65 - 150cm

Aria Ceiling Hood Fitting Instructions and Operation
Cleaning and Care
Monthly Cleaning for Grease Filter
Clean the filter every month can prevent any risk of fire. The filter
collects grease, smoke and dust, so the filter is directly affecting
the efficiency of the cooker hood. If not cleaned, the grease
residue (potential flammable) will saturate on the filter. Clean it
with household cleaning detergent.
Hints on disposal
According to the European waste regulation 2012/19/EU this
symbol on the product or on its packaging indicates that this
product may not be treated as
household waste. Instead it should be
taken to the appropriate collection point
for the recycling of electrical and
electronic equipment. By ensuring this
product is disposed of correctly, you will
help prevent potential negative
consequences for the environment and
human health, which could otherwise be
caused by inappropriate waste handling
of this product. For more detailed
information about recycling of this
product, please contact your local
council or your household waste disposal service.

Aria Ceiling Hood Fitting Instructions and Operation
Notes

Aria Ceiling Hood Fitting Instructions and Operation
This manual suits for next models
4
Table of contents
Other Viand PRO Ventilation Hood manuals
Popular Ventilation Hood manuals by other brands

Jenn-Air
Jenn-Air JXW8230WS Installation Instructions and Use & Care Guide

ETNA
ETNA RA345BEI Instructions for use

Zanussi
Zanussi ZHC 929 X Installation, use and maintenance handbook

GE
GE JV666HSS Owner's Manual & Installation Instructions

Kruger
Kruger ALTO-T user manual

BOMANN
BOMANN DU 622.1 instruction manual

Siemens
Siemens LC87KHM10 Instructions for installation and use

Home appliances
Home appliances IRI6WE3 manual

Fisher & Paykel
Fisher & Paykel HI90BLX1 installation instructions

Bosch
Bosch DWC041650 installation instructions

Electrolux
Electrolux ICON RH42PC60GS Brochure & specs

Beko
Beko CTB 6255 X user manual