Viatek Smart Vacuum Trashcan BJ-1841 User manual

READ MANUAL FULLY BEFORE USING.
INCLUDES:
1 Smart Vacuum Trashcan (BJ-1841)
Smart Vacuum Trashcan™

PARTS DIAGRAM
Flip Cover
Hose Assembly Storage
Additional Pipe Storage
Induction Zone
Omni-directional Wheel
Battery Flip Cover
Suction Flip Cover
Flip Switch
Barrel Components
Hose Assembly
Additional Pipe
Floor Brush
Combined Nozzle
1.
Take o the Flip Cover.
2.
Take out the Dust Bin and
dissassemble the upper and
lower bins. Put the special
garbage bag into the lower
bin. If you use non-standard
garbage bags, we recommend
they be 12”-14” wide, 13”x19”
tall and are a double layer
thickness.
3.
Put the lter into the
corresponding bottom portion
after the combination of the
upper and lower bins and then
place the dust bin according to
the original way.
LOADING BAGS AND THE DUST SUCTION SWITCH
HEPA Filter
Power Supply Socket
Flip Switch

4.
Remove the screws on the
battery cover with a screwdriver.
Open the battery cover and
take out the battery box. Install
3 AA batteries, according to the
positive and negative electrode
indication. Place the battery box
according to the original way.
Alighn the metal sheet.
5.
Induction Screen Display is ON
when the intelligent switch is
moved to “I”.
6.
Press the start key on the left of
the machine. Start the machine
and keep the ip cover in open
status. Then press the shut o
key on the left side after use.
OPERATING THE DUST ABSORPTION
1.
Make sure the intelligent switch
and dust absorption switch are
OFF. Please check to insure the
HEPA lter is installed correctly,
and make sure the garbage
bag in the dustbin is installed
correctly. Check the wind cover
to insure proper installation
when there is no garbage bag
in the unit.
2.
Screw out the hose cover, take
out the hose assembly. Uncover
the suction cover. Insert and
screw the hose component
assembly tight.
3.
Connect the suction
accessories by gradually
inserting the hose assembly,
additional pipe and small round
brush together.
4.
After connecting the power
supply cord and pressing the
power switch the unit will start
working.
5.
After use, press the power
switch, pull out the power cord,
empty the dust bin and clean
the lter.

DUST BIN FUNCTIONS
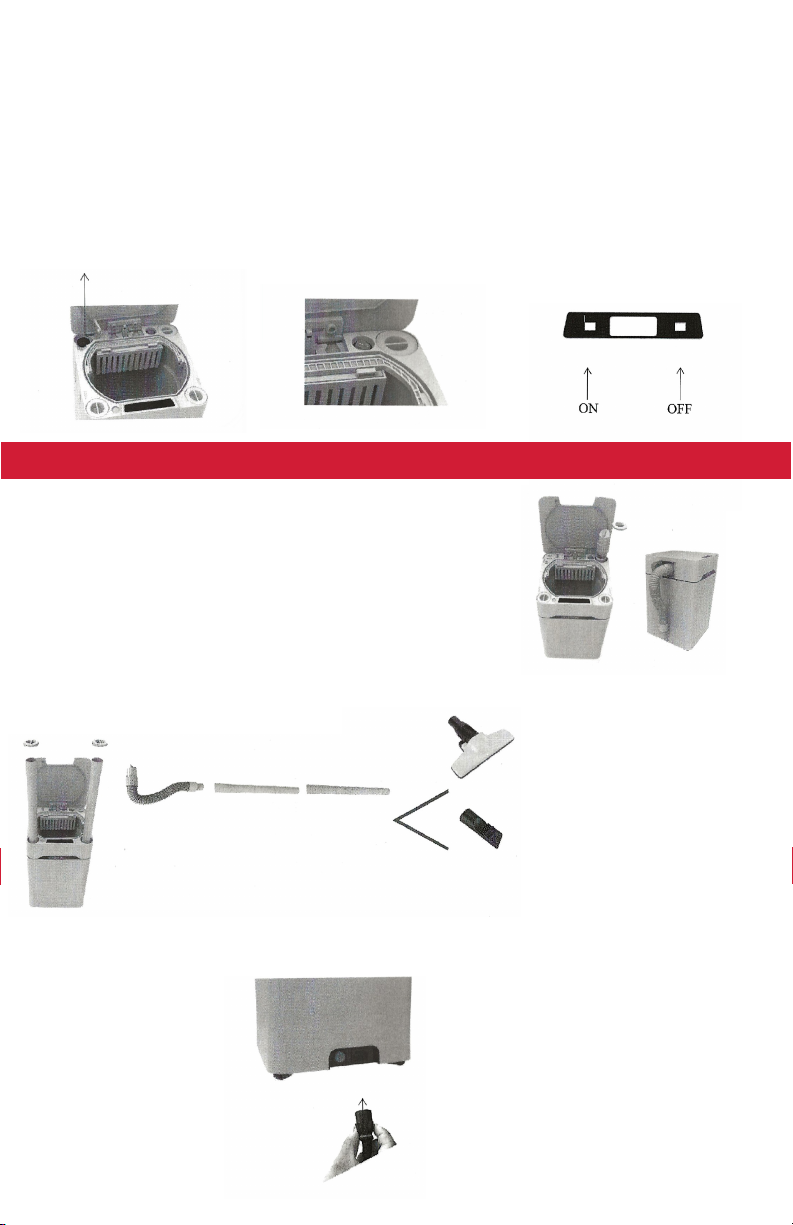
1. Please pay attention to the positive and negative electrode of the battery in the battery installation
2. Make sure to clean the dustbin with a clean cloth. Do not ush the dustbin with water, this can damage the
electric circuits of the dustbin. The internal electronic components are easily damaged if they get wet.
Please place the unit in a ventilated, dry area before using.
3. Do not press the ip cover or turn the ip cover quickly or forcibly in order to avoid damage.
4. Please replace the batteries regularly to avoid electric component damage caused by weak batteries.
5. Do not use the dustbin in direct sunlight or damp environment.
6. Keep the induction window clean to allow for normal functioning of the dustbin.
7. Do not use mixed battery types: rechargeable and primary batteries together
or acid and alkaline batteries together.
USE REQUIREMENTS
• DO NOT VACUUM THE FOLLOWING OBJECTS:
1. Desiccant
2. A large amount of powder
(Construction Waste, Fire Extinguisher Powder, etc....)
3. Pet Excrement
4. Glass, Pins, Needle, Toothpicks
5. Objects that are easy ti block the hose
(Long rope, stocking, etc.....)
• Be careful with the hose (in order to avoid hose damage)
• Do not overheat the vacuum. Suggested run time is half an hour to maintain the service life of the unit
• Do not vacuum dust directly with hose or additional hose front inlet to avoid front end damage
• Do not block the air exhaust inlet in order to avoid the deformation caused by excessive heat.
• Please check whether the lter is installed, such as dust bag, HEPA, etc. (In order to avoid the motor
working abnormally and the burning caused by garbage.
CLEANING AND MAINTENANCE
Shut of the power switch and unplug the unit before maintenance. Remove the lter and ush with tap water.
It is recommended to use tap water to ush the dust o the lter. Place the lter in a well ventilated area to dry
naturally.
• Shake o the moisture and dry it completely (in order to prevent peculiar smell or blockage)
• Do not dry with a hair dryer or in the dryer (any type of hot air can cause deformation
and interfere with function)
• Do not use detergent, bleach, alcohol, etc.… (in order to avoid cracks, color changes, etc.…)

WARRANTY INSTRUCTION
Our product warranties include the following aspects according to Regulation of Replacement and Amendment
Liability of Some Commodities, Law of the United States on the protection of the Rights and Intrests of Consumers
and relevant laws and regulations.
1. Consumers can choose to return their purchase, exchange the item and return if for defect with valid receipt
within 15 days of purchase, or the rules of the retailer..
2. We carry out the policy of “complete machine and motor warranty for half a year” for the product in normal
use condition.
3. The maintenance network is liable for the 90-day free warranty of spare parts replacement and maintenance.
4. The following situations are beyond the scope of the warranty.
• No valid receipt, warranty card, or beyond the warranty period
• Accessories are not guaranteed
(such as hose, additional pipe, scrubbibg brush, small round brush, small at suction head)
• Damages due the improper handling, use, maintenance, and safekeeping by users
• The warranty period of non-family use is 6 months.
(such as production, business, commercial and other places with strong operation)
• Machine damages with no installation of lter before use
(such as dust bag, HEPA, etc.....)
• Damaged due to the use and maintenance of the product inconformity with the product instruction.
• Damages caused by dissassembly and maintenance by non-special maintenance center
• Damages by force majeure
(such as lightning, re, earthquake, ood and other natural disasters)
• Users must show the valid receipt and warranty card when putting forward the maintenance
services. The period of validity is calculated since the date of purchase. The warranty period of the
product shall be calculated from date of purchase.
• Note: We do not provide on-site services. Customers can negotiate with the service network on the
door-to-door services
Warranty Card
Customer Name Telephone No.
Address
Machine Type
Purchased
Date of
Purchase
Customer Opinion
Place of
Purchase
Production
Lot Number
Maintenance Time Reason Mode Maintenance Location

WARNINGS
EXAMPLES INCLUDE:
• It cannot run even if the power switch is on
• It has an electricity supply and power is interrupted at intervals when the power
plug or power supply cord is pulled.
• Deformation and abnormal heating
• Abnormal sound in operation
• Burning smell due to the hose damage
• Constant stop in operation
PLEASE CONTACT THE NEAREST DESIGNATED SERVICE AND MAINTENANCE
CENTER FOR INSPECTION AND MAINTENANCE.
072221
MK-031
• DO NOT inhale re source or combustable substance (Cigarette butt, printing ink,
gasoline, dilutents, etc.)
• DO NOT use the damaged power supply cord in order to avoid excessive heat, re,
etc.
• PLEASE TAKE CARE OF CHILDREN Children are prohibited from playing with this
appliance, in order to avoid the re, electric shock, injury, etc.
• PLEASE SHUT OFF THE POWER SWITCH or pull out the power socket in case of the
power ailure of the vacuum cleaner in order to avoid the smoke or re.
• MAKE SURE TO INSTALL THE FILTER in use in order to prevent the burning of
the motor due to the blockage of the motor by the garbage suction. The lter is
equipped with dust bag, HEPA, etc.
• PLEASE STOP USING AND PULL OUT THE POWER PLUG IN CASE OF ANY
ABNORMALITY AND FAULT ( in order to avoid the smoking, re, electric shock)
2020
This manual suits for next models
1
Table of contents