Vibralarm VAL105 User manual

This product may be purchased from Connevans Limited secure online store
at www.DeafEquipment.co.uk
DeafEquipment.co.uk
Solutions to improve the quality of life
SSoolluuttiioonnss
ttoo
iimmpprroovvee
tthhee
qquuaalliittyy
ooff
lliiffee
Connevans

Digital Alarm Clock
with
Bedshaker Jack
Night Light
Variable Volume
Variable Tone
Model VAL105

2

3
The Digital alarm Clock allows the user to
set Variable Loudness and Variable Tone for the audible
alarm. The Output Jack on allows you
also to wake up to vibration by connecting our Vibes 12
Volt Bedshaker or flashing light by connecting our Prism
12 Volt Strobe Light (Bedshaker or Strobe Light are
purchased separately)
is manufactured by GLOBAL ASSISTIVE
DEVI CES INC
. for people with special needs for wake up.
You can select the tone and loudness for the audible
alarm that meets your personal requirements or
situation. With the auxiliary jack provided, you can add
the low voltage “Vibes” Bedshaker and place it under
your pillow or mattress to awaken by vibration. You have
the option of plugging in the Prism strobe light to awaken
by flashing light.
With the selection controls you can choose to have a
constant or pulse vibration. You can select to have the
vibration with or without audible sound or you can have
the strobe light flashing with or without the audible alarm.
If you want a silent alarm that will not disturb others, the
audible alarm can be set to “OFF”.
The green LED display provides enhanced reading of the
time. has a built in night light.
For International use, the is available in
both 110/130 volt and 220/240 volt models to
accommodate different Electrical requirements. The built
in “Auto Detect” Circuit for 50/60 Hz will automatically

4
detect the correct frequency and operate the clock in the
correct mode for keeping accurate time.
BEFORE using your unit, take a few minutes to read the
following instructions. The understanding of the features
of your new wake up device will allow you ease in setting
and ensure effective use.
POWER SOURCE:
A plug in 9VAC 750mA Power Supply powers the clock.
The power supply is available in 110/130 Volt or 220/240
Volt. North America uses the 110/130 volt power supply.
For other countries, use the correct Voltage for your
area. At the back of the clock you will find a small jack
(opening). Insert the small single plug of the Power
Supply into the jack marked AC INPUT. Connect the
other end of the Power Supply into an AC wall outlet near
your bedside. 12:00 will flash on the clock display. When
you set the time, the display will stop flashing.
SETTING THE TIME
To set the correct hour of the day, press and hold the
TIME button. While you hold down the TIME button,
press the HOUR button until it advances to the correct
hour of the day. Release buttons when correct hour
shows on the clock display.
N.B. The PM INDICATOR LIGHT is a glowing green dot
at the top left of the clock display. When the clock is
reading PM time, the light will be "on". The light will be

5
off when the clock is reading AM time. BE SURE TO
USE THIS GUIDE FOR CORRECT SETTING OF
CURRENT TIME (as well as Alarm Settings).
To set the correct minute of the hour, press and hold the
TIME button. While you hold down the TIME button,
press the MINUTE button until it advances to the correct
minute. Release buttons when correct minute shows on
the clock display.
SETTING THE ALARM TIME:
The ALARM SET button is labeled ALARM.
To set the hour you wish to wake up, press and hold the
ALARM button. While you hold down the ALARM button,
press the HOUR button until it advances to the correct
hour you want for wake up. Release the button when
desired alarm hour shows on the clock display.
N.B. Use the PM INDICATOR LIGHT to ensure that the
setting for alarm is correct. Example: PM INDICATOR
LIGHT is OFF for AM time wake up.
To set the correct minutes past the hours you want for
wake up, press and hold the ALARM button at the same
time as you press the MINUTE button. When the
minutes advance to the desired time, release the
buttons.
USING THE ALARM:
Set the ALARM SELECTOR (4-position switch located
on the side of the clock) to the desired mode(s).

6
AUDIBLE can be set to OFF or ON. When AUDIBLE is
set for ON, a green indicator light will show on the bottom
left of the display. VIBRATE position will activate the
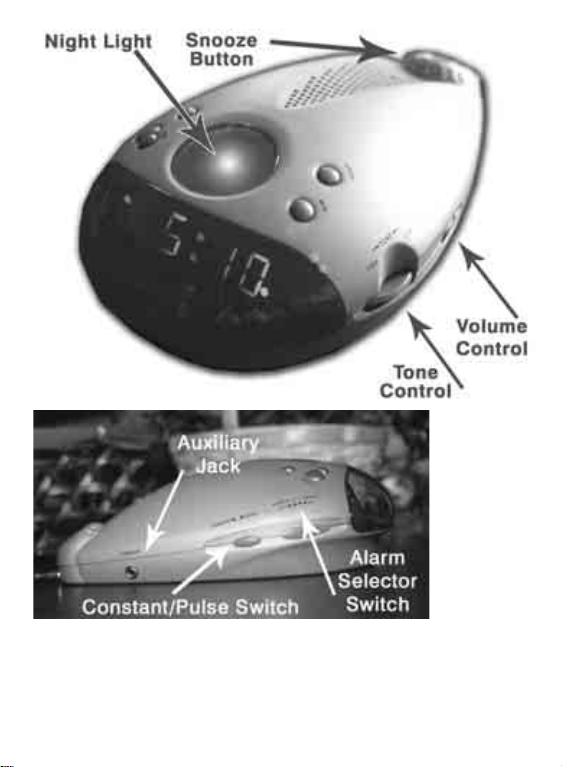
auxiliary jack and cause the connected Vibes Bedshaker
to vibrate when the alarm is activated. When the Prism
strobe Light is connected to the auxiliary jack, the strobe
light will flash when the alarm is activated. When the
Vibrate position is ON, an indicator light will show on the
bottom right of the display. When set to ALL, audible &
vibration (or Strobe Light) are activated and the nightlight
will also flash. Both alarm indicator lights will show on
the bottom of the display.
To stop the ALARM after it is activated, press the button
on top of the clock marked AL OFF. The alarm setting
will remain for the same time, for the next day.
If you wish to awaken at the same time each day, there
is no need to adjust or reset the alarm time. Just ensure
that the Alarm selector switch is in the desired ON
position before going to sleep. (Audible, Vibrate or ALL)
To stop the ALARM from being activated at the preset
time, such as days off or weekends, slide the Alarm
Selector switch to the OFF position. The Alarm Indicator
light(s) will turn off.
Whenever you wish to check what time the Alarm is set
for, press and hold the ALARM button. The Clock
Display will then show the alarm time that has been set.
Check that it is set properly for AM or PM time by using

7
the PM indicator light to confirm time of day you want to
be awakened.
VARIABLE LOUDNESS/ VARIABLE TONE
The Volume Dial allows you to select the alarm loudness
you require or prefer. (Alarm selector must be in Audible
or ALL position for audible alarm to work)
The Tone Dial allows you to select the frequency/tone of
sound that is most effective for your needs.
AUXILIARY JACK FOR 12VDC BEDSHAKER:
Your clock is equipped with an AUXILIARY JACK that
allows you to connect a Bedshaker, Vibes Model VSS12
or the Prism Strobe Light, Model SL12. (The Bedshaker
and Strobe Light are purchased separately).
This auxiliary jack is located on the side of the clock near
the back and is labeled VIBRATOR. Simply insert the
mini plug of the Bedshaker into this jack. To use the

8
Bedshaker, place it under your pillow or between your
box spring and mattress. You can select either a pulse or
constant vibration by adjusting the switch on the side of
the clock. When the alarm is activated, the Bedshaker
will also be activated. When the alarm is turned off, the
vibration will stop.
To use the Prism Strobe Light, plug it into the auxiliary
jack and set the Constant/Pulse switch to CONSTANT.
Do not use the Pulse position for the Strobe Light.
USING THE SNOOZE FEATURE
After the alarm is activated, press the SNOOZE button.
This will stop alarm activity (sound, Bedshaker or light).
In approximately 9 minutes the alarm(s) will start again
automatically. You can press the SNOOZE button to
repeat this off/on again cycle as many times as you wish,
up to one hour.
BATTERY BACK UP for CLOCK MEMORY
Your clock is equipped with a BATTERY BACK UP
system. This system will keep the clock time running and
the alarm settings maintained IN THE EVENT OF A
POWER FAILURE. The clock display is not illuminated
when the clock is running on battery. The correct time
will show on the display when the clock is returned to
electrical power (providing the battery has adequate
power). A prolonged power failure can drain the battery's
power. If your clock's display flashes when electrical
power is returned, replace the battery and reset the clock
time.

9
Installing/Replacing the Back-up Battery:
The battery compartment is located on the bottom of the
clock. To remove the cover, slide the tab and lift up to
remove.
Connect a 9 volt battery to the terminals. Alkaline
recommended. (Battery not included) Position battery in
the compartment. Replace the cover.
Night Light
The night-light is located on the top of the clock.
Pressing down on the clear circular button will turn the
light on and off.
CARE AND MAINTENANCE
Your clock has been carefully designed
and manufactured to provide you with accuracy and
dependability. The following suggestions will help you
care for your clock so that you can enjoy the maximum
from it.
• Keep the clock dry. If it gets wet, wipe it dry
immediately. Liquids can contain minerals that
corrode the electronic circuits.
• Use only a fresh battery of the recommended size
and type. Always remove an old or weak battery. It
can leak chemicals that can damage electronic
circuits.

10
• Handle the clock gently and carefully. Dropping it can
damage the circuit boards and case and can cause it
to work improperly.
• Use and store the clock only in normal temperature
environments. Extreme temperatures can shorten
the life of electronic devices and distort or melt plastic
parts.
• Keep the clock away from dust and dirt, which can
cause premature wear of parts.
• Wipe the clock with a dampened cloth occasionally to
keep it looking new. Do not use harsh chemicals,
cleaning solvents, or strong detergents to clean the
clock.
• Modifying or tampering with your clock s internal
components can cause a malfunction and will
invalidate the clock s warranty.
SERVICE:
Qualified service personnel should service the unit. The
user should not attempt to service the unit. All servicing
should be referred to:
GLOBAL ASSISTIVE DEVICES, INC.
4950 North Dixie Highway
Fort Lauderdale FL USA 33334-3947

11
ONE YEAR LIMITED WARRANTY
• Your is warranted to be free from
defects in material or workmanship for One Year
from the date of purchase.
• This warranty does not apply to any unit that has
been subject to misuse, negligence or accident or
has been opened or serviced by anyone other than
an authorized Service Depot of Global Assistive
Devi ces , I nc.
• At its option, GLOBAL ASSISTIVE DEVICES, INC
.may
select to replace the entire unit, rather than repair it.
• During the warranty period, return the clock, with
dated proof of purchase, in a secure package,
insured and with shipping charges prepaid. C.O.D.
packages will not be accepted. Include a note
describing the service required and your return street
address. No PO Box Numbers Please. Include $7.50
(check, money order, Visa, MasterCard or American
Express) Contact us for a quote for shipping and
handling charges outside of the US.
Disclaimer
GLOBAL does not accept any responsibility whatsoever
for any inconvenience or for any non-functioning of the
unit. When an accessory that is not manufactured by
GLOBAL is used with this product, GLOBAL will not
accept any liability for the performance of malfunction of
the connected product.

12
Fort Lauderdale Florida USA
Model VAL105
Table of contents