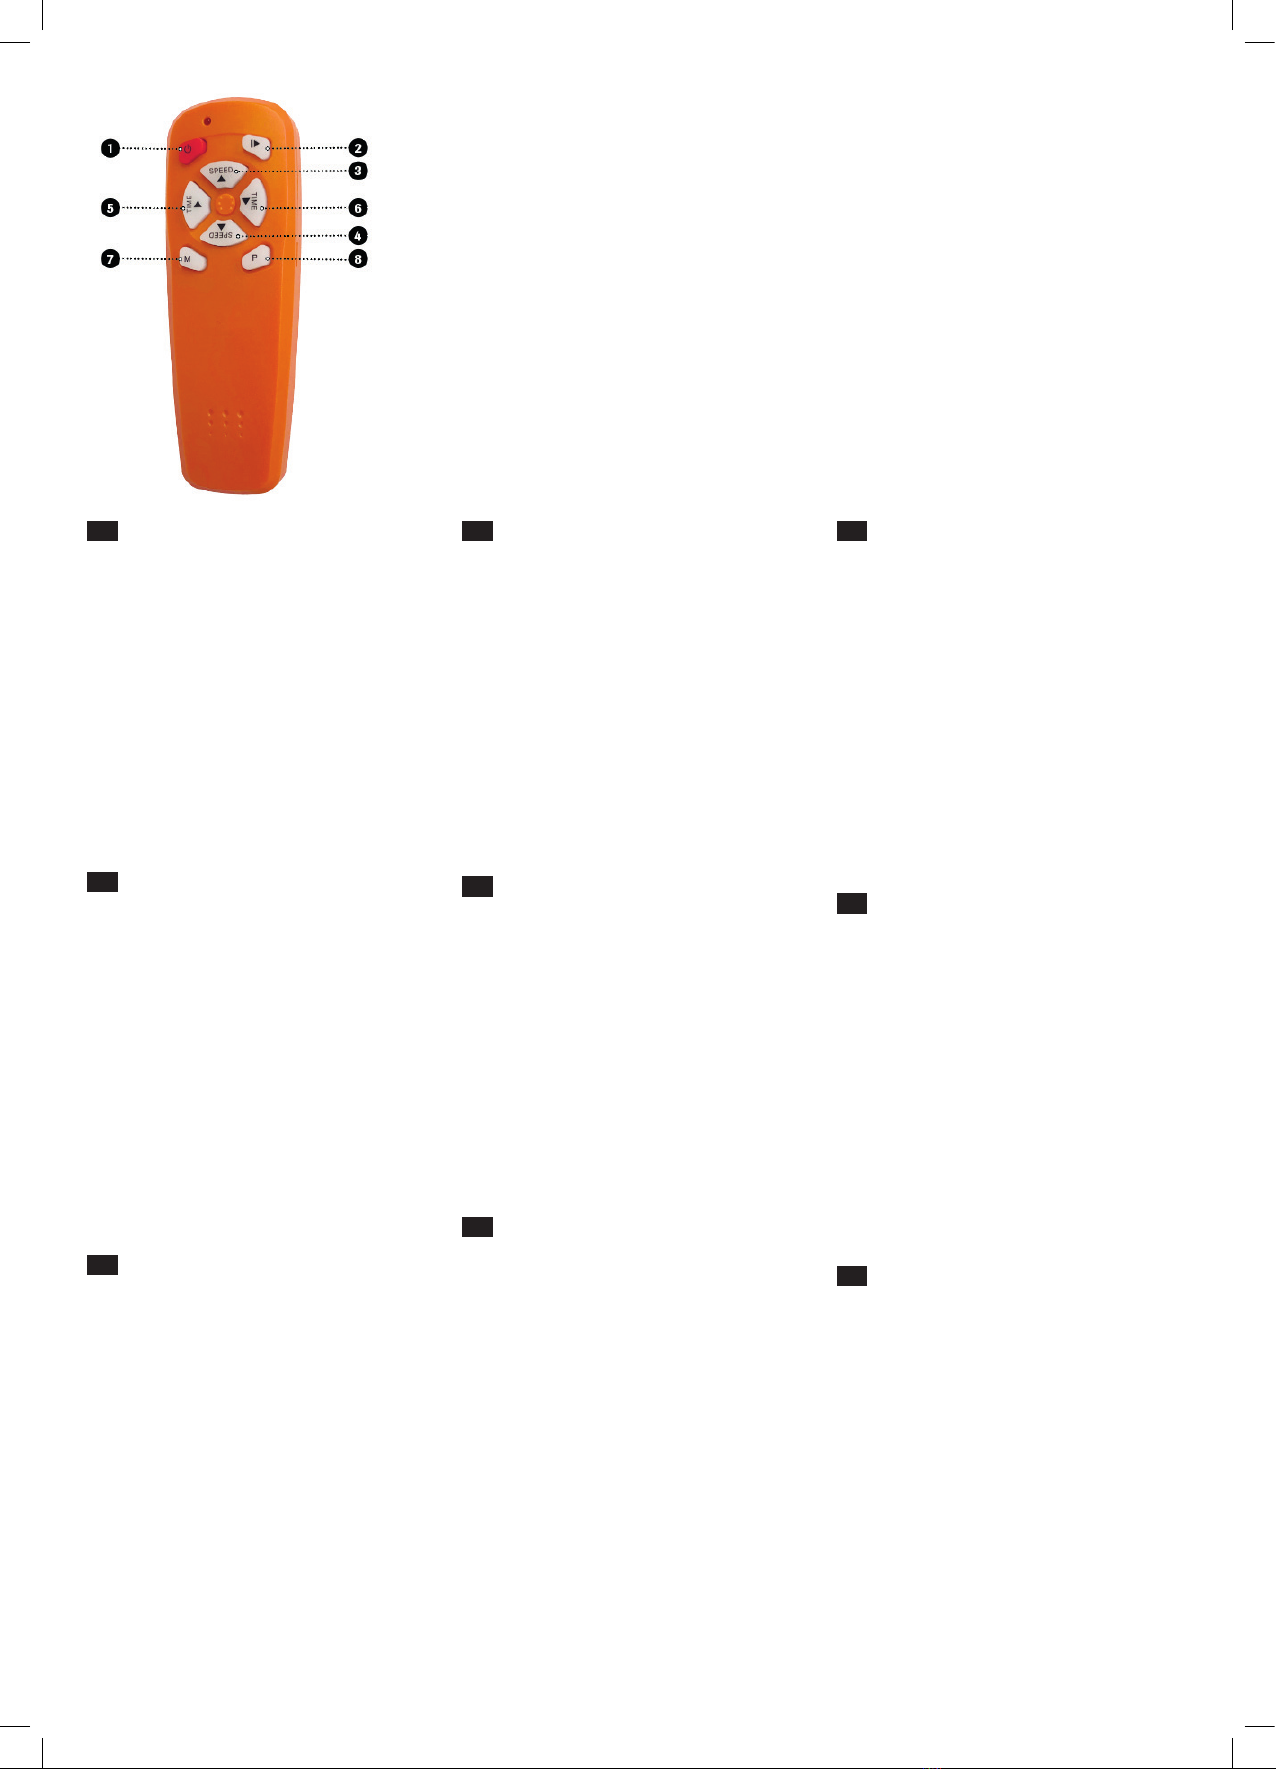
VibroShaper E382 User manual

GEBRAUCHS-
ANLEITUNG
User instructions |Istruzioni per l’uso |Mode d’emploi |Gebruik-
saanwijzing |Használati utasítás |Návod k použití |Návod na
použitie |Instrucţiuni de utilizare | Instrukcja obsługi
HOME GYM
BITTE VOR VERWENDUNG DIESES GERÄTES ALLE ANLEITUNGEN LESEN UND DIESE BEDIENUNGS-
ANLEITUNG ZUM NACHSCHLAGEN AUFBEWAHREN
.
PLEASE READ ALL THE INSTRUCTIONS IN THIS GUIDE BEFORE USING THE DEVICE AND KEEP THE GUIDE TO REFER TO.
SI PREGA DI LEGGERE TUTTE LE ISTRUZIONI PRIMA DI UTILIZZARE QUEST’APPARECCHIO E DI CONSERVARE QUESTO MANUALE PER POTERLO SEMPRE REPERIRE
IN UN SECONDO MOMENTO.
VEUILLEZ LIRE L’INTÉGRALITÉ DES INSTRUCTIONS AVANT LA MISE EN SERVICE ET CONSERVER LE PRÉSENT MODE D’EMPLOI POUR LE CONSULTER PLUS TARD.
LEES VOOR HET GEBRUIK VAN DIT APPARAAT DE VOLLEDIGE GEBRUIKSAANWIJZING. BEWAAR DEZE HANDLEIDING VOOR LATER GEBRUIK.
KÉRJÜK, HOGY A KÉSZÜLÉK HASZNÁLATA ELŐTT OLVASSA EL AZ ÖSSZES UTASÍTÁST ÉS ŐRIZZE MEG EZT A KÉZIKÖNYVET KÉSŐBBI HIVATKOZÁS CÉLJÁBÓL.
PŘED POUŽITÍM TOHOTO PŘÍSTROJE SI PŘEČTĚTE VŠECHNY NÁVODY A TUTO PŘÍRUČKU SI ULOŽTE K POZDĚJŠÍMU NAHLÉDNUTÍ.
PROSÍM, PRED POUŽITÍM TOHTO ZARIADENIA PREČÍTAŤ VŠETKY NÁVODY A USCHOVAŤ TENTO NÁVOD PRE MOŽNOSŤ NESKORŠIEHO NAHLIADNUTIA.
ÎNAINTE DE A UTILIZA APARATUL CITIŢI TOATE INSTRUCŢIUNILE ŞI PĂSTRAŢI ACEST MANUAL PENTRU CONSULTAREA VIITOARE.
Gebrauchsanleitung .............................. 08
Instructions for Use................................ 11
Mode d’emploi ....................................... 14
Manuale di utilizzazione......................... 17
Gebruiksaanwijzing ............................... 20
Használati utasítás................................. 23
Návod k použití ...................................... 26
Návod na použitie .................................. 29
Instrucţiuni de utilizare .......................... 32
M30388_VibroshaperHOMEGYM_Manual_20210727_DR.indd 1M30388_VibroshaperHOMEGYM_Manual_20210727_DR.indd 1 02.08.21 09:1202.08.21 09:12

DE
Lieferumfang: 1 x Vibrationsplatte, 2 x Trainingsgriffe,
2 x Widerstandsbänder, 1 x Fernbedienung,
1 x Gebrauchsanleitung, 1 x Ernährungsplan,
1 x Trainingsplan
EN
Includes: 1 x vibration plate, 2 x training grips, 2 x resistance
bands, 1 x remote control, 1 x instruction manual, 1 x nutrition
plan, 1 x training plan
IT
Contenuto della confezione: 1 piastra vibrante, 2 maniglie di
allenamento, 2 bande di resistenza, 1 telecomando,
1 manuale di istruzioni, 1 piano di alimentazione, 1 piano di
allenamento
FR
Volume de livraison:
1 x plateforme vibrante, 2 x poignées de
musculation, 2 x bandes de résistance, 1 x télécommande,
1 x mode d'emploi, 1 x programme alimentaire, 1 x programme
d'entraînement
NL
Inhoud van de verpakking: 1 x trilplaat, 2 x trainingsgrepen,
2 x weerstandsbanden, 1 x afstandsbediening,
1 x handleiding, 1 x voedingsplan, 1 x trainingsplan
HU
Szállítási terjedelem: 1 db rezgőlap, 2 db kapaszkodó,
2 db ellenálló gumiszalag, 1 db távirányító, 1 db használati
útmutató, 1 db táplálkozási terv, 1 db edzésterv
CZ
Obsah balení:
1x vibrační deska, 2x tréninkové rukojeti,
2x posilovací pás, 1x dálkové ovládání, 1x návod k použití,
1x výživový plán, 1x tréninkový plán
SK
Obsah balenia: 1 x vibračná doska, 2 x tréningové úchyty,
2 x odporové pásy, 1 x diaľkové ovládanie, 1 x návod na
obsluhu, 1 x plán výživy, 1 x tréningový plán
RO
Inclus în livrare: 1 x placă cu vibrații, 2 x mânere de
antrenament, 2 x benzi de rezistență, 1 x telecomandă,
1 x manual de utilizare, 1 x plan de alimentație, 1 x plan de
antrenament
Abbildung 1 | Figure 1 | Image 1 | Figura 1 | Afbeelding 1 | Ábra 1 | Obrázek 1 |
Obrázok 1 | Ilustraţia 1 | Zdjęcie 1
M30388_VibroshaperHOMEGYM_Manual_20210727_DR.indd 2M30388_VibroshaperHOMEGYM_Manual_20210727_DR.indd 2 02.08.21 09:1302.08.21 09:13

3
#3
20
21
22 23 24 25
27
26
17 18 19
#2
DE
VIBROSHAPER HOME GYM TEILE & KNÖPFE (#2)
1. Rutschfeste Gummimatte
2. Trainingsgriffe
3. Trainingsgriffhalter
4. Obere Abdeckung
5. Zwischendeckel mit Griff
6. Bodenabdeckung
7. Rutschfester Boden
8. Transporträder
9. Bedienfeldanzeige
10. Metallhaken für Gummibänder
11. Ein-/Aus-Schalter
12. Buchse des Elektrosteckers
13. Stromschalter
14. Widerstandsbänder mit Fit TENSOR-Technologie
15. Stromkabel
16. Fernbedienung
BEDIENFELD (#3)
17. Zeit-/Programmanzeige
18. Infrarot-Empfänger
19. Geschwindigkeits-/Programmanzeige
20. Zeit erhöhen
21. Zeit senken
22. Ein / Aus Schalter
23. Programmauswahl
24. Starttaste
25. Pause/Stopp-Taste
26. Geschwindigkeit erhöhen
27. Geschwindigkeit verringern
EN
VIBROSHAPER HOME GYM PARTS & BUTTONS (#2)
1. Non-slip rubber mat
2. Grips
3. Grip holder
4. Upper cover
5. Intermediate cover with grip
6. Lower cover
7. Non-slip base
8. Transport wheels
9. Control panel display
10. Metal hooks for the rubber bands
11. On/Off switch
12. Electrical plug socket
13. Power switch
14. Resistance bands with Fit TENSOR technology
15. Power cable
16. Remote control
CONTROL PANEL (#3)
17. Time/program display
18. Infrared receiver
19. Speed/program display
20. Increase time
21. Reduce time
22. On/Off switch
23. Program selection
24. Start button
25. Pause/stop button
26. Increase speed
27. Reduce speed
M30388_VibroshaperHOMEGYM_Manual_20210727_DR.indd 3M30388_VibroshaperHOMEGYM_Manual_20210727_DR.indd 3 02.08.21 09:1302.08.21 09:13

4
IT
VIBROSHAPER HOME GYM PARTI E PULSANTI
(#2)
1. Tappetino in gomma antiscivolo
2. Maniglie
3. Supporto della maniglia
4. Coperchio superiore
5. Coperchio intermedio con maniglia
6. Copertura del pavimento
7. Pavimento antiscivolo
8. Ruote di trasporto
9. Display del pannello di controllo
10. Gancio di metallo per gli elastici
11. Pulsante di accensione
12. Presa della spina elettrica
13. Interruttore di alimentazione
14. Bande di resistenza con tecnologia Fit TENSOR
15. Cavo di alimentazione
16. Controllo remoto
PANNELLO DI CONTROLLO (#3)
17. Visualizzazione del tempo/programma
18. Ricevitore a infrarossi
19. Visualizzazione della velocità/programma
20. Aumentare il tempo
21. Diminuire il tempo
22. Interruttore On / Off
23. Selezione del programma
24. Pulsante di avvio
25. Pulsante Pausa/Stop
26. Aumentare la velocità
27. Ridurre la velocità
FR
VIBROSHAPER HOME GYM PIÈCES ET BOUTONS
(#2)
1. Tapis en caoutchouc antidérapant
2. Poignées
3. Support de poignée
4. Partie supérieure
5. Partie intermédiaire avec poignée
6. Partie inférieure
7. Tapis antidérapant
8. Roues de transport
9. Affichage du panneau de commande
10. Crochets métalliques pour élastiques
11. Interrupteur marche/arrêt
12. Prise électrique
13. Interrupteur d'alimentation
14. Bandes de résistance avec technologie Fit
TENSOR
15. Cordon d'alimentation
16. Télécommande
PANNEAU DE COMMANDE (#3)
17. Affichage du temps/du programme
18. Récepteur infrarouge
19. Affichage de la vitesse/du programme
20. Augmenter le temps
21. Diminuer le temps
22. Interrupteur marche/arrêt
23. Sélection de programme
24. Bouton de démarrage
25. Bouton pause/arrêt
26. Augmenter la vitesse
27. Diminuer la vitesse
NL
VIBROSHAPER HOME GYM: ONDERDELEN EN KNOP-
PEN (#2)
1. Antislip rubberen mat
2. Handgrepen
3. Handgreephouder
4. Bovenste afdekking
5. Tussendeksel met handgreep
6. Onderste afdekking
7. Antislipbodem
8. Transportwielen
9. Display op het bedieningspaneel
10.Metalen haken voor rubberen banden
11.Aan/uit-knop
12.Aansluiting voor stekker
13.Stroomschakelaar
14.Weerstandsbanden met Fit TENSOR-technologie
15.Voedingskabel
16.Afstandbediening
BEDIENINGSPANEEL (#3)
17. Tijd-/programmaweergave
18. Infraroodontvanger
19. Weergave van snelheid en programma
20. Tijd verhogen
21. Tijd verminderen
22. Aan/uit-knop
23. Programmaselectie
24. Startknop
25. Pauze/stop-knop
26. Snelheid verhogen
27. Snelheid verminderen
HU
VIBROSHAPER HOME GYM -
ALKATRÉSZEK ÉS GOMBOK (#2)
1. Csúszásgátló gumiszőnyeg
2. Kézi fogantyúk
3. A kézi kapaszkodók tartószerkezete
4. Felső burkolat
5. Köztes fedél fogantyúval
6. Fenékburkolat
7. Csúszásbiztos padló
8. Kerekek a mozgatáshoz
9. A kezelőfelület kijelzője
10. Fémkampó a gumiszalagok számára
11. Be-/Ki-kapcsoló
12. A villamos dugó hüvelye
13. Áramkapcsoló
14. Fit TENSOR-technológiával készült ellenálló
gumiszalagok
15. Villamossági vezeték
16. Távirányító
KEZELŐMEZŐ (#3)
17. Idő-/Programkijelző
18. Infravörös vevőkészülék
19. Sebesség-/Programkijelző
20. Időtartam növelése
21. Időtartam csökkentése
22. Be-/Ki-kapcsoló
23. Programválasztó
24. Indítógomb
25. Szünet/Stop gomb
26. Sebesség növelése
27. Sebesség csökkentése
CZ
VIBROSHAPER HOME GYM ČÁSTI A TLAČÍTKA (#2)
1. Protiskluzová gumová podložka
2. Rukojeti
3. Držák rukojeti
4. Horní kryt
5. Vložené víko s rukojetí
6. Spodní kryt
7. Podlaha s protiskluzovou úpravou
8. Přepravní kola
9. Displej s čelními panely
10. Kovový háček na gumičky
11. Spínač Zap / Vyp
12. Elektrická zásuvka
13. Spínač proudu
14. Odporové pásy s technologií Fit TENSOR
15. Napájecí kabel
16. Dálkové ovládání
OVLÁDACÍ PANEL (#3)
17. Zobrazení času / programu
18. Infračervený přijímač
19. Zobrazení rychlosti / programu
20. Přidat čas
21. Ubrat čas
22. Spínač Zap / Vyp
23. Výběr programu
24. Tlačítko Start
25. Tlačítko Pauza / Stop
26. Zvýšit rychlost
27. Snížit rychlost
SK
DIELY A TLAČIDLÁ VIBROSHAPER HOME GYM (č. 2)
1. Protišmyková gumová podložka
2. Úchyty
3. Držiak na úchyty
4. Horný kryt
5. Stredné veko s úchytom
6. Spodný kryt
7. Protišmyková podlaha
8. Transportné kolesá
9. Displej ovládacieho panela
10. Kovové háčiky na gumičky
11. Hlavný vypínač
12. Elektrická zásuvka
13. Vypínač prúdu
14. Odporové pásy s technológiou Fit TENSOR
15. Elektrický kábel
16. Diaľkové ovládanie
OVLÁDACIE POLE (č. 3)
17. Zobrazenie času / programu
18. Infračervený prijímač
19. Rýchlosť / zobrazenie programu
20. Zvýšenie času
21. Zníženie času
22. Hlavný vypínač
23. Výber programu
24. Tlačidlo Štart
25. Tlačidlo pozastavenia / zastavenia
26. Zvýšenie rýchlosti
27. Zníženie rýchlosti
RO
VIBROSHAPER HOME GYM PIESE & BUTOANE (#2)
1. Saltea din cauciuc antiaderentă
2. Mânere
3. Suport mânere
4. Acoperire superioară
5. Capac intermediar cu mâner
6. Acoperire podea
7. Podea rezistent la alunecare
8. Roți de transport
9. Afișaj câmp de operare
10. Cârlig metalic pentru benzi de cauciuc
11. Comutator pornit/oprit
12. Mufa ștecherului electric
13. Întrerupător de curent
14. Benzi de rezistență cu tehnologie Fit TENSOR
15. Cablu de curent
16. Telecomandă
CÂMP DE OPERARE (#3)
17. Afișaj pentru timp/program
18. Receptor infraroșu
19. Afișaj viteză/program
20. Mărire timp
21. Reducere timp
22. Comutator pornit/oprit
23. Selectare program
24. Buton Start
25. Buton pauză/stop
26. Mărire viteză
27. Reducere viteză
M30388_VibroshaperHOMEGYM_Manual_20210727_DR.indd 4M30388_VibroshaperHOMEGYM_Manual_20210727_DR.indd 4 02.08.21 09:1302.08.21 09:13

5
DE
FERNBEDIENUNG #4
1. ON/OFF
2. Start/Stopp
3. Tempo erhöhen
4. Tempo senken
5. Zeit verlängern
6. Zeit verkürzen
7. Zu Tempostufe 90, 60 und 30 springen
8. Programmwahl
Die Fernbedienung läuft mit zwei 1,5V-AAA-Batte-
rien (nicht mitgeliefert). Gehen Sie sicher, dass die
Batterien mit der richtigen Polarität im Batteriefach
an der Rückseite der Fernbedienung eingesetzt sind.
Wenn Sie die Fernbedienung verwenden, richten Sie
sie zum Infrarot-Empfänger oder zum Bedienpult.
EN
REMOTE CONTROL (#4)
1. ON/OFF
2. Start/Stop
3. Increases the tempo
4. Decreases the tempo
5. Extends the time
6. Shortens the time
7. Used to jump to the tempo 90, 60, and 30
settings
8. Used to select a programme
The remote control runs on two 1.5V AAA batte-
ries (not included). Make sure the battery poles
are the right way round when the batteries are
inserted into the battery compartment on the
back of the remote control. If you use the remote
control, point it at the infrared receiver or the
control panel.
IT
TELECOMANDO (#4)
1. ON/OFF
2. Start/Stop
3. Aumentare la velocità
4. Diminuire la velocità
5. Prolungare la durata
6. Accorciare la durata
7. Saltare ai livelli di velocità 90, 60 e 30
8. Selezione del programma
Il telecomando funziona con due batterie AAA
da 1,5V (non incluse). Assicurarsi che le batterie
siano collocate correttamente nell’apposito vano
sul lato posteriore del telecomando. Quando si
utilizza il telecomando, orientarlo in direzione del
ricevitore a infrarossi o del pannello di comando.
FR
TÉLÉCOMMANDE (#4)
1. MARCHE/ARRÊT
2. Démarrage/Arrêt
3. Augmenter le tempo
4. Diminuer le tempo
5. Augmenter la durée
6. Réduire la durée
7. Passer à la vitesse de tempo 90, 60 et 30
8. Sélection du programme
La télécommande fonctionne avec deux piles AAA
de 1,5 V (non fournies). Assurez-vous que les pi-
les sont placées dans le logement des piles au re-
vers de la télécommande en respectant la polarité
des piles. Lorsque vous utilisez la télécommande,
dirigez-la en direction du capteur infra-rouge ou
du pupitre de commande.
NL
AFSTANDSBEDIENING (#4)
1. ON/OFF
2. Start/stop
3. Tempo verhogen
4. Tempo verlagen
5. Tijd verlengen
6. Tijd inkorten
7. Naar amplitude 90, 60 en 30 springen
8. Programmakeuze
De afstandsbediening heeft twee 1,5V-AAA-batteri-
jen nodig (niet meegeleverd). Controleer of de bat-
terijen op de juiste manier in het batterijvak aan de
achterkant van de afstandsbediening zijn geplaatst.
Wanneer u de afstandsbediening gebruikt richt dan
op de infrarood ontvanger of het bedieningspaneel.
HU
TÁVIRÁNYÍTÓ (#4)
1. ON/OFF (BE/KI)
2. Indítás/Leállítás
3. Tempó növelése
4. Tempó csökkentése
5. Idő meghosszabbítása
6. Idő lerövidítése
7. Ugrás a 90-es, 60-as és 30-as tempófokozatra
8. Programválasztás
A távirányító két 1,5-os AAA elemmel működik
(nem tartozék). Győződjön meg arról, hogy az
elemek a távirányító hátoldalán lévő elemrekeszben
a megfelelő polaritással helyezkedjenek el. Ha a
távirányítót használja, irányítsa az infravörös vevő
vagy a kezelőpult felé
CZ
TELECOMANDĂ (#4)
1. ZAP/VYP
2. Start/Stop
3. Zvýšit rychlost
4. Snížit rychlost
5. Prodloužit čas
6. Zkrátit čas
7. Přeskočit na stupeň rychlosti 90, 60 a 30
8. Volba programu
Dálkové ovládání je napájeno dvěma 1,5V bateriemi
AAA (nejsou součástí dodávky). Zajistěte, aby byly
baterie vloženy do oddílu na baterie na zadní straně
dálkového ovládání se správnou polaritou. Když
používáte dálkové ovládání, namiřte je na přijímač
infračerveného záření nebo na ovládací pult.
SK
DIAĽKOVÉ OVLÁDANIE (č. 4)
1. ON/OFF
2. Štart/Stop
3. Zvýšenie tempa
4. Zníženie tempa
5. Predĺženie času
6. Skrátenie času
7. Preskočiť na stupeň tempa 90, 60 a 30
8. Voľba programu
Diaľkové ovládanie je napájané dvomi batériami
1,5V-AAA (nie sú obsahom dodávky). Uistite sa, že
sú batérie vložené do priehradky na zadnej strane
diaľkového ovládania správnou polaritou. Keď
používate diaľkové ovládanie, nasmerujte ho na in-
fračervený prijímač signálu alebo na obslužný panel.
RO
TELECOMANDĂ
1. ON/OFF
2. Start/Stop
3. Creşterea ritmului
4. Reducerea ritmului
5. Extinderea timpului
6. Reducerea timpului
7. Salt la nivelul de ritm 90, 60 şi 30
8. Selectare program
Telecomanda funcţionează cu două baterii AAA de
1,5V (nu sunt incluse). Asiguraţi-vă că bateriile sunt
introduse cu polaritatea corectă în compartimentul
pentru baterii de pe partea posterioară a telecomen-
zii. Când utilizaţi telecomanda, îndreptaţi-o către
receptorul de infraroşii sau spre panoul de comandă.
#4
M30388_VibroshaperHOMEGYM_Manual_20210727_DR.indd 5M30388_VibroshaperHOMEGYM_Manual_20210727_DR.indd 5 02.08.21 09:1302.08.21 09:13

#5-9 Trainingsgriffe Montage |Fitting the training grips |Montaggio delle manopole di allenamento |Installation des poignées de musculation |Montage van de
trainingsgrepen |A kapaszkodók összeszerelése | Montáž tréninkových rukojetí |Montáž tréningových úchytov |Montaj mânere de antrenament
#10 Trainingsgriffe Positionen |Positioning the training grips |Posizioni delle impugnature di allenamento |Positions des poignées de musculation |
Posities van de trainingsgrepen |A kapaszkodók beállítása |Polohy tréninkových rukojetí |Polohovanie tréningových úchytov |Poziționare mânere de antrena-
ment
M30388_VibroshaperHOMEGYM_Manual_20210727_DR.indd 6M30388_VibroshaperHOMEGYM_Manual_20210727_DR.indd 6 02.08.21 09:1302.08.21 09:13

7
TEMPO FÜR JEDE STUFE | TEMPOS FOR ALL LEVELS | VELOCITÀ PER OGNI LIVELLO | RYTHME DE LA DURÉE DE CHAQUE NIVEAU |
TEMPO VOOR ELKE STAND | TEMPÓ MINDEGYIK FOKOZATHOZ | RYCHLOST PRO KAŽDÝ STUPEŇ | TEMPO PRE KAŽDÝ STUPEŇ | RITM PENTRU
FIECARE TREAPTĂ
minuten
| minutes
| minuti |
minutes
minuten |
perc | minuty
| minúty |
minute
ANFÄNGER | BEGINNERS | PRINCIPIANTE
| DÉBUTANT |
BEGINNER | KEZDŐ |
ZAČÁTEČNÍK | ZAČIATOČNÍK | ÎNCEPĂTOR
MÄSSIG FORTGESCHRITTENE |
MODERATELY ADVANCED | MEDIO-
AVANZATO | NIVEAU AVANCÉ MODÉRÉ |
LICHT GEVORDERD | KÖZÉPHALADÓ | MÍRNĚ
POKROČILÝ | MIERNE POKROČILÝ | AVANSAT
MODERAT
FORTGESCHRITTENE | ADVANCED |
AVANZATO | NIVEAU EXPERT |
GEVORDERD
| HALADÓ | POKROČILÝ | POKROČILÝ |
AVANSAT
10 30-33 64-66 98-99
9 27-29 62-64 96-98
8 24-26 60-62 92-94
7 20-23 56-59 94-96
6 16-19 53-55 88-91
5 13-16 49-52 84-87
4 10-12 44-48 81-83
3 6-9 41-44 75-78
2 4-5 37-40 71-74
1 1-3 34-36 67-70
Tabelle 1: Manueller Modus - Trainingsempfehlung | Chart 1: Manual mode – training recommendations | Tabella 1: modalità
manuale – consigli per l’allenamento |Tableau 1: mode manuel – conseil d’entraînement |Tabel 1: handmatige modus -
trainingsadvies |1. táblázat: Kézi üzemmód - ajánlott edzés |Tabulka 1: Ruční režim - tréninková doporučení |Tabuľka 1:
Manuálny mód – odporúčaný tréning | Tabelul 1: Modul manual - Recomandare de antrenament
minuten
| minutes
| minuti |
minutes
minuten |
perc | minuty
| minúty |
minute
TEMPO FÜR JEDES PROGRAMM | TEMPO FOR EVERY PROGRAMME | VELOCITÀ PER OGNI PROGRAMMA | RYTHME DE CHAQUE PRO-
GRAMME |
TEMPO VOOR ELK PROGRAMMA | TEMPÓ MINDEGYIK PROGRAMHOZ | RYCHLOST PRO KAŽDÝ PROGRAM | TEMPO PRE KAŽDÝ
STUPEŇ | RITM PENTRU FIECARE PROGRAM
P1 P2 P3
9 16 20 10
8 18 40 44
7 28 60 99
6 38 80 33
5 48 99 99
4 58 40 22
3 48 99 99
2 38 40 11
1 28 99 99
ANFÄNGER | BEGINNERS |
PRINCIPIANTE | DÉBUTANT |
BEGINNER
| KEZDŐ | ZAČÁTEČNÍK | ZAČIATOČNÍK |
ÎNCEPĂTOR
MÄSSIG FORTGESCHRITTENE |
MODERATELY ADVANCED | MEDIO-
AVANZATO | NIVEAU AVANCÉ MODÉRÉ
|
LICHT GEVORDERD | KÖZÉPHALADÓ |
MÍRNĚ POKROČILÝ | MIERNE POKROČILÝ |
AVANSAT MODERAT
FORTGESCHRITTENE | ADVANCED |
AVANZATO | NIVEAU EXPERT |
GEVORDERD
| HALADÓ | POKROČILÝ | POKROČILÝ | AVANSAT
Tabelle 2: Automatischer Modus - Trainingsempfehlung | Chart 2: Automatic mode – training recommendations |Tabella
2: modalità automatica – consigli per l’allenamento |Tableau 2: mode automatique – conseil d’entraînement |Tabel 2:
Automatische modus - trainingsadvies |2. táblázat: Automatikus üzemmód - ajánlott edzés |Tabulka 2: Automatický režim
- tréninková doporučení |Tabuľka 2: Automatický mód – odporúčaný tréning |Tabelul 2: Modul automat - Recomandare de
antrenament
Sie können natürlich jederzeit auch Ihre ganz individuelle Tempo-Einstellung wählen. | You can, of course, select your own tempo setting that suits you
individually as well, however. | Naturalmente, sarà sempre possibile impostare una velocità personalizzata. | Vous pouvez évidemment sélectionner le
réglage personnalisé de votre rythme. | Natuurlijk kunt u ook zelf uw persoonlijke tempo-instelling kiezen. | Természetesen bármikor választhat saját egyéni
tempóbeállítást is. | Můžete si samozřejmě kdykoli zvolit i své zcela individuální nastavení rychlosti. | Samozrejme, kedykoľvek môžete zvoliť aj vaše celkom
individuálne tempo. | Bineînţeles că puteţi selecta în orice moment şi propria dvs. setare individuală a ritmului.
M30388_VibroshaperHOMEGYM_Manual_20210727_DR.indd 7M30388_VibroshaperHOMEGYM_Manual_20210727_DR.indd 7 02.08.21 09:1302.08.21 09:13

8
DE
SICHERHEITSHINWEISE
Lesen Sie bitte diese Anleitung vor der Verwendung Ihres VibroShaper Home Gyms genau durch, um Verletzungen oder
Schäden am Gerät zu vermeiden.
• Die Höchstlast des Geräts beträgt 120kg.
• Bei unsachgemäßen oder übermäßigen Training sind Gesundheitsschäden möglich.
• Wenn Sie bereits längere Zeit keinen Sport betrieben haben oder Herz-, Kreislauf oder orthopädische Probleme haben,
konsultieren Sie Ihren Arzt, bevor Sie das Gerät verwenden.
• Personen mit Bluthochdruck, Bronchitis, Hautkrankheiten, Diabetes, körperlichen Einschränkungen oder sonstigen Leiden
dürfen dieses Gerät nur unter ärztlicher Aufsicht verwenden.
• Die Verwendung des VibroShaper Home Gym empfiehlt sich nicht für Personen mit Osteoporose, Krebs, Herzkrankheiten,
Schrittmachern, Prothesen oder anderen implantierten medizinischen Geräten.
• Ältere Menschen sollen dieses Gerät sachgemäß und unter Aufsicht verwenden.
• Die Verwendung des Geräts empfiehlt sich nicht in der Schwangerschaft oder während der Menstruation.
• Kinder dürfen dieses Gerät nicht als Spielzeug verwenden.
• Dieses Gerät ist nicht zur Verwendung durch Personen (auch Kinder) gedacht, deren sensorische, körperliche oder
mentale Fähigkeiten herabgesetzt oder eingeschränkt sind oder denen es an Erfahrung oder Knowhow mangelt, wenn
sie nicht von einer für ihre Sicherheit verantwortlichen Person beaufsichtigt oder über die Funktionsweise des Geräts
aufgeklärt werden.
• Finger oder Fremdkörper dürfen nicht in den Zwischenraum zwischen mittlerer und unterer Abdeckung gesteckt werden.
• Nicht nach Alkoholgenuss verwenden.
• Nach dem Essen mindestens eine Stunde vor Verwendung warten.
• Das Gerät vor Gebrauch auf eine flache, stabile und ebene Unterlage stellen.
• Einen Abstand von mindestens 100 cm von der Wand oder anderen Gegenständen lassen. (Abbildung 4.)
• Bitte nehmen Sie vor Gebrauch Schmuck, Mobiltelefon oder sonstige Wertgegenstände bzw. Schlüssel
oder andere scharfe Gegenstände ab, um Beschädigungen oder Verletzungen zu vermeiden.
• Um Verletzungen zu vermeiden, nicht springen oder auf das Gerät hinknien, während das Gerät läuft.
• Es darf stets nur eine Person auf dem Gerät stehen.
• Wegen Kippgefahr das Gerät nicht einseitig belasten.
• Keine anderen Geräte oder Gegenstände zusätzlich zum eigenen Gewicht auf das Gerät stellen.
• Bei Schwankungen der Stromversorgung das Gerät nicht verwenden und sofort abstecken.
• Das Gerät von feuchten Stellen und direkter Sonneneinstrahlung fernhalten; nicht im Freien stehen lassen.
• Das Gerät stets von Kontakt mit Flüssigkeiten fernhalten. Nicht mit feuchten Händen berühren, nicht ruckartig bewegen
und keinesfalls bei der Verwendung rauchen.
• Bei Problemen mit dem Stromschalter, berühren Sie das Gerät nicht, um einen Stromschlag zu vermeiden.
• Das Gerät nicht verwenden, wenn die Raumtemperatur über 40°C liegt.
• Das Gerät nur an eine den Angaben entsprechenden Stromversorgung anschließen.
• Den Stromschalter vorsichtig betätigen.
• Das Kabel weder knicken noch mit nassen Händen berühren.
• Die Verwendung des Geräts beenden, wenn es draußen gewittert oder stürmt; bei Unwetter das Gerät sofort ausstecken.
• Keine Geräte mit hohem Strombedarf an dieselbe Steckdose wie das Gerät anschließen, um elektrische Störungen zu
vermeiden.
• Das Gerät nur so wie in der Beschreibung abgebildet transportieren.
• Keinesfalls entflammbare Substanzen nahe dem Gerät lagern.
• Nicht neue mit alten Batterien oder Batterien unterschiedlicher Marken in der Fernbedienung mischen.
• Dieses Gerät erfüllt die EN ISO 20957-1 Klasse HB (H=Heimbereich, B=Mittlere Genauigkeit).
• Das Widerstandsband darf bis maximal 8,5 kg/84 N bzw. 155 cm Ausdehnung belastet werden. Dies entspricht allen im
Trainingsplan vorgeschriebenen Übungen.
• Das Sicherheitsniveau des Geräts kann nur gehalten werden, wenn es regelmäßig auf Schäden und Verschleiß geprüft wird.
Insbesondere die Widerstandsbänder sollten regelmäßig überprüft werden.
• Defekte Teile sofort auszutauschen und/oder das Gerät bis zur Instandsetzung nicht mehr benutzen.
ERSTE VERWENDUNG
• Zum Transport des VibroShaper Home Gym den Griff an der rechten Seite des Geräts verwenden und es so neigen, dass
100 cm
100 cm
100 cm
100 cm
Abb. 4
M30388_VibroshaperHOMEGYM_Manual_20210727_DR.indd 8M30388_VibroshaperHOMEGYM_Manual_20210727_DR.indd 8 02.08.21 09:1302.08.21 09:13

9
seine Räder den Boden berühren, dann ziehen, um es behutsam zu verschieben.
• Sichergehen, dass das Gerät auf einer flachen, stabilen und ebenen Unterlage zu stehen
kommt, mit mindestens 100cm Abstand von Wänden oder Gegenständen.
• Wenn Sie das Gerät zum ersten Mal verwenden, sollten Sie sich auf einen Stuhl setzen
und die Füße auf das Gerät stellen. Jetzt das Gerät einschalten, um die Intensität der
Bewegungen zu testen; so können Sie sich an die Schwingungen und den gewählten
Betriebsmodus gewöhnen.
• Beim Trainieren unbedingt bequemes Gewand und Schuhwerk tragen.
ACHTUNG: Bei empfindlichen Böden (z. B. Parkett) empfehlen wir, eine feste Matte oder
einen entsprechenden Teppich unter das Gerät zu legen. Dies verhindert Beschädigungen
und Verfärbungen Ihres Bodens.
BETRIEBSMODI
Der VibroShaper Home Gym stellt Ihnen zwei Betriebsmodi zur Auswahl: den manuellen und den automatischen Modus.
In beiden Modi können Sie die Widerstandsbänder (14) verwenden. Zur Verwendung der Widerstandsbänder den
Sicherheitshaken in die dafür vorgesehenen Öffnungen an der Rückseite der Plattform
stecken, wie in Abbildung 5 abgebildet.
Manueller Modus: Der Benutzer kann Dauer und Tempo der Übung einstellen, um
sie an seine Bedürfnisse anzupassen.
Bei Verwendung dieses Modus folgende Anleitung befolgen:
1. Gerät an die Steckdose anschließen. Stromschalter (13) einschalten.
2. Den „ON“-Button am Bedienpult (22) oder den Button (1) an der
Fernbedienung betätigen.
3. Zuerst die Übungsdauer wählen, sie kann zwischen 1 und 10 Minuten liegen. Zur
minutenweisen Verlängerung betätigt man den (20) Button am Bedienpult oder den entsprechenden Button an der
Fernbedienung. Zum Verkürzen der Zeit betätigt man den Button am Bedienpult (21) oder den entsprechenden Button
an der Fernbedienung. In der Zeitanzeige (17) erscheint die verbleibende Übungsdauer.
4. Beginnen Sie die Übung durch Betätigen des Buttons (24) am Bedienpult oder des Buttons an der Fernbedienung.
5. Jetzt können Sie das Tempo der Vibration wählen. Die Tempostufen reichen von 1 bis 99. Um das Tempo auf die
gewünschte Stufe zu stellen, betätigt man den Button (26) am Bedienpult oder den entsprechenden Button an der
Fernbedienung. Zum Herabsetzen des Tempos betätigt man den Button (27) am Bedienpult oder den entsprechenden
Button an der Fernbedienung.
6. Sie können auch eine Schnellwahl des Tempos mit dem M-Button an der Fernbedienung vornehmen, dabei können Sie
zu den Stufen 90, 60 und 30 springen.
7. Zum jederzeitigen Beenden der Übung betätigt man den Button (25) am Bedienpult oder den entsprechenden
Button an der Fernbedienung. Ist man mit der Übung fertig, schaltet man anschließend das Gerät durch Betätigung des
Buttons (22) am Bedienpult oder des Buttons (1) an der Fernbedienung ab.
Tabelle 1 zeigt die Trainingsempfehlung für das manuelle Training.
Automatischer Modus: Das Gerät folgt einem voreingestellten Übungsprogramm, bei dem Geschwindigkeit und Zeit nicht
veränderbar sind. Beim Verwenden dieses Modus folgende Anleitungen befolgen:
1. Gerät an die Steckdose anschließen. Stromschalter (13) einschalten.
2. Den „On“-Button am Bedienpult (22) oder den Button an der Fernbedienung betätigen.
3. Es stehen 3 unterschiedliche Übungsprogramme (P1, P2, P3) zur Auswahl; am Bedienpult wiederholt den Button (23)
oder an der Fernbedienung wiederholt den Button betätigen, bis in der Programmanzeige (19) das gewünschte
Programm erscheint.
4. Tabelle 2 zeigt das Übungstempo jedes Programms je nach Dauer.
5. Haben Sie das gewünschte Programm gewählt, beginnen Sie die Übung durch Betätigen von (24) am Bedienpult
oder an der Fernbedienung.
6. Zum jederzeitigen Anhalten des Geräts am Bedienpult den Button (25) oder an der Fernbedienung den
entsprechenden Button betätigen. Wenn Sie die Übung beenden, schalten Sie anschließend das Gerät durch
Betätigen von (22) am Bedienpult oder des entsprechenden Button an der Fernbedienung aus.
VERWENDUNG WIDERSTANDSBÄNDER
Sie können die Widerstandsbänder zum Training verwenden, egal ob das Gerät ein- oder ausgeschaltet ist. Bitte öffnen Sie
den Metallkarabiner durch Drücken des Riegels und befestigen Sie ihn im Loch der Metallhaken des Produkts. Drehen Sie die
Karabinersicherung fest.
VERWENDUNG DER TRAININGSGRIFFE (#5-9)
Sie können die Trainingsgriffe zum Training verwenden, egal ob das Gerät ein- oder ausgeschaltet ist.
1. Bitte entfernen Sie die Kappe vom Griffhalter wie im Bild gezeigt.
2. Schieben Sie den Griff ganz nach unten in die Halterungen und ziehen Sie sie nach Gebrauch heraus.
Abb. 5
Griff
Transporträder
M30388_VibroshaperHOMEGYM_Manual_20210727_DR.indd 9M30388_VibroshaperHOMEGYM_Manual_20210727_DR.indd 9 02.08.21 09:1302.08.21 09:13

10
3. Es gibt zwei Positionen zum Trainieren unterschiedlicher Muskelgruppen (#10).
WARTUNG UND REINIGUNG
• Vor dem Reinigen des Geräts müssen Sie sichergehen, dass der Stromschalter auf OFF geschalten und das Stromkabel
aus der Steckdose gezogen ist.
• Sie können einen sauberen und trockenen Besen oder eine Bürste verwenden, um Staub vom Gerät zu entfernen.
• Die Trittfläche kann mit einem feuchteten Tuch gereinigt werden.
• Das Gerät nicht mit ätzenden Mitteln reinigen – Beschädigungsgefahr.
• Die Fernbedienung mit einem sauberen Tuch reinigen.
• Bleibt das Gerät längere Zeit außer Betrieb, stelle man es in den Verpackungskarton und bewahre es an einem kühlen
und trockenen Ort auf. Man nehme auch die Batterien aus der Fernbedienung.
• Weist der VibroShaper Home Gym einen Defekt auf, folgen Sie den Anleitungen im Abschnitt „Fehlerbehebung“. Bleibt
das Problem bestehen, wenden Sie sich bitte an den Kundendienst.
FEHLERBEHEBUNG
PROBLEM URSACHE BEHEBUNG
Das Gerät läuft nicht
Stromkabel ist nicht an die
Steckdose angeschlossen Stromkabel an die Steckdose anschließen
Stromschalter ist auf OFF Stromschalter auf ON stellen
Fernbedienung
funktioniert nicht
Batterien schwach Batterien auswechseln
Fernbedienung zu weit vom
Infrarot-Sensor des Geräts entfernt
Die Reichweite des
Infrarot-Signals beträgt 2 Meter
Gerät ist plötzlich
stehengeblieben Programmierte Übungszeit zu Ende Reset Übungszeit
Das Gerät rührt sich nicht Dem Gerät wurden zu viele Befehle gegeben und es
kann nicht alle erfüllen
Gerät ausschalten, eine Minute warten und wieder
einschalten
Gerät lässt sich während dem
Betrieb über die Fernbedienung
nicht anhalten.
Batterie schwach Batterien auswechseln
Den Knopf „On-Off“ betätigt Den Knopf „Start-Stopp“ betätigen
TRAINIEREN
GEHEN, JOGGEN UND LAUFEN
Der VibroShaper Home Gym ist eine vibrierende Plattform, die Gehen, Joggen oder Laufen durch ihre horizontal
oszillierenden Bewegungen simuliert, je nachdem wie Ihre Füße auf der Bodenfläche des Geräts stehen: größerer Abstand
zwischen den Beinen bedeutet mehr Aktivität des Körpers. Drei Übungen an einem einzigen Ort.
Tabelle 3 zeigt die Positionen, die Ihre Füße für die drei Übungen einnehmen müssen:
Tabelle 3: Position der Füsse bei Gehen, Joggen, Laufen
POSITION DER FÜSSE
Gehen
Füße in der Mitte
Joggen
Füße leicht auseinander
Laufen
Füße weiter auseinander
DEHNÜBUNGEN
Wir empfehlen vor Beginn jedes Trainings mit diesem Gerät Dehnübungen zu machen, um Ihre Muskeln aufzuwärmen.
Dehnübungen sind langsam und behutsam anzugehen, ohne schnelle Bewegungen oder Sprünge. So lange üben, bis
Sie eine leichte und nicht schmerzhafte Spannung spüren. Diese Position 20 bis 30 Sekunden lang halten. Sie müssen
langsam, rhythmisch und natürlich atmen, um Ihren Körper vollständig mit Sauerstoff zu versorgen.
Anm.: Orientieren Sie sich an den Abbildungen mit der jeweiligen Anleitung. (siehe Trainingsplan)
M30388_VibroshaperHOMEGYM_Manual_20210727_DR.indd 10M30388_VibroshaperHOMEGYM_Manual_20210727_DR.indd 10 02.08.21 09:1302.08.21 09:13

11
EN
SAFETY INFORMATION
Please read this user guide through carefully before using your VibroShaper Home Gym to prevent injuries and damage
to the device.
• The maximum weight for the device is 120kg.
• Damage to health is possible when overdoing the training activity or training improperly or incorrectly with the device.
• When users have not practised sport for some time, or have heart, circulation or orthopaedic problems, they should
consult their doctor before using the device.
• People with high blood pressure, bronchitis, skin diseases, diabetes, physical limitations or other ailments may only use
this device under the supervision of a doctor.
• The VibroShaper Home Gym is not suitable for people with osteoporosis, cancer, heart problems, a pacemaker, a prothesis
or another implanted medical device.
• Older people should use this device properly and under supervision.
• The device is not suitable for women who are pregnant or menstruating.
• Children must not be allowed to use this device as a toy.
• This device is not designed to be used by adults or children whose sensory, physical or mental capacity is reduced or
restricted, or who have a lack experience or knowledge, unless they are shown how the device works or are supervised by
someone who is responsible for their safety.
• Do not poke fingers or foreign bodies into the space between the middle and bottom panels of the device.
• Do not use the device after consuming alcohol.
• Wait at least one hour after eating before using the device.
• Before using your VibroShaper Home Gym, place it on a flat, stable and even floor or mat.
• Ensure it is positioned at least 100 cm from the wall and any other objects nearby. (Figure 4)
• Before using the device, remove jewellery, your mobile phone and any other valuables, keys and sharp objects from your
person to avoid damage or injuries.
• To avoid injuries, do not jump or kneel down on the device while it is running.
• Only one person at a time may ever stand on the device.
• To prevent the device from tipping over, do not rest more weight on one side than on the other.
• Do not place any other devices or objects on your VibroShaper Home Gym in addition to your own weight.
• If there are fluctuations in your electricity supply, do not use the device and unplug it immediately.
• Keep the device away from damp areas and direct sunlight, and do not leave it outside.
• Always keep the device away from liquids. Do not touch it with wet hands, move it suddenly or jerkily, and never smoke
when using it.
• If there are problems with the power switch, do not touch the device; if you do, you could get an electric shock.
• Do not use the device if the room temperature exceeds 40 °C.
• Only connect your VibroShaper Home Gym to an electricity supply that is compatible with the device’s technical data and
complies with the instructions.
• Be careful when pressing the power switch.
• Do not kink the cable or touch it with wet hands.
• Stop using the device and unplug it immediately if a thunderstorm starts outside.
• To avoid any electrical interference, do not plug any other devices with a high power demand into the same socket as your
VibroShaper Home Gym.
• Only transport the device as per the diagram and the instructions regarding this.
• Never store inflammable substances near the device.
• Do not use new and old batteries or batteries of different brands together in the remote control.
• This equipment complies with EN ISO 20957-1 class HB (H = domestic use, B=medium precision).
• Force may be exerted on the resistance band up to a maximum of 8.5 kg/84 N or 155 cm. All
the exercises outlined in the training plan are below this maximum.
• The safety level of the device can only be maintained if it is regularly checked for damage and
wear. The resistance bands in particular should be checked regularly.
• Replace defective parts immediately and/or cease use of the device until it has been repaired.
FIRST USE
• To transport your VibroShaper Home Gym, grip the handle on the right-hand side of the device
and tilt the device until its wheels touch the floor. Then pull the handle to move the device
carefully.
Handle
Transport wheels
100 cm
100 cm
100 cm
100 cm
Figure 4
M30388_VibroshaperHOMEGYM_Manual_20210727_DR.indd 11M30388_VibroshaperHOMEGYM_Manual_20210727_DR.indd 11 02.08.21 09:1302.08.21 09:13

12
• Ensure that the VibroShaper Home Gym is standing on a flat, stable and even floor or mat andthat the device is positioned at
least 100 cm from walls and other objects when you stop.
• When using your VibroShaper Home Gym for the first time, you should sit on a chair and place your feet on the device. Now
turn on the device to test the intensity of the movements. This allows you to get used to the oscillations and your chosen
operating mode.
• Always wear comfortable clothing and footwear when training.
WARNING: For delicate floors (for example, parquet), we recommend the placing of a stable mat or a
suitable carpet below the device. This prevents damage and discolouration to your
floor.
OPERATING MODES
The resistance bands (14) can be used in both modes. To use them, slip the safety
hooks through the openings specially designed for them on the back of the platform,
as shown in figure 5. The resistance bands (14) can be used in both modes. To use
them, slip the safety hooks through the openings specially designed for them on the
back of the platform, as shown in figure 5.
Manual mode: Here, the user can set the length and tempo of their exercise, so that it’s
tailored to their needs. When using manual mode, follow these instructions:
1. Plug the VibroShaper Home Gym into a power socket and press the power switch (13) so that it is in the ON position.
2. Press the “ON” button on the control panel (22) or the button (1) on the remote control.
3. Next, select the length of your exercise. It can be between one and 10 minutes. To increase the number of minutes, press the
button (20) on the control panel or the button on the remote control. To shorten the time, press the button on the control
panel (21) or the button on the remote control. The amount of time left in the exercise appears in the time display (17).
4. Start the exercise by pressing the button (24) on the control panel or the button on the remote control.
5. You can now select the tempo of the vibration. The tempo settings range from 1 to 99. To select your desired tempo setting,
press the button (26) on the control panel or the button on the remote control. To reduce the tempo, press the button
(27) on the control panel or the button on the remote control.
6. You can also select certain tempos quickly using the M button on the remote control. The M button allows you to jump to 90,
60 or 30.
7. To end the exercise at any time, press the button (25) on the control panel or the button on the remote control. Once
you’ve finished the exercise, turn off the device by pressing the button (22) on the control panel or the button (1) on the
remote control.
Chart 1 shows our training recommendations for manual training.
Automatic Mode: The device follows a preset training programme, in which speed and time cannot be altered. When using this
mode the following instructions should be followed:
1. Plug the VibroShaper Home Gym into a power socket and press the power switch (13) so that it is in the ON position.
2. Press the “ON” button on the control panel (22) or the button on the remote control.
3. There are three different exercise programmes (P1, P2 and P3) available. Press button (23) on the control panel
repeatedly or the button on the remote control repeatedly until the programme you want appears on the programme
display (19).
4. Chart 2 shows the exercise tempo of each programme depending on the length.
5. Once you’ve selected your chosen programme, start the exercise by pressing (24) on the control panel or on the
remote control.
6. To stop the device at any time, press the appropriate button (25) on the control panel or the Button on the remote
control. Once you’ve completed the exercise, turn the device off by pressing (22) on the control panel or the utton on the
remote control.
USING THE RESISTANCE BANDS
You can use the resistance bands to exercise regardless of whether the device is on or off. Open the metal carabiner by pressing
the latch, and fix it in the hole of the metal hook. Tighten the securing mechanism on the carabiner.
USING THE TRAINING GRIPS (#5-9)
You can use the training grips to exercise regardless of whether the device is on or off.
1. Remove the cap from the grip holder as shown in the picture.
2. Slide the grips all the way down into the holder, and pull them out after use.
3. There are two positions for exercising different muscle groups (#10).
CLEANING AND MAINTENANCE
• Before cleaning your VibroShaper Home Gym, you must make sure that the power switch is in the OFF position and that
the cable has been unplugged from the power socket.
• You can use a clean, dry broom or brush to remove dust from the device.
figure 5
M30388_VibroshaperHOMEGYM_Manual_20210727_DR.indd 12M30388_VibroshaperHOMEGYM_Manual_20210727_DR.indd 12 02.08.21 09:1302.08.21 09:13

13
• The standing area can be cleaned with a damp cloth.
• Do not use corrosive agents to clean the device, because these could damage it.
• Clean the remote control with clean cloth.
• If the device is not being used for an extended period of time, put it back in its box and store it in a cool, dry place. You should
also take the batteries out of the remote control.
• If the device appears to have a defect, follow the instructions in the Troubleshooting section. If the problem persists, please
contact our customer service team.
TROUBLESHOOTING
PROBLEM CAUSE SOLUTION
The device is not running.
The cable is not plugged
into a socket. Plug the cable into a socket.
The power switch is in the OFF position. Put the power switch in the ON position.
The remote control
is not working.
The batteries are weak. Change the batteries.
The remote control is too far
away from the device’s infrared sensor. The infrared signal’s range is two metres.
The device suddenly
stopped running.
The end of the programmed exercise period has been
reached. Reset the exercise period.
The device isn’t moving.
The device has been given too many commands and is not
able to fulfil them all.
Turn off the device, wait one
minute and turn it on again.
The remote control can’t
be used to stop the device
while the device is running.
The batteries are weak. Change the batteries.
The On/Off button has been pressed. Press the Start/Stop button.
TRAINING
WALKING, JOGGING AND RUNNING
VibroShaper Home Gym is a vibrating platform that, through its horizontal oscillations, simulates walking, jogging or running,
depending on the position of your feet on its surface: The greater the distance between your legs, the more activity your body will be
engaging in. So the VibroShaper Home Gym enables you to do three exercises in one single place.
Chart 3 shows the positions your feet need to be in for the three exercises:
CHART 3: Feet positions for walking, jogging and running
FEET POSITION
Walking
Feet together in the centre Jogging
Feet slightly apart
Running
Feet further apart
STRETCHING EXERCISES
We recommend that you perform stretching exercises to warm up your muscles before starting any workout with this
appliance.
Stretching exercises should be done slowly and carefully and should not involve fast movements or jumps. With each exercise,
stretch until you feel a slight tension that’s not painful. Hold the position for 20 to 30 seconds.
You need to breathe slowly, rhythmically and naturally, so that your body is completely supplied with oxygen.
NB: For each stretching exercise, refer to the diagram accompanying the instructions.
(see trainingplan)
M30388_VibroshaperHOMEGYM_Manual_20210727_DR.indd 13M30388_VibroshaperHOMEGYM_Manual_20210727_DR.indd 13 02.08.21 09:1302.08.21 09:13

14
IT
AVVISI DI SICUREZZA
Si prega di leggere queste istruzioni per l’uso prima di utilizzare il VibroShaper Home Gym per evitare possibili infortuni o danni
all’apparecchio.
• La portata massima dell’apparecchio è di 120kg.
• Un allenamento non conforme o eccessivamente prolungato può essere causa di danni alla salute.
• In caso di prolungata inattività o di problemi cardiocircolatori, si raccomanda di consultare il proprio medico prima di utilizzare
l’attrezzo.
• Le persone che soffrono di alta pressione, bronchite, malattie della pelle, diabete, handicap fisici o altre patologie possono
utilizzare quest’apparecchio unicamente sotto la supervisione di un medico.
• L’uso del VibroShaper Home Gym è sconsigliato per le persone affette da osteoporosi, cancro, malattie cardiache, nonché per i
portatori di pacemaker, protesi e altri apparecchi medici impiantati.
• Le persone anziane devono utilizzare quest’apparecchio in modo conforme alle istruzioni e sotto la supervisione di un adulto.
• L’uso dell’apparecchio è sconsigliato durante la gestazione o il ciclo mestruale. bambini non devono giocare con l’apparecchio.
• Quest’apparecchio non è concepito per l’uso da parte di persone (anche bambini) con capacità sensoriali, fisiche o mentali
ridotte o limitate o che non hanno la necessaria esperienza di questo attrezzo, se non sono monitorate da una per
sona responsabile della loro sicurezza o se non sono state prima istruite sulla modalità di funzionamento dell’apparecchio.
• Non inserire dita o corpi estranei nelle intercapedini o sotto la copertura centrale o inferiore dell’apparecchio.
• Non utilizzare l’apparecchio se si è sotto l’effetto dell’alcool.
• Dopo i pasti, attendere almeno un’ora prima di utilizzare l’apparecchio.
• Prima dell’uso, collocare l’apparecchio su una superficie orizzontale, pianeggiante e stabile, a una distanza di almeno 100 cm
dalla parete o da altri oggetti. (figura 4).
• Prima dell’uso, si prega di riporre gioielli, cellulari o altri oggetti di valore, chiavi e oggetti appuntiti, onde evitare il pericolo di
ferite o danneggiamento.
• Per evitare ferite e infortuni, non saltare o inginocchiarsi sull’apparecchio mentre è in funzione.
• Sull’apparecchio può salire una sola persona alla volta.
• Per scongiurare eventuali ribaltamenti, non posizionarsi mai su un solo lato dell’apparecchio.
• Non collocare altri attrezzi o oggetti sull’apparecchio in aggiunta al proprio peso.
• In caso di abbassamenti di corrente, non utilizzare l’apparecchio e staccarlo subito dalla corrente.
• Tenere l’apparecchio lontano dall’umidità e dalla luce solare diretta; non utilizzarlo all’aperto.
• Tenere lontano l’apparecchio dai liquidi. Non toccare l’apparecchio con le mani bagnate, evitare di muoversi all’indietro e non
fumare in nessun caso durante l’uso.
• In caso di problemi con l’interruttore, non toccare l’apparecchio onde evitare eventuali folgorazioni.
• Non utilizzare l’apparecchio se la temperatura ambiente è superiore ai 40°C.
• Collegare l’apparecchio esclusivamente a una presa di corrente conforme ai dati tecnici riportati sull’apparecchio.
• Azionare l’interruttore con cautela.
• Non toccare il cavo con mani bagnate e non piegarlo.
• Spegnere l’apparecchio in caso di temporali; in caso di maltempo, scollegare subito l’apparecchio dalla corrente.
• Non collegare apparecchi ad elevato consumo di corrente alla stessa presa a cui è collegato l’apparecchio, onde evitare
eventuali problemi elettrici.
• Trasportare l’apparecchio esclusivamente nella modalità illustrata in queste istruzioni.
• Non conservare mai sostanze infiammabili in prossimità dell’apparecchio.
• Non mischiare mai batterie vecchie e nuove o batterie di marche diverse nel telecomando.
• Questo attrezzo è conforme alla norma EN ISO 20957, parte 1, classe HB (H= uso domestico, B= precisione media).
• La fascia di resistenza può essere caricata fino a un massimo di 8,5 kg/84 N o 155 cm di
estensione. Questo corrisponde a tutti gli esercizi prescritti nel piano di allenamento.
• Il livello di sicurezza del dispositivo può essere mantenuto solo se viene controllato
regolarmente per danni e usura. Le bande di resistenza in particolare dovrebbero essere
controllate regolarmente.
• Sostituire immediatamente le parti difettose e/o non utilizzare il dispositivo fino a quando non
sia stato riparato.
PRIMO UTILIZZO
• Per trasportare il VibroShaper Home Gym, utilizzare l’impugnatura presente sul lato
destro dell’apparecchioe inclinarlo fino a far toccare le ruote sul pavimento, quindi tirarlo
delicatamente per spostarlo.
• Assicurarsi che l’apparecchio sia collocato su una superficie orizzontale, pianeggiante e stabile, a una distanza di almeno 100
Impugnatura
Ruote per trasporto
100 cm
100 cm
100 cm
100 cm
Figure 4
M30388_VibroshaperHOMEGYM_Manual_20210727_DR.indd 14M30388_VibroshaperHOMEGYM_Manual_20210727_DR.indd 14 02.08.21 09:1302.08.21 09:13

15
cm dalle pareti o da altri eventuali oggetti.
• Quando si utilizza l’apparecchio per la prima volta, si consiglia di sedersi su una sedia e mettere i piedi sull’apparecchio.
Accendere l’apparecchio per testare l’intensità del movimento; in tal modo, sarà possibile abituarsi alle oscillazioni e alla
modalità di funzionamento selezionata.
• Durante l’allenamento, si raccomanda di indossare abbigliamento e scarpe comodi.
ATTENZIONE: sui pavimenti delicati (es. parquet) si consiglia di collocare uno zerbino
fisso o un tappetino al di sotto dell’attrezzo onde prevenire eventuali danneggiamenti o
scolorimenti del pavimento.
MODALITÀ DI FUNZIONAMENTO
Il VibroShaper Home Gym offre due modalità di funzionamento: automatica e manuale.
Tuttavia, potrete utilizzare i nastri elastici con resistenza (14) con entrambe le modalità di
funzionamento.
Per utilizzare i nastri elastici con resistenza, agganciare i ganci di sicurezza alle apposite
aperture apposte sui lati della piattaforma, come mostrato nella figura 5.
Modalità manuale: l’utente può impostare durata e velocità per adattarle alle sue necessità. In caso di utilizzo con questa
modalità, si prega di osservare le seguenti istruzioni:
1. Collegare l’apparecchio alla presa di corrente. Accendere l’interruttore (13).
2. Azionare il pulsante ON sul pannello di controllo (22) o il tasto sul telecomando (1).
3. Selezionare prima la durata dell’esercizio (1 - 10 minuti). Per prolungare l’esercizio di ulteriori minuti, azionare il pulsante
(20) presente sul pannello di controllo o il tasto sul telecomando. Per ridurre la durata dell’esercizio, azionare il pulsante
(21) presente sul pannello di controllo o il tasto sul telecomando. Nell’indicatore della durata (17) viene mostrato il tempo
rimanente.
4. Iniziare l’esercizio premendo il pulsante (24) presente sul pannello di controllo o il tasto sul telecomando.
5. Adesso è possibile selezionare la velocità della vibrazione. I livelli di velocità vanno da 1 a 99. Per impostare la velocità sul livello
desiderato, premere il pulsante (26) sul pannello di controllo o il pulsante sul telecomando. Per diminuire la velocità, azionare
il pulsante (27) presente sul pannello di controllo o sul telecomando.
6. È inoltre possibile optare per la selezione rapida della velocità premendo il pulsante M presente sul telecomando, saltando ai
livelli di velocità 90, 60 e 30.
7. È possibile terminare l’esercizio in qualsiasi momento premendo il pulsante (25) sul pannello di controllo o il tasto sul
telecomando. Una volta terminato l’esercizio, spegnere l’apparecchio premendo il tasto (22) sul pannello di controllo o il tasto
(1) sul telecomando.
La tabella 1 mostra dei consigli per l’allenamento in modalità manuale.
Modalità automatica: l’attrezzo esegue un programma preimpostato di esercizi in cui velocità e tempo non sono modificabili.
Se si desidera impostare questa modalità di funzionamento, si prega di osservare le seguenti istruzioni:
1. Collegare l’apparecchio alla presa di corrente. Accendere l’interruttore (13).
2. Azionare il pulsante ON sul pannello di controllo (22) o sul telecomando.
3. Sono disponibili 3 diversi programmi di esercizio (P1, P2 e P3); sul pannello di controllo, premere ripetutamente il
tasto (23) oppure il tasto sul telecomando, finché nell’indicatore del programma non (19) non appare il programma
desiderato.
4. La tabella 2 mostra la velocità dell’esercizio di ogni programma in base alla durata.
5. Una volta selezionato il programma desiderato, iniziare l’esercizio premendo il pulsante (24) presente sul pannello di
controllo o sul telecomando.
6. Per fermare l’apparecchio in qualsiasi momento, premere il tasto (25) sul pannello di controllo o il tasto corrispondente
sul telecomando. Una volta terminato l’esercizio, spegnere l’apparecchio premendo il tasto (22) presente sul pannello di
controllo o il tasto corrispondente sul telecomando.
USO DI BANDE DI RESISTENZA
Potete usare le bande di resistenza per allenarvi sia che la macchina sia accesa o spenta. Si prega di aprire il moschettone di
metallo premendo il fermo e fissarlo nel foro del gancio di metallo del prodotto. Serrare il blocco del moschettone.
USO DELLE MANIGLIE DI ALLENAMENTO (#5-9)
È possibile utilizzare le maniglie di esercizio per allenarsi sia che la macchina sia accesa o spenta.
1. Si prega di rimuovere il tappo dal supporto della maniglia come mostrato nell'immagine.
2. Spingete la maniglia fino in fondo nei supporti ed estraetela dopo l'uso.
3. Ci sono due posizioni per esercitare diversi gruppi muscolari (#10).
MANUTENZIONE E PULIZIA
• Prima di effettuare la pulizia dell’apparecchio, assicurarsi che l’interruttore sia posizionato su OFF e che la spina non sia
ancora inserita nella presa.
• Per rimuovere la polvere dall’apparecchio, utilizzare una scopa pulita e asciutta o una spazzola.
• Pulire la pedana con un panno umido.
• Non pulire l’apparecchio con un detergente corrosivo: pericolo di danneggiamento.
figura 5
M30388_VibroshaperHOMEGYM_Manual_20210727_DR.indd 15M30388_VibroshaperHOMEGYM_Manual_20210727_DR.indd 15 02.08.21 09:1302.08.21 09:13

16
• Pulire il telecomando con un panno pulito.
• In caso di prolungato inutilizzo, ricollocare l’apparecchio nel suo imballaggio e conservarlo in un luogo fresco e asciutto.
• Rimuovere anche le batterie dal telecomando.
• Qualora il VibroShaper Home Gym denoti dei malfunzionamenti, si prega di osservare le istruzioni contenute nella sezione
“Soluzione dei problemi”. Se il problema persiste, si prega di contattare il servizio di assistenza clienti.
SOLUZIONE DEI PROBLEMI
PROBLEMA CAUSA SOLUZIONE
L’apparecchio non si accende. Il cavo di corrente non è collegato alla presa. Collegare l’apparecchio alla presa di corrente.
L’interruttore è su OFF. Posizionare l’interruttore su ON.
Il telecomando non funziona
Batterie scariche. Sostituire le batterie.
Il telecomando è troppo lontano dal sensore a infrarossi
dell’apparecchio. La portata massima del segnale a infrarossi è di 2 metri.
L’apparecchio si è fermato im-
provvisamente. La durata dell’esercizio è terminata. Resettare la durata dell’esercizio.
L’apparecchio non si muove. Sono stati dati troppi comandi all’apparecchio e non
riesce ad eseguirli tutti.
Spegnere l’apparecchio, attendere un minuto e riaccen-
derlo.
Non è possibile fermare l’ap-
parecchio con il telecomando
quando è in funzione.
Batterie scariche. Sostituire le batterie.
Azionare il tasto “ON-OFF” . Azionare il tasto “Start-Stop”
ALLENAMENTO
CAMMINATA, JOGGING E CORSA
Il VibroShaper Home Gym è una piattaforma vibrante che simula camminata, jogging e corsa grazie a dei movimenti oscillatori
orizzontali, a seconda di come si poggiano i piedi sulla superficie dell’apparecchio: una distanza maggioretra le gambe
comporta una maggiore attività del corpo. Tre esercizi diversi con un unico attrezzo.
La tabella 3 mostra le posizione da assumere con i piedi per ciascuno dei tre esercizi:
TABELLA 3: posizione dei piedi per camminata, jogging e corsa
POSIZIONE DEI PIEDI
Camminata
Piedi al centro. Jogging
Piedi leggermente distanziati. Corsa
Piedi molto distanziati
STRETCHING
Si consiglia di fare esercizi di stretching con questa macchina prima di iniziare qualsiasi allenamento per riscaldare i muscoli.
Gli esercizi di stretching vanno eseguiti lentamente e con cautela, evitando movimenti bruschi o salti. Tenere i muscoli in
estensione finché non si avverte una lieve tensione non dolorosa. Tenere questa posizione per 20-30 secondi. Si raccomanda
di respirare lentamente e in modo ritmico e naturale, onde poter ossigenare completamente il corpo.
Nota: si raccomanda di osservare le illustrazioni e le relative istruzioni. (vedi piano di allenamento)
M30388_VibroshaperHOMEGYM_Manual_20210727_DR.indd 16M30388_VibroshaperHOMEGYM_Manual_20210727_DR.indd 16 02.08.21 09:1302.08.21 09:13

17
FR
CONSIGNES DE SÉCURITÉ
Veuilez attentivement consulter les présentes instructions de sécurité avant l’utilisation de votre VibroShaper Home Gym afin d’éviter
de vous blesser ou d’endommager l’appareil.
• La capacité maximum de l’appareil est de 120 kg.
• D’éventuelles atteintes à la santé sont possibles en cas d’entraînement incorrect ou excessif.
• Si vous n’avez pas pratiqué de sport depuis longtemps, ou si vous avez des problèmes cardiaques, des ennuis de circulation ou
des soucis orthopédiques, consultez votre médecin avant d’utiliser cet appareil.
• Les personnes souffrant d’hypertension, de bronchite, de dermatose, de diabète, physiquement diminuées ou atteintes de toute
autre maladie ne sont autorisées à utiliser cet appareil que sous stricte surveillance médicale.
• L’utilisation du VibroShaper Home Gym est déconseillée aux personnes souffrant d’osthéoporose, de cancer, de maladies
cardio-vasculaires, port ant un stimulateur cardiaque, des prothèses ou tout autre dispositif médical implanté.
• Les personnes d’un certain âge doivent utiliser cet appareil conformément à l’usage prévu et sous surveillance médicale.
• L’utilisation de l’appareil n’est pas conseillée en cas de grossesse, ni pendant les menstruations.
• Les enfants ne doivent pas se servir de cet appareil comme d‘un jouet.
• Cet appareil ne doit pas être utilisé par des personnes (ou des enfants) dont les facultés sensorielles, physiques ou mentales
sont diminuées ou réduites ou par toute personne dénuée d’expérience ou de savoir-faire, si elle n‘a pas été prise en main par
une person ne responsable de sa sécurité ou si le fonctionnement de l’appareil ne lui a pas été
expliqué.
• Il est interdit de glisser les doigts ou tout corps étranger dans l’interstice situé sous le couvercle
médian et inférieur.
• Ne pas utiliser après absorption d’alcool.
• Après un repas, attendre au minimum une heure avant de l’utiliser.
• Avant de l’utiliser, placer l’appareil sur une surface plane, stable et plate.
• Laisser un espace libre d’au minimum 100 cm entre l’appareil et le mur à proximité ou tout autre objet. (Figure 4)
• Avant d’utiliser cet appareil, veuillez retirer tout bijou, téléphone cellulaire ou autre objet de valeur, comme des clés ou autres
objets contondants, afin de vous épargner la moindre blessure ou tout autre dommage.
• Afin d’éviter de vous blesser, ne jamais sauter ou vous mettre à genoux sur l’appareil pendant que ce dernier est en cours de
fonctionnement.
• Seule une personne à la fois peut monter sur l’appareil.
• Afin d’éviter tout risque de basculement de l’appareil, ne pas le surcharger d’un seul côté.
• Ne jamais placer sur l’appareil d’autres appareillages ou objets en plus de votre propre poids.
• Ne pas utiliser l’appareil en cas de perturbations de l’alimentation électrique et le débrancher immédiatement.
• Éloigner l’appareil des endroits humides, ainsi que d’un ensoleillement direct ; ne pas le laisser à l’extérieur.
• Toujours tenir l’appareil éloigné des liquides. Ne jamais toucher cette machine avec les mains humides, ne pas secouer
l’appareil brutalement et surtout ne jamais fumer en l’utilisant.
• En cas de problèmes avec l’interrupeur électrique, ne touchez pas l’appareil afin d’éviter tout risque d’électrocution.
• Ne jamais utiliser cet appareil si la température ambiante est supérieure à 40° C.
• Ne brancher l’appareil qu’à une alimentation électrique conforme aux informations fournies.
• Manipuler le commutateur électrique avec prudence.
• Ne pas plier le câble, ni toucher ce câble avec les mains humides.
• Éteindre l’appareil par temps d’orage ou de grand vent ; en cas d’intempéries, débrancher immédiatement l’appareil.
• Ne pas brancher des appareils nécessitant une forte consommation électrique sur la même prise de courant que l’appareil, afin
d’éviter des pannes de secteur.
• Ne transporter l’appareil qu’en respectant les illustrations.
• Ne pas entreposer de substances inflammables à proximité de l’appareil.
• Ne pas mettre dans la télécommande des piles anciennes avec de nouvelles piles, ni faire un mix de piles de différentes
marques.
• Cet appareil répond à la norme EN ISO 20957-1 classe HB (H=utilisation domestique, B=précision moyenne).
• La bande de résistance peut supporter une tension maximale de 8,5 kg/84 N ou 155 cm. Compatible avec tous les exercices
prescrits dans le programme d'entraînement.
• Le niveau de sécurité de l'appareil ne peut être maintenu que si celui-ci est régulièrement contrôlé quant aux dommages et à
l'usure. Les bandes de résistance, en particulier, doivent être vérifiées régulièrement.
• Remplacez immédiatement les pièces défectueuses et/ou arrêtez d'utiliser l'appareil jusqu'à ce qu'il soit réparé.
PREMIÈRE UTILISATION
• Utiliser la poignée située sur le côté droit de l’appareil pour transporter le VibroShaper Home Gym et incliner l’appareil pour le faire
rouler sur ses roues, puis tirer, pour le déplacer avec précaution.
100 cm
100 cm
100 cm
100 cm
Figure 4
M30388_VibroshaperHOMEGYM_Manual_20210727_DR.indd 17M30388_VibroshaperHOMEGYM_Manual_20210727_DR.indd 17 02.08.21 09:1302.08.21 09:13

18
• S’assurer d’un emplacement sur une surface plane, stable et plate pour l’appareil, avec un
espacement minimum de 100 cm des murs ou des objets les plus proches.
• Si vous utilisez l’appareil pour la première fois, asseyez vous sur une chaise et placez vos pieds sur
l’appareil. Allumez ensuite l’appareil pour tester l’intensité des mouvements ; vous pourrez ainsi
vous habituer aux vibrations et au mode de fonctionnement sélectionné.
• Portez impérativement des vêtements et des chaussures de sport confortables.
ATTENTION : Pour les sols sensibles (par exemple un parquet), nous vous recommandons de
placer un tapis résistant ou adéquat sous l‘appareil. Cela évite les dommages et les colorations
de votre sol.
MODES DE FONCTIONNEMENT
Le VibroShaper Home Gym propose deux modes de fonctionnement distincts:
Le mode manuel et le mode automatique. Vous pouvez utiliser les bandes de résistance (14)
dans les deux modes.
Pour utiliser les bandes élastiques, insérer le crochet de sécurité dans les ouvertures
prévues à cet effet au dos de la plateforme, comme décrit sur la figure 5.
Mode manuel: l’utilisateur peut régler la durée et le rythme de l’exercice pour l’adapter à ses
propres besoins. En cas de recours à ce mode, respecter les instructions suivantes:
1. Brancher l’appareil à la prise de courant électrique. Mettre le commutateur électrique (13)
sous tension.
2. Actionner la touche «MARCHE» du pupitre de commande (22) ou la touche (1) de la télécommande.
3. Sélectionner d’abord la durée de l’exercice qui peut aller de 1 à 10 minutes. Afin de prolonger la durée en minutes, actionner
la touche (20) du pupitre de commande ou la touche orrespondante de la télécommande. Pour réduire la durée, actionner
la touche (21) du pupitre de commande ou la touche correspondante de la télécommande. Le temps restant de l’exercice
s’affiche lors de l’affichage de la durée (17).
4. Commencez l’exercice en actionnant la touche (24) du pupitre de commande ou la touche de la télécommande.
5. Vous pouvez maintenant sélectionner le rythme des vibrations. Les niveaux de rythme varient de 1 à 99. Afin de régler le rythme
au niveau souhaité, ultilisez la touche (26) , du pupitre de commande ou la touche correspondante de la télécommande.
6. Vous pouvez également procéder à une sélection rapide du rythme en utilisant la touche M de la télécommande, vous pouvez
alors passer successivement des rythmes 90, 60 à 30.ce faisant passer successivement des tempos 90, 60 à 30.
7. Afin de pouvoir à tout moment mettre fin à l’exercice, il actionner le bouton (25) du pupitre de commande ou la touche
correspondante de la télécommande. Lorsque l’exercice est terminé, on éteint l’appareil en actionnant la touche (22) au pupitre
de commande ou la touche (1) e la télécommande. Vous trouverez à cet effet un tableau avec des conseils destinés à votre
entraînement en mode manuel. Vous pouvez évidemment régler votre rythme personnalisé.
Le tableau 1 indique le conseil d‘entraînement pour l’entraînement en mode manuel.
Mode automatique : L’appareil fonctionne suivant un programme d’exercices préréglé pour lequel la vitesse et le temps ne
sont pas modifiables. Suivre les instructions suivantes en cas d’utilisation de ce mode :
1. Brancher l’appareil à une prise électrique. Actionner le commutateur électrique (13).
2. Actionner la touche «MARCHE» du pupitre de commande (22) ou la touche de la télécommande.
3. Une sélection de 3 programmes d’exercices différents est proposée (P1, P2, P3); actionner plusieurs fois la touche (23) ou
la touche jusqu’à l’affichage du programme souhaité de l’affichage des programmes (19).
4. Le tableau 2 indique le rythme de l’exercice de chaque programme en fonction de la durée..
5. Lorsque vous avez sélectionné le programme souhaité, commencez l’exercice en actionnant la touche (24) du
pupitre de commande ou de la télécommande.
6. Actionner la touche correspondante du pupitre de commande (25) ou de la télécommande pour stopper à tout moment
l’appareil. Lorsque vous mettez fin à l’exercice, éteignez l’appareil en actionnant la touche (22) du pupitre de commande ou
la touche correspondante de la télécommande.
UTILISATION DES BANDES DE RÉSISTANCE
Vous pouvez utiliser les bandes de résistance pour vous entraîner, que l'appareil soit allumé ou éteint. Ouvrez le mousqueton
en métal en appuyant sur le loquet et fixez-le dans le trou du crochet métallique du produit. Serrez bien le verrou du
mousqueton.
UTILISATION DES POIGNÉES DE MUSCULATION (#5-9)
Vous pouvez utiliser les poignées de musculation pour vous entraîner, que l'appareil soit allumé ou éteint.
1. Veuillez retirer le capuchon du support de poignée comme indiqué sur l'illustration.
2. Faites glisser la poignée entièrement vers le bas dans les supports et retirez-les après utilisation.
3. Il existe deux positions pour faire travailler différents groupes musculaires (#10).
MAINTENANCE ET NETTOYAGE
• Avant de procéder au nettoyage de l’appareil, il est impératif de vous assurer que le commutateur électrique est positionné
sur ARRÊT et que le câble électrique est débranché de la prise de courant.
• Pour cela, vous pouvez utiliser un balai ou une brosse propre et sèche, afin d’éliminer toute trace de poussière sur l’appareil.
Figure 5
Poignée
Roues de transport
M30388_VibroshaperHOMEGYM_Manual_20210727_DR.indd 18M30388_VibroshaperHOMEGYM_Manual_20210727_DR.indd 18 02.08.21 09:1302.08.21 09:13

19
• La surface d’appui peut être nettoyée avec un chiffon humide.
• Ne pas nettoyer l’appareil avec des détergents agressifs – en raison de risques d’endommagements.
• Nettoyez la télécommande avec un chiffon propre.
• Si l’appareil reste hors-fonction un certain temps, veillez à le placer dans le carton d’emballage et entreposez le dans un
endroit frais et sec. Il serait également judicieux de retirer les piles de la télécommande.
• Si le VibroShaper Home Gym s’avérait défectueux, suivez alors les instructions de la section «Procédure de traitement des
dysfonctionnements». Si le problème persiste, veuillez alors dans ce cas contacter le service après-vente.
PROCÉDURE DE TRAITEMENT DES DYSFONCTIONNEMENTS
PROBLÈME CAUSE RÉSOLUTION
L’appareil ne fonctionne pas.
Le câble électrique n’est pas relié à la
prise de courant Relier le câble électrique à la prise de courant
Le commutateur électrique est sur la
position ARRÊT Positionner le commutateur électrique sur MARCHE
La télécommande ne fonctionne
pas
Piles usées. Remplacer les piles.
Télécommande trop éloignée du cap-
teur infra-rouge de l’appareil.
La portée du signal infra-rouge est
de 2 mètres.
L’appareil est soudainement
tombé en panne.
Durée du programme arrivée à son
terme. Réinitialisation de la durée de l‘exercice.
L’appareil ne bouge absolument
pas.
L’appareil a reçu trop d’instructions et
se retrouve alors dans l’incapacité de
les appliquer dans leur intégralité.
Débrancher l’appareil, attendre une minute et rebrancher ensuite l’appareil.
Au cours de son fonctionnement,
l‘appareil ne réagit pas aux im-
pulsions de la télécommande.
Piles usées. Remplacement des piles usagées.
Actionne la touche
«MARCHE-ARRÊT» Actionner la touche «Démarrage-Arrêt»
ENTRAÎNEMENT
MARCHE, JOGGING ET COURSE
Le VibroShaper Home Gym est une plateforme en vibration, simulant la marche, le jogging ou la course via ses mouvements
oscillatoires horizontaux, selon le positionnement de vos pieds sur la surface du sol de l’appareil : un espacement plus
important
des jambes correspond à davantage d’acitivité physique. Trois exercices en un seul et unique endroit.
Le tableau 3 affiche les positions que doivent prendre vos pieds pour chacun des trois exercices:
TABLEAU 3: Position des pieds lors de la marche, du jogging, de la course
POSITION DES PIEDS
Marche
Pieds au centre.
Le jogging
Faire du jogging avec
les pieds légèrement écartés
La course
Pieds largement écartés
EXERCICES D‘ÉTIREMENT
Nous vous recommandons de vous étirer avant chaque entraînement avec cet appareil pour échauffer vos muscles.
Il faut aborder les exercices d’étirement progressivement et prudemment, sans procéder à des mouvements rapides
et brusques, ni à des sauts. Pratiquez cet exercice jusqu’au moment où vous allez ressentir une tension légère et non
douloureuse. Maintenir cette position durant 20 à 30 secondes.
Vous devez respirer lentement, en tythme et naturellement, afin d’aller chercher pour votre corps la quantité nécessaire
d’oxygène dont il a besoin pour ces exercices.
Remarque : s’inspirer des illustrations concernant les instructions respectives. (Voir plan d’entraînement)
M30388_VibroshaperHOMEGYM_Manual_20210727_DR.indd 19M30388_VibroshaperHOMEGYM_Manual_20210727_DR.indd 19 02.08.21 09:1302.08.21 09:13

20
NL
VEILIGHEIDSADVIEZEN
Ter voorkoming van verwondingen en schade aan het apparaat deze gebruiksaanwijzing zorgvuldig doorlezen voordat u de
VibroShaper Home Gym gaat gebruiken.
• De maximale belasting van het apparaat bedraagt 120 kg.
• Onjuist gebruik of overmatig trainen kan schadelijk zijn voor de gezondheid.
• Als u al langere tijd geen sport meer bedreven heeft of hart- en vaatproblemen of orthopedische problemen heeft, raadpleeg
dan eerst een arts voordat u het toestel gaat gebruiken.
• Personen met een hoge bloeddruk, bronchitis, huidaandoeningen, diabetes, lichamelijke beperkingen of andere klachten
mogen dit apparaat alleen gebruiken onder toezicht van een arts.
• Het gebruik van de VibroShaper Home Gym wordt afgeraden voor personen met osteoporose, kanker, hartaandoeningen,
pacemakers, protheses of andere medische implantaten.
• Oudere mensen dienen het apparaat op de juiste wijze en onder toezicht te gebruiken.
• Het gebruik van het apparaat wordt afgeraden tijdens zwangerschap of menstruatie.
• Het apparaat mag niet door kinderen als speelgoed worden gebruikt.
• Dit apparaat is niet bedoeld voor het gebruik door personen (ook kinderen) met verminderde sensorische, lichamelijke of menta
le vaardigheden, dan wel met beperkingen op dit vlak of met onvoldoende kennis en ervaring, tenzij onder toezicht van verant
woordelijke personen of wanneer ze over het functioneren van het apparaat op de hoogte zijn gesteld.
• Steek geen vingers of ander vreemde objecten in de tussenruimte tussen de middelste en onderste afdekplaat.
• Niet gebruiken nadat men alcohol heeft gedronken.
• Wacht na het eten minstens 1 uur voordat u het apparaat gaat gebruiken.
• Plaats het apparaat voor gebruik op een vlakke, stevige en egale ondergrond en bewaar een
afstand van minimaal 100 cm tot de muur en andere objecten. (afbeelding 4)
• Ter voorkoming van schade en verwondingen sieraden, mobiele telefoons en andere waardevolle
voorwerpen, alsmede sleutels en andere scherpe objecten uit de buurt van het apparaat houden.
• Ter voorkoming van verwondingen niet op het apparaat springen of knielen wanneer het apparaat aan staat.
• Het is verboden om met meer dan 1 persoon op het apparaat te staan.
• Ter voorkoming van omkiepen, het apparaat niet aan slechts aan één kant belasten.
• Plaats geen extra apparaten of voorwerpen op het apparaat.
• Gebruik het apparaat niet bij schommelingen in de stroomvoorziening en haal direct de stekker uit het stopcontact.
• Houd het apparaat uit de buurt van vochtige plaatsen en direct zonlicht en laat het niet buiten staan.
• Vermijd contact met vloeistoffen. Niet met vochtige handen aanraken, geen plotselinge bewegingen maken en niet roken tijdens
het gebruik.
• Ter voorkoming van elektrische schokken, het apparaat niet aanraken wanneer er problemen zijn met de aan-uitschakelaar.
• Het apparaat niet gebruiken wanneer de kamertemperatuur hoger is dan 40°C.
• Sluit het apparaat uitsluitend aan op de voorgeschreven stroomvoorziening.
• Ga voorzichtig om met de aan-uitschakelaar.
• De kabel niet knikken of met natte handen aanraken.
• Stop met het gebruik van het apparaat wanneer het buiten onweert of stormt en haal bij onweer direct de stekker uit het
stopcontact.
• Ter voorkoming van elektrische storingen, geen apparaten die veel stroom nodig hebben op hetzelfde stopcontact aansluiten.
• Het apparaat uitsluitend verplaatsen zoals in de beschrijving wordt afgebeeld.
• Bewaar geen ontvlambare stoffen in de buurt van het apparaat.
• Gebruik geen combinatie van nieuwe en oude batterijen of batterijen van verschillende merken in de afstandsbediening.
• Dit toestel voldoet aan EN ISO 20957-1, Klasse HB (H = thuisgebruik, B = midden nauwkeurigheid).
• De weerstandsband mag tot maximaal 8,5 kg/84 N of 155 cm worden belast. Dit komt overeen met alle oefeningen die in het
trainingsplan zijn voorgeschreven.
• Het veiligheidsniveau van het apparaat kan alleen worden gehandhaafd als het regelmatig wordt
gecontroleerd op schade en slijtage. Vooral de weerstandsbanden moeten regelmatig worden
gecontroleerd.
• Vervang onmiddellijk de defecte onderdelen en/of gebruik het apparaat niet meer totdat het is
gerepareerd.
EERSTE GEBRUIK
• Gebruik voor het verplaatsen van de VibroShaper Home Gym de handgreep aan de rechterkant van het
apparaat en kantel het apparaat zo dat de wielen de grond raken. Trek daarna om het behoedzaam te
Handgreep
Transport
wielen
100 cm
100 cm
100 cm
100 cm
afbeelding 4
M30388_VibroshaperHOMEGYM_Manual_20210727_DR.indd 20M30388_VibroshaperHOMEGYM_Manual_20210727_DR.indd 20 02.08.21 09:1302.08.21 09:13
Table of contents
Languages: