Victrola VC-100 User manual

MODEL: VC-100
BLUETOOTH CLOCK RADIO

CAUTION: To reduce the risk of fire or electric shock, do not expose this appliance to rain or moisture.
WARNING: To prevent electric shock, do not use this (polarized) plug with an extension cord, receptacle
or other outlet unless the blades can be fully inserted to prevent blade exposure.
IMPORTANT SAFETY INSTRUCTIONS
1. Read these instructions –All the safety and operating instructions should be read before this product is
operated.
2. Keep these instructions – The safety and operating instructions should be retained for future reference.
3. Heed all warnings – All warnings on the appliance and in the operating instructions should be
adhered to.
4. Follow all instructions –All operating and use instructions should be followed.
5. Do not use this apparatus near water –The appliance should not be used near water or moisture –
for example, in a wet basement or near a swimming pool, and the like.
6. Clean only with dry cloth.
7. Do not block any ventilation openings. Install in accordance with the manufacturer’s instructions.
8. Do not install near any heat sources such as radiations, heat registers, stoves, or other apparatus
(including amplifiers) that produce heat.
9. Protect the power cord from being walked on or pinched particularly at the plugs, convenience
receptacles, and at the point where they exit from the apparatus.
10. Only use attachments/accessories specified by the manufacturer.
11. Use only with the cart, stand, tripod, bracket, or table specified by the
manufacturer, or sold with the apparatus. When a cart or rack is used,
use caution when moving the cart/apparatus combination to avoid
injury from tip-over.
12. Unplug the apparatus during lightning storms or when unused for
long periods of time.
13. Refer all servicing to qualified personnel. Servicing is required when the apparatus has been damaged
in any way, such as power supply cord or plug is damaged, liquid has been spilled
or objects have fallen into the apparatus has been exposed to rain or moisture, does not
operate normally, or has been dropped.

14.
-This lightning flash with arrowhead symbol within an equilateral triangle is intended to alert the user to the
presence of non-insulated “dangerous voltage”within the product’s enclosure that may be of sufficient
magnitude to constitute a risk of electric shock.
-Warning: To reduce the risk of electric shock, do not remove cover (orback) as there are no user-serviceable
parts inside. Refer servicing to qualified personnel.
-The exclamation point within and equilateral triangle is intended to alert the user to the presence of important
operating and maintenance instructions in the literature accompanying the appliance.
15.
This equipment is a Class Ⅱordoubleinsulatedelectricalappliance.Ithasbeendesignedinsuchaway
that it does not require a safety connection to electrical earth.
16. The mains plug is used as disconnect device, the disconnect device shall remain readily operable.
17. WARNING:
To reduce the risk of fire or electric shock, do not expose this apparatus to rain or moisture. The
apparatus shall not be exposed to dripping or splashing and that no objects filled with liquids, such as
vases, shall not be placed on apparatus.
18. The use of the equipment in moderate climate.
19. The ventilation should not be impeded by covering the ventilation openings with items such as,
newspapers, tablecloths, curtains, etc.
20. No naked flame sources, such as lighted candles, should be placed on the apparatus.
21. The symbol with indicates AC voltage.
22. The symbol with indicates DC voltage.
23. The batteries (battery pack or batteries installed) shall not be exposed to excessive heat such as
sunshine, fire or the like.
24. Attention should be drawn to the environmental aspects of battery disposal.
25. CAUTION: These servicing instructions are for use by qualified service personnel only. To reduce the
risk of electric shock, do not perform any servicing other than that contained in the operating instructions
unless you are qualified to do so.
26. Correct Disposal of this product. This marking indicates that this product should not be disposed
with other household wastes throughout the EU.
-To prevent possible harm to the environment or human health from uncontrolled waste disposal, recycle
it responsibly to promote the sustainable reuse of material resources.
-To return your used device, please use the return and collection systems or contact the retailer where
the product was purchased. They can take this product for environmental safe recycling.
ACCESSORIES INCLUDED:
• INSTRUCTION MANUAL
• WARRANTY
• DETACHABLE POWER CORD (2PC)

PRODUCT OVERVIEW
Front View
1. VOLUME: When unit is ON, rotate to adjust the volume.
2. RADIO TUNER KNOB: In FM mode, turn knob to tune to desired station.
3. ANALOG RADIO
4. LED CLOCK DISPLAY
Top View
4. SNOOZE/DIMMER:
SNOOZE:When the alarm sounds, press to snooze alarm.
DIMMER: Touch lightly to adjust the brightness of the LED clock display.

Rear View
6. USB CHARGING PORT: In OFF or Bluetooth mode, it will charge an external device.
7. SET/PAIR/PLAY/PAUSE: In OFF mode, press and hold to set the time and alarm time.
Once the Bluetooth connection is successful, press and hold to disconnect from your
external device. Press again to connectthe device whichhas been connected.
When listening to music, press to temporarily pause the track, press again to resume.
8&9.UP & DOWN: In Bluetooth mode, press to skip to the previous/next track.
10. OFF-FM-BT: Slide to select function (OFF, FM Radio, Bluetooth)
11. FM wire antenna
While tuned to a station in FM mode, extend the wire and reposition to adjust for best reception.
12. AC SOCKET: Connect the AC power cord into AC connection socket and then insert the AC plug
into a wall outlet.
It is strongly recommended that this product be operated only from the type of power source
indicated on the marking label.
13. FEET
14. BATTERY COMPARTMENT
SETUP / BASIC OPERATION
BATTERY OPERATION
1. Remove the battery compartment door at the back of unit.
2. Insert two (2) AAA batteries (not included) into the battery compartment, making sure that the
batteries are installed in the designated numerical order and that the proper polarities (+ and -)
are maintained.
Note: The batteries are used for memory backup function only.
Battery Precautions!
Be sure to insert the batteries with correct positive “+” and negative “-” orientation.!
ALWAYS use batteries of the same type. Never mix different types of batteries together.!
When using rechargeable batteries, refer to the precautions on their labels.!
Do not heat or disassemble batteries, and NEVER dispose of old batteries by throwing them in a fire.!
Do not dispose device into standard garbage disposal sites. Dispose of device at available Battery!Recycling Sites
after fully discharging battery. Not doing so may violate disposal laws and regulations. Please refer to local regulations
for proper battery disposal.
!
!

!
Setup!
1. Remove any packaging materials from the unit.
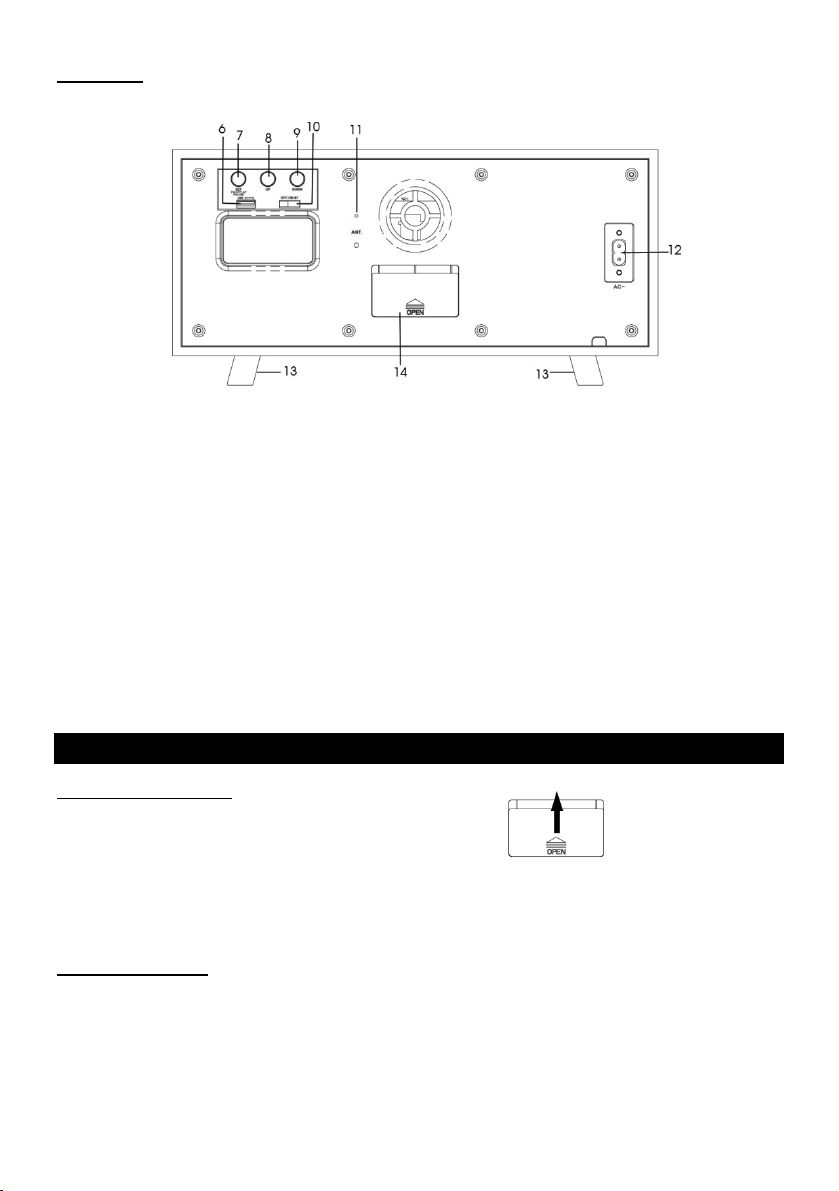
2. Connect the AC power cord into AC connection socket and then insert the AC plug into
a wall outlet.
Note:
- It is strongly recommended that this product should be operated only from the type of power source
indicated on the marking label.
- To prevent interference, avoid bundling audio signal cables together with the AC power cord.
Standby
The main unit will switch to economic standby mode when the speaker is idle for approximately 15
minutes, except for Radio mode. Once the unit turn into standby mode, you can slide the OFF-FM-BT
button to select source again.
Basic Operation
1. Select the source by sliding the OFF-FM-BT button.
2. Rotate the VOLUME knob to adjust to the desired sound level.
CONDENSATION WARNING:
When the unit is moved from a cold or warm place, or is used following a sudden temperature change, there is the
danger that water vapor in the air may condense on the unit, preventing proper operation. In such cases, leave the
unit for 1-2 hours after plugging it into an AC outlet to allow it to stabilize at the temperature of its surroundings.
LISTENING TO FM RADIO
1. Slide the OFF-FM-BT button to switch to FM function, “FM”and the time will show on the display.
2. Tune to the desired station by using the Radio Tuner Knob.
3. Rotate the VOLUME knob to adjust your desired volume.
LISTENING TO AN EXTERNAL AUDIO DEVICE (BT MODE)
In BT (Bluetooth) mode, this unit can play music from an external device with the Bluetooth feature.
GETTING CONNECTED USING BLUETOOTH
1. Slide switch to the BT function. The display will show “Blue”with the icon.
2. The blue LED indicator and the iconwill flash while searching for a device.
3. On your external device,turn the Bluetooth function ON.
NOTE: The effective distance between your external device and this apparatus is 10 meters (33ft).
4. Wait a moment for “VC-100” to appear on the devices list. Press “VC-100” to connect to the unit.
Ifasked for a password. Use “0000”, then press OK on your external device.
5. Once the Bluetooth connection is successful, the iconwill remain lit.
6. Press the UP or DOWN button to skip to the previous/next track OR control it from your device.
7. Press SET/PAIR/PLAY/PAUSEbutton to temporarily pause the track, press again to resume.
8. If you want to reconnect your external device after disconnecting, press the
SET/PAIR/PLAY/PAUSE button to reconnect.
NOTE:The PAIR Button will allow you to disconnect from your external device while remaining in BT
mode. Press and hold the PAIR button to disconnect and search for a new device. Follow the pairing
directions above to connect to the new device.

SETTING THE TIME
1. Slide the OFF-FM-BT button on the OFF mode, which is the clock mode. The time will appear on the
display automatically.
Note: The batteries are used for the memory backup function only.
2. Press and hold the SET/PAIR/PLAY/PAUSE button to adjust the time.
3. The digit of Hour will flash, press the UP or DOWN button to select the hour.
4. Press the SET/PAIR/PLAY/PAUSE button to confirm, the minuteswill flash.
5. Press the UP or DOWN button to select the minute, and then press the SET/PAIR button to confirm.
Note: It will auto confirm after flashing approximately 5 times. Once the time stopsflashing, repeat
Steps2 through 5 to reset the time if necessary.
SETTING THE ALARM
1. Press the SET/PAIR/PLAY/PAUSE button repeatedly until the “alarm”icon appearson the display.
2. Press the UP or DOWN button to select the hour, then press the SET/PAIR/PLAY/PAUSE button to
confirm.
3. The minuteswill flash on the display, press the UP or DOWN button to select the minutes.
4. Press the SET/PAIR/PLAY/PAUSE button to confirm. The display will show ON or OFF.
5. Press the UP or DOWN button to turn the alarm on or off.
6. Press the SET/PAIR/PLAY/PAUSE button to confirm the alarm setting.
7. When the alarm is turned on, the “alarm”icon will flash briefly. Press the SET/PAIR/PLAY/PAUSE
button to turn off the alarm. The alarm icon will remain stay lit. The alarm is now set to chime daily at
thesame time.
Note: It will auto confirm after flashing approximately 5 times. Once the time stopsflashing, repeat
Steps2 through 5 to reset the time, if necessary.
ALARM OFF / SNOOZE FEATURE
1. When the alarm sounds, press the SET/PAIR/PAY/PAUSE button to silence the alarm.
2. To snooze the alarm, touch the SNOOZE/DIMMER button. The alarm will snooze for approximately
nine(9)minutes.Tocancelthe snooze feature and alarm sound, press the SET/PAIR/PLAY/PAUSE
button. The alarm icon will stop flashing.
DIMMER FEATURE
Lightly touch the SNOOZE/DIMMER button to cycle through the three (3) brightness settings.
CHARGING AN EXTERNAL DEVICE
1. Connect the AC plug to awall outlet.
2. Plug aUSB cable (not included) into the USB port of the speaker. Plug the other end of theUSB
cableinto a Smartphone or an external device.
3. The unit will charge the device automatically.
Note: Charging function only works in Bluetooth mode or when the unit is OFF.

TROUBLESHOOTING GUIDE
Symptom
Possible Cause
Solution
•Unit will not power on.
•Unit is unplugged.
•Connect the unit to the AC
power supply.
•No sound output from
speakers.
•The volume level is set too low.
•The input selector does not
match the playback source.
•Adjust the volume.
•Select the correct input
source.
•Noise/Distortion in
sound output.
•The unit is too close to a TV set
or another interfering device.
•Turn off the TV or other
appliance, and relocate
the unit.
GENERAL
•Unit fails to respond.
•It might result from external
factors such as ESD
(Electro-static discharge).
•Disconnect the power cord
and external audio device.
Re-plug the power cord
after one minute.
•Cannot listen to any
station, or signal
appears weak.
•The station is not tuned-in
properly.
•A TV set is being used nearby
and is interfering with the radio
reception.
•Properly tune-in the
desired station.
•Turn-off the interfering TV
set.
FM RADIO
•The sound is distorted.
•The antenna is not oriented
properly.
•Re-orient the antenna until
reception improves.
•No sound
•The unit is not switched to
Bluetooth mode.
•Your device’s and/or the unit’s
volume is not turn up.
•Your device is too far from the
unit or there’re some obstacle
between your device and the
unit.
•Ensure the unit is switched
to BT mode.
•Move your Bluetooth
device closer to unit.
•Turn up the volume on
your portable device
and/or the unit.
•Turn OFF your Bluetooth
device and unit. Then
power them both back ON.
•Sound has a lot of static
•Your device is too far away.
•Bring your device closer to
the turntable.
BLUETOOTH
•Unable to pair with a
Bluetooth device
•Your device doesn’t have
Bluetooth connectivity.
•The Bluetooth pairing is not
successful.
•Confirm that your device is
Bluetooth compatible.
•Re-pair the unit and device
again.

SPECIFICATIONS
•Hereby, Innovative Technology Electronics, LLC, declares that this Bluetooth Clock Radio is in compliance with
the essential requirements and other relevant provisions of Directive 2014/53/EU.
•The full test of the EU declaration of conformity is available at the following internet address:
www.victrola.com/eudoc
GENERAL
Power Requirements AC 230 V~ 50 Hz
Backup Battery 2 AAA (LR03) Batteries
Power Consumption 11W
Dimensions (W x H x D) 13 in x 5.51 in x 5.98 in (approx.)
330 x 140 x 152mm (approx.)
Weight 4.17 lbs (approx.)
1.89 kg. (approx.)
AMPLIFIER
Output Power 5W
Frequency Response 60 to 20,000 Hz
SPEAKER SYSTEM
Type 1-way
Impedance 6ohms
Input Power Max 10W
FM RADIO
Range 88 to 108 MHz
BLUETOOTH
Bluetooth Version Bluetooth V2.1+EDR
Bluetooth Profiles A2DP, AVRCP
Bluetooth Frequency range 2.402GHz-2.480GHz
Operating Distance 33 feet / 10 meters
USB
USB port for charging 5V 1A
Please note: As a result of continual improvements, the design and specifications of this product are
subject to change without notice.
Bluetooth is a registered trademark of Bluetooth SIG, Inc.
Other trademarks and trade names are those of their respective owners.
This product is manufactured and sold by Innovative Technology Electronics LLC. Victrola and the
Victrola logo are trademarks of Technicolor or its affiliates and are used under license by Innovative
Technology Electronics LLC. Any other product, service, company, trade or product name and logo
referenced herein are neither endorsed nor sponsored by Technicolor or its affiliates.
Made in China.
Imported by:
Exertis Supply Chain Services Ltd.
M50 Business Park, Ballymount Rd. Upper,
Dublin 12, D12 T4C2, Ireland
Other manuals for VC-100
1
Table of contents
Other Victrola Clock Radio manuals