Videcon VHSD-870EXT User manual

INSTRUCTION MANUAL Ver 1.4
Firmware Ver. 1.2.1a
ANTIVANDAL OUTDOOR IP SPEED DOME CAMERA
| MPEG4 with Motion Tracking

ANTIVANDAL OUTDOOR
IP SPEED DOME CAMERA / MPEG4 with Motion Tracking 2/95
This lightning flash with arrowhead symbol is intended to alert the user to the
presence of un-insulated "dangerous voltage" within the product's enclosure that
may be of sufficient magnitude to constitute a risk of electric shock to persons.
This exclamation point symbol is intended to alert the user to the presence of
important operating and maintenance (servicing) instructions in the literature
accompanying the appliance.

ANTIVANDAL OUTDOOR
IP SPEED DOME CAMERA / MPEG4 with Motion Tracking 3/95
Important Safeguard
1. Read Instructions
Read all of the safety and operating instructions before using the product.
2. Retain Instructions
Save these instructions for future reference.
3. Attachments / Accessories
Do not use attachments or accessories unless recommended by the appliance manufacturer as they may
cause hazards, damage product and void warranty.
4. Water and Moisture
Do not use this product near water or moisture.
5. Installation
Do not place or mount this product in or on an unstable or improperly supported location. Improperly
installed product may fall, causing serious injury to a child or adult, and damage to the product. Use only
with a mounting device recommended by the manufacturer, or sold with the product. To insure proper
mounting, follow the manufacturer's instructions and use only mounting accessories recommended by
manufacturer.
6. Power source
This product should be operated only from the type of power source indicated on the marking label.
Precautions
Operating
Before using, make sure power supply and others are properly connected.
While operating, if any abnormal condition or malfunction is observed, stop using the camera
immediately and then contact your local dealer.
Handling
Do not disassemble or tamper with parts inside the camera.
Do not drop or subject the camera to shock and vibration as this can damage camera.
Care must be taken when you clean the clear dome cover. Especially, scratch and dust will ruin your
quality of camera.
Installation and Storage
Do not install the camera in areas of extreme temperature, which exceed the allowable range.
Avoid installing in humid or dusty places.
Avoid installing in places where radiation is present.
Avoid installing in places where there are strong magnetic fields and electric signals.
Avoid installing in places where the camera would be subject to strong vibrations.
Never expose the camera to rain and water.
NOTICE

ANTIVANDAL OUTDOOR
IP SPEED DOME CAMERA / MPEG4 with Motion Tracking 4/95
○
1Introduction
Features 6
About Network Function 8
Product & Accessories 9
Parts Name & Functions 10
○
2Installation
Configure, fix and wire 12
DIP Switch Setup 13
Installation using Mount Bracket 15
Cabling 17
○
3Operation
Check points before operation 20
Preset and Pattern Function Pre-Check 20
Starting OSD Menu 21
Reserved Preset 21
Preset 22
VST 22
Pattern 23
Group 24
Other Functions 25
OSD Display of Main Screen 26
○
4How to use OSD Menu
General Rules of Menu Operation 27
Main Menu 27
Display Setup 28
Privacy Zone Mask Setup 29
Dome Camera Setup 30
Preset Setup 36
VST Setup 38
Pattern Setup 39
Group Setup 40
System Initialize 42
○
5Network Setup
DDNS Registration 43
Quick Start of Network Connection 44
Initial Setup via a Crossover Cable 46
Guide to Network Setup 49
C
ONTENTS

ANTIVANDAL OUTDOOR
IP SPEED DOME CAMERA / MPEG4 with Motion Tracking 5/95
Case A : Dynamic IP or PPPoE + Personal Router
50
Case B : Static(Fixed) IP + Personal Router
52
Case C : Static(Fixed) IP
54
Case D : Dynamic IP + DSL/Cable Modem
56
Case E : PPPoE + DSL Modem
57
Port Forwarding
58
Starting IP Speed Dome
59
○
6Web Viewer
Web Viewer Screen
60
How does Motion Tracking work?
64
Create, Save, Load Map 6
6
Preset 6
7
Group 6
8
Viewer Interface 6
9
○
7Admin Tool
Video Tool
70
Control Tool 7
2
Motion Detection Tool 7
3
Motion Tracking Tool 7
4
TCP/IP Tool 7
6
DDNS Tool 7
7
SMTP Tool 7
8
Date & Time Tool 7
9
Users Tool
80
Firmware Update Tool 8
1
Default Set Tool 8
2
Rebooting Tool 8
2
○
8Appendix
A : Current TCP/IP Setting 8
3
B : Changing your computer’s IP address and subnet mask 8
4
C : Port Forwarding 8
5
○
9FAQ 8
9
○
10 Specifications 9
3
Specifications 9
3
Dimension & Options 9
5
C
ONTENTS

ANTIVANDAL OUTDOOR
IP SPEED DOME CAMERA / MPEG4 with Motion Tracking 6/95
Features
Network Video Interface
High frame are using hardware MPEG4 compression.
High frame rate with superior Video Quality
High speed : 30 fps at 720 x 480, 25 fps at 720 x 576
Web Browser based Viewer & i-Pro Multi Viewer supported.
Remote control for Pan/Tilt & Sensor I/O.
Bidirectional Audio support
Support with DDNS Service (www.net4c.net) for Dynamic IP
Hardware based Motion Detection function
Hardware based Intelligent Motion Tracking Algorithm
Auto Map Generation
Virtual Joystick is inspired by real Joystick
Camera Specifications
CCD Sensor : 1/4" Interline Transfer CCD
Zoom Magnification : 18 Optical Zoom, 120 Digital Zoom
Zoom Magnification : 36 Optical Zoom, 120 Digital Zoom
Day & Night Function
Various Focus Mode : Auto-Focus / Manual Focus
Powerful Pan/Tilt Functions
Max. 360/sec high speed Pan/Tilt Motion
Using Vector Drive Technology, Pan/Tilt motions are accomplished in a shortest path. As a result,
time to target view is reduced dramatically and the video on the monitor is very natural to watch.
For jog operation using a controller, since ultra slow speed 0.05/sec can be reached, it is very easy
to locate camera to desired target view. Additionally it is easy to move camera to a desired position
with zoom-proportional pan/tilt movement.
PTZ(Pan/Tilt/Zoom) Control
With RS-485 communication, max. 255 of cameras can be controlled at the same time.
Pelco-D or Pelco-P protocol can be selected as a control protocol in the current version of firmware.
I
NTRODUCTION
1

ANTIVANDAL OUTDOOR
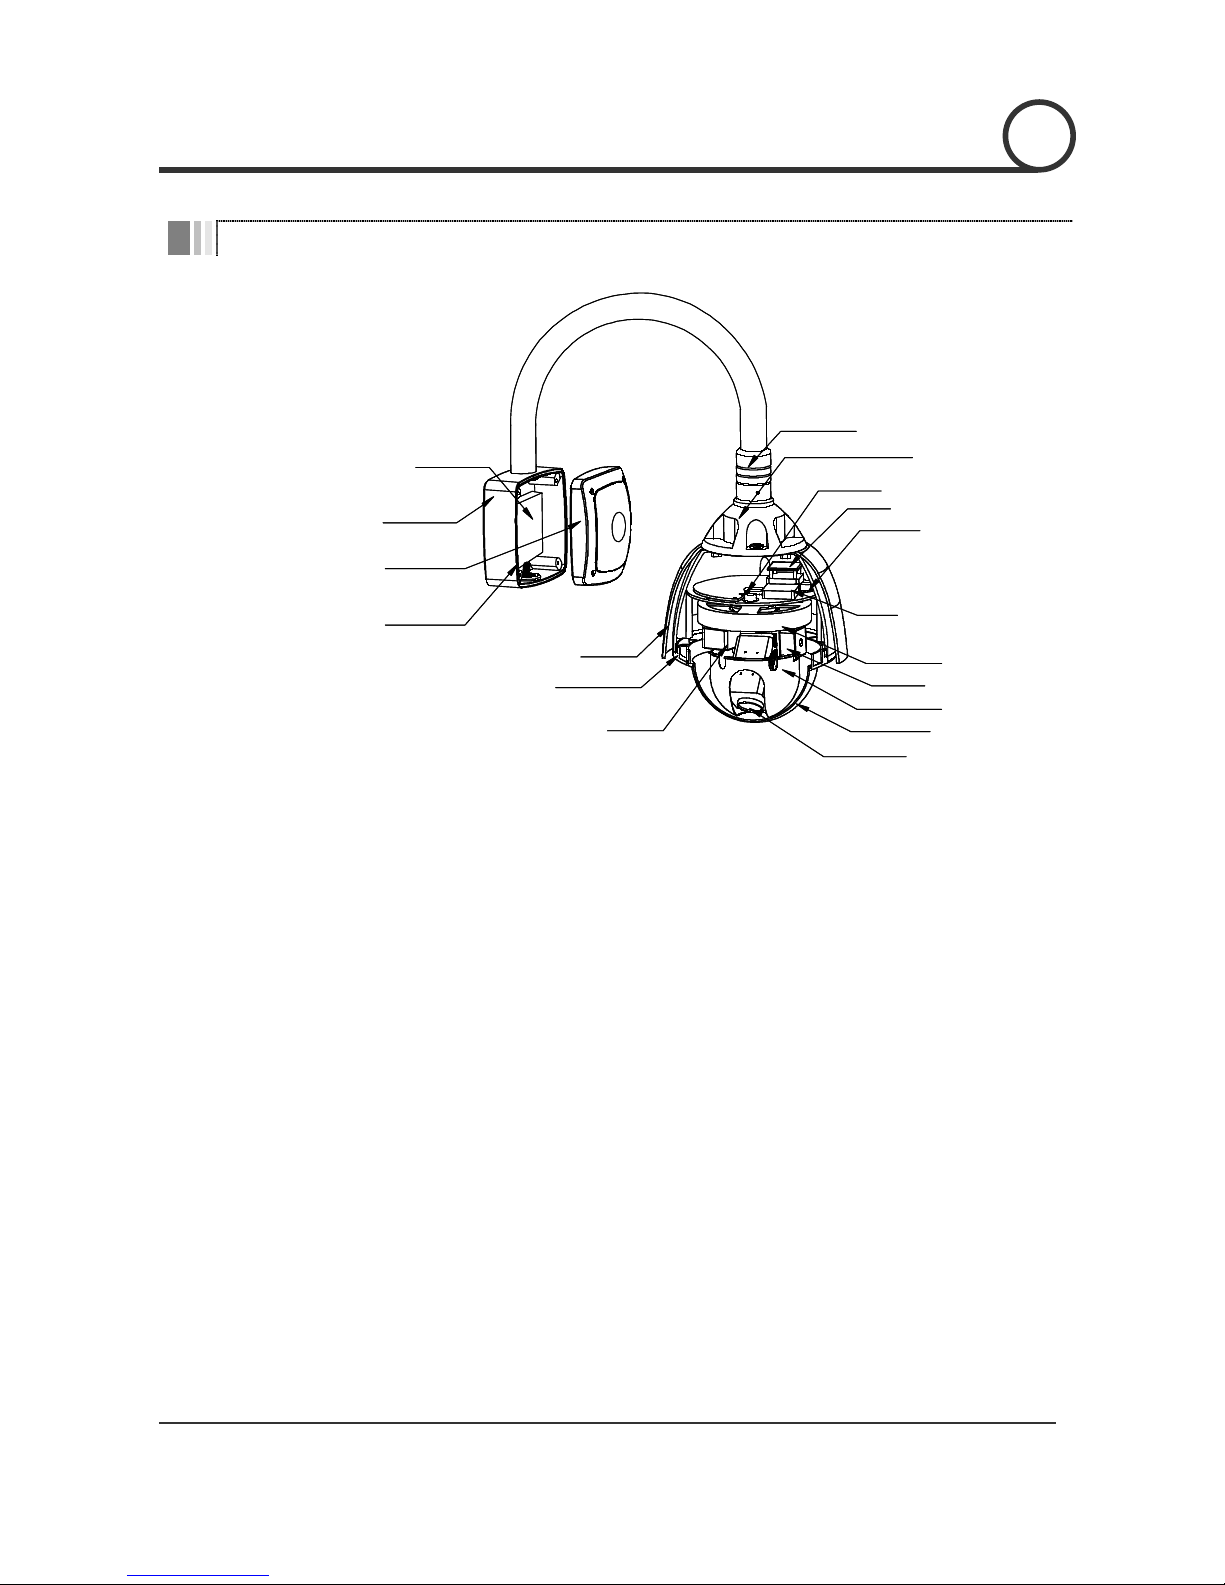
IP SPEED DOME CAMERA / MPEG4 with Motion Tracking 7/95
Preset, Pattern,VST, Group, Privacy Mask and More…
Up to 127 sets of positional and zoom level information can be stored as presets. These can be
called manually by the operator, automatically by an alarm input, or grouped to form a sequence of
actions to run automatically. Each preset can also be programmed with the following:
- Alarm action - relay outputs can be triggered when particular presets are called
- Title - each preset can be titled with up to 10 characters so that zones can easily be identified
Max. 8 set of VST action can be stored. This enables to move camera repetitively between two
preset positions with designated speed.
Max. 4 of Patterns can be recorded and played back. This enables to move camera to follow any
trajectory operated by joystick as closely as possible.
Max. 8 set of Group action can be stored. This enables to move camera repetitively with
combination of Preset or Pattern or VST. A Group is composed of max. 20 entities of
Preset/Pattern/VSTs.
Privacy Masks are assignable, not to intrude on other’s privacy. (4 Privacy Zones)
OSD(On Screen Display) Menu
OSD menu is provided to display the status of camera and to configure the functions interactively.
The information such as Camera ID, Pan/Tilt Angle, Alarm Input, Time and Date and Preset can be
displayed on screen.
Alarm I/O Functions
This Dome has 8 alarm sensor Inputs and 4 Relay outputs.
Any alarm input can be set to call a predefined preset,VST function, pattern or group.
Any preset can be configured to activate any or all of the alarm outputs.
To reject external electric noise and shock perfectly, alarm sensor Input is decoupled with photo
coupler.
The signal range of sensor input is from DC 5.0 to 12.0 volts to adopt various applications.
If an external sensor is activated, camera can be set to move to the corresponding Preset position.
Reserved Presets for Special Purpose
Most camera characteristics can be set up easily and directly with reserved preset, not entering
into OSD menu. For more information, refer to “Reserved Preset” in this manual.
I
NTRODUCTION
1

ANTIVANDAL OUTDOOR
IP SPEED DOME CAMERA / MPEG4 with Motion Tracking 8/95
About Network Function
This product is only compatible with current versions of the Microsoft Windows OS.
This product operates with Microsoft’s Internet Explorer only.
You must have ActiveX controls enabled on your browser, found in the Options menu.
Some pop-up blockers may block legitimate configuration screens, please disable these
blockers when configuring the IP Speed Dome.
Some hardware manufacturers include a cable/DSL modem, router/firewall, and Ethernet
switch in one device.
If you have no available ports on your router (with integrated switch) you can purchase a
10/100 Ethernet switch to “expand” your Local Area Network
The crossover cable is not wired as a typical straight-through network cable. This cable (or
any crossover) should be used for initial setup of the IP Speed Dome via a PC/laptop.
Please temporarily disconnect any proxy servers associated with Internet Explorer while
configuring the IP Speed Dome.
Modification and Development
The Linux-based operating system and flash memory file system enable advanced users and
application developers to customize the IP Speed Dome. An SDK developer kit is available for
users to interface ActiveX controls and other applications.
Attempts to modify the IP Speed Dome will void all warranties and will not be supported by
manufacturer or its seller. Further development tools and documentation for assistance may be
accessible in future releases. We strongly recommend that inexperienced users DO NOT modify
the firmware of IP Speed Dome.
The manufacturer or its seller will not be held accountable in a user's attempt to modify the IP
Speed Dome that renders the unit inoperable or otherwise.
This document is for Network firmware version 1.2.1a
I
NTRODUCTION
1

ANTIVANDAL OUTDOOR
IP SPEED DOME CAMERA / MPEG4 with Motion Tracking 9/95
Product & Accessories
Main Body Wall Mount Bracket
Screws & Terminal Block Crossover Cable
Options
Ceiling Mount Bracket Corner Mount Bracket
Pole Mount Bracket
I
NTRODUCTION
1

ANTIVANDAL OUTDOOR
IP SPEED DOME CAMERA / MPEG4 with Motion Tracking 10/95
Parts Name & Functions
Thermostat
Fan
Thermostat
TiltMotor
Innercover
ZoomModule
Dome Cover
PanMotor
Sunshield
DomeHousing
BracketMount
Base
BracketUpper
Cover
Seal
Housing UpperCover
BracketJoint
PCB
Shield Mount
Heater
Thermostat
Fan
Thermostat
TiltMotor
Innercover
ZoomModule
Dome Cover
PanMotor
Sunshield
DomeHousing
BracketMount
Base
BracketUpper
Cover
Seal
Housing UpperCover
BracketJoint
PCB
Shield Mount
Heater
Main Unit / Wall Mount Bracket
Dome Cover Do not detach protection vinyl from dome cover before finishing all
installation process to protect dome cover from scratches or dust.
Wall Mount Bracket Wall bracket option. After making all the connections to the PCB, fit the
junction box cover with the four screws.
Cabling Terminal Block During installation, Power, Video, Communication, Alarm Input cables
are connected on to this cabling terminal block.
DIP Switch Adjusts camera ID and protocols.
Ethernet Connector This RJ-45 connector is for network connection and designed to operate
on 10 or 100 Mbps.
Reset Switch Return all settings to their factory defaults. Care must be taken since
you will lose all data made previously.
ACTIVE LED When in use, this Yellow indicator should always be flashing or
flickering. During reboots or power cycling, it may take several seconds
for the unit to initialize and illuminate the indicator.
I
NTRODUCTION
1

ANTIVANDAL OUTDOOR
IP SPEED DOME CAMERA / MPEG4 with Motion Tracking 11/95
LINK LED This green indicator should be flashing or glowing during normal
operation. During a reboot or power cycling, it may take up to 50 seconds
to initialize, negotiate your network speed, and begin operation at 10 or
100Mbps. If this light is not lit after 50 seconds of operation, check the
network cable to ensure a proper connection. When a proper connection
is met, the green indicator should immediately glow.
I
NTRODUCTION
1

ANTIVANDAL OUTDOOR
IP SPEED DOME CAMERA / MPEG4 with Motion Tracking 12/95
Configure, fix and wire
①Wearing the gloves and using the supplied tool,
remove the outer dime cover.
②Remove the foam pieces from the camera
module.
.
③Carefully unclip the black inner dome ④Locate the dip switches and set protocol and ID
according to the next section.
**Note.
I
NSTALLATION
2
Foam
Foam
Cover
L
a
n
yard
ID
Protocol

ANTIVANDAL OUTDOOR
IP SPEED DOME CAMERA / MPEG4 with Motion Tracking 13/95
DIP Switch Setup
Before you installed camera or After you mount the camera, you should set the DIP switches properly to match
your control equipment. Most important settings are camera ID, communication protocol and its speed. As
Shown in the Picture bellow, there are two dip switch for protocol and ID
Camera ID Setup
[Factory Default Setting]
ID number of camera is set using binary number. The example is
shown bellow.
Pin 12345678
ID Value 1 2 4 8 16 32 64 128
ex) ID=5 on off on off off off off off
ex) ID=10 off on off on off off off off
The range of ID is 1~255. Do not use 0 as camera ID. Factory
default of Camera ID is 1.
If you want to control a certain camera, you must match the camera
ID with Cam ID setting of DVR or Controller.
2
ID (8P)
Protocol (
6P)
I
NSTALLATION

ANTIVANDAL OUTDOOR
IP SPEED DOME CAMERA / MPEG4 with Motion Tracking 14/95
Communication Protocol Setup
Reserved for Supplier
I
NSTALLATION
Select the appropriate Protocol with DIP switch combination.
Switch State
P0
(Pin 1)
P1
(Pin 2)
Protocol
OFF OFF PELCO-D, 2400 bps
ON OFF PELCO-D, 9600 bps
OFF ON PELCO-P, 4800 bps
ON ON PELCO-P, 9600 bps
If you want to control using DVR or P/T controller, their protocol must
be identical to camera. Otherwise, you can not control the camera.
If you changed camera protocol by changing DIP S/W, the change
will be effective after you reboot the camera.
Factory default of protocol is “Pelco-D, 2400 bps”.
Since Pin 3 ~ Pin 6 are reserved, DO NOT CHANGE THESE ITS
ORIGINAL STATE.If you change one of these, proper operation can
not be achieved.
2

ANTIVANDAL OUTDOOR
IP SPEED DOME CAMERA / MPEG4 with Motion Tracking 15/95
Installation using Mount Bracket
①Fix the supplied mounting template, taking
account of any pipework, cables, overhangs
etc.that may obstruct the bracket once fitted.
②after making suitable checks fir buried pipes and
cables, drill fixing holes suitable for the bolts
supplied with the speed dome
③Remove the junction box cover. Using the
supplied bolts and tool, firmly fix the bracket.
④Feed the speed dome cable through the bracket.
⑤Bring the speed dome up to the bracket. ⑥Tighten the three screws to fis the speed dome
and ensure the lanyard safety chain is properly
connected.
I
NSTALLATION
2
Lanyard
Pendent option
Pendent option
Pendent option

ANTIVANDAL OUTDOOR
IP SPEED DOME CAMERA / MPEG4 with Motion Tracking 16/95
⑦1a-wall bracket option. After making all the
connections to the PCB, fit the junction box cover
with the four screws.
⑧1b-pendent option. After making all the
connections to the PCB, raise the dome assembly
to the junction box, connect the dome cable to
the PCB and fix with the four screws.
**Note: when fixing the cover to the junction box, ensure that the seal is also fitted properly and that
none of the cables are trapped
Lanyard
Seal Seal
I
NSTALLATION
2

ANTIVANDAL OUTDOOR
IP SPEED DOME CAMERA / MPEG4 with Motion Tracking 17/95
Cabling
* NOTE: As shown in the drawing, you can change the type of Relay Out (NC or NO) by shifting the jumpers
near by terminal blocks of Alarm Outputs.
Power Connection
Please, check the voltage and current capacity of rated power carefully. Rated power is indicated in the
back of main unit.
Rated Power Input Voltage Range Current Consumption
AC 24V AC 17V ~ 29V 0.8 A
RS-485 Communication
For PTZ control, connect this line to keyboard and DVR. To control multiple cameras at the same time,
RS-485 communication lines of them is connected in parallel as shown below.
I
NSTALLATION
2

ANTIVANDAL OUTDOOR
IP SPEED DOME CAMERA / MPEG4 with Motion Tracking 18/95
Video Connection
Connect with BNC coaxial cable.
I
NSTALLATION
2

ANTIVANDAL OUTDOOR
IP SPEED DOME CAMERA / MPEG4 with Motion Tracking 19/95
Alarm Input Connections
Sensor Input
Before connecting sensors, check driving voltage and output signal type of the sensor. Since output
signal types of the sensors are divided into Open Collector and Voltage Output type in general, the
cabling must be done properly after considering these typed.
Signal Description
IN #+ Connect (+) cable of electric power source for Sensors to this port as
shown in the circuit above. Allowable voltage is 5 ~ 12 Volts DC.
GND Common to all 8 Sensor input.
* NOTE: Type of sensor is fixed to NO type (Normally Open).
Sensor Out
* NOTE: As shown in the drawing, you can change the type of Relay Out (NC or NO) by shifting the
jumpers near by terminal blocks of Alarm Outputs.
I
NSTALLATION
2

ANTIVANDAL OUTDOOR
IP SPEED DOME CAMERA / MPEG4 with Motion Tracking 20/95
Check points before operation
Before power is applied, please check the cables carefully.
The camera ID of the controller must be identical to that of the target camera. The camera ID can be checked
by reading DIP switch of the camera.
If your controller supports multi-protocols, the protocol must be changed to match to that of the camera.
If you changed camera protocol by changing DIP switch, the change will be effective after you reboot the
camera.
Since the operation method can be different for each controller available, refer to the manual for your
controller if camera can not be controlled properly. The operation of this manual is based on the standard
Pelco® Controller.
Preset and Pattern Function Pre-Check
Check how to operate preset and pattern function with controller or DVR in advance to operate camera
function fully when using controller or DVR.
Refer to the following table when using standard Pelco® protocol controller.
< Go Preset > Input [Preset Number] and press [Preset] button shortly.
< Set Preset > Input [Preset Number] and press [Preset] button for more than 2 seconds.
< Run Pattern > Input [Pattern Number] and press [Pattern] button shortly.
< Set Pattern > Input [Pattern Number] and press [Pattern] button for more than 2 seconds.
If controller or DVR has no pattern button or function, use shortcut keys with preset numbers. For more
information, refer to “Reserved Preset”in this manual.
OPERATION
3
Table of contents
Other Videcon Security Camera manuals