FUNCTION SETTING
FUNCTION SETUP*
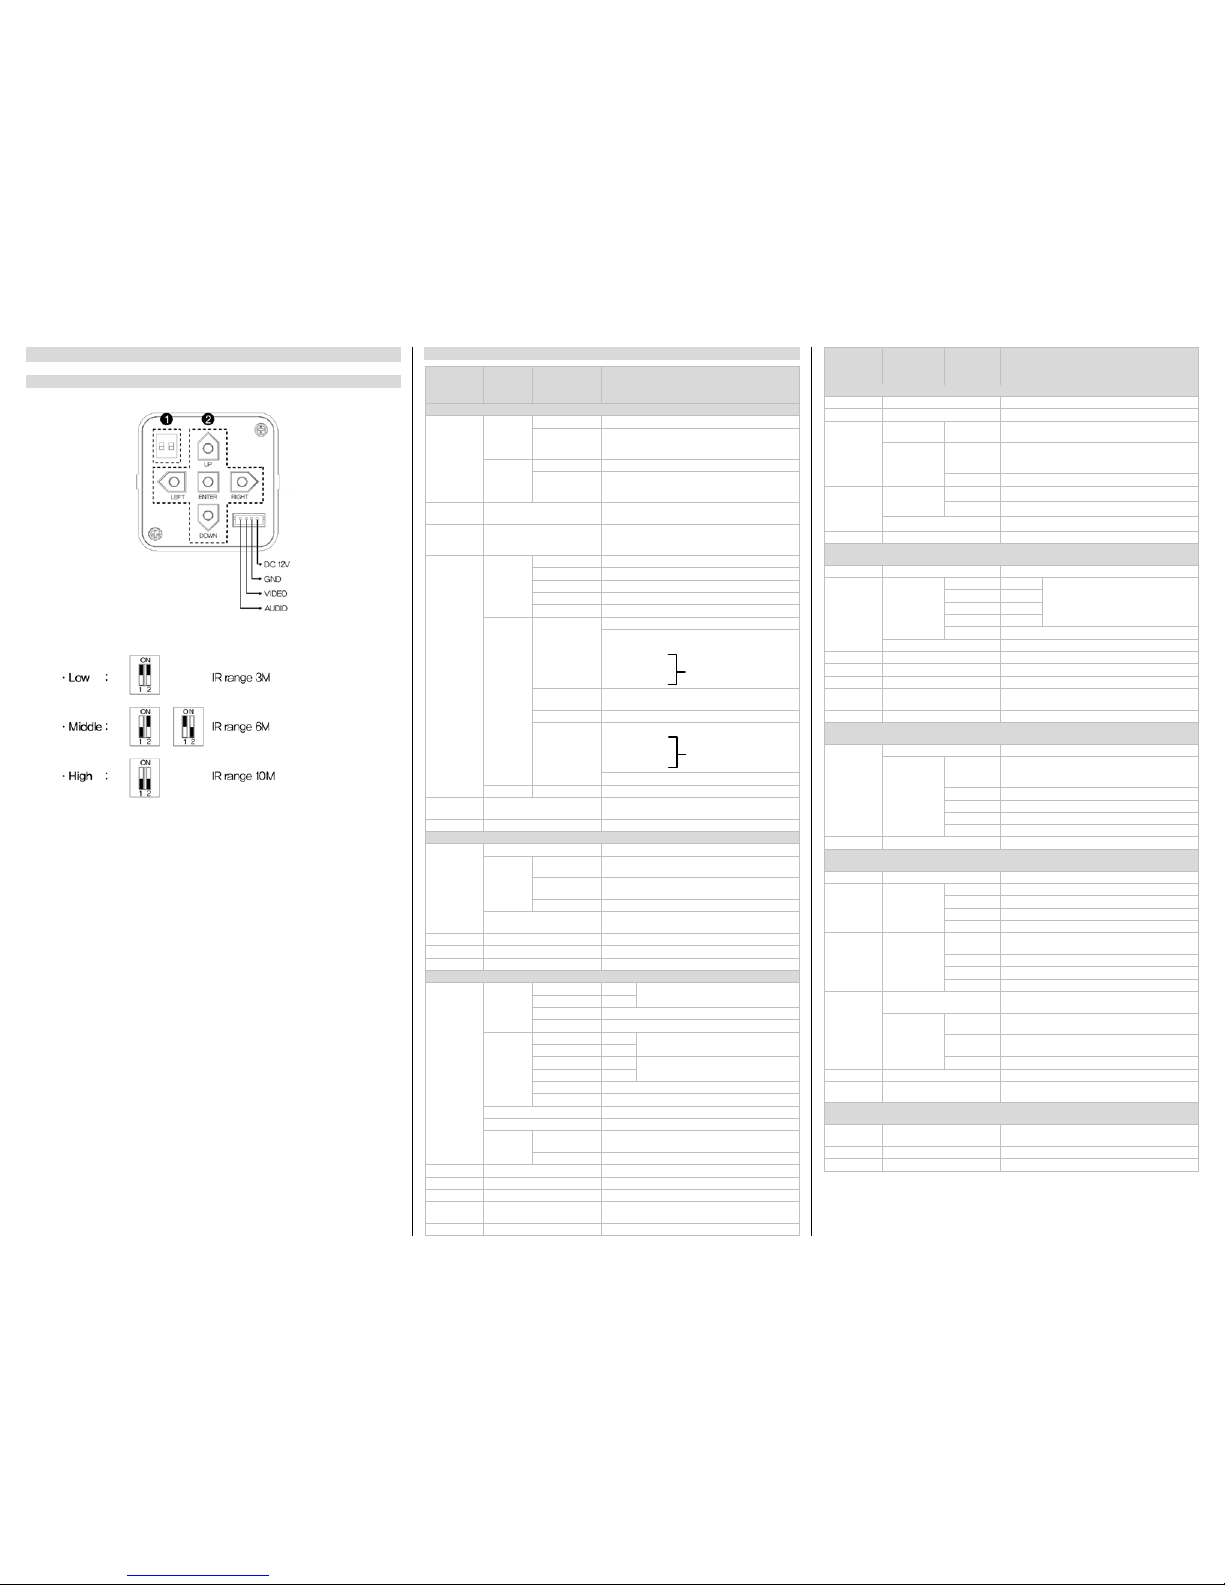
How to use the Dip Switches
1. LED Brightness Adjustment
Brightness of LED light can be controlled by 3 levels.
Factory default is "High".
2. Menu setup push buttons
•ENTER: Used to access the menu and confirm selection.
•UP, DOWN: Used to move the cursor to up or down.
•LEFT, RIGHT: Used to move the cursor to left or right and
change the value.
*Pressing 2 buttons at one time might cause an error.
In this case, exit and enter the menu again or turn off and on.
OSD MENU STRUCTURE
Select
menu Sub menu Contents
0~99 : Adjust brightness with a manual iris lens
AUTO, 1/60, 1/100FLK, 1/120, 1/250, 1/500,
1/1000, 1/2000, 1/4000, 1/10000, 1/100000
0~99 : Adjust brightness with a DC iris lens
AUTO, 1/60, 1/100FLK, 1/120, 1/250, 1/500,
1/1000, 1/2000, 1/4000, 1/10000, 1/100000
AGC OFF, LOW, MIDDLE, HIGH
You cannot use the Auto D&N change mode
when AGC is off
AUTO, OFF, X2, X4, X8, X16,
X32, X64,X128, X256, X512,
X1024
Sense-up levels for low luminance
(x2 ~ x1024)
BACKLIGHT
BLC
0~15: Adjust top position of BLC zone
1~16 : Adjust bottom position of BLC zone
0~15: Adjust left position of BLC zone
1~16 : Adjust right position of BLC zone
OFF : Deactivates HBLC function
HBLC LEVEL : OFF, LOW, MID, HIGH
TOP : 0~15
BOTTOM : 1~16
LEFT : 0~15
ALL DAY : Activates HBLC function all day
NIGHT : Use the function at night only
TOP : 0~33
BOTTOM : 1~34
LEFT : 0~44
3D-DNR OFF, LOW, MID, HIGH, AUTO
Reduce noise in low illumination (Level
selectable)
Color temperature 25000k ~ 95000k
0~128 : Adjust the Red value to shift the color of
the image
0~128 : Adjust the Blue value to shift the color of
the image
Move back to previous menu
Automatically set white balance for current
luminance environment
Adjust Red tone of the image
Adjust Blue tone of the image
Select brightness of illumination about
changing the day↔night mode by AGC
0~15 : Select the delay time
Move back to previous menu
Select brightness of illumination about
changing the day↔night mode by AGC
Select brightness of illumination about
changing the day↔night mode by CDS
0~15 : Select the delay time
0~15 : Change the color↔B/W by external signal
(N/A)
Move back to previous menu
Transmit the burst signal or not in B/W mode
Color suppress controllable
Iris suppress controllable
Decreases screen saturation of objects within a
short range
Set a vertical image inversion
Set a gamma value
USER GAMMA
0.20, 0.25, 0.30, 0.35, 0.40, 0.45, 0.50, 0.55,
0.60, 0.65, 0.70, 0.75, 0.80, 0.85, 0.90, 0.95,
Move back to previous menu
0~30 : Use the LSC and level adjustable
Move back to previous menu
Motion detection function activate/deactivate
To create a zone for motion detection
Motion detection sensitivity
Select notification method of motion detection
Set the duration of alarm out
Display each privacy mask or not
L_TOP, L_BOT, R_BOT, R_TOP : Determines
which of the 4 vertices of each MD area is to be
ENTER SETTING : Determines the coordinate
ENTER SETTING : Move the mask
BLACK, WHITE, … : Select mask color(8 colors)
ENGLISH, … : Select language(9 languages)
Display the camera name on the screen
COMMUNICAT
ION (N/A) OFF- -ON
ID
1~255 : Select the camera ID for RS-485
communication
2400, 4800, 9600 : Select baud rate
PELCO-D : Camera protocol
Deactivates Defect Pixel Correction in low
illumination
0~255 : Setup the limited value of white pixel
correction
0~255 : Setup the limited value of white pixel
correction
Reset your camera to factory default condition
Return to previous menu
(Communication setting is not changed)
Save the value and exit menu
Escape the menu without save
To create a zone
for HBLC
To create a zone for
HLC mask


