Vienna Percolator User manual

HANDLEIDING
PERCOLATOR
USER GUIDE

Inhoud
Veiligheidsinstructies 03
Onderhoud 04
Perfecte Percolator koffie 05
Perfecte Percolator koffie 06
Content
Safety instructions 07
Maintenance 08
Perfect moka pot coffee 09
Perfect moka pot coffee 10
Follow us
@viennacoffeenl
www.viennacoffee.nl

Veiligheidsinstructies
03
Zet je percolator nooit zonder water op het fornuis.
De onderste kamer mag alleen gevuld worden met water.
Gebruik voor de bereiding alleen gemalen koffie. Andere ingrediënten zoals thee of
cacao kunnen het filter verstoppen.
Controleer voor gebruik of de percolator correct is gesloten en de schroefdraad
stevig is vastgeschroefd. Gebruik de handgreep niet tijdens het in elkaar schroeven.
De meegeleverde vervangende siliconenring is alleen bedoeld voor vervanging in
geval van slijtage. Deze mag in geen geval naast de reeds aangebrachte afdichting
worden gebruikt.
Bij gebruik van een gasfornuis mag de vlam niet boven de ketel reiken. De percolator
is ook geschikt voor inductie.
Gebruik bij gebruik van inductiekookplaten of andere kookplaten zeker niet de
hoogste warmtestand, maar pas een middelhoge warmtestand toe.
Laat de percolator tijdens het gebruik niet onbeheerd achter.
Raak de hete koker alleen aan bij het handvat en de knop.
Houd de percolator tijdens het gebruik uit de buurt van kinderen.
Voordat je begint…
Raden wij aan om een reinigingscyclus uit te voeren om achtergebleven resten te
verwijderen. Voor de eerste kookcyclus alleen uit met water (zonder koffie) op het
fornuis op middelhoog vuur met gesloten deksel. Zet dan minimaal één keer koffie met
je percolator en giet de eerste portie weg.
Ben je tevreden?
Met een review kan je ons bedrijf enorm helpen. We waarderen het als je dat wilt doen.
Om ons continue te kunnen verbeteren is iedere vorm van feedback hard nodig.
Voorzorgmaatregel
Belangrijk: Zet de percolator na het kookproces direct van het fornuis.
Omdat na het kookproces nog maar een kleine hoeveelheid water in het onderste bakje
achterblijft, kan het bij het aanhouden van de hitte een overdruk ontstaan, wat in het
ergste geval zelfs tot een explosie kan leiden.

Onderhoud
Onderhoudsinstructies: de algemene regel is dat wanneer je de percolator gewoon met
de hand en heet water zonder wasmiddel of schuurmiddel reinigt, dit de meest
voorzichtige manier is om de percolator schoon te maken. Ook reinig je alle onderdelen
van je percolator eenvoudig en veilig in de vaatwasser.
Droog alle onderdelen van de espressokoker grondig af na het schoonmaken.
Belangrijk: Er kan restwater in het veiligheidsventiel en de trechter achterblijven. Dit kan
na verloop van tijd leiden tot kalkaanslag, waardoor ventiel en inzetstuk verstopt raken en
problemen opleveren in je percolator.
TIP: Blaas daarom naast het drogen ook actief het ventiel uit met je mond om alle
waterresten echt te verwijderen. Zet de percolator pas weer in elkaar als alle onderdelen
goed zijn opgedroogd. Schroef het niet te vast om te bewaren.
Ontkalk de percolator regelmatig: vul hiervoor de percolator met water tot net onder het
ventiel.
Voeg twee theelepels citroenzuur of azijn toe. Zet de espressokoker in elkaar en zet een
espresso, zonder toevoeging van koffie.
Verwijder de vloeistof en noteer vervolgens het punt “voordat je begint”.
Controleer regelmatig of het ventiel, de trechter en de filterplaat niet verstopt zijn. maak
anders de gaatjes schoon met een zachte borstel of de punt van een naald.
Controleer regelmatig de slijtage van de afdichting. Als je merkt dat het versleten of
beschadigd is, vervang je het door de meegeleverde vervangende siliconenring.
Zorg ervoor dat het water altijd onder het ventiel staat. Als er te veel water in de moka pot
wordt gegoten, kan het ventiel na verloop van tijd door kalkaanslag verstopt raken en
daarmee een veilig gebruik niet meer garanderen.
Een percolator is niet geschikt voor zeer fijngemalen koffiepoeder, zoals gebruikt in
espressomachines! Dit kan niet alleen invloed hebben op de smaak, maar kan ook leiden
tot overdruk in de ketel.
Druk of stamp het koffiepoeder in geen geval aan. Dit beïnvloed ook de smaak en kan
leiden tot overdruk in de koker.
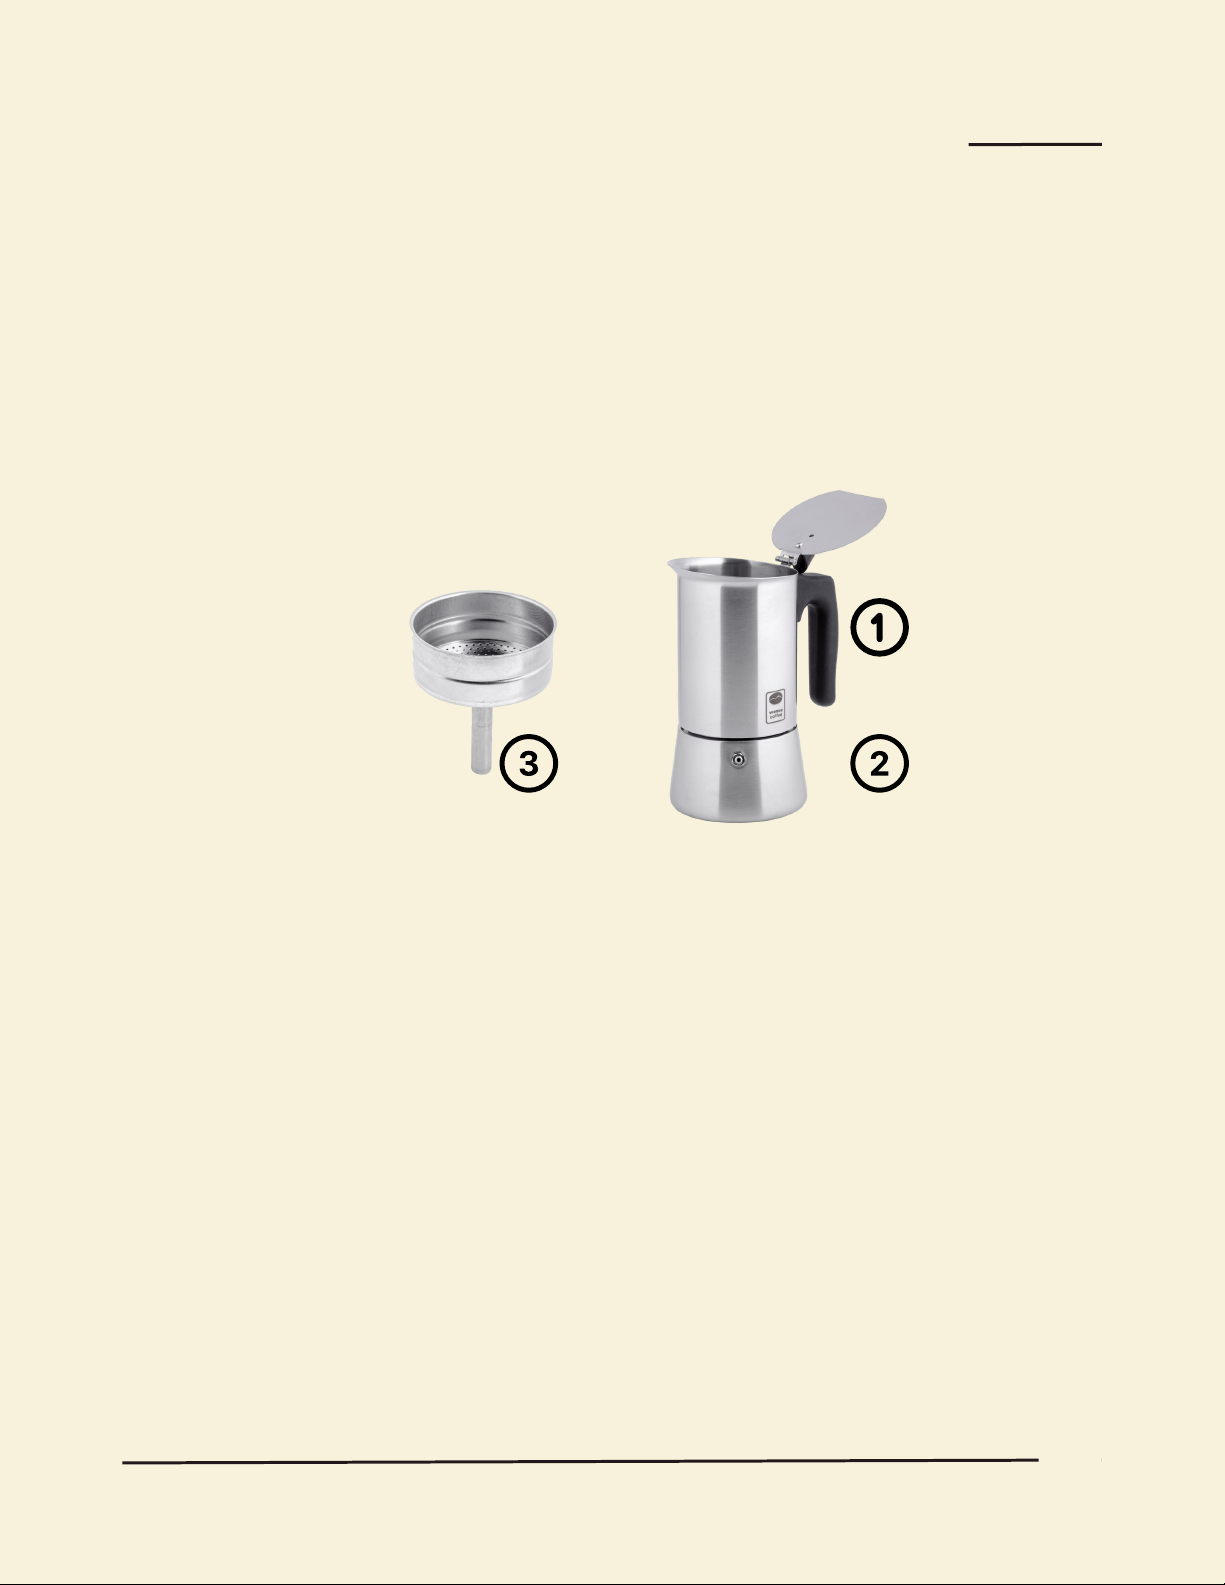
Belangrijk: let bij het gebruik van onze percolator vooral op de volgende 3 punten om
functiestoringen te voorkomen:
1.
2.
3.
04

Perfecte percolator koffie
Schroef de percolator uit elkaar
Vul met water. Schroef de opvangkamer uit de onderste kamer en verwijder de
filtermand. Vul tot net onder het ventiel. TIP: verwarm het water voor om te voorkomen
dat de kan te snel opwarmt, wat kan leiden tot onnodig bittere koffie.
Filtermand plaatsen. Vul met espressomaling. Plaats de filtermand terug en voeg
fijngemalen koffie toe aan de filtermand. Strijk het poeder voorzichtig glad met vinger of
lepel. De mand moet bijna vol zijn. plaats de mand in de onderste kamer.
Schroef de percolator in elkaar. Schroef de opvangkamer en de onderste deel samen
zodat de pot goed gesloten is.
Zet de percolator op het fornuis op middelhoog vuur. Het water in de onderste kamer zal
na korte tijd opwarmen en door de trechter in de opvangkamer stromen.
Neem de percolator op het juiste moment van het vuur. Als alle koffie in de koffiekamer
zit, hoor je een sissend geluid. Dat geluid is de lucht die door de standpijp naar boven
komt. Voor jou is dit het sein om de percolator van het vuur te halen, anders verbrandt je
koffie en krijg het een bittere smaak.
Maalgraad: gemiddelde tot fijne maling = 4 -5 (op een schaal zeer fijn tot zeer grof = 1 – 10)
Hoeveelheid: 300ml = 6 koppen espresso
Dosering: vul het filtermandje tot de rand en strijk het teveel glad.
Een percolator pot bestaat altijd uit drie onderdelen: een opvangkamer met tuit (1). Een
onderste kamer die gevuld is met water (2) en een trechtervormige filtermand die het
koffiedik vasthoud (3). In de opvangkamer (boven) zit een fijne zeef die de koffie uit het
koffieresidu filter.
Handleiding
1.
2.
3.
4.
5.
6.
TIP: idealiter spoel je de bodem van de koker met koud water direct na nadat je hem van het
fornuis hebt gehaald. Dit voorkomt ook dat de koffie bitter of verbrand smaakt.
Geweldig! Je hebt zojuist koffie gezet met de percolator. Genieten!
05

Perfecte percolator koffie
Koffie te fijn gemalen en poeder te dicht opeengepakt. Gebruik altijd fijn tot medium
koffiepoeder. Als het poeder niet fijn genoeg is gemalen, wordt er onvoldoende koffie
uitgetrokken, waardoor je koffie minder smaak krijgt. Als het poeder te fijn is, wordt je
koffie te bitter en is de druk van 1,5 bar niet sterk genoeg om al het water door het poeder
te persen. Dit is ook de reden waarom je nooit op het poeder moet drukken, maar het
gewoon plat moeten drukken met een vinger of lepel.
Vooraf koffie malen Gemalen koffie verliest snel zijn smaak. Let op en maal niet te veel
koffie/espresso in één keer. Hoe verser het poeder, hoe beter. Het is vrij eenvoudig om dit
te doen met een koffiemolen, zoals die je in ons assortiment kan vinden.
Te snel opwarmen van de percolator. Als het roestvrijstaal van de koffiepot te snel
opwarmt, kan je gemalen koffie aanbranden, waardoor de koffie zijn smaak en aroma
verliest. Vul je espressokoker daarom altijd met voorverwarmd water en zet het fornuis
alleen op medium. Zo zorg je voor het beste resultaat e geniet je van heerlijk aromatische
koffie.
Espressokoker te lang laten koken. Zodra er alleen waterige koffie en steeds meer lucht
uit de standpijp komt, dien je de koker van het vuur te halen. Dit voorkomt dat de koffie
aanbrandt, waardoor deze een zeer bittere smaak krijgt.
TIP: verwarm je kopje voor met heet water voordat je er koffie in schenkt. Zo blijft het langer
warm.
Belangrijk: het waterreservoir wordt erg heet tijdens het opwarmen. Raak het tijdens het
zetten niet aan en wacht minimaal 20 minuten voordat je de pot opent! Anders kun je je
vingers verbranden. Hetzelfde geldt voor het ventiel: houd handen en gezicht weg tijdens het
verwarmen!
4 meest voorkomende fouten bij het maken van espresso en hoe je ze kunt
voorkomen
1.
2.
3.
4.
TIP: Spoel de onderkant van de koker af met wat koud water (2-3 seconden). Zo voorkom je
overtollige extractie van koffie.
06

Safety instructions
03
Never put your percolator on the stove without water.
The lower chamber may only be filled with water.
Only use ground coffee for preparation. Other ingredients such as tea or cocoa can
clog the filter.
Before use, check that the percolator is properly closed and the screw thread is
tightened. Do not use the handle while screwing together.
The included replacement silicone ring is only for replacement in case of wear.
Under no circumstances should this be used in addition to the already applied seal.
When using a gas stove, the flame must not reach above the boiler. The moka pot is
also suitable for induction cookers.
When using induction hobs or other hobs, do not use the highest heat setting, but
use a medium heat setting.
Do not leave the percolator unattended during use
Only touch the hot cooker by the handle and knob
Keep the percolator away from children during use
Before you start…
We recommend that you perform a cleaning cycle to remove any remaining residue.
For the first cooking cycle only with water (without coffee) on the stove over medium
heat with the lid closed. Then make coffee with your percolator at least once and pour
away the first portion.
Are you satisfied?
You can help our company enormously with a review. We appreciate if you want to do
that. In order to continuously improve, any form of feedback is essential.
Precaution
Important: Immediately remove the percolator from the stove after the cooking
process.
Since only a small amount of water remains in the lower container after the boiling
process, if the heat is maintained it can create an overpressure, which in the worst case
can even lead to an explosion.

Maintenance
Care instructions: The general rule is that simply cleaning the percolator by hand and
hot water without detergent or abrasives is the most gentle way to clean the percolator.
You can also easily and safely clean all parts of your percolator in the dishwasher.
Dry all parts of the espresso maker thoroughly after cleaning.
Important: Residual water may remain in the safety valve and funnel. Over time, this can
lead to limescale build-up, clogging the valve and insert and causing problems in your
percolator.
TIP: Therefore, in addition to drying, also actively blow out the valve with your mouth to
really remove all water residues. Do not reassemble the percolator until all parts have
dried properly. Do not screw it too tight for storage.
Descale the percolator regularly: fill the percolator with water to just below the valve.
Add two teaspoons of citric acid or vinegar. Assemble the espresso maker and make an
espresso without adding coffee.
Remove the liquid and then note the "before you begin" point.
Regularly check that the valve, funnel and filter plate are not clogged. otherwise, clean
the holes with a soft brush or the tip of a needle.
Regularly check the wear of the seal. If you find it is worn or damaged, replace it with the
included replacement silicone ring.
Make sure that the water is always below the valve. If too much water is poured into the
moka pot, the valve can become clogged over time due to limescale and thus no longer
guarantee safe use.
A percolator is not suitable for very finely ground coffee powder, as used in espresso
machines! This can not only affect the taste, but can also lead to overpressure in the
kettle.
Never press or tamp the coffee powder. This also affects the taste and can lead to
overpressure in the cooker.
Important: When using our percolator, pay particular attention to the following 3 points to
avoid malfunctions:
1.
2.
3.
04

Perfect moka pot coffee
Unscrew the percolator
Fill with water. Unscrew the collection chamber from the lower chamber and remove the
filter basket. Fill to just below the valve. TIP: Preheat the water to prevent the jug from
heating up too quickly, which can lead to an unnecessarily bitter coffee.
Insert filter basket. Fill with espresso grind. Replace the filter basket and add finely
ground coffee to the filter basket. Gently smooth the powder with finger or spoon. The
basket should be almost full. place the basket in the lower chamber.
Screw the percolator together. Screw the collection chamber and the bottom part
together so that the jar is tightly closed.
Place the percolator on the stove over medium heat. The water in the lower chamber
will heat up after a short time and flow through the funnel into the collection chamber.
Remove the percolator from the fire at the right time. When all the coffee is in the coffee
chamber, you will hear a hissing sound. That sound is the air coming up through the
standpipe. For you, this is the signal to remove the percolator from the heat, otherwise
your coffee will burn and it will have a bitter taste.
Grinding degree: medium to fine grind = 4 -5 (on a scale very fine to very coarse = 1 – 10)
Quantity: 300ml = 6 cups of espresso
Dosage: fill the filter basket to the brim and smooth out the excess.
A percolator pot always consists of three parts: a collection chamber with spout (1). A lower
chamber filled with water (2) and a funnel-shaped filter basket that holds the coffee
grounds (3). In the collection chamber (top) there is a fine sieve that filters the coffee from
the coffee grounds.
Manual
1.
2.
3.
4.
5.
6.
TIP: ideally, rinse the bottom of the kettle with cold water immediately after you remove it
from the stove. This also prevents the coffee from tasting bitter or burnt.
Awesome! You have just made coffee with the percolator. Enjoy!
05

Perfect moka pot coffee
Coffee ground too fine and powder too densely packed. Always use fine to medium
coffee powder. If the powder isn't ground fine enough, not enough coffee will be
extracted, which will make your coffee less flavorful. If the powder is too fine, your coffee
will be too bitter and the pressure of 1.5 bar will not be strong enough to force all the
water through the powder. This is also why you should never press the powder, but just
flatten it with a finger or spoon.
Pre-ground coffee Ground coffee loses its flavor quickly. Be careful not to grind too
much coffee/espresso in one go. The fresher the powder, the better. It is quite easy to do
this with a coffee grinder, such as those you can find in our range.
Heating up the percolator too quickly. If the stainless steel of the coffee pot heats up too
quickly, your ground coffee can burn, causing the coffee to lose its flavor and aroma.
Therefore, always fill your espresso maker with preheated water and only set the stove to
medium. This way you ensure the best result and enjoy delicious aromatic coffee.
Let the espresso maker boil for too long. As soon as only watery coffee and more and
more air comes out of the standpipe, you need to remove the kettle from the heat. This
prevents the coffee from burning, giving it a very bitter taste.
TIP: preheat your cup with hot water before pouring coffee into it. This way it stays warm
longer.
Important: The water tank gets very hot during heating. Do not touch it during brewing and
wait at least 20 minutes before opening the jar! Otherwise you can burn your fingers. The
same applies to the valve: keep hands and face away during heating!
4 most common espresso making mistakes and how to avoid them
1.
2.
3.
4.
TIP: Rinse the bottom of the cooker with some cold water (2-3 seconds). This way you
prevent excess extraction of coffee.
06
This manual suits for next models
1
Table of contents
Languages:
Other Vienna Coffee Maker manuals