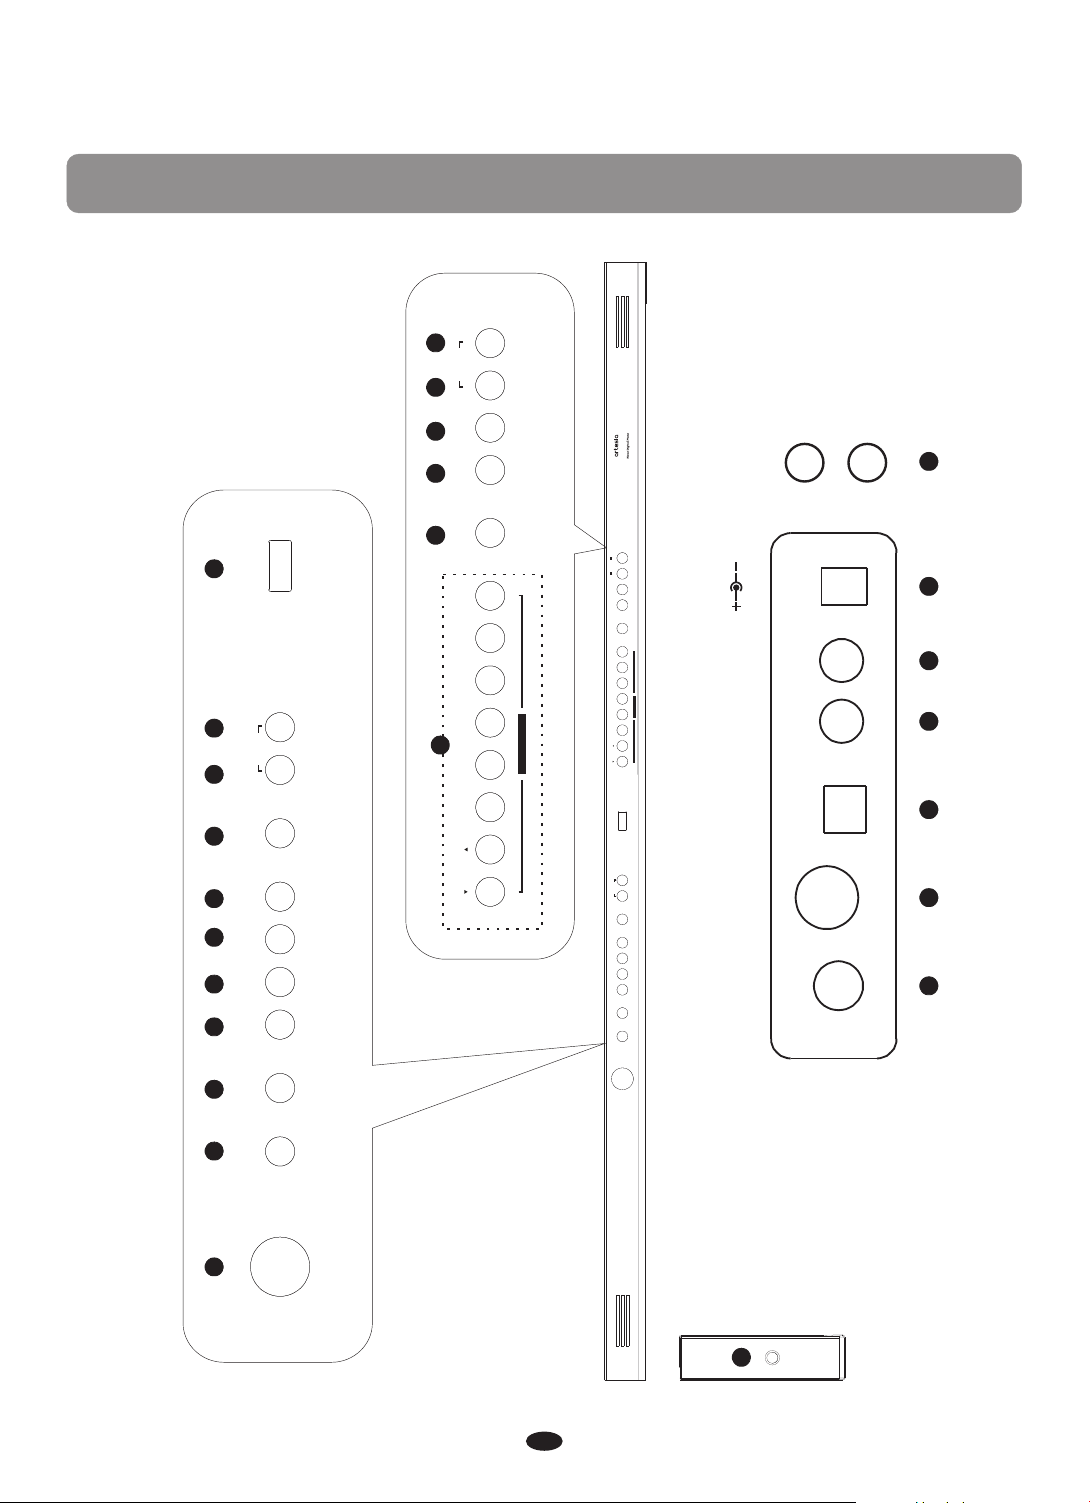
Virgin Musical Instruments Artesia DP-2 User manual

DP-2
Virgin Musical Instruments
Owner s Manual


Thank you for choosing the Artesia DP-2 Digital Piano
Your digital piano is a high quality digital piano featuring an 88 note
hammer action, touch sensitive keyboard and the most advanced PCM
tone generation technology that combined will provide you with a rich
performing and playing experience. You can also record your own
performances or record your own accompaniment to play along to.
Your digital piano is not only great technology but also a stylish piece
of furniture that will look great anywhere in your home. To get the
most out of your instrument, please read this manual thoroughly and
try out the various functions as we take you through them. We hope
your new instrument will continue to entertain you for many years to
come.

Panel Control ····
Setup
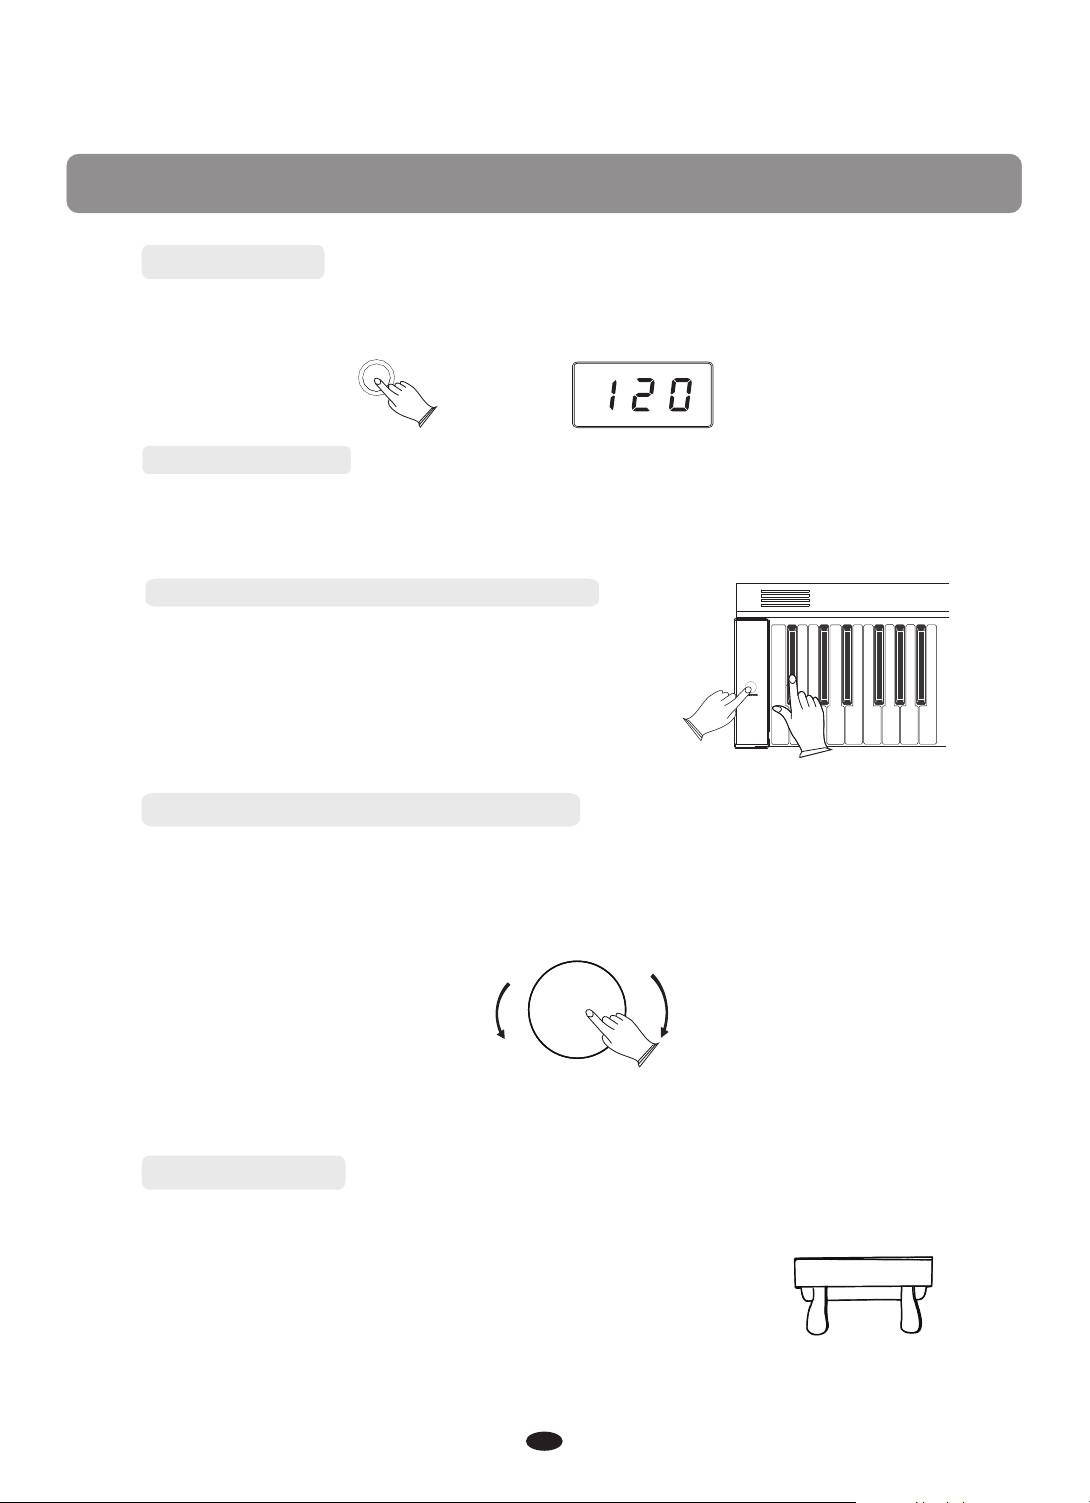
Basic Operation ····································································································
Standby/On ··········································· ································· ································
Auto Standby ·················································· ·······················································
Deactivate Auto Standby Function ······················· ································· ···········
Adjusting Volume & Start Playing ·····································································
Piano Pedals ···········································································································
Playing Demo Songs ·····························································································
[+/YES] & [-/NO] ··································································································
Rear Panel Jack ····································································································
Headphones ···········································································································
MIDI Out ·················································································································
Line In ·····················································································································
Line Out ·················································· ································· ································
USB To Host ··································································· ································· ········
Voice/Effect ···································································································· ······
Selecting a Voice ··································································································
Layer Button ······················································································· ···················
Split Button ············································································································
Reverb ·····················································································································
Chorus ·····················································································································
Duet ·························································································································
Metronome ··············· ································· ·····························································
Touch ·······················································································································
Set Up ·······················································································································
Song Recording ····································································································
Start recording ······································································································
Stop recording ·······································································································
Listen to your recording ·························· ································· ···························
Track Clear ······················································ ································· ······················
Learning Function ·······························································································
Selecting a song ···································································································
Listening to the entire song ···············································································
Practicing the right hand of the selected song ··············································
Practicing the left hand of the selected song ·················································
Turn Off the Learning Function ··········································································
MIDI Function ······ ·································································································
Local On/Off ································· ································· ·········································
Appendix ·················································································································
MIDI Implementation Chart ···············································································
Voice List ················································································································
Factory Reset ····················································· ································· ···················
Specifications ······ ································· ·································································
Assembly Instructions ·························································································
·····································································································
·························································································································
1
3
4
4
4
4
4
4
5
5
6
6
6
7
7
7
8
8
8
9
9
10
10
11
11
12
19
19
19
20
20
21
21
21
22
22
22
23
23
24
24
25
26
27
28

1
Panel Control
2
VOLUME
MIN MAX
DEMO METRONOME LAYER SPLIT REVERB CHORUS SETUP + / YES - / NO GRAND PIANO E.PIANO HARPSICHORD VIBES C.ORGAN STINGS CHOIR A.BASS DUET RECORD PLAY/STOP TRACK 1 TRACK 2
TOUCH
VOICE SELECT
DP -2
TEMPO LEFT RIGHT
SONG
VOLUME
MIN MAX
DEMO METRONOME LAYER SPLIT REVERB CHORUS SETUP + / YES - / NO
TEMPO
GRAND PIANO E.PIANO HARPSICHORD VIBES C.ORGAN STINGS CHOIR A.BASS DUET RECORD PLAY/STOP TRACK 1 TRACK 2
TOUCH
VOICE SELECT
LEFT RIGHT
SONG
POW ER/
STAN DBY
1
3 4 5 6 7 8 9 10 11 12
13 14 15 16 17 18
19 20 21 22 23 24
PHONES 1
PHONES 2
25
LINE INPEDAL LINE OUTMIDI OUT USB TO HOST DC 12V

2
1. STANDBY /ON button
2. VOLUME Data Control knob
3. DEMO button
4. METRONOME button
5. LAYER button
6. SPLIT button
7. REVERB button
8. CHORUS button
9. SETUP button
10. +/YES button
11. -/NO button
12. LED display
13. Voice Select buttons
14. DUET button
15. RECORD button
16. PLAY/STOP button
17. TRACK 1 button
18. TRACK 2 button
Front Panel
Rear Panel
19. PEDAL
20. MIDI OUT JACK
21. USB TO HOST JACK
22. LINE IN JACK
23. LINE OUT JACK
24. DC JACK
25. HEADPHONE JACKS
JACK

Setup
3
You are no doubt eager to play your new piano instrument, but first please
make sure you have completed the following setup steps:
1) Follow the assembly instructions as outlined on page 28.
2) Once the piano is securely assembled, connect the plug of the foot pedal
unit into the pedal jack located on the rear panel.
3) Plug the other end of the power cable into the power outlet.
NOTE
1. Ensure the piano is turned off before connecting and disconnecting the power.
2. Turn the volume knob to its minimum level before turning on the power.
Soft Sustain

4
Basic Operation
Adjusting Volume & Start Playing
The speaker system in your piano is very powerful and can be overpowering
in some rooms. Adjust the [VOLUME] control to a 12 o'clock position as a safe
starting point. You can adjust the volume at any time even while you are playing.
Now play the keyboard. You should hear the rich tone of the default Grand Piano
sound.
Piano Pedals
Standby/On
Press the [STANDBY/ON] button to turn on the power and the LCD display will
illuminate.
Auto Standby
Deactivate Auto Standby Function
Your piano will switch off automatically after 30 minutes of inactivity.
In this case, press the [STANDBY/ON] button to turn on the power.
To deactivate the Auto Standby Function: hold the first
white key and first black key from the left
side of the keyboard at the same time and then press
the [STANDBY/ON] button.
MIN MAX
VOLUME
Soft Pedal(left):
The Soft Pedal controls the sound volume. Press the pedal
to decrease the output sound volume.
Sustain(right):
It performs the same function as the damper pedal on an
actual acoustic piano, letting you sustain the sound of
the voices even after releasing your fingers from the keys.
Soft Sustain
POWER/
STANDBY

5
Playing Demo Songs
DEMO
■Listen to Demo Songs
There are 8 demo songs for you to play individually. Here's how to select
and play the demo songs.
Press the [DEMO] button to enter Demo Mode.
The display will show “,” and the button will flash,
se the [+/YES] / [-/NO] buttons to
select the song you want to play.
then the demo
songs will play in sequence. You can u
+ / YES - / NO
TEMPO
Parameter adjusting buttons.
[+ / YES] & [- / NO]
Press the [DEMO] button again to stop playing.
In this mode, you also can use the direct-selecting voice button to select
the desired demo song.
GRAND PIANO E.PIANO HARPSICHORD VIBES C.ORGAN STINGS CHOIR A.BASS
TOUCH
VOICE SELECT

6
Rear Panel Jack
Headphones
This piano is equipped with two sets of standard stereo headphone jacks to
accommodate private practice or late-night playing. The internal speaker system
is automatically shut off when a pair of headphones is plugged into the Headphone
jacks.
MIDI Out
MIDI (Musical Instrument Digital Interface) is a world-standard communication
interface which allows electronic musical instruments to communicate with each
other, by sending and receiving compatible notes, program changes and other
types of MIDI data. You should only plug the MIDI out in to another device
featuring a MIDI input.
NOTE
The MIDI OUT jack transmits MIDI data to another MIDI device.
MIDI OUT
MIDI IN
PHONES 1
PHONES 2

7
Line In
The audio output from other sound system connected to the LINE IN jack on the
bottom panel can be mixed with the sound of the unit. This function is convenient
when you want to play along with a favorite song.
this
instrument, and enjoy it on this instrument or use it for accompany
Using USB To Host
This product allows the transfer of MIDI information over USB to a laptop,
tablet or smartphone. As complicated as this might sound, it's actually pretty
straight forward. This piano is USB Class Compliant; therefore there is no need
to install a driver to enable it to work with a computer. Simply just plug it in and
the computer's operating system will do the rest. The piano will work with all
standard MIDI based computer software.
USB AUDIO interface is a digital audio interface. By USB cable, you can digitally
transfer intact audio signals from a Laptop, Tablet or Smartphone to
when you
play this instrument; likewise,you can transfer intact audio signals of the
instrument to Laptop, Tablet or Smartphone to record and edit music.
LINE IN
Line Out
The piano's stereo RCA line output can be used to deliver the output of the
piano to a keyboard amplifier, stereo sound system, mixing console or tape
recorder.
The piano's internal sound system will remain on unless headphones are
plugged in to the Headphone jacks.
LINE OUT
USB to Host

8
Selecting a Voice
Voice/Effect
This piano has 8 instrument voices and a variation of each voice pattern to
choose from. See page 25 for a complete list of all voices.
The digital piano has 8 direct-selecting voice buttons.
When pressing a voice button, the assigned voice number is shown on the
display and the button will light.
You can change the instrument voice by pressing one of the other instrument
voice buttons.
Select the desired voice by pressing the appropriate VOICE button.
In Layer mode two voices may be played simultaneously, each at selected volumes.
Press the [LAYER] button and when the indicator is flashing press a voice button to
select the second voice.
Layer Button
If you do not choose the layer voice within 5 seconds after entering the Layer mode,
it will quit this menu automatically.
If the Layer indicator is not flashing, then pressing a voice select button will change
the voice.
To turn off layer mode: press the [LAYER] button again.
primary
LAYER
GRAND PIANO E.PIANO HARPSICHORD VIBES C.ORGAN STINGS CHOIR A.BASS
TOUCH
VOICE SELECT

9
Split Button
Press the [SPLIT] button to activate split mode, your keyboard will be split into
two sections that play different voices on the left and right sides of the keyboard.
To activate Split mode: press the [SPLIT] button, then when the Split indicator is
flashing press a voice select button to select the .
If you do not choose the left voice within 5 seconds after entering the split mode,
it will quit this menu automatically.
When the Split indicator is not flashing, then pressing a voice select button will
change the voice.
To turn off split mode: press the [SPLIT] button again.
left voice
right
SPLIT
The [REVERB] button selects a number of digital reverb effects that you can
use for extra depth and expressive power.
Pressing the [REVERB] button will turn on or turn off the reverb effect.
The default reverb type is room 3 .
When the reverb mode is turned on, you can
use the buttons to select reverb type.
“ ”
[+/YES] and [-/NO]
Reverb
REVERB
01 02 03 04 05 06 07 08
Hall1 1 Stage2 Plate Hall2 Room1 Room2 Room3 Stage
00
Off
The reverb types in the list below can be selected from the reverb display.
To change the reverb level: see page 14

10
off Chorus1 Chorus2 Chorus3 Feedback Flanger1 ShortDelay
When the chorus mode is turned on, you can press the
buttons to select chorus type.
The chorus types in the list below can be selected from the chorus display.
[+/YES] and [-/NO]
Flanger2
ShortDe-
layFb
Chorus
Shimmering, broadening effect that is added to your selected instrument voice.
Press the [CHORUS] button to turn on or turn off the chorus effect.(Default:00)
CHORUS
] button to select mode. In this mode, the keyboard will be
DUET (Teacher's Mode)
Press the [DUET
split into two playing areas.
Right: from C#3 to C7 Left: from
A-1 to C3
DUET
DUET
To change the Chorus Level see page 15.
01 02 03 04 05 06 07 08
00
This will be very helpful when a student and teacher use the piano at the same
time as they will be able to play the same piano sound in the same octave.
Press [ ] button again to exit the DUET mode.
While the feature is selected using the optional 3 lever pedal, the pedals
automatically switch in a different configuration where there are 2 Sustain pedals,
one for the left and one for the right part of the keyboard.
DUET
DUET

11
Metronome
Metronome is a convenient feature for practice.
METRONOMEPress the [ ] button to turn the metronome off or on.
While holding down the METRONOME use the [+/YES] and [-/NO]
buttons to change the time signature of the metronome .
Time signatures: 2/2, 1/4, 2/4, 3/4, 4/4, 5/4, 6/4, 3/8, 6/8, 7/8, 9/8, 12/8.
[ ] button
METRONOME
When the metronome mode is on.
Use the + / YES] / [- / NO] button [ to change the tempo value range from 20
to280 BPM (beats per minute).
Touch
●Adjusting the Metronome Tempo
●Time signature
E.PIANO
TOUCH
You can press the [GRAND PIANO] and [E.PIANO] buttons at the same time to
Then use the [TOUCH / ]
the touch type.
enter the touch function.
[+/YES] and [-/NO] buttons or buttons to select
The touch function provides six different types of keyboard touch sensitivity
that you can try to see which is the best for your playing style: S-Low,
S-Normal,S-High,L-Low,L-Normal,L-High.(Default: 02 S-Normal).
GRAND PIANO
METRONOME + / YES - / NO
TEMPO
+ / YES - / NO
TEMPO
+ / YES - / NO
TEMPO

12
Setup
Press the [SETUP] button repeatedly to select the function, see the table below:
Function LCD Display Range Default
Main Voice Volume
Split Voice Volume
Layer Voice Volume
Reverb Type
Reverb Level
Chorus Type
Chorus Level
Tune
Transpose
Local
EQ Bass
EQ Treble
Song Grading
Reset
127
127
65
100
05
18
00
18
00
00
On
00
00
On
Metronome Voice Volume
F01
F02
F03
F04
F05
F06
F07
F08
F09
F10
F11
F12
F13
F14
F15
00-127
00-127
00-127
00-127
00-08
00-63
00-08
00-63
-64-63
-12-12
On/Off
-12-12
-12-12
On/Off

13
●Main Voice Volume
In this function you can set the Main Instrument Voice Volume.
Press the [SETUP] button repeatedly to select“F01”, then press the
[+/Yes] button to confirm
estore the
default value
the selection, then use the [+/Yes] and[-/No]
buttons Range: 00 ~ 127.
Press the [+/Yes] and[-/No] buttons at the same times to r
increase or decrease the value.
: 127
SETUP
Split Voice Volume●
In this function you can set the Split Voice Volume.
Press the [SETUP] button repeatedly to select“F02”, then press the
[+/Yes] button to confirm
estore the
default value
the selection, then use the [+/Yes] and[-/No]
buttons Range: 00 ~ 127.
Press the [+/Yes] and[-/No] buttons at the same times to r
increase or decrease the value.
: 127
Dual Voice Volume●
In this function you can set the Dual Voice Volume.
Press the [SETUP] button repeatedly to select“F03”, then press the
[+/Yes] button to confirm
estore the
default value
the selection, then use the [+/Yes] and[-/No]
buttons Range: 00 ~ 127.
Press the [+/Yes] and[-/No] buttons at the same times to r
increase or decrease the value.
: 65
+ / YES - / NO
TEMPO
SETUP + / YES - / NO
TEMPO
SETUP + / YES - / NO
TEMPO

14
●Metronome Volume
In this function you can set the Metronome Volume.
Press the [SETUP] button repeatedly to select“F04”, then press the
[+/Yes] button to confirm
estore the
default value
the selection, then use the [+/Yes] and[-/No]
buttons Range: 00 ~ 127.
Press the [+/Yes] and[-/No] buttons at the same times to r
increase or decrease the value.
: 100
estore the
default value
“ ”
Press the [SETUP] button repeatedly to select F05 , then press the [+/Yes]
button to confirm the selection, then use the [+/Yes] and[-/No] buttons to
select the desired Reverb Type ~
Press the [+/Yes] and[-/No] buttons at the same times to r
. Range: 00 08.
: 05
No reverb effect is produced when you select the reverb type 00 .
●Reverb Type
This function allows you to adjust the reverb depth for the voice section.
estore the
default value
Press the [SETUP] button repeatedly to select F06 , then press the [+/Yes]
button to confirm the selection, then use the [+/Yes] and[-/No] buttons to
adjust the value. : 00 ~ 63
Press the [+/Yes] and[-/No] buttons at the same times to r
Range .
: 18
●Reverb Level
SETUP + / YES - / NO
TEMPO
SETUP + / YES - / NO
TEMPO
SETUP + / YES - / NO
TEMPO

15
●Chorus Type
This function allows you to adjust the chorus depth for the voice section.
Press the [SETUP] button repeatedly to select F08 , then press the [+/Yes]
button to confirm the selection, then use the [+/Yes] and[-/No] buttons to
adjust the value. : 00 ~ 63
Press the [+/Yes] and[-/No] buttons at the same times to r
Range .
: 18
estore the
default value
estore the
default value
“ ”
Press the [SETUP] button repeatedly to select F07 , then press the [+/Yes]
button to confirm the selection, then use the [+/Yes] and[-/No] buttons to
select the desired Chorus Type ~
Press the [+/Yes] and[-/No] buttons at the same times to r
. Range: 00 08.
: 00
No chorus is produced when you select the chorus type 00 .
●Chorus Level
●Tune
This function makes it possible to raise or lower the pitch of your piano.
Press the [SETUP] button repeatedly to select F09 , then press the [+/Yes]
button to confirm the selection, then use the [+/Yes] and[-/No] buttons to
adjust the value. Range:-64 ~ 63.
Press the [+/Yes] and[-/No] buttons at the same times to restore the
default value: 00
SETUP + / YES - / NO
TEMPO
SETUP + / YES - / NO
TEMPO
SETUP + / YES - / NO
TEMPO
Table of contents
Popular Musical Instrument manuals by other brands

SONIC COUTURE
SONIC COUTURE MORPHEUS user guide

Allen Organ Company LLC
Allen Organ Company LLC ADC 1100 series user manual

Allen Organ Company LLC
Allen Organ Company LLC MDS THEATRE II user manual

Allen Organ Company LLC
Allen Organ Company LLC Protege C-19C user guide

BYO Guitar
BYO Guitar Strat Instructions for the user

Bigben
Bigben Idance My Piano 1000 user manual

Studio Logic
Studio Logic acuna88 Operation manual

BOSSCO
BOSSCO BR-1200CD Turbostart

Allen Organ Company LLC
Allen Organ Company LLC MDS-26 owner's manual

Allen Organ Company LLC
Allen Organ Company LLC 3 Manual Series owner's manual

BYO Guitar
BYO Guitar 69 TLine Setting up

Generalmusic
Generalmusic RealPiano pRP6 owner's manual