VisIC SmartWAV 2 User manual

Quick Guide -- Rev 2.0
VIZIC
TECHNOLOGIES
SMARTWAV 2+
MIDI ADAPTER
UPGRAGE DRUM
MODULE SOUNDS

SMARTWAV 2 + MIDI ADAPTER UPGRAGE DRUM MODULE SOUNDS
Quick Guide
Vizic Technologies ©2020 | 1
SmartWAV 2 + MIDI Adapter
Professional MIDI Audio System

SMARTWAV 2 + MIDI ADAPTER UPGRAGE DRUM MODULE SOUNDS
Quick Guide
Vizic Technologies ©2020 | 2
Table Of Contents:
1- SmartWAV 2 + MIDI Adapter ........................................................................3
1.1 Introduction .........................................................................................3
2- Hardware Requirements ………………………...............................................4
2.1 Inserting the MicroSD Card ................................................................5
3- Software Requirements …..............................................................................6
3.1 MicroSD Card .wav Files Management ............................................7
3.2 MicroSD Card Folders Management .................................................8
3.3 The MIDIConfig.txt File .......................................................................10
4- Getting Ready –Alesis® Nitro …………………….........................................11
4.1 Hardware Connections .....................................................................11
4.2 MicroSD .wav Files ..............................................................................11
4.3 MicroSD Card “MIDIConfig.txt” File Configuration ........................13
4.4 Nitro Drum Module Configuration ...................................................14
5- Getting Ready –Roland® TD-25 ………………….........................................16
5.1 Hardware Connections .....................................................................17
5.2 MicroSD .wav Files ..............................................................................17
5.3 MicroSD Card “MIDIConfig.txt” File Configuration ........................18
5.4 TD-25 Drum Module Configuration ...................................................19
6- Formatting MicroSD Card ………...……………….........................................21

SMARTWAV 2 + MIDI ADAPTER UPGRAGE DRUM MODULE SOUNDS
Quick Guide
Vizic Technologies ©2020 | 3
1- SmartWAV 2 + MIDI Adapter
1.1- Introduction:
The SmartWAV 2 is an Intellectual
Property smart high-end audio
processor, when mounted on the
MIDI Adapter board, it is called the
SmartWAV2 + MIDI Adapter and the
processor always operates in “MIDI
Mode”.
The system is therefore a professional
MIDI receiver, with high-quality
audio track/sample triggering via
MIDI commands.
The processor supports 8/16bit, 8Khz-48Khz, mono/stereo, “.WAV”files.
The main goal of the SmartWAV 2 + MIDI Adapter it’s to bring the
easiest way to evaluate the MIDI mode of the bare SmartWAV 2
processor board and provide simple inputs and outputs as any other
commercial musical product, this way any user without the
experience in wiring electronics can operate the system.
This document covers a simple tutorial on how to upgrade the sounds
of an Alesis®Nitro and a Roland®TD-25 drum sound modules, however
the same procedure applies for any drum module with a 5-pin DIN
MIDI Out. For more detailed information about MIDI operation please
refer to SmartWAV2-MIDI.pdf document.
For detailed hardware specifications of the SmartWAV 2 + MIDI
Adapter refer to the SmartWAV2+MIDI Adapter_Datasheet.pdf.

SMARTWAV 2 + MIDI ADAPTER UPGRAGE DRUM MODULE SOUNDS
Quick Guide
Vizic Technologies ©2020 | 4
2- Hardware Requirements
The required hardware to operate the SmartWAV2 + MIDI Adapter is
the next:
1.- AC/DC power supply 5V-12V DC out with any polarity. (D’Addario
PW-CT-9V or a Boss PSA are recommended). It is advised to use a
noise-filtered AC/DC adapter like the recommended ones.
2.- Standard universal 5-Pin DIN MIDI cable.
3a.- For connection of SmartWAV 2 + MIDI Adapter to a PA mixer,
audio interface or powered speaker with 1/4” TS or TRS line-in inputs;
use single TS 1/4” plug cable for mono, Single TRS 1/4” plug cable for
single stereo or dual TS 1/4” plug cables for dual stereo sound.
3b.- For connection of SmartWAV 2 + MIDI Adapter to the drum sound
module auxiliary input, use a stereo 1/4” to 3.5mm adapter, and a
3.5mm plug cable.
4.- MicroSD card, SD or SDHC type, formatted with FAT32, a 32GB or
less capacity is recommended. (Refer to section 6 Format uSD card).

SMARTWAV 2 + MIDI ADAPTER UPGRAGE DRUM MODULE SOUNDS
Quick Guide
Vizic Technologies ©2020 | 5
2.1- Inserting the MicroSD Card
The SmartWAV2+MIDI Adapter contains a special locking microSD
card socket, this ensures the card stays in place and avoids
accidental falling, placing and lock of this socket can be tricky,
please follow the next instructions:

SMARTWAV 2 + MIDI ADAPTER UPGRAGE DRUM MODULE SOUNDS
Quick Guide
Vizic Technologies ©2020 | 6
3- Software Requirements
The SmartWAV2+MIDI Adapter is a MIDI controlled device that triggers
audio samples/tracks, those samples are read from the inserted
microSD card, the audio samples to be triggered must follow the next
audio format:
-Uncompressed WAVE(.WAV or .wav) format.
-Mono(1) or Stereo(2) channels.
-8/16 bits per sample.
-8khz to 44.1khz sample rate.
Any windows/MAC computer can upload .wav files to the microSD
card, no special software or drivers are required for this operation.
There are many software that can convert audio files into .wav files, a
free online software is the next: https://online-audio-converter.com/
If use of the online-audio-convert, please mark as follows:

SMARTWAV 2 + MIDI ADAPTER UPGRAGE DRUM MODULE SOUNDS
Quick Guide
Vizic Technologies ©2020 | 7
3.1- MicroSD Card .wav Files Management
SmartWAV2 triggers audio tracks based on the received NoteON /
NoteOFF MIDI commands, using the parameter Note Number. The
“.wav” files must exist and be stored/named as note numbers in the
next manner:
-MIDI Note 0 -must be stored/named as “000.wav”.
-MIDI Note 64 -must be stored/named as “064.wav”.
-MIDI Note 127 -must be stored/named as “127.wav”.
Please check that the note number/track name is 3 characters long
(filled with zeros) plus the “.wav” extension.
*For more detailed information please refer to the document
SmartWAV2_MIDIMode.pdf, section 6.1.
SmartWAV2 can support 4 velocity layers, but this functionality must
be enabled (section 3.3), so the system can trigger note names with
a suffix ‘a’, ‘b’, ‘c’ or ‘d’ depending on the received velocity
parameter, the next table illustrates how the “.wav” files inside the
microSD card must be named if multi-layer velocity defendant is
enabled:
Note #
Name if Layer Velocity
Disabled(default)
Names if Layer Velocity is Enabled, each note
has 4 “.wav” files.
0
“000.wav”
“000a.wav”, “000b.wav”, “000c.wav”, “000d.wav”
64
“064.wav”
“064a.wav”, “064b.wav”, “064c.wav”, “064d.wav”
127
“127.wav”
“127a.wav”, “127b.wav”, “127c.wav”, “127d.wav”
This functionality is useful for percussion sounds, as for example a
cymbal does not sound equal being hit at slow(a), medium low(b),
medium high(c) or fast(d) speed, user can store different sounding
“.wav” files for those 4 velocity layers. *By default layer velocity is
disabled.
*For more detailed information please refer to the document
SmartWAV2_MIDIMode.pdf, section 7- Layer Velocity.

SMARTWAV 2 + MIDI ADAPTER UPGRAGE DRUM MODULE SOUNDS
Quick Guide
Vizic Technologies ©2020 | 8
3.2- MicroSD Card Folders Management
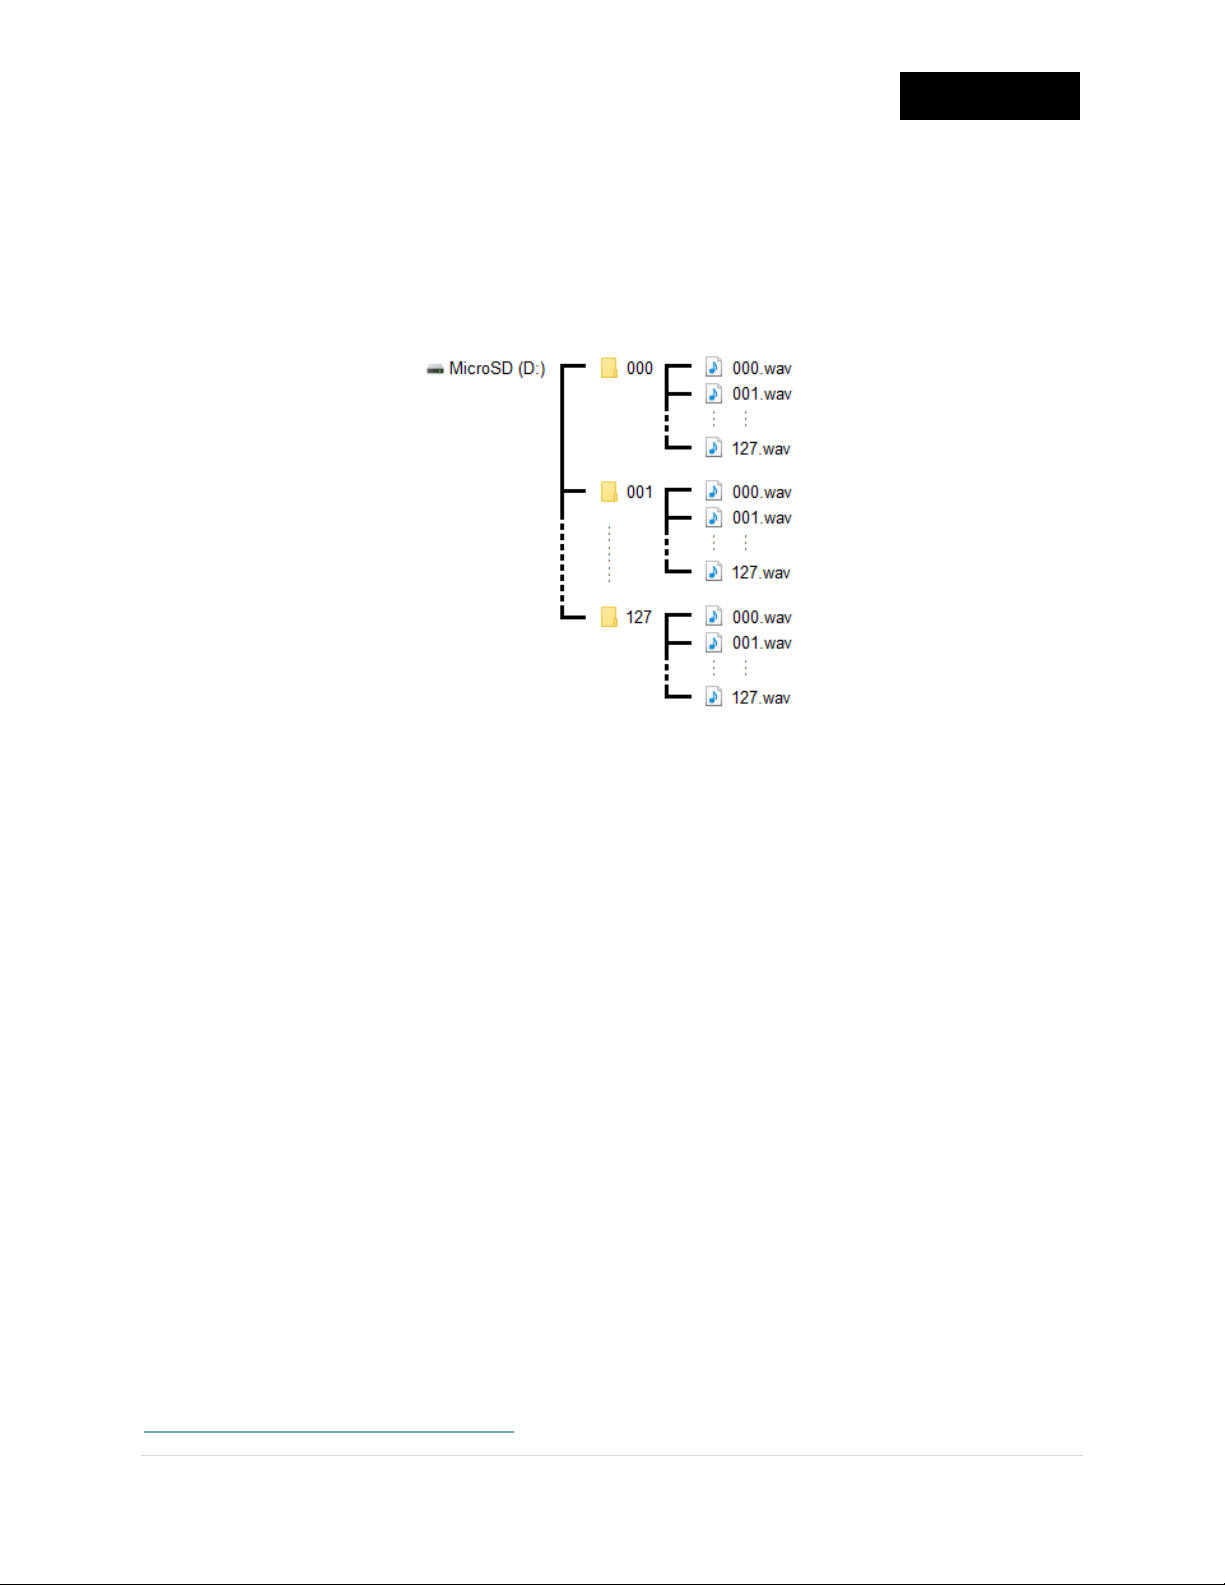
SmartWAV2 can change its internal folders (Therefore its internal .wav
note numbered .wav files to be triggered) based on the received PC
program change commands, using the parameter Program / Patch
Number. The folder must exist and be stored / named as 000 to 127
numbers in the next manner:
-Program/Patch/Kit Number 0 refers to a folder named “000”.
-Program/Patch/Kit Number 64 refers to a folder named “064”.
-Program/Patch/Kit Number 127 refers to a folder named “127”.
Please check that the folder name is 3 chars long (filled with zeros).
*For more detailed information please refer to the document
SmartWAV2_MIDIMode.pdf, section 6.2.
Not all the drum modules work the same or support/send the same
MIDI commands; all drum modules do support NoteOn/NoteOff
commands used to trigger .wav files, but only some modules support
PC program-change commands used to change folders, those PC
commands are generated when the user changes the drum kit/bank
number of the drum module.
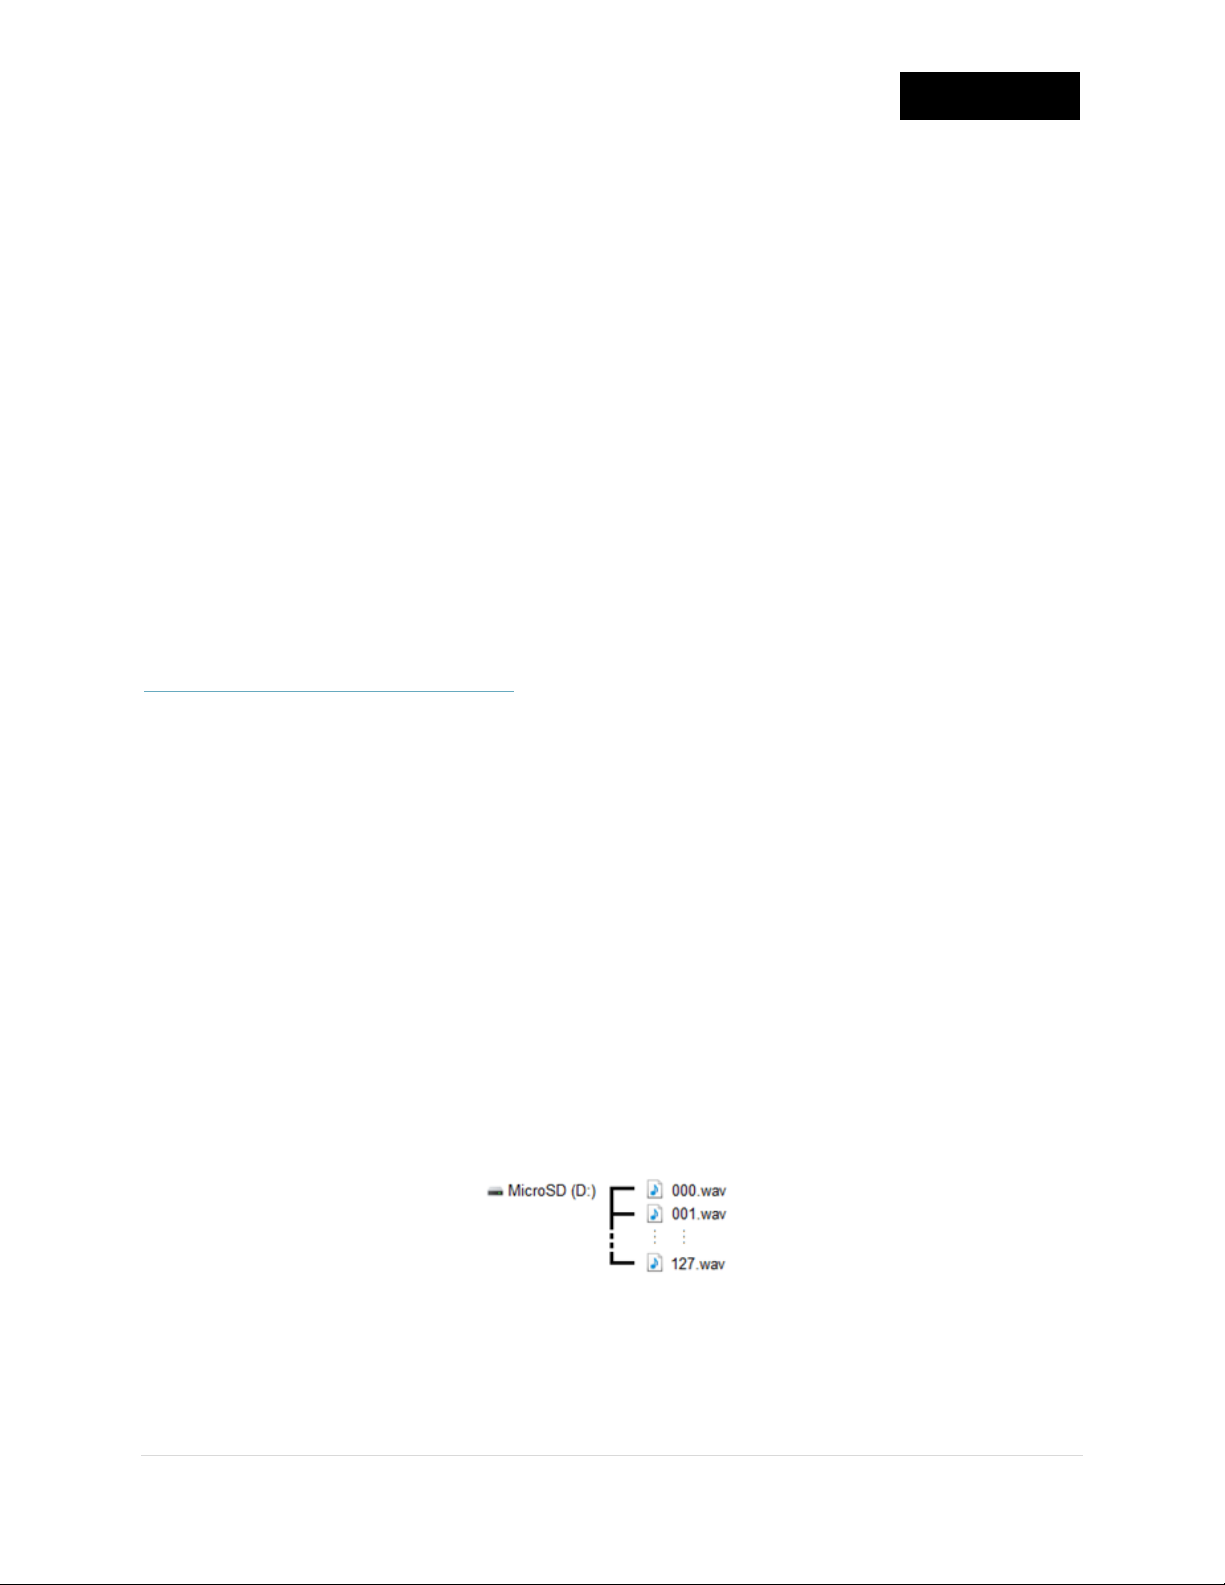
-For modules that NOT support PC program-change commands (ex.
Alesis® Nitro module), is recommended to place all the .wav audio
files directly in the microSD card root path:
Recommended MicroSD Card .wav Files Location
Based on the above, as no PC command will be received, the
SmartWAV2+MIDI Adapter will always point to the microSD card root
path, triggering the received NoteON commands with the available
note numbered xxx.wav files.

SMARTWAV 2 + MIDI ADAPTER UPGRAGE DRUM MODULE SOUNDS
Quick Guide
Vizic Technologies ©2020 | 9
-For modules that Support PC program-change commands (ex.
Roland TD-25® module), is recommended to place all the note
numbered .wav audio files inside folders that are placed in the
microSD card root path:
Recommended MicroSD Card Folders and .wav Files Location
The Image shows folders from 000 to 127 that are placed in the
microSD root path, those folders denote Program Change possible
values or drum kits numbers, drum modules that support and send PC
program change will cause SmartWAV2 to enter inside those
numbered folders, SmartWAV2 will further trigger NoteON command
audio tracks that are inside the newly entered folder.
Based on the above, when a drum kit of the module is selected via its
module knobs, a PC command will be generated and the internal
folder number of the microSD card will change according to the PC
command, so all the future received NoteON commands will trigger
only the note numbered xxx.wav samples that are stored inside the
new folder.
It is not strictly necessary that the microSD card contains all the 000 to
127 folders, neither all the 000 to 127 “.wav” notes inside each folder,
the microSD card can be loaded with only the folders and “.wav”
notes that will be required by the audio application.
*For more detailed information please refer to the document
SmartWAV2_MIDIMode.pdf, section 8.

SMARTWAV 2 + MIDI ADAPTER UPGRAGE DRUM MODULE SOUNDS
Quick Guide
Vizic Technologies ©2020 | 10
3.3- The MIDIConfig.txt File
At system boot/start SmartWAV2 always look for a file called
“MIDIConfig.txt” placed in the microSD card root path, this file is used
to provide SmartWAV2 with some pre-configurations and parameters
during system boot, there are several configurations but the most used
and needed are the next:
-Note OFF Disable
-Layer Velocity
-Hi-Hat Close Note
-Hi-Hat Open Note
The above parameters are explained next in the Getting Ready
sections.
*For more detailed information please refer to the document
SmartWAV2_MIDIMode.pdf, section 7.

SMARTWAV 2 + MIDI ADAPTER UPGRAGE DRUM MODULE SOUNDS
Quick Guide
Vizic Technologies ©2020 | 11
4- Getting Ready - Alesis® Nitro
4.1- Hardware Connections
While all hardware is powered OFF:
-Push and rise the hinge of the microSD card socket, place and fit the
microSD card, close the hinge, then pull to lock and secure the
microSD card from falling.
-Connect one side of the 5-pin MIDI cable to the MIDI OUT jack of the
drum module, then connect the other side to the MIDI IN of the
SmartWAV2 + MIDI Adapter board.
-Connect one side of a 3.5mm stereo cable to the aux input of the
drum module, insert the other side to the 3.5mm to 1/4” adapter and
then plug the adapter end to the TRS STEREO 1/4” labeled input of
SmartWAV2 + MIDI Adapter board.
-Roll the volume potentiometer of SmartWAV2 + MIDI Adapter to the
lowest position.
-Plug the DC adapter power supply to the SmartWAV2 + MIDI Adapter
DC Jack input, the blue LED must power on.
-Turn On the Nitro module and slowly adjust volumes.
4.2- MicroSD Card .wav Files
The inserted microSD card must be loaded with .wav samples
according to the previous document section 3, the samples must
sound as high-volume possible but not clip, this will give a good noise
to sound ratio performance. For the Nitro module: .wav files must be
loaded in the microSD root path as the Nitro module does not support
/ send Program Change commands.

SMARTWAV 2 + MIDI ADAPTER UPGRAGE DRUM MODULE SOUNDS
Quick Guide
Vizic Technologies ©2020 | 12
The Nitro module by default is configured to send MIDI NoteON /
NoteOFF, note number parameters based on the next table:
*For more detailed information please refer to the Nitro user’s manual:
Appendix section on page 38.
The previous MIDI note numbers table shows that if the Nitro snare
drum pad is hit, the module will send a MIDI NoteON command with
note parameter of 38, therefore, if it is required for SmartWAV2 to
trigger a drum sample when the snare is hit, the .wav audio file inside
the microSD card must be named:
Note #
If Layer Velocity
Disabled(default)
If Layer Velocity Enabled, each note has 4
“.wav” files.
34
“034.wav”
“034a.wav”, “034b.wav”, “034c.wav”, “034d.wav”
*For more detailed information please refer to the document
SmartWAV2_MIDIMode.pdf, section 6.1 and 7- Layer Velocity.

SMARTWAV 2 + MIDI ADAPTER UPGRAGE DRUM MODULE SOUNDS
Quick Guide
Vizic Technologies ©2020 | 13
4.3- MicroSD Card “MIDIConfig.txt” File Configuration
Creation of the “MIDIConfig.txt” file, for this tutorial only the next
parameters must be contained in the txt file:
-Note OFF Disable: If the file contains the word NOTEOFFDISABLE,
SmartWAV2 will disable/ignore all Note OFF commands during system
run, this functionality is great for percussion sounds, where there is no
need to receive or must ignore Note OFF commands that can cut /
stop the sound.
-Layer Velocity: If the file contains the word LAYERVEL, SmartWAV2 will
enable the velocity layering functionality of the system, this means
that during system execution, received notes will trigger tracks based
not only on the note number, but also on the velocity parameter.
Apart from many MIDI trigger systems that doesn’t support it,
SmartWAV 2 processor supports configurations so a real Hi-Hat pedal
action (stopping the sound of an open hi-hat ringing sound when the
hi-hat pedal is stomped/closed), this can be simulated by providing
two note numbers, the HHCLOSENOTE and the HHOPENNOTE, the next
paragraphs will describe those keywords:
-Hi-Hat Close Note: If the file contains the word HHCLOSENOTE:
followed by a number between 0-127, SmartWAV2 will take this note
and save it during system execution.
-Hi-Hat Open Note: If the file contains the word HHOPENNOTE:
followed by a number between 0-127, SmartWAV2 will take this note
and if during system execution, a “Note On” command with note
number same as the saved HHCLOSENOTE is received, the system will
automatically stop playing the track number HHOPENNOTE (open hi-
hat note sound), this will simulate a hi-hat close pedal action. This
functionality is intended for drum modules / percussion applications.

SMARTWAV 2 + MIDI ADAPTER UPGRAGE DRUM MODULE SOUNDS
Quick Guide
Vizic Technologies ©2020 | 14
Based on the default Pad MIDI Note Numbers of Nitro module, the Hi-
Hat Open note number is the 46, and the Hi-Hat Pedal is the 44,so the
MIDIConfig.txt file will be created as follows:
Contents of the Suggested “MIDIConfig.txt” File
*For more detailed information please refer to the document
SmartWAV2_MIDIMode.pdf, section 7.
4.4- Nitro Drum Module Configuration
SmartWAV2 + MIDI Adapter can be used in two ways:
1.-To completely replace all the Nitro drum module sounds of a kit.
To deactivate/mute/bypass the sounds of the Nitro module: press
Utility button, then press Page/Select, go to LOC(Local Mode), and set
it to OFF.
*For more detailed information please refer to the Nitro user’s manual:
MIDI Settings section on page 9.

SMARTWAV 2 + MIDI ADAPTER UPGRAGE DRUM MODULE SOUNDS
Quick Guide
Vizic Technologies ©2020 | 15
2.-To replace only a drum pad sound, or to mix/layer Nitro drum
module sounds plus SmartWAV2 sounds, as an example: Nitro module
snare sound + SmartWAV2 tambourine sound, both triggered each
time the snare drum pad is hit.
Hit the pad to configure, press Voice, then press Page/Select, go to
MID(MIDI note) and adjust this number to match the note number of
the microSD card audio .wav file to be triggered.
Secondly, press Page/Select, go to VOL(Pad Volume) and adjust the
volume of the Nitro drum sound, if the volume is set to zero, then all
the sound will be replaced by the SmartWAV2, but if this volume
parameter is set to a medium level, then it will be mixed/layered with
the SmartWAV2.
*For more detailed information please refer to the Nitro user’s manual:
Editing and Saving Drum Kits section on page 6.

SMARTWAV 2 + MIDI ADAPTER UPGRAGE DRUM MODULE SOUNDS
Quick Guide
Vizic Technologies ©2020 | 16
5- Getting Ready - Roland® TD-25
5.1- Hardware Connections
While all hardware is powered OFF:
-Push and rise the hinge of the microSD card socket, place and fit the
microSD card, close the hinge, then pull to lock and secure the
microSD card from falling.
-Connect one side of the 5-pin MIDI cable to the MIDI OUT jack of the
drum module, then connect the other side to the MIDI IN of the
SmartWAV2 + MIDI Adapter board.
-Connect one side of a 3.5mm stereo cable to the aux input of the
drum module, insert the other side to the 3.5mm to 1/4” adapter and
then plug the adapter end to the TRS STEREO 1/4” labeled input of
SmartWAV2 + MIDI Adapter board.
-Roll the volume potentiometer of SmartWAV2 + MIDI Adapter to the
lowest position.
-Plug the DC adapter power supply to the SmartWAV2 + MIDI Adapter
DC Jack input, the blue LED must power on.
-Turn On the TD-25 module and slowly adjust volumes.
5.2- MicroSD Card .wav Files
The inserted microSD card must be loaded with .wav samples
according to the previous document section 3. The TD-25 module
support/send PC commands when a drum kit is selected, .wav files
must be loaded inside 000 to 035 named folders, the TD-25 has 36
selectable kits (0 to 35). As an example if the first available kit is
selected (Program change #000), then .wav samples of folder 000 will
be triggered.

SMARTWAV 2 + MIDI ADAPTER UPGRAGE DRUM MODULE SOUNDS
Quick Guide
Vizic Technologies ©2020 | 17
The TD-25 module by default is configured to send MIDI NoteON /
NoteOFF, note number parameters based on the next table:
*For more detailed information please refer to the Roland TD-25 user’s
manual.
The previous MIDI note numbers table shows that if the TD-25 snare
drum pad is hit, the module will send a MIDI NoteON command with
note parameter of 38, therefore, if it is required for SmartWAV2 to
trigger a drum sample when the snare is hit, the .wav audio file inside
the microSD card must be named:
Note #
If Layer Velocity
Disabled(default)
If Layer Velocity Enabled, each note has 4
“.wav” files.
34
“034.wav”
“034a.wav”, “034b.wav”, “034c.wav”, “034d.wav”
*For more detailed information please refer to the document
SmartWAV2_MIDIMode.pdf, section 6.1 and 7- Layer Velocity.

SMARTWAV 2 + MIDI ADAPTER UPGRAGE DRUM MODULE SOUNDS
Quick Guide
Vizic Technologies ©2020 | 18
5.3- MicroSD Card “MIDIConfig.txt” File Configuration
Creation of the “MIDIConfig.txt” file, for this tutorial only the next
parameters must be contained in the txt file:
-Note OFF Disable: If the file contains the word NOTEOFFDISABLE,
SmartWAV2 will disable/ignore all Note OFF commands during system
run, this functionality is great for percussion sounds, where there is no
need to receive or must ignore Note OFF commands that can cut /
stop the sound.
-Layer Velocity: If the file contains the word LAYERVEL, SmartWAV2 will
enable the velocity layering functionality of the system, this means
that during system execution, received notes will trigger tracks based
not only on the note number, but also on the velocity parameter.
Apart from many MIDI trigger systems that doesn’t support it,
SmartWAV 2 processor supports configurations so a real Hi-Hat pedal
action (stopping the sound of an open hi-hat ringing sound when the
hi-hat pedal is stomped/closed), this can be simulated by providing
two note numbers, the HHCLOSENOTE and the HHOPENNOTE, the next
paragraphs will describe those keywords:
-Hi-Hat Close Note: If the file contains the word HHCLOSENOTE:
followed by a number between 0-127, SmartWAV2 will take this note
and save it during system execution.
-Hi-Hat Open Note: If the file contains the word HHOPENNOTE:
followed by a number between 0-127, SmartWAV2 will take this note
and if during system execution, a “Note On” command with note
number same as the saved HHCLOSENOTE is received, the system will
automatically stop playing the track number HHOPENNOTE (open hi-
hat note sound), this will simulate a hi-hat close pedal action. This
functionality is intended for drum modules / percussion applications.

SMARTWAV 2 + MIDI ADAPTER UPGRAGE DRUM MODULE SOUNDS
Quick Guide
Vizic Technologies ©2020 | 19
Based on the default Pad MIDI Note Numbers of TD-25 module, the Hi-
Hat Open note number is the 46, and the Hi-Hat Pedal is the 44,so the
MIDIConfig.txt file will be created as follows:
Contents of the Suggested “MIDIConfig.txt” File
*For more detailed information please refer to the document
SmartWAV2_MIDIMode.pdf, section 7.
5.4- TD-25 Drum Module Configuration
SmartWAV2 + MIDI Adapter can be used in two ways:
1.-To completely replace all the TD-25 drum module sounds of a kit.
To deactivate/mute/bypass the sounds of the TD-25 module: press
MENU, then SETUP, scroll to MIDI, select LOCAL CONTROL and turn it to
OFF.
*For more detailed information please refer to the TD-25 Parameter
Guide: MIDI-Related Settings section on page 14.
Table of contents