Vision Sony BRC-H700 User manual

4999DR-162F-03
Sony BRC-H700 Robotic Camera
Requirements
• Robotic Camera Control software option.
• Serial Interface Cable (DB9 to VISCA)
Port Connections
Cable Connectors
Figure 1 DB9 to VISCA Cable
Pinouts
Note: These pinouts do not match the Sony documentation but have
been tested and verified by Ross Video.
FlexDevice™ Installation
To Install the FlexDevice Driver
1. On your computer, open your Web Browser and, in the address
bar, enter the IP address of your frame and press Enter.
2. Enter your username and password as follows when the Login
Dialog Box appears. The default Name is user and Password is
password.
3. Click Other... FlexDevices.
4. Click Browse. A file selection dialog box is displayed.
5. Locate the FlexDevice driver file Robo-Cam_Sony x.x-
###.tar.gz.
6. Click Open/Choose to select the file.
7. Click Install Driver to upload and install the selected driver to
the switcher.
To Initialize the FlexDevice Driver
1. Press HOME Setup Installation Com Setup
FlexDevices.
2. Press Start Driver.
3. Use the Interface knob to select Panel0.
4. Use the Type knob to select FlexCAM.
5. Use the Driver knob to select Sony x.x.
6. Press Accept. You must initialize a separate instance of a driver
for each device you want to control from the switcher.
Switcher Setup
To Set Up Communications
1. Press HOME Setup Installation Com Setup
Type.
•UsetheCom Port knob to select the REMOTE Xport that
you connected the Sony BRC-H700 to.
•UsetheDevice knob to select FlexCAM.
2. Press Select Device.
•UsetheDevice knob to select x_Sony x.x.
3. Press Com Type.
•UsetheType knob to select RS-422.
4. Press Com Settings.
•UsetheBaud knob to select 9600.
•UsetheParity knob to select NONE.
5. Press HOME Confirm.
To Set Up Video Inputs
1. Press HOME Setup Installation BNC BNC
Type.
•UsetheBNC knob to select the input BNC that the Video
output of the BRC-H700 is connected to.
•UsetheType knob to select Robotic Cam.
•UsetheVideo Format knob to select the video format of the
Video output of the camera.
2. Press More Camera Setup.
Switcher Robotic
Camera
Communications REMOTE Port
(female) VISCA RS-422
Port (male)
Video Input BNC Output BNC
Switcher BRC-H700
2 (Rx-) 9 (Tx-)
3 (Tx+) 6 (Rx+)
7 (Rx+) 8 (Tx+)
8 (Tx-) 7 (Rx-)
To Switcher
(male cable end) To Device
(female cable end)
15432
6987
157689432

52
•UsetheController knob to select the BRC-H700.
•UsethePort knob to select the port that you are using on the
BRC-H700.
3. Press Camera Options and use the knobs to set the options.
4. Press HOME Confirm.
Device Setup
The bottom switches on the BRC-H700 that is connected to the
switcher must be set as follows:
Refer to the Sony manual for information on setting the other bottom
buttons on the camera.
If you are daisy chaining multiple Sony BRC-H700s together, use
the following pinouts to connect the one camera to the next.
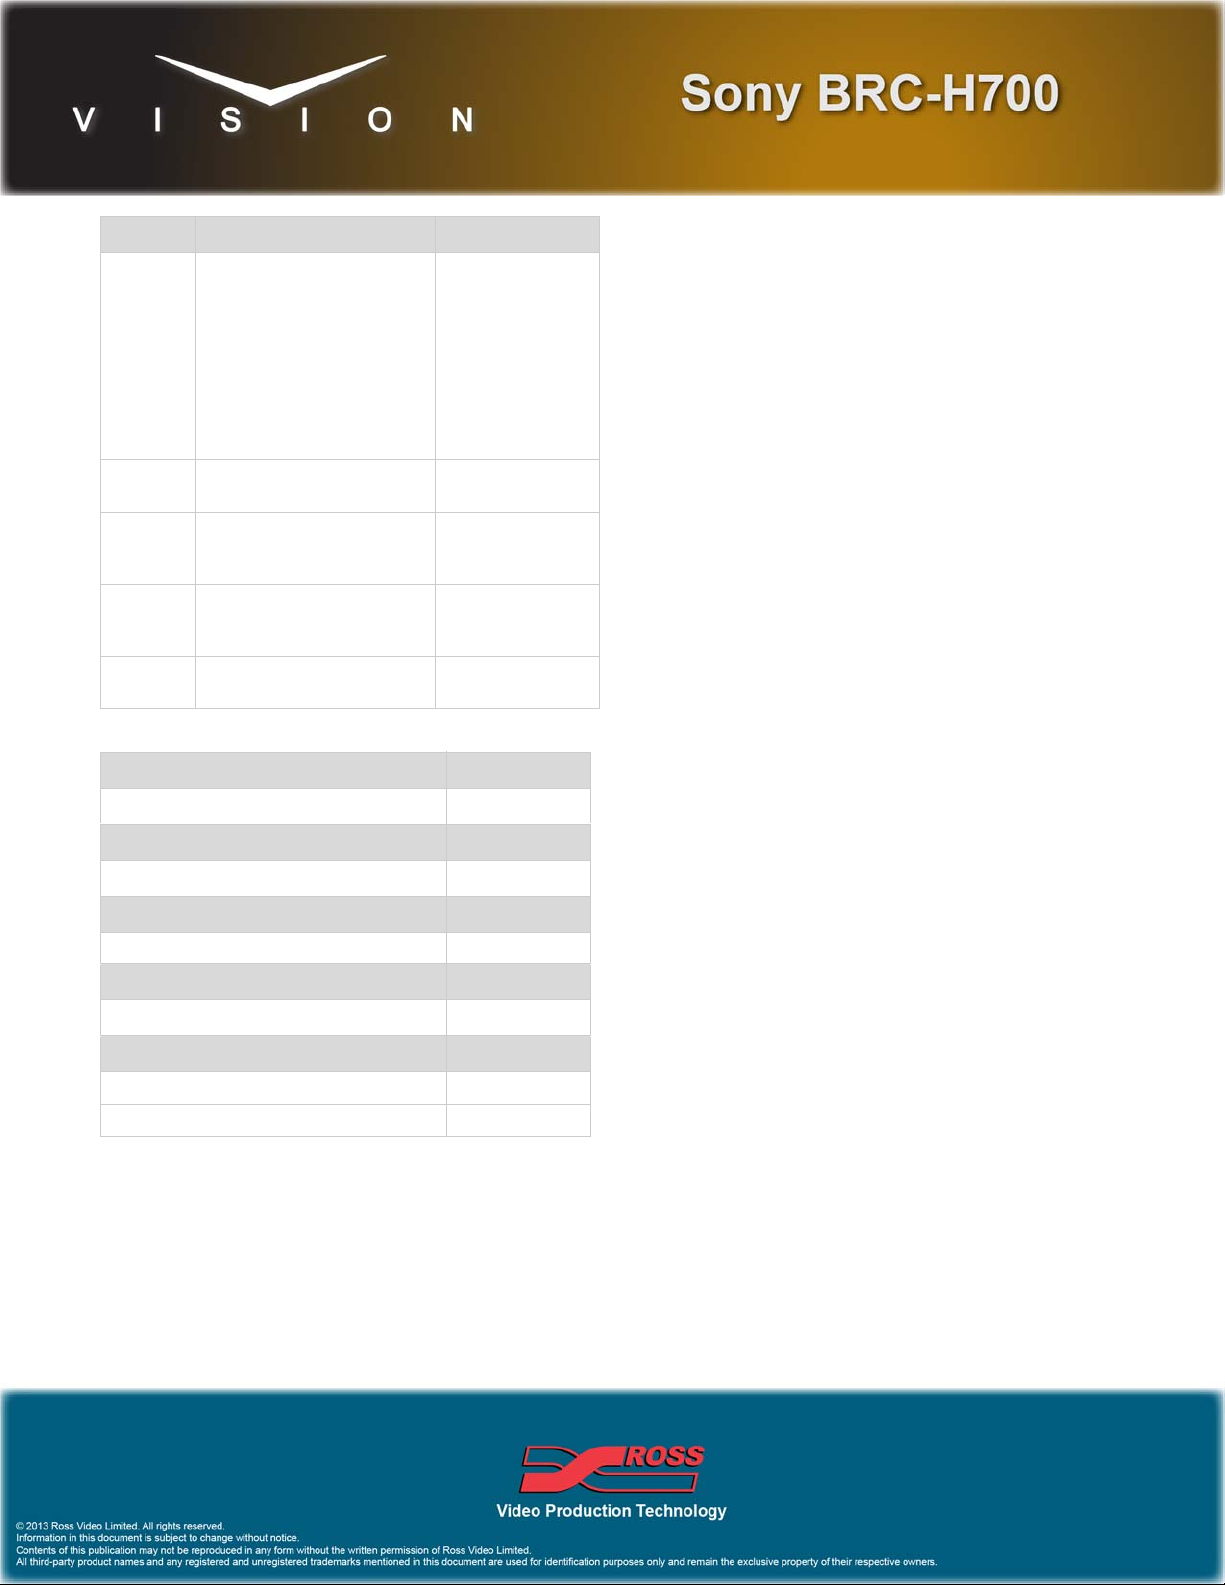
Device Operation
Available settings on the Sony BRC-H700 are dependent on the
current configuration of the camera. Refer to the following table for
settings and dependencies.
Option Description
Pan Invert Use the Value knob to invert the direction that the
camera moves when using the positioner (Yes), or
not (No).
Tilt Invert Use the Value knob to invert the direction that the
camera moves when using the positioner (Yes), or
not (No).
Zoom Invert Use the Value knob to invert the direction that the
camera zooms when using the positioner (Yes), or
not (No).
Focus Invert Use the Value knob to invert the focus direction
when using the positioner (Yes), or not (No).
Iris Invert Use the Value knob to invert the iris direction
when using the positioner (Yes), or not (No).
X Invert Use the Value knob to invert the direction that the
camera moves in the X-axis when using the
positioner (Yes), or not (No).
Y Invert Use the Value knob to invert the direction that the
camera moves in the Y-axis when using the
positioner (Yes), or not (No).
Z Invert Use the Value knob to invert the direction that the
camera moves in the Z-axis when using the
positioner (Yes), or not (No).
Button Value
1Set to ON for 50i, or OFF for 59.94i
signal format.
2 Set to ON for RS-422 communication
3 Set to ON for 38400 baud rate
4Infra-red signal control (OFF)
disables the control
VISCA Out VISCA In
1 (Rx-) 8 (Tx -)
2 (Rx+) 9 (Tx+)
3 (Tx-) 6 (Rx-)
4 (Tx+) 7 (Rx+)
5 (Gnd) 5 (Gnd)
Setting Description Dependency
Focus
Mode Sets whether focus should be
manually or automatically
controlled.
Auto
Exposure Sets which exposure
parameters (Shutter, Gain, Iris/
StepIris) can be controlled and
which are automatically
adjusted.
• AUTO — all parameters are
automatically controlled
• MANUAL — all parameters
are under manual control
• SHUTTER — Shutter speed
is manually controlled, all
other are automatically
controlled
• IRIS — Iris size is manually
controlled, all other are
automatically controlled
• GAIN — Gain is manually
controlled, all others are
automatically controlled
Shutter Adjust the shutter speed of the
camera AutoExposuremust
be set to MANUAL
or SHUTTER.
Gain Adjusts the sensitivity of the
camera. AutoExposuremust
be set to MANUAL
or GAIN.

4999DR-162F-03
Compatibility
White
Balance Sets the white balance, or how
it is adjusted, for the camera.
• AUTO — white balance is
automatically controlled
• OUTDOOR — fixed to
5,800K
• INDOOR — fixed to 3,200K
• MANUAL — RGain and
BGain are unlocked
RGain &
BGain Manually adjust the white
balance White Balance must
be set to MANUAL.
Rshift &
Bshift Adjusts the white balance in
AUTO mode. Less control than
RGain & BGai.n
White Balance must
be set to AUTO.
StepIris Adjust the Iris in step values,
rather than with the positioner. Auto Exposure
Mode must be set to
MANUAL or IRIS.
Iris Limit Limits the Iris settings when
Iris is automatically controlled. Auto Exposure is
not set the IRIS.
Robotic Camera Version
Sony BRC-H700 --
FlexDevice
Sony FlexCAM Driver 1.0
MultiPanel
MultiPanel Support
Automation
OverDrive 12.0
Port Expanders
BSS4
Comtrol DeviceMaster
Setting Description Dependency

54
Other Vision Digital Camera manuals