vissonic VIS-TCAMH-B HD User manual

HD Tracking Camera User Manual
VIS-TCAMH-B HD Video Tracking Camera
User Manual
V1.3 Version
User Manual

HD Tracking Camera User Manual
Catalogue
1Note............................................................................................................................ 1
2Packing List................................................................................................................ 1
3Quick Start.................................................................................................................. 1
4Product Installation..................................................................................................... 2
5About Product............................................................................................................. 2
5.1 Features..................................................................................................................................2
5.2 Product Specification...............................................................................................................3
5.3 Interfaces and Buttons.............................................................................................................4
5.4 Dimension ...............................................................................................................................5
5.5 Remote Control .......................................................................................................................5
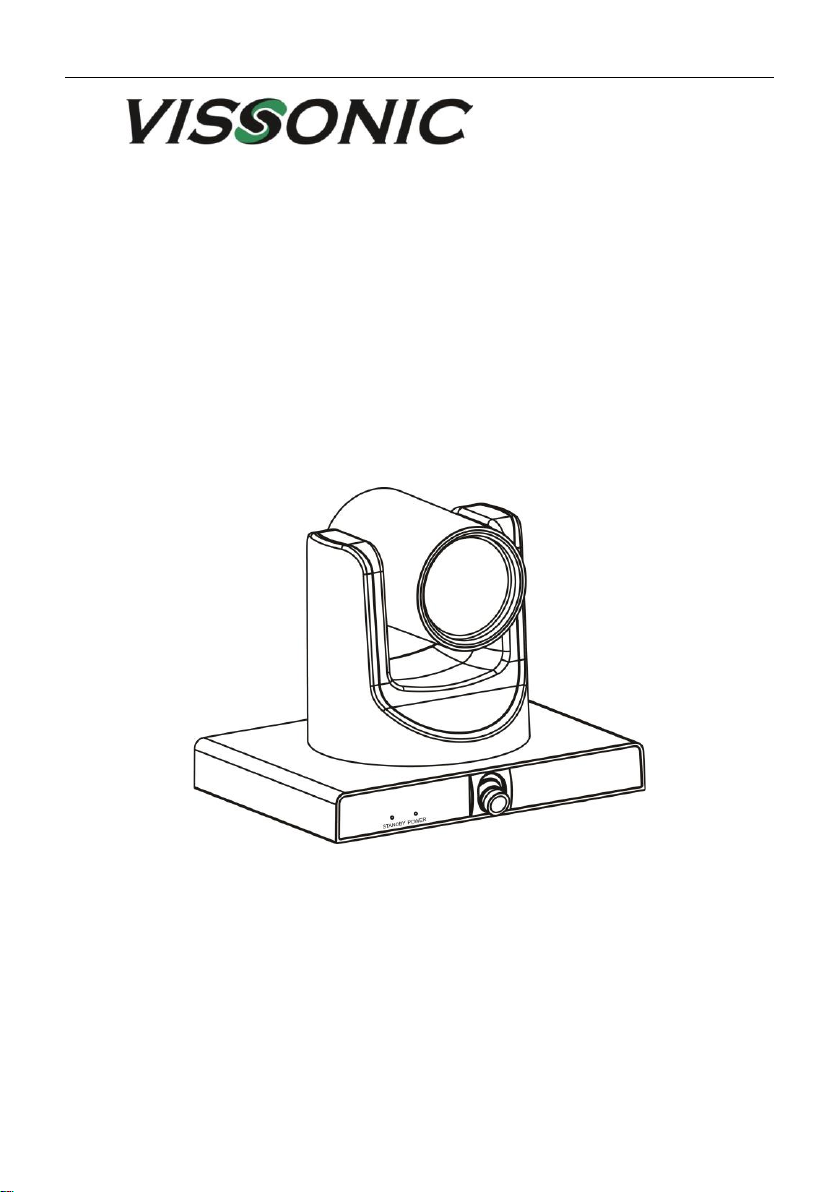
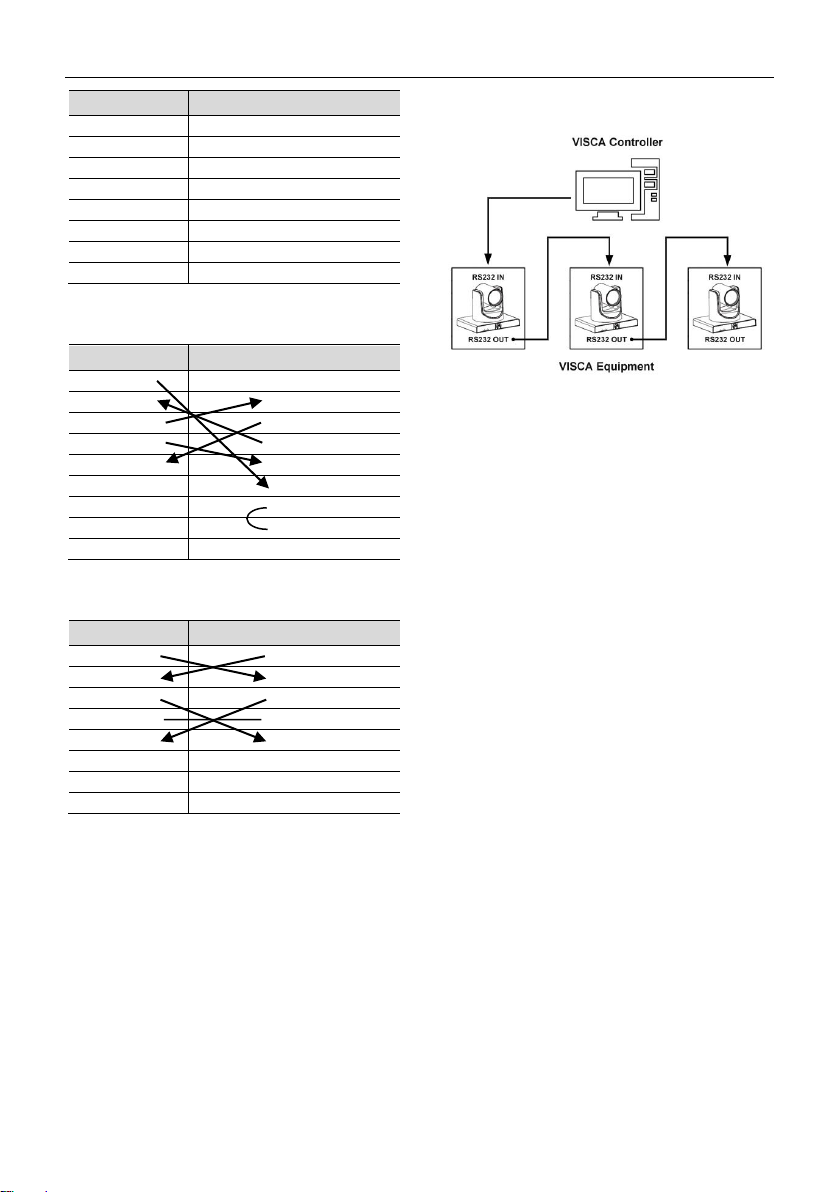
5.6 RS232 Interface.......................................................................................................................6
5.7 VISCA Network........................................................................................................................7
5.8 Serial Communication Control..................................................................................................7
6GUI Settings............................................................................................................... 8
6.1 MENU......................................................................................................................................8
6.2 EXPOSURE.............................................................................................................................8
6.3 COLOR ...................................................................................................................................8
6.4 IMAGE.....................................................................................................................................9
6.5 P/T/Z .......................................................................................................................................9
6.6 NOISE REDUCTION .............................................................................................................10
6.7 SETUP..................................................................................................................................10
6.8 COMMUNICATION SETUP ...................................................................................................10
6.9 RESTORE DEFAULT.............................................................................................................10
7Network Function ......................................................................................................11
7.1 Operating Environment..........................................................................................................11
7.2 Equipment Installation............................................................................................................11
7.3 Internet Connection ...............................................................................................................11
7.4 Camera Controlled by LAN ....................................................................................................11
7.4.1 Setup IP Address....................................................................................................................... 11
7.4.2 Visit/Access Camera.................................................................................................................12

HD Tracking Camera User Manual
7.5 Camera Controlled by WAN...................................................................................................12
7.5.1 Setup IP Controlled by Dynamic DNS ......................................................................................12
7.5.2 Dynamic DNS Visit Camera......................................................................................................13
7.5.3 VLC Stream Media Player Monitor ...........................................................................................13
7.6 Camera Parameter Setup......................................................................................................13
7.6.1 Homepage Introduction.............................................................................................................13
7.6.2 Video Settings ...........................................................................................................................15
7.6.3 Image Settings ..........................................................................................................................16
7.6.4 Audio Settings ...........................................................................................................................16
7.6.5 System Settings ........................................................................................................................17
7.6.6 Network Settings .......................................................................................................................17
7.6.7 Device Information ....................................................................................................................18
7.7 Download the Upgrade Program............................................................................................18
8Maintenance and Troubleshooting ........................................................................... 18

HD Tracking Camera User Manual
1
1 Note
⚫Electric Safety
Installation and operation must accord with
electric safety standard.
⚫Use Caution to Transport
Avoid stress, vibration or soakage in transport,
storage and installation.
⚫Polarity of Power Supply
The power supply of this product is +12V, the
max electrical current is 1.5A. Polarity of the
power supply plug drawing shows as below.
⚫Installation Precautions
Do not grasp the camera lens when carrying it.
Don’t touch camera lens by hand. Mechanical
damage may be caused by doing so.
Do not use in corrosive liquid, gas or solid
environment to avoid any cover (plastic
material) damage. Make sure there is no
obstacle within rotation range.
Please never power on before installation is
completed.
⚫Do not Dismantle the Camera
We are not responsible for any unauthorized
modification or dismantling.
Specific frequencies of electromagnetic field
may affect the image of the camera!
2 Packing List
When you unpack, check that all the supplied
accessories are included:
Name
Quantity
Camera
1
AC Power Adaptor
1
Power Cable
1
RS232 Cable
1
Remote Control
1
Wall Bracket with Screw Pack
1
User Manual
1
3 Quick Start
1) Please check connections are correct before starting.

HD Tracking Camera User Manual
2
2) Connect the DC 12V power cord to the supplied power adapter and connect the power adapter
to a power outlet. The power indicator on the front panel of the camera is on.
3) After the camera is powered on, it starts to initialize, right up to the limit position, and then both
horizontal and vertical go to the middle position, the motor stops running, and the initialization is
completed (Note: If preset 0 is saved, PTZ will be move to preset 0).
4 Product Installation
When the monitor thickness is >170mm or when it is required to be mounted on a wall, the wall
mounting method can be selected. The specific installation steps are shown in the following figure.
5 About Product
5.1 Features
⚫Integrated Design
Integrated design, it can output panoramic and
close-up 4 channel HD 1080P video.
⚫Intelligent Teaching Tracking
Built-in leading image recognition and tracking
algorithm, you can achieve smooth and natural
tracking without any auxiliary positioning
camera or tracking host. Different cameras can
be installed to achieve teacher tracking or
student tracking.

HD Tracking Camera User Manual
3
⚫Lens Replaceable
The panoramic lens is replaceable and
compatible with M12 interface lenses, then
making it easy to respond to different
classroom scenes.
⚫Adjustable Viewing Angle
The panoramic lens angle can be adjusted up
and down (-15°~0°), which is very convenient
for engineering installation and debugging.
⚫Same Video Style
The panoramic machine and the close-up
machine adopt the same image processing
scheme to ensure the brightness, color and
style of the two images are consistent.
⚫72.5°Wide-angle Lens
Close-up camera use 72.5°wide-angle high
quality lens, support 12x optical zoom and 16x
digital zoom.
⚫1080P Full HD
Apply Panasonic's high quality HD CMOS
sensors of 1/2.7 inch, 2.07 million effective
pixels, so as to reach maximum 1920 x 1080
resolution and achieve quality image.
⚫Ultra-high Frame Rate
The output frame rate is up to 60fps in 1080P.
⚫AAC Audio Encoding
Close-up camera support AAC audio encoding,
better sound quality and smaller bandwidth.
⚫Low Light
The application of 2D and 3D noise reduction
algorithm greatly reduces image noise. Even
under the condition of ultra-low illumination, it
still keep the picture clean and clear, and the
SNR of image is as high as 55dB.
⚫Remote Control
Through the RS232 serial port, the camera
can be controlled remotely.
5.2 Product Specification
Name
HD Teaching Tracking
Camera
Camera
Video System
1080P/60, 1080P/50,
1080I/60, 1080I/50,
1080P/30, 1080P/25,
720P/60, 720P/50
Sensor
1/2.7'', CMOS,
Effective Pixel: 2.07M
Scanning Mode
Progressive
Lens
12x, f=3.5mm ~ 42.3mm,
F1.8 ~ F2.8
Teacher
Panorama Lens
f=6mm, F1.8, angle of
view is about 60°(optional)
Student
Panorama Lens
f=3.24mm, F1.8, angle of
view is about 84°(optional)
Digital Zoom
16x
Minimum
Illumination
0.5 Lux @
(F1.8, AGC ON)
Shutter
1/30s ~ 1/10000s
White Balance
Auto, Indoor, Outdoor, One
Push, Manual, VAR
Backlight
Compensation
Support
Digital Noise
Reduction
2D & 3D Digital Noise
Reduction
Signal Noise
Ratio
≥55dB
Horizontal Angle
of View
72.5°~ 6.9°
Vertical Angle of
View
44.8°~ 3.9°
Horizontal
Rotation Range
±170°
Vertical Rotation
Range
-30°~ +90°
Pan Speed
Range
1.7°~ 100°/s
Tilt Speed
Range
1.7°~ 69.9°/s
H & V Flip
Support
Image Freeze
Support

HD Tracking Camera User Manual
4
Number of
Preset
255
Preset Accuracy
0.1°
Network Features
Video
Compression
H.264/MJPEG
Video Stream
First Stream,
Second Stream,
Third Stream,
Four Stream
First Stream
Resolution
1920x1080, 1280x720,
1024x576, 960x540,
640x480, 640x360
Second Stream
Resolution
1920x1080, 1280x720,
1024x576, 720x576
(50Hz support), 720x480
(60Hz support), 720x408,
640x360, 480x270,
320x240, 320x180
Third Stream
Resolution
1024x576, 960x540,
720x576 (50Hz support),
720x480 (60Hz support),
720x408, 640x360,
480x270, 320x240,
320x180
Four Stream
Resolution
1024x576, 960x540,
720x576 (50Hz support),
720x480 (60Hz support),
720x408, 640x360,
480x270, 320x240,
320x180
Video Bit Rate
32Kbps ~ 102400Kbps
Bit Rate Type
Variable Rate, Fixed Rate
Frame Rate
50Hz: 1fps ~ 25fps,
60Hz: 1fps ~ 30fps
Audio
Compression
AAC
Audio Bit Rate
96Kbps, 128Kbps,
256Kbps
Protocols
TCP/IP, HTTP, RTSP,
RTMP, ONVIF, DHCP, etc.
Input/Output Interface
HD Output
1 x HDMI: Version 1.3
1 x 3G SDI: BNC type,
800mVp-p, 75Ω, Along to
SMPTE 424M standard
Network
Interface
1 x RJ45: 10M/100M
Adaptive Ethernet Port
Audio Interface
1 x LINE IN: 3.5mm Audio
Interface
Communication
Interface
1 x RS232 IN: 8pin Min
DIN, Max Distance: 30m,
Protocol: VISCA / Pelco-D
/ Pelco-P
1 x RS-232 OUT: 8pin Min
DIN, Max Distance: 30m,
Protocol: VISCA network
use only
Power Jack
JEITA type (DC IN 12V)
Physical Parameter
Input Voltage
DC 12V
Current
Consumption
1.0A (Max)
Operating
Temperature
-10°C ~ 40°C
Storage
Temperature
-40°C ~ 60°C
Power
Consumption
12W (Max)
MTBF
>30000h
Size
200 x 150 x 165mm
Net Weight
About 1.6Kg
5.3 Interfaces and Buttons

HD Tracking Camera User Manual
5
Item
Name
1
System Select Switch
2
Network Interface
3
RS232 OUT Interface
4
RS232 IN Interface
5
HDMI Interface
6
LINE IN Interface
7
3G SDI Interface
8
DC 12V Interface
9
Power Switch
5.4 Dimension
5.5 Remote Control
Key Description
1. Standby Key
Press this button to enter standby mode.
Press it again to enter normal mode.
Note: Power consumption in standby mode is
approximately half of the normal mode
2. Number Key
To set preset or call preset.
3. *Key
Used with other buttons.
4. Preset Key
Set preset: Store a preset position.
[SET PRESET] + Numeric button (0-9): Setting
a corresponding numeric key preset position.

HD Tracking Camera User Manual
6
5. HOME Key
Confirm menu, enter the submenu or the PTZ
will back to the middle position after pressed it
6. Return Key
Return back the last level menu
7. Zoom Key
Slow Zoom: Zoom In [+] or Zoom Out [-] slowly
Fast Zoom: Zoom In [+] or Zoom Out [-] fast
8. Left/Right Setting Key
Press with 1 button and 2 button setting the
direction of the Pan-Tilt.
⚫Simultaneously press L/R Set +1[STD]:
set the Pan-Tilt turn the same direction as
the L/R Set.
⚫Simultaneously press L/R Set +2[REV]:
set the Pan-Tilt turn the opposite direction
as the L/R Set.
9. Focus Key
Used for focus adjustment.
Press [AUTO] adjust the focuses on the center
of the object automatically.
Press [MANUAL] adjust the focus on the
center of the object manual.
MANUAL button, and adjust it with [Far]
(Focus on far object) and [NEAR] (Focus on
near object).
10. Selection Key
Press the button corresponding to the camera
you want to operate with the remote controller.
11. #Key
Used with other buttons.
12. IR Remote Control Key
[*]+[#]+[F1]: Address 1
[*]+[#]+[F2]: Address 2
[*]+[#]+[F3]: Address 3
[*]+[#]+[F4]: Address 4
13. Reset Key
Clear preset: Erase a preset position.
[CLEAR PRESET] + Numeric button (0-9)
Or: [*]+[#]+[CLEAR PRESET]: Erase all the
preset individually.
14. PTZ Control Key
Press arrow buttons to perform panning and
tilting. Press [HOME] button to face the
camera back to front.
15. Menu Key
MENU: enter or exit OSD MENU.
16. Backlight Key
BLC ON/OFF: Press this button to enable the
backlight compensation. Press it again to
disable the backlight compensation.
NOTE:
⚫Effective only in auto exposure mode.
⚫If a light behind the subject, the subject
will become dark. In this case, press the
backlight ON/OFF button. To cancel this
function, press backlight ON/OFF button.
17. PTZ Reset Key
Preset Pan/Tilt self-test.
18. Image Freezing Function
Manually freeze: Open the freezing function
after press the remote control [F4], display
“Freeze” on the left upper corner character,
after five seconds display disappear
automatically. If you want to cancel the freeze,
press [F4] key and then can return to normal,
display “Unfreeze” on the left upper corner,
after five seconds display will disappear
automatically.
Recalling the Preset image Freeze: By the
OSD Menu “Image Freeze”to set recalling the
preset image freeze function.After the function
is opened, the screen will stay in before
Recalling the Preset when Recalling the
Preset, the screen can be switched to the
preset position screen until the camera points
to the preset position.
19. Shortcut Set
[*]+[#]+[1]: OSD menu default English
[*]+[#]+[3]: OSD menu default Chinese
[*]+[#]+[4]: Display current IP address
[*]+[#]+[6]: Quickly recover the default
[*]+[#]+[8]: View the camera version
[*]+[#]+[9]: Quickly set up inversion
[*]+[#]+[MANUAL]: Restore default IP
address
5.6 RS232 Interface

HD Tracking Camera User Manual
7
No.
Function
1
DTR
2
DSR
3
TXD
4
GND
5
RXD
6
GND
7
IR OUT
8
NC
The correspondence between the camera and
Windows DB-9 pin:
Camera
Windows DB-9
1.DTR
1.CD
2.DSR
2.RXD
3.TXD
3.TXD
4.GND
4.DTR
5.RXD
5.GND
6.GND
6.DSR
7.IR OUT
7.RTS
8.NC
8.CTS
9.RI
The correspondence between the camera and
the Mini DIN pin:
Camera
Mini DIN
1.DTR
1.DTR
2.DSR
2.DSR
3.TXD
3.TXD
4.GND
4.GND
5.RXD
5.RXD
6.GND
6.GND
7.IR OUT
7.NC
8.NC
8.NC
5.7 VISCA Network
5.8 Serial Communication Control
⚫RS232 Communication Control
The camera is controlled via RS232. The
RS232 serial port parameters are as follows:
Baud rate: 2400/4800/9600/38400;
Starting position: 1 bit
Data bits: 8 bits
Stop bits: 1 bit
Parity: None
After power on, the camera goes to the upper
right limit and then back to the middle position.
The zoom lens is pulled to the farthest position,
auto focus, and the aperture is adjusted to the
default value. If the camera has preset 0 saved,
the camera will be set to position 0 after the
initialization is completed. At this point, the
user can use the serial port command to
control the camera.
⚫List of protocols (omitted)
The serial port of the camera follows the
VISCA/Pelco-D/Pelco-P standard protocol. If
secondary development is required, the
camera can be controlled according to the
standard protocol.

HD Tracking Camera User Manual
8
6 GUI Settings
6.1 MENU
Press [MENU] button to display the main menu
on the normal screen, using arrow button to
move the cursor to the item to be set. Press
the [HOME] button to enter the corresponding
sub-menu.
MENU
Exposure
Color
Image
P/T/Z
Noise Reduction
Setup
Communication Setup
Restore Default
[Home] Enter
[Menu] Exit
6.2 EXPOSURE
Move the main menu cursor to [EXPOSURE],
and press [HOME] key enter the exposure
page, as shown in the following figure.
EXPOSURE
Mode
Auto
ExpCompMode
On
ExpComp
+1
Backlight
Off
Gain Limit
6
Anti-Flicker
50Hz
Meter
Average
DRC
5
Select Item
Change Value
[Menu] Back
Mode: Exposure mode, optional items: Auto,
Manual, SAE, AAE, Bright.
ExpCompMode: Exposure the compensation
mode, optional items: On, Off (Effective only in
Auto mode).
ExpComp: Exposure the compensation value,
optional items: -7 ~ 7 (Effective only in
ExpCompMode item to On).
Backlight: Set the backlight compensation,
optional items: On, Off (Effective only inAuto
mode).
Bright: Intensity control, optional items: 0 ~ 17
(Effective only in Bright mode).
Gain Limit: Maximum gain limit, optional items:
0 ~ 15 (Effective only in Auto, SAE, AAE,
Bright mode).
Anti-Flicker: Anti-flicker, optional items: Off,
50Hz, 60Hz (Effective only in Auto, AAE, Bright
mode).
Meter: Optional items: Average, Center, Smart,
Top.
Iris: Aperture value, optional items: F1.8, F2.0,
F2.4, F2.8, F3.4, F4.0, F4.8, F5.6, F6.8, F8.0,
F9.6, F11.0, Close (Effective only in Manual,
AAE mode).
Shutter: Optional items: 1/30, 1/60, 1/90, 1/100,
1/125, 1/180, 1/250, 1/350, 1/500, 1/725,
1/1000, 1/1500, 1/2000, 1/3000, 1/4000,
1/6000, 1/10000 (Effective only in Manual,
SAE mode).
Gain: Optional items: 0 ~ 7 (Effective only in
Manual mode).
DRC: DRC strength, optional items: 0 ~ 8.
6.3 COLOR
Move the main menu cursor to [COLOR], and
press [HOME] key enter the color page, as
shown in the following figure.
COLOR
WB Mode
Auto
RG Tuning
0
BG Tuning
0
Saturation
100%
Hue
7
AWB Sens
High
Select Item
Change Value
[Menu] Back

HD Tracking Camera User Manual
9
WB-Mode: White balance mode, optional
items: Auto, Indoor, Outdoor, One Push,
Manual, VAR.
RG Tuning: Red gain fine-tuning, optional
items: -10 ~ +10 (Effective only in Auto, One
Push, VAR mode).
BG Tuning: Blue gain fine-tuning, optional
items: -10 ~ +10 (Effective only in Auto, One
Push, VAR mode).
Saturation: Optional items: 60% ~ 200%.
Hue: Optional items: 0 ~ 14.
AWB Sens: The white balance sensitivity,
optional items: Low, Middle, High.
RG: Red gain, optional items: 0 ~ 255
(Effective only in Manual mode).
BG: Blue gain, optional items: 0 ~ 255
(Effective only in Manual mode).
Color Temp: Optional items: 2500K ~ 8000K
(Effective only in VAR mode).
6.4 IMAGE
Move the main menu cursor to [IMAGE], and
press [HOME] key enter the image page, as
shown in the following figure.
IMAGE
Luminance
6
Contrast
9
Sharpness
1
Flip-H
Off
Flip-V
Off
B&W-Mode
Off
Gamma
0.5
Style
Clarity
LDC
Off
Select Item
Change Value
[Menu] Back
Luminance: Brightness adjustment, optional
items: 0 ~ 14.
Contrast: Contrast adjustment, optional items:
0 ~ 14.
Sharpness: Sharpness adjustment, optional
items: Auto, 0 ~ 15.
Flip-H: Image flipped horizontally, optional
items: On, Off.
Flip-V: Image Flip Vertical, optional items: On,
Off.
B&W-Mode: Optional items: On, Off.
Gamma: Optional items: Default, 0.45, 0.5,
0.56, 0.63.
Style: Optional items: Norm, Clarity (LED),
Clarity, Bright, PC, Custom.
LDC: Optional items: Off, -10 ~ +10.
6.5 P/T/Z
Move the main menu cursor to [P/T/Z], and
press [HOME] key enter the P/T/Z page, as
shown in the following figure.
P/T/Z
SpeedByZoom
On
AF-Zone
Center
AF-Sense
High
L/R Set
STD
Display Info
On
Image Freeze
Off
Digital Zoom
Off
Call Preset Speed
24
Pre Zoom Speed
5
Select Item
Change Value
[Menu] Back
SpeedByZoom: The depth of field scale switch,
optional items: On, Off.
AF-Zone: Interested in focusing area, optional
items: Top, Center, Bottom.
AF-Sense:Automatic focusing sensitivity
options, optional items: Low, Normal, High.
L/R Set: Optional items: STD, REV.
Display Info: Optional items: On, Off.
Image Freeze: Optional items: On, Off.
Digital Zoom: Optional items: Off, 2x, 4x,
8x, 16x.
Call Preset Speed: Optional items: 1 ~ 24.
Pre Zoom Speed: Optional items: 0 ~ 7.

HD Tracking Camera User Manual
10
6.6 NOISE REDUCTION
Move the main menu cursor to [NOISE
REDUCTION], and press [HOME] key enter
the noise reduction page, as shown in the
following figure.
NOISE REDUCTION
NR2D-Level
Off
NR3D-Level
2
Select Item
Change Value
[Menu] Back
NR2D Level: 2D noise reduction, optional
items: Off, Auto, 1 ~ 5.
NR3D Level: 3D noise reduction, optional
items: Off, 1 ~ 8.
6.7 SETUP
Move the main menu cursor to [SETUP], and
press [HOME] key enter the setup page, as
shown in the following figure.
SETUP
Language
EN
DVI Mode
DVI
Select Item
Change Value
[Menu] Back
Language: Optional items: EN, Chinese,
Russian.
DVI Mode: Optional items: DVI, HDMI.
6.8 COMMUNICATION SETUP
Move the main menu cursor to
[COMMUNICATION SETUP], and press
[HOME] key enter the communication setup
page, as shown in the following figure.
COMMUNICATION SETUP
Protocol
VISCA
V_Address
1
V_AddrFix
Off
Net Mode
Serial
Baudrate
9600
Select Item
Change Value
[Menu] Back
Protocol: Control protocol type, optional items:
Auto, VISCA, PELCO-D, PELCO-P.
V_Address: Optional items: 1 ~ 7.
(Effective only in Auto, VISCA protocol).
V_AddrFix: Optional items: On, Off (When set
to On, useless in 88 30 01 FF Command).
P_D_Address: Optional items: 0 ~ 254.
(Effective only in Auto, PELCO-D protocol).
P_P_Address: Optional items: 0 ~ 31.
(Effective only in Auto, PELCO-P protocol).
Net Mode: Set the serial port network control,
optional items: Serial, Paral.
Baudrate: Serial port baud rate, optional items:
2400, 4800, 9600, 38400.
6.9 RESTORE DEFAULT
Move the main menu cursor to [RESTORE
DEFAULT], and press [HOME] key enter the
restore default page, as shown in the following
figure.
RESTORE DEFAULT
Restore?
No
Change Value
[Home] OK
[Menu] Back
Restore: Confirm restore factory settings,
optional items: Yes, No.
Note: Press [HOME] button to confirm, all
parameter restore default, include IR Remote
address and VISICA address.

HD Tracking Camera User Manual
11
7 Network Function
7.1 Operating Environment
Operating System: Windows 2000/2003/XP/
vista/7/8/10
Network Protocol: TCP/IP
Client PC: P4/128M RAM/40G HDD/ support
scaled graphics card, support DirectX 8.0 or
more advanced version.
7.2 Equipment Installation
1) Connect video conference camera to your
internet or to your PC via network cable.
2) Turn on DC 12V power.
3) If the network connection is normal, the
connection light (green) at the network
interface will light up within 5 seconds, and
the data indicator (orange) will flash,
indicating that the physical connection of
the camera has been completed.
7.3 Internet Connection
There are two main ways to connect video
conference camera.
Connect by Network Cable
Connect by Switch/Router
7.4 Camera Controlled by LAN
7.4.1 Setup IP Address
If you don't know the camera IP, view as
below:
Method 1: Press * and # and 4 on remote
controller one by one, the camera IP address
will be shown on screen.
Method 2: Connect camera to PC with network
cable, use “upgrade_En.exe”to search for IP
address.
Change IP address, two methods as below:
Method 1: Login the web page, select
“Network > Lan Settings”, change IP address,
subnet mask and gateway. Click “Apply” and
restart the camera.

HD Tracking Camera User Manual
12
Method 2: Open “upgrade_En.exe”, change IP
and click “Set”. After modified, the video
conference camera will be restart.
Change IP address:
Step 1 Search the IP address of camera.
Step 2 Select the camera IP of you want to
change.
Step 3 Select the config dialog of upgrade
applets.
Step 4 Change the IP address, netmask and
gateway, then click “Set”.
Step 5 Finish.
7.4.2 Visit/Access Camera
Input http://192.168.100.82 to IE (the teacher
camera IP address: 192.168.100.82; the
student camera IP address: 192.168.100.92),
a login window pop up, input username: admin,
password: admin, shown as below:
After login, shown as below:
If user first time use this camera by internet
(only for new user), must install a player
software (VLC). Please go to VLC website
http://www.videolan.org/vlc/#download and
Install VLC (player software). After installation,
login again, will show as above.
7.5 Camera Controlled by WAN
7.5.1 Setup IP Controlled by Dynamic DNS
Two dynamic DNS: Dyndns.org, 3322.org.
Router Port Mapping:
Take Tenda router for example, enter the
Router Home Page (interface page), select
“Advanced”- “Virtual Server”, add a new port
number in “Ext Port”, add a new port number in
“Int port”, put camera IP address to “Internal
IP”, then select “Save”, shown as below:

HD Tracking Camera User Manual
13
7.5.2 Dynamic DNS Visit Camera
Set domain name to camera, setup the
parameter, then dynamic DNS can access
camera. Access link: http://hostname: port
number. For example, setup host computer
name: youdomain.f3322.org, the camera port
number is 89, the access link should be
http://youdomain.3322.org:89.
If the camera port default is 80, then
unnecessary to input port number, use host
name can access camera directly.
7.5.3 VLC Stream Media Player Monitor
Visit VLC Media Server Procedure
Step 1 Open VLC media player.
Step 2 Click “Media > Open Network Stream”,
or click “Ctrl + N”; as below:
Step 3 Input URL address:
rtsp://ip: port number/1 (First stream);
rtsp://ip: port number/2 (Second
stream).
Step 4 Click “Play”.
RTSP port number default 554. If the camera
port default is 80, then unnecessary to input
port number of URL address.
7.6 Camera Parameter Setup
7.6.1 Homepage Introduction
Menu
All pages include two menu bars:
Real time monitoring: displaying video image
Parameter setup: with function buttons.
A. Video Viewing Window
Video viewing window must be same as video
resolution, the bigger the resolution is, the
bigger the playing area is. Double click viewing
window, will show full-screen, double click
again, will return to initialized size.
Status bar in viewing window shown as below:
1) Video playback pause button: control
real-time video pause, stop the last picture,
click recoverable video again.
2) Audio control buttons: can adjust the
volume or set silent mode.
3) Full screen switch button.

HD Tracking Camera User Manual
14
B. PTZ Setup
1) Pan and Tilt Control
Up, Down, Left and Right arrows and the home
button allow you to manually drive the camera
to the desired position.
2) Zoom
Zoom In and Zoom Out buttons allow for wide
or narrow view of the space.
3) Focus
Focus In and Focus Out buttons allow for fine
manual focus adjustment if the camera has
any problems auto focusing on the difficult
object.
4) PTZ Speeds
Pan speed can be set at any rate between
1 ~ 24, Tilt speed can be set at any rate
between 1 ~ 20. Zoom and Focus speeds can
be set at any rate between 0 ~ 7.
5) PTZ Presets
After manually setting up a shot that you would
like to return to later, you can save presets for
quick recall of these positions. Type a number
between 0 and 254 into the Preset box.
Click the "Set" button to save the current
location with that preset number. Click the
“Call” button to cause the camera to return to
that position. This enables smooth, quick and
convenient control without the need to
manually drive the camera.
You can set up preset that user want as below.
Method 1: Type a number into the Preset box.
Preset: Optional items: 0 ~ 254.
Method 2: Type the name into the Presets
Information.
Click “Set”button, when PTZ turn to other
position, click “Call”button or click “No.”of the
Presets Information, PTZ will turn back to
preset position.
6) PTZ / OSD Dropdown
From the dropdown menu, clicking the OSD
option will open the on-screen display menu of
the camera giving you control from within the
IP interface.
C. Language Selection
Click either “Chinese”, “English” or “Russian”
to change the language of the webpage.

HD Tracking Camera User Manual
15
7.6.2 Video Settings
1) Video Format
Support 50Hz (PAL) and 60Hz (NTSC), and
Dial Priority three formats.
2) Encode Level
Support baseline, mainprofile and highprofile
three levels.
3) Encode Protocol
Support H.264 and MJPEG two protocols, and
only the first stream support MJPEG.
4) Resolution
First stream support 1920x1080, 1280x720,
1024x576, 960x540, 640x480, 640x360.
Second stream support 1920x1080, 1280x720,
1024x576, 720x576 (50Hz support), 720x480
(60Hz support), 720x408, 640x360, 480x270,
320x240, 320x180. Third/Four stream support
1024x576, 960x540, 720x576 (50Hz support),
720x480 (60Hz support), 720x408, 640x360,
480x270, 320x240, 320x180. The bigger
resolution is, the clearer the image will be,
more network bandwidth will be taken.
5) Bit Rate
The user can specify the bit rate. Generally
speaking, the larger of the bit rate, the clearer
of the image. However, the configuration of the
bit rate needs to be combined with the network
bandwidth. When the network bandwidth is
narrow and the bit rate is configured larger, the
video stream cannot be transmitted normally,
and the visual effect is worse.
6) Frame Rate
User can specify the size of the frame rate,
generally, the frame rate greater, the image
more smooth; Frame rate is smaller, the more
sense of beating.
7) I Key Frame Interval
Set interval between 2 I frame, the bigger
interval is the response will be lower from
viewing window.

HD Tracking Camera User Manual
16
8) Bit Rate Control
Constant Bit Rate: Video coder will be coding
according to preset speed.
Variable Bit Rate: Video coder will adjust the
speed based on preset speed to gain the best
image quality.
9) Fluctuate Level
Restrain the fluctuation magnitude of variable
rate, grade 1 ~ 6.
7.6.3 Image Settings
1) Brightness
Image bright 0 ~ 14, slider control, on the right
shows the corresponding numerical.
Default value is 7.
2) Saturation
Saturation 0 ~ 14, slider control, on the right
shows the corresponding numerical.
Default value is 4.
3) Contrast
Contrast 0 ~ 14, slider control, on the right
shows the corresponding numerical.
Default value is 7.
4) Sharpness
Sharpness 0 ~ 15, slider control, on the right
shows the corresponding numerical.
Default value is 2.
5) Hue
Hue 0 ~ 14, slider control, on the right shows
the corresponding numerical.
Default value is 7.
6) Flip & Mirror
Tick Flip to realize image upside down, tick
mirror to realize image around the mirror.
Default value is not tick.
7.6.4 Audio Settings
1) Audio Switch
Enable or disable audio switch.
2) Audio Type
Audio typeAAC.
3) Sample Rate
Optional items: 44.1K, 48K.
4) Bit Rate
Optional items: 96K, 128K, 256K.
5) Input Type
Optional items: Line in.
6) Input Vol L
The volume of the left channel.
7) Input Vol R
The volume of the right channel.
8) ADTS Options
Optional items: On, Off.

HD Tracking Camera User Manual
17
7.6.5 System Settings
1) Work Mode
The default work mode is RTSP.
Optional items: RTSP, SDK, Multicast.
2) Reboot
Click the “Reboot”button, system restart.
3) Username and password
The user can modify the password (letters and
Numbers only).
7.6.6 Network Settings
1) Lan Settings
The teacher camera IP address:
192.168.100.82; the student camera IP
address: 192.168.100.92, the MAC address
cannot be modified.
2) Port Settings
A. HTTP Port
IP address identifies the network device, the
device can run multiple web applications, each
network program using network port to
transmit data, so data transmission to be
carried out between the port and port. Port
setting is to set up web server program using
which port to transmit. When port mapping,
need to be consistent with the port number
(default port: 80).
B. RTSP Port
The video conference camera support RTSP
protocol, use the VLC tools broadcast, default
port: 554.
C. PTZ Port
Support PTZ protocol, default port: 5678.
3) Control Protocol Settings
Setting the camera control communication
protocol, include Visca address, Pelco-D
address and Pelco-P address.
4) RTMP Settings
Setting the MRL of RTMP, select enable or
disable video and audio. You can select control
code stream of “On”, “Off”, “Video”, “Audio”
between in the two streams.
5) RTSP Settings
Turn On/Off RTSP auth.
6) ONVIF Settings
Turn On/Off ONVIF and ONVIF auth.
7) Multicast Settings
Turn On/Off multicast. Setting the multicast
address (default value is 224.1.2.3) and port
(default value is 6688, then 6688 is the
Table of contents