Vitals BKZ 5022o User manual

MANUAL FOR TECHNICAL USE
КЕРІВНИЦТВО З ЕКСПЛУАТАЦІЇ
РУКОВОДСТВОПОЭКСПЛУАТАЦИИ
C
H
A
I
N
S
A
W
S
BKZ 5022o BKZ 5823o BKZ 5823os
WWW.VITALS.COM.UA

СОДЕРЖАНИЕ
ЗМІСТ
1.Общее описание
2.Комплект поставки
3.Технические характеристики
4.Требования безопасности
4.1.Важная информация по безопасности
4.2.Безопасность эксплуатации
4.3. рименение индивидуального защитного снаряжения
4.4.Опасность отдачи и "обратного удара"
5.Эксплуатация
5.1. рименение
5.2. одготовка к работе
5.3.Работа бензопилой
6.Техническое обслуживание
7.Транспортировка и хранение
8.Возможные неисправности и пути их устранения
9.Гарантийные обязательства
1.Загальний опис
2.Комплект поставки
3.Технічні характеристики
4.Вимоги безпеки
4.1. Важлива інформація з безпеки
4.2. Безпека експлуатації
4.3. Застосування індивідуального захисного спорядження
4.4. Небезпека віддачі та "зворотного удару"
5.Експлуатація
5.1. Застосування
5.2. ідготовка до роботи
5.3. Робота бензопилою
6.Технічне обслуговування
7.Транспортування та зберігання
8.Можливі несправності та шляхи їх усунення
9.Гарантійні зобов'язання
1. General Description
2. Delivery kit
3. Technical characteristics
4. Safety
4.1. Important Safety Information
4.2. Safety of operation
4.3. The use of personal protective equipment
4.4. Risk of output and "kickback"
5. Operation
5.1. Application
5.2. Getting Started
5.3. Chainsaw Work
6. Maintenance
7. Transportation and storage
8. Troubleshooting and their solutions
9. Warranty
CONTENTS
УКРАЇНСЬКА ENGLISH
РУССКИЙ
6
10
11
12
12
13
16
17
19
19
19
35
43
54
56
60
64
68
69
70
70
71
74
75
77
77
77
93
101
112
114
118
122
126
127
128
128
129
132
133
135
135
135
151
159
170
172
176

5
4
DEAR BUYER!DEAR BUYER!
Thank you for purchasing a chain saw TM «Vitals».
The TM technique «Vitals» developed by European standards and the use
of modern technology.
Improper use of the chain saw and unsafe practices that may result in
damage or serious injury!
This manual contains all the necessary information on safety and handling
the chain saw. Carefully read the manual before using the product.
Please provide the other users of this manual, before they begin to use the
product. This manual must be stored for later use.
We are constantly working to improve its products and, therefore, reserve
the right to make changes in the appearance, equipment and production
technology, without changing the basic principles of management, without
notice to the consumer. All possible changes will be directed at improving and
upgrading the product.
WARNING!
Indicates a potentially hazardous situation that may result in
minor injury or damage to the product.
NOTE!
The important additional information.
CAUTION!
Indicates a potentially hazardous situation that should be
avoided, otherwise there is a danger to life and health.
THE KEYWORD VALUE

Chain saws «Vitals Master» and
designed for fast cutting of fresh, dry and wet wood of different thicknesses
and configurations, particle boards, firewood logs of small and medium
diameter.
Through the use of modern design and technology, models of chain saws
«Vitals Master» exhibit optimum performance of the engine, and are durable
and wear-resistant parts and major components.
By design, chainsaws are simple, classic arrangements - a chain driven by
an internal combustion engine. Easy device chainsaw is a factor of reliability,
providing its up to the toughest conditions.
In addition, chain saws «Vitals Master» BKZ 5022o, BKZ 5823o and
BKZ 5823os (hereinafter - the chainsaw) have a number of other advantages,
which include:
chrome-plated cylinder. Long life cylinder engine is achieved by increasing
the wear resistance of the friction pair piston ring - cylinder;
fuel pump "primer". To facilitate starting the engine chainsaw provided
"primer" by which provided preliminary pumping fuel into the carburetor.
Thus, the starting of the motor chainsaw is much faster, especially in the
cold season;
mounting the tire cover and a protective finger guard is made of
magnesium alloy - for longer life;
Easy start (only for BKZ 5823os): the force applied by the operator at the
time of starting the engine is reduced by 30%. Easy start system is an
additional spring, which is passed through the rotary motion of the ratchet
recoil starter on the flywheel chainsaw. When pulling the starter cord, a
spring is compressed to a certain point and then sharply turning actuates
the crankshaft. There is no need to pull the starter, you just gently pull the
cord;
BKZ 5022o, BKZ 5823o BKZ 5823os
choke with automatic opening (only for BKZ 5823os): when you press the
throttle lever choke valve opens automatically;
High performance air filter paper type (only for BKZ 5823os);
High speed chain: ensuring high productivity chainsaw;
Adjustable oil pump. The amount of oil is supplied to the circuit depends on
the pre manually adjust the oil pump. Oil from the oil reservoir flows into the
oil pump, and then supplied through the oil passage in the groove and the
tire chain;
advanced anti-vibration system. The engine is mounted on the housing
chainsaw special damping elements;
Effective emergency brake circuit. In case of return or "kickback" chain
brake works very fast rotation of the chain at the same time immediately
cease;
reinforced recoil starter - a metal flywheel with two large cast teeth, and
metal cams on the ratchet wheel.
Description of the main components of the chainsaw is presented below.
7
6
GENERAL DESCRIPTION
1

1. Safety brake control circuit with a protective shield.
2. Front handle.
3 Air filter cover.
4. Lock the air filter cover.
5. Key lock to prevent accidental start.
6. Rear handle with a protective shield.
7. The throttle lever.
8. The ignition switch.
9. Stopper holes for pouring fuel mixture.
10. Carburetor adjustment screws.
11. The handle for manual starter.
12. Protective finger guard.
13. Plug the oil fill.
14. Spiked bumper.
15. Chain.
16. Sheen.
17. Silencer.
18. Mounting nuts tires.
19. The chain catcher.
20. Adjusting the chain tensioning screw.
21. Cover mounting tires.
22. Primer.
23. Handle Choke.
figure 1
9
8

1. Chainsaw.
2. Sheen.
3. Chain.
4. Spiked bumper.
5. Food container for the fuel mixture.
6. Funnel.
7. T-wrench 13x19 mm (the combination of plug wrench and screwdriver)
8. Allen key 3 mm
9. 4 mmAllen key
10. Screwdriver.
11. File
12. Mesh filter for refueling.
13. Instruction manual.
14. Packing.
NOTE!
The manufacturer reserves the right to make the look, design
and delivery chain saw minor changes that do not affect
product performance.
DELIVERY KIT
2
TECHNICAL
CHARACTERISTICS
3
11
10
MODEL
Engine type
gasoline two-stroke single-cylinder air-cooled
Fuel type
mixture of gasoline with oil for two-stroke
engines 25:1
Volume of cylinder sm, 3
50
58
58
Power W h p.,к / .
2,2 / 3,0
2,3 / 3,2
2,3 / 3,2
The maximum frequency, rev/min
10500
10500
10500
Idlespeed, rev/min
2800
2800
2800
Chainspeed, m/s
17,3
17,3
17,3
While the brake circuit, s
0,12
0,12
0,12
Engine starting system
recoil starter
Transmission
automatic centrifugal clutch
Ofil eed
with automatic adjustment
The volume of the fuel tank, ml.
550
550
550
Oil Tank, ml.
260
260
260
Bar length, inches
18
20
20
Chain pitch inch,es
0,325
0,325
0,325
The sound pressure level, dB
110
Dimensions (LxWxH), mm
without installing tires
405х265х285
a fixed bus
860х265х285
packing
410х270х300
Net/gross weight, kg
7,0 / 7,5
BKZ o5022 BKZ 5823o BKZ 5823os

4.2. Safety of operation
1. DO NOT ALLOW PRODUCT FOR CHILDREN AND PERSONS WITH
DISABILITIES.
2. DO NOT TRUST THE CHAINSAW YOUNG PEOPLE UNDER 18 YEARS,
EXCEPT FOR OVER 16 YEARS OF STUDENTS STUDYING THE WORK
OF THE CHAINSAW UNDER CLOSE SUPERVISION OF AN
INSTRUCTOR.
3. DO NOT LEAVE UNATTENDED EQUIPMENT INCLUDED.
4. DO NOT START AND USE THE PRODUCT IN CASE OF ILLNESS, IN
THE STATE OF FATIGUE, DRUGS OR ALCOHOL, OR UNDER THE
INFLUENCE OF DRUGS POTENT DRUGS, REDUCES THE RATE OF
REACTIONANDATTENTION.
5. DO NOT WORK WITHOUT PRIOR TRAINING.
6. FOLLOW INTEGRITYAND THE PRODUCT TO.
Do not start and use the product in the presence of damage to the insecure
parts and components.
7. CHAINSAW USE ONLYASAFULLY STOCKED.
All components of the envisaged design and safety elements must be in
regular places.
8. NEVERALLOW STRANGERSANIMALAND WORK PLACE.
9. DO NOT OPENTHE PRODUCTAND DO NOT COVER IT.
10.EVERY TIME BEFORE CHECKING THE OIL LEVEL IN THE TANK, AND
PERFORMANCE OF ITS APPLICATION. IF NECESSARY, ADD OIL OR
CLEAN FEED HIS CHANNELS.
11. MAINTAIN EMERGENCY BRAKE CIRCUIT.
12. REGULARLY CHECK THE CONDITIONAND TENSION OF THE CHAIN.
IF NECESSARY,ADJUST THE CHAIN TENSION.
4.1. IMPORTANT SAFETY INFORMATION
Before you begin, please read chainsaw safety regulations and warnings
given in this manual.
Most of the accidents during the operation of the product is the result of
non-compliance with the provisions of the basic safety rules.Accidents can be
avoided if strict safety precautions in advance and provide a potential danger.
Do not, under any circumstances, use a product in a manner or for
purposes not specified in this manual.
Improper handling or operation of an untrained person can damage
property, cause injury or death.
Bounce when cutting wood chips and branches.
The exhaust gases.
Rotating chain.
Giving and "kickback."
The main hazards when working chainsaw
CAUTION!
To avoid injury or fire when using chainsaws, obey all
instructions in this manual, safety.
SAFETY
4
13
12

13. WHILE FILLING AND USE CHAINSAW NOT EXPOSE AND FUEL OIL
ON THE GROUNDAND IN DRAINAGE.
After refueling, tighten the fuel and oil tanks, check for leaks. In case of
leakage of fuel or oil to eliminate disadvantage engine start, since it can
cause fire. If fuel or oil spilled on the product, wipe it dry.
14. DO NOT REFILLTHE FUELIF THE ENGINE IS STARTED.
15. WHEN NOT USING, DRAINTHE FUEL.
16. BEFORE STARTING THE ENGINE CHAINSAW MAKE SURE THAT THE
BUS IS MOUNTED SECURELY AND CONTACT WITH OTHER
OBJECTS.
17. REFRAIN FROM CHAINSAW WORKALONE.
18. DO NOT OPERATE IN CLOSE PROXIMITY (LESS THAN 5 METERS)
ON THE LOCATION OF HIGHLY FLAMMABLE MATERIALS.
19. KEEPAWAY FROM CHAINSAW FLAMMABLE MATERIALS.
20. DO NOT WORK CHAINSAW IN RAIN AND SNOW, STRONG WIND, IN
LOW VISIBILITY CONDITIONS.
Do not wash the product and do not pour water on it. If the chainsaw
somehow gets wet, wipe it dry with a body. If water gets inside the casing,
unplug the product. Do not attempt to open the product - contact the
service center.
21. BEFORE FELLING TREES, MAKE SURE THAT THE TREE IN FALL NOT
CAUSE INJURY TO YOU AND OTHERS PERSONS, ANIMALS, NOT
DAMAGE THE OTHER TREES.
22.SURE PROVIDES FOR A WORKPLACE HEALTH STAFFED WITH
FIRSTAID BOX FIRSTAID.
23. DURING WORK HARD TO HOLD THE CHAINSAW IN BOTH HANDS DO
NOTATTEMPTTO CUT, KEEPTHE CHAINSAW WITH ONE HAND.
24. IN THE EVENT THAT OCCURRED DURING THE TOUCH OF CHAIN
WITH METAL, STONE AND OTHER SOLID FOREIGN OBJECTS, STOP
THE ENGINE IMMEDIATELYAND INSPECTTHE BARAND CHAIN.
25. DURING OPERATION, THE VENTILATION HOLES ON THE HOUSING
CHAINSAW WERE NOT CLOSED OR CLOGGED CHIPS AND DIRT,
OTHERWISE IT CAN LEAD TO PREMATURE PRODUCT FAILURE.
26. DO NOT USEA CHAINSAW FOR CUTTING SHEET METAL, PLASTICS,
AND OTHER NON-MATERIAL.
WARNING!
For safe and efficient operation is very important to set the
chain on the guide rail and the bus itself securely in the
housing and adjust the tension of the saw chain.
WARNING!
Take great care when handling fuel, lubricants, gasoline
fumes are dangerous to health. Remember that careless
handling of gasoline could cause a fire. Do not refuel the fuel
in the room.
15
14

27.AVOID CUTTING BUSHES, BECAUSE SMALL BRANCHES CAN BE
GRABBED BY THE CHAIN AND THROWN BACK AT YOU - RISK OF
INJURY.
28.DO NOT OPERATE A BLUNT CHAINSAW CHAIN, AS THIS INCREASED
LIKELIHOOD OF INJURY.
29.IN CASE OF ANY DEVIATIONS IN THE NORMAL OPERATION
CHAINSAW, STOPTHE ENGINE IMMEDIATELY, FIND THE FAULT.
30.OVERDRIVEN AND ALLOW THE ENGINE CHAIN SAWS,
ALTERNATING WORKAND REST.
31.DURING TRANSPORT CHAINSAW WEAR PROTECTIVE COVER FOR
BUS.
32.CLEANING THE SURFACE CHAINSAW DIRT OR SAWDUST
IMMEDIATELY AFTER WORK. ARM PRODUCTS MUST BE KEPT DRY
AND CLEAN, WITHOUTTHE PRESENCE OF OIL STAIN ON IT.
33.MAINTENANCE AND STORAGE CHAINSAW MADE ONLY PURSUANT
TO THE REQUIREMENTS OF THIS OPERATION MANUAL.
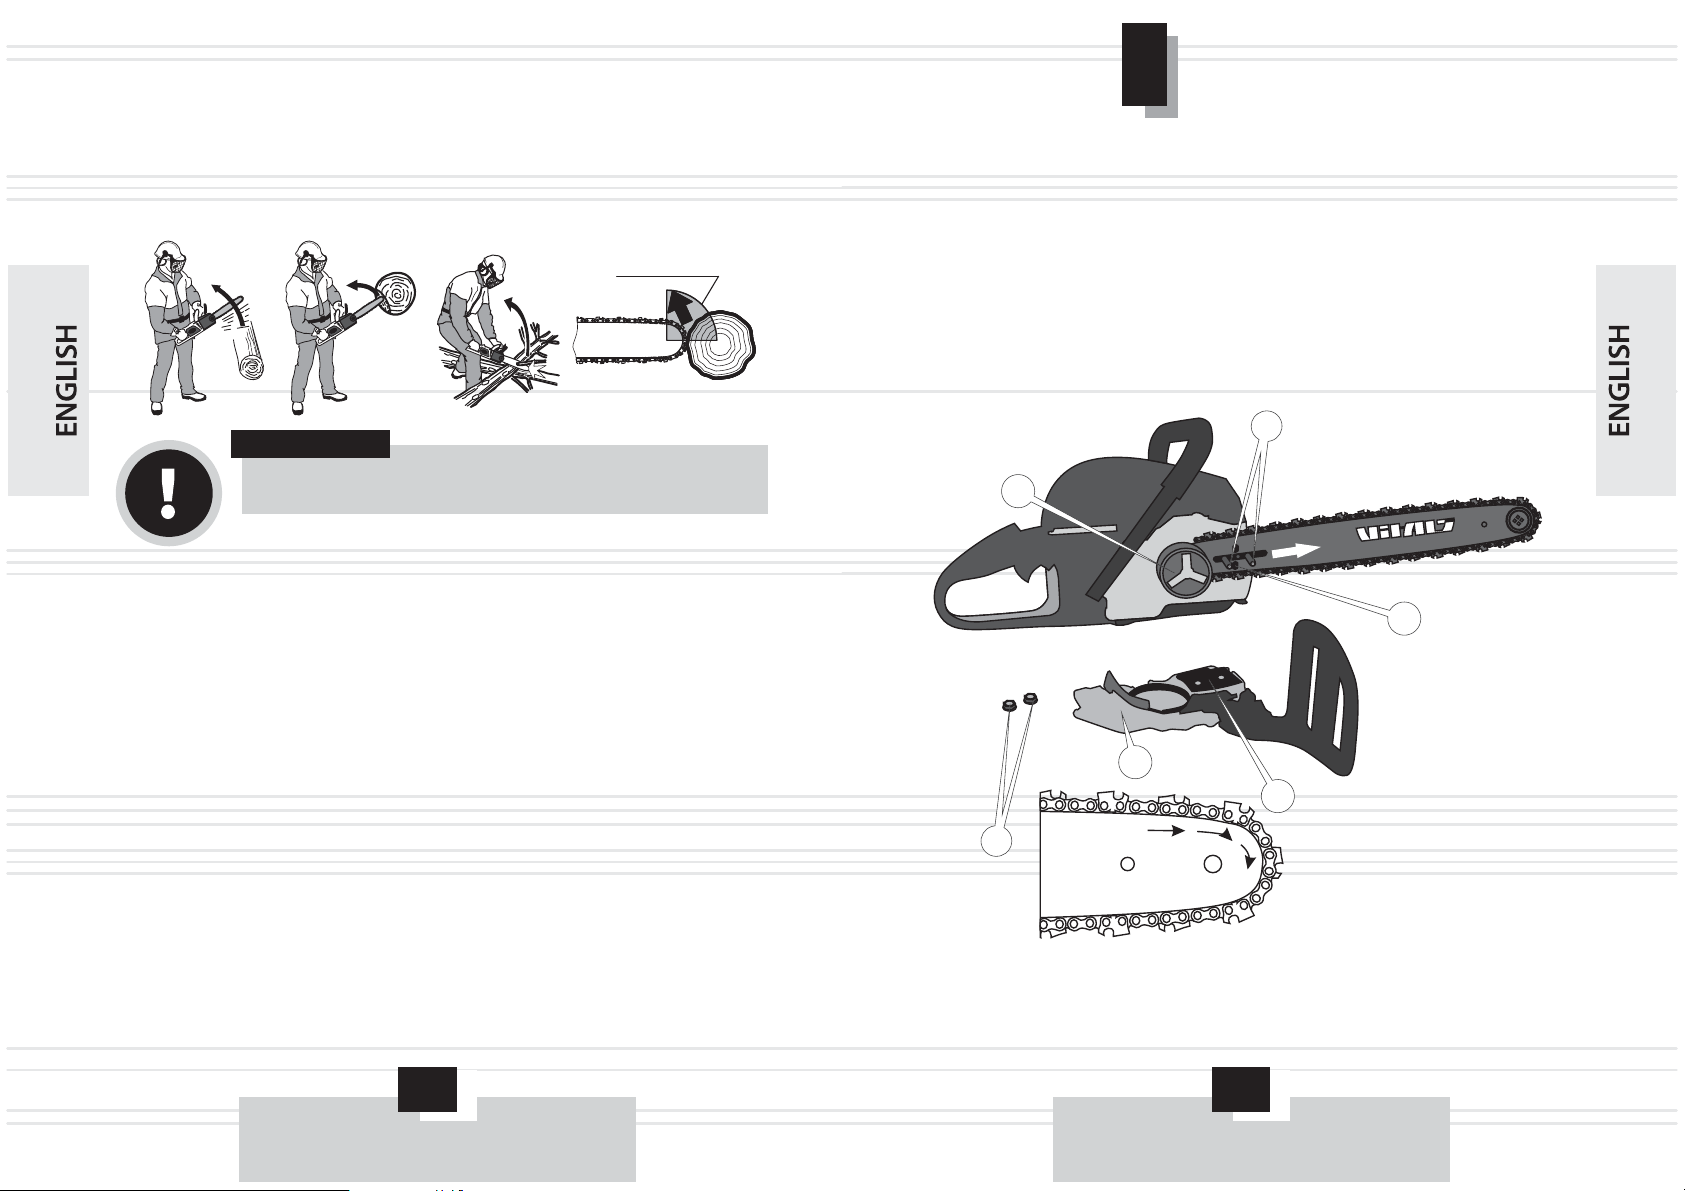
Clothing operator shall be made of durable material that provides reliable
protection. It should not hamper the movements, but at the same time fit
snugly to the body to avoid the possibility of it falling into the moving parts of
the chain saw, or cling to the tree (see Figure 2).
Do not wear loose clothing for work, a shirt with sleeves or with wide
sleeves, scarf, tie, as well as objects of decoration, for example, chains and
bracelets.
Always wear face and eye protection (vented mask, glasses) and ear (ear
plugs, headphones).
Wear safety boots or sturdy shoes with non-slip soles and closed-toe.
4.3. The use of personal protective equipment
To protect your hands, use tight-slip gloves or mittens.
Always wear a tight hat, and carrying out tree felling and pruning, take care
of a special protective helmet.
1. Hard hat or helmet.
2. Headphones.
3. Face shield.
4. Protective clothing.
5. Gloves or mittens.
6. Robust closed shoes.
Returns - a sharp movement of the housing chainsaw to the operator
terminal in the cut at the top of the sock tires or chains (see Figure 3).
"Blowback" - a sudden and rapid movement of the chainsaw back-up to the
operator that occurs when a bus hit a sock running saws for solid wood or on
any solid object - made of stone or metal.
Clothing and protective equipment operator
4.4. Risk of output and "kickback”
21
3
4
5
6
figure 2
17
16
To avoid injury or damage to the product from the impact and the
"kickback":
Follow recommendations for tree felling and bucking avoid clamping the
tire cut.
Do not start the chainsaw when the chain is in contact with something.
Avoid accidental contact with the tire sock tree trunks and branches.
If, in the course of the chain was contacted with stones, metal and other
hard foreign objects, stop the engine immediately and, examine the tires
and chains.
While working, always keep in sight of the bus operating the saw,
especially the bar nose.
The tire is solid wood chainsaw to hold only when the engine is running, the
engine already clocked up to maximum speed.
Holes toe tires do only if you are well trained in this business.
When replacing worn components chainsaw (tire chain), use only genuine
parts and recommended.
5.1. APPLICATION
5.2. GETTING STARTED
Assembling the product
Chainsaw is indispensable during the execution of various joinery,
carpentry and gardening at any level of complexity.
1. Remove from the box chainsaw and all its components.
2. Place the chain saw on a flat surface.
WARNING!
Maintain emergency brake circuit.
MASTER
A
1
2
3
4
5
6
Danger zone of tire
figure 3
OPERATION
5
figure 4
19
18

1. Inspect the product and make sure there is no mechanical damage to the
hull chainsaw bar and chain.
2. Check for loose tires.
3. Check the chain tension.
4. Check the fuel mixture and the fuel oil, where necessary to fill the norm.
5. Check the chain lubrication system.
6. Check that the chain brake.
The greatest influence on the durability and efficiency of the saw sets (tires,
chains, leading and following stars) chainsaws have such factors include
timely and proper chain sharpened teeth, the correct chain tension and
lubrication mechanism serviceable job chain.
If the chain is pulled tight, they are:
creating additional friction, which leads to overheating and irreversible
thermal deformation of the tire;
causes accelerated tire wear, drive and driven sprockets and bearings;
leads to overheating of the motor overload;
increases fuel consumption.
If the chain is stretched slightly, they are:
leads to a devastating shock-dynamic loads during engine start and during
the operation of the product;
significantly increases the risk of kickback and "kickback";
can cause slippage with tire chains and as a consequence, its breakage,
jamming of the drive sprocket and injury to the operator;
causes accelerated tire wear, drive and driven sprockets and bearings.
Checking the chain tension
3. Set on the housing front spike bumper 14 (see Figure 1) and secure it with
two screws.
4. Place the chain over the drive sprocket located on the clutch (6). Note the
correct direction of movement of the chain, as shown in Figure 4.
5. Put the tire on the guide pins (1) (a long groove) (see Figure 4).
6. Insert into the groove on the shank chain. This operation start with the
upper branch of the tire.
7. Enter chain in engagement with a driven sprocket disposed on the tire
wear.
8. Shortly move the bus in the direction of arrow (A) (see Figure 4), the chain
is a little stretched.
9. Put the lid mounting tires (3) in such a way that the chain tensioner pin (5) is
exactly the same as the tension hole tire (2) (see Figure 4).
10.Tighten the two nuts (4) without tightening them (see Figure 4).
11.Tension the chain. Stretch chain as long as it does not lie down tightly to the
bottom of the tire.
12.Securely tighten the mounting nuts of the mounting tires.
13.Check the chain tension.
14.Check that the chain brake by locking it by pressing the emergency brake
lever in the direction of tire chains. The chain should not slip on the bus
back or forward.
Control before starting the engine
WARNING!
Edges of the cutting links in the chain is sharp enough. To
avoid injury, the installation is carried out in a chain of dense
protective gloves.
CAUTION!
For safety, always stop the engine before performing any of
the actions in this guide. All actions are performed only when
the engine is cold.
NOTE!
In the operation of chain saws from heating or cooling can be
lengthened or shortened, so you should periodically check
and adjust the chain tension.
21
20
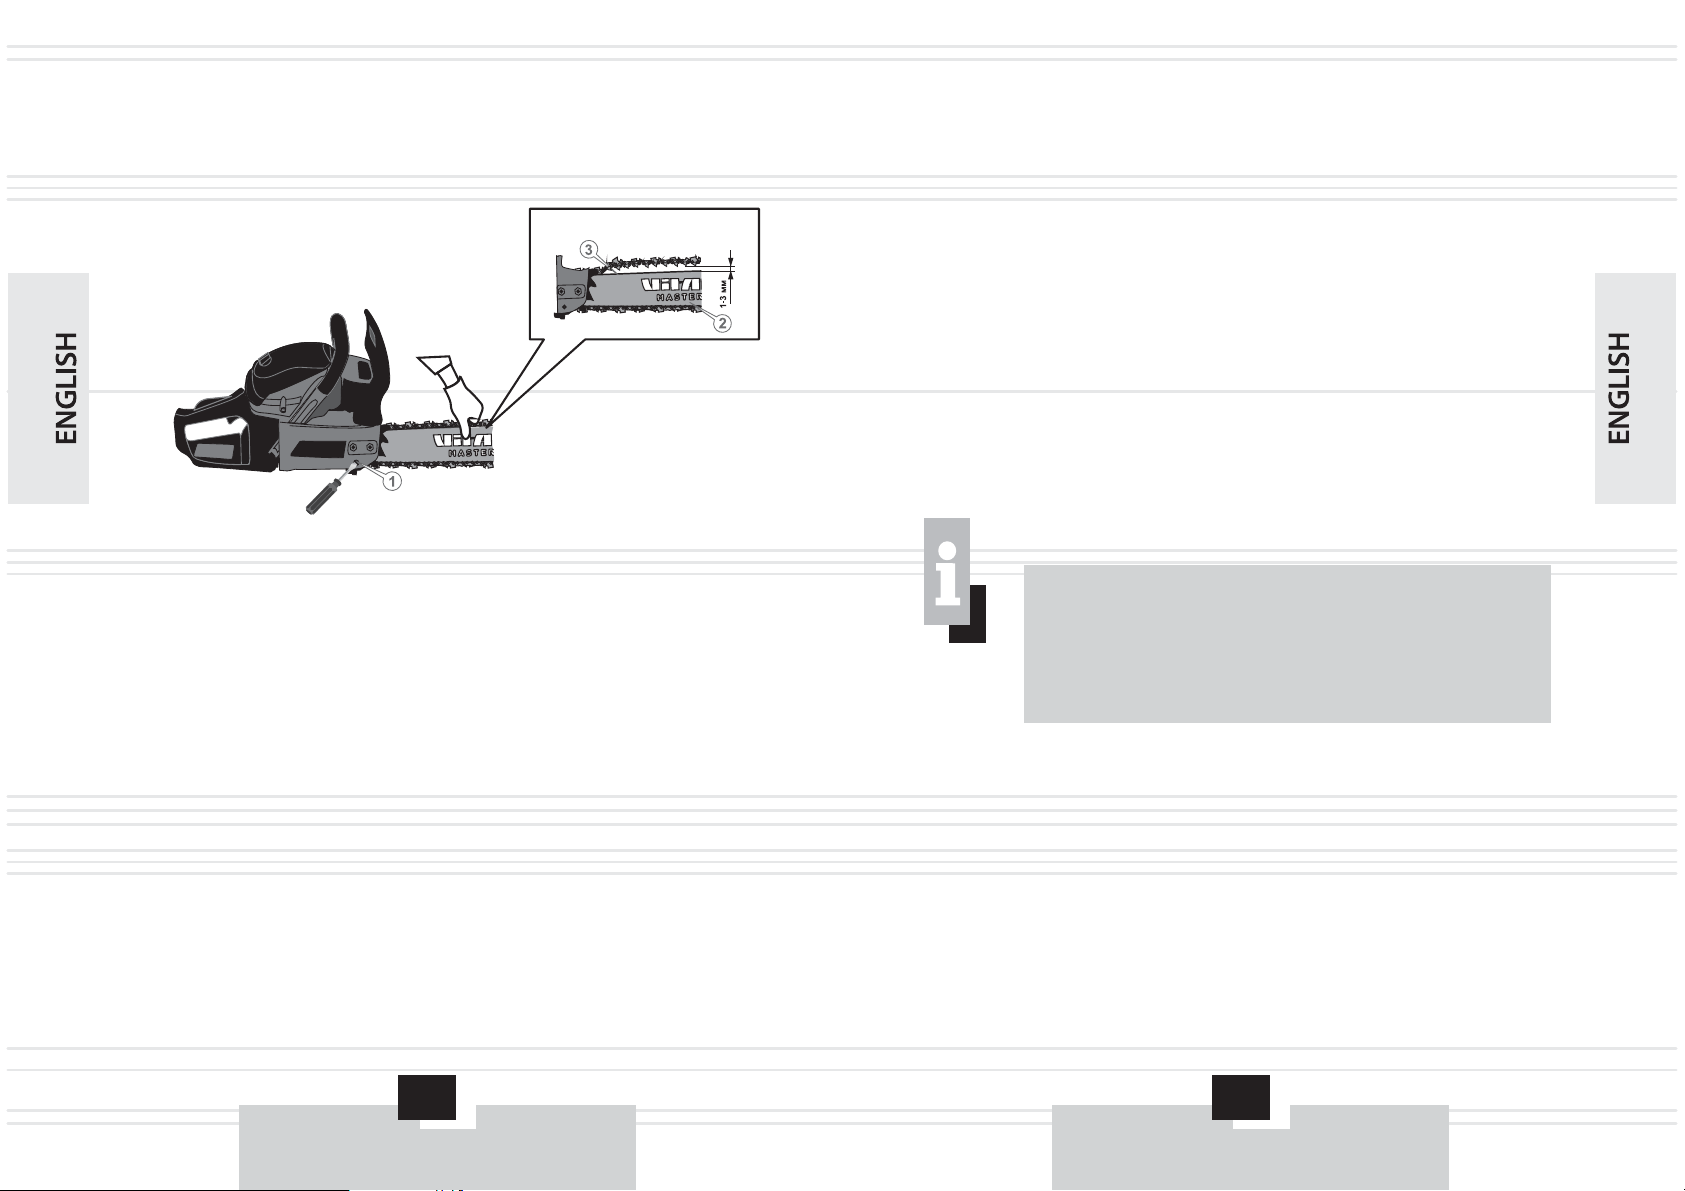
Procedure for checking the chain tension
1. Stop the engine.
2. Carefully grasp the upper branch of the chain in the middle of the bus, or a
little closer to her toe and pull the chain on the tire with a force of 1.5-2 kg.
3. Measure the distance between the chain guide (3) and rail (2). The gap
should be in the range of 1-3 mm, and the circuit itself should be easy to
move by hand along the groove tires.
4. If the gap is more or less than this figure -Adjust the chain tension.
Upon completion of the test chain tension slightly loosen the chain tension.
Otherwise, the circuit cools taut, causing excessive mechanical stress on the
tire as well as master and slave sprocket.
If you put a new chain on the tire, after the pre-tension adjustment, start the
engine and let the chainsaw to work for 3-5 minutes, and then finally adjust the
chain tension.
Adjust the chain tension
1. Stop the engine.
2. Slightly loosen the mounting tires - with the key turn the two nuts that
secure the lid counterclockwise one turn. If the clearance between the
chain guide and the bus does not meet the terms of 1-3 mm and rotate the
screwdriver chain tension adjustment screw (1) in the direction of the arrow
"A" or "B" (see Figure 5) to loosen or tighten the chain. By turning the screw
(1) anti-clockwise - the chain is weakened (A) while turning the adjusting
screw (1) clockwise (B) - the chain is tensioned. By rotating the screw pin
chain tension is moved along the slot in the lid of the pressure, dragging the
bus, which in turn causes the chain tension.
3. By adjusting the chain tension, make sure the chain is free to move in the
groove of the tire and correctly engaged with the teeth of the driven
sprocket. This gently pull chain by hand, by moving it over the bus in both
directions.
4. Securely tighten the caps key lock nuts securing the tire.
5. Check the chain tension, for which:
Start the engine and run the engine at high speed to a normal warm-up
circuit;
Stop the engine and re-check the distance between the chain guide and
the bus;
If the clearance between the chain guide and the bus does not meet the
terms of 1-3 mm, repeat the adjustment procedure.
NOTE!
If the circuit does not move into the recess or seizes tires,
which means that it is highly tensioned. Adjust, up until the
chain will not move freely in the groove tires and correctly
engaged with the teeth of the driven sprocket, and at the same
time, the chain will not sag.
figure 5
23
22
If you plan to operate a chainsaw in the cold season, the slightly loosen the
chain.
The high temperature tends to lengthen the chain (begins to sag), which
may lead to slippage of the tire chain. Upon completion of the chainsaw bit,
loosen the chain tension. Otherwise, when the cooling circuit will be stretched,
leading to excessive mechanical stress on the tire, chain and drive sprocket
driven.
Fueling
CAUTION!
The teeth of the chain have sharp edges, so if you check the
chain tension and tension adjustment is necessary to use
protective gloves or mittens, which are made of thick
material.
WARNING!
Chainsaw comes with no fuel in the tank!
Never fill the fuel tank with fresh gasoline. Use a mixture of
gasoline with two-stroke oil in the ratio of 25:1.
1. Stop the engine.
2. Prepare the fuel mixture, using a special container that came with the
package.At first pour gasoline into the tank, and then the oil. Mix well.
3. Thoroughly clean (!) Area around the fuel cap and the fuel tank cap itself
from contamination to prevent the ingress of chips, particles of dust and dirt
inside the tank.
4. Remove the plug (1) the fuel filler.
5. Fill the fuel tank 550 ml of fuel mixture (use a funnel to avoid spilling fuel).
6. Tighten the fuel cap fuel tank.
7. If the fuel mixture spilled on the body chainsaws, wipe dry.
Do not fill the fuel tank, clean gasoline. Since there is no chain saw engine
lubrication system, all of its internal parts are lubricated with oil from the
fuel mix.
Do not use gasohol - risk of engine damage rubber seals.
Do not use oil for four-stroke engines - the potential for contamination of
the channel exit exhaust, spark plugs, piston rings ceasing.
If possible, prepares the fuel mixture and pour it into the fuel tank just
before the chainsaw work. Storage fuel mixture over 10 days can lead to
unsuitable for further use of the fuel.
In order not to bring down the chainsaw engine:
NOTE!
To prepare the fuel mixture is recommended to use gasoline
with octane rating of 92.
figure 6
25
24

Check of oil supply
1. Start engine and for 1 minute hold at a height bar nose 15-20 cm above the
surface of any light, for example, spread out over a paper sheet or on
timber.
2. If the surface there are traces of oil, then the chain lubrication system is
working.
Oil filling
The order of filling oil in the tank:
In operation, the chainsaw, always make sure there is oil in the oil tank, and
the serviceability of its submission.
Before using chainsaws fill the oil tank 260 ml of a special oil for chain
saws.
Chainsaws «Vitals Master» BKZ 5022o, BKZ 5823o and BKZ 5823os
equipped with an adjustable oil pump - while the engine is on the chain and bar
served a necessary portion of the oil. With increasing engine speed increases
oil flow. Before you start a chainsaw necessarily adjust the oil flow (see
"Adjustment of the oil pump).
1. Stop the engine.
2 Thoroughly clean the area around the oil tank and the tank cap of dirt to
prevent the ingress of chips, particles of dust and dirt inside the tank.
3. Remove the fuel cap Oil tank (2) (see Figure 6).
4. Using a funnel to avoid spilling oil on the chain saw body or on the ground,
pour the oil in the oil tank. If oil is spilled on the body or the chainsaw on the
ground, wipe dry.
5 Tighten the fuel cap the oil tank.
.
.
WARNING!
Chainsaw without oil in the oil tank!
Chainsaw operation without the presence of oil in the oil tank,
or if the oil level in the tank is insufficient, is strictly forbidden.
When you operate a chainsaw tire, sprockets and the chain
will not be greased regularly, the effectiveness of the product
will go down, and the life of the tire, chains and sprockets
significantly reduced.
WARNING!
Do not fill the oil tank chainsaw lost their properties of oil and
oil is not designed for the lubrication of the saw chain.
NOTE!
If the chainsaw is not used for a long period of time or to be
transported product, be sure to drain the oil from the oil tank.
figure 7
27
26

3. If traces of oil are observed, stop the engine, remove the tire from the
chain, adjust the oil pump, clean the oil port and an oil hole in the tire. Run
the motor without the tire with a chain and make sure that the oil supply
system arrives. Only then install the tire with a chain on a chainsaw.
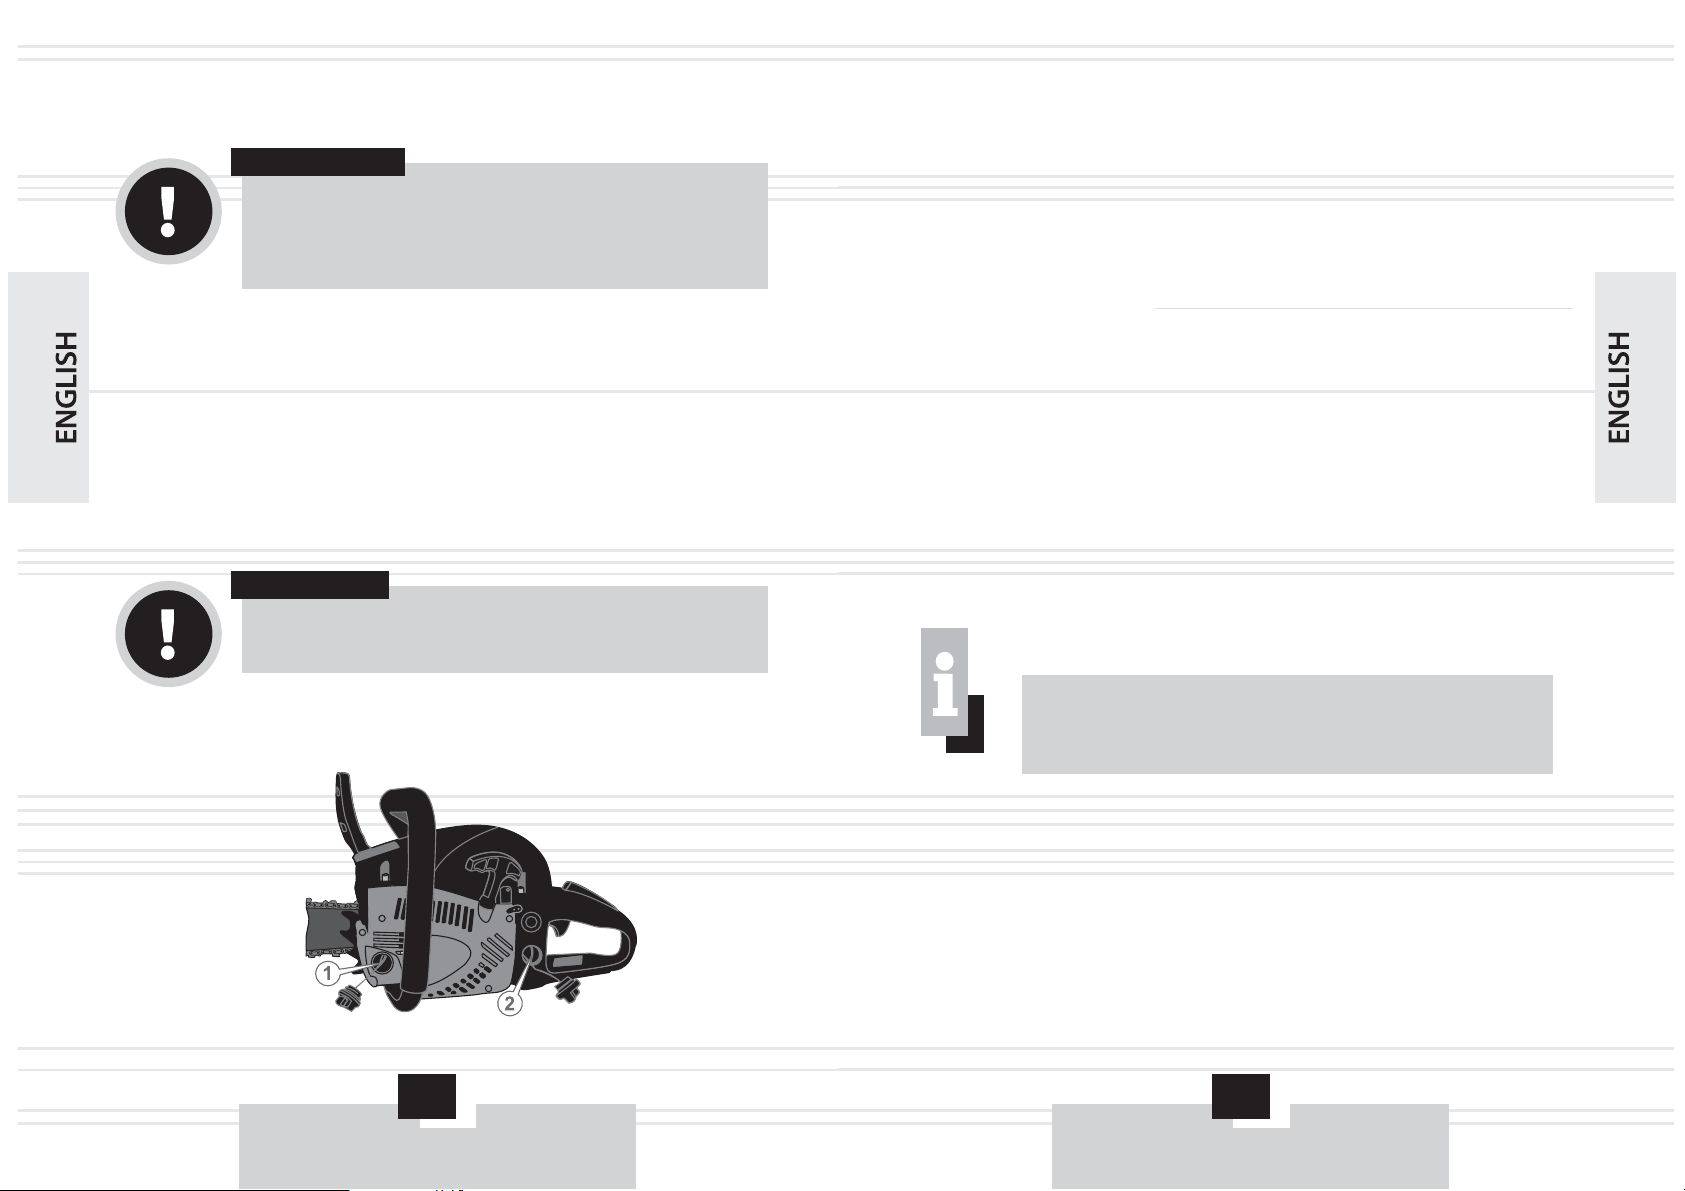
Adjustment of the oil pump
1. Insert a screwdriver into the slot of the stem (1) oil pump.
2. Adjust the flow of oil on the chain according to the sign (2), as marked on
the bottom of the saw.
3. Turn the valve stem (1) anti-clockwise towards "MAX" - oil supply
increased by rotating the stem (1) clockwise towards "MIN" - oil supply
decreases.
Checking the emergency brake circuit
WARNING!
If the oil is not supplied to the circuit for 1 minute, we
recommend to stop the engine. Otherwise, the circuit may be
damaged.
WARNING!
If the conduct of the procedure does not resolve the problem,
contact a service center.
NOTE!
Slot rod oil pump (1) is located on the bottom of the saw.
NOTE!
The quantity of oil fed to an oil pump circuit is dependent on
engine speed the higher the speed, the more oil is supplied to
the circuit and vice versa.
CAUTION!
The chain brake is designed to stop the chain for an instant
impact or "kickback." The chain brake is blocked from lock-
in-hand.
Operate a chainsaw with defective brake circuit is prohibited.
figure 8
29
28

The chain brake is disinhibited (unlocked - chain can rotate) when his arm
is in the cocked position (A) - the lever (2) pull towards the front of the handle
(1) (see Figure 9).
Chain brake inhibited (blocked - the chain is stopped) when the lever (2) is
in the on position (B). In this position, the lever you can not turn the chain (see
Figure 9).
Verify the operation of the emergency brake circuit should be carried out
immediately prior to the operation of the saw.
The order of test if the emergency brake circuit:
1. Place the chain saw on a flat surface. Make sure the tire chain is not
touching any other object.
2. Start the engine.
3. Click on the throttle.
4. Lock the chain brake, holding his hand fore grip clicking on the wrist of his
left hand safety brake chain in the direction of the arrow (see Figure 10).
Movement of the chain with the right to stop.
5. Release the throttle lever.
6. Stop the engine.
CAUTION!
The brake lever is fixed in both positions. In that case, if the
lever can not be moved to any of the provisions or strong
resistance is felt - to use a chainsaw is prohibited. NOTE!
If the brake chain rotates, contact the service center.
figure 9 figure 01
31
30

Starting and stopping the engine
Starting the engine at temperatures above +5 °C
1. Fill the fuel tank fuel mixture.
2. Fill the oil tank oil used to lubricate the chain.
3. Turn the chain brake.
4. Place the ignition switch (1) to the upper position "I" (see Figure 11).
Make sure the tire is not touching any other object.
6 Place the chain saw on a flat surface. Hold a product as shown in Figure 11.
5.
.
7. Pump the fuel to the carburetor, using the manual fuel pump "primer". To do
this, click on the cap 4-6 times "primer" (22) until it appears fuel (see Figure
1).
8. Pull the handle all the way Choke (2) in the direction of arrow (A) (see
Figure 11). In this case, close the choke valve.
9. Operate the starter motor: first gently pull the starter handle (3) (see Figure
11) in the direction of the arrow (B) until you feel resistance. Sensing
resistance, return the handle to the original position, and then abruptly pull
the starter handle. Repeat this process 2-3 times until the engine starts to
"catch." Once the engine will "catch", stop the process of starting the
engine chainsaw and immediately open the choke by turning the valve to
its original position.
10.Again, pull the starter grip to start the engine. Once the engine is running
chainsaw, starter handle slowly return to starting position.
11.Warm up the engine for 1-3 minutes (depending on ambient temperature)
until the engine begins to work on the stable idle.
12.Unlock the chain brake.
CAUTION!
To avoid injury to start the engine chainsaw is only necessary
when the brake circuit.
WARNING!
To prevent failure of the clutch centrifugal clutch and chain
brake mechanism does not allow the engine revving
chainsaw while the brake circuit.
WARNING!
When you press the throttle lever choke valve opens
automatically (only for BKZ 5823os).
WARNING!
Pull the starter handle to be very careful not to pull the starter
cord.
figure 11
33
32
B

Features of the engine chain saws in the cold (winter) time
The order of the engine stop
Engine Break
Please be aware that the ambient temperature is below +5 °C to start the
engine chainsaw becomes more difficult.
1. Starting the engine in cold weather (winter) being implemented at higher
speeds.
2. Engine start-up is carried out only when the brake is off the chain.
3. Warm up the engine for 3-5 minutes (depending on ambient temperature)
until the engine begins to work on the stable idle.
1. Release the throttle lever.
2. Allow the engine to idle for 1-3 minutes.
3. Place the ignition switch (1) in the lower position "0» (STOP) (see
Figure 11).
New or recently renovated chainsaw engine must be run for 5 hours.
Engine Break-in can be performed at the disconnected bus with a chain.
Throughout the period running engine must be running at idling speed
specified in paragraph 3 of this manual. During the run-in or run the engine at
higher speeds and loads, as the correctness of the durability of the running of
the engine.
5.3. Chainsaw work
Sawing wood
If the chain is sharpened, the process of cutting should take place without
much effort.
There is a way to make the cut trees fall down to where you need it.
WARNING!
If deviations are detected in the engine, stop it immediately,
find out cause of the problem and take steps to eliminate
them.
WARNING!
Before proceeding directly to the work of a chainsaw,
carefully read this manual.
Initially Practice - Cut the small tree or branch.
CAUTION!
Remember that a falling tree can seriously damage anything
that will meet on the way.
figure 21
35
34
2-5 mс
1/10 tree trunk
diameter
30 - 45°°
1/3 tree trunk
diameter
3 3 3 3
33
3
33
12
1 2
3

The sequence of operation
1. Clear the area around the tree.
2. Determine the direction in which to cut down the tree to fall, taking into
account the wind direction, the location of the branches on the tree,
convenience, after felling the tree.
3. Take a stable stance, sitting so that the chainsaw was not able to cause
injury to you or bump into an obstacle.
4. Prepare the way of waste, which must be diametrically opposite to that of
the fall of the cut tree (see Figure 13).
5. Start the engine.
6. Start sawing wood on the side (3), which has to fall (see Figure 12). Make
propyl wedge (1) at an angle of 30-45 degrees, the depth of which is
approximately equal to 1/3 the thickness of the barrel. The felling cut (2) to
make the opposite side of the wedge cut by placing the spike bumper
chainsaw to the trunk 2.5-5 cm above the lower edge of the wedge cut.
Complete sawing when to cut the inside edge of the wedge will remain
somewhere tenth the diameter of the trunk.
7. When making the felling cut, do not try to saw through the trunk to the
wedge-shaped cut. Part of the trunk, the rest not sawn, will serve pin by
falling trees, directing it to the desired direction. When the tree starts to fall,
stop the engine chainsaw, put the product on the ground and immediately
move away to a scheduled safe area.
8. Using special harvester accessories, fell a tree in a pre-planned direction.
Bucking
Bucking - a cross-sawing a fallen tree or log into pieces.
Place the timber on the support (using goats);
when sawing logs on the slope position yourself always on the highest part
of the slope;
When sawing never stand on a log.
The basic rules that apply in the bucking
Sawing logs without placing the poles
CAUTION!
When the tree starts to fall, get away from the trunk of at least
3 meters in order to avoid, in the case of a rebound in the trunk
stump.
NOTE!
To cut the tree trunk to the engine at full throttle while slowly
sinking bus chainsaw in the trunk of the tree.
1-st notch
2/3 the diameter
of the trunk of a tree
figure 31
figure 41
37
36
45° 45°
The intended direction of the fall
Dangerous zone
Dangerous zone
Run awayRun away Run awayRun away
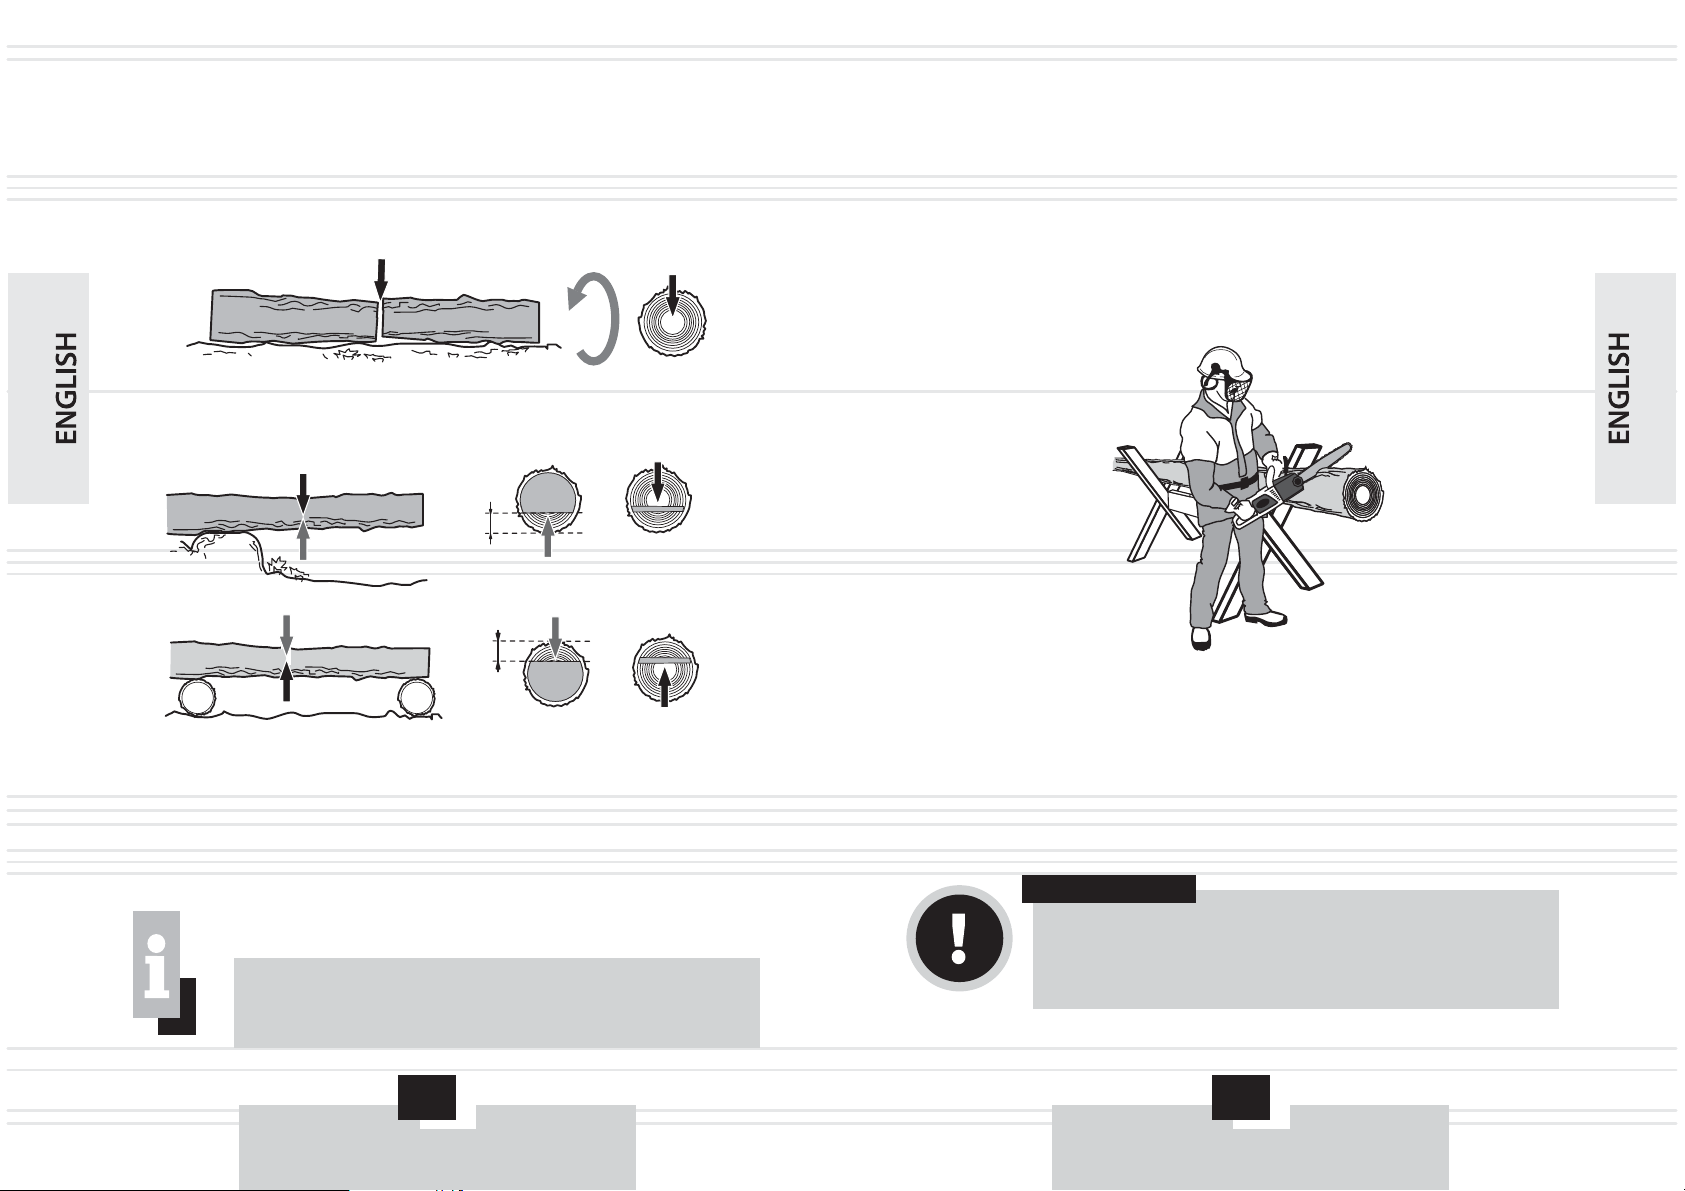
1. Make the first cut down to 2/3 the diameter of the trunk of a tree (see
Figure 14).
2. Turn the log and cut (2) it from the opposite side (see Figure 15).
1. Make cuts logs in the "A". Make the first cut from the bottom up (1) 1/3 of the
log and finish the cut from the top down.
2. If the timber has two points of support at the edges of the support and are
positioned correctly in relation to the center of gravity, the first cut (area 'B')
to make downward (a third the diameter of the log), and the second propyl -
upward (toward the first).
Sawing logs with underplayed supports (see Figure 16)
If, however, a tire jammed and can not pull out without applying significant
effort, in any case, do not pull a chainsaw and do not try to pull out. Stop the
operation of the product, drive pin in the cut to reveal it, and then gently pull out
the bus.
When cutting logs are best used as a stop goats. Make sure when cutting
logs securely in place (see Figure 17).
Make the first cut from the bottom up to 1/3 of the log and finish the cut from
the top down. Gently slide the timber and repeat cutting.
Sawing logs using goat
Pruning branches and twigs
2-nd notch
Upheaval
180°
Upheaval
180°
NOTE!
If you make a cut on the wrong side, there will be a pinched
tires in the wood.
CAUTION!
During sawing not keep a chainsaw at arm's length, and
placed vertically or overhead (see Figure 18).
Be careful that you do not toe the tire touched a tree trunk and
branches nearby.
figure 51
figure 61
figure 71
39
38
1st saw-cut
2nd saw-cut
1:st saw-cut
bottom to top
2:nd saw-cut
top to bottom
1/3 tree trunk
diameter
1st saw-cut
2nd saw-cut
2:nd saw-cut
bottom to top
1:st saw-cut
top to bottom
А
В
1/3 tree trunk
diameter
Table of contents
Languages:


