Vizio D50u-D1 User manual

Models D50u-D1 and D55u-D1
USER MANUAL
VIZIO

6DIHW\&HUWLȴFDWLRQ
ii
THANK YOU FOR CHOOSING VIZIO
And congratulations on your new VIZIO HDTV.
To get the most out of your new VIZIO product, read these
instructions before using your product and retain them for future
reference. Be sure to inspect the package contents to ensure there
are no missing or damaged parts.
PRODUCT REGISTRATION
To purchase or inquire about accessories and installation services
for your VIZIO product, visit our website at www.VIZIO.com or call
toll free at (877) 698-4946.
We recommend that you register your VIZIO product at
www.VIZIO.com
Extended Warranties
For peace of mind, and to protect your investment beyond the
VWDQGDUGZDUUDQW\9Ζ=Ζ2RHUVRQVLWHH[WHQGHGZDUUDQW\VHUYLFH
plans. These plans provide additional coverage during the standard
ZDUUDQW\SHULRG7R SXUFKDVH DQ H[WHQGHGZDUUDQW\VHUYLFH SODQ
visit www.VIZIO.com.
WHEN READING THIS MANUAL
When you see this symbol, please read the
accompanying important warning or notice. It is
intended to alert you to the presence of important
operating instructions.
IMPORTANT SAFETY INSTRUCTIONS
<RXU 79 LV GHVLJQHG DQG PDQXIDFWXUHG WR RSHUDWH ZLWKLQ GHȴQHG
GHVLJQOLPLWV0LVXVHPD\UHVXOWLQHOHFWULFVKRFNRUȴUH7RSUHYHQW
your TV from being damaged, the following instructions should be
observed for the installation, use, and maintenance of your TV.
Read the following safety instructions before operating your TV.
Keep these instructions in a safe place for future reference.
• To reduce the risk of electric shock or component damage,
VZLWFKRWKHSRZHUEHIRUHFRQQHFWLQJRWKHUFRPSRQHQWV
to your TV.
• Read these instructions.
• Keep these instructions.
• Heed all warnings.
• Follow all instructions.
• Do not use this apparatus near water.
• Clean only with dry cloth.
• Do not block any ventilation openings. Install in accordance
with the manufacturer’s instructions.
• Do not install near any heat sources such as radiators, heat
UHJLVWHUVVWRYHVRURWKHUDSSDUDWXVLQFOXGLQJDPSOLȴHUV
that produce heat.
• Do not defeat the safety purpose of the polarized or
grounding-type plug. A polarized plug has two blades with
one wider than the other. A grounding type plug has two
blades and a third grounding prong. The wide blade or the
third prong are provided for your safety. If the provided
SOXJGRHVQRWȴWLQWR\RXURXWOHWFRQVXOWDQHOHFWULFLDQIRU
replacement of the obsolete outlet.
• Protect the power cord from being walked on or pinched
particularly at plugs, convenience receptacles, and the point
ZKHUHWKH\H[LWIURPWKHDSSDUDWXV
• 2QO\XVHDWWDFKPHQWVDFFHVVRULHVVSHFLȴHGE\WKH
manufacturer.
• Use only with the cart, stand, tripod, bracket,
RU WDEOH VSHFLȴHG E\ WKH PDQXIDFWXUHU RU
sold with the apparatus. When a cart is used,
use caution when moving the cart/apparatus
combination to avoid injury from tip-over.
• Unplug this apparatus during lightning storms or when
unused for long periods of time.
• 5HIHUDOOVHUYLFLQJWRTXDOLȴHGVHUYLFHSHUVRQQHO6HUYLFLQJ
is required when the apparatus has been damaged in any
way, such as the power-supply cord or plug is damaged,
liquid has been spilled or objects have fallen into the
DSSDUDWXVWKHDSSDUDWXVKDVEHHQH[SRVHGWRUDLQRU
moisture, does not operate normally, or has been dropped.
• Unplug the power cord before cleaning your TV.
• When moving your TV from an area of low temperature to
an area of high temperature, condensation may form in the
housing. Wait before turning on your TV to avoid causing
ȴUHHOHFWULFVKRFNRUFRPSRQHQWGDPDJH
• A distance of at least three feet should be maintained
between your TV and any heat source, such as a radiator,
KHDWHURYHQDPSOLȴHUHWF'RQRWLQVWDOO\RXU79FORVHWR
smoke. Operating your TV close to smoke or moisture may
FDXVHȴUHRUHOHFWULFVKRFN
• 6ORWVDQGRSHQLQJVLQWKHEDFNDQGERWWRPRIWKHFDELQHW
are provided for ventilation. To ensure reliable operation of
your TV and to protect it from overheating, be sure these
openings are not blocked or covered. Do not place your
TV in a bookcase or cabinet unless proper ventilation is
provided.
• Never push any object into the slots and openings on your
TV cabinet. Do not place any objects on the top of your TV.
'RLQJVRFRXOGVKRUWFLUFXLWSDUWVFDXVLQJDȴUHRUHOHFWULF
shock. Never spill liquids on your TV.
• Your TV should be operated only from the type of power
source indicated on the label. If you are not sure of the type
of power supplied to your home, consult your dealer or
local power company.
When you see this symbol, please read the
accompanying helpful tip.

iii
• Do not apply pressure or throw objects at your TV. This may
compromise the integrity of the display. The manufacturer’s
warranty does not cover user abuse or improper
installations.
• 7KHSRZHUFRUGPXVWEHUHSODFHGZKHQXVLQJGLHUHQW
YROWDJHWKDQWKHYROWDJHVSHFLȴHG)RUPRUHLQIRUPDWLRQ
contact your dealer.
• :KHQFRQQHFWHGWRDSRZHURXWOHWSRZHULVDOZD\VȵRZLQJ
into your TV. To totally disconnect power, unplug the power
cord.
• 7KHOLJKWQLQJȵDVKZLWKDUURZKHDGV\PEROZLWKLQDQ
equilateral triangle is intended to alert the user to the
presence of un-isolated, dangerous voltage within the
LQVLGHRI\RXU79WKDWPD\EHRIVXɝFLHQWPDJQLWXGHWR
constitute a risk of electric shock to persons.
• 'RQRWRYHUORDGSRZHUVWULSVDQGH[WHQVLRQFRUGV
2YHUORDGLQJFDQUHVXOWLQȴUHRUHOHFWULFVKRFN
• The wall socket should be installed near your TV and easily
accessible.
• Only power of the marked voltage can be used for your TV.
$Q\RWKHUYROWDJHWKDQWKHVSHFLȴHGYROWDJHPD\FDXVHȴUH
or electric shock.
• Do not touch the power cord during lightning. To avoid
electric shock, avoid handling the power cord during
electrical storms.
• Unplug your TV during a lightning storm or when it will not
be used for long period of time. This will protect your TV
from damage due to power surges.
• Do not attempt to repair or service your TV yourself.
2SHQLQJRUUHPRYLQJWKHEDFNFRYHUPD\H[SRVH\RXWR
high voltages, electric shock, and other hazards. If repair
is required, contact your dealer and refer all servicing to
TXDOLȴHGVHUYLFHSHUVRQQHO
• :$51Ζ1*.HHS\RXU79DZD\IURPPRLVWXUH'RQRWH[SRVH
your TV to rain or moisture. If water penetrates into your TV,
unplug the power cord and contact your dealer. Continuous
XVHLQWKLVFDVHPD\UHVXOWLQȴUHRUHOHFWULFVKRFN
• Do not use your TV if any abnormality occurs. If any smoke
or odor becomes apparent, unplug the power cord and
contact your dealer immediately. Do not try to repair your
TV yourself.
• Avoid using dropped or damaged appliances. If your TV
is dropped and the housing is damaged, the internal
components may function abnormally. Unplug the power
cord immediately and contact your dealer for repair.
&RQWLQXHGXVHRI\RXU79PD\FDXVHȴUHRUHOHFWULFVKRFN
• Do not install your TV in an area with heavy dust or high
humidity. Operating your TV in environments with heavy
GXVWRUKLJKKXPLGLW\PD\FDXVHȴUHRUHOHFWULFVKRFN
• Follow instructions for moving your TV. Ensure that the
power cord and any other cables are unplugged before
moving your TV.
• When unplugging your TV, hold the AC/DC power adapter,
not the cord. Pulling on the power cord may damage the
ZLUHVLQVLGHWKHFRUGDQGFDXVHȴUHRUHOHFWULFVKRFN:KHQ
\RXU79ZLOOQRWEHXVHGIRUDQH[WHQGHGSHULRGRIWLPH
unplug the power cord.
• To reduce risk of electric shock, do not touch the connector
with wet hands.
• Insert batteries in accordance with instructions. Incorrect
polarities may cause the batteries to leak which can
damage the remote control or injure the operator. Do not
H[SRVHEDWWHULHVWRH[FHVVLYHKHDWVXFKDVVXQVKLQHȴUHRU
the like.
• If any of the following occurs, contact the dealer:
- The power cord fails or frays.
- Liquid sprays or any object drops into your TV.
<RXU79LVH[SRVHGWRUDLQRURWKHUPRLVWXUH
- Your TV is dropped or damaged in any way.
- The performance of your TV changes substantially.
• 7KLVDSSDUDWXVVKDOOQRWEHH[SRVHGWRGULSSLQJRU
VSODVKLQJDQGQRREMHFWVȴOOHGZLWKOLTXLGVVXFKDVYDVHV
shall be placed on the apparatus.
• The mains plug or appliance coupler is used as the
disconnect device, the disconnect device shall remain
readily operable.
• CAUTION - These servicing instructions are for use by
TXDOLȴHGVHUYLFHSHUVRQQHORQO\7RUHGXFHWKHULVNRI
electric shock, do not perform any servicing other than
that contained in the operating instructions unless you are
TXDOLȴHGWRGRVR
• TKHOLJKWQLQJȵDVKZLWKDUURZKHDGV\PEROZLWKLQDQ
equilateral triangle is intended to alert the user to the
SUHVHQFHRIXQLQVXODWHG'$1*(528692/7$*(ZLWKLQWKH
SURGXFWȇVHQFORVXUHWKDWPD\EHRIVXɝFLHQWPDJQLWXGHWR
constitute a risk of electrical shock to persons.
h

iv
Ground Clamp
Antenna Lead In Wire
Antenna Discharge Unit
1(&6HFWLRQ
Grounding Conductors
1(&6HFWLRQ
Ground Clamps
3RZHU6HUYLFH*URXQGLQJ(OHFWURGH6\VWHP
1(&$57SDUW+
(OHFWULF6HUYLFH(TXLSPHQW
TELEVISION ANTENNA CONNECTION
PROTECTION
If an outside antenna/satellite dish or cable system is to be
connected to the TV, make sure that the antenna or cable system
is electrically grounded to provide some protection against voltage
surges and static charges.
$UWLFOHRIWKH1DWLRQDO(OHFWULFDO&RGH$16Ζ1)36$SURYLGHV
information with regard to proper grounding of the mast and
supporting structure, grounding of the lead-in wire to an antenna
discharge unit, size of the grounding conductors, location of
antenna discharge unit, connection to grounding electrodes, and
requirements of the grounding electrode.
Lightning Protection
For added protection of the TV during a lightning storm or when it
is left unattended or unused for long periods of time, unplug the TV
from the wall outlet and disconnect the antenna or cable system.
Power Lines
Do not locate the antenna near overhead light or power circuits, or
where it could fall into such power lines or circuits. Remember, the
VFUHHQRIWKHFRD[LDOFDEOHLVLQWHQGHGWREHFRQQHFWHGWRHDUWKLQ
the building installation.

v
Manufactured under license from Dolby Laboratories.
Dolby and the double-D symbol are trademarks of Dolby
Laboratories.
+'0Ζ WKH +'0Ζ ORJR DQG +LJK'HȴQLWLRQ 0XOWLPHGLD
Interface are trademarks or registered trademarks of
HDMI Licensing LLC.
)RU'76SDWHQWVVHHKWWSSDWHQWVGWVFRP
0DQXIDFWXUHGXQGHUOLFHQVHIURP'76/LFHQVLQJ/LPLWHG
'76 WKH 6\PERO '76 DQG WKH 6\PERO WRJHWKHU DUH
UHJLVWHUHG WUDGHPDUNV DQG '76 6WXGLR 6RXQG LV D
WUDGHPDUNRI'76ΖQFk'76ΖQF$OO5LJKWV5HVHUYHG
7KLV SURGXFW TXDOLȴHV IRU (1(5*< 67$5 LQ WKH ȊIDFWRU\
default” settings and this is the setting in which power
savings will be achieved. Changing the factory deafult
picture settings or enabling other features will increase
SRZHUFRQVXPSWLRQWKDWFRXOGH[FHHGWKHOLPLWVQHFHVVDU\
WRTXDOLI\IRU(1(5*<67$5UDWLQJ)RUPRUHLQIRUPDWLRQ
RQWKH(1(5*<67$5SURJUDPUHIHUWRHQHUJ\VWDUJRY

Table Of Contents
vi
Table Of Contents
Getting to Know Your TV .............................................7
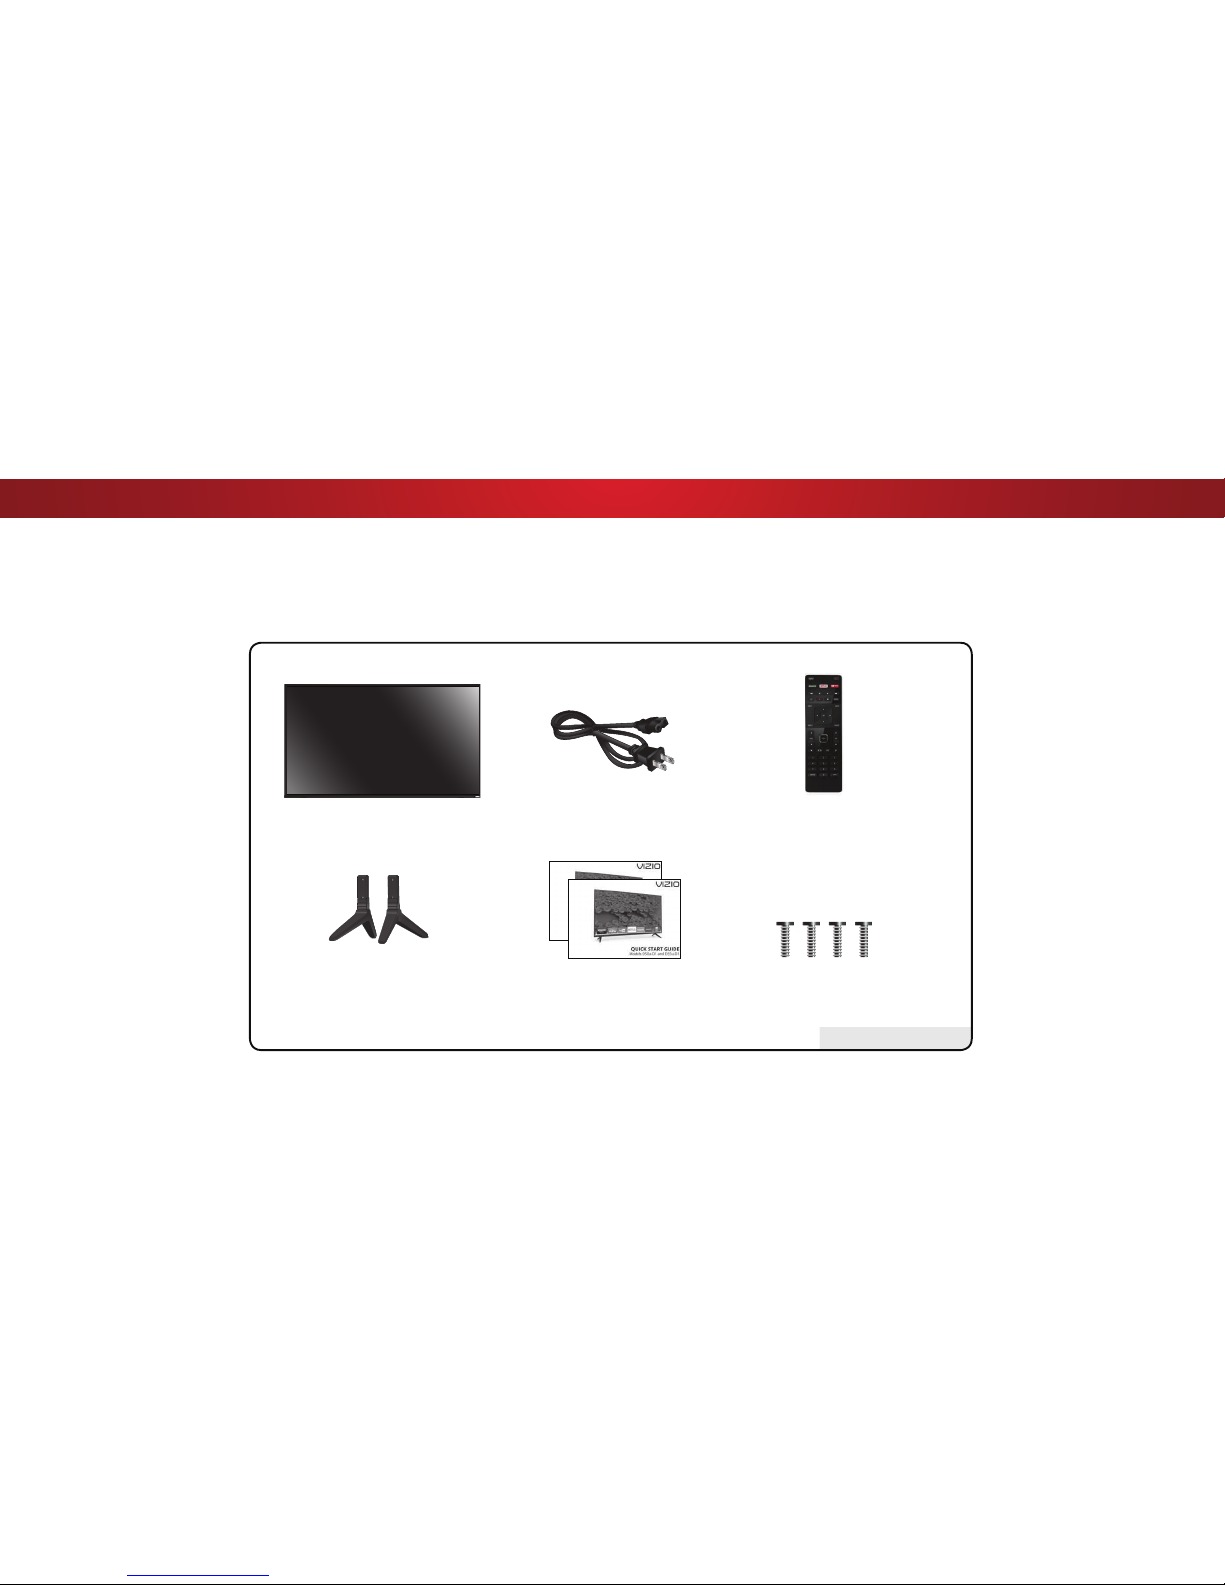
Inspecting the Package Contents ...................................................... 7
Installing the TV ..................................................................................8
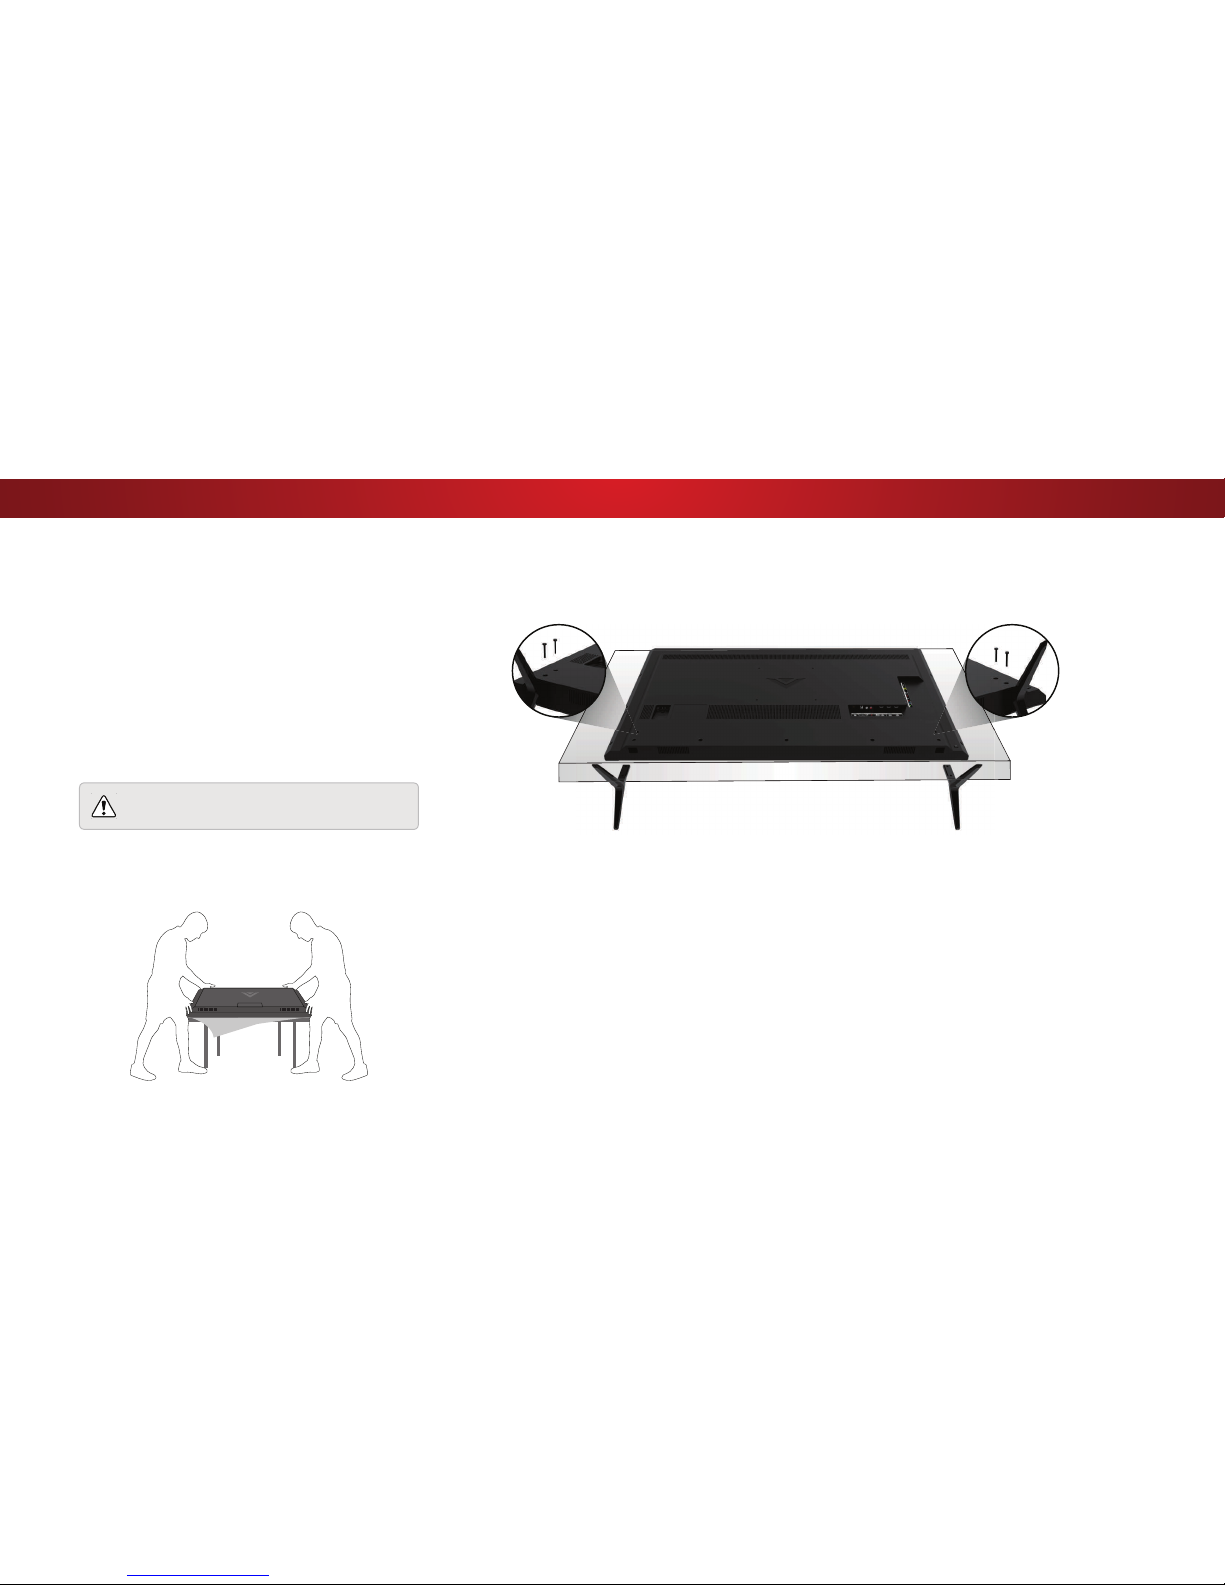
Installing the TV Stand ....................................................................8
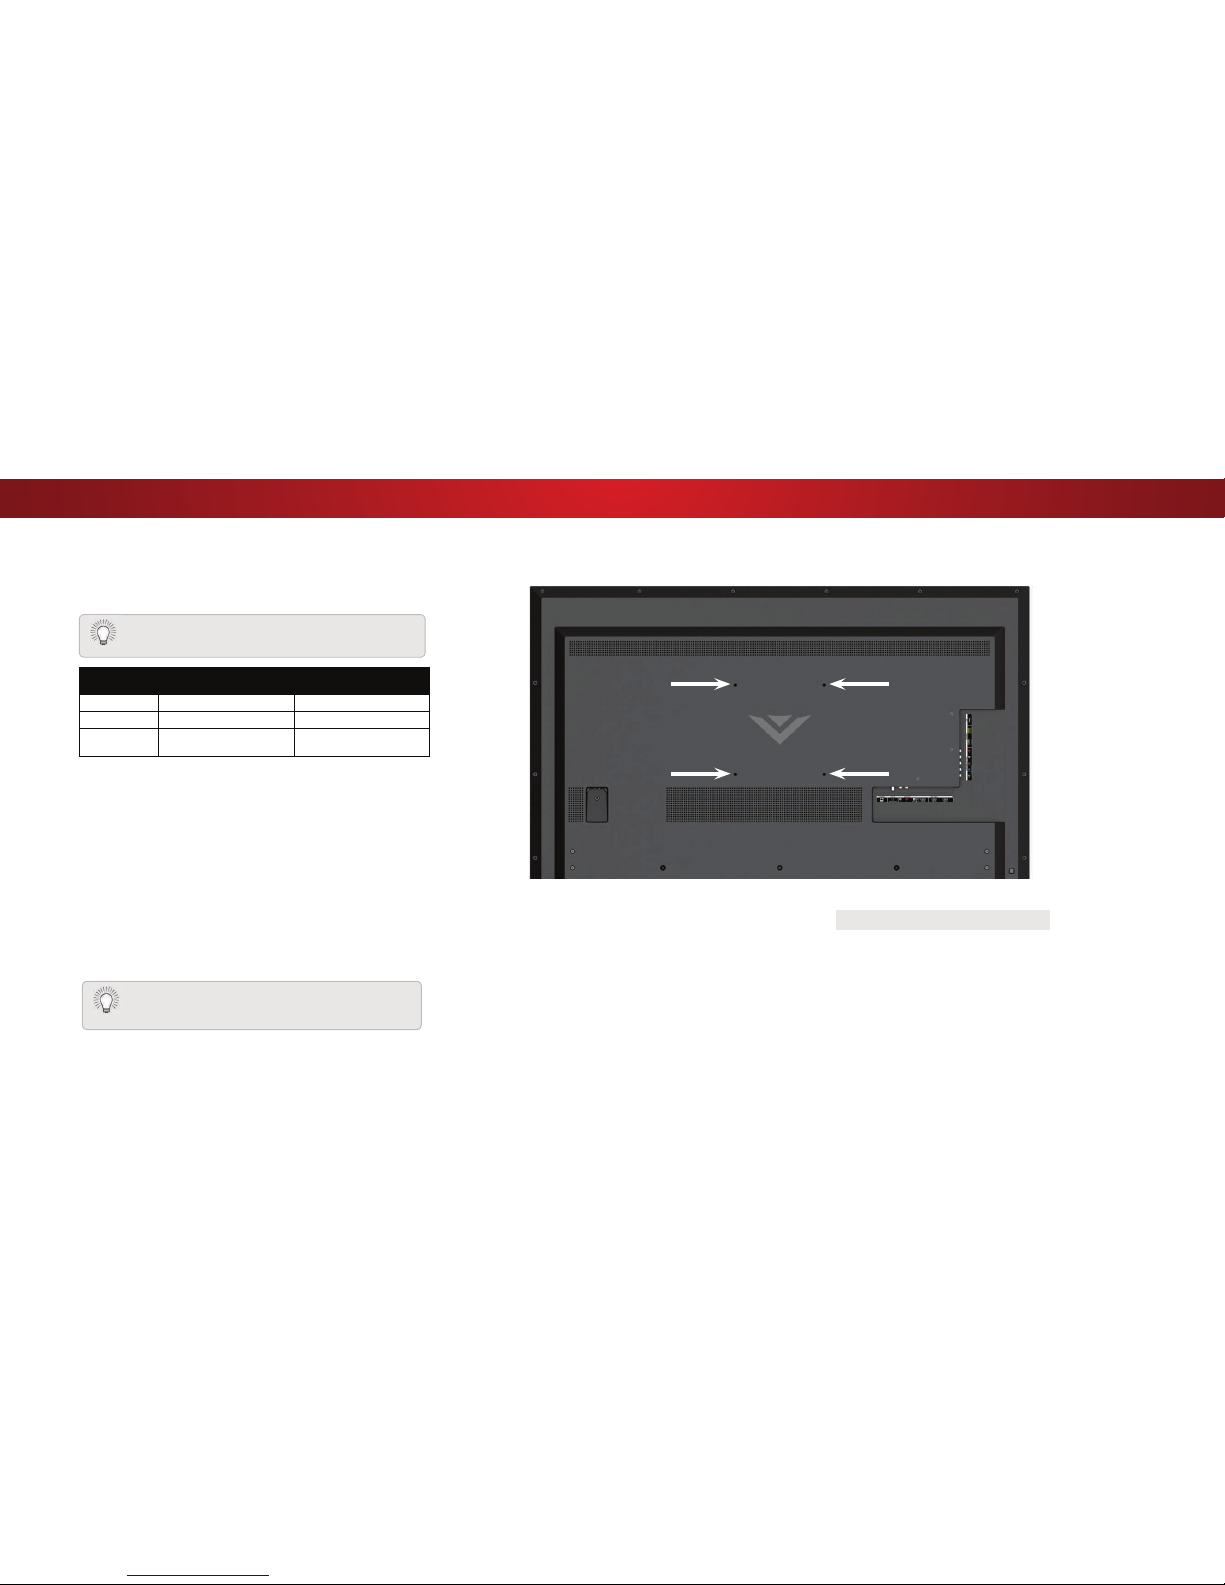
Installing the TV on a Wall............................................................... 9
Front Panel .......................................................................................... 10
Rear Panel ........................................................................................... 11
Remote Control Front.........................................................................12
Replacing the Batteries ................................................................... 12
Connecting Your Devices.............................................13
Connecting A Device...........................................................................13
Connecting A Device - Audio & Video Cable Types...........................14
Connecting an Audio Device ..............................................................15
Connecting An Audio Device - Audio Cable Types............................16
Connecting an Audio Device - ARC ....................................................17
Connecting to Your Network..............................................................18
Completing The First-Time Setup ...............................19
Using the On-Screen Menu .........................................22
Navigating the On-Screen Menu........................................................22
Changing the Input Source ................................................................22
Changing the Screen Aspect Ratio.....................................................23
Viewing Video with the Menu Open ..................................................24
Adjusting the Picture Settings............................................................25
Adjusting More Picture Settings ..................................................... 26
Adjusting the Color Temperature...................................................26
Adjusting the Picture Mode Edit Settings ......................................27
Saving a Custom Picture Mode .......................................................27
Locking/Unlocking a Custom Picture Mode ...................................27
Deleting a Custom Picture Mode.................................................... 28
Resetting a Picture Mode ................................................................ 28
Adjusting the Color Tuner Settings ................................................29
Adjusting the Audio Settings..............................................................31
Changing the Equalizer Settings ..................................................... 31
Deleting the Custom Audio Mode .................................................. 32
Setting Timers ..................................................................................... 33
Setting the Sleep Timer ................................................................... 33
6HWWLQJWKH$XWR3RZHU2)HDWXUH ...............................................33
Enabling the Screen Saver .............................................................. 33
Blanking the Screen......................................................................... 33
Using the Network Connection Menu ............................................... 34
Connecting to a Wireless Network ................................................. 34
Changing the Manual Setup Settings ............................................. 34
Finding MAC Addresses for Network Setup................................... 34
Connecting to a Hidden Network ................................................... 35
Setting Up Channels ...........................................................................36
Selecting a Channel Source............................................................. 36
Scanning for Channels ....................................................................36
Adding New Channels .....................................................................36
Skipping Channels ...........................................................................37
Listening to Alternate Audio ..............................................................38
Changing the Analog Audio Language ...........................................38
Setting Up Closed Captioning ............................................................39
Changing the Appearance of Digital Closed Captions .................. 39
Renaming Devices on the Input Menu .............................................. 41
Changing the TV Settings ...................................................................42
Viewing System Information ........................................................... 42
Changing the On-Screen Menu Language .....................................42
Setting the Time and Local Settings ............................................... 43
Using the Parental Controls............................................................ 43
Accessing the Parental Controls Menu .......................................... 43
Enabling or Disabling Program Ratings .........................................43
Locking and Unlocking Channels....................................................43
Blocking and Unblocking Content by Rating .................................44
Changing the Parental Control PIN ................................................ 44
Resetting the Content Locks ...........................................................44
Changing the View Mode Settings..................................................45
Changing the Screen Aspect Ratio.....................................................45
Changing the DLNA Name of Your TV ............................................46
Adjusting the CEC Settings ..............................................................46
7XUQLQJWKH3RZHUΖQGLFDWRU2QRU2 ..........................................46
Using the Reset & Admin Menu......................................................... 47
Restoring the TV to Factory Default Settings................................. 47
Enabling and Disabling Smart Interactivity.................................... 47
Using the Guided Setup Menu........................................................ 48
Using the Info Window ....................................................................... 48
Using the USB Media Player........................................49
Preparing Your USB Drive to Play USB Media ...............................49
Playing USB Media...........................................................................49
Removing the USB Drive from the TV ............................................ 49
Using VIZIO Internet Apps Plus®(V.I.A. Plus) .............53
Using the Fullscreen V.I.A. Apps Window..........................................54
Fullscreen V.I.A. Plus Apps Window Overview ..................................55
Customizing the V.I.A. Plus Apps Window ........................................56
Adding an App to the My Apps Tab................................................56
Deleting an App from the My Apps Tab .........................................56
Moving an App in My Apps .............................................................56
Viewing Ultra HD Content ...........................................58
What is Ultra HD?................................................................................58
What You Need to View Ultra HD Content........................................58
What Are HDMI 2.0 and HDCP 2.2? ................................................... 58
Troubleshooting & Technical Support........................59
6SHFLȴFDWLRQV ...............................................................63
Warranty.......................................................................65
Legal & Compliance .....................................................66

1
INSPECTING THE PACKAGE CONTENTS
Before installing your new TV, take a moment to inspect the package
contents. Use the images below to ensure nothing is missing or
damaged.
Getting to Know Your TV
PACKAGE CONTENTS
Power CordVIZIO LED UHDTV Remote Control
with Batteries
2 x Quick Start Guides
(1 English, 1 French-Spanish)
4 x Phillips Screws
TV Stands
7

1
INSTALLING THE TV
After removing the TV from the box and inspecting the package
contents you can begin installing the TV. Your TV can be installed in
two ways:
• 2QDȵDWVXUIDFHXVLQJWKHLQFOXGHGVWDQG
• On a wall, using a VESA-standard wall mount (not included)
Installing the TV Stand
Your TV includes a stand designed to support the weight of the TV
and keep it from falling over. However, the TV can still fall over if:
• It is placed on an uneven, unstable, or non-level surface
• It is pushed, pulled, or otherwise improperly moved
• If an earthquake occurs and the TV is not properly secured
3ODFHWKH79VFUHHQGRZQRQDFOHDQȵDWVXUIDFH7RSUHYHQW
scratches or damage to the screen, place the TV on a soft surface,
such as carpet, rug, or blanket.
To install the stands:
1. Insert the stands into the base of the TV.
2. Secure each stand to the TV with two (2) Phillips screws (included).
Insert the screws into the back of the TV and tighten them using a
Phillips screwdriver.
3. :KHQ\RXDUHȴQLVKHGSODFHWKH79RQDVWDEOHOHYHOVXUIDFH
It is recommended that two people take part in the
base installation.
8

1
Installing the TV on a Wall
To mount your TV on a wall, you will need a wall mount. Consult the
LQIRUPDWLRQEHORZWRȴQGWKHDSSURSULDWHPRXQWIRU\RXU79PRGHO
Be sure the mount you choose is capable of supporting the weight of
the TV. After you have determined that you have the correct mount
for your TV, you can begin the installation.
To install your TV on a wall:
1. Disconnect any cables connected to your TV.
2. 3ODFHWKH79IDFHGRZQRQDFOHDQȵDWVWDEOHVXUIDFH%HVXUH
the surface is clear of debris that can scratch or damage the TV.
3. Remove the stands by loosening and removing
the screws.
4. Attach your TV and wall mount to the wall, carefully following the
instructions that came with your mount. Use only with a UL-listed
wall mount bracket rated for the weight/load of this TV.
For some wall mounts, you may want to use cables
with right-angle connectors. This allows the TV to rest
closer to the wall.
WALL-MOUNT SCREW LOCATIONS
D50u-D1 D55u-D1
Screw Size: M6 M6
Hole Pattern: 200mm (V) x 200mm (H) 300mm(V) x 300mm(H)
Weight w/o
Stand: 30.0 lbs 36.6 lbs
Installing a TV on a wall requires lifting. To prevent
injury or damage to the TV, ask someone to help you.
9

1
FRONT PANEL
REMOTE SENSOR & POWER INDICATOR
When using the remote, aim it directly at this sensor.
7KHSRZHULQGLFDWRUȵDVKHVRQZKHQWKH79WXUQVRQWKHQJRHVRXWDIWHUVHYHUDOVHFRQGV
To keep the power indicator on as long as the TV is on, see
7XUQLQJWKH3RZHUΖQGLFDWRU2QRU2RQSDJH.
10

1
REAR PANEL
Ethernet - Connect an Ethernet cable from home network.
Coaxial - Connect a coaxial cable from cable, satellite, or antenna.
Optical Audio Out - Connect an optical/SPDIF audio device, such as home audio receiver.
Stereo Audio Out - Connect an RCA audio device, such as sound bar.
Component/Composite - Connect a component or composite device.
USB - Connect a USB thumb drive to play photo, music, or video.
HDMI - Connect an HDMI device.
Power3UHVVWRWXUQRQWKH793UHVVDQGKROGWRWXUQWKH79R
Input - Press once to access the input menu.
Note:b7KHLPDJHVKRZQKHUHLVIRULOOXVWUDWLYHSXUSRVHVRQO\DQGPD\EHVXEMHFWWRFKDQJHb
The actual number of ports and their locations may vary, depending on the model.
11

1
REMOTE CONTROL
APP LAUNCHER
Quickly launch the pictured App.
INPUT
Change the currently
displayed input.
NUMBER PAD
Manually enter a channel.
WIDE
Change the display mode.
ARROW
Navigate the on-screen menu.
POWER
7XUQ79RQRUR
INFO
Display the info window.
MENU
Display the on-screen menu.
GUIDE
Display the info window.
PIC
Opens the Picture Mode menu.
V BUTTON
Open the VIZIO Internet Apps
Plus®(V.I.A. Plus) dock.
CHANNEL UP/DOWN
Change the channel.
LAST
Return to the channel last viewed.
DASH
Use with number pad to manually
enter a digital sub-channel.
(For example, 18-4 or 18-5.)
ENTER
&RQȴUPFKDQQHORUSDVVFRGH
entered using the Number Pad.
A/V CONTROLS
Control the USB media player and
streaming video playback.
CLOSED CAPTIONS
7XUQFORVHGFDSWLRQVRQDQGR
EXIT
Close the on-screen menu.
VOLUME UP/DOWN
Increase or decrease loudness
of the audio.
OK
Select the highlighted option.
BACK
Go to the previous on-screen menu.
MUTE
7XUQWKHDXGLRRRURQ
Replacing the Batteries
1. Remove the battery cover by pressing down on the arrow
markings and sliding out.
2. Insert two batteries into the remote control. Make sure that
the (+) and (-) symbols on the batteries match the (+) and (-)
symbols inside the battery compartment.
3. Replace the battery cover.
12

2Connecting Your Devices
CONNECTING A DEVICE
Your TV can be used to display output from most devices.
1. Verify that your device has a video port that matches an
available port on the TV (HDMI, Component, etc.).
2. 7XUQWKH79DQG\RXUGHYLFHR
3. Connect the appropriate cable (not included) to the TV and the
device.
4. Turn the TV and your device on. Set the TV’s input to match the
connection you used (HDMI-1, HDMI-2, etc.).
BETTER
COMPONENT CABLE • ANALOG
• HD VIDEO (1080p)1
• STEREO AUDIO
BEST
HDMI (HDMI 1-4)2• DIGITAL
• ULTRAHDVIDEO(4K@30 Hz)1
• HD AUDIO
GOOD
AV CABLE • ANALOG
• SD VIDEO (480i)1
• STEREO AUDIO
BETTER
COAXIAL CABLE • ANALOG/DIGITAL
• HD VIDEO (1080i)1
• STEREO/HD AUDIO
BEST
HDMI CABLE
(HDMI 5)*
• DIGITAL
• ULTRAHDVIDEO(4K@60 Hz)1
• HD AUDIO
• HIGH VELOCITY MODE†
1Maximum Resolution
2HDCP 2.2 supported on HDMI ports 1,2, and 5
* Recommended for use with high-performance devices only
†Available for compatible gaming systems or high-performance PCs for display of 1080p @ 60 fps
Note:
7KHLPDJHVKRZQKHUHLVIRULOOXVWUDWLYHSXUSRVHVRQO\DQGPD\EHVXEMHFWWRFKDQJHb
The actual number of ports and their locations may vary, depending on the model.
Connect to HDMI 5 13

2
CONNECTING A DEVICE - AUDIO & VIDEO CABLE TYPES
AV CABLE
AV cables (or Composite cables) are the
traditional way of connecting your devices to
your TV. Video signals are sent over the yellow
connector while audio is sent over the red and
white connectors.
• Video Resolutions up to 480i
• Analog Connection
• Audio and Video Signals
GOOD
Y/V L R
COAXIAL CABLE
Coaxial cables are the traditional way of
connecting antennas and cable television
signals to your TV. Coaxial cables carry both
audio and video signals through a single
connector.
• HD Video Resolutions up to 1080i
• Analog Connection
• Audio and Video Signals
BETTER
Coaxial
COMPONENT CABLE
Component cables are designed to carry high
GHȴQLWLRQ YLGHR VLJQDOV DORQJ ZLWK DGGLWLRQDO
audio connections. Colors are delivered with color
LQIRUPDWLRQ VSOLW XS WKUHH GLHUHQW ZD\V RYHU
three connectors for video (separated into Red,
Blue and Green signals) and the left and right
audio connectors (Red and White).
• HD Video Resolutions up to 1080p
• Analog Connection
• Audio and Video Signals
HDMI CABLE
HDMI is the intelligent, all-digital interface that
delivers both dazzling quality and unmatched ease
of use. HDMI technology transmits crystal-clear
digital video along with multi-channel surround
audio. HDMI-connected devices have the ability
to automatically adjust themselves for optimal
viewing.
• HD Video Resolutions up to UHD*
• HD Audio
• Digital Connection
• Audio and Video Signals
BETTER
R L Pr/Cr Pb/Cb Y HDMI
BEST
* High-Speed HDMI cable required for UHD resolutions 14

2
CONNECTING AN AUDIO DEVICE
Your TV can output sound to an audio device, such as a receiver or
sound bar.
1. Verify that your device has an audio port that matches an
available port on the TV (Optical, RCA, or HDMI).
2. 7XUQWKH79DQG\RXUDXGLRGHYLFHR
3. Connect the appropriate cable (not included) to the TV and the
device.
4. Turn the TV and your device on.
Home Audio Receiver VIZIO Sound Bar
BEST
HDMI CABLE • ARC 2-WAY COMMUNICATION
• 2.0-5.1 DIGITAL AUDIO
• PCM, DTS, DOLBY DIGITAL
GOOD
RCA CABLE • ANALOG STEREO CONNECTION
• 2.0 CHANNEL
BETTER
OPTICAL/SPDIF CABLE
• PCM STREAM
• DOLBY DIGITAL 5.1 CHANNEL
• DTS 5.1 CHANNEL
Note:
7KHLPDJHVKRZQKHUHLVIRULOOXVWUDWLYHSXUSRVHVRQO\DQGPD\EHVXEMHFWWRFKDQJHb
The actual number of ports and their locations may vary, depending on the model.
15

2
CONNECTING AN AUDIO DEVICE - AUDIO CABLE TYPES
RCA CABLE
RCA cables (or Composite cables) are the
traditional way of connecting your devices to your
audio device. Audio signals are sent over the red
and white connectors.
• Quality Stereo Connection
• 2.0 Channel
• Analog Connection
• Audio Signal Only
OPTICAL/SPDIF CABLE
Optical/SPDIF cables transmit audio signals as
pulses of light through a cable made of plastic
ȴEHUV $XGLR VLJQDOV DUH GLJLWDOO\ WUDQVPLWWHG
between devices.
• PCM Stream (Lossless)
• Dolby Digital 5.1 Channel
• DTS 5.1 Channel
• Digital Connection
• Audio Signal Only
HDMI CABLE
HDMI technology transmits crystal-clear digital
multi-channel surround audio through a single
HDMI cable. Audio Return Channel-enabled
(ARC) TVs allow audio to be sent over an already
connected HDMI cable, eliminating the need for
a separate audio cable. See Connecting an Audio
Device - ARC on page 17.
• ARC 2-way Communication
(Auto setup)
• PCM, DTS, Dolby Digital
• 2.0 - 5.1 Scaleable Lossless
Digital Audio Connection
• Audio and Video Signals
GOOD
L R
BETTER
Optical/SPDIF
BEST
HDMI
16

2
CONNECTING AN AUDIO DEVICE - ARC
Your Home Audio Receiver
Without HDMI ARC
Without an HDMI ARC setup, your TV will transmit audio signal
from the built-in tuner and VIA apps to your home audio receiver
through a separate audio connection.
HDMI Cable
HDMI Cable
Your Blu-Ray Player
RCA (Audio)
Your Home Audio Receiver
With HDMI ARC
With an HDMI ARC setup, the audio connection between your
TV and Home Audio Receiver can be removed. The HDMI cable
will transmit audio signal to and from your TV with an all-digital
audio/video connection.
HDMI Cable
HDMI Cable
Your Blu-Ray Player
VIZIO Internet Apps Plus®
Built-In Tuner
VIZIO Internet Apps Plus®
Built-In Tuner
Your TV Your TV
17

2
CONNECTING TO YOUR NETWORK
Your TV is Internet-ready. It can be connected to your home network
with a Wired or Wireless connection.
Connecting to a Wired Network (Best)
1. Connect an Ethernet cable to your router and to the Ethernet
port on the back of the TV. See below.
2. 8VHWKH*XLGHG1HWZRUN6HWXSWRFRQȴJXUHWKH796HH
Using
Guided Setup on page 48
.
Connecting to a Wireless Network
1. Ensure you have a router or modem broadcasting as
high-speed wireless signal (802.11n recommended).
2. 8VHWKH*XLGHG1HWZRUN6HWXSWRFRQȴJXUHWKH796HH
Using
Guided Setup on page 48.
Router / ModemEthernet Cable
Note:
7KHLPDJHVKRZQKHUHLVIRULOOXVWUDWLYHSXUSRVHVRQO\DQGPD\EHVXEMHFWWRFKDQJHb
The actual number of ports and their locations may vary, depending on the model.
18

3Completing The First-Time Setup
The first time you turn on the TV, the Setup App will guide
you through each of the steps necessary to get your TV
ready for use.
Before you begin the first-time setup:
• Your TV should be installed and the power cord
should be connected to an electrical outlet.
• Your devices should be connected.
• If you have a wireless network, have the network
password ready.
• If you are connecting to your network with an
Ethernet cable, connect it to the Ethernet port on
the TV.
Choose your mode.
Select Store Demo for in-store display.
Select Home Use for in-home use.
Seleccione "Home Use" para Modo de Casa o "Store Demo" para Demostración en la Tienda.
Choisissez "Home Use" pour le Mode Domicile ou "Store Demo" pour la Démo en Magasin.
Store Demo Home Use
Press the Power button on the remote. The TV
powers on and the Setup App starts.
1
2
Use the Arrow buttons on the remote to
highlight Home Use and press OK.
To complete the first-time setup:
Use the Arrow buttons on the remote to highlight
your language of preference and press OK.
3
4
Use the Arrow buttons on the remote to
highlight your country, and then press OK.
19

3
Select the name of your wireless network from the
list of available networks and press OK.
6
Enter the network password using the on-screen
keyboard, then highlight Connect and press OK.
Use the Arrow and OK buttons on the remote to
review the Terms Of Service and Privacy Policy.
:KHQ\RXDUHȴQLVKHGKLJKOLJKWI Accept
and press OK.
7
8
Enter your E-mail Address, First Name, Last
Name, and Zip Code using the on-screen
keyboard.
Highlight Next and press OK.
5
Select your time zone and press OK.
20
Other manuals for D50u-D1
2
This manual suits for next models
1
Table of contents
Other Vizio LED TV manuals

Vizio
Vizio M801i-A3 User manual

Vizio
Vizio M501d-A2R User manual

Vizio
Vizio D28h-C1 User manual

Vizio
Vizio E601i-A3 User manual

Vizio
Vizio M470SL User manual

Vizio
Vizio M401i-A3 User manual

Vizio
Vizio E420i-A0 User manual

Vizio
Vizio M551d-A2 User manual

Vizio
Vizio M551d-A2R User manual

Vizio
Vizio D32hn-E1 User manual

Vizio
Vizio M501d-A2R User manual

Vizio
Vizio M3D651SV User manual

Vizio
Vizio 47" Class User manual

Vizio
Vizio E320-A0 User manual

Vizio
Vizio E420i-A1 User manual

Vizio
Vizio M320SR User manual

Vizio
Vizio D24h-G9 User manual

Vizio
Vizio E320i-A2 User manual

Vizio
Vizio E231-B1 User manual

Vizio
Vizio M3D550KDE User manual