vocalFON DECT PENDANT User manual

DECT PENDANT
talking phone
for visually impaired persons
Native Voice Assistant DECT Pendant Comfort Handsfree
10 personal telephone books 100 Contacts supported by Voice Assistant
Time Announcement via central button Smoke Alarm Detection
Memos, Wake-Up, Clock function for home-based DECT System
User MANUAL
You will find more up-to-date operating instructions on enclosed USB-stick
or on your distributor’s website

User Manual Guide DECT vocalFON EN 10-2020 V971 2von 30
This Manual may contain non-actualized data and information
Please contact Website of Supplier or Dealer
and download actualized version of Manual

User Manual Guide DECT vocalFON EN 10-2020 V971 3von 30
Contents
1 Overview
1.1 operating elements and LEDs …………………………………………….. 4
2 Getting started
2.1 package contents check …………………………………………….. 5
2.2 charge Device (*) and Switch-On Device …………………………………………….. 6
2.3 subscribe to DECT Base Station (*) see also chap 3.3 …………………………………………….. 7
2.4 check telephone line (*) …………………………………………….. 8
2.5 hints regarding DECT Range …………………………………………….. 8
3 Configuration via PC APP
3.1 install and use PC APP …………………………………………….. 9
3.2 language selection …………………………………………….. 10
3.3 enter personal data …………………………………………….. 11
3.4 registration to DECT Base Station.. see also chap 2.3 …………………………………………….. 12
3.6 handsfree telephony …………………………………………….. 14
3.6.1 telephone books …………………………………………….. 14
3.6.2 contact names and numbers …………………………………………….. 15
3.8 Smoke Alarm / help call sequence... …………………………………………….. 17
3.9 time-triggered Memos (wake-up, time, memo) …………………………………………….. 18
3.9.1 instant time announcements …………………………………………….. 18
3.9.2 remote configuration of system time …………………………………………….. 18
3.10 general settings (a.o. PABX line access) …………………………………………….. 19
3.11 system settings (a.o Software Update,…) …………………………………………….. 20
3.11.3 RESET functions (a.o. de-register from Base) …………………………………………….. 21
4. Special instructions
4.2 Smoke Alarm detection …………………………………………….. 23
5 Important notes
5.1 troubleshooting Guide …………………………………………….. 24
5.2 Device charging …………………………………………….. 26
5.3 hands-free speaker …………………………………………….. 26
5.4 adjusting necklace length …………………………………………….. 26
5.5 protection against environmental influences …………………………………………….. 26
5.6 cleaning …………………………………………….. 27
5.7 repair …………………………………………….. 27
5.8 disposal …………………………………………….. 27
5.9 warranty …………………………………………….. 27
5.10 CE Declaration of Conformity …………………………………………….. 27
5.11 technical services …………………………………………….. 27
6 Technical data …………………………………………….. 28
7 Ordering information …………………………………………….. 28
User Manual Guide DECT vocalFON EN 10-2020 V971 4von 30
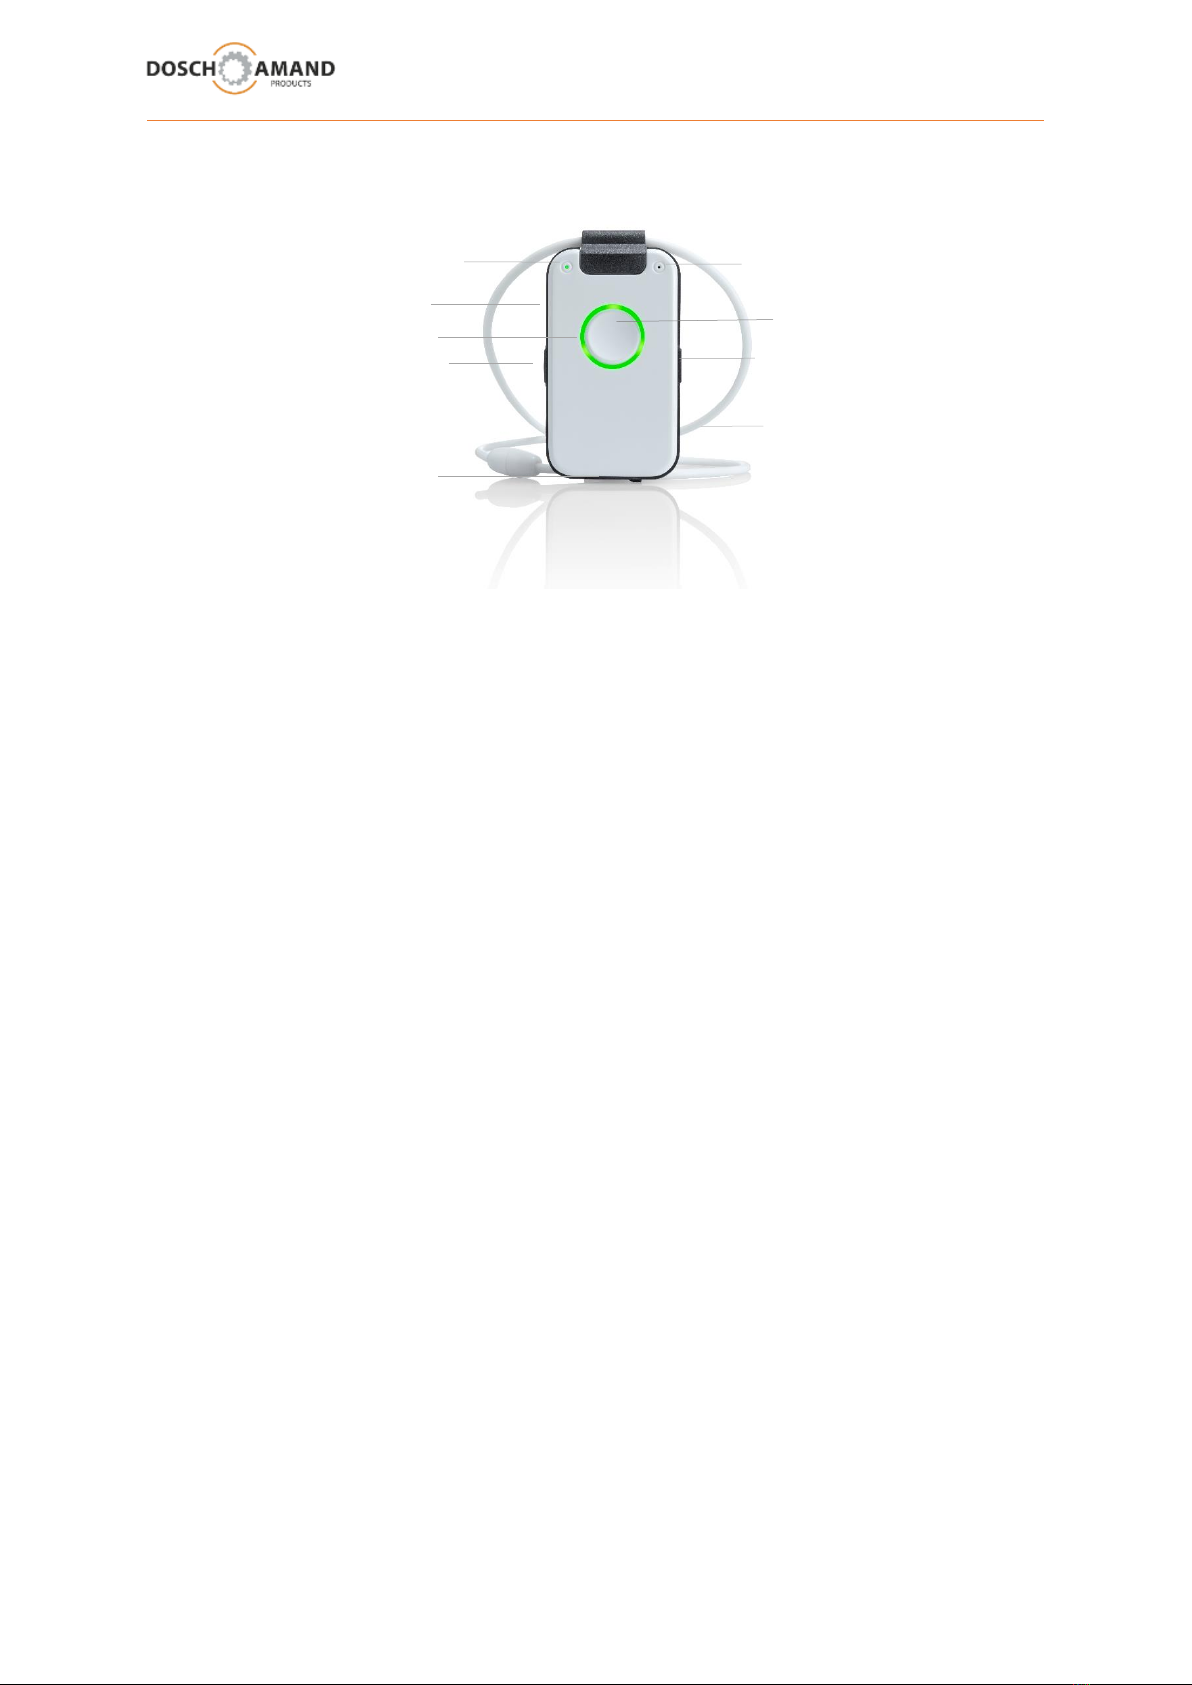
1 Overview
Central Button ___________________________________________________
press short trigger time announcement
stop ongoing connection
various functions according to announcement
Side Key __________________________________________________
press short trigger select telephone book and name/number (Idle state)
increase volume (during call)
press long trigger both at the same time: switch off the Device
Remark: Device can only be switched-on via charging disk
Status LED ___________________________________________________
Radio range and battery status indicator
green 1/20 sec both functions work correctly
yellow 1/5 sec one or both functions at borderline
red 1/1 sec one or both functions in error state
Ring LED ___________________________________________________
red permanent there is a telephone to call for help
red flashing dialing a phone number is enabled
green permanent there is a telephone connection
green flashing incoming phone call
yellow permanent there is a link with PC app via USB
yellow flashing DECT Subscription ongoing
3D sensor has been activated; possible man-down detected
USB connector ___________________________________________________
Micro USB for connection with PC via supplied cable
Central Button, Call Button
Status LED
Loudspeaker
left Side Key
Microphone
Micro USB
right Side Key
Ring LED
Necklace

User Manual Guide DECT vocalFON EN 10-2020 V971 5von 30
2 Getting started
2.1 package contents check
The packaging contains following articles:
DECT Pendant Qi Charge Disk USB Cable
with Necklace Remark: Switch-On device Remark: Use this cable
by placing on Charge Disk for Charge Disk and
for connecting device with PC
USB Power Adapter USB Stick with Get Started
Installation Software
User Manual Guide DECT vocalFON EN 10-2020 V971 6von 30
2 Getting started
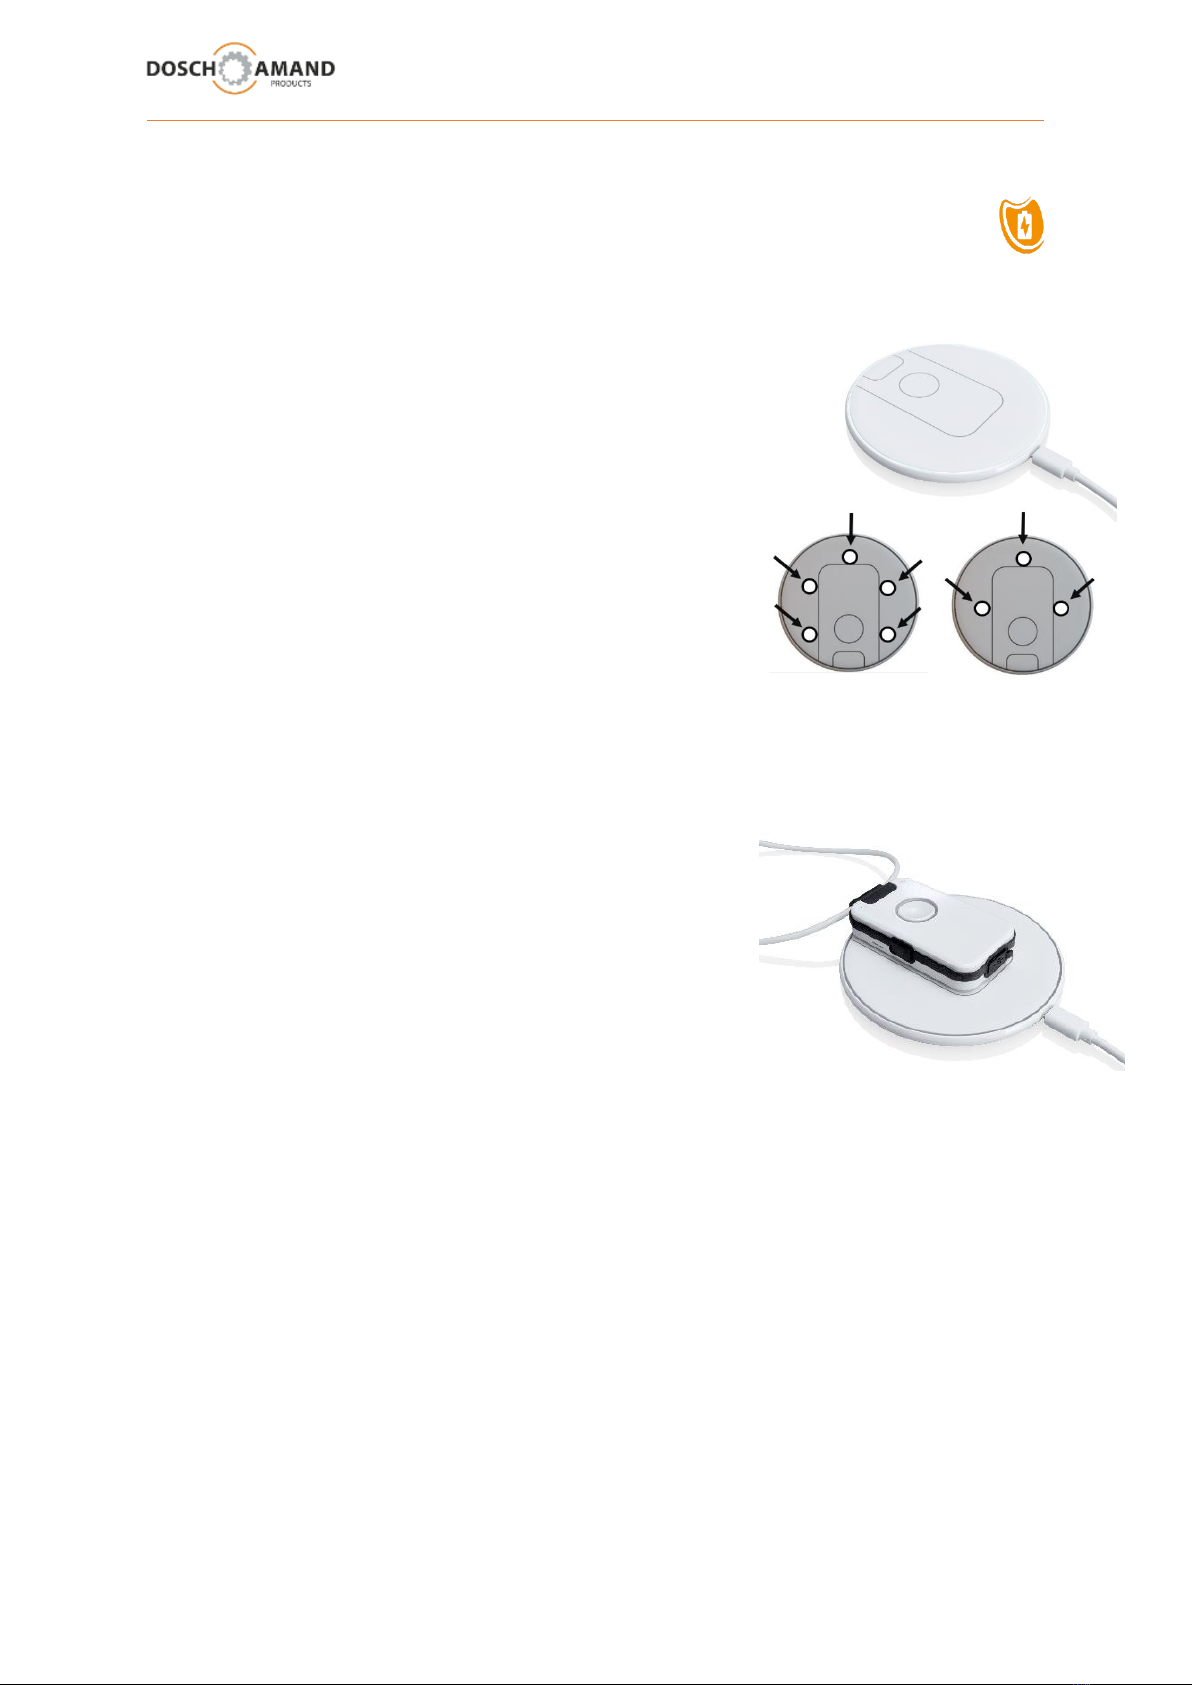
2.2 place Charging Disc, charge Device, switch-on Device
Place the Charging Disc on a flat, non-slip surface and connect it to the
mains via the supplied USB power supply. The Charging Disc works
contactless.
Remark: If Device is switched-off, it can be switched-on only by placing
it on the Charging Disk
Please use the included rubber pegs to individually optimize your
placing of the device on the charge disk. Moreover these rubber pegs
prevent the device from accidental shifts.
The use of the rubber pegs is optional They do not have any
functional influence on the charging procedure.
Without prejudice to further possibilities we recommend shown positions:
In order to charge the Device, simply place it on the Charging Disc. Once the Device is correctly placed,
the Disc will light up. The Device switches on after a few seconds and the Voice Assistant reports to:
"Battery is charging"
During charging the Device warms up. This is no fault but normal.
Leave the Device on the Charging Disc for at least 30 min. In case of
fully charged, the Device has a standby time of max 3 days. Charge
the Device regularly, best overnight.
When the battery is deeply discharged, it may take up to 5 minutes
to turn on the device on the charging disc.
Please notice that only if the Device is on the Charging Disc, the Smoke Alarm detection is activated
(see 3.8 chap and chap 4.2)
You can use multiple Charging Disc; e.g. in living room and bedroom.
(Please contact your dealer).
User Manual Guide DECT vocalFON EN 10-2020 V971 7von 30
2 Getting started
2.3 subscribe to DECT Base Station
alias: „Subscription“
methode: „easy subscription“with PIN „0000“
Place the Device near the DECT Base Station e.g. in the same room. Subscription can be accomplished
more safely.
Find and press "DECT Subscription" or similar notified
button on the Base Station.
Manufacturer-specific enabling the DECT Subscription mode may be different. Usually press a button
for a few seconds (in case of consult the manual of the Base Station). Make sure that DECT Base
Stations are only 5 minutes in the Subscription mode. The Subscription of the Device must be made
within this time. In case of, re-enable the Subscription mode.
For starting Subscription procedure of the Device, press the
Call Button on the Device. The Ring LED starts flashing and
the Voice Assistant reports:
"Searching for Base Station, please wait"
After typically 10-20 seconds the Subscription is completed. The Ring LED shortly lights up green. The
Voice Assistant reports the successful subscription: "Device is registered"
If Subscription fails, the Voice Assistant gives dedicated information to the possible root cause
(see notes for Trouble Shooting in Chapter 5).
Modern DECT Base Stations use the Subscription method according "easy subscription" standard with
system PIN "0000". Should System PIN of Base Station be different from “0000”, then use Subscription
of Device via PC APP (see Chapter 3.4)
Note: If the Device is on the Charging Disc, it cannot perform Subscription.
The device switches automatically off after 10 minutes if it has not been registered.
User Manual Guide DECT vocalFON EN 10-2020 V971 8von 30
2 Getting started
2.4 check Telephone Line
Now, check the connection of the Device with your phone line.
1. Call Device with your mobile phone
2. When Device rings, answer the call
Additionally, the first calling number is stored as Emergency Number for Smoke Alarm Calls. Change
or supplement this number with the PC APP.
Hint: The calling party can configure the system time of device via the keypad of his telephone
(see chap. 3.9.2)
Your Device is now ready for use!
2.5 hints regarding DECT Range
alias radio range
Inside of buildings the radio range (distance from Device to the Base Station) can be 50 meters and
more. In the garden, the range may increase to 300 meters. Should the Device cover also the garden
area, then it is advisable to place the DECT Base Station to this wall, which is next to the garden.
Should the Device get out of the reach, then that is recognizable by red status LED (1/1 sec). If the
Device is more than 5 minutes outside the radio coverage the Voice Assistant will make announce an
appropriate message.
If the Device is longer than 2 hours outside of wireless coverage, the Device switches off to save the
battery. Then the Device can be switched on again by placing on the Charging Disc. All functions
automatically resume your preset operation.
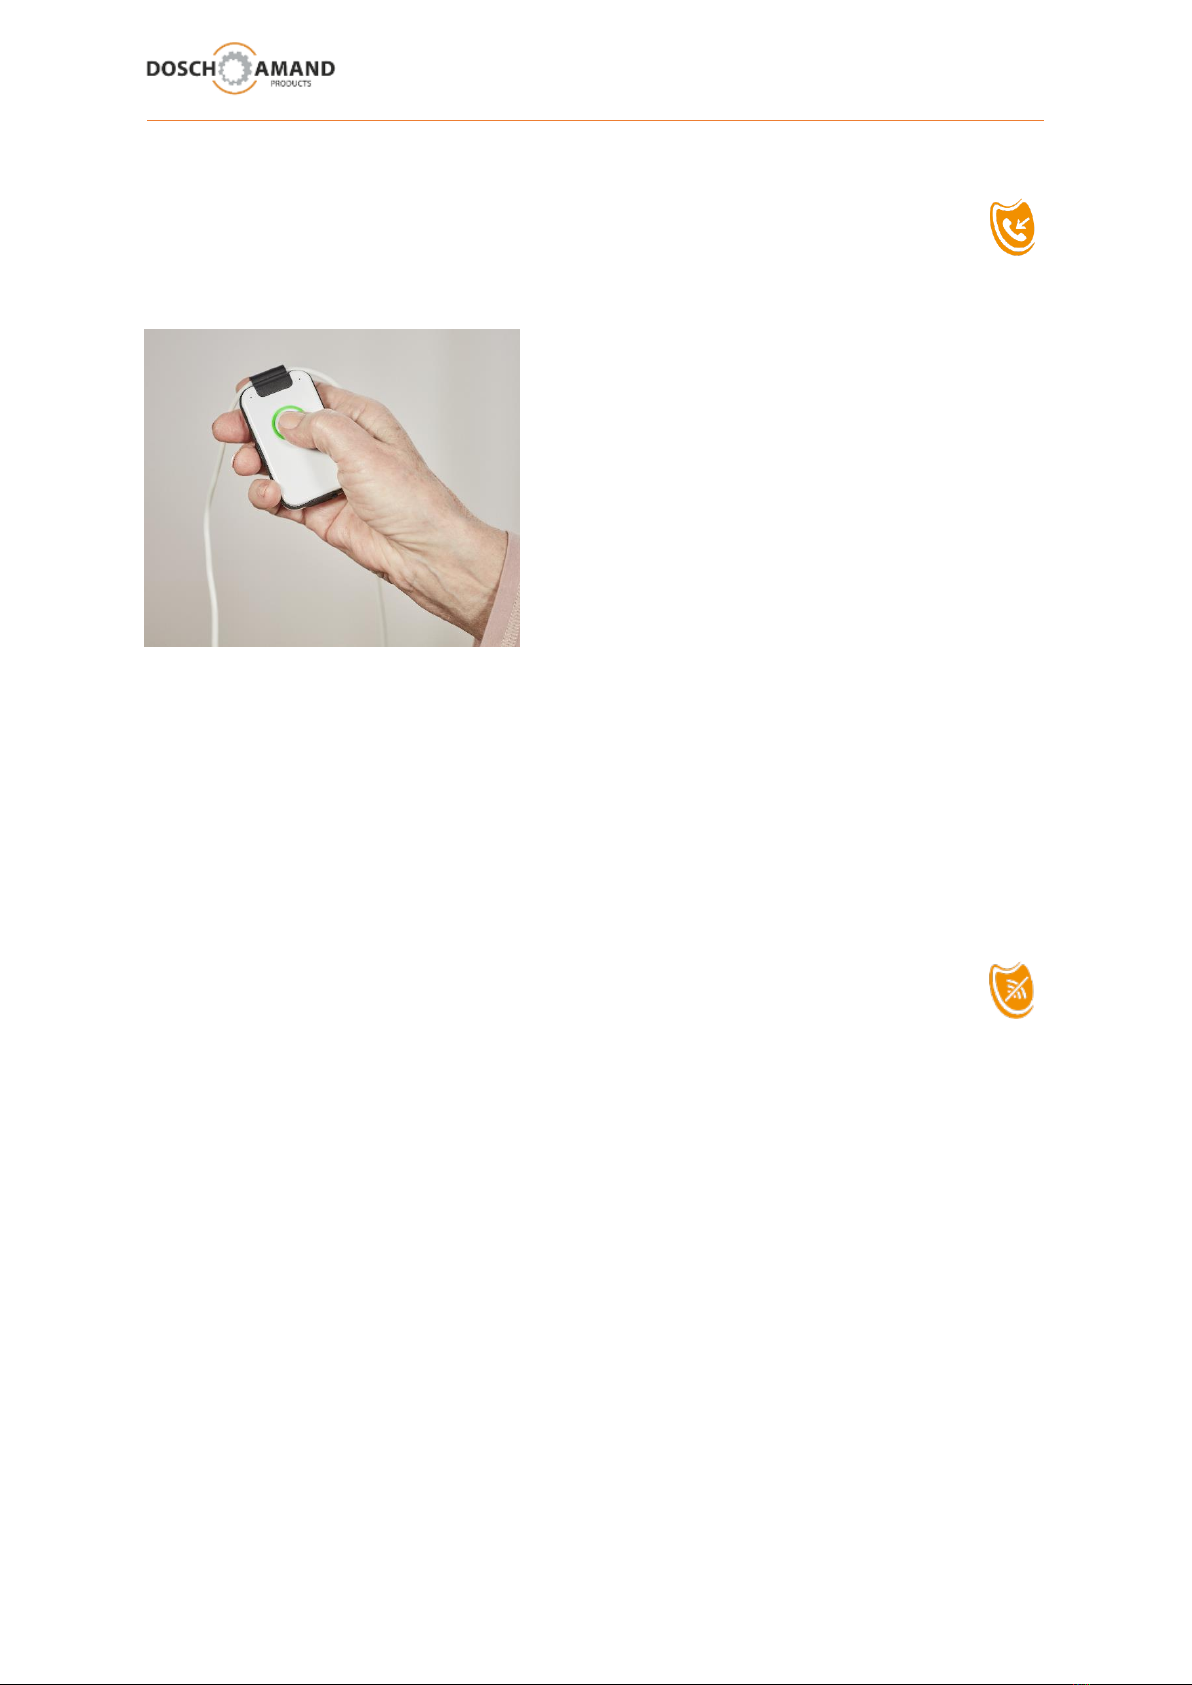
At any time you can request the Device to find the base and to logon by pressing the Call Button.
User Manual Guide DECT vocalFON EN 10-2020 V971 9von 30
3 Configuration via PC APP
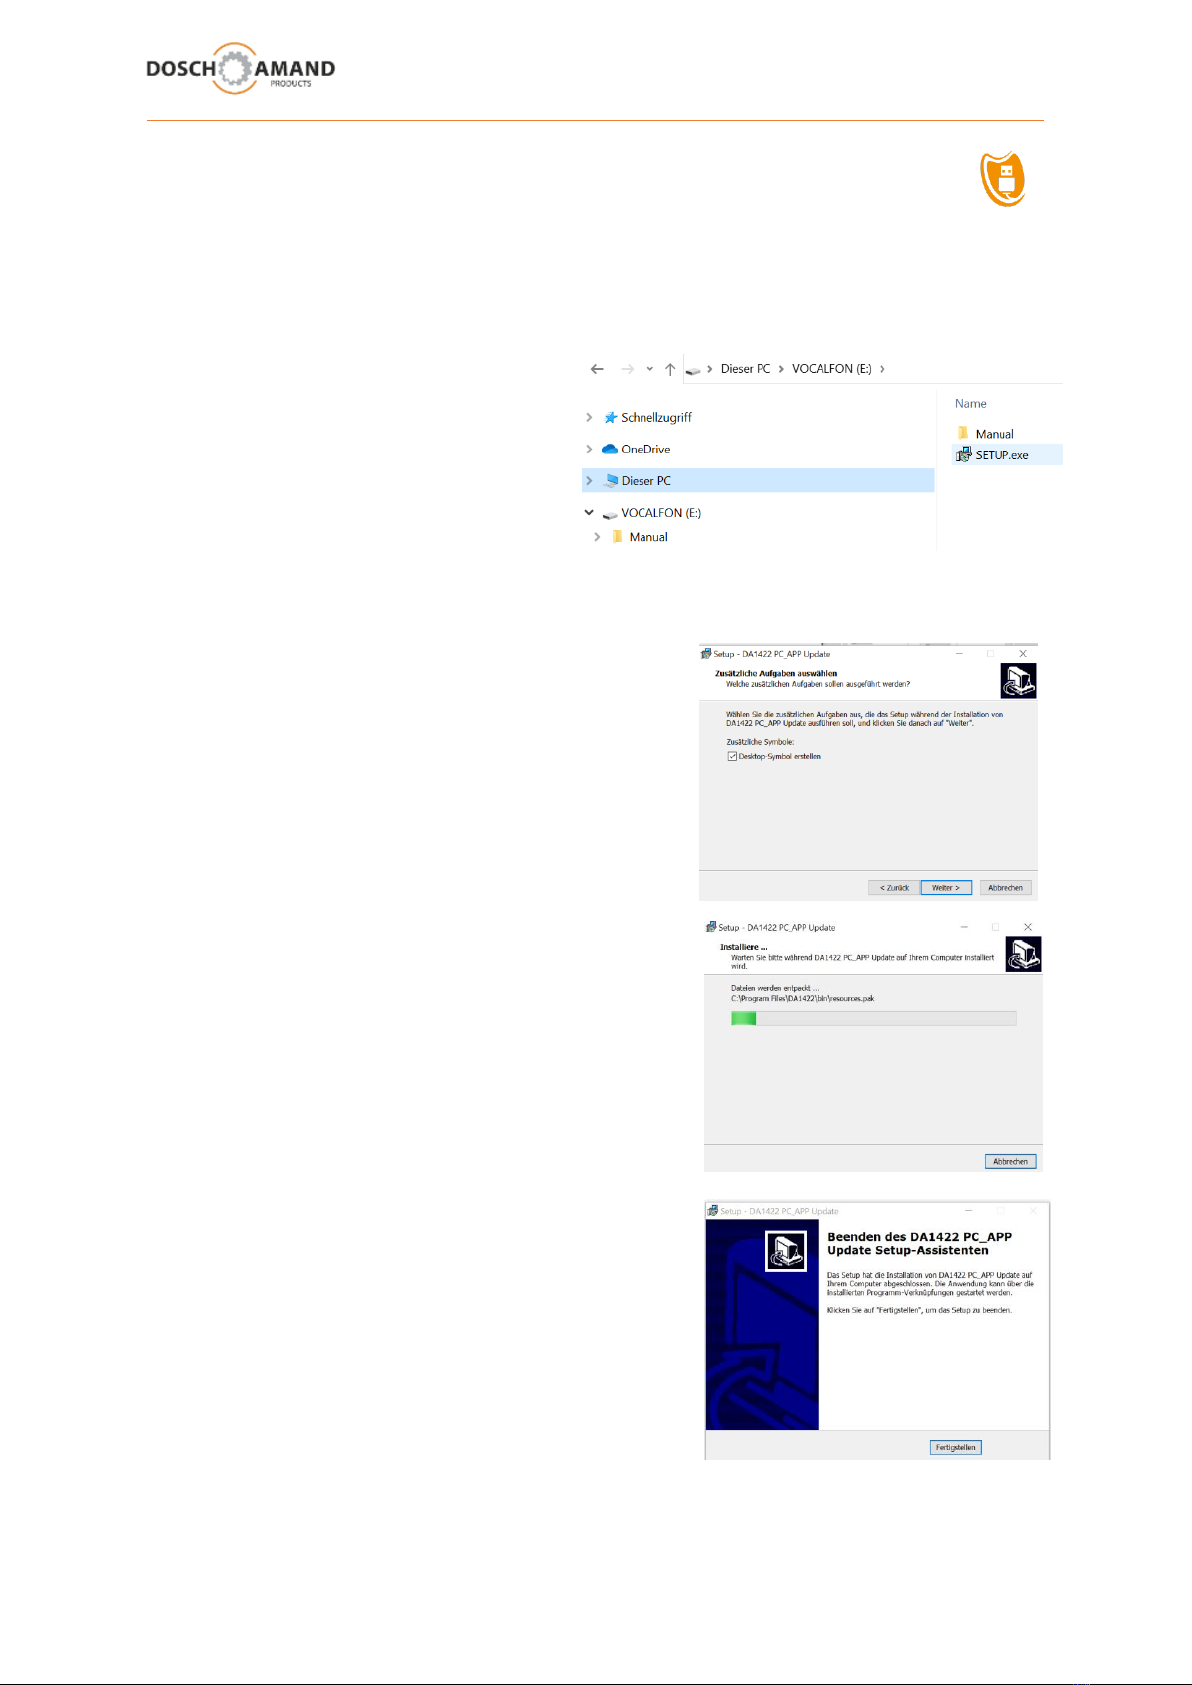
3.1 a install and start PC APP
compatible to WIN PC only
Hint: Close all programs and applictions prior to start installation in order to avoid that necessary
Entry Boxes will be covered by foreground applications.
Connect the enclosed USB stick with your PC
and start SETUP.exe with double click
in register VOCALFON
Please be patient.
This process can take some minutes
You will get several queries which you please positively confirm. You will be asked to select the
language of the WIN installer. Make your choice.
Afterwards you have to confirm the D&A license
agreement.
Please confirm completion with „Continue“
The Operating System will regularly ask you if you agree
that device is will get access to the system. As this is a
precondition to the later correct functionality you have to
confirm this with “Yes“.
The installation of the PC APP takes some minutes.
Please be patient.
Finally you have to confirm the completion
Now you have got a very simple but effective
Configuration Program which you use for defining all
Telephone Numbers and Names of your choice and
settings.
User Manual Guide DECT vocalFON EN 10-2020 V971 10 von 30
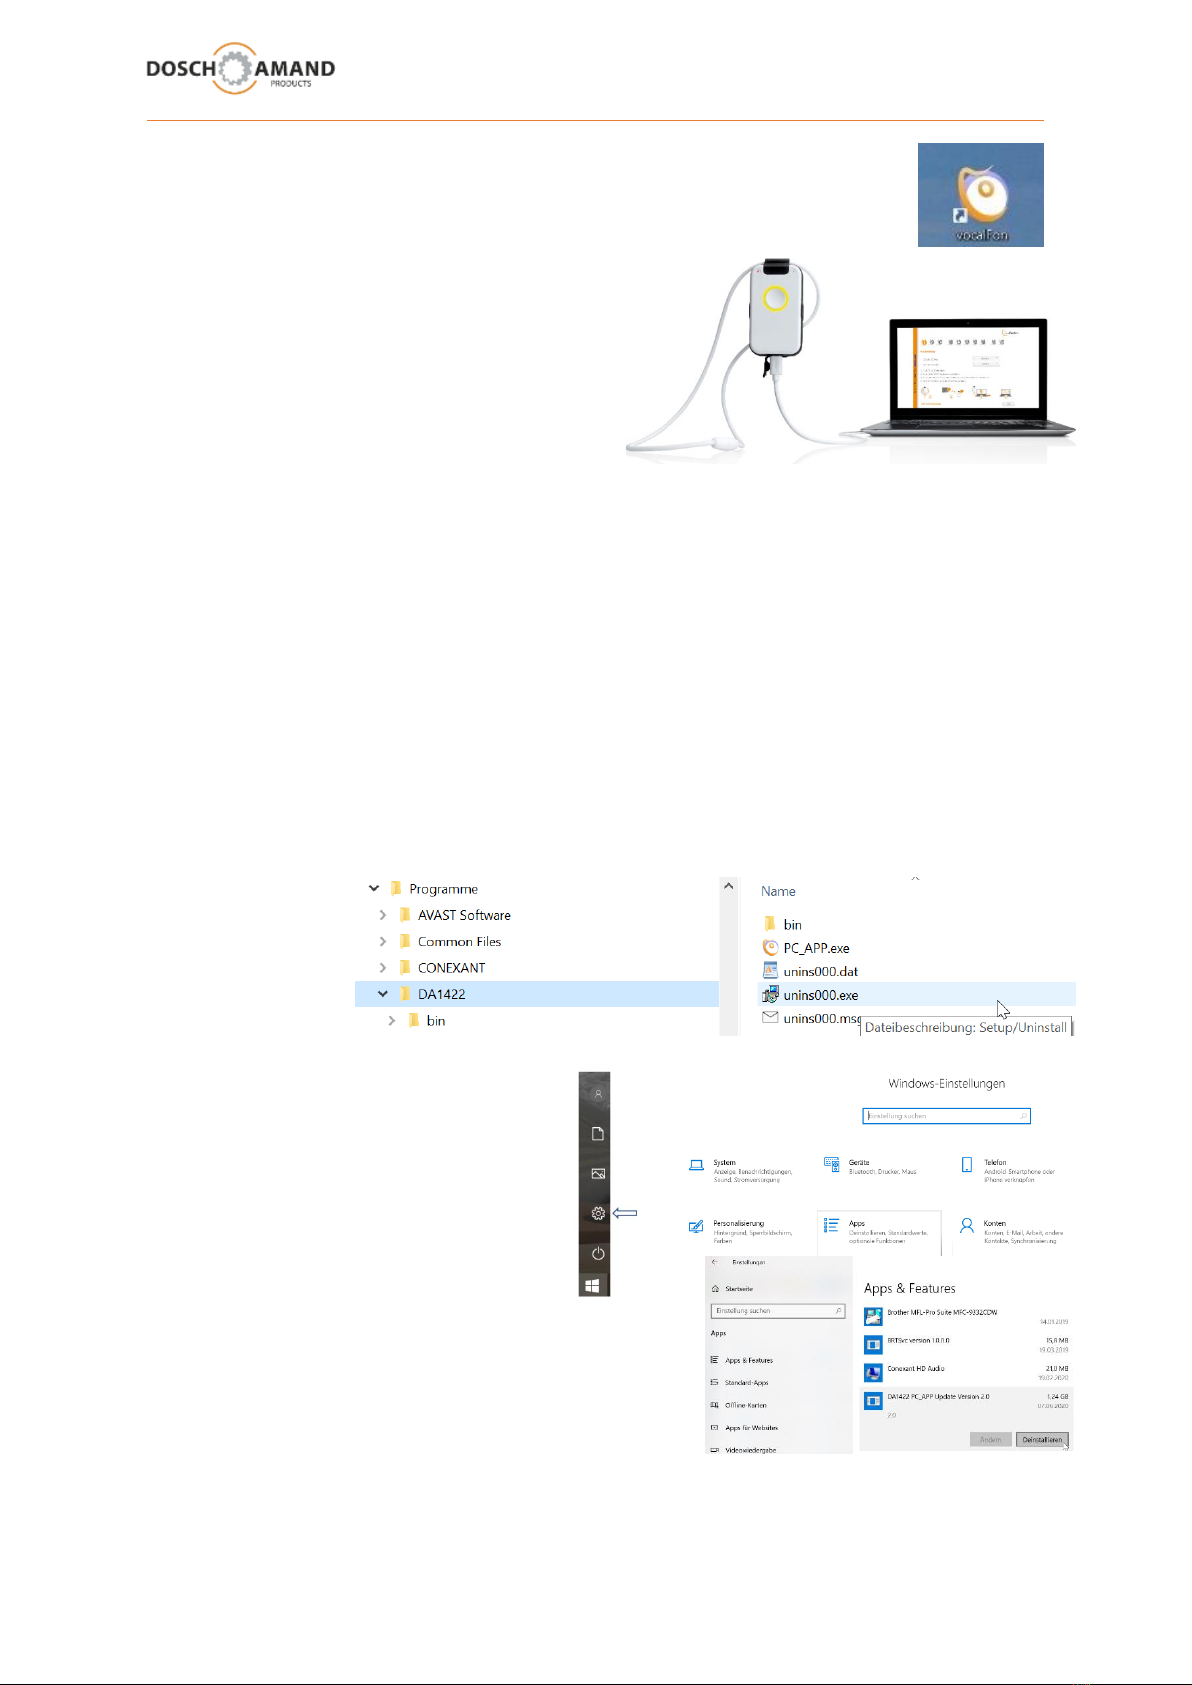
Open your Desktop Screen (Start page). You must seen following icon „vocalFON“.
By Click on this icon you can open the PC APP, a simple but effective Configuration
Program
Open PC APP and connect the device with your PC
vis USB port.
IMPORTANT:
Be sure to use the USB cable of the Charge Disk !
As this USB cable is always used with Charge
Disk you will never loose this cable for future
modifications of the device.
Configure Names and Numbers and operational options.
Please take care to confirm and save all entries with APPLY button (blue color).
The transfer of Audio to your device will take some time
3.1 b PC APP De-installation
There are 2 options to De-Install the PC APP
1. via WIN-Explorer
Open WIN-Explorer and Register „Programs“
Search for DA1422.
Open this Register and excute De-install Program: unins000.exe
2. via WIN SETTINGS
Open WIN Settings via Task Bar and select
„Apps“
Here you will find
DA1422 PC_APP …
and option „De-Installation“

User Manual Guide DECT vocalFON EN 10-2020 V971 11 von 30
3 Configuration via PC APP
3.2 language selection
You can choose both the language of the Voice Assistant and the PC App language using the PC APP
under Get Started.
The language of the PC App is automatically selected according to the language of your PC system.
If your language is not listed, please contact your distributor.
User Manual Guide DECT vocalFON EN 10-2020 V971 12 von 30
3 Configuration via PC APP
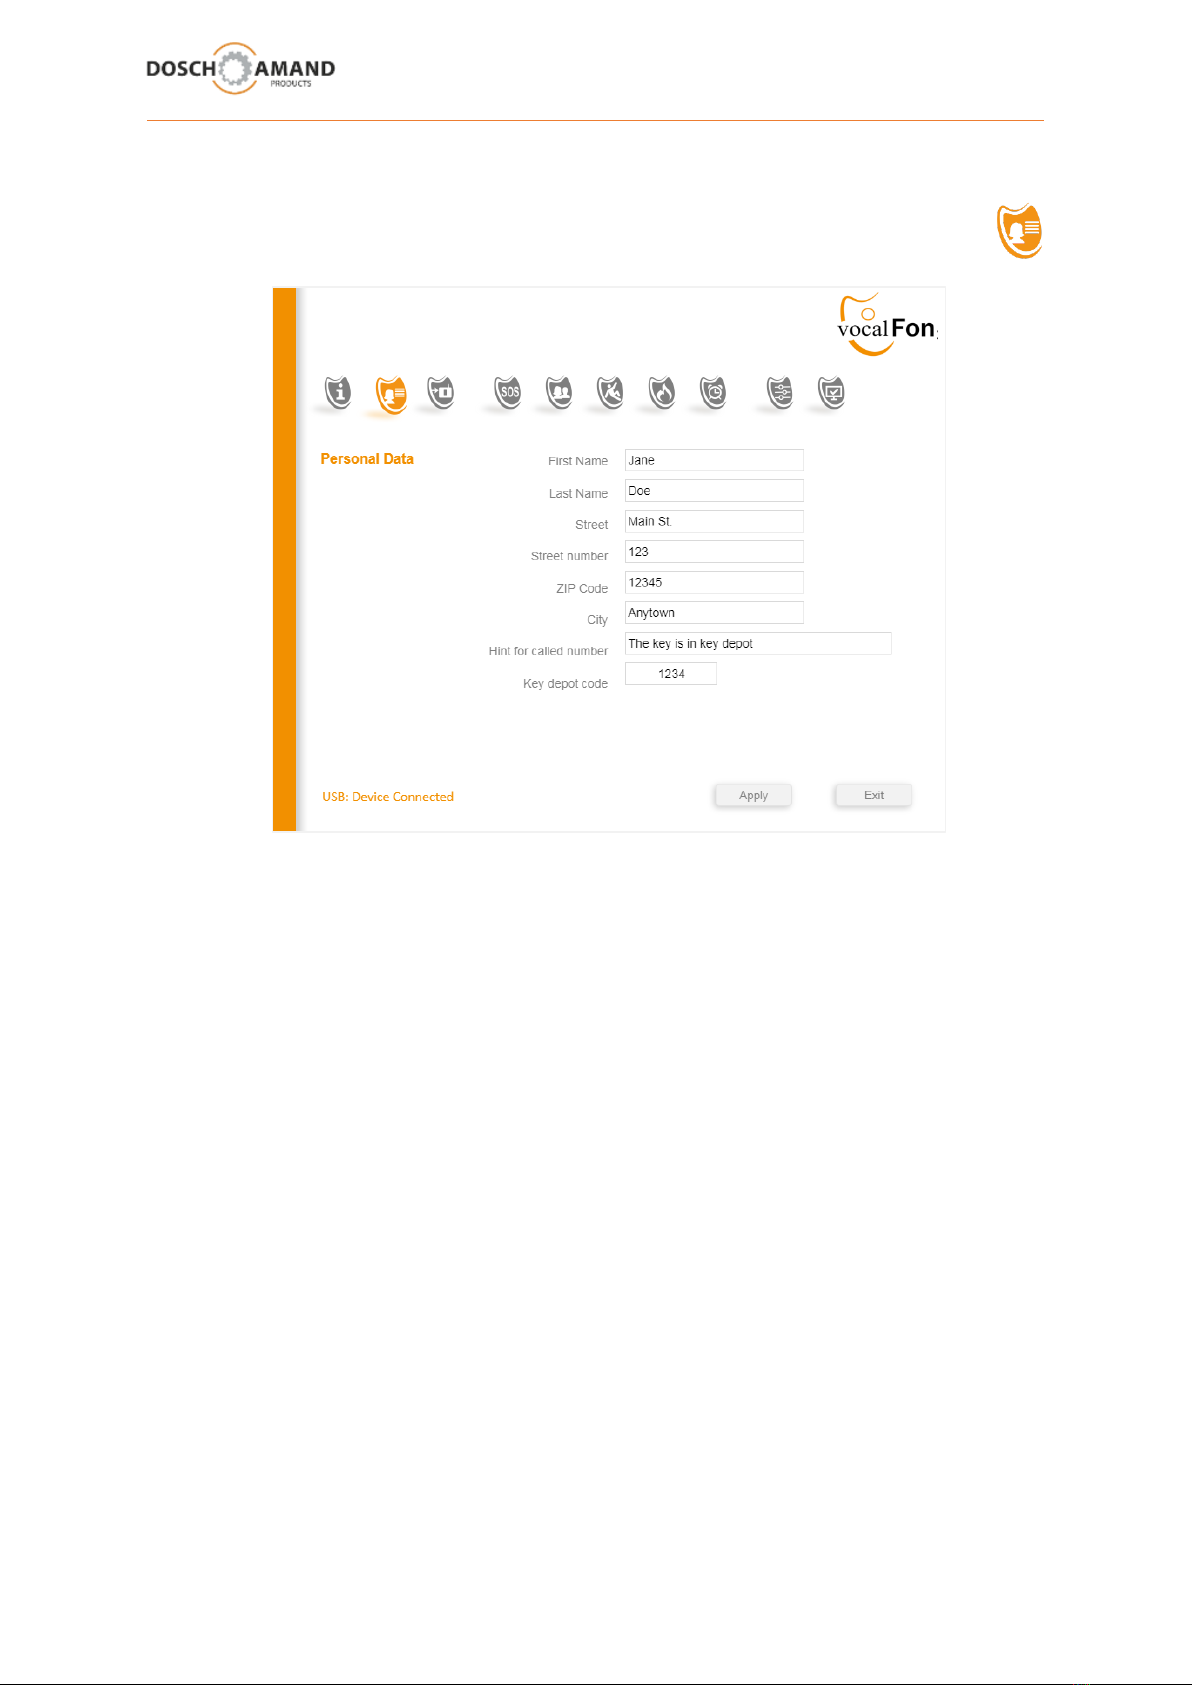
3.3 Enter Personal Data
The personal and location data contains name and place of residence, and optional notes, e.g. as an
access to the apartment is possible in case of emergency.
In addition, a 4-digit number code can be set. To do this, you can mount the keys in a safe key safe
with combination lock next to the front door. There are numerous manufacturers for such locks.
This location data - like all other data of the PC APP - are stored only locally on the Device and as a
backup on a USB stick and they are therefore protected from access of third parties.
The personal and location data are provided at automatic help calls only: Smoke Alarm detected.
The Voice Assistant will read your text. You can change the data and texts at any time with the help
of the PC APP.
Remark: In case of manually triggered Help Call, no personal data will be given to called party. In
such situation there is the assumption that the person can and will talk to the contact person by
himself.

User Manual Guide DECT vocalFON EN 10-2020 V971 13 von 30
3 Configuration via PC APP
3.4 registration to DECT Base Station
The Registration with the help of the PC APP is only necessary if the DECT Base Station does not have
the system PIN "0000" (see Chapter 2.3) (standardized Subscription according to the principle "easy subscription)
This the Base Station system PIN was either provided by you or is factory pre-set. More information,
see the operations guide of the DECT Base Station under chapter which is similar to "DECT handset
Registration".
1. Enter the system PIN of the Base Station. You can enter PIN codes with up to
8 digits. In case of residential Base Station, it is a 4-digit number.
2. Enable the logon mode of the Base Station (see Chapter 2.3)
Please notice that DECT Base Stations are only 5 minutes in the Subscription mode.
The application of the Device must be made within this time. In case of, please activate
Registration mode of the Base Station once more.
3. Now click the button Start Registration (PC APP). The registration process may take typically
10-20 sec. Please wait.
If the Subscription fails, see Chap 5.1 Troubleshooting Guide
DECT
WLAN

User Manual Guide DECT vocalFON EN 10-2020 V971 14 von 30
3 Configuration via PC APP
3.5 not applicable
User Manual Guide DECT vocalFON EN 10-2020 V971 15 von 30
3Configuration via PC APP
3.6 Telephony
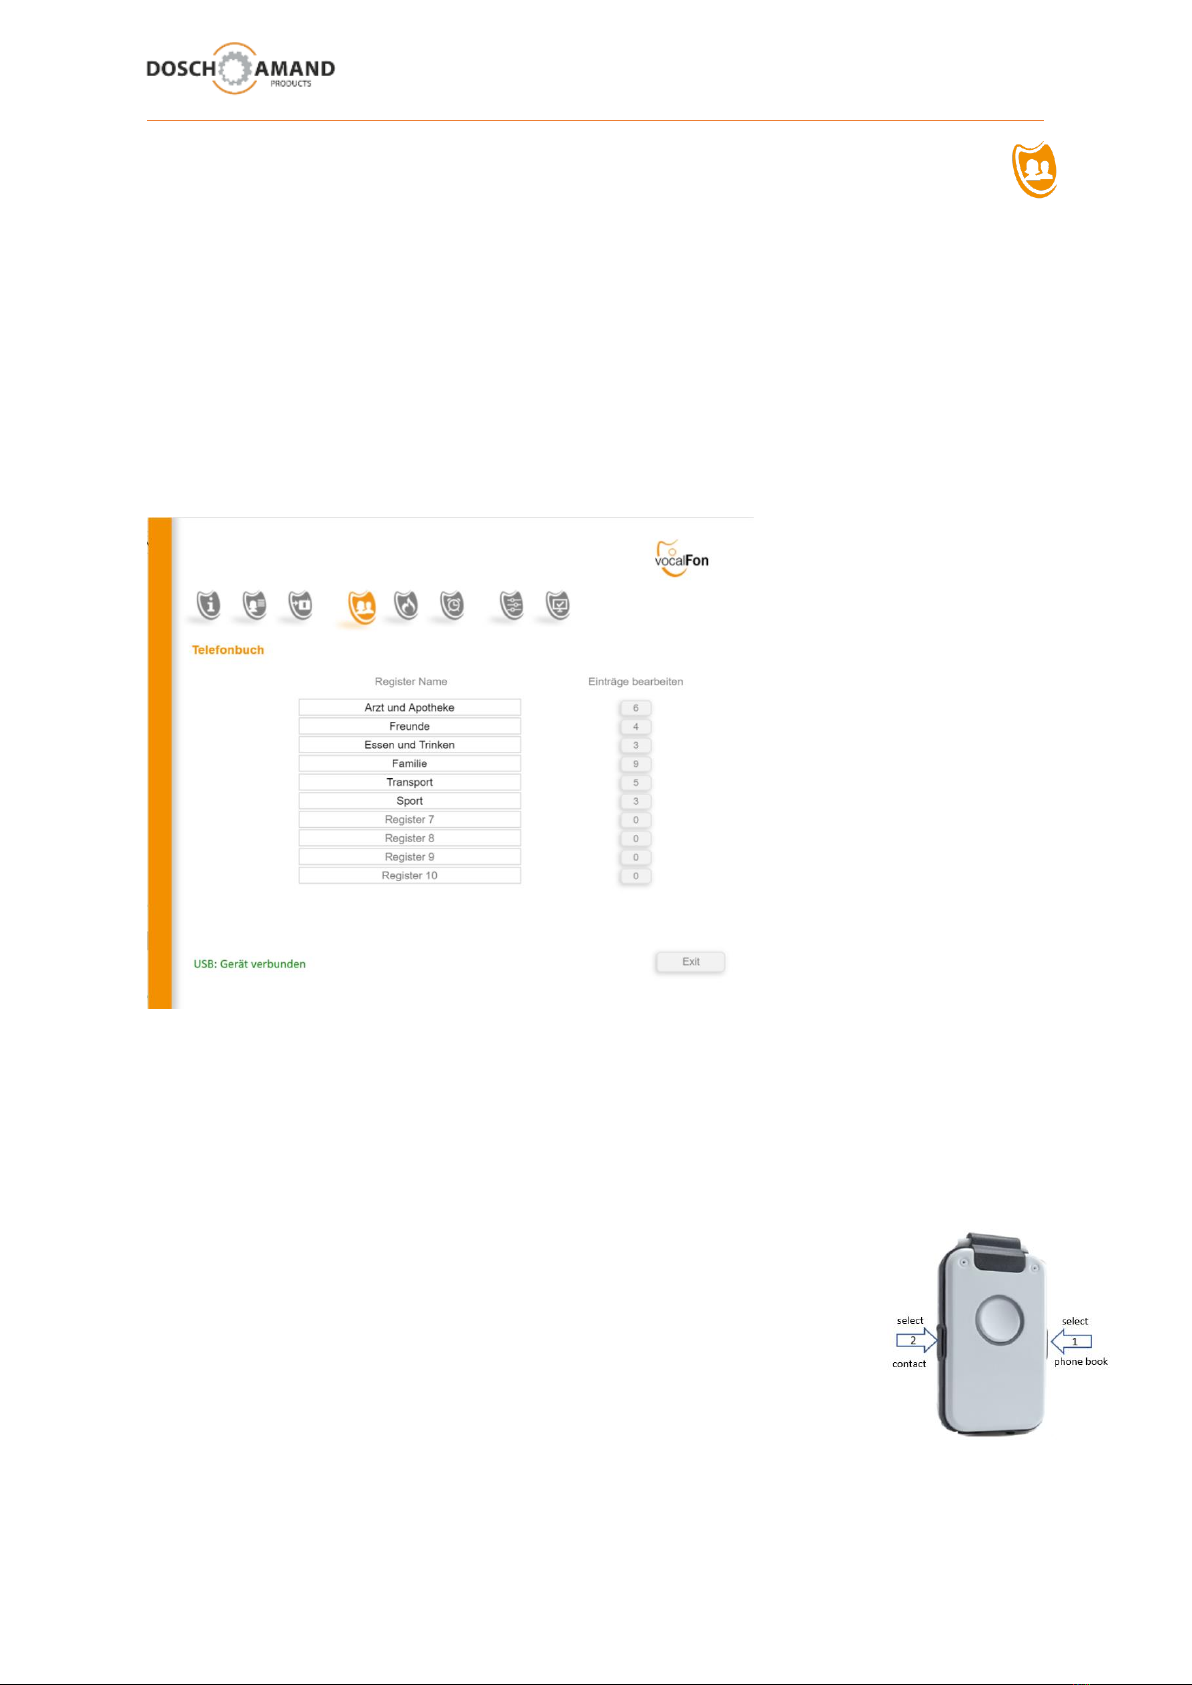
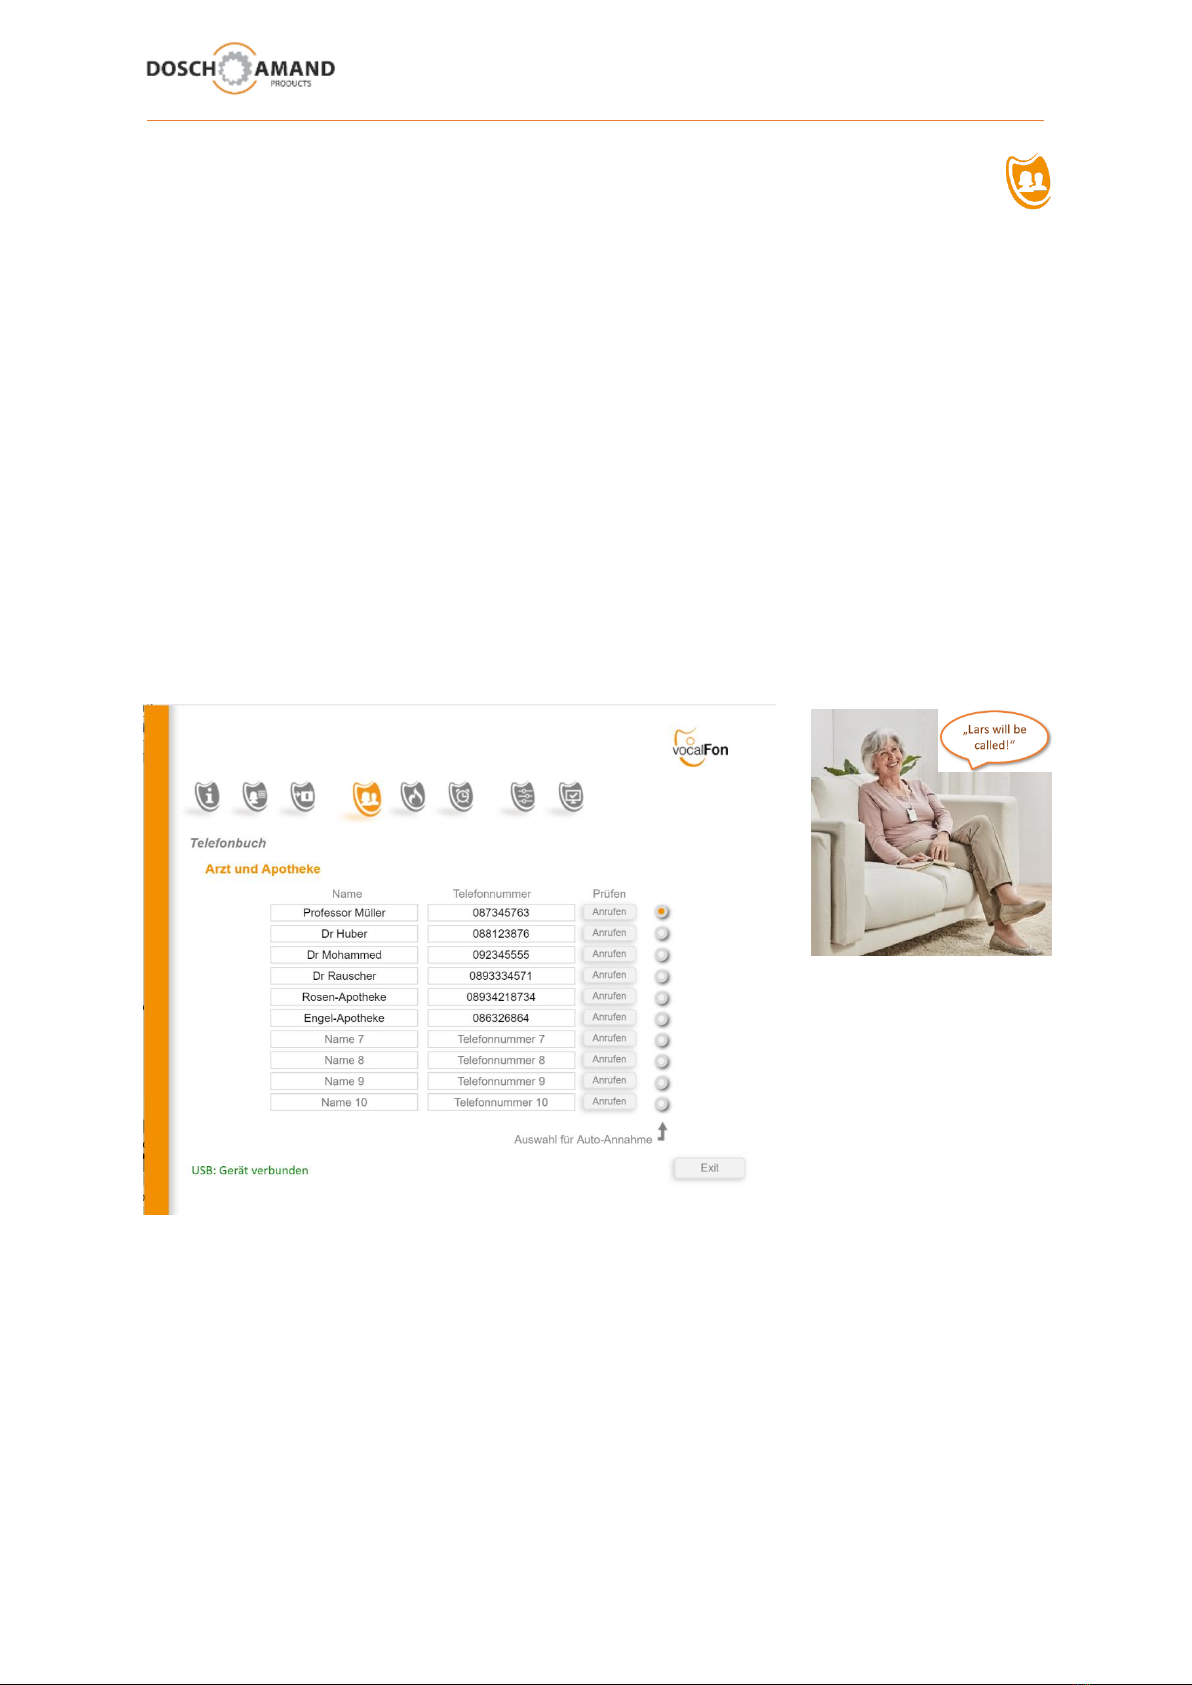
3.6.1 Telephone Books (Register)
There are 10 Telephone Books available with 10 contacts each, in total 100 contacts with names and
telephone numbers. Every Telephone Book can be individually named. Due to this structure and
support by voice assistance the searching of dedicated contacts is a matter of typically 10 seconds for
blind persons.
It is recommended to rank the telephone books and its contacts according the probability of use.
Describe every Telephone Book (Register) with a significant title, e.g. „Family“, „Friends“, „Medicals“,
Eating & Drinking“, „Transportation“,….
You can use as many registers as you need. Not used registers will not be considered during use.
You can see the number of available contacts of each Register on the button at right side, „ e.g. „6“
which means this Register (Telephone Book) has currently 6 contacts. Click this button to make further
entries or corrections (chap 3.6.2) . Store all entries or corrections with „APPLY“ (blue button).
For making a telephone call, you first select the Register Name (Telephone Book)
by pressing a side key. The Voice Assistant will read the Names of Registers
according the entered ranking. It is irrelevant which sidekey is used.
After Register Name has been found, use opposite sidekey to select wanted
Contact Name (chap 3.6.2)
If selection of contact will not be started within 3 seconds the telephony service
will be set to start condition. You can start again with selecting wanted Register and Name.
User Manual Guide DECT vocalFON EN 10-2020 V971 16 von 30
3Configuration via PC APP
3.6 Telephony
3.6.2 Telephone Contacts (Names)
Each 10 Telephone Book can hold 10 Contacts (Name and Number), in total 100 Contacts.
Enter Name and Telephone Number which can be any number up to 25 numeric characters. Non-
numeric characters will be automatically corrected after saving (APPLY),
except characters * and # which can be used for internal calls and control functions of PABX.
Hint: In case your DECT Base Station is used as PABX System and needs an extra number for line access,
please use such extra Line Access Number globally via PC APP Section „SYSTEM“ (Chap 3.11.1)
Beside Name and Number you can define „Auto Hook Off“ per each number individually. In such case
this call will be automatically connected after Caller Name has been announced by Voice Assistant.
Check entered Telephone Numbers before saving them via APPLY
press Check Call button right-side of Telephone Number
You can enter any Name of any length, also First Name plus Family Name („e.g. Peter Robards“ )
You can enter as many contacts as you need. Not used contacts will not be considered during use.
Please rank the Contacts according the probability of use.
For making a telephone call, you first select the Register Name (Telephone Book) by pressing a side
key (chap 3.6.1)

User Manual Guide DECT vocalFON EN 10-2020 V971 17 von 30
3.6 Telephony
3.6.3 Outgoing Calls using Side Keys
advantage quick selection of wanted contact
disadvantage skilled fingers requested (not recommended for elderly persons)
principle use both sidekeys to select
Telephone Register and Name
execute call via Call Button
in Register General Settings
and activate „Side Keys“
Principle : Search Contact and Execute Call
1 2 3
steps
1press any sidekey to select Telephone Register
2press other sidekey to select Name
3 press Call Button to execute call
Hint: you can press sidekeys as quick as you want.
You must not wait till you get announcement from Voice Assistant
Example for quick dialling:
You want to call your friend Stephen.
You know that Stephen is in 2nd Register and here on 5th position.
Then you can press 2times any Side Key and 5times opposite Side Key followed by Call Button
User Manual Guide DECT vocalFON EN 10-2020 V971 18 von 30
3.6 Telephony
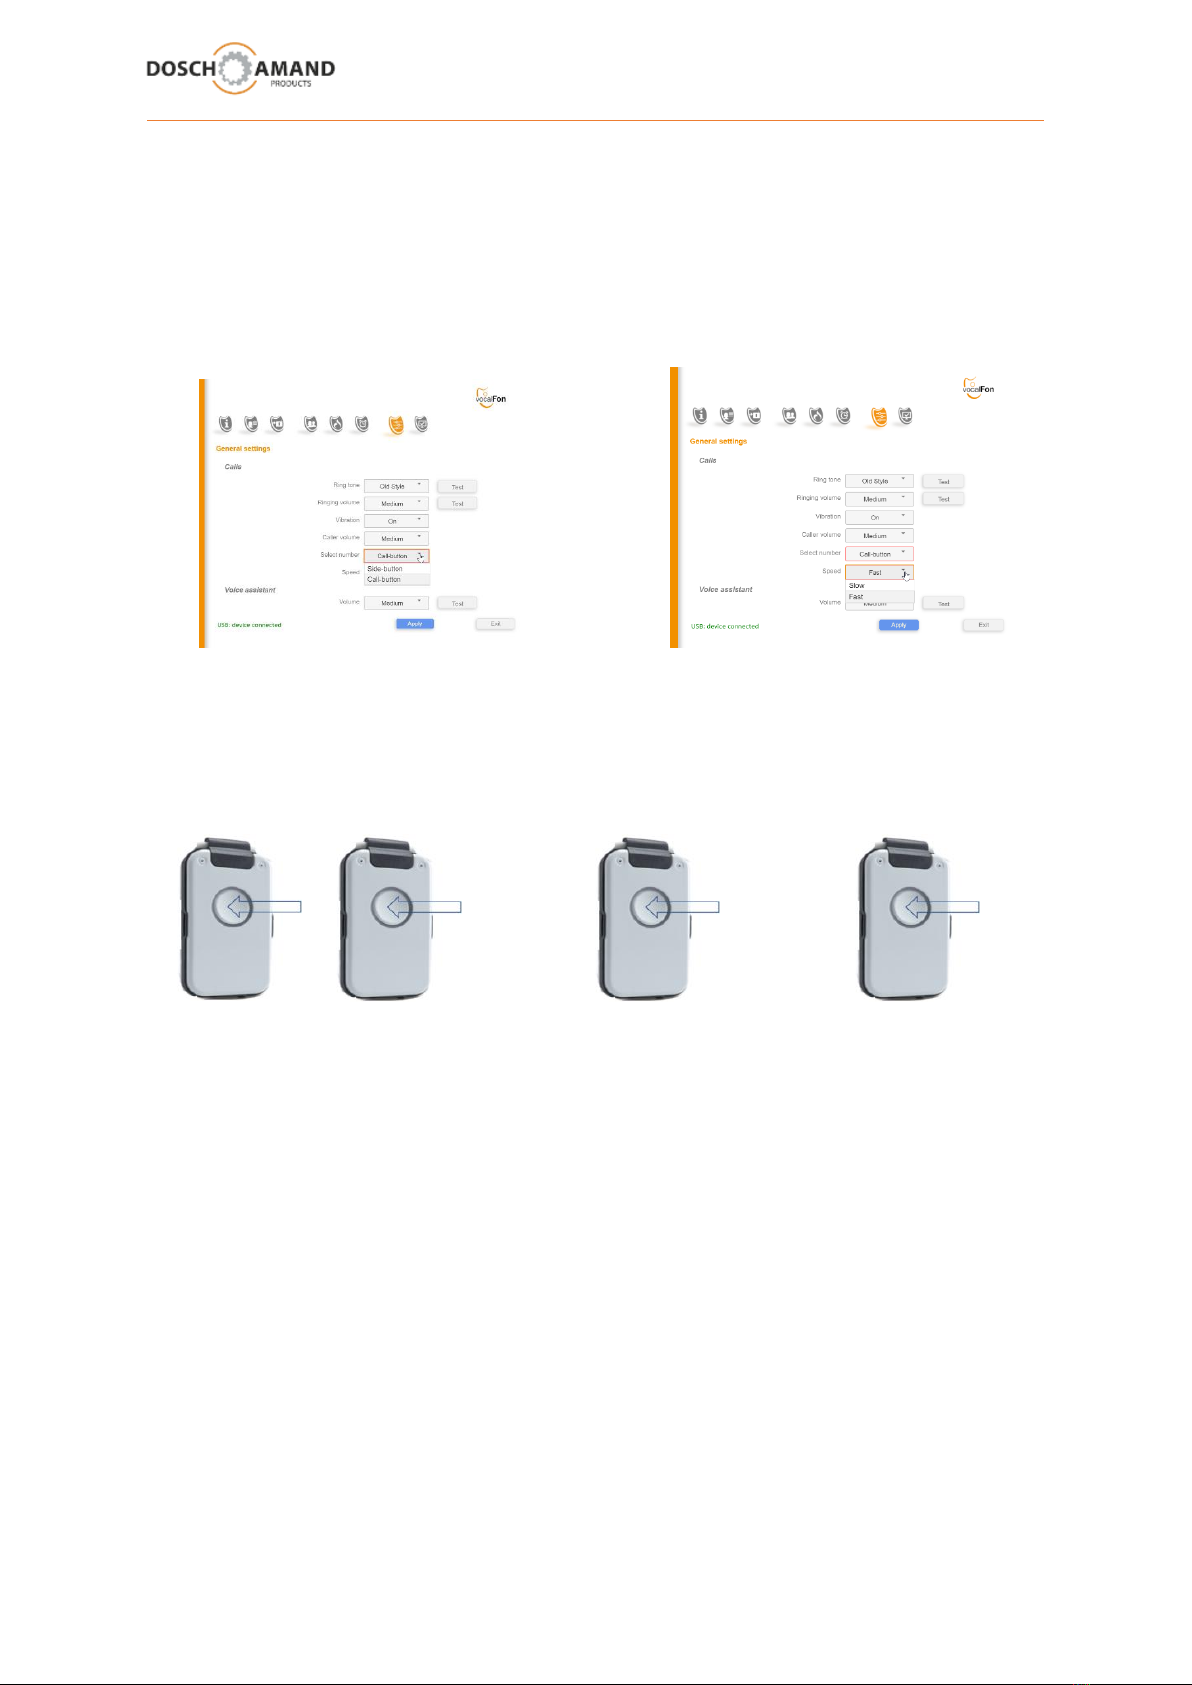
3.6.4 Outgoing Calls using Central Key Default Setup
recommended mode for elderly persons
advantage simple handling with good haptic
disadvantage it takes more time due to wait sections
wait sections can be selected in slow and quick
in Register General Settings define „Speed“ of wait section
and activate „Call Button“ and activate „Slow“ or „Fast“
Principle : Search Contact and Execute Call
wait wait
1 23 4
press 2 sec select Register select Name execute Call
1press Call Button till first Register will be announced
2press Call Button repeatedly till wanted Register is announced
wait for announcement „select Name“
3 press Call Button repeatedly till wanted Name is announced
wait for announcement „press Call Button“
4 press Call Button to execute Call
Hint: Take sufficient time to practice this principle
Once understood it is very simple to use
Train person to handle searching contact slowly
User Manual Guide DECT vocalFON EN 10-2020 V971 19 von 30
3 Configuration via PC APP
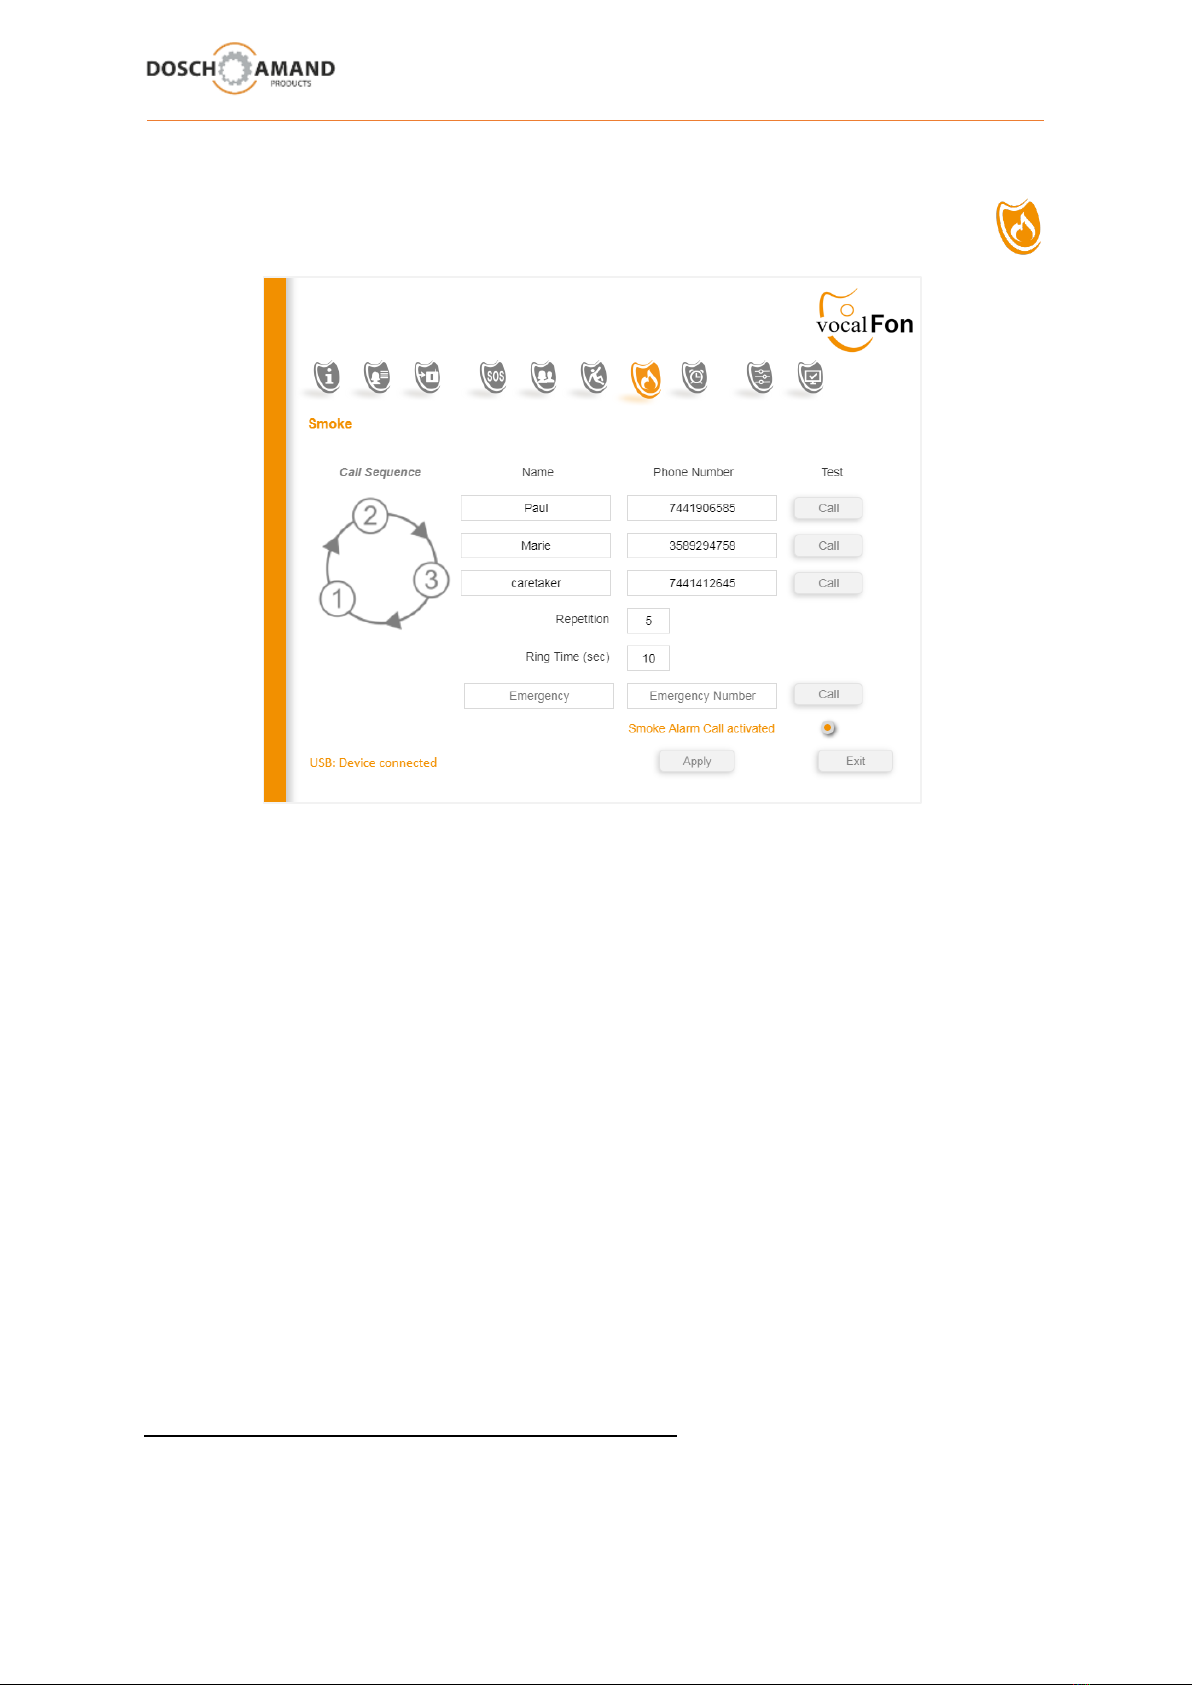
3.8 Smoke Alarm Detection automatic Help Call
The Device features a new Smoke Alarm detection. To activate this function place Device on
Charging Disc. Smoke Alarm will automatically run the help sequence accompanied by Voice
Assistant.
Up to 3 help telephone 25-digit numbers and 1 emergency number can be set.
The call sequence is repeated until a contact has been established. The Voice Assistant informs the
called party of the Smoke Alarm and is the special instructions (chap 3.4) as personal and location
data. Then, the call sequence is suspended for 30 minutes. If the Smoke Alarm has not been
switched off, the Smoke Alarm call sequence will be repeated.
Enter "Ring Time"
Here is set, how long the Ringing duration should be before - in case of non-acceptance- the next
number in the sequence will be selected. “Ring time”should be chosen at least as long as it is assured
that called person can take the call. However Ring Time should be as short as possible because this
time will cause delays in finding a contact or a network-side answering machine can be activated.
Better shorten the Ring Time and apply for more Repetitions.
Telephone numbers should not support answering machine.
User Manual Guide DECT vocalFON EN 10-2020 V971 20 von 30
3 Configuration via PC APP
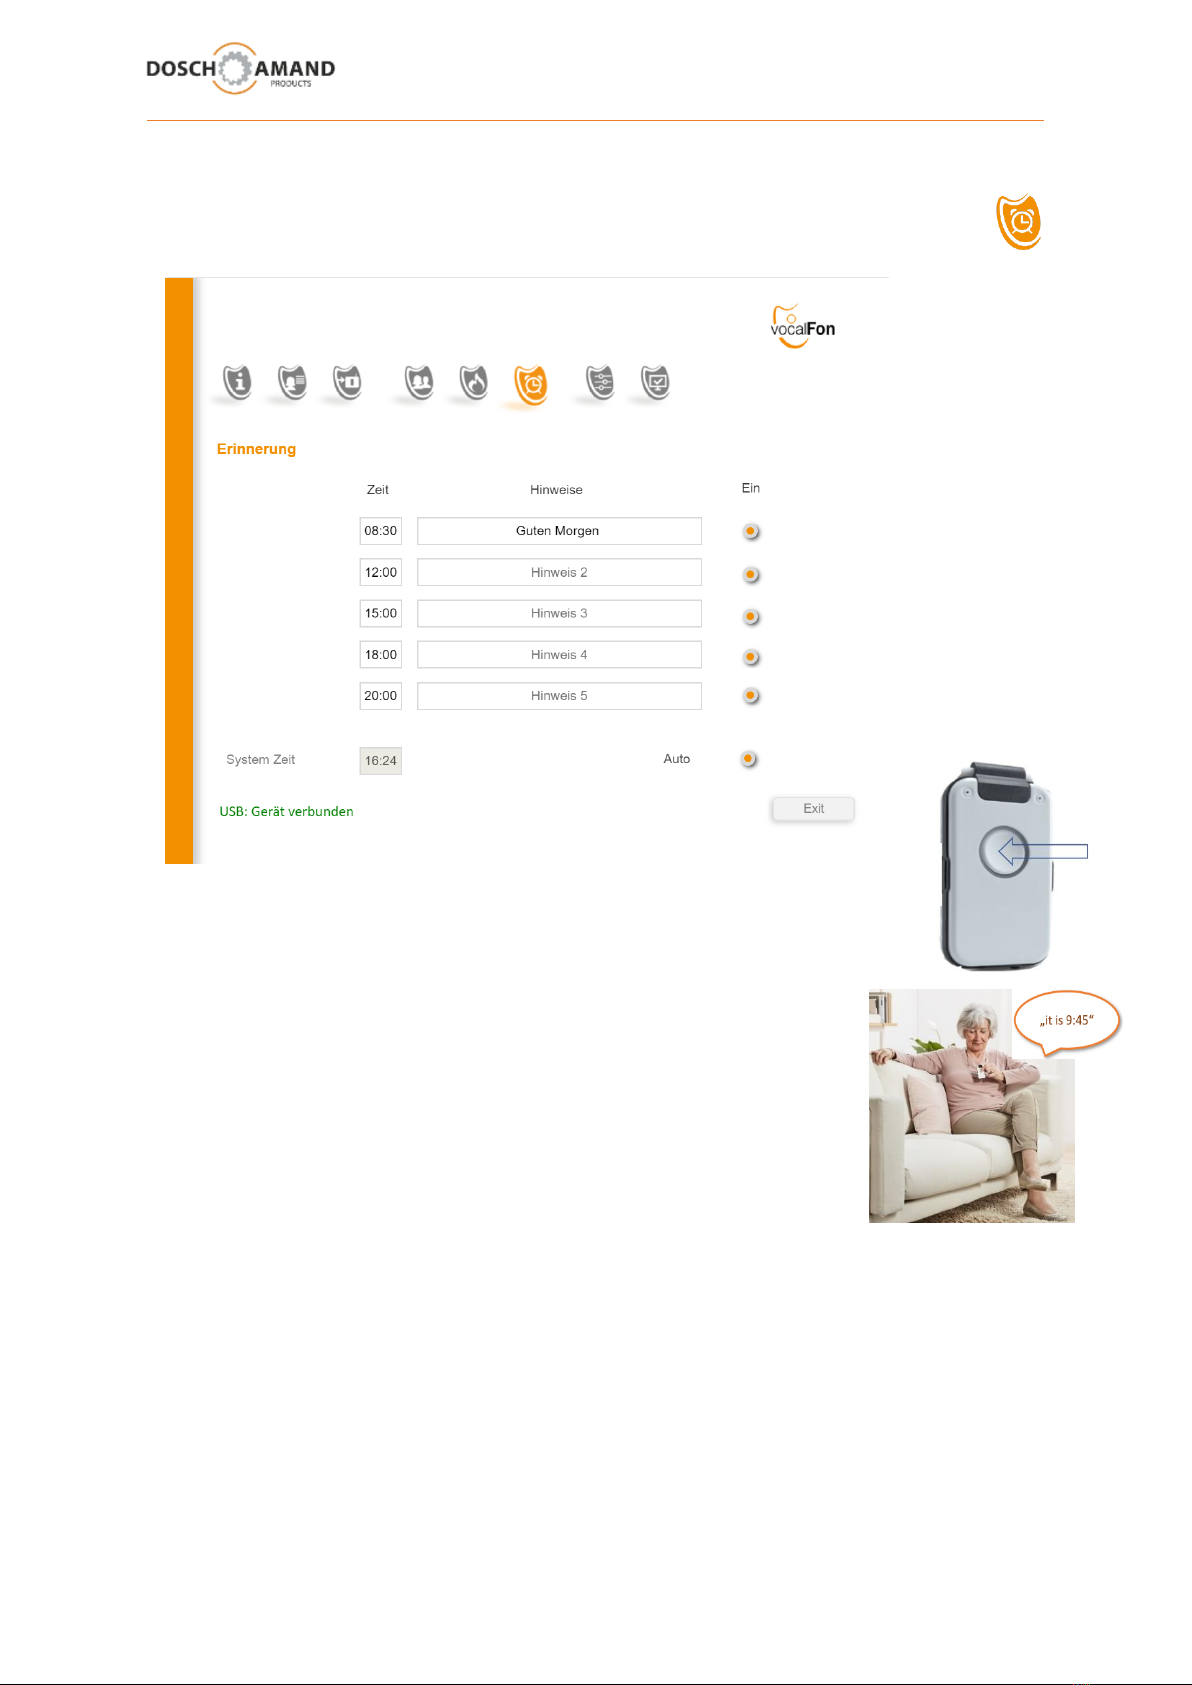
3.9 time-triggered memos, Wake-up Call, clock function
instant time announcements
You can enter up to 5 time stamps for vocal announcements (prompts)
Enter the prompts in the side-standing box.
If no prompt is entered, device will announce the time only (clock function)
3.9.1 instant time announcements (what time it is?)
By pressing Central Button the actual time will be instantly announced
3.9.2 Enter current time (System Time) via external call
In case no System Time is entered (e.g. after switch OFF)
the Voice Assistant will notify „no valid time available“
Enter System Time (= current Time) via 2 methods:
a) input via PC APP (see above template: System Time or use Auto Button (= PC time)
b) via external incoming call and entering time via telephone keypad
in following format #TIME#hhmm#
TIME corresponds to key sequence 8463
hh = current hour mm = current minute
example: current time is 9:45 am => format is #8463#0945#
The time-triggered prompts/memos will be announced also in case of Device is on Charging Disc.
Daily wake-up announcement can be entered, e.g. 08:30 “Good Morning Dad”
Table of contents
Other vocalFON Cordless Telephone manuals

Popular Cordless Telephone manuals by other brands


Panasonic
Panasonic KX-TCD650 Operating instructions & quick guide

Uniden
Uniden TRU341 - TRU 341 Cordless Phone owner's manual

Panasonic
Panasonic KX-TH1201 operating instructions

Auerswald
Auerswald 800 user manual

Avaya
Avaya Agent Deskphone 16CC quick reference

Panasonic
Panasonic VE-GD72DL quick reference