Vocalist Vocalist Live 5 User manual

Owner’s
Manual
Vocal Harmony & Real-Time
Pitch Correction for Guitarists
Professional audio equipment

WARNING FOR YOUR PROTECTION
READ THE FOLLOWING:
KEEP THESE INSTRUCTIONS
HEED ALL WARNINGS
FOLLOW ALL INSTRUCTIONS
THE APPARATUS SHALL NOT BE EXPOSED TO DRIPPING OR SPLASHING LIQUID AND NO OBJECT FILLED WITH LIQUID, SUCH AS VASES,
SHALL BE PLACED ON THE APPARATUS
CLEAN ONLY WITH A DRY CLOTH.
DO NOT BLOCK ANY OF THE VENTILATION OPENINGS. INSTALL IN ACCORDANCE WITH THE MANUFACTURER’S INSTRUCTIONS.
DO NOT INSTALL NEAR ANY HEAT SOURCES SUCH AS RADIATORS, HEAT REGISTERS, STOVES, OR OTHER APPARATUS (INCLUDING
AMPLIFIERS) THAT PRODUCE HEAT.
ONLY USE ATTACHMENTS/ACCESSORIES SPECIFIED BY THE MANUFACTURER.
UNPLUG THIS APPARATUS DURING LIGHTNING STORMS OR WHEN UNUSED FOR LONG PERIODS OF TIME.
Do not defeat the safety purpose of the polarized or grounding-type plug. A polarized plug has two blades with one wider than the other. A
grounding type plug has two blades and a third grounding prong. The wide blade or third prong are provided for your safety. If the provided plug
does not fit your outlet, consult an electrician for replacement of the obsolete outlet.
Protect the power cord from being walked on or pinched particularly at plugs, convenience receptacles, and the point where they exit from the
apparatus.
Refer all servicing to to qualified service personnel. Servicing is required when the apparatus has been damaged in any way, such as power-supply
cord or plug is damaged, liquid has been spilled or objects have fallen into the apparatus, the apparatus has been exposed to rain or moisture,
does not operate normally, or has been dropped.
MAINS DISCONNECT: The plug shall remain readily operable. For rack-mount or installation where plug is not accessible, an all-pole mains switch
with a contact separation of at least 3 mm in each pole shall be incorporated into the electrical installation of the rack or building.
If connected to 240V supply, a suitable CSA/UL certified power cord shall be used for this supply.
ELECTROMAGNETIC
COMPATIBILITY
This device complies with part 15 of the FCC
Rules and the Product Specifications noted on
the Declaration of Conformity. Operation is
subject to the following two conditions:
• this device may not cause harmful
interference, and
• this device must accept any interference
received, including interference that
may cause undesired operation.
Operation of this unit within significant
electromagnetic fields should be avoided.
• use only shielded interconnecting cables.
The symbols shown above are internationally accepted symbols
that warn of potential hazards with electrical products. The
lightning flash with arrowpoint in an equilateral triangle means
that there are dangerous voltages present within the unit. The
exclamation point in an equilateral triangle indicates that it is
necessary for the user to refer to the owner’s manual.
These symbols warn that there are no user serviceable parts
inside the unit. Do not open the unit. Do not attempt to service
the unit yourself. Refer all servicing to qualified personnel.
Opening the chassis for any reason will void the manufacturer’s
warranty. Do not get the unit wet. If liquid is spilled on the
unit, shut it off immediately and take it to a dealer for service.
Disconnect the unit during storms to prevent damage.

If you want to dispose this product, do not mix it with general household waste. There is a
separate collection system for used electronic products in accordance with legislation that
requires proper treatment, recovery and recycling.
Private household in the 25 member states of the EU, in Switzerland and Norway may return their used
electronic products free of charge to designated collection facilities or to a retailer (if you purchase a similar
new one).
For Countries not mentioned above, please contact your local authorities for a correct method of disposal.
By doing so you will ensure that your disposed product undergoes the necessary treatment, recovery and
recycling and thus prevent potential negative effects on the environment and human health.
DECLARATION OF CONFORMITY
Manufacturer’s Name: Harman Music Group
Manufacturer’s Address: 8760 S. Sandy Parkway
Sandy, Utah 84070, USA
declares that the product:
Product name: Vocalist®Live 5
Product option: all (requires Class II power adapter that conforms
to the requirements of EN60065, EN60742, or equivalent.)
conforms to the following Product Specifications:
Safety: IEC 60065 -01+Amd 1
EMC: EN 55022:2006
EN 55024:1998
FCC Part 15
Supplementary Information:
The product herewith complies with the requirements of the:
Low Voltage Directive 2006/95/EC
EMC Directive 2004/108/EC
RoHS Directive 2002/95/EC
WEEE Directive 2002/96/EC
With regard to Directive 2005/32/EC and EC Regulation 1275/2008 of 17 December 2008, this
product is designed, produced, and classified as Professional Audio Equipment and thus is exempt
from this Directive.
With regard to Directive 2005/32/EC and EC Regulation 278/2009 of 6 April 2009, this regulation
applies to Class A (single output) external power supplies.The external power supply used with this
product is a multi-output power supply and thus is exempt from this Directive.
Roger Johnsen
Vice-President of Engineering
8760 S. Sandy Parkway
Sandy, Utah 84070, USA
Date: September 22, 2010
European Contact: Your local DigiTech/Vocalist Sales and Service Office or
Harman Music Group
8760 South Sandy Parkway
Sandy, Utah 84070 USA
Ph: (801) 568-8800
Fax: (801) 568-7583

Warranty
We at Vocalist®are very proud of our products and back up each one we sell with the following
warranty:
1. The warranty registration card must be mailed within ten days after purchase date to validate this
warranty.
2. Vocalist warrants this product, when used solely within the U.S., to be free from defects in materials
and workmanship under normal use and service.
3. Vocalist liability under this warranty is limited to repairing or replacing defective materials that show
evidence of defect, provided the product is returned to Vocalist WITH RETURN AUTHORIZATION,
where all parts and labor will be covered up to a period of one year.A Return Authorization number
may be obtained fromVocalist by telephone.The company shall not be liable for any consequential
damage as a result of the product’s use in any circuit or assembly.
4. Proof-of-purchase is considered to be the burden of the consumer.
5. Vocalist reserves the right to make changes in design, or make additions to, or improvements upon this
product without incurring any obligation to install the same on products previously manufactured.
6. The consumer forfeits the benets of this warranty if the product’s main assembly is opened and
tampered with by anyone other than a certied Vocalist technician or, if the product is used with AC
voltages outside of the range suggested by the manufacturer.
7. The foregoing is in lieu of all other warranties, expressed or implied, andVocalist neither assumes nor
authorizes any person to assume any obligation or liability in connection with the sale of this product.
In no event shall Vocalist or its dealers be liable for special or consequential damages or from any delay
in the performance of this warranty due to causes beyond their control.
NOTE: The information contained in this manual is subject to change at any time without notication.
Some information contained in this manual may also be inaccurate due to undocumented changes in the
product or operating system since this version of the manual was completed.The information contained
in this version of the owner’s manual supersedes all previous versions.

Overview .................................... 1
Introduction ......................................1
musIQ®Technology .........................1
Included Items ..................................1
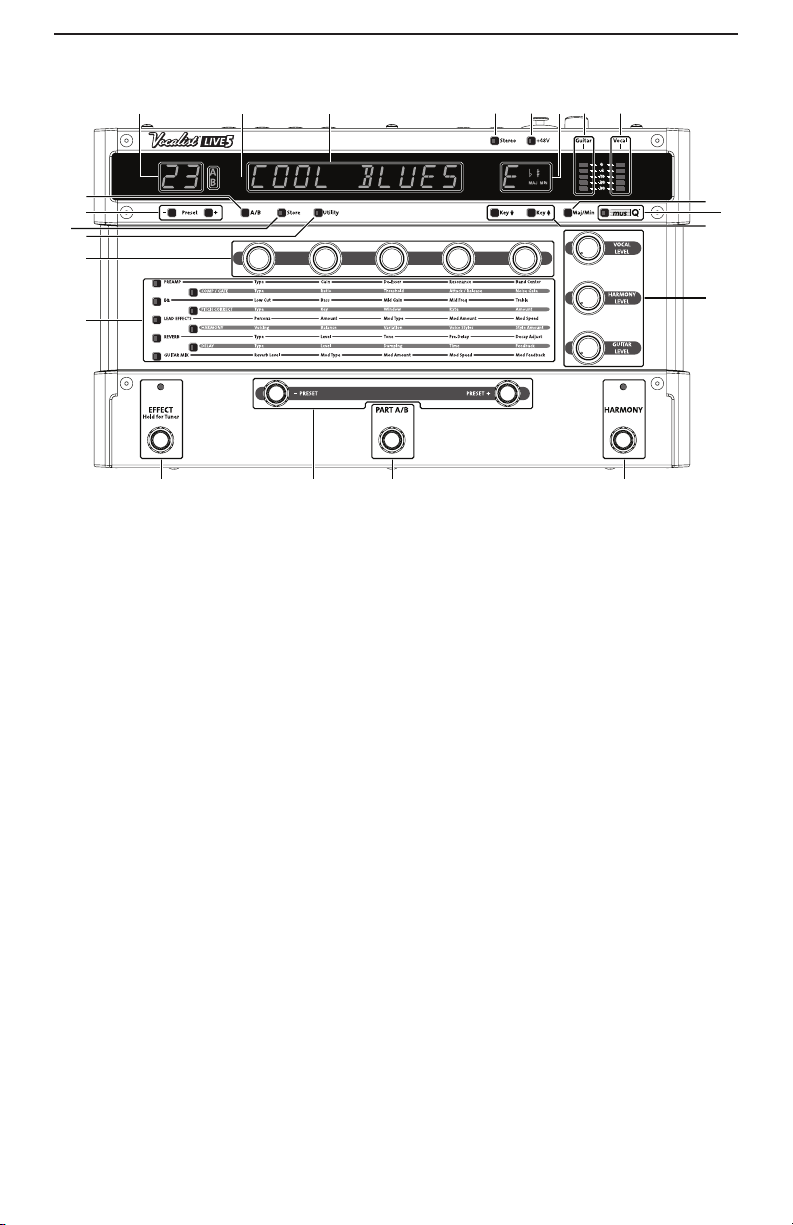
Front Panel ................................ 3
Numeric Display...............................3
Part A/B Display ...............................3
Alphanumeric Display .....................3
Stereo Button ...................................3
Phantom Power Button..................3
Key Display........................................3
Guitar Signal LED Ladder...............4
Vocal Signal LED Ladder.................4
Major/Minor Button........................4
musIQ® Button................................4
Key Up/Down Buttons ...................4
Level Knobs.......................................4
Harmony Footswitch ......................4
Part A/B Footswitch ........................4
Preset +/- Footswitches .................4
Effects Footswitch............................4
Effects Matrix....................................5
Effect Parameter Knobs..................5
Utility Button ....................................5
Store Button .....................................5
Preset +/- Buttons ...........................5
Part A/B Buttons ..............................5
Rear Panel.................................. 6
Mic/Line Input Level ........................6
Mic In/Line In ....................................6
Guitar In.............................................6
Guitar Thru........................................6
Left Out and Right Out (XLR
Outputs) ............................................6
Ground Lift........................................6
Line Out L/R .....................................6
Headphones ......................................7
Expression Pedal ..............................7
Power .................................................7
Getting Started ......................... 7
Connecting a Microphone and
Guitar to a PA (Mono or Stereo) 8
Connecting a Microphone and
Guitar to a Guitar Amp and PA
(Mono)................................................9
Connecting a Microphone and
Guitar to a PA and Powered
Monitor (Mono)...............................9
Connecting a Guitar and
Microphone from a Mixer/Preamp
to a PA (Stereo) ...............................10
Adjusting the Guitar Sensitivity ....10
Tuning Your Guitar ...........................10
Adjust the Vocal Level .....................11
Adjust the Guitar Level ..................11
Choose a Preset...............................11
Using the Vocalist® Live 5 ...... 12
Mono and Stereo.............................12
Regarding External Effects Pedals.12
Creating and Modifying Presets 12
How to Store Presets.....................12
Copying Presets................................13
Effects and Parameter
Descriptions............................... 14
Preamp ...............................................14
Comp/Gate .......................................15
EQ .......................................................16
Pitch Correct....................................17
Lead Effects .......................................19
Harmony............................................20
Reverb ................................................23
Guitar Mix .........................................24
Utility Parameters............................25
Factory Reset ............................ 26
Troubleshooting........................ 27
Effects Block Diagram ............. 28
Preset List .................................. 29
Specifications............................. 34


1
Overview
Introduction
Congratulations on your purchase of the Vocalist®Live 5.TheVocalist Live 5 is a
breakthrough processor that automatically generates live multi-part vocal harmony
by analyzing guitar chord progressions.Armed with patent pending musIQ®
Harmony Technology (which includes both musIQ note detection and musIQ
harmony generation), the Vocalist Live 5 gives you accurate vocal harmonies even
with complicated songs because onlyVocalist Live tracks guitar chords, along with
your voice.
musIQ®Technology
musIQ is a revolutionary technology that eliminates the need to program key and
scale information to generate Harmony Voices. In real time musIQ technology
analyzes the LeadVoice as well as the notes and chords played on a guitar and
automatically generates accurate and musically correct vocal harmonies that both
complement the Lead Voice and t the music being played. With musIQ technology,
you can focus on your singing and playing performance and eliminate song
programming.
Vocalist®Live 5 Main Features
• musIQ harmony technology
• Up to four voices of automatic harmony with selectable voicing or a manually
selected key and scale/mode
• Selection of lead voice effects (Preamp, Reverb, Echo/Delay, Compressor, EQ,
modulation and pitch effects)
• Next-generation vocal pitch detection, pitch shifting, and humanization
processing.
• Built-in guitar tuner
• Built-in microphone preamp
• Stereo XLR balanced and 1/4” unbalanced line outputs
• 50 factory presets (each with a Part A and Part B) and 50 user (editable)
presets (each with a Part A and Part B)
• Expression pedal input for real-time control of most performance parameters
• XLR ground lift function
• 1/4” Headphone output
• +48V phantom power
• 24-bit/44.1kHz audio quality
Included Items
Before you get started, please make sure that the following items have been
included:
• The Vocalist Live 5
• PS0913B Power Supply
• This owner’s manual
• Warranty Card

2
The utmost care was taken while your Vocalist®Live 5 was being manufactured.
Everything should be included and in perfect working order. If anything is missing,
contact the factory at once. Please help us become acquainted with you and your
needs by completing your warranty card or registering online at www.vocalistpro.
com. It is your safeguard should a problem arise with your Vocalist Live 5.
Important safety tip: Always turn on ampliers AFTER all other connections are
made to the Vocalist Live 5 and AFTER the Vocalist Live 5 is powered on.

3
Front Panel
12345678
9
10
11
12
13141516
17
18
19
20
21
22
1. Numeric Display
Shows the number of the selected preset.
2. Part A/B Display
Shows which part is currently active, Part A or Part B.
3. Alphanumeric Display
Shows the name of the selected preset.While editing, it will show the param-
eter name and value being edited.
4. Stereo Button
When Stereo is the selected output mode (Stereo button is lit), the harmony
voices are panned slightly left and right, and certain effects (chorus, flanger, and
reverb, for example) operate in stereo.When Mono is the selected output
mode (Stereo button is off), the output mix is mono and the outputs all carry
the same signal.
5. Phantom Power Button
Enables 48 volt phantom power on the XLR mic input. Note: Phantom power
is normally only needed with condenser microphones and should never be
used with ribbon microphones.To avoid damaging the microphone, please
consult your microphone documentation to ensure phantom power is applied
only when appropriate.
6. Key Display
Shows the selected root key (E, F, F#, etc.) for generating harmonies when
musIQ is off.The Key display includes accidental symbols (sharp and flat) as
well as the scale modes major or minor.

4
7. Guitar Signal LED Ladder
Shows the signal strength from the guitar input. Green indicates that a signal is
present, amber indicates the signal is approaching levels that may clip and red
indicates clipping. Clipping may degrade the ability of the Vocalist®Live 5 to
detect the guitar notes.
NOTE: Adjust the guitar input sensitivity in the Utilities menu to optimize the
signal level that works best with your guitar (see page 25).
8. Vocal Signal LED Ladder
Shows the signal strength from the Mic input. Green indicates a signal is present,
amber indicates the signal is approaching levels that may clip and red indicates
the built-in limiter is active.The limiter generally prevents clipping unless a very
large input is applied.
9. Major/Minor Button
Toggles between major and minor scale types when the musIQ® button is not lit.
10. musIQ® Button
Turns automatic harmony generation on or off.When turned on, harmonies
will be generated by analyzing the Lead Vocal and guitar inputs.
11. Key Up/Down Buttons
Used to select a key for the harmonies to be generated (when the musIQ® is
off).
12. Level Knobs
Vocal Level – Controls the lead vocal level in the mix.
Harmony Level – Controls the harmony vocal level in the mix.
Guitar Level – Controls the guitar level in the mix.
13. Harmony Footswitch
Enables and disables the vocal harmonies.You can configure the Harmony
Footswitch to be a toggle or momentary control. See the Utility Parameters
menu on page 25 for more information.
14. Part A/B Footswitch
Use this to toggle between Part A and Part B of the preset.
15. Preset +/- Footswitches
Use these to step through the presets. Hold either down to scroll quickly
through the presets.
16. Effects Footswitch
Enables and disables the selected effects. Press and hold this footswitch for at
least one second to enable the guitar tuner. Press the Effects/Tuner footswitch
again to disable the guitar tuner.

5
17. Effects Matrix
The Effects Matrix provides information regarding the current preset and
parameter edit functions.The buttons running down the left side of the Matrix
provide a visual indication of which effects are in use for the selected preset.
While editing a preset, the flashing button LED indicates that the Effect row
is selected for editing. Use the five Parameter knobs above the Effects Matrix
columns to edit the parameters for the selected effect row. For more infor-
mation about the Effects matrix, see page 14.
18. Effect Parameter Knobs
Use these to adjust parameters for the selected row in the Effects matrix.
19. Utility Button
Press to access the Utility Parameter menu. For more information on the
Utility menu, see page 25.
20. Store Button
Press to save changes you make to a preset. For more information on storing
presets, see page 12.
21. Preset +/- Buttons
Use these to step through the presets. Hold either down to scroll quickly
through the presets.
22. Part A/B Button
Use this to toggle between Part A and Part B of the preset.

6
Rear Panel
Input Gain
Mic/Line In
9VAC
1.3A
musIQ is a registered
trademark of 3dB Research
Left Out Right Out
Guitar Thru Left
Line Out
Right
Line Out
Stereo
Headphone
Expression
Pedal
Guitar In Ground
Lift
On Off
12 34 5678910
1. Mic/Line Input Level
This knob adjusts the gain of the Mic and Line inputs.Turn clockwise to
increase gain, or counter-clockwise to decrease gain. If the Vocal Signal LED
ladder reaches red while you sing, you need to decrease the Mic gain.
2. Mic/Line In
This is a combination Mic (XLR) and Line (1/4”) input and is the lead voice for
the Vocalist®Live 5. Connect a dynamic or condenser microphone here with
an XLR cable. If the mic signal is line level (coming from the output of a pre-
amp before the Vocalist Live 5), connect the line output of the preamp here
using a 1/4” balanced or unbalance cable.
3. Guitar In
Connect a guitar directly to this high-impedance input. Note that there is no
loss of quality between the Guitar In and Guitar Thru jacks.
4. Guitar Thru
Connect this output to the input of a guitar amplifier or mixer channel (if the
guitar uses active electronics).
5. Left Out and Right Out (XLR Outputs)
Connect these XLR balanced outputs to a powered speaker or mixer. XLR
outputs can be run in stereo (Stereo button on front panel is lit) or mono
(Stereo button is off). Either output can be used in mono mode.
6. Ground Lift
The XLR Ground Lift switch can be used to eliminate most hum and ground
loop noise problems when the VL5 is connected to a both a P.A. and a guitar
amp. If you hear a humming sound or buzz coming from your amp or P.A., try
pressing this button.
7. Line Out L/R
Connect both these balanced/unbalanced outputs to a mixer, powered speak-
ers or P.A. system. If only a single output is to be used, be sure the output
mode is set to Mono (Stereo button on front panel is off).

7
8. Headphones
Use this jack to hear the Line Out L/R mix through headphones.
9. Expression Pedal
The Vocalist®Live 5 can use either a standard passive guitar volume pedal or
a resistance-based expression pedal. If using a standard guitar volume pedal, it
should use a 250 kOhms or higher pot. If using an expression pedal, it must
offer a TRS connection and offer a minimum resistance of 10kOhms.
See the Utility Parameters menu on page 25 for information on expression
controllable parameters.
10. Power
Connect only the PS0913B power supply to this jack.

8
Getting Started
Before connecting the Vocalist® Live 5 to your amplier, make sure that the power
to your amplier is off and that the Vocalist Live 5 is plugged into the wall and
powered on.There is no power switch on theVocalist Live 5.To turn the Vocalist
Live 5 on or off, connect or disconnect the included power supply from the Power
Input jack.
Connecting a Microphone and Guitar to a PA (Mono or Stereo)
This is a basic setup for stereo or mono outptut. For stereo output, enable the
Stereo button on the front panel. For mono output, turn the Stereo button on the
front panel off. For the Mic/Line input, use the XLR input for the Microphone in
order to utilize theVocalist Live 5’s preamp. Note that the XLR outputs can also be
used for stereo output.
Input Gain
Mic/Line In
9VAC
1.3A
musIQ is a registered
trademark of 3dB Research
Left Out Right Out
Guitar Thru Left
Line Out
Right
Line Out
Stereo
Headphone
Expression
Pedal
Guitar In Ground
Lift
On Off
Stereo
or
Mono
To Speakers
1 2 3 4 5 6 L R
To Mixer

9
Connecting a Microphone and Guitar to a Guitar Amp and PA
(Mono)
This setup bypasses theVocalist®Live 5 guitar effects via the Guitar Thru output.A
mono vocal and guitar signal is sent to the mixer. Turn the Stereo button off on the
front panel for mono operation.
Input Gain
Mic/Line In
9VAC
1.3A
musIQ is a registered
trademark of 3dB Research
Left Out Right Out
Guitar Thru Left
Line Out
Right
Line Out
Stereo
Headphone
Expression
Pedal
Guitar In Ground
Lift
On Off
To Mixer
To Speakers
1 2 3 4 5 6 L R
Mono
or
Mono
Connecting a Microphone and Guitar to a PA and Powered
Monitor (Mono)
This setup sends guitar and vocals to the mixer as well as an onstage monitor.Turn
the Stereo button off on the front panel for mono operation.
Input Gain
Mic/Line In
9VAC
1.3A
musIQ is a registered
trademark of 3dB Research
Left Out Right Out
Guitar Thru Left
Line Out
Right
Line Out
Stereo
Headphone
Expression
Pedal
Guitar In Ground
Lift
On Off
To Speakers
1 2 3 4 5 6 L R
To MixerTo Powered Monitor

10
ConnectingaGuitarandMicrophonefromaMixer/Preamptoa
PA (Stereo)
This setup includes a preamp or mixer between the microphone and theVocalist®
Live 5. Use the ¼” input of the Mic/Line input as the Microphone is running through
a preamp. Turn the Stereo button on the front panel on for stereo operation.
Input Gain
Mic/Line In
9VAC
1.3A
musIQ is a registered
trademark of 3dB Research
Left Out Right Out
Guitar Thru Left
Line Out
Right
Line Out
Stereo
Headphone
Expression
Pedal
Guitar In Ground
Lift
On Off
Stereo
To Speakers
To Microphone In
1 2 3 4 5 6 L R
To Mixer
To Mixer
1 2 3 4 5 6 L R
or
Stereo
Adjusting the Guitar Sensitivity
While playing the guitar, the Guitar Signal LED Ladder should be bouncing in the
green or amber range. If the Guitar Signal LED Ladder does not light when you
play, or only the bottom green LED of the ladder lights, the guitar signal level may be
too low and the Guitar Sensitivity should be changed to Hi in the Utility menu. If the
Guitar Signal LED Ladder bounces in the red, then the Guitar Sensitivity should be
changed to Lo in the Utility menu (See page 25 for Utility menu).
Tuning Your Guitar
It is important for your guitar to be properly tuned in order for the musIQ®
technology to generate the best sounding harmonies.Alternate tunings (for example,
DADGAD or tuning down) are ne, as long as the built-in tuner shows each string
as in tune. If you are using an external tuner, make sure that the reference is set to
440 Hz.
To use the built-in tuner, press and hold the Effect Footswitch to start the Guitar
Tuner. The Effect LED will ash and the display will show TUNER while the Tuner
mode is active.Tune each string until a star (*) without arrows (>> or <<) appears
in the center of the display for each string, indicating it’s in tune.
Note: For the Tuner to work properly it needs to receive adequate guitar signal
strength, as indicated by the Guitar Signal LED Ladder.

11
Adjust the Vocal Level
Using the Input Gain knob on the rear of the unit adjust the level so the Vocal Level
LED Ladder bounces around amber when you sing loudly and bounces in the green
when you sing quietly.Avoid having the Vocal Level LED Ladder bouncing in the red.
Adjust the Guitar Level
Ideally the Guitar Signal LED Ladder should be in the green or amber range
while playing. Most electric and acoustic/electric guitars send their signal at a level
appropriate for the Vocalist Live 5. If you have a volume control on your guitar (for
example, an acoustic guitar with a pre-amp built in), you should adjust the volume so
that the Guitar Signal LED Ladder is in the green or amber range most of the time
while playing.
Once the guitar level is set with your guitar’s volume control, you can adjust how
much guitar is heard in the mix with the Guitar Level knob.
Choose a Preset
Using the Preset +/- footswitches and buttons you can cycle through the different
presets (for a full preset list see page 29). Some presets to try:
• 03 CSN - Contains a three part harmony: your lead vocal, a 3rd and 5th above
to create a triad.
• 05 Gold PC – Studio quality vocal enhancement and pitch correction with a
simple 3rd above harmony.
• 06 4 UNISONS – Uses four harmony voices in unison to create a fat thick-
ening effect.
• 09 ACCAPELLA C - Features 5th down, 3rd down and 3rd up harmonies in
the key of C without the need for a guide instrument.
• 10 OTTOTUNE1 - Uses the Chromatic Pitch Correction to get that chart
topping sound best suited for Pop and R & B.
Cycle through different presets to get an idea of the range of effects contained in
the Vocalist®Live 5.

12
Using the Vocalist®Live 5
Each preset has two parts, an A part and a B part that can be toggled with the
A/B footswitch or button.This can be helpful for subtle changes within a song. For
example, you could have different harmony settings for the Verse and Chorus of
a song. Each preset has a name, number, part, as well as a set of harmonies and/or
other effects assigned to it.
• You can cycle through all the different presets by pressing the Preset +/- foot-
switches or buttons
• Toggle between the A and B parts of each preset by using the Part A/B foot-
switch or button.
• You can turn a preset’s harmonies on or off with the Harmony footswitch.
• You can turn a preset’s effects on or off with the Effects footswitch.
Mono and Stereo
You can output the lead vocal and harmonies in either mono or stereo.To use a
mono signal, enable the Stereo button on the front panel, and connect the Line Out
Left/Right or Left/Right Out XLR output to your P.A.
To use a stereo signal, enable the Stereo button on the front panel and connect
both XLR outputs or Line outputs to your P.A.
Regarding External Effects Pedals
Do not hook up any other effects pedals to your guitar prior to plugging it into
the Vocalist®Live 5, as this could affect vocal harmony generation.The only thing
between your guitar and the Vocalist Live 5 should be the guitar cable. Use the
Guitar Thru to connect your effects and stomp boxes.
Creating and Modifying Presets
In addition to creating vocal harmonies, the Vocalist Live 5 also offers a wide variety
of effects you can apply to your voice.You can quickly change the harmonies and
effects by changing the presets. Use the Effects Matrix and Parameter Knobs
to edit effects and harmonies.To start, press an effect button to the left of the
matrix, the button LED will blink indicating that you are in Edit Mode.Then use the
parameter knobs to adjust the current value for each parameter.While editing a
parameter the Alphanumeric Display will show its name and the Numeric Display
will show its current value. Once you are nished editing, press the effect button
again to exit edit mode. Effects and parameter descriptions are described later in
this manual.
How to Store Presets
Note: The Vocalist Live 5 has two parts to each preset, an A part and a B part. Each
part of the preset is edited separately, but they are stored together.
1. Select a preset with the Preset +/- footswitches or buttons.
2. Press the Store button.The Alphanumeric Display briey reads Store to,
then the currently selected preset name and number appear.
3. Use the rst parameter knob to choose which preset you would like to save to

13
4. Change the Preset Name (if desired).To change the preset name:
• Turn the second Parameter knob to select a letter in the Alphanumeric
display (or use the Key Up/Down buttons). The selected letter will ash.
• Turn the third Parameter Knob to change the selected letter.
5. Press the Store button again to save your settings (or press any button other
than Store to cancel).
Note: There are two kinds of presets: User and Factory.You can change User
presets (numbers 1A/B-50A/B), but you can’t change Factory presets (numbers
51A/B-00A/B).When the Vocalist®Live 5 ships from the factory, the User and
Factory presets are identical.
Warning: Do not disconnect the power from the Vocalist Live 5 when storing a
preset (when the Alphanumeric display reads Storing...). Doing so may erase
your user presets. In the event that this happens, perform a Factory Reset, described
on page 26.
Copying Presets
The Vocalist Live 5 allows you to copy the A part to both A and B parts and vice
versa.This can be helpful when making massive changes to a preset and you want it
copied to both parts.
To copy the A or B part to both parts:
1. Follow Steps 1-4 for storing a preset above.
2. Press the A/B footswitch or button (Display shows STOR A AB,
STOR B AB, depending on which part was selected when you pressed Store).
Press the A/B Footswitch again to select STOR AB AB.
3. STOR A AB will store Part A settings to both Part A and B.
4. STOR B AB will store Part B settings to both Part A and B.
5. STOR AB AB will store Parts A and B to Parts A and B.
6. Press the Store button again to copy the preset to both parts (or press any
button other than Store to cancel).

14
Effects and Parameter Descriptions
Preamp
The Preamp row includes a model of a tube-based preamp, a De-esser and audio
frequency band limiting.The preamp is controlled by the Type and Gain parameters.
The De-esser is controlled by the De-esser parameter, and band limiting is
controlled by the Resonance and Band Center parameters. In order to turn the
preamp row off, you need to set Type to Pre Bypass, De-esser to 0, and Band
Resonance to 0.
Type PRE BYPASS
PRE TUBE
PRE HARSH
Bypasses the preamp model (turns it off).
Selects a tube preamp model, which provides mild
distortion to give your vocals more warmth.
Selects a preamp with heavy distortion and low
susceptibility to feedback.
Gain PRE GAIN Adjusts the preamp’s gain. Range: 0-99
De-esser DE-ESSER Increasing this value applies more gain reduction
to sibilant sounds. Range: 0-99
Band
Resonance
BAND RES Controls the narrowness of the selected audio
frequency band (see Band Center, below). All
frequencies outside the band are attenuated
while all frequencies inside the band have no
attenuation. There is no band limiting applied
when this parameter is set to 0. As this
parameter is turned up, the band becomes
narrower, and the effect of the band limiting
becomes more prominent. Range: 0-99.
Band
Center
BNDCENxxxx Controls the location of the audio frequency
band center, where xxxx is the band center in Hz.
Range: 80-7650 Hz.
Table of contents
Other Vocalist Recording Equipment manuals