VoIPon AT-320 User manual

AT-320 SIP Phone User Manual (V1.43)
AT-320 SIP Phone User Manual
1. AT-320 IP PHONE APPEARANCE INTRODUCTION .............................. 3
1.1 Function Keys of AT-320 IP Phone Introduction (Normal State):.........................4
2. FEATURES ....................................................................................................... 5
2.1 Hardware.................................................................................................................... 5
2.2 Software..................................................................................................................... 5
2.3 Standard and Protocol .............................................................................................5
2.4 Operating requirements ...........................................................................................6
2.5 Electric requirements ...............................................................................................6
2.6 Size.............................................................................................................................6
2.7 Installation ................................................................................................................. 6
3. CONFIGURATION ......................................................................................... 7
3.1 Phone Keypad setup ................................................................................................ 7
3.1.1 Function Keys Introduction: .................................................................................... 7
3.1.2 Keypad setup step by step: ......................................................................................11
3.2 Configured by WEB ................................................................................................ 12
3.2.1 Network Setting
:
.................................................................................................. 13
3.2.2 Audio Setting
:
...................................................................................................... 15
3.2.3 Dial plan Setting
:
................................................................................................ 17
3.2.4 SIP Protocol Settings
:
.......................................................................................... 19
3.2.5 Other settings:........................................................................................................ 23
3.3 Configured by PalmTool ........................................................................................ 26
3.4 Telnet Configuration............................................................................................... 27
3.4.1 AT-320 Telnet Commands Explanation .................................................................. 28
4. UPGRADE AT-320 IP PHONE .................................................................. 38
4.1 Use IE browse to upgrade the IP phone ...............................................................38
4.2 Use the PalmTool to upgrade the IP phone..........................................................38
4.3 Use FTP to upgrade the phone..............................................................................38
5. USAGE OF THE PHONE ............................................................................. 40
5.1 Receiving calls........................................................................................................ 40
5.2 Place a call...............................................................................................................41
5.3 View Records ..........................................................................................................43
6. RESET AT-320 TO FACTORY DEFAULT.................................................. 44

AT-323 SIP Phone User Manual (V1.43)
2
7. FAQ.................................................................................................................. 45
Q1 For two ports of the AT-320/AT-323, what is the function for the other port? ..45
Q2 Why I can’t see the complete setting page when access the AT-320 by IE? ....45
Q3 How to use the PalmTool to upgrade the IP phone?........................................... 45
Q4 Why the Palmtool shows “can’t connect to palm1” message box? ................. 45
Q5 How to update the protocol for the AT-320/AT-323?............................................ 46
Q6 After updating AT-320/AT-323 ,the LCD shows "■■" and stops ,how to deal
with it? ..................................................................................................................................46
Q7 Why is the local IP 0.0.0.0? .................................................................................... 46
Q8 Why is the local IP 255.255.255.255?.................................................................... 46
Q9 How to reset the AT-320/AT-323 to the factory default?......................................46
Q10 How to use the speed dial function?......................................................................46
Q11 Why is there no sound after pressing the speaker button while using MGCP
protocol? ..............................................................................................................................47
Q12 Why does the other side feel my voice is very weak?..........................................47
Q13 Why do AT-320/AT323 IP phone and AG-168V gateway disconnect while calling
each other, but it rings?...................................................................................................... 47
Q14 What is Dial Plan used for? How to configure it? .................................................47
Q15 What is "inner line"? ................................................................................................48
Q16 Why does it take so long before the phone logins to the server? How to speed it
up? 48
Q17 How to set TOS field? ..............................................................................................49
Q18 How to use call transfer function? .........................................................................49

AT-323 SIP Phone User Manual (V1.43)
3
1. AT-320 IP phone Appearance Introduction
●AT-320 IP Phone Front Illustration (Refer to Fig 1.1):
Fig 1.1 AT-320 IP Phone Illustration

AT-323 SIP Phone User Manual (V1.43)
4
1.1 Function Keys of AT-320 IP Phone Introduction (Normal State):
Keys Function
F1 With handset hung, press this key to get local IP address of the phone
F2 Speed Dial Key
NUMBER With handset hung, press this key to get phone number
ANSCAL With handset hung, press this key to review received number
MISCAL With handset hung, press this key to review missed number
FWD Call transfer key
HOLD Call hold key
DIACAL With handset hung, press this key to review dialed number
Vol+ Increase the volumes of handset or speaker; turn over the record backward
Vol- Decrease the volumes of handset or speaker; turn over the record forward
Redial While reviewing missed, received or dialed number, press this key to dial current number
Speaker Press this key to have a call without lifting the handset
SET Enter setting mode
OK Confirm change, enter submenu
EXIT Back to the parent menu

AT-323 SIP Phone User Manual (V1.43)
5
2. Features
2.1 Hardware
●Main chip—PA1688 50MHz
●Data Memory—16MB SDRAM
●Program Memory—8 MB Flash memory
●Ethernet Jack—1/2 10/100M jacks
●AC/DC adapter—Output 12V DC, 450mA
2.2 Software
●DHCP support for LAN or Cable modem
●PPPoE support for ADSL or Cable modem
●Set phone by HTTP web browser (IE6.0) or Telnet
●Upgrade by FTP
●Support major G.7XX; GSM 610; iLBC audio Codec
●VAD (Voice Active Detect)
●CNG (Comfort noise generation)
●Dynamic voice jitter buffer
●G.168/165 compliant 16ms echo cancellation
●Tone generation and Local DTMF re-generation according with ITU-T
●E.164 dial plan and customized dial rules
●100 entries for quick dial
●80 entries each for missed calls, answered calls and dialed calls
●Adjustable volume for both handset and speaker
●Voice prompt
●Hotline
●Support adjustable user password and super password
2.3 Standard and Protocol
AT-320 IP Phone supports following standard and protocol:
●IEEE 802.3 /802.3 u 10 Base T / 100Base TX
●Major G.7XX; GSM610 iLBC audio Codec
●SIP RFC3261
●TCP/IP: Internet transfer and control protocol
●RTP: Real-time Transport Protocol
●RTCP:Real-time Control Protocol
●VAD/CNG save bandwidth
●DHCP:Dynamic Host Configuration Protocol
●PPPoE:PPP Protocol over Ethernet

AT-323 SIP Phone User Manual (V1.43)
6
●DNS:Domain Name Server
●Telnet:Internet's remote login protocol
●FTP:File Transfer protocol
●HTTP:Hyper Text Transfer protocol
2.4 Operating requirements
●Operation temperature: 0 to 40° C (32° to 104° F)
●Storage temperature: -30° to 65° C (-22° to 149° F)
●Humidity: 10 to 90% no dew
2.5 Electric requirements
●Voltage: 9V~24V
●Power adapter: output DC 12V/450mA
●Network interface:1/2X RJ-45 Ethernet Connectors
2.6 Size
200 X 195 X 87 mm (L x W x H)
2.7 Installation
1.Connect handset to base: insert handset cord into handset cord jack at the
left side of the base.
2.Connect IP phone to Internet: plug the RJ-45 Ethernet cable into the
Ethernet Jack. Plug the other end of the cable into HUB.
3.Power on IP phone: plug the power cord adapter into the Power Jack.
Then plug the other end of the power cord adapter into the appropriate
wall outlet.

AT-323 SIP Phone User Manual (V1.43)
7
3. Configuration
Four different ways can be used to configure AT-320 IP phone: phone
keypad, web browser, Telnet commands and PalmTool configuration tool on
computer.
3.1 Phone Keypad setup
3.1.1 Function Keys Introduction:
When using keypad and LCD to configure the settings of IP phone,
following keys will be used:
Keys Function Keys Function
F1/LOCIP Enter setting mode OK/Speaker Enter submenu; confirm change
VOL+ Turn over menu
backward VOL- Turn over menu forward; move
cursor backward
Digital key Modify values EXIT/Redial Exit current menu; exit setting mode
●Enter the keypad setting mode
Press “Speaker” keyÆenter “1234#”Æyou can see LCD display
password”Æenter “1234”Æpress “speaker” key to confirm.
●Select the submenu
After entering the main menu, press“VOL+”or “VOL-”to page the menu
up or page the menu down; when you want to set the submenu item to be
displayed, press “OK/speaker”to enter the submenu.
●Enter the EDIT mode
After entering the submenu, when you want to set the submenu item to be
selected, press “Set”to enter EDIT mode.
●Enter the settings
Once the phone enters EDIT mode, enter the settings by numeric keypad
respectively, then press “OK/speaker”key to confirm.
●Modify enter error
If the errors come forth when you enter the settings, press“VOL-”key to
delete it and enter the settings again
●Abort the settings
If there is no need for the modified settings, press “EXIT”key to
return to the main menu, and press “VOL+”or “VOL-”to page the menu
up or page the menu down; When“exit settings”submenu item is selected,
press “OK/speaker”key to confirm, AT-320 IP phone will reboot and be

AT-323 SIP Phone User Manual (V1.43)
8
used the current settings.
●Save the settings
When all parameters have modified, press “EXIT”key to return to the main
menu, and press “VOL+”or “VOL-”to page the menu up or page the
menu down; When “save settings”submenu item is selected, press
“OK/speaker”key to confirm,AT-320 IP phone will reboot and use the
already modified setting.
Refer to above operation; you can reach any menu to modify any value.
Please refer to following structure illustrations to learn the values of each
menu item. As for the meaning of each item and value, please refer to Web
Browser Setting chapter.

AT-323 SIP Phone User Manual (V1.43)
9
¾Menu Structure:

AT-323 SIP Phone User Manual (V1.43)
10

AT-323 SIP Phone User Manual (V1.43)
11
3.1.2 Keypad setup step by step:
For example, you want to setup jack’s number 56712389 as speed dial
number, you can:
Step 1. Enter setup mode: press “Speaker” keyÆenter “1234#”Æyou
can see LCD display “password”Æenter “1234”Æpress “Speaker” key to
confirm.
Step 2. Set speed dial number: use “Vol +/-“ key to choose the
“speed dial setting” menuÆpress “speaker” enter its submenu and choose
“memory 1”Æpress “Local IP” key and enter “jack” to modifyÆpress
“Speaker” to confirmÆchoose “number 1”Æpress “Local IP” key and enter
“56712389” to modifyÆpress “Speaker” to confirm.
Step 3. Save your setting: use “redial” key return to main
menuÆchoose “save setting”Æpress “Speaker” to confirm the change.
AT-323 SIP Phone User Manual (V1.43)
12
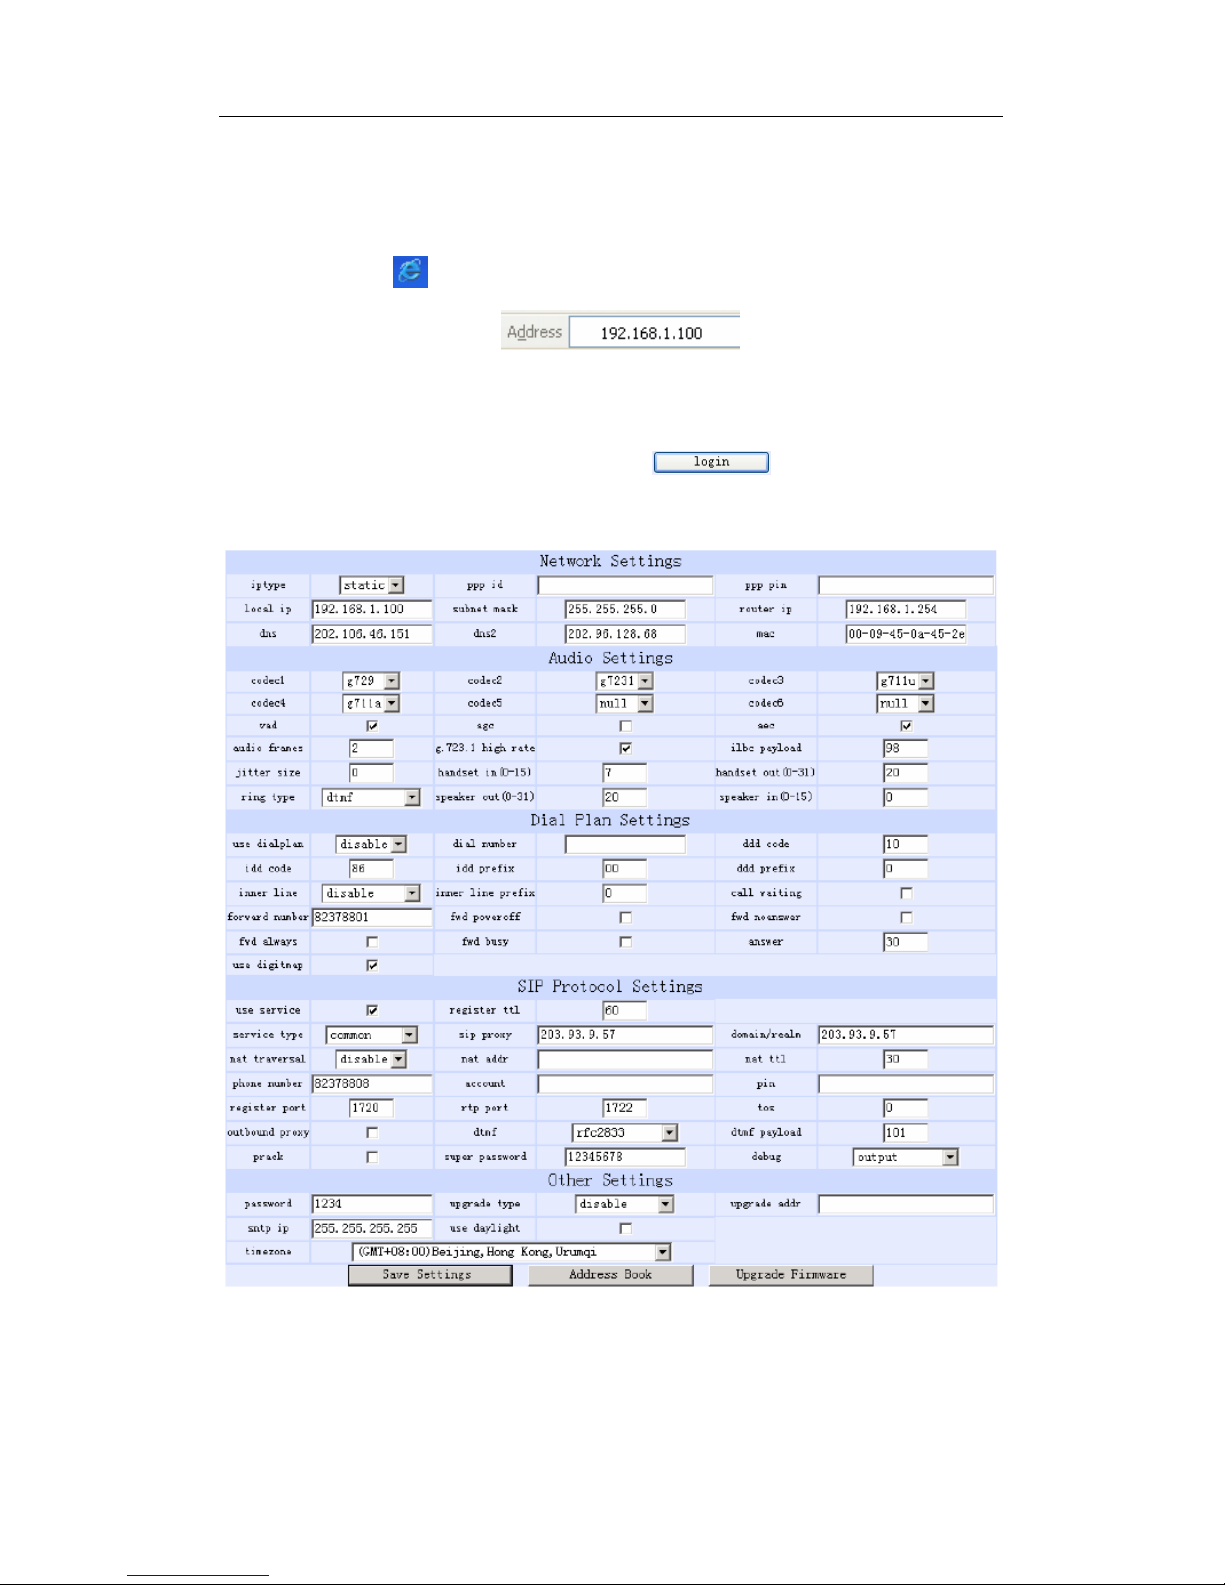
3.2 Configured by WEB
Double click icon to open the IE browser. Input the IP address of the
phone into address bar ( ), and then input password
of the phone into the following page. Default password 1234 is ordinary
password and super password is 12345678. With Debug set 0[disable],
please input super password; while Debug is not set as 0[disable], please
input ordinary password. Then click button. The following
configured page wills pop up. Refer to Fig 3.1 please.
Fig 3.1 Http Setting

AT-323 SIP Phone User Manual (V1.43)
13
3.2.1 Network Setting:
Fig 3.2 Network Setting
●IPtype: Set how IP phone gets relevant network parameters by selecting
corresponding item from drop down list.
static IP: Select this item to authorize users set IP address, subnet
mask and router IP address of IP phone manually.
dhcp: Select this item to enable DHCP mode. With this system, your
LAN or router automatically assigns all the required network parameters
to any device connected to it when the device log on. AT-320 IP phone
is shIPped from the factory with DHCP on. So, if your LAN or router is
configured to use DHCP addressing, the IP phone’s LAN parameters
will automatically be configured as soon as it is connected to the LAN or
router and powered up.
PPPoE:Those ADSL and Cable Modem users please select this item
for it is a protocol especially designed for them. With this system, ADSL
ISP automatically assigns all the required IP parameters to any device
connected to it when the device log on.
modem:If the IP phone used with modem, please select this item to get
relevant network parameters auto. Then please fill ID and pin into ppp id
and ppp pin fields.
●ppp id: With PPPoE or modem selected in IPtype drop down list, please
enter the user name here.
●ppp pin: With PPPoE or modem selected in IPtype drop down list,
please enter the password here.
●local IP: With static IP selected in IPtype drop down list, please enter IP
address of IP phone here.
●subnet mask: With static IP selected in IPtype drop down list, please
enter subnet mask of IP phone here.
●router IP: With static IP selected in IPtype drop down list, please enter
router IP address of IP phone here.

AT-323 SIP Phone User Manual (V1.43)
14
●dns: With static IP selected in IPtype drop down list, please enter IP
address of DNS server here.
●dns 2: With static IP selected in IPtype drop down list, please enter IP
address of backup DNS server here.
●mac: MAC address is the physical address supplied by the Ethernet
NIC. AT-320 phone is shIPped from the factory with a unique algorism
MAC address printed on the back of the base.
Note To avoid colliding with other device in network, please don’t change the
MAC address arbitrarily. If you have use “* and power on twice” method to
enter the safe mode of your phone, remember to change the phone’s MAC
to factory default after safe mode.
AT-323 SIP Phone User Manual (V1.43)
15
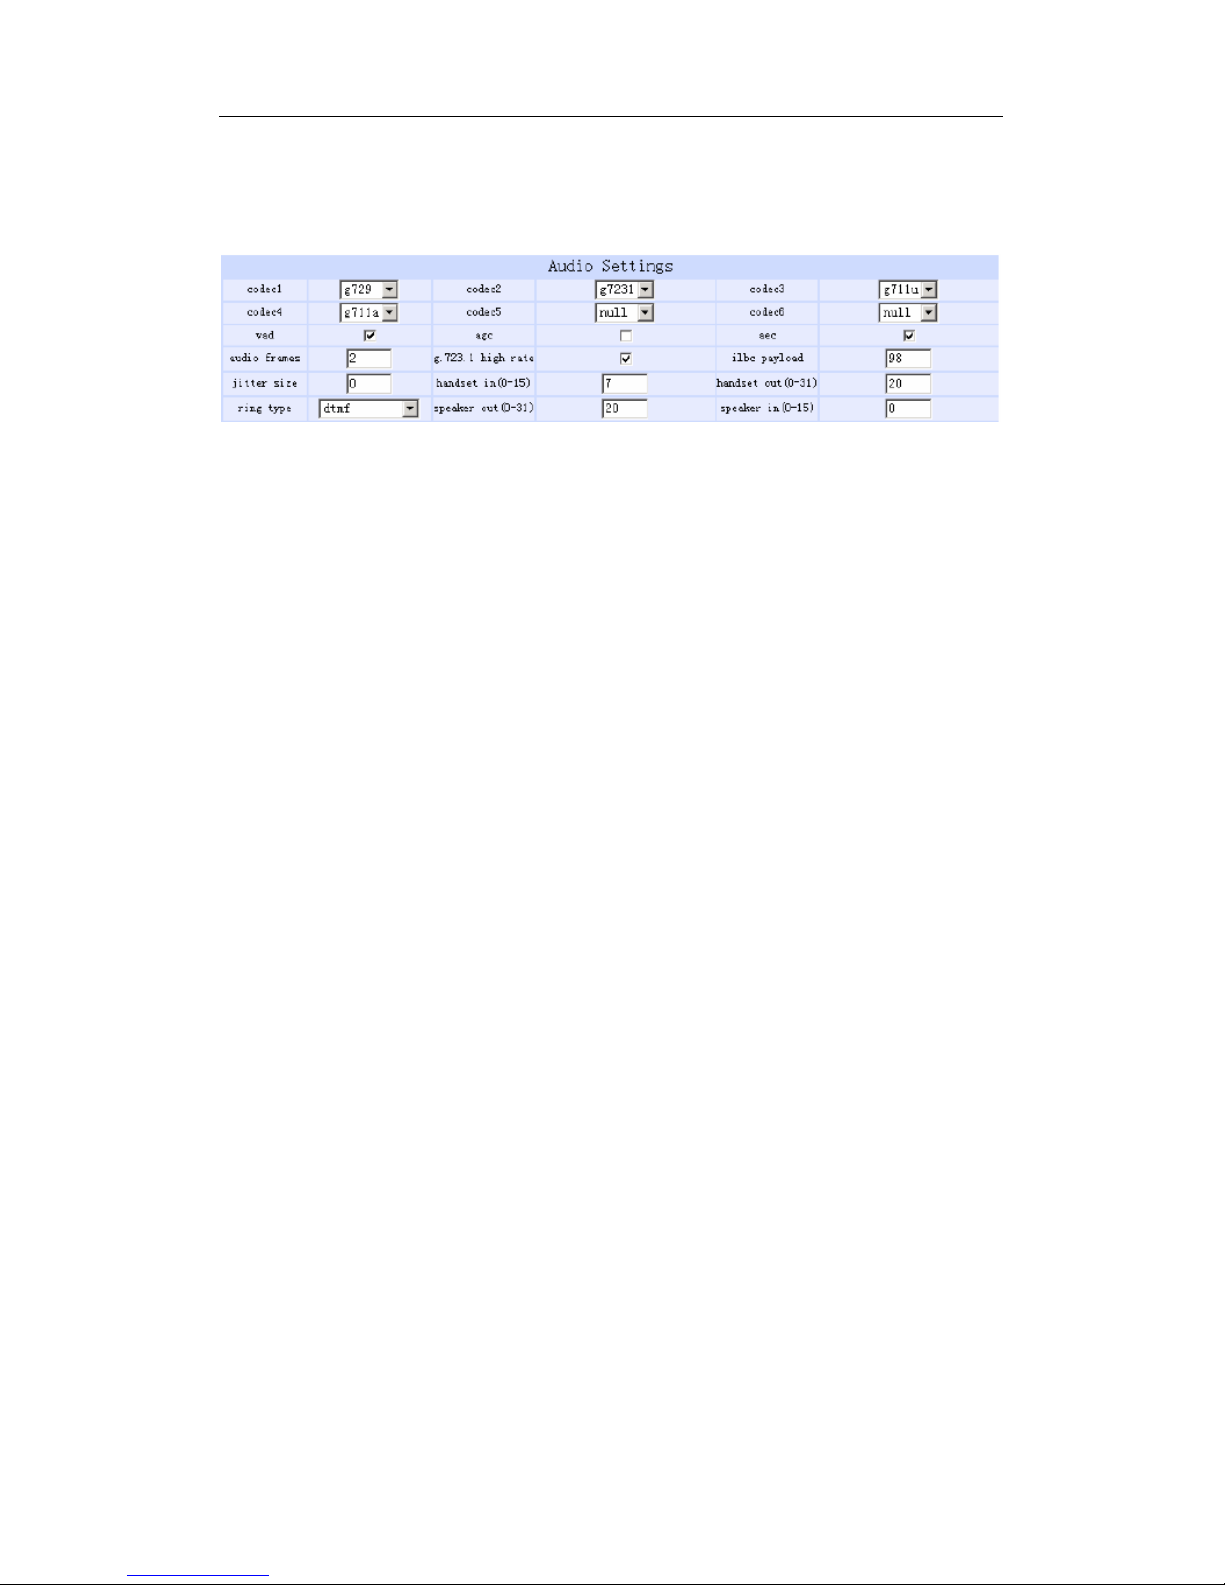
3.2.2 Audio Setting:
Fig 3.3 Audio Setting
●codec1: Set the priority 1 of the audio compression algorithm. The
options are g729,g7231,g711u,g711a , gsm and iLBC.
●codec2: Set the priority 2 of the audio compression algorithm. The
options are g729,g7231,g711u,g711a , gsm and iLBC.
●codec3: Set the priority 3 of the audio compression algorithm. The
options are g729,g7231,g711u,g711a , gsm and iLBC.
●codec4: Set the priority 4 of the audio compression algorithm. The
options are g729,g7231,g711u,g711a , gsm and iLBC.
●codec5: Set the priority 5 of the audio compression algorithm. The
options are g729,g7231,g711u,g711a , gsm and iLBC.
●codec5: Set the priority 6 of the audio compression algorithm. The
options are g729,g7231,g711u,g711a , gsm and iLBC.
●vad: Enable/disable VAD (voice activity detection).
●agc: Enable/disable AGC.
●aec: Enable/disable AEC.
●g.723.1 high rate: enable/disable g.723.1 high rate. G.723.1 high rate is
6.3kbps, low rate is 5.3kbps.
●audio frame: Set audio frames in RTP package. Minimum is 1 and
maximum is 8.
●jitter size : Set buffer size of RTP package. The value range is 0-32.
●ilbc payload : Set the payload type of RTP package when ILBC codec

AT-323 SIP Phone User Manual (V1.43)
16
selected to DTMF delay. The value range is 96-255.
●handset in: Drag the slider to adjust the volume of handset input. Drag it
to the left to reduce the volume; while drag it to the right to increase the
volume.
●handset out: Drag the slider to adjust the volume of handset output.
Drag it to the left to reduce the volume; while drag it to the right to
increase the volume.
●ring type: Set ring type by selecting corresponding item from drop down
list.
dtmf: Set ring as ordinary rings in different frequency
not disturb: Set the phone do not ring by selecting this item.
Advanced: Set ring used the individualized tone provided by system
(need system support).
user define:Set ring as music saved by user by selecting this item.
●speaker in: Set the volume of handfree input.
●speaker out: Set the volume of handfree output.
AT-323 SIP Phone User Manual (V1.43)
17
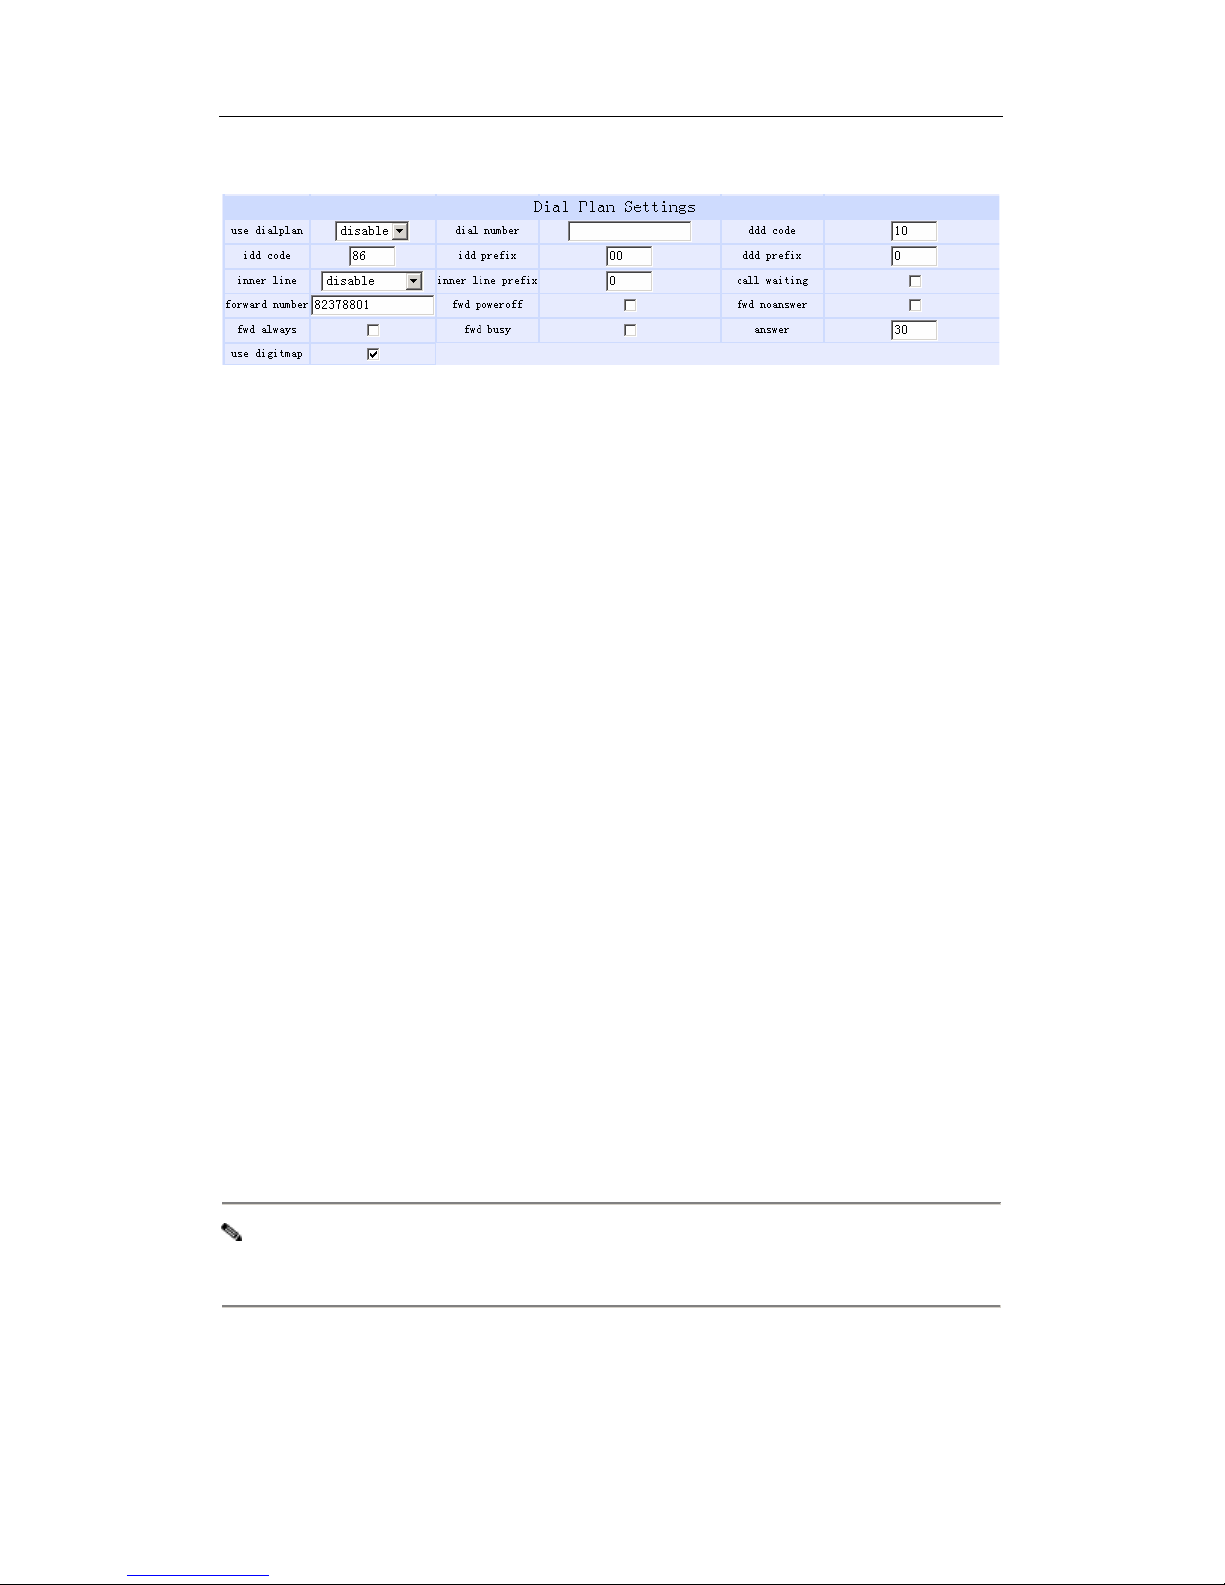
3.2.3 Dial plan Setting:
Fig 3.4 Dial Plan Setting
●use dialplan: Set whether use dial plan or use dial number by selecting
the corresponding item in drop down list.
disable: Do not use dial plan or dial number by selecting this item.
enable: Use dial plan by selecting this item.
dialnum: Use dial number by selecting this item. With this item
selected, please enter the dial prefix into dial number field.
prefix: Use specially service by selecting this item.
Hotline: Use Hotline function by selecting this item. With this item
selected, please enter the hotline number into dial number field.
●dial number: With dialnum selected in use dialplan drop down list,
please enter the dial prefix into this field according to requirement of log
in server. For example, with eTalk card used, enter 00 here.
●ddd code: With enable or dialnum selected in use dialplan drop
down list, set area code according to E.164 dial rule. For example,
Beiing 10; Shanghai 21.
●idd code: With enable or dialnum selected in use dialplan drop down
list, set country code according to E.164 dial rule. For example, China
86; U.S.A .1.
●idd prefix: With enable or dialnum selected in use dialplan drop
down list, set international call prefix according to E.164 dial rule, such
as 00.
●ddd prefix: With enable or dialnum selected in use dialplan drop
down list, set long distance call prefix according to E.164 dial rule, such
as 0.
Note With dialnum seletcted in use dialplan drop down list, you can also set dddcode,
iddcode, iddprefix and dddprefix according to requirement of system.
●innerline: Enable/disable multi-settings by selecting corresponding items
from dropdown list. AT-320 IP phone allows saving 5 settings totally.

AT-323 SIP Phone User Manual (V1.43)
18
disable: Disable multi-settings by selecting this item, then the phone
will call out using current setting.
enable: Use designated system to place calls by selecting this item.
innerlineprefix: With enable selected in innerline dropdown list, please
fill the prefix number pick up to inner line, such as 0.
●Use digitmap: Enable/disable digit map by checking/unchecking the
box.
●Call waiting: Enable/disable call waiting by checking/unchecking the
box.
●forward number: Enter receiving forwarded calls phone number into this
field; If the IP phone used with modem, with modem item selected in
IPtype list box, and then fill ISP number into this field.
●fwd poweroff: Forward calls if power off by checking this box. Please
enter receiving forwarded calls phone number into fwd number field.
●fwd noanswer: Forward calls without replying by checking this box.
Please enter receiving forwarded calls phone number into fwd number
field.
●fwd always: Forward all calls by checking this box. Please enter
receiving forwarded calls phone number into fwd number field.
●fwd busy: Forward calls if busy by checking this box. Please enter
receiving forwarded calls phone number into fwd number field.
●answer: Enter a number from 0 through 60 to set the entries of the
seconds before the phone answer the call auto or forward the calls.
Note please refer to FAQ for more information of dial plan

AT-323 SIP Phone User Manual (V1.43)
19
3.2.4 SIP Protocol Settings:
Fig 3.5 SIP Protocol Settings
●Use service: Enable/disable service by checking/clearing this box. To
make calls through SIP Proxy Server, please check this box; otherwise,
phone can only make IP-to IP calls.
●register ttl : IP phone will send a keep-alive registration message to SIP
proxy server every “register ttl” seconds. The minimum value is 10,
maximum value is 65535. Default is 60.
●service type: This option is used to accommodate the miscellaneous
requirements of the system providers. When IP phone is connected to
these systems, please select the corresponding service type.
Common: no special requirements
Huawei: use Huawei system
zte: Use ZTE’s SIP system
harbour: Use harbour’s SIP system
utstarcom: Use UtstarCom’s SIP system
uptech: Use uptech’s SIP system
keimen: Use keimen’s SIP system
mediaring: Use mediaring’s SIP system
italkbb: Use ItalkBB’s SIP system
stanaphone: Use Stanaphone’s SIP system

AT-323 SIP Phone User Manual (V1.43)
20
net2phone: Use Net2phone’s SIP system
Sipphone: Free SIP service on internet, please visit
www.sipphone.com for more information.
Inphonex: Free SIP service on internet, please visit
www.inphonex.com for more information.
Fwd: Free SIP service on internet, please visit
www.freeworldialup.com for more information.
ndtel: Use NGTEL’s SIP system
ayctel: Use ayctel’s SIP system
●sip proxy: If “use service”is checked, please set the URI of SIP proxy
server .
●domain/realm: Set the domain name of the SIP proxy server.
●nat traversal: When the IP phone with private IP address need
communicate with other IP phones in a different LAN or on Internet,
please select an item from dropdown list to set the proxy used by the
phone.
disable: Select this item when the log in server and IP phone in
the same LAN, or the log in system supports the IP phone working
behind the LAN.
enable: When the system does not support IP phone working
behind the LAN, please select this item to search public IP address of
the NAT device. With this item selected, “nat addr”field will be
activated. Besides, port mapping (port forwarding) needs to be
properly set up on NAT device.
stun: Select this item with SIP protocol used according to
requirement of system. With this item selected, nat addr field is
activated.
●nat addr: When “nat traversal” is set to “enable”, please put the
domain name of the servers ( These web server helps to find out the
public IP of the IP phone) into “nat addr”, such as
www.whatismyip.com.
Table of contents
Other VoIPon IP Phone manuals


