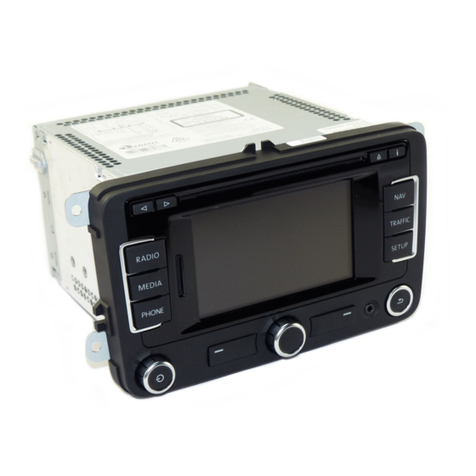
Volkswagen 3.4 RNS 510 Installation and operation manual

3.4
RNS
510 INavigation system
Print statu
s:
04
.2
007
Art.
-N
r
.:
281.552.RN5.20 IEnglisch
05.2007
3.4
RNS
510
Navigation system
3.4

About this booklet
This booldet co
nt
ains important information
and
warnings
on
usingyour radio navigation
system. The
other
booldets in the vehicle wallet
contain further information which you should
be aware offor
your
ownsafetyand for the safety
of
yo
ur passengers.
Please ensure
that
this booldet is in
the
vehicle if
you l
end
or
sell
the
vehicle to
someo
ne else.
Somesections
of
this booldet
do
not
app
ly to all
vehicles. In
these
cases, the textat
the
start
of
the
section indicates to whichvehicles it applies,
e.g.
"A
pplies
to
ve
hi
cles with:
CD
changer".
llIustrations mayvaryfrom yourvehiclein
some
details.
You
should therefore regard illustrations
as a general gu
id
e.
An
alphabetical
ind
ex
is
included
at
the
end
of
the booldet.
Directions a
nd
positions (e.g.
ri
ght, left, front,
rear) are always relative
to
the direction in which
the vehicle is travelling unless otherwise stated.
~
The section is
continued
on
the next page.
~
Symbo
li
ses the
end
of
a section.
® Registered trademarks are marked with ®.
Ho
wever, the absence
of
this symbol does
not
guarantee that the term is free from cop-
)'Tight restrictions.
=>
& Cross-reference to a
"WARN
ING!
" text
within asection. This
"WARNING"
text
is
located
outside
of
the section
if
a page
number
is
given.
=>
CD
Cross-reference
to
a "caution" text within
a section.This "caution" text
is
located outside
of
the sec
ti
on if a page
number
is
given.
&.
WARNING
Texts with thissymbol
contain
information
on
safety. They help protect you from accidents
and
injury.
CD
Caution
Texts with this symbol draw
yo
ur attention
to
pot
en
tial sources ofdamage to your vehicle.
<i'
For
the
sake
of
the
environment
Texts with this symbol
contain
additional infor-
mation on the protection of the environment.
(l]
Note
Texts
wi
th this symbol
con
tain additional infor-
mation.
Contents
Quick
Reference
Guide
Unit overview .
.....
....................
.
Operation
whilst the vehicle
is
in
motion
General
operation
...............
.
Presentation
in
this
operating
manual
Switching on
or
off
......
.....
.......
.
Using
input
masks
..........
..
Overview........
. .
.......
. .
Inp
ut
mask for free te
xt
input
.......
.
..
. .
Input mask for entering
number
s
..
Function selection
button
RADIO
Radio
mode
......................
..
...
. .
Traff
ic
programme
(TP)
function
Function selection
button
MEDIA
General
information on CD/DVD m
ode
..
MEDIA main menu
Audio menu
..
.
MP
3 files
......
..
Storing
and
editing
audio
files
(HDD)
...
.
External
CD
changer
...................
.
Vid
eo
DVD
mode
TV
mode
...................
.
........
...
.
Important
information
on
operating
the
CD
player
..
Safety precautions for devices fitted with
lo
sers .
.......
.
T
ip
s for the
CD
mode
......
.
Handling
data
media (
CDs
and
DVDs)
. . .
TONE function selection
button
Changing the sound, sound focu
s,
and
volume
..
. .
..
...........................
.
Function overview
table
for the TONE
function selection button
................
.
2
2
5
5
7
8
10
10
11
12
13
13
18
19
19
20
24
28
30
33
38
42
53
53
53
54
55
55
57
Booklet
3.4
RNS
510 @
NAV
(navigation
system) function
selection button ..
..............
.
...
.
Overview
Input windows for navigation
....
. ..
..
..
.
The Navigation main menu .
........
....
.
Destination entry: selecting 0 destination
Destination memory
...............
. . .
Tour
mode
...
..........
.
.........
...
....
.
Waypoint navigation
mode
(off-rood
navigat
io
n)
...
..
......
.
.....
.
Route
guidance
....
. .
....
. . . .
.........
..
.
58
58
62
65
67
78
83
89
95
MAP function selection
button
...
102
Mop
di
splay . .
.........
..
. .
..
.
...
..
.....
.
102
locat
ion display without route
guidance
105
TRAFFIC function selection
button
...
.
......
.
....
.
.........
107
D
is
playing
TMC
traff
ic
messages
107
PHONE function selection
button
109
Requirements
and
op
eration
.......
...
...
109
Safety information
..............
.
..
......
109
PHONE main menu
......
.
.........
. .
...
III
Entering 0
telephone
number
...........
.
112
Selecting
saved
tel
ep
hone numbers
......
113
Making 0 call
........
...............
....
118
SETUP function selection
button
.
120
Settings main menu (setup) . .
....
120
Radio settings
.. ..
...........
..
....
......
121
Map
settings
....
.
..
.
..
........
......
122
Traff
ic
information settings
..
. . .
.....
.....
122
Screen settings . . .
..
.
......
.
..
. . . . . . . .
123
Media settings
.............
......
........
124
Navigation settings . .
..
. . . . . .
.......
124
Sy
stem settings
....
. .
..
. . . .
....
. . .
..
126
Video settings . .
.......
....
..
.
'"
126
Telephone settings
..
. . .. .
....
. .
.....
.....
127
Index
.........
.
.............
.
...
.
128
Contents

Booklet 3.4
RNS
510
• Please
note
that a dirty
or
scratched naviga-
tion
DVD
can seriously
impair
the
speed
and
functions
of
the
navigation system.
rn
Note
• Your navigation system
is
a powerful com-
puter. Just like your
computer
at home, the unit
needs a few seconds to process complex com-
mands
. In these cases, the
unit
may
no longer
react to external
commands
until the com-
mands
being
processed are finished.
Be
patient,
as
the
unit
may
already have "stored" the com-
mands, even if
it
does not
appear
to
be
reacting
to them. These
commands
are processed
one
after
the
other
when background processing
is
complete, which could lead to confusion.
• The
DVD
drive in this
unit
uses a Dolby Dig-
ital®
audio codingsystem
and
MLP
Lossless® for
4 Quick Reference
Guide
optimal playback quality, includingfor audio
DVDs
that conform
to
this standard. "Dolby®",
"MLP Lossless®"
and
the
double-D symbol are
registered trade marks
of
Dolby Laborat.ories®.
• The surround
sound
of
a
DVD
is
converted
using
"DTS®"
and
"DTS
2.0®"
and
reproduced in
optimal stereo quality.
"DTS
®"
and "
DTS
2.
0®"
are registered trade marks
of
DTS
, Inc.
•
WMA
audiofiles (Windows MediaAudio) can
also be played
on
the
unit
and
stored
on
the hard
drive (HOD) provided they are
not
copyright
protected by the
DRM
process (Digital Rights
Management). Theiroperation and perform-
ance
on
the unit
is
the
same
as for
MP3
com-
pressed audio files,
and
is
t.herefore
not
de-
scribed separately here
=>
page
28,
"MP3
files".
<Ill
Booklet
3.4
RNS
510
Opel'ation
whilst
the vehicle
is
in motion
Travelling
on
today's roads requires
the
driver's
full
attention
at
all times.
& WARNING
Please keep
your
attention
on
driving
at
all
times. Accidents
and
injuries
can
occur
if
the
driver is distracted.
• Do
not
allowyourselfto
be
distractedfrom
the
road by
making
settings in
the
unit
or
using
the
unit
itself.
• Please only
use
the
unit
when
the
road,
weather
and
traffic conditions are
such
that
it
is safe to
do
so.
General
operation
.&.
WARNING
(con~nued)
-
• The volume settings
should
be
selected so
that
warning
signalsfrom
outside
the
vehicle,
e.g. police
or
fire brigadesirens,
can
be
heard
at all times.
rn
Note
Depending
on
the
country,
some
radio naviga-
tionsystem functions
can
no
longer be selected
when the vehicle
is
travelling above a certain
speed. This
is
not
a malfunction,
but
simply the
legal requirements valid in this country.
<Ill
The screen
of
the
unit
is
known
as a touchscreen. Areas with a colourborder
on
the
screen are currently "active"
and
can
be
operated
by
touching
the
screen.
Fig. 2
SETU
Pfunction selection button: Settings
main menu.
Thefollowing
information
provides a brief
overview
of
how
the
unit
is
operated.
The main
menu
is
called
up
using
"function selection buttons"
-For example, press
the
"function
selec-
tion
button"
=>
page
2,
fig.
1 I
SETUP
),
to
call
up
the
Settings
main
menu
=>
fig.
2.
Fig.3
SETUP
function selection
button:
Radio main
menu.
Operating
the
touchscreen
-Functional
or
active areas
of
the
screen
have a colour border.
-Touch
the
screen
inside
the
active area
to activate it.
Quick Reference
Guide
5
-

Booklet 3.4
RNS
510
"Function keys"
on
the screen
-Active areas
of
the screen
that
call
up
a
function
or
menu
are called "function
keys
".
-After touching a function
key,
the
screen view changes
to
the corresponding
menu
.
-For example, in the Settings majn
menu, touch
thelRadia)
function
key=:>
page
5,
fig.
2
to
call
up
theRadio set-
tings
=:>
page
5,
fig
.3 menu. The title line
will show the
menu
where you are cur-
rently located
0.
-Use
the
~
®function key to change
from any
menu
back
to
the
previous menu.
Moving objects
or
controllers
-Put your finger on the screen
on
a mov-
able object such as the "slider" @ in a
"scroll bar"
=:>
page
5,
fig
.
3.
-Move your finger across
the
screen
withoutlifting
it.
The object follows your
movements
but
onlywithin
the
pre-de-
fined area.
-
Lift
yourfinger from the screen
at
the
desired position.
-
To
view
the
displayed
menu
section
=:>
page 5,
fig
.3 move the rightslider in the
scroll
bar
all
the
way to
the
bottom.
-Alternatively you
can
move the slider
up
and down by touching
the
function
keys
~
and (!) on the screen.
- Aslider in a setting
bar
rn can also be
moved by pressing
[]
or
G.
For example in
the screen settings for Video/DVD opera-
tion
=:>
page
40.
If no function keys are shown with the unit
switched
on
(e.g. while playing a
DVD),
touch
the screen briefly to show the current available
function keys.
A function key highlighted in grey
is
currently
not
available
(e
.
g.
the function key
Iso
card)
in lhe
MEDIA
main
menu
if
no
memorycard
is
in-
serted
=>
page
20,
fig
.
13).
"Scroll
bars":
moving
the
screen section
The vertical
bar
on
the
right edge
of
the screen
with a
slider@
between
the arrow keys
~
and
(!)
is
called a "scroll bar".
It
indicates that adru-
tional
menu
entries will
become
visible if the
slider
is
moved all the way to
the
bottom.
SeHings menu: modifying seHings
Settings
or
values are modified in the setting
menu
=>
page
40,
fig
.
36.
The settings are
changed by moving
the
slid
er
[I]
or
pressing the
function keys
Gor(J.
Touch
the~function
key
to
accept a changed setting
and
to return to the
original
menu
.
"Pop-up
window":
selecting
an
option
Afunction key with
an
arrow
~
after
another
function key indicates
the
currentlyselected set-
ling, e.g. forI
Preferred
TMC
station]l
~
Automotic)
=>
page
5,
fig.
3 @.
If
you touch
the~
function key
on
the screen,
a
"pop-up
window
"S)
is
opened
displaying all
the
possible settingoptions.
Briefly touch the desired setting option. The
pop-up
window disappears
and
the
newly se-
lected setting
option
is
shown
in the
~
func-
tion key.
To
close
the
pop-up
window without
changingthesetting, touch
the®
function key in
the
pop-up
window.
"Checkbox": switching a function on
or
off
Some functions
can
only be switched on or
off.
There
is
a "checkbox"
CD
in front
of
a function
that can
be
switched on
or
off.
A
ti
ck in the
checkbox
~
indicates
that
the function
is
switched on,
and
an
empty
checkbox
Omeans
that it
is
switched off.
To
switch it on
or
off, touch the function key
briefly
...
6) Apop-up window
is
shown
in
fmnt of the current menu and
is
closed automatically after a
se
lling has
been selected.
6 Quick Reference Guide
Booklet 3.4
RNS
510
Presentation in this
operating
manual
A
brief
explanation
to
better
understand
thepresentation
of
procedures
and
func-
tions
shown
in this
manual.
This operating manual differentiates between
non-modifiable, printed keys
on
the
unit,
and
the
"function keys" (soft keys) which
appear
on
the
screen.
The printed
unit
buttons (e.g. the function selec-
tion
buttons
=>
page
2,
fig.
1 0) are always ac-
companied
by the word "button" in
the
text An
example instruction in
the
manual is: "Briefly
press
the
ITONE)
function selection
button
."
If
a
"button"
or
a "function selection
button"
is
mentioned
in
the
manual
together with
the
button symbol
0,
you will find this
button
on
the
unit
and
not
on the screen.
You
will find an
overview and briefdescription
of
the unit but-
tons at
the
beginning
of
the manual
=>
page 2,
fig.
I.
Function keys are described in the text by the
word "function key"
and
the key symbol 0
or,
in
some
cases, only by the
key
symbol
O.
\Nhen a function key
is
referenced in an illustra-
tion for the first time,
an
illustration reference
is
inserted in addition to the
key
symbol. The illus-
tration reference
is
shown at the beginning
of
an
illustration description. When the text refers
to
another
illustration, a new illustration reference
is
inserted.
Procedure
example
The procedure for switching
the
Traffic informa-
tion function
on
or
offis described as follows:
-Briefly touch
the
(SETUP)
function selection
button.
-In
the
Settings
=>
page
5,
fig.
3
main
menu
,
touch
thelRadio)
function key
and
in the following
menu,
touchI
Troffic
informotion)
to switch
the
Traffic
information function
on
or
off.
Structure
of
the
manual
The
unit overview is
at
the
beginning
of
the
manual
where the unit
buttons
(hard keys) and
additional control elements are explained in a
briefoverview.
If
more detailed information
is
required relating
to
the
position
of
a particularcontrolelement,
cross-references are
made
to
the
unit
overview
and
its numbering. Only
the
screen content
is
shown in
other
illustrations in the manual.
An overviewproviding a briefexplanation ofthe
available functions
is
included at
the
beginning
ofeach main chapter. The details
of
the indi-
vidual
commands
can be found in
the
additional
chapters
of
this main chapter. A function over-
view in table form
is
provided at the
end
of
some
main chapters.
..
Quick Reference Guide 7

Booklet 3.4
RNS
510
Switching
on
or
oH
Anti-theftcodingelectronically prevents unauthorized personsfrom operating
the
unit
after ithas been removedfrom the vehicle.
Fig.4 Entering the
PIN
.
Switching
on
or off
-Briefly press the
onl
off switch
:::::>
page
2,
fig.
1to switch
on
the unit. The
system
is
started
and
the
most
recent set-
tings are loaded.The
most
recently used
audio orvideo source is activated.
-Press the
onl
off switch again to switch
off the unit.
Entering the PIN
-If the keyboard field a
ppears
after the
unit
is
switched on, requesting
that
you
enter
a code, the unit
must
be
unlocked by
entering the correct, four-digit
code
number. The
number
ofpossible a
ttempts
is
s
hown
in the
second
line of the s
creen
.
-Touch a
number
between
@)
and
®
on
the
number
pad
on
the screen. The
number
is
entered in
th
e
input
line.
-After you have
enter
ed a four-digit
number, the
number
pad
becomes
grey
(inactive)
and
no more
numbers
can
be
entered in the
input
line.
8 Quick Reference Guide
-
Touch@on
the screen to delete
num-
bersin the
input
line from right to left, thus
allowing you to correct your input.
-When
the
correct
code
number
is
shown in the display,
touch~.
When the unit is switc
hed
on
,
the
la
st audio
or
videosource used
is
ac
ti
v
ated
at
the
most
rece
nt
volume setting, provided that the pre-selected
"switch-on volume" is
not
exceeded
=>
page
55
.
Time out
The
unit will be switched off if the ignition is
turn
ed off.
It
is possible
to
switch the unit back
on
when
the ignition is switched off.The unit
will be switc
hed
off again
autom
atically after a
halfan
hour
to
protect
the vehicle battery.
Convenience radio coding
If
the unit is removed
and
reinstalled
or
the
ve-
hicle battery dis
conn
ected, you will
no
longer
have
to
e
nt
er
the
anti-theft coding manually as
the code
number
remains stored in the vehicle
when it is e
ntered
for the first tim
e.
If
the
code
number
s do
not
match
,however, e.g.
because the
unit
has been installed in
another
vehicle, the electronic lock
must
be released
manually
=>
page 8, "Entering the PIN".
Code
number
The
code
number
can only be requested "on-
line" via the Volkswag
en
sy
stem
thus making
more
effective anti-theft
prote
ction possible.
Please contact your Volkswagen dealer ifyou re-
quire assistance.
Incorrect
code
number
This whole procedure can be repeated
once
if
you
enter
an incorrect code
number
byaccident
when releasing the electronic lock. The
numb
er
of
possible
attempt
s is shown in the sec
ond
line
of
the screen.
Ifyou
enter
an incorrect code
number
again, the
unit
is
locked for around
one
hour. This
means
it
cannot
be started (display: "System locked!
Please woit
..
. minutes").
T
he
displaywill
di
s
appear
a
ft
er
one
hour,
during
which t.ime the unit
must
re
main
switched on.
The
electronic lock can be released as described
above.
Booklet
3.4
RNS
510
The
same
cycle -two
attempts,
on
e
hour
lock-
applies again.
<Ill
Quick Reference Guide 9

Booklet 3.4
RNS
510
Using input masks
Overview
Input
masks
are used to select
an
address orentera
name
ornumbers.
There are two kinds
of
input
ma
s
ks
.The in
put
masks used
to
search for
and
call up information
in the unit (e.g "select" an address) and input
masks where "free text" can
be
entered.
Input masks
appear
in a wide range
of
menus
buttheiroperation
is
almost identical.The high-
lightingcolour oftheavailable function keys de-
pends
on
which
menu
the
input
maskwas called
up
from.
Input
masks
for selecting a
saved
entry
These
input
masks can be found in the naviga-
tion for selecting a target address [rom the avail-
able navigation data. Each entrylimits the
se
lec-
tion ofavailable entries further
=>
page 62,
"I
nput
windows for navigation" or
=>
page 114,
"Searching for an entry
in
the telephone book,,7).
Input
masks
for
"free
text input"
Free text entry allows any letter,
number
,
and
special character
to
be entered in any combina-
tion at any time.
All
special charactersare always
available for each letter. Touching the
(QK)
func-
tion
key
will apply the character sequence as
it
appears in the inputline.
You
can accept a
name
offered by the unit or allocate your own name.
Selecting
special
characters
based
on
letters
In
input
masks, a
numb
er ofletters are also
marked with a small
tTian
gle "T ". This indicates
that special characters based on this letter can
be selected.
Keep
the function key pressed until a pop-up
window appears with the special character.
Ac-
cept the desired character
by
touching the
input
line - the pop-up window will be closed.
If
no
entries are
made
, the
pop-up
window
is
closed
automatically after a
few
seconds.
Some special characters can also be "written
out
".
Thus, instead ofthe Germanspecial char-
acters "A", "0",
and
"0", the sequence ofcharac-
ters
"AE",
"
UE",
and
"OE"
are recognised by the
navigation system. Otherspecial characters can
be ignored, e.g. instead of
"E"
,
"E",
or
"E",
a
normal
"E"
is
recognised by the nav
ig
ation
system. "
7)
only
for
vehicles
with
PREMIUM
mobile telephone provision
10
Using input masks
Booklet 3.4
RNS
510
Input
mask
fo
r
free
text
input
An
input
mask
forfree textentryallows
any
letter, number,
and
specialcharacter
to
beentered in
any
combination.
Fig. 5 Input mask for free text input.
You
can
enter
free
text
in
some
menus.
This
can
be
done,
for
example,
when
as-
signing
a file
name
to
save
MP3 files
on
the
hard
drive
=>
page
30
or
when
searching
for
the
name
of
a
point
of
interest
=>
page
70.
-
Touch
@El
to
accept
a
sequence
of
char-
acters
offered
by
the
unit,
or
touch
@
to
delete
the
c
haracters
in
the
input
line.
-
In
the
input
mask,
touch
a
character
display
ed
in
the
keyboard
block
to
add
it
to
the
input
line.
-You
can
also
delete
or
alter
the
charac-
ters
in
the
input
line
,
as
well
as
add
addi-
tional
characters
=>
page
ll
,
"Further
input
options:".
-
Touch
@El
to
accept
the
series
of
char-
acters
displayed
in
the
input
line
.
Touch
~
to
close
the
input
mask
without
ac-
cepting
the
entries.
Letters marked with a small triangle "T " indi-
cate that special characters
can
be selected
based on this letter
=>
page
10,
"Selectingspecial
characters based on letters".
Further
input
options:
(f)-changes from
upper
case
to
lower case and
vice versa.
@-opens
the
input
mask for numbers and spe-
cial characters.The function
key
changes
to~.
Touch~
to
change
to
the letter input mask
again.
(=:::J-space bar for entering spaces.
8)
or(B moves the cursor in the input line
to
the
left 0 r right.
@-deletescharacters
from
ri
g
ht
to left in the
input line starting
at
the position ofthe cursor. "
Using input masks
11

Booklet
3.4
RNS 510
Input mask for entering numbers
An
input
mask
for
number
entryallows numbers to be entered in
any
combina-
tion.
Fig.6
Input mask
for
entering numbers.
12 Using input masks
-Touch
~
to accept a displayed se-
quence
of
numbers,
or
touch @ to delete
the
characters in the
input
line from right
to left.
-In the
input
mask, touch
one
of the
function
keys@)
to ®to accept the
number
in the
input
line.
-Touch
~
when
the correct
number
is
displayed in the
input
line. Touch
~
to
close the
input
mask without accepting
the entries.
-Oil
Booklet
3.4
RNS 510
~
Function selection buHon
RADIO
Radio
mode
Selecting radio stations
Radio stationscan bechangedsimplybypressinga button orcan beset
manually
via thestationfrequency.
Fig.7
RADIO main menu.
All
radio stations with strong reception are
automaticallystored in the
station
list. The
station list
is
updated
automatically
on
a
regular basis.
Opening the
RADIO
main menu
and
selecting the frequency range
-Press the
IRADlol
function se
le
ction
button
to
open
the
RADIO
main
menu.
Thestation
you
are currentlylisteningto
is
shown
at
the
top
of
the
screen. With
RDS-
compatible8) stations, the station
name
is
displayed if reception
is
strong
enoug
h,
e.g.
=>
fig.
7 "Radio
2"
.
-Press the
IRADlol
function selection
button
again to change the frequency
range=> page
14.
Or,
in
the
RADIO
main
menu,
touch theI
Bondl
function key
and
then
pressIT0or~in
the
popup
window
which opens. The
current
frequency
band
is displayed
in
the top left corner of the
screen.
Changing radio stations
-Briefly pressing
the
arrow keys on the
unit
=>
page 2,
fig.
1
CD
or touching the
arrow keys
on
the screen ofthe RADIO
main
menu
takes you to the previous or
next station. Depending
on
the settings in
the Radiosettings
menu,
you move to a sta-
tion from the station
li
st
or
the
memory
list=> page
121
, "Specifying station selec-
tion using arrow keys".
Selecting radio stations from the sta-
tion list
-Touch theI
Station
listlfunction
key
to view
a list
of
all radio stations which
can
cur-
rently
be
received. The list "jumps"
straightto a view
ofthe
stationyou are cur-
rently listening to.
-Move thesliderin thescroll
bar
down to
see more stations.
-Touch the required station to select it.
The station list view closes automatically
after
around
20
seconds
ofinactivity.
~
8)
"Radio Data
Sy
stem
"·
used
to
tr
ansm
it
progra
mme
identification and additional services
~
page 16.
"
RDS
Funct
io
n"
Function selection button
RADIO
13

Booklet
3.4
RNS
510
Selecting stored r
adio
stations
Stored radio stations can beselected
using
the on-screen station buttons orfrom
the
memory
list.
Fig.l0
RADIO
main menu: Memory location 4
is
selected.
If
the
radio
station
you
are
currently
lis-
tening
to is
already
stored
in
the
memory
list,
the
memory
location
number
will
be
displayed
beside
the
frequency
band
(FM
or
AM)
:::::>
fig.
10.
RDS
Function
RDS
("Radio DataSystem")
is
used to transmit
programme identifiers and additional services,
thereby enabling functions such as automatic
station tracking.
With stations
that
are RDS-compatible, the sta-
tion
name
will
be displayed instead
of
the
fre-
quency, provided reception
is
good enough.
Ifa radio station broadcasts additional informa-
tion with the
RDS
function while a station
is
being stored, the
name
of
the radio station may
16
Function selection button RADIO
Selecting stations via
the
station but-
tons
-Briefly
touch
one
ofthe
six
station
but-
tons:::::>
fig.
10
CIJ
to
([J
displayed
in
the
RADIO
main
menu
to
activate
the
station
displayed.
Selecting stations from the memory list
-
Touch
[MemoryJ
to
open
the
memory
list.
-
In
the
memory
list,
touch
the
display
of
the
station
you
require:::::> fig.
10.
If
selecting from the
I~
Memory
listJ is programmed
in Radiosettings
=:>
page
121
as
an
option for the
I
o"ow
keys
J,
then
stored stations can aJso
be
se-
lected using
the
arrow keys
on
the
unit
and
the
on-screen arrow keys
on
the
RADIO
main
menu
screen. In this case the
word"
Memory" will ap-
pear
at
top left
beneath
the function key 8).
You
can specify which six station
buttons
will
appear
in the RADIO main
menu
in the
Radio
settings
menu
=:>
page
121,
"Selecting station
buttons
for
display".
Theview
of
the memory
li
st closes automaticaJly
after around
one
minute
of
inactivity.
<4
not
subsequently
be
correctly displayed in
the
memory list.
Changing 0 station
name
You
can change the station
name
manuaJly.
Select the storedradio station
and
wait until
the
correct
name
appears on the screen. Keep your
finger pressed
on
the display
of
the station
name
between the arrow keys until "Station name has
been saved" appears.
<4
Booklet
3.4
RNS
510
O
verview
of functions for
the
RAD
IO function selection button
Main
menu:
RADIO
Function keys
I.
Sub-menu
2.
Sub-menu
8)
and
(t)
Go
to the last
or
next station (from the station list
or
memorylist
depending
on
the
setup
=:>
page
121,
"Specifying station selection using arrow keys").
Popupwindow: Frequency selection
Band
-FM
-AM
Station list -List view
of
radio stations
that
can
currently
be
received:
Touch the station to select it.
-List view
of
stored radio stations:
Touch the stored station to select it.
Memorylist Memory -List view: Touch to select
memory
loca-
tion.
ITn
-Popup window: Confirm Delete
or
select
Cancel.
Popup window: Turn speciaJ functions
on
or
off
-Scan: Turn automatic scan
on
or
off.
Extras -TP function
on
or
off:
Activate
~
for "on".
or~
Scan
If
"
~
Scan"
is
displayed in
the
function
key,
the scan function
is
on -touch
to
turn
it
off.
Man. Set radio station manually: The frequency
band
appears at
the
bottom -press the
settings knob
10
hide it.
Touching
the
function
key~
takes you from
any
menu
to
the
menu
you
previouslyselected.
Station list
and
Memory list close automaticaJly
after
20
seconds
of
inactivity.
Function selection button RADIO
17

Booklet
3.4
RNS
510
Traffic programme (TP) function
If
the traffic programmefunction
is
turned on, you will hear traffic announce-
ments
madebya
TP
station duringactive audio mode. The audio mode will be
pausedfor the duration
of
an
announcement.
Fig.
11
Activating the
TP
function.
Turning
the
traffic
programme
(TP)
on
or
off
-Press the [RADIO) function selection
button
to
open
the RADIO
main
menu.
-Touch theIExtra,) function
key.
-In the
popup
windowwhich
open,
touch
=>
fig.
11
cm
briefly to turn the
traffic
programme
function
on
oroff.Atick
in the checkbox
~
indicates
that
the
TP
function
is
already active. Alternatively,
the
TP function can also
be
turned
on
or
offin
the
RADIO
settings
=>
page
121.
The
display
"TP"
in
conjunction
with a
station
name
(e.g. in
the
station
list
or
memory
list) in-
dicates a
TP
station.
Whatever
radio
station
you
happen
to
be
lis-
tening
to,
an
additional
receiver
section
in
the
unit
ensures
that
a TP
station
is always received
so long
as
the
TP function
is
turned
on.
"TP"
in
the
top right
corner
of
the
screen
indi-
cates
that
the
TP
function
is rea
dy
for use
=>
fig.
12.
If
no
TP
station
can
be
received at
any
time, e.g.
because
radio reception is generally
poor
,
then
18
Function selection
button
RADIO
Fig.
12
Incoming traffic announcement.
"No
TP"
is displayed
instead
of"TP". Note
that
multi-storey
car
parks,
tunnels.
high buildings
or
mountains
can
interrupt
or
even
completely
block radio signals.
Incoming traffic
announcement
A
popup
window
opens
=>
fig.
12
while a traffic
announcement
is
being
played.
!fyou
wish to
interrupt
the
announcement,
touchlcancellin
the
Traffic
annoullcement
popup
window.
The
TP
function
remains
in s
tandby
(display: TP)
and
the
next traffic
announcem
e
nt
will
be
made
in
the
current
audio
mode
. Touch
IDeact
TPJ
to
permanently
deactivate
the TP func-
tion.
The
unit
wiU
be
switched to predefined
settings
for volume,
balance
and
fader for
the
duration
of
the
announcement.
You
can
change
these
set-
tings while
the
traffic
announcement
is
being
made.
Adjust
the
volume
during
a traffic
announce-
ment
using
the
volume
control. Pre
ss
thelTONEJ
function
selection
button
to
adjust
the
settings
for
balance
during
a traffic
announcement
=>
page 55.
In
the
volume
presets
you
can
also specify
the
volume
with which traffic
announcements
are
made
=>
page 55.
~
Booklet
3.4
RNS
510
Function selection buHon
MEDIA
General information on
CDIDVD
mode
Audio CDs (CD-A)
and
audio
DVDs, MP3 CDs
and
MP3 DVDs,
as
well
as
video DVDs
can
be
played in
the
internal
CDI
DVD
drive.
CD
cannot
be
read
Ifa CD/DVD is
loaded
which
the
player
cannot
read,
the
following messages
appear
briefly
"CD
error. Please check
CD."
or
"Incorrect
data
format.
Unable to
read
file."
and
the
CD/DVD is
ejected
after
a few
seconds.
Ifthe
CD/DVD
is
not
removed
from
the
tray
within
10
seconds,
it is retracted again to
prevent
damage.
&.
WARNING
•
The
CD
player
is a class 1
laser
product.
When
the
CD
player
is
opened,
there
isa
risk
of
injury
caused
by
the
invisible
laser
beams
es-
caping
from
the
unit.
•
The
CD
player
contains
no
parts
which
you
can
service
or
repai
.r
by
yourself. You
should
therefore
contact
an
authorised
dealer
if
there
is a
mechanical
fault
or
ifa
repair
is
required.
CD
Caution
•
Inserting
a
second
CD/DVD while
an
in-
serted
CD/DVD
is
being
ejected
can
destroy
the
CD/DVD
drive in
the
unit. Note
that
it takes a
few
seconds
to eject
the
CDIDVD
after
pressing
the
Eject
button
@.
The
protective
barrier
in
front
of
the
CD/DVD
slot is
opened
while this is
happening.
You
must
wait until
th
e
CD/DVD
is
ejected
before trying to
insert
a
new
CD/DVD.
•
If
the
CD/DVD drive has a
mechanical
fault
or
if a CD/DVD
has
been
incorrectly
or
not
fully
loaded
,
the
message "
CD
error. Please check
CD
:'
and
then
"OVD drive error" a
ppears
on
the
screen.
Check
the
CD/DVD
and
then
insert it
properly
in
the
drive. If
the
message "DVD drive
error" reappears,
please
contact
your
Volkswagen Service
=>
& .
•
You
wiU
be
unable
to
insert
any
more
CDs
or
DVDs if
the
temperature
inside
the
unit
is too
high.
The
unit
will switch
on
in
the
last
used
mode.
• Refer to
the
notes
on
handling
CDs
and
DVDs
=>
page
54,
"Handling
data
media
(CDs
and
DVDs)".
[l)
Note
•
Ifthe@functionkeYisshownasinactive,it
means
that
no
audio
CD/DVD
is
currently
loaded
or
that
a
loaded
audio
CD/DVD
cannot
be
read.
• You
might
not
be
able
to play
copy-protected
CDs
or
CD-Rs, CD-RWs
and
DVD-RWs
which
you
have
burned
yourself.
• WMAaudio files (Windows
Media
Audio)
can
also
be
played
on
the
unit
and
stored
on
the
hard
drive (HDD)
provided
they
are
not
copyright
protected
by
the
DRM
process
(Digital Rights
Management).
Their
operation
and
perform-
ance
on
the
unit
is
the
same
as
for MP3
com-
pressed
audio
files,
and
is
therefore
not
de-
scribed
separately
here.
• Please also refer to
the
additional
informa-
tion
on
MP3
mode
=>
page
28.
• Please
observe
the copyright laws
applicable
in
your
country
.
•
The
DVD
drive in this
unit
uses
a Dolby Dig-
ital®
audio
coding
system
and
MLP Lossless®for
optimal
playback qualiry,
including
for
audio
DVDs
that
conform
to this
standard.
"Dolby®",
"MLP Lossless®"
and
the
double-D
symbol
are
registered
trade
marks
of
Dolby Laboratories®.
•
The
surround
sound
of
a
DVD
is
converted
using
"DTS®"
and
"DTS 2.0®"
and
reproduced
in
optimal
stereo
qualiry.
"DTS®"
and
"DTS 2.0®"
are
registered trade marks ofDTS, Inc.
~
Function selection button MEDIA
19

Booklet
3.4
RNS
510
MEDIA
main
menu
Overview
of
the
M
EDI
A main
menu
The MEDIA
main
menu
is
usedto start
and
controltheplayback
of
different
audio
and
video sources or to store MP3files
on
the unit's
hard
drive.
Fig.13
MEDIA
main menu: Audio menu.
Depending
on
the
selected
media
source,
the
MEDIA
main
menu
is
displayed
as
an
audio
menu
=>
fig.
13
or
video
DVD
menu
=>
fig.
14.
Activating
the
MEDIA
main
menu
and
selecting a
media
source
-
Press
the
IMEDIAI
function
selection
button
to
go
to
the
MEDIA
main
menu.
Playback
of
the
media
source
last
played
is
resumed.
-
If
video
and
audio
sources
can
cur-
rently
be
selected
on
the
unit
,
use
the
[MEDIAl
function
selection
button
to
switch
between
the
last
audio
source
and
the
last
video
source
.
Selecting a different
audio
source
-
In
the
audio menu,
touch
one
of
the
function
keys
at
the
top
of
the
screen
=>
fig.
13
to
select
a
different
audio
source.
-
Touch
the
[Videol
function
key
to
change
to
the
video
DVD
menu
=>
fig. 14.
20
Function selection button MEDIA
Fig.14
MEDIA
main menu: Video
DVD
menu.
Selecting a different
video
source
-
In
the
video
DVD
menu,
touch
one
of
the
function
keys
at
the
top
of
the
screen
=>
fig.
14
to
select
a
different
video
source
=>
page
38
.
-
Touch
the
[Audio
I
function
key
to
change
to
the
audio
menu
=>
fig. 13.
"Audio
sources"
are
sources
which
only
transmit
audio
signals; "video
sources"
transmit
both
audio
and
video signals.
"Media
sources"
are
all
audio
and
video
sources
which
can
be
selected.
Ifa
media
source
that
has
already
been
played is
selected
again, playback is
resumed
from
the
point
that
was
last played.
If
you
cannot
currentlyselecta
media
source, for
example
because
no
data
medium
(e.g.
memory
card) is
loaded
, the
function
key is greyed
out
=:.
fig.
13
:Iso
card
I.
Hardkeys
to control
the
current
audio
or
video
source
The
arrow
keys
on
the
unit
=:.
page
2,
fig.
1
@]
or
(B always refer to
the
audio
source
you are
cur-
rently listening to,
whatever
menu
you are in
at
the
time.
~
Briefly press
@]
to go to
the
beginning
of
the
cur-
rent
track
or
chapter
, press
again
to go to
the
be-
ginning
of
the
previous track
or
chapter
.
Brieflypress
(Bto go to
the
beginning
of
the
next
track
or
chapter.
In
the
menu
of
the
audio
source
currently
playing, tracks
can
also
be
changed
using
the
settings
knob
.
Functian keys to control
the
currenl
audio
or
video
source
Brieflypress
~
to go to
the
beginning
of
the
CUf-
rent
track
or
chapter,
touch
again
to go to
the
be-
ginning
of
the
previous track
or
chapter.
Briefly press
(3
to go to
the
beginning
of
the
next
track
or
chapter
.
@-
Pause: Playback is
paused
at
the
current
point
-
the
icon
changes
to
IB,
-
touch
!B
to
resume
playback
fTOm
that
point.
Selectable
audio
sources
in
the
Audio
menu
@-changestoaloaded
CO/OVD
~
page
24
or
to playback from
an
external
CO
changer
9).
Iso cardl-
changes
to a
loaded
memory
card
=:>
page
24.
(i=ffiD)-changes to
the
audio
files
stored
on
the
in-
ternal
hard
drive
=:>
page
28.
MP3 files
and
un-
protected
WMA
fileslO)
can
be
stored
on
the
hard
drive from a
ll
available
media
(CD,
DVD
,
memory
card)
=:>
page
30.
~
-switches to
an
additionally
connected
ex-
ternal
audio
source
ll
).
Operating
an
externally
connected
audio
source
from
the
radio naviga-
tion
unit
is
su
bject to limitations
and
will largely
depend
on
the type
of
connection
.Your
Volkswagen
Partner
will
be
pleased
to
help
you.
Selectable
video
sources
in
the
Video
DVD
menu
@Z]-
change
s
to
an
optionaUy
connected
ex-
ternal
video
source
I2
).
Booklet
3.4
RNS
510
(!Y)-
switches
to
TV
mode
if a
TV
tuner
13
) is
con-
nected
~
page
42.
@ZQ)-changes to a video
DVD
loaded
in the in-
ternal
CDIDVD drive
=:>
page
38.
Additional function keys in
the
Audio
menu
(Video)-
changes
to
the
video
DVD
menu
and
plays
the
last
selected
video source=:>
page
20,
fig.
14
.
IRepeatl-
opens
a
popup
window
which
defines
whether
the
repeat
function
will
repeat
thelTrack)
or
the
@ (in Audio CD
mode)
or
the
current
(Folder!
(in MP3
mode
=:>
page 28).
(Extra
,
l-opens
a
popup
window
in which
random
playback
Mix
=:>
page
27
or
th
e
automatic
Scan
=:>
page 28
can
be
started.
IfI~
Mixl
or(~
scanl
is al-
ready displayed,
then
the
corresponding
func-
tion
is already active -
touch
the
function
key
briefly to close.
(Selection)-Opens
the
tracklist
of
the
current
audio
source
for
you
to select a different track
=:>
page
25
or
a different
audio
source
=:>
page
24.
Additional
function keys in
the
Video
DVD
menu
(A
ud
io
1-
changes
to the audio
DVD
menu
and
plays
the
last selected
audio
source=:>
page
20,
fig.
13.
(Menu)
-switches
the
video
DVD
played in the in-
ternal CD/DVD drive to
the
menu
selection
of
the
film a
nd
also
opens
the
unit
's
own
menu
control
=:>
page
38.
~
-
opens
a
setup
menu
where
you
can
ad-
just
the
display
setup
for
the
current
film
=:>
page 40.
IChapterl-
opens
the
chapter
selection
for
the
video
DVD
playingin
the
internaJ
CDIDVD
drive
=:>
page 40.
~
9) Optional equipment
=>
page
33,
"External
CD
changer"
to) Audio files that have been compressed
via
Windows Media Audio may also be copyright protected
by
the
DRM
process
(Digital.
Rights Management). The unit does not support
WMA
files protected
in
this
way.
11)
Optional equipment
=>
page
124,
"Media settings"
12)
Optional equipment, can only be connected if the unit
is
also fitted with a TV tuner
=>
page
124,
"Media
settings" and
=>
page
126
,
"V
ideo settings"
13)
Optional equipment
Function selection
button
MEDIA
21

Booklet
3.4
RNS
510
rn
Note
Please also refer to
the
additional information
on
MP3
mode
~
page
28
....
In
serting
and
ejecting
C
D/DVDs
Audio
CDslDVDs
and
MP3 CDsIDVDs, as wellas video DVDs can
be
played
in
the
internal
CDIDVD drive.
To
selecta
CD/DVD
that
has
already
been
inserted in the
internal
CD/DVD
drive
again, please read
~
page
24,
"Selecting a
track
or
an
audio source".
Inserting a CD/DVD
-Push the CDIDVD with the
printed
side
facing
up
into the
CD/DVD
slot to the
point
where it is automaticallypulled into
the unit ~
CD.
Playback starts automati-
cally (exception
~
page
19,
"CD
cannot
be
read").
Ejecting a CD/DVD
-Press
~
to move the
CD/DVD
in the in-
ternal CD/DVD drive to the eject position.
-Remove the CDIDVD.
A
CO/OVD
will be retracted back into
the
player
to
prevent
damage
unless removed from the
ejection position within
around
ten
seconds.
Playable
MP3
and
WMA
files can also be stored
on
the
unit's
hard
drive
~
page 30.
WMA files (Windows
Media
Audio)
Audio files
that
have
been
compressed
via Win-
dows MediaAudio
may
also be copyright pro-
tected by the
DRM
process (Digital Rights Man-
agement). The
unit
does not
support
WMA
files
protected
in
this way.
22
Function selection
button
MEDIA
&.
WARNING
• Pleaserefer to
~
page
19, "General infor-
mation
on
CD/DVD
mode"
and
~
page
53,
"Important
information
on
operating
the
CD
player".
CD
Caution
• Insertinga
second
CD/DVD
while
an
in-
serted
CD/DVD
is
being ejected
can
destroy the
CD/DVD
drive in the unit. Note that
it
takes a
few
seconds
to eject
the
CD/DVD
after pressing
the eject
button
@.
The protective barrier in
front
of
the CDIDVD slot is
opened
while this is
happening
.
You
must
wait until the
CO/D\!])
is
ejected before trying to insert a
new
CD/D\!]).
• COs/OVDs
should
always be stored in the
rack from the GenuineVolkswagen accessories
range
or
in the original case when not in use.
rn
Note
• Uneven road surfaces and
strong
vibrations
may cause
the
CDIDVD
to
jump
. The
CD
ID\!])
play function
should
be
switched offin this case.
• Ifthe unit
cannot
read a
CD
I
DVD
pleasealso
refer
to
~
page
19,
"General information on
CD/D\!])
mode".
• With cabriolet car models, for anti-theft rea-
sons, the ignition key
must
be inserted in the
ig-
nition
when
the
eject
button@
is
pressed.
...
Booklet
3.4
RNS
510
Inserting
or
removing
a
memory
card
MP3files stored
on
a
memory
card
can
eitherbe played directly
from
the card or
stored
on
the
unit's
hard
drive.
To
re-select a
memory
card
that
has
al-
ready
been
inserted, please read
~
page
24,
"Selectinga track or
an
audio
source".
Inserting a
memory
card
-Push the memorycard into the
memory
card slot
~
page
2,
fig.
1
0,
with the
clipped
corner
to the front
and
right (hori-
zontal card slot)
or
to
the
front
and
top
(vertical card slot), until
it
engages into
place. Playback starts automatically (ex-
ception
~
page
23,
"Memorycard
empty
or
data unreadable").
Removing a
memory
card
-
Push
on
the inserted
memory
card
against the springresistance
and
the card
will "
jump"
to
its eject pOSition.
-Remove the memory card.
Only
MP3
files
and
unprotected
WMA
fLIes
can
be read from
an
SD
card
~
page
22,
"WMA
files
(Windows Media Audio)".
Other
data will be ig-
nored.
Playable
MP3
and
WMA
files can also be stored
on
the
unit's
hard
drive
~
page 30.
Memory
card
empty
or
data
unreadable
Ifyou insert a
memory
card that
does
not
con-
tain
any
audio files, the unit will
nOI
change 10
memory
card mode. In
the
audio
menu,
the
(so
cmd) function key
on
the
top line
ofthe
screen
remains
inactive
and
the
function
cannot
be
se-
lected
~
page
20,
fig.
13.
Requirements for
the
memory
card
The
memory
card slot accepts
memory
cards
with a size
of32
mm
x
24
mm
x
2.1
mm
or
1.4
mm
.
The
unit can read
SO
memory
cards ("Se
cure
Digital Memory Cards")
and
MMC
memory
cards ("Multimedia Cards") with a capacity
of
up
t02GB.
Other
memory
cards that fit the slot physically,
such
as SOHC cards ("Secure Digital High-Ca-
pacity Memory Cards")'
cannol
be read....
Function selection
button
MEDIA
23

Booklet
3.4
RNS
510
Audio
menu
Selecting a
track
or
an
audio
s
ou
rce
You can selecta specific
music
track
or
a different
audio
source.
You
can also store
audio
files
on
the harddrive.
Fig.15
MEDIA
main menu: Audio menu.
Changing
the
audio
source
-Press the
[MEDIAl
function selection
button
to
open
the
MEDIA
main
menu
.
If
a
video source was last selected, press the
[MEDIAl
function selection
button
again
to
open
the audio
menu
=>
fig.
15.
-In the audio
menu
,playback of the
audio source
that
was last played resumes
from the
point
that
was last playing.
-Touch
one
ofthe
function keys at the
top ofthe screen
to
select the required
audio source. Playback
of
the selected
audio source will resume from the point
that
was last playing.
Opening
a selection menu
of
the
available
audio
sources
-In the audio menu, touch the
[Selectionl
function key
to
view the track list
of
the
audio source
that
is
currentlyplaying. The
track that
is
currently playing
is
high-
lighted
=>
page
25,
fig.
17
.
24 Function selection
button
MEDIA
Fig.
16
Selection menu of available audio sources.
-Touch the function key@ repeatedly
until
t.he
selection
menu
of
available audio
sources
opens
=>
fig
.
16
.
-Touch the icon of
an
audio source
[@,CD
I,
[~SD
cordl
or
[!!IHDDI
on
t.he
left of the screen
to view the
contents
of
that
folder
or
data
medium
.
The
(§l)
function key
appears
beside audio files
that
can
only
be
played back
=:>
page
26,
"Audio
CD/DVD: Track selection".
The@function
appears
beside
audio
files
that
can
be
played back
=:>
page
26
or
stored
on
the
hard
drive
=:>
page
30. Audio files
that
are
stored
on
the
hard drive
can
also
be
renamed
or
deleted
=:>
page
32.
An
audio
source
that is
not
currently
loaded
with
a
data
medium
cannot
be selected
(=:>
fig.
16 ®
beside
[SD
cardD. Likewise, a video
DVD
that
is
loaded
in
the
internal
CD/DVD
drive
cannot
be
selected in
the
selection
menu
ofavailable
audio
sources.
If
an
external
CD
changer
l4) is also
connected,
after
you
touch
the
~
function
key,
you
must
also select
the
required
CD/DVD
drive in
the
fol-
lowing selection
menu
by touching a function
~
key
=:>
page
37,
"Opening
the
CD
selection
menu".
The
top
line
of
the
track
=:>
fig
.
17
or
folder dis-
play
=:>
fig.
18
shows
the
audio
source:
• "
CD:"
-Internal
CD/DVD
drive
or
external
CD
changer
J4
).
•
"SD
cord" -
inserted
SD
memory
card ("Se-
cur
e Digital
Memory
Card")
or
MMC
card
("Mul-
timedia
Card").
• "
HDD"
-
Internal
hard
drive ("Hard Disk
Drive").
Booklet
3.4
RNS
510
rn
Note
• Please also refer to
the
additional informa-
tion
on
MP3
mode
=:>
page 28.
• WMA
audio
files (WindowsMediaAudio)
can
also
be
played
on
the
unit
and
stored
on
the
hard
drive (HDD) provided
they
are
not
copyright
protected
by
the
DRM
process (Digital Rights
Management).
Their
operation
and
perform-
ance
on
the
unit is
the
same
as for
MP3
com-
pressed
audio
files,
and
is therefore
not
de-
scribed separately
here
.
~
Ch
an
ging
trac
ks
or
selecting tracks
manually
The arrow keys
on
the unit@)
or(8
always refer
to
the
audio
source
you
are cur-
rently listening
to,
whatever
menu
you
are in
at
the time.
Fig.
17
Track
list
of
a playing audio
CD
.
Press the
[MEDIAl
function selection
button
to
open
the
MEDIA
main
menu.
If
a video
sourcewas last selected, press the
[MEDIAl
function selection
button
again
to
open
the audio
menu
=>
page 24,
fig
.
15
.
Playing
the
previous
or
next track
-
In
the audio menu, briefly press the
arrow keys
on
the unit@l or(8, or touch
the on-screen function keys
~
page 24,
fig
.
15
f8
or
(3.
Fig.
18
Track
list
of 0 playing audio
MP3
CD.
Rewind, fast
forward
-Press
and
hold the arrow keys
on
the
unit@lor(8ortheon-screen
function keys
f8or(3.
-Release the
button
when
the desired
track has
been
found.
14)
Optional
equipment:
Operation
of
the
external CD
changer
=>
page
33.
Function selection button MEDIA 25

® Booklet
3.4
RNS
510
Audio CO/DVO: Track selection
-Touch the
=>
page
24,
fig.
IS
[Selection]
function key to view the track list of
the
audio source
that
is
currently playing. The
track
that
is currently playing
is
high-
Lighted
=>
page
25,
fig.
17.
-Select a track from the list bytouching
[Track
..
.].
-Use the function
key@to
switch from
the tracklist back to
the
CD
selection
menu
l5)
or
theselection
menu
of
avaiJable
audio
source
s=>
page
24,
fig.
16
.
- Using the function key
~
always takes
you directly to the audio
menu
=>
page
24,
fig.
IS
.
MP3 files: Track selection
-Touch the
=>
page
24,
fig.
15
[Selection]
function key to view the track list
that
con-
tains the track currently playing,
and
the
subfolders
contained
in this folder, if
any
.
The track
that
is
currently playing is high-
lighted
=>
page
25
,
fig.
18
.
-Touch
another
track to select it. If the
track you
want
is in a different folder, you
mu
st search through the folder structure.
-Touch the displayofa file folder to
open
the
folder (in the figure
=>
page
25,
fig.
18:
[Lal.1]).
-Touch the function key @ to
open
the
next higher folder. The
parent
folders are
displayed
on
the title
bar
(in the figure
"Fl.l"
and
"
Fl
").
-
By
repeatedly pres
sing@
y
ou
can
switch folder by folder until you reach the
selection
menu
of
the available audio
sources
=>
page
24,
fig
.
16.
You
can
now
search for tracks, e.g.
on
a different audio
source.
)5) only if a
CD
changer
is
fitted
=>
page:rl.
26
Function selection button MEDIA
-Using the function
key~
always takes
you directly to the audio
menu
=>
page
24,
fig.
15.
MP3 files:
Opening
the
popup
window
for editing
-Select a track,folder or audio source for
playback, as described above.
-When you touch
the
function key
=>
page 30, fig.
21
~
beside
the
display
of
a
track, folder
or
audio source, a
popup
window
opens
=>
page
32
.
-In the
popup
window, touch
~
to
start playback. See also
=>
page
29
, "Play
order
of
MP3
files
and
folders".
-The
popup
window can also be used to
store a
number
of
audio files
on
the hard
drive
=>
page
30.
Audio files
that
are al-
ready stored
on
the
hard drive
can
also
be
renamed
or
deleted
=>
page
32.
Repeat
function
-
Open
the audio
menu
=>
page
20.
-Touch the[Repeat] function ke
y.
-In the
popup
window which now ap-
pears, touch [Track] to automatically repeat
the
current
track at the end.
-
If
you touch @ (audio
CD
mode) or
[F
o
lder)
(MP3
mode) in the
popup
window,
the tracks
on
the current
CD
or in the cur-
rent folder will automatically repea
t.
In
th
e
audio
menu
you
can
also
ch
a
nge
tr
acks
by
turning
the
s
etting
s
knob
=>
pag
e 2. fig. 1 0 .
"
CD
int
."
appears
at
the
top
left
of
the
screen
if a
data
medium
is
being
played
in
the
internal
C
DIDVD
drive.
The
name
of
the
artist,
the
album
and
the
tr
ac
k
c
an
be
displayed
while MP3 files
are
playing
pro
-
vided this
information
is
available as
an
1D3
tag.
If
there
is
no
ID3 tag,
the
folder
or
file
nam
e will
be
s
hown
instead
=>
page
28, "
General
informa
-
tion
on
the
MP3
mode".
~
Some
audio
CDs a
nd
a
udio
DVDs
support
"CD
text". With
these
CDs/DVDs,
th
e track
name
is
shown
inst
ea
d
of
"Track"
=>
fig.
19
.
Storing
audio
files
=>
pag
e 30, "
Storing
MP3
and
WMA
fil
es
on
the
hard
drive
(HOD)"
Ra
ndom
play
(MIX)
Booklet 3.4
RNS
510 ®
Playing
audio
COs from
an
external
CD
changer
Optional
e
quipment:
Operation
of
an
ext
e
rn
al
CD
chang
er
=>
page
33.
[I]
Note
Th
e dis
play
of
the
names
of
tracks
and
artists
can
be
deactivated
in "
Media
setting
s"
=>
page
124.
~
The tracks
of
theselected
audio
source will be played in random order.
Fig.19
MEDIA
main menu: Audio menu.
-In the audio me
nu
, touch the [Extras]
function
key.
-In
the
popup
window which
open
s,
touch~.
The[Extras Ifunction key changes
to
[~Mix)
and
random
play starts with
the
next track.
AIl
the tracks on the current
audio
sour
ce now play in
random
order.
-Touch the function
key[~
Mi
x)
to
stop the
function at the
current
track. Normal play-
back now resumes with
the
current
track.
Random
play
remains
active for
the
corre-
sponding
audio
source
until
it
is
clo
se
d for
that
s
our
ce.
"Vhile
random
play is
active
in MP3
mode,
only
th
e
audio
files in
the
selected
folder (e.g. Fl.l in
=>
page
25, fig.
18)
or
all
audio
files in
th
e
se-
lected folder in
addition
to
audio
files from all
s
ubfold
ers,will
be
played
in
random
order
in ac-
cordanc
e with
the
settings
=>
page
124
,
"Media
setting
s".
To
random
play all
of
the
folders in a
data
me-
dium
, y
ou
mu
st first
pla
y a
mu
sic file
at
root
di-
rectory
level a
nd
then
start
random
play.
If
a very
la
rge
number
of
mu
sic files
are
stor
ed
on
the
ha
rd
drive,
the
image
on
the
screen
may
"freeze"
fo
r a few s
econd
s
after
you
select
the
fun
c
tion
key
~
and
the
unit
will
not
accept
any
opera·
tion
for
thi
s pe
riod
of
time.
Please
be
patient
while
this is
happening!
The
unit
is
checking
the
files
you
have
selected
for
random
play.
~
Function selection button
MEDIA
27

Booklet 3.4
RNS
510
Scan function
All
the tracks
on
the
selected
audio
source are
scanned
for ten seconds each.
-In the audio menu. touch the IExtras1
function
key.
-In the
popup
windowwhich opens.
touchIScan
I.
TheIExtras Ifunction key
changesto
I~
Scan
I.
All
the tracks on the cur-
rent audio source are
scanned
for
10
sec-
onds
each. The scan function starts with
the
next track.
-Touch
I~
Sconl to stop the scan function
at
the
current track. Normal playback now
resumes with the current track.
MP3
files
Alt
ernatively. y
ou
can also
start
and
stop
the
sc
an
function by briefly
pushing
the
settings
knob
~
page 2. fig. 1
0.
The
scan
function remains active for
the
corre-
sponding
audio
source
until it is clos
ed
for
that
source.
While
the
scan
function is active in MP3 mode.
aJI
MP3 files
on
the
curr
e
nt
audio
source.
or
only
the
files in a selected folder (e.g. Fl.l in
~
page
25.
fig.
18)
are
scanned
in
accordance
with
the
settings
~
page
124
. "Media settings".
~
Genera
l information
on
the MP3
mode
MP3files can be playedback
from
a variety
of
media
and
stored
on
the
hard
drive
(HDD)
.
General
MP3
mu
sic files stored
on
data
media
are nor-
maJly subject to
national
and
internationaJ
cop-
yright laws.In certain
countries
.theymay
not
be
copied
even for private use
without
prior
co
n-
sent
of
the copyright holder.
Please find
out
about
rele
vant
copyright laws
and
observe them.
These
re
strictions
do
not
apply to
compositions
and
recordings for
which
you personaJly hold
the
copyr
ight
or
for which you have
been
granted rights.
Requirements for MP3 music files
and
MP3
data
media
•
CD
-
ROM
. CD-R. CD-RWwith a
capa
city of
650
MB
and
700
ME.
•
DVDs
with a capacity
of
up
to 4.7
GB
and
double
-layer
DVDs
with a capacity
of
up
to
8.5
GB.
•
SO
memory
cards ("Se
cure
DigitaJ Memory
Cards") and
MMC
memory
cards ("Multimedia
28 Function selection buHon MEDIA
Cards") with a size
of
32
mm
x
24
mm
x
2.1
mm
and
a capacity of
up
to 2
GB.
•
The
CDslDVDs
mu
st
comply
with the
ISO
9660 Level 2
standard
and
the
)oliet file s
ystem
(single-session a
nd
multi-session).
•
Fil
e
names
are restricted to
64
characters.
• The folder
structure
is limited to a
maximum
of
8 folder levels.
• The
name
of the artist.
the
album
and
the
track can
be
display
ed
while
MP
3 files are
playingprovided this information is available as
an
103 tag. Ifthere is no 103 tag.
the
folder
or
file
name
will
be
shO\'\TIl
instead.
• Play lists are
not
supported.
• WMA files (Windows Media Audio)
can
also
be played provided they are
not
copyright pro-
tected by
the
DRM
process (Digital
Ri
ghts Man-
agement).
The
unit does
not
support
WMA
files
protected in this way.
• The
operation
and
performanc
e
of
playable
WMA files
is
the
same
as for MP3
fil
es. and so is
not
de
scribed
separat
e
ly
here.
Bit
rate
•
The
unit
supports
MP3
files with bit rates
of
between
32
and
320
kBit/
s
and
MP3 files with
variable bit rates.
•
The
display for
th
e track
running
time may
be
incorrect for files with a variable bit rate.
& WARNING
Please
refer to
~
page
19.
"GeneraJ
informa-
tion
on
CDIDVD
mode"
and
~
page
53.
"Im-
Play
order
of MP3
fi
les
an
d fo
ld
ers
CD
®
®
CV
Fig.20
Possible structure
on
on
MP3 CD.
tra
·0631
Th
e unit plays
the
MP3files stored
on
a
data
me-
dium
in a certain orde
r.
The illustration
shows
a
typicaJ MP3
CD
that
contains
tracks
(Dt
folders
(L:)J
and subfolders. Whe
ther
MP3
fil
es from all
folders
and
subfolder
s will be played
can
be
Booklet 3.4
RNS
510
& WARNING (conl;nued)
portant
information
on
operating
the
CD
player
".
[I]
Note
• Thedis
pla
y
of
the
name
s
of
tracks
and
artists
can
be
deactivated in "Media settings"
~
page
12
4.
• Please
ob
se
rve
the
copyright laws applicable
in
your
country
.
• Please
aJ
so refer to
the
additionaJ
informa
-
tion
on
MP3
mode
~
page
28.
<4
sp
ecified in
th
e
setup
~
page
1
24.
"Media set-
tings".
• Play starts with
the
first track in
the
"root
di-
rectory"
on
the CD. In
the
example there are two
tracks0
and
®in
the
root
folder.
•
Once
the
tracks in
the
root directory have
been
played.
the
unit
will access
the
folders in
the
order
in which they are arranged
on
the
data
medium
. In
the
example
shown
here
.
there
are
two
main
folders in
the
rootdirectory:
Fl
and
F2.
The
folder FI is in
the
first
position
in
the
root
folder.
so
tracks
CD
and
0 are played
immedi-
ately after
the
tracks in
the
root folder.
• Once
the
tracks in
the
first folder have
been
played. the
unit
will access subfolders in
that
folder in the order in which they are
arranged
on
the
data
medium
. In
the
example. folder FI
con-
tains two subfolders:
Fl.l
a
nd
F1.2 as well as an-
other
subfolder
Fl.l.l
within
Fl.l.
The playerfirst
plays all
the
tracks 0 in subfolder
Fl.l
~
page 30.
fig.
21.
then
change
s to
subfolder
Fl.l.l
a
nd
plays
the
tracks in
that
subfolder
0.
Once
all
the
tracks in sub-folder FI.l.I have be
en
played.
the
unit
changes
to sub-folder
F1.2
and
plays the tracks stored there
0.
If
there are more
subfolders within
F1.2
.
th
e unit
chang
es
to
tho
se
folders as
de
scribed above.
and
plays
the
trac
ks
stored in them.
• Once all
the
tracks in
the
first
main
folder
(and its subfolde
rs)
in
the
root folder have
been
played. the tracks in
the
next
main
folder are
played in
the
order
described. In the ex
ample
.
these are tracks 0
and
CV
in folder
F2
.
~
Function selection buHon MEDIA 29

Booklet
3.4
RNS
510
•
Use
thelSel
e
cti
onlfunction
key
to open the
tra
ck
list from
t.he
audio menu.
In
the track list
=>
page
30,
fig
.
21
the track that
is
currently
playing
is
highlighted.The name
of
the current
main folder appears on the title bar together
with the currentsubfolder,
if
applicable. If the
track
is
in
the rootdirectoryon the datamedium,
only the type of medium
is
di
splayed.
~
Storing and editing audio files (HOD)
Storing M
P3
and
WMA
files
on
the
hard
drive
(H
OD)
Fig
.
21
Track
list
of a playing audio
MP3
CD.
Fig.
22
Storing
MP3
files
.
-
Here
you
can
create
another
folder
(a
folder
can
have
up
to
seven
subfolders)
or
store
the
selected
track
or
folder
in
the
cur-
rently
displayed
folder.
Touch
the
function
key@
to
open
the
next
higher
folder
.
-
Select
the
function
key
Ilnsert
file/folder
here
jto
store
the
track
or
folder
at
the
se
lected
po
s
ition
.
-
When
you
touch
Ilnsert
file/folder
here
j, a
popup
window
opens.
The
number
of
tracks
still to
be
copied
is
displayed
.
Touch
ICancerJ
to
stop
storing
at
the
currently
stored
track.
The
popup
window
closes
au-
tomatically
once
storing
is
complete.
It
takes around
40
minutes
to
store
100
music
tracks ofaverage length
(3-5
minutes).
If
the unit is switched offwhile storing is
in
progress. storing
wiU
be cancelled with the last
fully
stored track.
Functions
and
progress
display
during
the
storage
operation
While audio
files
are being stored you can
stiJJ
listen
to
tracks on this or a different audio
The
function
key@
appears
next
to
stor-
abl
e
tracks
or
folders
in
the
track
li
st
and
in
the
selection
menu
of
available
audio
sources
.
-
Pre
ss
IContinuej
in
the
pop-up
window
to
source.
Selecting tracks
or
folders to
be
stored
-
Browse
the
available
audio
sources
by
track
s
or
folders
which
you
wish
to
store
on
th
e
hard
driv
e
=::>
page
26.
In
the
selection
window
of
available
audio
sources
you
can
a)
so
select
the
entire
contents
of
an
in-
se
rt
ed
data
me
dium
for
storage
on
the
hard
drive
=::>
page
24, fig.
16.
-
When
you
touch
the
function
key
=::>
fig.
21
~
beside
the
display
of
a
track
or
folder, a
popup
window
opens.
-
In
the
popup
window,
touch
~
to
start
playback.
-
In
the
popup
window,
select[copyj to
store
the
required
track
or
folder
to
your
hard
drive.
30
Function selection button MEDIA
confirm
that
you
have
seen
the
mes
sage.
-
The
"
HOD
" me
nu
(hard
disk
drive
)
opens
=::>
fig. 22.
Selecting 0
memory
location
and
storing trocks
-
Select
IEnter
file
/
folder
jto
store
the
track
or
folder
directly
on
t.he
top
level,
the
hard
drive's
root
directory.
See
also
=::>
pag
e 29,
"Play
order
of
MP3 files
and
folders"
.
-
Or
select
an
existing
folder
by
touching
it (in
th
e
illustration
=::>
fig. 22:
IC:MP3
-
CD
OlD.
-Alternatively,
select
I
New
fo
lderj
if
you
wish
to
create
a
new
folder
for
the
track
or
folder.
Enter
a
name
for
the
new
folder
in
the
follow-on
menu
=::>
pag
e
n,
"Input
mask
for free
text
input".
The
folder
you
have
just
created
is
opened
and
the
name
you
gave it
appears
on
the
title bar.
~
Booklet
3.4
RNS
510
File
names up
to
32
characters long can be
di
s-
played.
Note that the
{Selectio
n]function
key
in
the audio
menu
is
disabled duringstorag
e.
Jf
you touch the
I
Select
i
on]
function
key,
a popupwindow opens in-
stead ofthe selection menu and shows the
progress ofthe storage operation.
If
you touch
{Cancel]
in
the popup window, the storage opera-
tion
will
stop at the last completelystored track.
Press the
IMEDIA]
function selection button twice
to
close the popup window
and
resume storing.
In
theaudio
menuyou
can nowselect adifferent
audio source using the function keys
at
the top
=>
page
21,
"Selectable audio sources
in
the
Audio menu
".
To
change tra
cks,
use the arrow
keys
on the unit
or in the audio menu.
Some functions, such as
fa
st forward and
re
-
wind,have onlylimitedavailabilitywhile storing
is
in progress.
(]]
Note
Only \"JMA audio
files
(Windows Media Audio)
that are not copyright protected
by
the
DRM
process
(Digit
al Rights Management)can be
stored on the hard drive (HOD).
<4
Function selection button MEDIA
31

@ Booklet 3.4
RNS
510
Editing stored
audio
files (tracks)
an
d folders
Fig.
23
Selection menu of available
audio
sources.
Selecting tracks
or
folders
-Open
the
selection me
nu
of
the
avail-
able
audio
sources
~
page
24
.
-Touch
the
function
key~
fig.
23
I(ilHDD]
to view
the
tracks
and
folders storedon
the
hard drive.
-Select
the
track
or
folder you wish to
edit. Touch the display
of
a folder
~
fig.
24
ID
..
Name]
to
open
it. Touch the
function
key@to
open
the next higher
folder. The
names
of
the currently
open
folders
appear
on
the
title bar.
-Touch
the
function key@ next to
the
display
of
the
track
or
folder you wish to
edit. A
popup
window
opens.
32
Function selection button MEDIA
Fig.
24
Stored oudio files (tracks)
and
folders on
the hard drive.
-In the
popup
window
you can
start
playback.
or
you
can
copy.
rename
or
de-
lete
the
track
or
file.
Fundion
keys in
the
pop
up
window:
~-
starts the playback
of
the selected track
or
folder
=>
page
29.
"Play
order
of
MP3
files
and
folders".
~
-saves a copy
of
t.he
t.rack
or
folder
=>
page 30. "Se
le
cting a
memo
ry
lo
cation
an
d
storing track
s"
.
IR
enome
l-
open
s
an
input
template
whereyou can
re
name
the
track or folder
=:>
pa
ge
11.
"Input
mask for free t
ex
t
input
".
IO
e
letel-
deletes the selected track or folder
when
you confirm a
prompt
.
..
Booklet
3.4
RNS
510 @
External
CD
changer
Applies
to
vehicles:
with
an external
CD
changer
Operating
the external
CD
c
ha
nge
r
As well as the internal CDIDVD drive.
an
external CD changercan beconnected
for playing
up
to six
audio
CDs.
You do
not
have
to
load all theslots in the CD
changer.
Fig.
25
External
CD
changer
.
Depending
on
the
model
.
the
external
CD
changer
is
located in the glove co
mpart-
ment
or
in the
armrest
betw
ee
n
the
tw'O
front seats
~
Booklet 3
.1
"Operation".
Loading COs
-Briefly press theI
LOAD]
button.
The
LED
~
fig.
25
CD
above the next free CD slotwill
start
to
flash slowly.Itshowswhich
CD
slot
is being
prepared
.
-Wait until the
LED
starts
to
flash
quickly.
-Insert a
standard
12
cm
audio
CD
with
the
unprinted
side facing
the
buttons
GJ
to
@J
into the
CD
slot until it
is
automatically
pulledin~0.
Ejecting COs from the external
CD
changer
-
If
you wish
to
eject the
CD
which is
being played in the
CD
changer. briefly
press
~
fig.
25
I
EJECT
].
-
If
non
e of
the
COs in the
CD
changer is
being played.
pr
ess
IEJECT
]
and
then
one
of
the
button
sGJ
-
@Jto
select the
CD
you wish
to eject.
Operation
using the Radio
Naviga-
tion System
-
You
select
the
COs in
the
external
CD
changer
directly via
the
radio navigation
system
~
page
37.
If
a
CD
in the
ex
ternal
CD
changer
is being
played.
yo
u can select a
CD
directly
on
the
CD
changer
by pressing
one
of
the bUllons(j)
t00
. If
a
CD
slot contains a CD. the
LED
G)
above the
butt
on
wiU
li
ght
up
.
The
LEDs above
the
billions
® indicate
the
status
of
the
corresponding
CD
slot.
-CD slot empty; the
LED
is
off.
-
CD
slot being prepared; the LED
fla
shes
slowly.
-
CD
slot ready; the
LED
fla
shes
quickly.
CD
can
be inserted.
~
Function selection button MEDIA
33

Booklet
3.4
RNS 510
-CD slot is loaded;
the
LED
is lit continuously.
Quick
loading
Press
and
hold
=>
page
33,
fig.
25 (LOAD)for
more
than
three
seconds
to
load
all free CD slots
one
after
the
other.
All
free slots in
the
CD
changer
wiU
be
prepared
automatically
and
can
then
loaded
one
after
an-
other.
Ejecting all COs
To
eject all
of
the
CDs from
the
CD changer,
press
and
hold
the
(EJEer)
button
for
more
than
three
seconds.
All
CDs in
the
CD
changer
will
then
be
ejected
one
by
one
. Ifa CD is
not
removed
from
the
eject
position,CD
ejection
will
stop
and
the
CD will
be
puUed backinto
the
changer
after
around
15
sec-
onds
.
/1:).
WARNING
The
risk
of
injury
during
a
sudden
braking
manoeuvre
or
in
an
accident
is
increased
if
the
glove
compartment
cover
or
armrest
is
open
.
• Always keep
the
glove
compartment
cover
or
armrest
closed
while
the
vehicle
is in
mo-
tion
to
reduce
the
risk
of
injury
during
a
sudden
braking
manoeuvre
or
in
the
event
of
an
accident.
34 Function selection buHon
MEDIA
/1:).
WARNING
The
CD
changer
is also a class1
laser
product
.
Ifit
is
opened,
or
is faulty
or
damaged,
there
is
a
risk
of
invisible
laser
beams
escaping
from
the
unit.
The
CD
changer
contains
no
user-
serviceable
parts.
Repairs
should
therefore
only
be
carried
out
by
an
authorised
dealer.
•
Please
refer
to
=>
page
19,
"General
infor-
mation
on
CD/DVD
mode"
and
=>
page
53,
"Important
information
on
operating
the
CD
player".
o
Caution
• Always
insert
the
CDs in
the
CD
changer
with
the
unprinted
side
to
the
buttons
(D
to@
• Before closing
the
glove
compartment
or
armrest,
check
that
the
CD
has
been
inserted
properly
or
removed.
The
CD
changer
or
the
CD
could
otherwise
be
damaged
.
[]J
Note
•
The
next
free slot will automatically be se-
lected ifyou
do
not select
one
after
pressing
the
[LOAD)
button.
• ACD will
be
pulled
back
into
the
player to
prevent
damage
ifis
not
remo
ved from
the
eject
position
within
15
seconds.
• MP3 CDs
and
audio
DVDs
cannot
be
played.
•
You
may
not
be
able
to play
copy-protected
CDs
or
CO-Rs
and
CD-RWs which you have
burned
yourself.
<Ill
Booklet
3.4
RNS
510
Applies to vehicles, with
on
external CD
changer
with
magazine
Operating
the
external
CD
changer
with
magazine
This external CD changer contains a CD magazine which loads
CDs
into the
changer.
Fig.
26
CD
changer.
The external
CD
changer
with magazine
is
located
on
the
right-hand side
of
the lug-
gage
compartment
or
under
the front pas-
senger
seat
.
Removing
and
inserting the
magazine
-Push
the
CD
slot release
=>
fig.
26
CD
up
fully to gain access
to
the
magazine.
-Press
the
button
CD
to eject
the
maga-
zine.
The
maga
zine
is
ejected.
-Load
the
magazine as described
=>
page
36.
-Insert the loaded magazine
=>
fig
.
27
0
into
the
changer
with
the
word "disc"
facing
up
until it reaches
the
stop. The
arrow
on
the
magazine
must
point
to-
wards the magazine slot.
-Close the
CD
slot release fully.
Fig.
27
CD
magazine.
Operation
using the Radio
Naviga-
tion
System
-CDs in
an
external
CD
changer
with
magazine are selected directlyvia
the
radio navigation system
=>
page
37
.
/1:).
WARNING
The
CD
changer
is also a class 1
laser
product.
If
it is
opened,
or
is faulty
or
damaged,
there
is
a
risk
of
invisible
laser
beams
escaping
from
the
unit.
The
CD
changer
contains
no
user-
serviceable
parts.
Repairs
should
therefore
only
be
carried
out
by
an
authorised
dealer
for
safety
reasons.
•
Please
refer to
=>
page
19,
"General
infor-
mation
on
CD/DVD
mode"
and
=>
page
53,
"Important
information
on
operating
the
CD
player".
rn
Note
The
CD slot
cover
should
always
remain
closed
after
the
magazine
has
been
inserted. This will
stop
dust
entering
the
magazine.
<Ill
Function selection
button
MEDIA
35

~
Booklet
3.4
RNS
510
Applies to vehicles: with
an
external
CD
changer
with
magazine
Operati
ng the
CD
ma
g
az
ine
The CD
magazine
can
hold
up
to
six
CDs,
but
does
not
always have to becom-
pletelyfull.
Fig.
28
Inserti
ng
COs.
Inserting COs
-Hold
the
CD
by
its
centre
hole
and
outer
edge so
that
the
printed
side
is
facing
up.
-Load
the
CDs
one
at
a
time
into
the
magazine
by
sliding each CD in straight
until you
hear
it
engage
properly.
When
doing
this,
hold
th
e
maga
z
ine
with
the
word
"disc" facing
up
.
-
The
order
of
the
COs
can
he
seen
on
the
right-hand
side
of
the
magazine
=:>
fig.
28.
Removing COs
-
Turn
the
magazine
so
that
the
release
lever is facing
up
=:>
fig. 29.
36
Function selection
button
MEDIA
Fig.
29
Removing COs.
-
Turn
the
releaselever
against
the
spring
pres
s
ur
e.
-Press
the
CD
gently
out
through
the
op
e
ning
at
the
rear
of
the
magaz
ine
.
CD
Caution
Refer to
the
notes
on
handling
COs
=>
page
54.
[I]
Note
•
MP
3 COs
and
audio
OVDs ca
nn
ot
be
played.
• You
may
not
be
able
to pl
ay
copy
-
protected
COs
or
CO-Rs
and
CD-RWs
which
yo
u
ha
ve
burned
yourself.
<4
Booklet
3.4
RNS
510
~
Applies
to
vehicles:
with
on external
CD
chonger
Selecting CDs
in
an
external
CD
chang
er on the Radio Navi
gat
i
on
System
Opening
the
CD
selection
menu
-Press
the
[MEDIA]
fun
ct
ion
selection
button
to
open
the
MEDIA
main
menu.
Ifa
video
source
was
last se
lected
,
press
the
[MEDIAl
function
selection
button
again
to
open
the
au
dio
menu
.
-Playback
of
the
audio
source
that
was
last played is
continued
in
the
audio
menu
=:>
fig.30.
-
If
the
unit
is
not
in
CD
mode,
touch
the
@ key
on
the
top line
of
the
screen.
-Touch
the
[Selection
I
function
key to view
the
track list
of
the
CD
that
is
currently
playing
=:>
page
26,
"A
udio
CDIDVD: Track
se
lection
".
-Touch
the
function
key@
repeatedly
until
the
CD
selection
menu
opens
=:>
fig.
31.
Selecting a
CD
-Select a
CD
from
the
CD
changer
[
@C
D
1:
...
1to
[@CD
6,
··.1
by
touching
I
PLAY
Inext
to
the
required
option.
Fig.31
CD
selection menu.
-
Touching
one
of
the
function keys
[@CD
1,
...
ltO[
@C
D6: .
..
Idirectl
yo
pen
s
the
track
list
ofthat
CD
=:>
page
25,
"Changing
tracks
or
selecting tracks
manually
".
ACD drive with
no
CD in it is indica
ted
by
"<Empty>"
and
the
function
key next to
the
op-
tion
is
in
ac
tive.
Th
e t
op
op
tion
[Inlern,
_.
1
on
the
CD
selectio
n
me
nu
ac
tiva
tes
a CD
or
OVD
loaded
in
the
in-
tern
al
CO/DVD
dri
ve
.
~
-
random
playback
The
audio
tracks
on
a CD will be
played
in
random
order
=>
page
27,
"Random
play".
[
Sc
an]
-
scan
function
All
the
a
udio
tracks
on
a CD
are
scanned
for
ten
seconds
each
=>
page
28, "Scan
function
".
rn
Note
COs a
nd
OVDs
that
cannot
be
r
ea
d
by
the
con-
ne
cted
CD
changer
are
also
not
available
for
se-
lecti
on
in
the
CD
selection
menu
of
the
radio
navigation
s
ystem
(display: "
<Empty>"
=>
fig. 31).
<4
Function selection buHon MEDIA 37

Booklet
3.4
RNS
510
Video DVD mode
Notes on
video
DVD
s
Fig.32
MEDIA main menu.
General
information
Video
OVDs
are usually subject to national
and
international copyright laws. In certain coun-
Inserting
and
starting video
DV
Ds
Fig.33
Menu: Playing 0 video
DVD
.
Inserting a
video
DVD
-Inserta video
DVD
with the
printed
side
facing
up
into the CDIDVD slot to the
point
where
it
is
automatically pulled in
=>
page
22,
"Inserting
and
ejecting
CDIDVDs".
38 Function selection button MEDIA
tries, theymay
not
becopiedeven for private use
without prior consent
of
the
copyright holder.
Please fmd
out
about
relevant copyright laws
and
observe
them
.
These restrictions
do
not
apply to recordings for
which you personally hold
the
copyright
or
for
which you have been granted rights.
(lJ
Note
• Video
COs
cannot
be
played.
•
You
may
not
be
able
to
play Video-
OVDs
which you have
burned
yourself.
• The video image
on
the screen
of
the radio
navigation system
is
only displayed when
the
vehicle is stationary. The screen
is
switched off
while thevehicle
is
inmotion,
but
the
sound
can
still be heard.
~
Fig. 34
DVD
menu options
of
the inserted film.
-The
DVD
starts automatically.
It
can
take a
few
seconds
for the
DVD
to
be
read -
the screen stays dark while this
is
hap-
pening, so please be patient.
~
-The "Intro" stored
on
the video
DVD
(a
short
introductory sequence) is played.
Wait until
the
Intro has finished
and
the
film's
menu
options
appear
with
the
unit's
own
menu
prompts
=>
page38,
fig.
34
.The
film's
menu
options
cannot
be
controIled
directly by touching the screen -
instead
they are
operated
using the function keys
in the
unit's
own
menu
control system @
to the right
of
the film
options
0 .
-
Depending
on
the inserted video
DVD,
you may have to
open
the
unit's
menu
control system manuaIly.
Opening
and
operating
the
menu
control
-Briefly touch the screen to show the
video
DVD
menu
=>
page 38,
fig.
33
.
-Touch
IMenu)to
open
the
unit's
menu
control system
=>
page 38,
fig.
34.
-Nowselect
one
ofthe arrow keys
on
the
right
@to
move the pointerin the desired
direction
around
the film's
menu
options
0 ·
-Onceyou have highlighted the required
option, select the
IEnter!
function key to ac-
tivate it.
Booklet
3.4
RNS
510
-Make all
the
desired settings available
in
the
film's
menu
.
-Start the film byselecting the required
option
from the film's
menu
selection
0·
-The film starts
and
the unit switches to
full-screen view.
Full-screen
view
-In fuIl-screen view, all
buttons
are
hidden
.Briefly touch the screen to see
the
video DVD menuagain
=>
page
40
.
-
!fyou
now touch inside the free area of
the screen again,
the
video
DVD
menuwill
be
hidden again.The video DVD menu
is
hidden
automaticaJly after
15
seconds
of
inactivity.
Aspect
ratio
(4:3
or
16:9)
The film starts
to
play in the default aspect ratio
(4
:3
or
16
:
9)
.The aspect ratio
is
changed in
the
setup
menu
~
page
126
, "Video settings".
(lJ
Note
Thevisual
appearance
ofa film's
menu
selection
and
the options
and
settingswhich it offers
is
the
responsibility
of
the
OVD
manufacturer. The
OVD
manufacturer
is
also responsible for the
different ways in which individual films res
pond
to identical commands.
~
Function selection button MEDIA 39

Booklet
3.4
RNS
510
Th
e video DVD menu
Whilea
film
is
being
played,
you
can changesettings in the video DVD menu,
and
you
can switch
to
another
scene
on
the current video DVD
or
to
a different
audio
or
video source.
Fig.
35 Video
DVD
menu.
If
the
screen is in full-screen
mode
whHe a
film is running, briefly
touch
the
screen
to
see
the
video DVD
menu
=>
fig.
35.
The
video
DVD
menu
offers you
the
following
options:
Switching
between
audio
and
video
function
-In
the
video
DVD
menu, touch
the
=>
fig.
35
[Audio]
function key to switch to
the
audio
menu
=>
page
20,
fig.
13.
Opening
the unit's
own
menu control
-In
the
videoDVDmenu, touch
the
[Menu]
function key to
open
the
unit's
own
menu
control
=>
page 38,
fig.
34
.A film
that
is
running
is
switched back to its
menu
selec-
tion
=>
page39, "Opening
and
operating
the
menu
control".
-Touch
~
to close
the
unit's
menu
con-
trol system. The view
changes
back to full-
screen
mode.
Depending
on
the
file struc-
ture
of
the inserted
DVD,
the film will stop
in its
menu
selection
or
playback will
resume
from the point where it
stopped.
40 Function selection button MEDIA
Changing
display
settings
-In the video
DVD
menu, touch
the
[Display]
function key to
adjust
the bright-
ness,
contrast
or
colours
of
the film dis-
played
on
the
screen. A slide control
rn
is
provided for each
setting
option
=>
fig.
36.
-Press yourfinger
against
a
sliderrn
and
move italong thescaJe
without
takingyour
finger off. The film's
appearance
wiII
change
in the
background
accordingly.
-AJternatively, press the G
or
0key next
to
the
slider to
change
the
setting incre-
mentally. These settings
wiJI
not
affect the
display in any
other
menus
.
Opening
chapter
selection
-In the video DVD menu, touch
the
[Chapter)function keywhiJe a film
is
running
to view a list
of
chapters
on
the
video
DVD.
The
current
chapter
is
at
the
top, with all
the
following chapters
underneath
.
-Touch
the
display
of
a
chapter
directly
(e.g.
(Chapler
3D.
Film playback
continues
from
the
beginning
of
the selected chapter.
~
-Select
~
to
return
to
the
film without
selecting
another
chapter.
-AJternatively you
can
change
the
cur-
rent
chapter
by touching
the
arrowkeys
on
the
unit
or
in
the
video
DVD
menu,
or
by
turning
the
settings
knob
0·
To
adjust the screen display for all functions,
go
to the main Setup
menu
and
select
~
~
page
120.
Function keys
used
to control the current
audio
or
video
source
8 - touch briefly
to
go
to
the beginning ofthe
currentchapter, touch again
to
go
to the begin-
ning
of
the previous chapter.
(3
-touch briefly
to
go
to
the beginningofthe
next track or chapter.
@-Pausefunction:
playback
is
paused at the
current
point -theicon changes to(8, -touching
(8
resumes playback from that point.
16) Optional
equipment
Booklet
3.4
RNS
510
Other
function keys
in
the
Video
DVD
menu
@-changes
to an optionally connected
ex-
ternal video sourceI6).
@-
changes to
TV
mode
l7l
.
~-
changes to a video
DVD
loaded in the in-
ternal
CD/DVD
drive.
rn
Note
• The film's
menu
selection
~
page
38
,
fig.
34
®cannot
beoperated
on
the touchscreen, it can
onlybe operated using the unit's own
menu
control
0.
• The visual appearance ofa film's
menu
se-
lection and the options and settings which it of·
fers
is
the responsibility ofthe
DVD
manufac-
turer.The
DVD
manufacturer
is
also responsible
for the different ways in which individual films
respond
to
identical
commands
.
....
17)
only
when
a
TV
tuner
is
fitted (optional
equipment)
=>
page
42
Function selection button MEDIA
41
Other manuals for 3.4 RNS 510
1
Table of contents
Other Volkswagen Car Navigation System manuals

Volkswagen
Volkswagen TOUAREG - User manual

Volkswagen
Volkswagen 3.4 RNS 510 User manual

Volkswagen
Volkswagen 1999 Radio Navigation System User manual

Volkswagen
Volkswagen RNS 310 User manual

Volkswagen
Volkswagen MFD RADIO NAVIGATION SYSTEM User manual

Volkswagen
Volkswagen RADIO NAVIGATION MFD2 User manual