Volvo Delco User manual

Service Bulletin
Volvo Trucks North America, Inc.
Greensboro, NC USA
Date Group No. Page
4.2004 392 08 1(47)
Trucks
This Service Bulletin replaces Service Manual 39, “Delco
Audio System Troubleshooting, VN” (12.1998), publication
number PV776–TSP109859. Audio System Design and Function
Delco/Delphi
VN, VHD
Audio System
Delco/Delphi
This service information covers the Delco/Delphi System Design and Function. For
further information refer to Group 3.
Contents:
•“VolvoVNSoundSystem”page2
•“RadioSignals”page3
•“Noise”page9
•“TroubleshootingConsideration”page10
•“StereoReceiver”page11
•“WeatherbandFamily”page11
•“HighPerformanceFamily”page14
•“CDChanger—HighPerformanceFamily”page27
•“CDChangerMagazine”page29
•“Amplifier”page38
•“Speakers”page39
•“Antenna”page41
•“Schematics”page45
Note: Information is subject to change without notice.
Illustrations are used for reference only and may differ slightly from the actual
vehicle being serviced. However, key components addressed in this information are
represented as accurately as possible.
PV776-20002689 USA14750

Volvo Trucks North America, Inc. Date Group No. Page
Service Bulletin 4.2004 392 08 2(47)
Volvo VN Sound System
The audio receiver systems in the Volvo VN series trucks
are selected and tuned for optimized performance. All
VN models are available with a variety of Delco/Delphi
Electronics components.
Three receiver families are available:
•The Weatherband family is available with or without
a cassette player or early production VNs through
approximately June 1999.
•The High Performance family is available with a
cassette or CD player on early production VNs through
approximately June 1999.
•The Extreme Audio family, known as XTA, is available
on later production VNs beginning approximately June
1999. It is standard on the VHD vehicles. The XTA
series is available in a “Basic” system with or without
a cassette player, and an “Uplevel” system with a
cassette or CD player.
All VN/VHD models are also available with either basic
or premium speaker packages. The VN 770 premium
speaker system includes an 8 channel amplifier and a
subwoofer. The VN 660 and VN 770 models are available
with remote CD changers.
Consult the “Owner’s Manual” that is supplied with the
vehicle for complete operation instructions.
Repair/Replacement
As an alternative to expensive replacement, Delco/Delphi
Electronics Devices may be repaired at approved service
centers. Call D&B Auto Radio at 1-800-323-4813 for
repair information.
Unauthorized Repair
The warranty may not apply if the product is worked on
by an unauthorized person.

Volvo Trucks North America, Inc. Date Group No. Page
Service Bulletin 4.2004 392 08 3(47)
Radio Signals
The radio signal is sent from a broadcast station and this
signal is then received by an antenna. The strength of the
signal depends on the following:
•The power output (wattage) of the broadcasting station.
•The location of the receiver relative to the broadcast
tower.
•Obstacles between the tower and the receiver.
•Atmospheric conditions.
•What band (AM or FM) the station is broadcasting.
•Type of antenna and the grounding bases.
In North America, commercial radio signals are legislated
into two bands:
•AM 530-1710 kHz (in 10 kHz steps)
•FM 87.9-107.9 MHz (in 200 kHz steps)
Each frequency range uses a different modulation
method. Since a radio wave is really just electromagnetic
energy, it must be controlled in a certain way to carry
information. The process of adding the information to the
radio signals is called modulation.
There are two modulation techniques used in radio
broadcasts:
•AM = Amplitude Modulation
•FM = Frequency Modulation
The characteristics of the signal depend on both
the frequency and the modulation. It is important to
understand these characteristics to properly verify a
complaint.

Volvo Trucks North America, Inc. Date Group No. Page
Service Bulletin 4.2004 392 08 4(47)
AM Band
W3003003
AM radio signals. (100 km = 62 miles)
Radio signals in the AM band have lower frequency
and longer wavelengths than the FM band. Some
characteristics of the AM band include:
•The frequency used is relatively low; therefore, these
waves can bend around obstacles and skip along the
ground.
•The waves are reflected by the ionosphere layer in the
atmosphere.
•Long range reception is sometimes available.
•AM is subject to electrical interferences.
•AM can be blocked by steel and/or concrete structures.
The AM frequencies have longer range due to the ground
wave. The ground wave follows the curvature of the
earth and is effected by its conductivity. The greater the
conductivity, the less the signal loss; so transmission
over water is better than over land. The ground wave in
this frequency band has a range of 80–320 kilometers
(50–200 miles).
The sky wave will pass through the atmosphere and
reflect off of the ionosphere to the vehicle’s antenna. At
night, the ionosphere is actually higher than during the
day, so it is possible for AM signals from great distances to
be received during nighttime hours. As a result, many AM
stations actually reduce transmitting power in the evening
hours to maintain the same coverage as during the day.

Volvo Trucks North America, Inc. Date Group No. Page
Service Bulletin 4.2004 392 08 5(47)
FM Band
W3003002
FM band signal. (100 km = 62 miles)
Radio signals in the FM band have higher frequency
and shorter wavelengths than the AM band. Some
characteristics of the FM band include:
•FM is able to eliminate atmospheric noise mainly due
to its method of propagation. Atmospheric noises are
generally amplitude related and have little effect on
FM signals.
•Reflect off of obstacles.
•Penetrate the ionosphere.
Radio frequencies over 30 MHz are effectively absorbed
by the earth, eliminating the ground wave. Even when out
of a direct line of sight, the signal may be reflected into
areas that would be in a “shadow” otherwise.
FM signals and light rays respond to atmosphere in a
similar manner. The atmosphere bends them both so they
will follow the curvature of the earth to a certain extent.
This is called refraction and it is similar to a lens which
can bend light waves. A good example of this is when
you see a sunset. The sunlight is visible with the sun well
below the horizon. FM signals characteristically have a
shorter range than AM signals.
Factors which affect the line of sight include:
•Height of the broadcast antenna.
•Height of the receiving antenna.
•Terrain and buildings in the broadcast path.

Volvo Trucks North America, Inc. Date Group No. Page
Service Bulletin 4.2004 392 08 6(47)
Weatherband
NOAA — (National Oceanic and Atmospheric
Administration) is a service of the “Voice of the National
Weather Service.” It provides continuous broadcasts of
the latest weather information directly from the National
Weather Service offices. Taped weather messages are
repeated every four to six minutes and are routinely
revised ever one to three hours, or more frequently if
needed. Most of the stations operate 24 hours a day.
The weather for your area can be found on one of seven
stations. The frequency associated with each channel
is as follows:
•162.550 MHz
•162.400 MHz
•162.475 MHz
•162.425 MHz
•162.450 MHz
•162.500 MHz
•162.525 MHz
Approximately 90 percent of the nation’s population
is within listening range of a NOAA Weather Radio
broadcast.

Volvo Trucks North America, Inc. Date Group No. Page
Service Bulletin 4.2004 392 08 7(47)
Signal Disruption
W3003001
Since the higher frequency signals behave more like
light, the signal may be reflected or there may be areas
of shadow. When a receiver has more than one signal
due to reflection, we call it multipath distortion. When a
receiver is located in a signal shadow, we call it flutter.
Multipath
This condition is caused by reflected signals. The
reflected signal must travel further than the direct signal,
so it takes longer to get to the antenna and it is weaker
when it gets there. The receiver then has two signals
which are slightly out-of-time with each other. The two
signals tend to cancel each other out. This condition is
most common in built-up areas which reflect the signals.
A multipath area is often only a few inches wide. At home
you can locate the antenna to avoid a multipath area, but
in your vehicle you may drivein and out of multipath areas.
Flutter
Flutter occurs when the signal strength is too low to allow
proper reception. Flutter can occur when in a fringe area
of a transmitter. Flutter can occur much closer to the
transmitter if the receiver is located in a signal shadow.
In a strong signal area, reflection will generally fill in
the reception shadows. When there is little to support
reflection, an obstacle may cause a signal shadow.
Operating in the shadow will cause flutter. This may also
be called “picket fencing”.

Volvo Trucks North America, Inc. Date Group No. Page
Service Bulletin 4.2004 392 08 8(47)
Electrical Interference
Electrical interference signal disruptions may come from
electrical fields near high tension power lines, vehicle
electrical devices or other high power radio signals.
Strong FM band signals are usually not affected by
electrical interference.
Atmospheric Interference
A loss of sensitivity (especially from stations more than
25 miles away) may be due to atmospheric conditions. An
increase in sensitivity for a short period may be due to a
complementing atmospheric alignment.
Electrical storms will cause atmospheric interference,
especially in the AM band.

Volvo Trucks North America, Inc. Date Group No. Page
Service Bulletin 4.2004 392 08 9(47)
Noise
Noise is an undesirable interference in the audio system.
Noise can enter the audio system one of two ways,
conducted or radiated.
•Conducted noises will have a physical connection to
the audio system through one of the audio system
circuits.
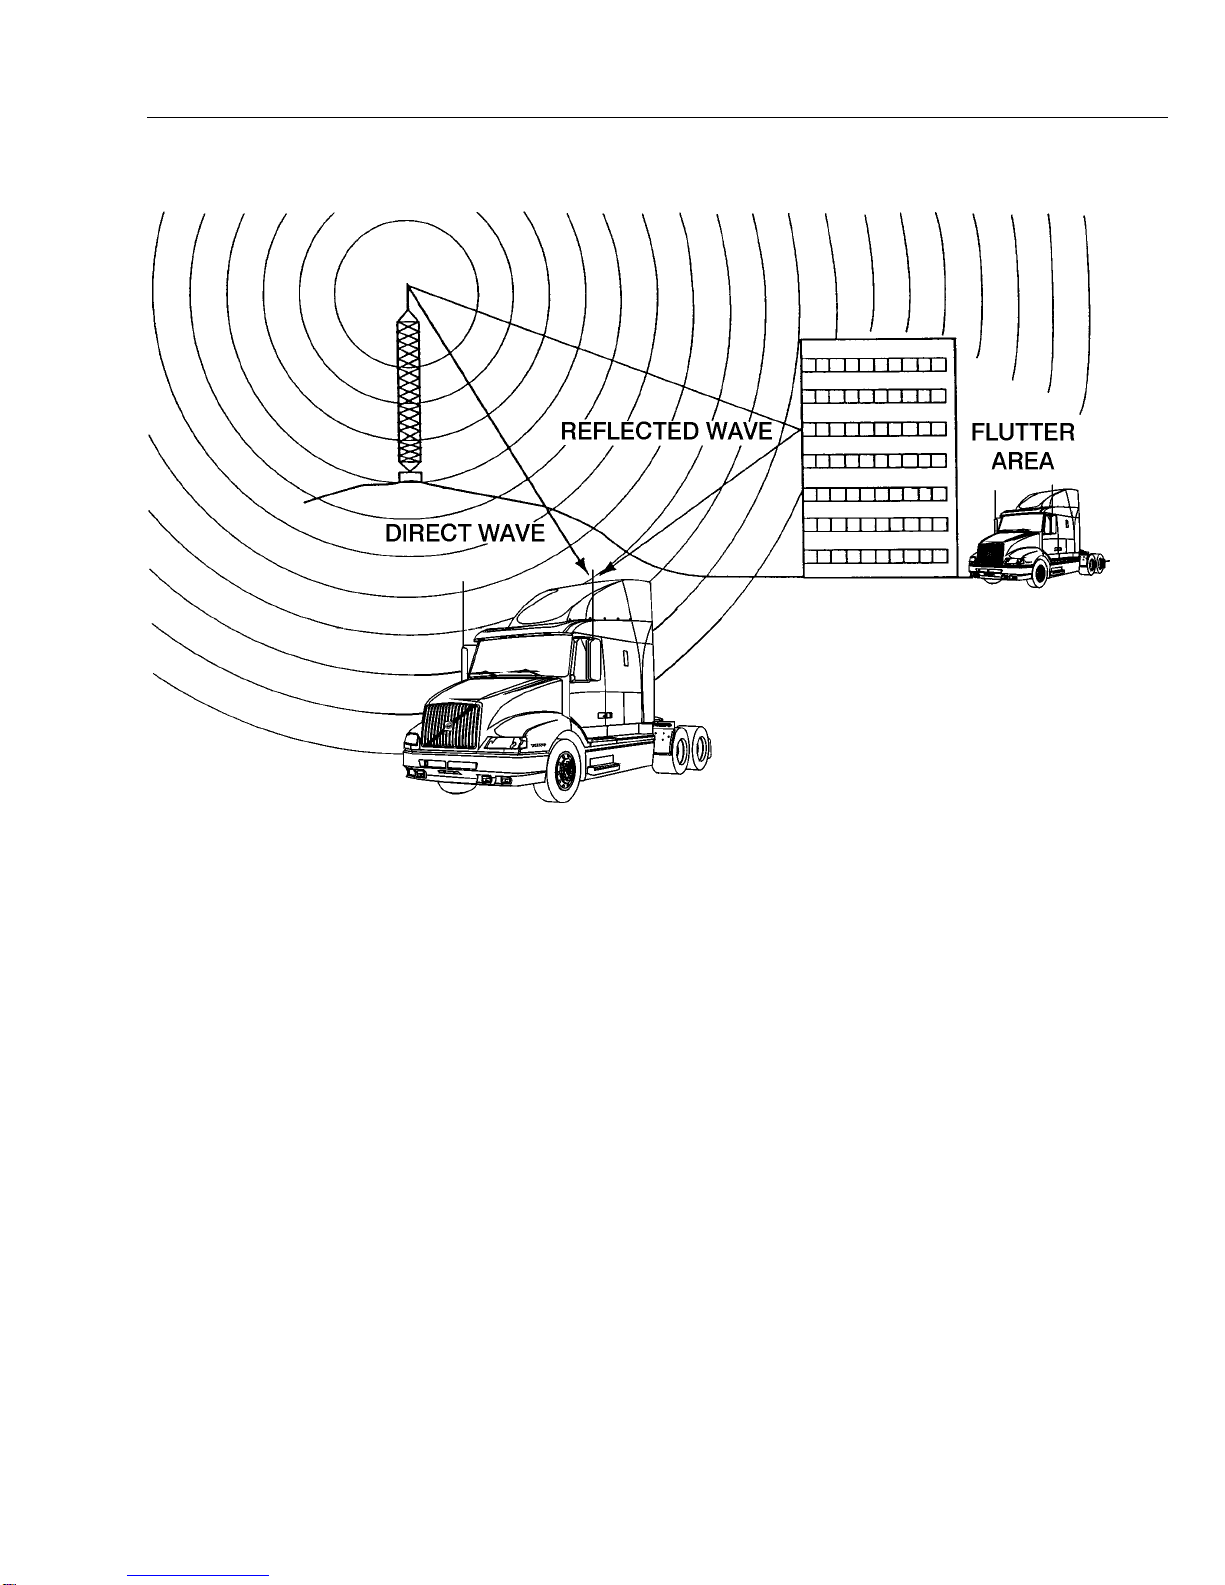
•Radiated noises have no physical connection to
the audio system, but the electrical or magnetic
fields reaching the audio system or wiring induce an
electrical effect causing noise.
In diagnosing noise complaints, technicians may need
to identify noise sources that are physically connected
(back-way noise) or sources affected only by radiation.
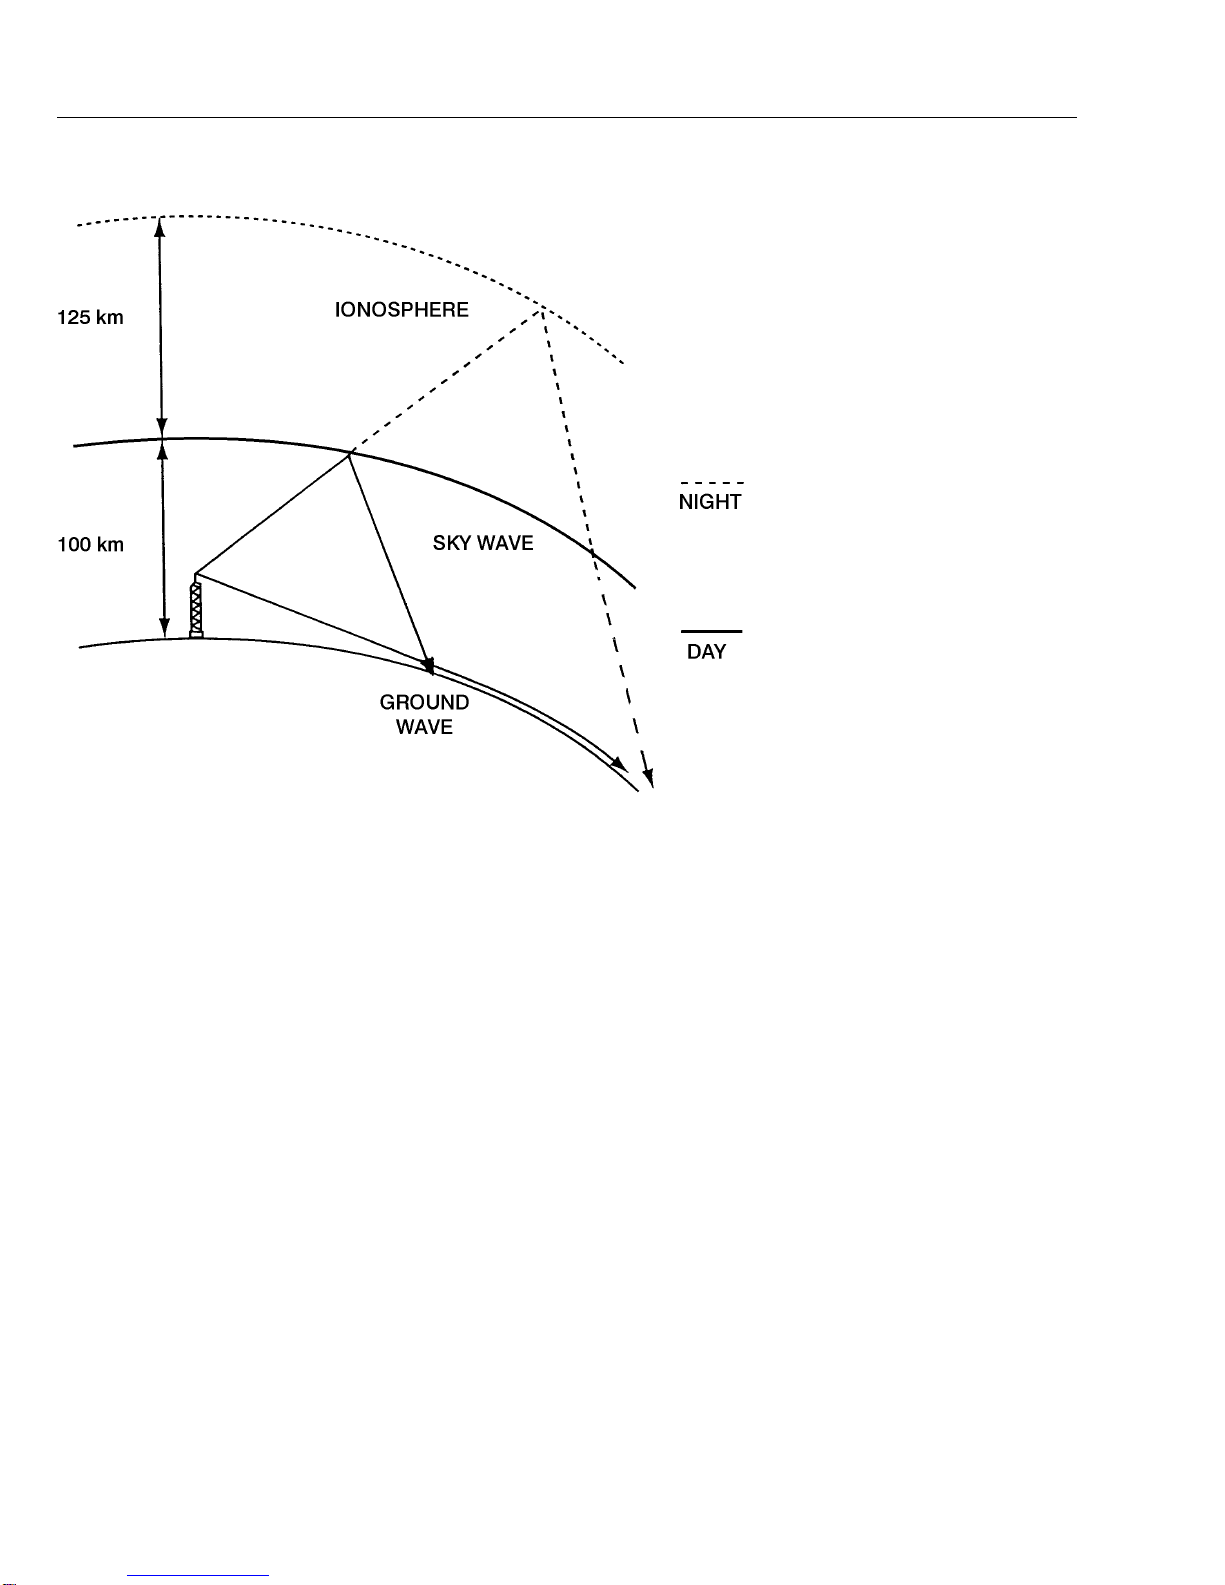
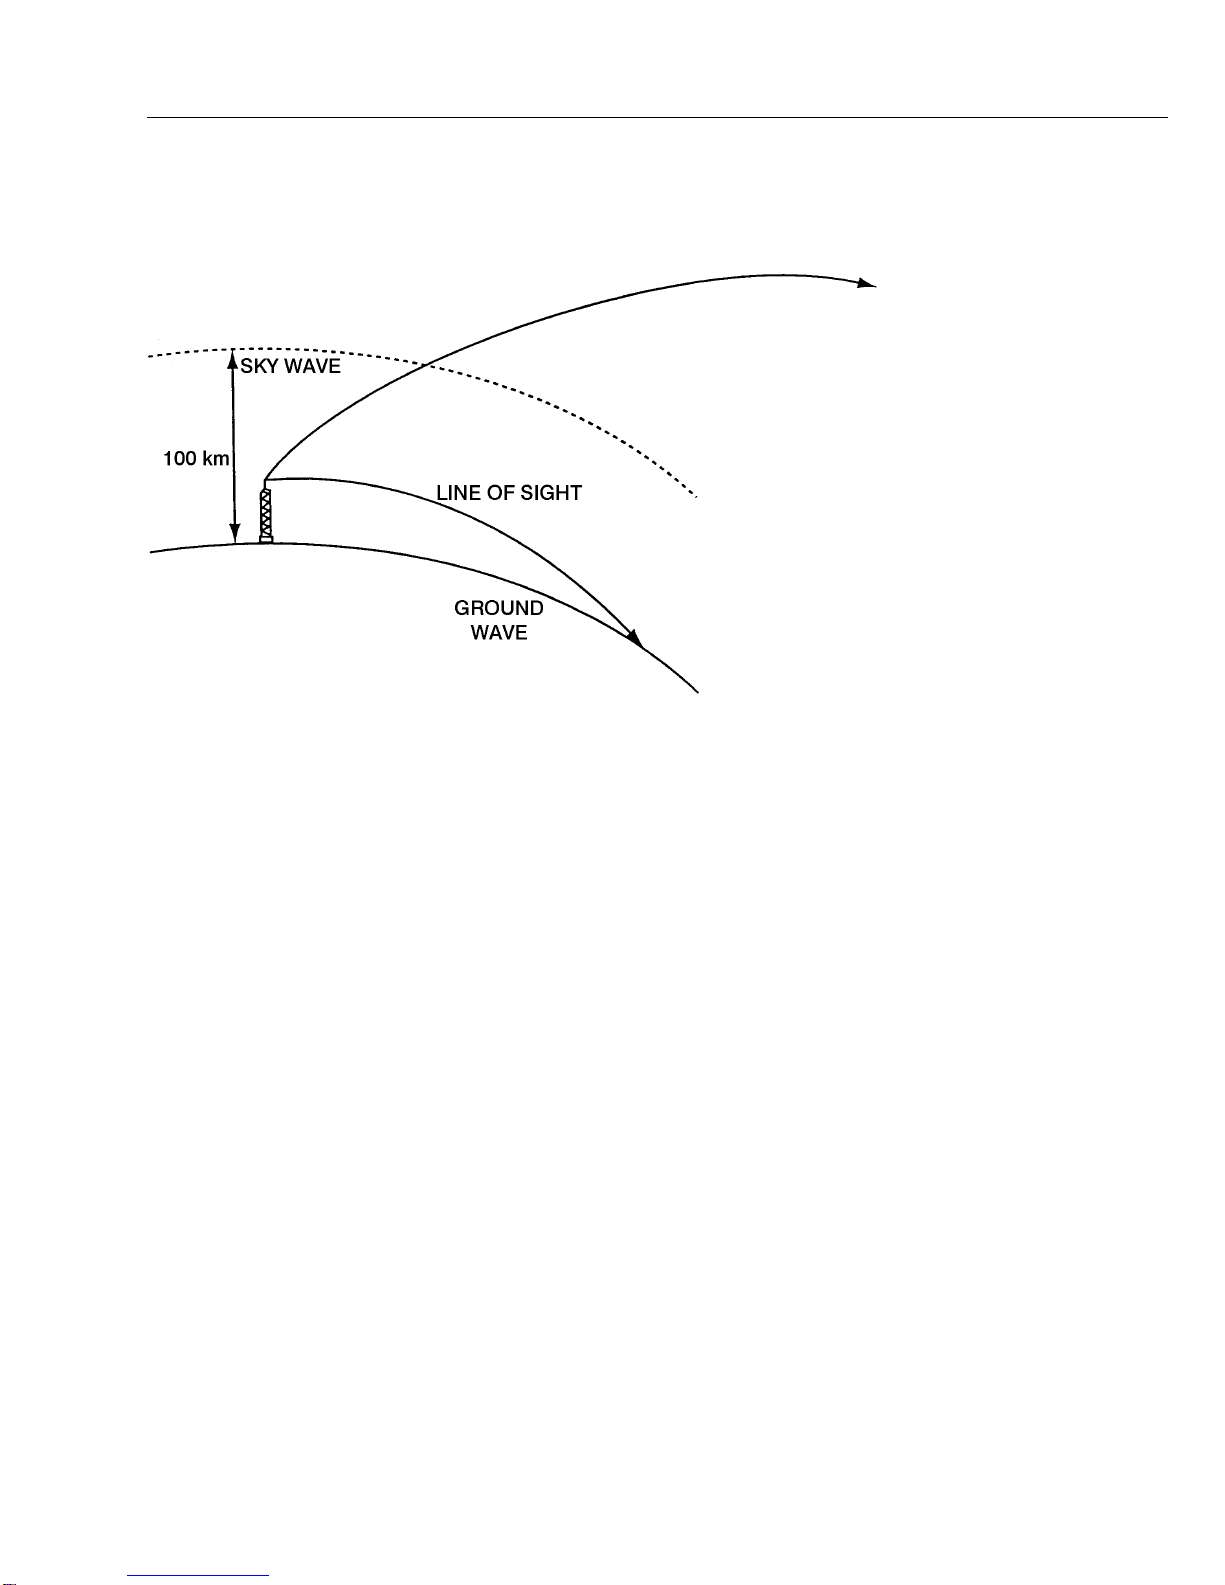
The vehicle contains many “noisy” components which
radiate an electromagnetic signal. As the distance
from the radio transmitter station increases, on-board
components may begin to compete with desired radio
signals. The following pages will help isolate the cause of
radio noise and suggest a fix.
EMI / RFI
EMI (Electromagnetic Interference) is the undesirable
interference of an electrical system via radiated emissions
from another electrical system.
The term “EMI” includes all disturbances in the
electromagnetic spectrum. Within the EMI category
is a smaller group known as RFI (Radio Frequency
Interference). This is the frequency group of EMI that is
the radio frequency band.
RFI characteristics:
•RF (Radio Frequency) waves are radiated when a
high-frequency current and proper geometry exist in
a circuit.
•Waves travel in all directions and pass easily through
non-conductive materials.
•Waves are reflected by conductive materials unless the
geometry is correct for absorption. If so, then the wave
is converted into electrical potential.
The energy radiated relates to the amount of energy in
the circuit and the geometry.

Volvo Trucks North America, Inc. Date Group No. Page
Service Bulletin 4.2004 392 08 10(47)
If conditions are correct, the RF wave is absorbed into the
system and will induce stray currents internally within the
system. RFI has the capability to cause disturbances over
longer distance because of the probability of susceptible
devices being highly sensitive. Therefore, RFI can be
very difficult to combat in some cases so good diagnostic
practices are absolutely required.
Some possible vehicle sources of interference:
•Charging system
•Solenoids
•Motors
•Engine electronics
•2–way radios
•Citizen band (CB) radios
•Cellular phones
•Satellite Communication systems
•After-market electrical devices
Troubleshooting Consideration
When troubleshooting radio reception problems consider
problems associated with radio signals. Do not attempt to
troubleshoot radio problems:
•inside buildings (steel and concrete structures are
worst).
•in an area with reflected signals (see “Multipath” page
7).
•close to areas with known electrical interference such
as near high tension power lines.
•with electrical storms in the area.
To minimize flutter, tune to radio stations with a strong
signal while troubleshooting.

Volvo Trucks North America, Inc. Date Group No. Page
Service Bulletin 4.2004 392 08 11(47)
Stereo Receiver
Weatherband Family
W3003393
This features a Delco/Delphi Heavy Duty stereo receiver
with weather-band. The basic stereo receiver is also
available with a cassette tape player. The stereo receiver
is installed in the dash and receives constant battery
power for its clock and memory functions. The basic
stereo receiver does not have ability to detect and display
error messages.

Volvo Trucks North America, Inc. Date Group No. Page
Service Bulletin 4.2004 392 08 12(47)
Operating instructions
W3003394
1Radio Power – Rotate the ON/OFF (1) control
clockwise to turn the radio on; rotate CCW to turn
radio off.
Volume – Rotate VOL (1) control clockwise to increase
volume.
2AM/FM or WX – Press BAND (2) switch to select
desired band. (AM/FM or WX will be displayed on
band choice.)
Note: The last station heard on each band will be stored
in memory. When switching back to that band, it will
automatically return.
3SEEK – Press SEEK ∇/(3) to automatically search
for the next higher or lower listenable station and stay
there. It will find another station and stay there. It
will find another station each time that you press the
button.
4Manual Tuning – Press and hold TUNE (4) button
to increase frequency. Release as desired frequency is
approached. Press TUNE ∇(4) to decrease frequency.

Volvo Trucks North America, Inc. Date Group No. Page
Service Bulletin 4.2004 392 08 13(47)
5Push-buttons – Press one of the five push-buttons (5)
to recall a preset station. (Use the following procedure
to setup push-buttons.)
•Locate a favorite station by using SEEK ∇/ (3)
or the TUNE ∇/(4) buttons.
•Press SET (6) push-button. The station frequency
will flash 5 seconds or until set.
•Press the push-button that you want to establish
for that station.
•The radio will now return to that frequency each
time that button is pressed.
Note: A total of fifteen stations can be preset –
5 AM, 5 FM and 5 WX.
6SET – Press the SET (6) button to set a stations
frequency.
7Clock – If time-of-day is not on the display, press RCL
(7).
•Press and hold SET (6) button and at the same
time press and hold TUNE (4) until correct
minute
appears. (Seconds will set to 00 when
adjusting minutes.)
Frequency – If radio is turned on and time is being
displayed, press RCL (7) to display frequency.
Stereo – The radio will automatically switch to stereo
when tuned to an FM station broadcasting stereo, and
the stereo indicator light ST will be displayed.
Note: FADe and BALance controls have a detent position
at the center for a balance of front to rear and left to
right.
8Balance – The left-right stereo balance is adjusted
by rotating the BAL (8) control in the corresponding
direction from the detent position.
9FADE – Using the tab behind the BAL control, adjust
the FAD (9) control to the right to fade toward the rear
speakers. Adjust it to the left to fade toward the front
speakers.
10 Treble – Rotate TRE (10) control to the left to decrease
treble; rotate TRE control to the right to increase treble.
11 Bass – Rotate BAS (11) control to the left to decrease
bass; rotate BAS control to the right to increase bass.
Note: Both controls, for bass and treble, have a detent
position at the center for a balance of treble and bass.
12 Tape Player – Insert a tape into the door marked
AUTO REVERSE (12). Insert the tape with the raised
side to the right.
Note: The arrow, in the display window, points in the of
tape play.
13 Fast Forward – To activate fast forward press the right
hand arrow (>>) button (13). Press the left hand arrow
(<<) button lightly to cancel fast forward and return to
play mode.
Fast Reverse – To activate fast reverse press the right
hand arrow (<<) button (13). Press the right hand
arrow (>>) button lightly to cancel fast reverse and
return to play mode.
Program – Press both direction buttons (13) (<< and
>>) simultaneously. The direction arrow will change in
the display window and the player will play the other
side of the tape.
14 Eject – Press EJT (14) button firmly to eject a tape.
Note: When a tape is ejected, the radio becomes
operative. It is not necessary to eject a tape when
leaving the vehicle; a solenoid removes internal
pressure automatically.

Volvo Trucks North America, Inc. Date Group No. Page
Service Bulletin 4.2004 392 08 14(47)
High Performance Family
The premium sound system features a Delco/Delphi
Heavy Duty High Performance stereo receiver available
with either a cassette or a CD player. The stereo receiver
is installed in the dash and receives constant battery
power for the clock and the memory functions. The
premium stereo has the ability to detect and display some
error codes from the cassette or CD player, and from the
CD changer (if equipped). Some of the standard features
of the premium sound system include:
•THEFTLOCK®theft deterrent feature.
•Sleep Feature.
•Infrared remote control.
•Cassette Tape or CD Player.
The VN 770 and VN 660 are also available with optional:
•Six disc CD Changer.
•Premium speaker system including a 8 channel
amplifier and a subwoofer.
Theft Deterrent Feature
THEFTLOCK®is designed to discourage theft of your
radio. It works by using a secret code that you select
to disable all radio functions whenever the radio is
disconnected from the vehicle or battery power is
removed.
Sleep Feature
The premium AM/FM radio receives a battery feed and
can be turned on when the ignition is OFF by pushing in
the POWER knob. With the ignition OFF, the radio will
play for one hour and automatically turn off.
Note: On amplified systems, when the sleep feature is in
use, only the two upper bunk speakers can be heard. In
order to play the stereo through all speakers, the ignition
switch must be turned on. (Applies only the VN 770’s
premium speaker package.)

Volvo Trucks North America, Inc. Date Group No. Page
Service Bulletin 4.2004 392 08 15(47)
Operating Instructions
W3003403
Clock
12 or 24 Hour Mode:
1 Turn the ignition ON and the radio off.
2 Press both the HR (2) and MN (3) buttons at the same
time. Hold them for 2 seconds.
3 Press both buttons again and hold to switch modes.
The current mode will appear on the display (4).
To Set the Clock:
1 Turn the ignition ON and the radio off.
2 Press and hold HR (2) until the correct hour appears
on the display.
3 Press and hold MN (3) until the correct minute appears
on the display.
The clock is now set.
Alarm
To Set the Alarm:
1 Press the alarm button (5) and hold until an alarm icon
(14) and the time at which the alarm is currently set
appear on the display.
2 Press the HR button (2) until the desired hour appears
on the display.
3 Press MN button (3) until the desired minute appears
on the display.
When the alarm icon and the time appears on the display,
the alarm has been set. If the radio is on the alarm
sounds. To turn off the alarm sound activate snooze or
turn off the alarm by pressing the alarm button (5).
To check the time for which the alarm is set, momentarily
press the alarm button.
To Turn Off the Alarm:
1 Press and hold the alarm button (5) until the alarm
clock icon on the display disappears.
To Set the Alarm Volume:
1 Turn the radio on.
2 Pull out the volume knob (1) gently, and rotate to set
the alarm volume.
3 Push the knob in to set the alarm volume.
The radio will return to the volume level at which the radio
was previously playing.
•Press any button or the volume knob when the
alarm is sounding. The display will show SNOOZE
momentarily. The alarm will sound again every 9
minutes until it is turned off.

Volvo Trucks North America, Inc. Date Group No. Page
Service Bulletin 4.2004 392 08 16(47)
Radio
Power: The radio can be turned on when the ignition is
ON or OFF by pushing the PWR knob (1). If the ignition
is OFF the radio will play for one hour and automatically
turn off (sleep feature).
IGN OFF – Radio ON/OFF: Theradio can be programmed
to switch on and off independent of the ignition.
1 Turn the ignition ON and the radio off.
2 Press and hold push-buttons 1 and 3 (2) at the same
time until it beeps. The radio display will show IGN
OFF=RADIO OFF or IGN OFF=RADIO ON.
3 Repeat this procedure to implement the opposite
condition.
If the display reads IGN OFF=RADIO OFF, the radio
will turn off when the ignition turns OFF. If the display
reads IGN OFF=RADIO ON, the radio will play, when the
ignition is turned OFF, until the radio is turned off or the
battery runs down.
Note: The automatic turn off after 1 hour is only valid
when the radio is turned on while the ignition is OFF.
Default Display:
1 Press DISPL (3) to view either radio frequency or the
time. Pressing DISPL more than one time allows to
toggle between the two displays.
2 Press DISPL again, hold it until it beeps, to set the
display.
To Find a Station:
Band: Press the BAND (4) button to switch between
AM, FM1 and FM2. The radio display shows the
selection.
TUNE: Press the TUNE/SEEK button (5) once to tune
to the next higher or lower station one frequency at a
time. Press and hold TUNE/SEEK until it beep to seek
the next station. When a station with a strong enough
signal is found, the seek function will stop and the
station will play. Press TUNE/SEEK to stop seeking.
Presetting Stations: 6 stations per band can be
preset.
1 Turn the radio on.
2 Select the band.
3 Tune in the desired station.
4 Press and hold one of the 6 push-buttons (6) until
it beeps. Whenever the button is pressed now, the
station set will be played.
5 Repeat steps 1 – 4 for each push-button.
AS: Press AS (7) (Auto Store) to automatically store
the 6 strongest stations onto the preset push-buttons.
AS only presets the default band.
SCAN: Press SCAN (8) to scan all station on the
default band. When a frequency of sufficient strength
is found, the radio will play for 5 seconds and then
continue scanning for next station. To stop the
scanning press SCAN again.
P.SCAN: Press P.SCAN (9) to scan the presets on
the default band. To stop the scanning press P.SCAN
again.

Volvo Trucks North America, Inc. Date Group No. Page
Service Bulletin 4.2004 392 08 17(47)
Adjusting the Radio:
AUDIO: To adjust Balance, Fade, Bass, Treble, DIM
and SEEK Sensitivity, press the AUDIO button (10)
until the feature appears on the display.
Balance: Rotate the VOL knob (1) to move the
sound to the left or right speakers.
Fade: Rotate the VOL knob to move the sound to
the front or rear speakers.
TREBLE: Rotate the VOL knob to adjust treble
sound.
BASS: Rotate the VOL knob to adjust the bass
sound.
DIM: Rotate the VOL knob to adjust the brightness
of the radio display. The brightness can be only be
adjusted when the vehicle lights are on.
SEEK: To set the radio to seek and find station
with a weak signal, press the AUDIO button until
SEEK+2 appears. To set the radio to seek only
strong signals, press the AUDIO button until
SEEK–2 appears.
Press the AUDIO button one more time to set all
adjustments and return to the default display.

Volvo Trucks North America, Inc. Date Group No. Page
Service Bulletin 4.2004 392 08 18(47)
W3003404
Cassette Tape Player
To Play a Cassette Tape:
1 Turn the radio on.
2 Insert a cassette into the cassette slot. The cassette
icon (1) will appear on the display and the tape will
begin to play.
3 If the radio or a CD is playing, press the tape button
(2) to play the cassette. If no tape is loaded into the
player, the display will show NO TAPE. If a tape is in
the player, SIDE 1 or SIDE 2 will be displayed.
4 The six numbered push-buttons (3) helps to operate
the tape player conveniently.
•Press
1
to go to the beginning of the selection
being played. If this button is pressed during
the first 8 seconds of the selection, the previous
selection will be played.
•Press
2
to reverse the direction of the tape and
play the existing track in that position.
•Press
3
to go to the next selection.
•Press
4
to rewind.
•Press
5
to turn the Dolby background noise
reduction on or off.
•Press
6
to fast forward.
5 Use the VOL knob (4) and AUDIO button (5) to adjust
the sound.
EJECT: Press the eject button (6) to eject a tape from
the tape player.
DISPL: Press the DISPL button (7) to view the time, SIDE
1 or SIDE 2. Pressing DISPL more than one time allows
to toggle between the displays. Press DISPL and hold it
until it beeps, to set the default display.
TAPE: Press the tape button (2) and hold for 2 seconds
any time the radio is on, to enable or disable “Radio
Monitor”. This feature allows you listen to the radio while
a tape is rewinding or fast forwarding. The display will
read RADIO ON or RADIO OFF.
If the radio detects a bad cassette, BAD TAPE will appear
on the display, and the tape will be ejected. The tape may
be damaged or too tight. If it is damaged, try a new tape.
If the tape is too tight, the player can not turn the tape
hubs. Remove the tape and hold it with the open end
down. Try to turn the right hub counterclockwise with a
pencil. Turn the tape over and repeat. If the hubs do not
turn easily, the tape may be damaged and should not be
used in the player.
Note: When using a CD adapter or a cleaning cassette,
the bad tape detector must be turned off.
Bad Tape Detector, ON/OFF:
1 Turn the ignition ON and the radio off.
2 Press and hold the tape button (2) for 5 seconds. The
display will read BAD TAPE DETECT OFF; a beep
confirms that the bad tape detector is off until the next
ignition cycle.

Volvo Trucks North America, Inc. Date Group No. Page
Service Bulletin 4.2004 392 08 19(47)
Cleaning the Tape Player: After 24 hours of cassette
play, the display will read TIME TO... If then pressing the
DISPL button (7),CLEAN TAPE PLAYER will appear.
Note: Avoid touching the cassette head with magnetic or
hard objects or/and lubricating the player mechanism.
1 Turn off the “Bad Tape Detect”.
2 Insert a wet-type, nonabrasive, scrubbing cassette
cleaner.
3 Follow the cleaning instructions provided with the
cassette cleaner.
4 Press the AUDIO button until the display reads
CLEAN ◊.
5 Rotate the VOL knob until YES appears.
6 Approximately 5 seconds after YES appears, the
cleaning reminder will disappear, and the display will
return to the previously set display.

Volvo Trucks North America, Inc. Date Group No. Page
Service Bulletin 4.2004 392 08 20(47)
W3003401
Compact Disc Player
To Play a CD:
1 Turn the radio on.
2 Insert a CD part way into the slot, with the label side
up. The CD icon (1) will appear on the display and the
disc will begin to play if the radio is in the CD mode.
Note: The player will automatically pull the disc in once it
has been partially inserted.
3 If the radio or a cassette is played, press the CD button
(2) to play the CD. If no CD has been loaded into the
player, the display will show NO CD. If a CD is loaded ,
the display will show the track number followed by the
elapsed time on the track.
4 The numbered push-buttons (3) helps to operate the
CD player conveniently.
•Press
1
to go to the beginning of the track being
played. If this button is pressed during the first 8
seconds of the track, the previous track will be
played.
•Press
3
to go to the next track.
•Press
4
to fast reverse.
•Press
6
to fast forward.
5 Use the VOL knob (8) and AUDIO button (9) to adjust
the sound.
Note: When driving on a very rough road or if it is very
hot, the disc may not play and ERROR and a number
may appear, for 5 seconds, on the display. Error may also
appear if a disc is dirty, wet or the air is very humid.
Note: If a CD is inserted upside down, FOCUS will
appear on the display. Remove the CD and insert it with
the label up.
RDM: Press the RDM button (4) to activate random track
selection. RDM will illuminate. All tracks on the CD will
be played in random order. RDM on the display indicates
“random play” on. Press this button again to turn off the
“random play” beginning with the next track played.
RPT: Press the RPT button (5) to repeat the same track
again. RPT on the display indicates that this feature is
on and the track will be repeated until the RPT button is
pressed again. The disc number and track number will
also show on the display.
SCAN: Press the SCAN button (6) to immediately
advance to the next track. SCAN will appear on the
display and 10 seconds of the track will be played, the
CD will advance to the next track, play 10 seconds and
continue. To deactivate SCAN, press the SCAN button
again.
DISPL: Press the DISPL button (7) to view the disc
number, elapsed time, track number or the time. Pressing
the DISPL button more than one time allows to toggle
between the displays. Press the DISPL button and hold it
until it beeps to set the default display.
This manual suits for next models
1
Table of contents
Other Volvo Car Stereo System manuals
Popular Car Stereo System manuals by other brands

Discount Car Stereo
Discount Car Stereo JAG97CD-HF Quick start installation guide

Philips
Philips CID3680/93 user manual

Crunch
Crunch Definition Series owner's manual

Sony
Sony CDX-MR60UI Installation/connections

Discount Car Stereo
Discount Car Stereo PXDP-C5 Quick Start Install Guide

Blaupunkt
Blaupunkt MONTE CARLO TCM 169 installation instructions