Vornado 154 User manual

models
154 & 184
vornado.com
TOWER CIRCULATOR
OWNER’S GUIDE
READ AND SAVE
THESE INSTRUCTIONS

2English
vornado.com
800-234-0604
help@vornado.com
We expect this
product to be
perfect.
If it is not, we
will make it
right.

3
English
Important Safety Instructions ............................................................. 4
Features .............................................................................................. 8
Getting Started................................................................................... 9
How To Use ....................................................................................... 10
Remote Battery................................................................................. 11
Cleaning ............................................................................................ 11
Troubleshooting ............................................................................... 12
Warranty............................................................................................ 13
CONTENTS

4English
READ AND SAVE THESE INSTRUCTIONS
IMPORTANT SAFETY INSTRUCTIONS
This owner’s guide and any additional inserts are considered part of
the product. They contain important information about safety, use
and disposal. Before using the product, please familiarize yourself
with all operating and safety instructions. Please keep all documents
for future reference and pass these documents on, together with
the product, to any future owner. See www.vornado.com/circulators-
manuals to view, download and print the most current version of
these instructions.
INTENDED USE: This product is intended to circulate the air in
indoor living spaces only in the United States and Canada. This
product is not intended for commercial or industrial use. The
manufacturer assumes no responsibility for damage or injury due to
unauthorized use or product modication. Failure to follow these
directions will void the product warranty.
WARNING: Risk to Children and Impaired Persons
Supervision is required during the installation, operation, cleaning
and maintenance of this product by children 12 years of age and
younger and anyone with reduced physical, sensory or mental
capabilities. Children should be supervised to ensure that they do not
play with the appliance, its parts and packaging material.
WARNING: Chemical burn hazard. Keep batteries away from
children.
- WARNING: KEEP NEW AND USED BATTERIES AWAY
FROM CHILDREN. This product contains a lithium button/coin
cell battery. If a new or used lithium button/coin cell battery is
swallowed or enters the body, it can cause severe internal burns
and can lead to death in as little as 2 hours. Always completely
secure the battery compartment. If the battery compartment does
not close securely, stop using the product, remove the batteries,
and keep it away from children. If you think batteries might have
been swallowed or placed inside any part of the body, seek
immediate medical attention. In the US call the National Poison
Control Center at 1-800-222-1222 or 202-625-3333. In Canada call
416-813-5900.
INSTALLATION WARNING—To reduce risk of re, electrical
shock and injury to persons, observe the following:
- Place this product away from curtains, draperies, tablecloths and
other fabrics, since they may be drawn into the product, damage
the motor and/or cause a re.
- No part of this product (the appliance, power cord, plug,
packaging, etc.) should be placed near furnaces, replaces, stoves
or other high temperature heat sources. Do not use this product in
a window, on an uneven or unstable surface, or near water.
- The appliance, power supply, power cord and plug cannot come
into contact with water. Do not use this product on wet surfaces.
Do not use this product in a bathtub or shower or position product
where it may fall into a bathtub, laundry, swimming pool or other
water container. Do not use this product outdoors or expose it to
weather or elements.
- Do not run cord under carpeting. Do not cover cord with throw
rugs, runners, or similar coverings. Do not route cord under
furniture or appliances. Arrange cord away from trafc area and
where it will not be tripped over. The cord should not hang over
edges of counters or be placed where it can be crimped or closed
in doors. Place appliance near an easily accessible outlet so the
product can be unplugged quickly during an emergency.

5
English
SAFE USE WARNING—To reduce risk of re, electrical shock and
injury to persons, observe the following:
- WARNING: To reduce likelihood of circuit overload, re and electric
shock, do not operate with a solid state speed device, such as a
dimmer control switch.
- Do not operate any fan with a damaged cord or plug. Discard fan or
return to an authorized service facility for examination and/or repair.
- Do not operate unit if the unit has been dropped or damaged. Do
not use this product if it has a damaged power cord or plug. To avoid
risk of electrical shock, do not attempt to repair or replace parts.
Only original replacement parts may be used. If the power cord
is damaged, it must be replaced by the manufacturer, its service
agent, or similarly qualied persons in order to avoid a hazard.
Contact Vornado Consumer Service at 1-800-234-0604 (phone) or
replacement and repair.
- Before plugging power cord into electrical outlet, be sure that
all electrical information on the rating label, including voltage, is
compatible with your outlet’s power supply.
- Do not sit or stand on product.
- Never use the cord as a handle or otherwise yank, strain or stretch
the power cord.
- While the product is plugged in, do not insert or allow foreign
objects to enter any input or output opening as this may cause risk
of electric shock or re, or damage the product.
- A loose t between wall outlet (receptacle) and plug may cause
overheating and distortion of the plug. Discontinue use of the
product in this outlet. Contact a qualied electrician to replace
loose or worn outlets.
- This appliance has a polarized plug (one blade is wider than the
other.) To reduce the risk of electric shock, this plug is intended to
t in a polarized outlet only one way. If the plug does not t fully in
the outlet, reverse the plug. If it still does not t, contact a qualied
electrician. Do not attempt to defeat this safety feature.
- Before moving, repositioning, servicing, cleaning and when not in
use, use the product controls to turn off the power and then unplug.
To disconnect from outlet, grasp and pull only the plug. Also, power
off and unplug if the product will be left unattended for an extended
period of time or during electrical storms.
SERVICING WARNING—To reduce risk of re, electrical shock
and injury to persons, observe the following:
- Clean your product regularly, only as is instructed in this manual.
Prior to cleaning, turn off the power on your product and unplug. Do
not use gasoline, thinners, solvents, ammonias or other chemicals
for cleaning. Refer to the CLEANING instructions provided.
- Do not open appliance housing while product is plugged in. To
avoid risk of shock, all service and/or repairs must be done by a
Vornado Authorized Service Center.
- This product employs overload protection (fuse). A blown fuse
indicates an overload or short-circuit situation. If the fuse blows,
unplug the product from the outlet. Replace the fuse as per the user
servicing instructions (follow product marking for proper fuse rating)
and check the product. If the replacement fuse blows, a short-circuit
may be present and the product should be discarded or returned to
an authorized service facility for examination and/or repair.
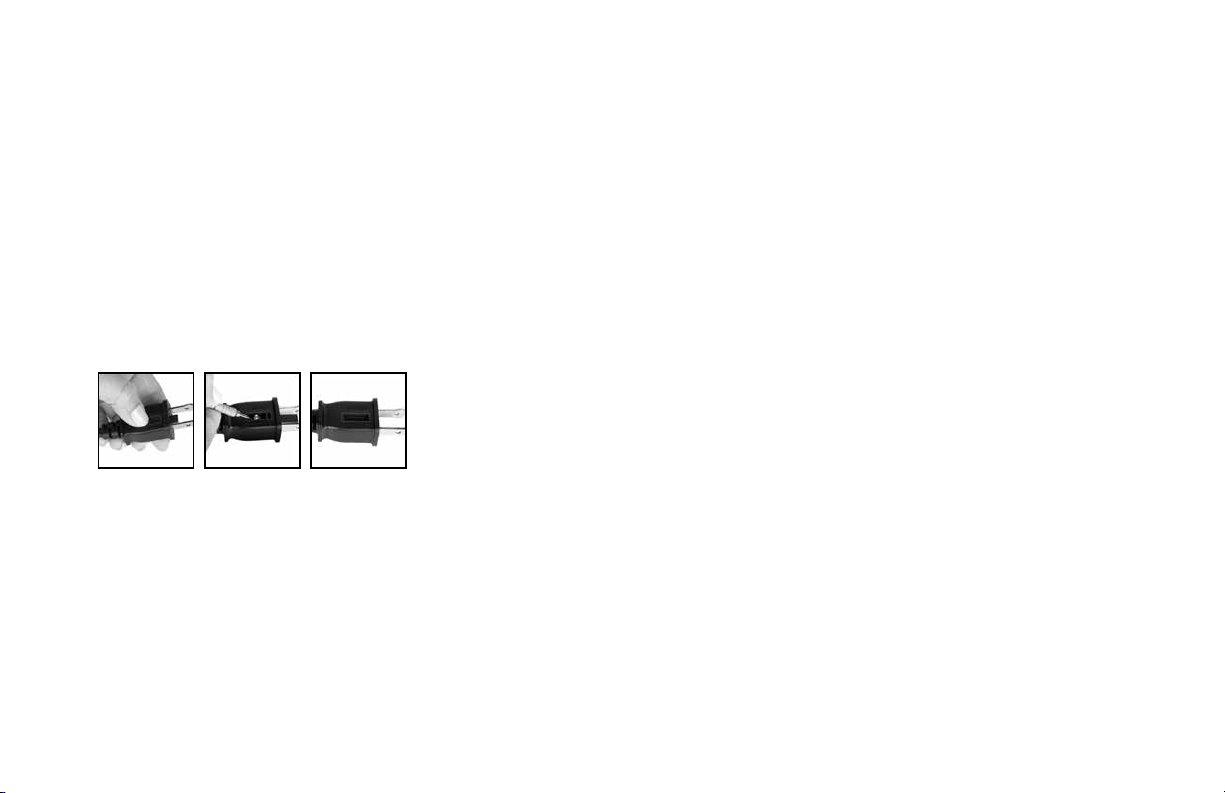
User Servicing Instructions
1. Using the product controls, turn off the appliance.
2. Grasp the plug (not the cord) and disconnect from the outlet.
3. Risk of Fire. Replace fuse only with 2.5 Amp, 125 Volt fuse as
approved by Vornado Consumer Service. For an authorized
replacement fuse, please contact Vornado Consumer Service.
4. Once the replacement is received, use a small at-head

6English
screwdriver to slide open the fuse cover (located on the plug)
(See Fig. A).
5. Remove fuse by using the screwdriver to gently lift each end of
the fuse (See Fig. B).
6. Install the replacement fuse by using the screwdriver to gently
push each metal end of the fuse into the receptacle one at a
time. Do not push on the center of the fuse—it is fragile and
may break.
7. Slide the fuse cover closed using the screwdriver. When
closed, the cover should t completely in the plug. No part of
the cover should stick out (See Fig. C).
8. Plug your appliance into the outlet and turn the power on.
9. If the replacement fuse blows, a short-circuit may be present
and the product should be discarded or returned to an
authorized service facility for examination and/or repair.
Risk of re. Do not replace attachment plug. Contains a safety device
(fuse, AFCI, LCDI) that should not be removed. Discard product if the
attachment plug is damaged.
FCC Compliance Statement
NOTE: This equipment has been tested and complies with Part 15 of
the FCC Rules. Operation is subject to the following two conditions:
(1) This device may not cause harmful interference, and (2) this device
must accept any interference received, including interference that may
cause undesired operation.
This equipment has been tested and found to comply with the
limits for a Class B digital device, pursuant to part 15 of the FCC
Rules. These limits are designed to provide reasonable protection
against harmful interference in a residential installation. This product
generates, uses and can radiate radio frequency energy and, if not
installed and used in accordance with the instructions, may cause
harmful interference to radio communications. However, there is no
guarantee that interference will not occur in a particular installation.
If this product does cause harmful interference to radio or television
reception, which can be determined by turning the equipment off and
on, the user is encouraged to try to correct the interference by one or
more of the following measures:
- Reorient or relocate the receiving antenna.
- Increase the separation between the product and the receiver.
- Connect the product into an outlet on a circuit different from that to
which the receiver is connected.
- Contact Vornado Consumer Service or dealer or an experienced
radio/TV technician for help.
This Class B digital apparatus complies with Canadian ICES-003.
Changes or modications to this unit not expressly approved by the
party responsible for compliance could void the user’s authority to
operate the product.
Supplier’s FCC Declaration of Conformity
Unique Identier: Vornado Models 154 / 184
Responsible Party: Vornado Air LLC
Mailing Address : 415 E. 13th St., Andover, KS 67002
Contact: www.vornado.com
Fig. A Fig. B Fig. C

7
English
WARNING: Batteries may pose a choking hazard. Do not let
children handle batteries.
BATTERY DISPOSAL: Please dispose of batteries according to the
local laws and regulations of your region, and while keeping them
away from children. Some batteries may be recycled and accepted
for disposal at your local recycling center. DO NOT DISPOSE OF
BATTERIES IN FIRE. BATTERIES MAY EXPLODE OR LEAK. New
and used batteries may cause injury. Keep new and used cells (or
batteries) away from children.
SAVE THESE INSTRUCTIONS

8English
FEATURES
REMOTE STORAGE
FINGER-FRIENDLY DESIGN
Resists curious ngers.
TOUCH-SENSITIVE
CONTROLS
MULTIPLE SPEEDS
4 speed settings for
every comfort level.
STURDY BASE
For wobble free airow.
SILICON FEET
Non-marking feet added
for stability.
REMOTE
CONTROL
Convenience at
your nger tips.
ENERGY-SAVING TIMER
1-8 hour timer.
CARRY HANDLE

9
English
GETTING STARTED
BASE ASSEMBLY Screwdriver required.
FIGURE B
FIGURE A
1. Assemble the two base halves together. Position the base half
with the alignment pin, over the other base half with the alignment
sockets. Press the two halves together until ush. (See Figure A)
2. Assemble the base to the tower bottom. With the Tower on its
side, align the 4 base sockets onto the Tower bottom pins. Note;
one of the 4 pins is “D” shaped to allow it to t only one way. With
the base in position, secure the base bottom to the tower with the
4 Phillip screws provided. Tighten the screws securely but do not
over tighten. (See Figure B)
PLACEMENT NEAR A WALL OR
CORNER
Please position at least 6” away
from walls or other large surfaces.
Doing so will ensure your Tower
Circulator has adequate room
to intake air, providing optimum
performance. (See Figure C)
DIRECTING THE
AIRFLOW
Unlike any other tower
fan, this product creates a
wide span of airow called
V-Flow™ Circulation. The
Vornado logo indicates
the center point of the
V-Flow™ airstream, and
can be used as a reference
point for positioning the
product in the room. (See
Figure D)
FIGURE C
FIGURE D
6”
6”

10 English
HOW TO USE
REMOTE
CONTROL
TIMER
POWER ON/OFF
FAN SPEED
Before use, check appliance for visible damage. DO NOT USE THIS TOWER if there is evidence of damage. If any damage is found, contact
Vornado Air LLC at 1-800-234-0604.
1. Touch to power on.
2. Select desired speed by
pressing . Speed is
indicated by number of lights
illuminated:
Low speed
Medium speed
High speed
Turbo speed
••
••••
••••••
••••••••
Note: The display will dim after 3
seconds of inactivity.
3. Press to activate timer. The
and Indicator Lights will
turn orange to indicate timer
adjustment mode. While in this
mode, select amount of time in
one-hour intervals by pressing
. After a few seconds, the
ashing orange Indicator
Lights will turn white,
indicating you have left timer
adjustment mode.
Note: The display will dim after 3
seconds of inactivity.
The will continue to glow
orange to indicate the timer
is set. Touch the to quickly
tell you how many hours are
remaining on the timer.
4. To adjust timer, press until
Indicator Lights ash orange.
Then press to select new
timer setting.
5. To cancel timer, press and hold
for 4 seconds. Speed/timer
indicator lights will illuminate
white, indicating the timer
is off.
SPEED/TIMER
INDICATOR
LIGHTS
POWER
FAN SPEED TIMER

11
English
REMOTE BATTERY
Screwdriver required.
1. For battery replacement, the remote requires one coin style 3V
CR2032 battery. Always use the correct size and grade of battery for
this product.
2. To replace battery, open battery door on the back side of the
remote control (you will need to loosen the small screw on door
using a #1 Phillips screwdriver). If necessary, clean the battery
contacts and also those of the device prior to battery installation.
Remove any plastic protection from the battery and place it
in the remote with the + side facing out. Ensure the battery is
installed correctly with regard to polarity. Replace the battery door
and screw.
Note: Remove battery from the remote control when not in use for an
extended period of time and always remove dead battery immediately
and replace with fresh. Do not store dead battery in remote.
The remote control functions are the same as the control panel on
the tower. The remote requires a line-of-sight path to allow for the
signal to be received by the tower. Position the tower so the receiver
lens (inside the Vornado “V” logo) is visible from the remote control.
Your tower circulator remote includes (1) coin style 3V CR2032 battery.
Battery comes pre-installed. Remove battery pull tab before rst use.
CLEANING
Because your tower moves a substantial amount of air, it will need
regular cleaning. If service is required, return your tower to Vornado
(see WARRANTY for instructions).
WARNING: To reduce the risk of electrical shock and injury to
persons, unplug the tower before cleaning.
REGULAR CLEANING
1. Unplug tower before cleaning.
2. Use the brush attachment on your household vacuum cleaner to
vacuum any accumulated dust off the tower.
3. Wipe down the entire tower with a soft cloth.
Note: Do not use gasoline, thinners, solvents or other chemicals for
cleaning. The motor is permanently lubricated and requires no oiling.
WARNING: This product contains a button battery. If swallowed, it could cause
severe injury or death in just 2 hours. Seek medical attention immediately.

12 English
TROUBLESHOOTING
POSSIBLE CAUSE AND SOLUTIONPROBLEM
Unit is not plugged in. Plug Power Cord into electrical outlet.
Unit is damaged or in need of repair. Cease usage and unplug. Contact Consumer Service for assistance.
Fuse needs to be replaced. See IMPORTANT INSTRUCTIONS for how to replace the fuse or contact
Consumer Service.
Ensure unit is set to highest setting for maximum air circulation.
Allow the unit to fully circulate the air throughout the room, this may take several minutes.
Ensure all air inlets and outlet grilles are unobstructed.
The battery is packaged separately and may not be installed. Refer to CONTROLS - Remote Control
Battery for instructions.
The battery is dead. Replace with new 3 volt CR2032 battery. Refer to CONTROLS - Remote Control
Battery for instructions.
The remote requires a line-of-sight path to allow for the signal to be received by the unit. Position the unit
so the receiver lens (located above the Vornado logo) is visible from the remote control.
Unit fails to
power on.
Unit is not producing
sufcient amount of air.
Remote Control is not
working.
Other manuals for 154
2
Table of contents
Other Vornado Fan manuals

Vornado
Vornado 279T User manual

Vornado
Vornado 133-AU User manual

Vornado
Vornado AXL User manual

Vornado
Vornado 5303DC User manual

Vornado
Vornado 52 User manual

Vornado
Vornado flippi V6 User manual

Vornado
Vornado 293HD User manual

Vornado
Vornado HELIX1 User manual

Vornado
Vornado OSCR37 User manual

Vornado
Vornado Whole Room Air Circulator User manual

Vornado
Vornado VFANA User manual

Vornado
Vornado 5350 User manual

Vornado
Vornado Zippi User manual

Vornado
Vornado 533 XT User manual

Vornado
Vornado 530 User manual

Vornado
Vornado EXO51 HD User manual

Vornado
Vornado 723 User manual

Vornado
Vornado ATOM 1S User manual

Vornado
Vornado Duo User manual

Vornado
Vornado OZI42 User manual