VS MEDIAGONE 500 User manual


VS Security Products LTD ZZ001234, ZZ001235 Page 2 of 15
Unit 17, Pegasus Court
North Lane
Aldershot
Hampshire - GU12 4QP
United Kingdom
Tel: +44 (0) 1252 333577
Fax: +44 (0) 1252 333448
Email: [email protected]
3160 Texas Hill Road
Placerville
California
95667
United States of America
Tel: 530-626-6924
Fax: 530-626-6989
Email: [email protected]
VS SECURITY PRODUCTS LTD
-

VS Security Products LTD ZZ001234, ZZ001235 Page 3 of 15
’
-

VS Security Products LTD ZZ001234, ZZ001235 Page 4 of 15
Solid-State Drives (SSD) including M.2/NVMes,
Flash drives, USB Sticks, Smartphones, Cell
Phones, Mobile phones, CD, DVD, Blu-Ray, Credit
Cards. (All devices must have any batteries
removed prior to destruction)
Continuous
Less than 65dB
Per hour: Up to 500 USB-Sticks / 45 Smart Phones
220-240 VAC 50Hz—6 amps
1400 Watts Max (Please specify Voltage and
Frequency when ordering)
Temperature: 41ºF - 104ºF (5ºC - 40ºC)
Humidity: 10 to 40% (non-condensing)
Touch Sensitive Display, E Stop, Power Button
Desktop Model or Fitted Trolley
19.4” x 15.9” x 24.7” (49cm x 41cm x 63cm)
176 lbs (80kg)
1gal. (5Ltr)
30.7” x 26.7” x 24.4” (78cm x 68cm x 62cm)
203lb (92kg)
19.4” x 30.5” x 24.7” (49cm x 77cm x 63cm)
66lb (30kg)
5 gal. (25Ltr) (Also Space for Spare Bin)
26.4” x 31.9” x 21.6” (67cm x 81cm x 55cm)
73lb (33.5kg)
19.4” x 46.4” x 24.7” (49cm x 118cm x 63cm)
248lb (112kg)
Waste electrical products should not be thrown away with household waste.
Please recycle where facilities exist.
Check with your local authority or retailer for recycling advice.

VS Security Products LTD ZZ001234, ZZ001235 Page 5 of 15
Carefully remove your VS Security Products MediaGone 500 from its shipping carton and verify that all parts are present. If
there are missing or damaged parts contact VS Security Products Ltd or an authorised distributor immediately. If damage
has occurred in transit the shipping company must be informed immediately. The carton and packaging should be retained
for use in the event that the unit requires transit for any reason.
You should find the following:
MediaGone 500
Mains Power Lead
1 Gallon (5 Litre) Waste Drawer
Warranty Card
Quick Start Guide/Manual
2 Keys
Pusher
Grease Gun
Care should be taken when moving/handling the MediaGone 500.
The MediaGone 500 is shipped on a wood pallet with cardboard packing on the top. Carefully disassembling the
cardboard packing leaving the MediaGone 500 sitting on the wood pallet . Inspect it for signs of physical damage. If
damage is apparent, a claim should be filed with the carrier immediately.
Caution — the MediaGone 500 is heavy and should only lifted using the 4 handles 2 on each side . It is recommended
4 people should lift the unit one on each handle.
Alternatively a lifting hoist can be used but it must utilise 4 straps one on each handle.
Position the MediaGone 500 on a hard flat surface at a comfortable working height. Ensure there are no obstructions to
any of the air flow grills which are situated on both the right hand sides and rear of the unit.
Ensure the operating environment is within the limits shown on page 4.
Power connection is made to the MediaGone 500 in the form of an IEC type electrical lead (supplied). The user should
ensure that their power supply meets the specifications outlined on Page 4.
Carefully remove your VS Security Products MediaGone 500 Trolley from its shipping carton and verify that all parts are
present. If there are missing or damaged parts contact VS Security Products Ltd or an authorised distributor immediately.
If damage has occurred in transit the shipping company must be informed immediately. The carton and packaging should be
retained for use in the event that the unit requires transit for any reason.
You should find the following:
Trolley
Door
Door Hinge Screws x 6
Allen Key
Drawer Funnel Kit - Includes:
Allen Key
Rubber Gasket
Smaller Half of Funnel
Larger Half of Funnel
M3 Screws x4
Plastic Push Rivets x 4.

VS Security Products LTD ZZ001234, ZZ001235 Page 6 of 15
The MediaGone 500 Trolley is shipped inside a cardboard packing case (separately from the MediaGone 500). Unpack
the Trolley carefully by disassembling the packing case and inspect it for signs of physical damage. If damage is
apparent, a claim should be filed with the carrier immediately.
Locate the door inside the back of the trolley. Fit the door by screwing the hinges into the front of the trolley using the
screws and Allen key provided. (See figure 1).
Carefully lift the MediaGone onto the trolley lifting only using the 4 handles 2 on each side. Place the 4 feet within the
dips on the trolley, the front of the MediaGone needs to be on same side as the clear door on the trolley.
On the front right hand side of the trolley, be sure to connect the cable between the MediaGone and the trolley. (See
Figure 2)
When using MediaGone 500 with the trolley the waste drawer will need to be modified as described below to allow the
shredded material to drop into the trolley waste basket.
1. Undo the 4 nylocs, shown in the figure 3, and remove the blanking late from the bottom of the drawer.
Door Hinges
Cable
Figure 1
Figure 2
Figure 3

VS Security Products LTD ZZ001234, ZZ001235 Page 7 of 15
2. Fit the rubber seal over the 4 studs (shown in figure 4). It will not need to fix it down using the nuts.
3. Place the larger half of the chute in the drawer (shown in figure 5), then secure it in place using the 2 screws.
4. Place the larger half of the chute in the drawer (shown in figure 6), then secure it in place using the 2 screws.
5. Push the little black Push Rivets into the holes in the middle of the chute. The rivets should be fitted on the
inside of the chute. You may need to push and pull the chute around a little to get the holes to line up.
The modified waste drawer can now be returned to its location in the MediaGone 500.
The MediaGone 500 from Verity Systems is a precision-designed shredder that securely destroys a wide range of media
including solid state drives, flash drives, optical discs and smart phones with the press of a button.
Shredding particles to less than 4mm in width, the MediaGone 500 ensures total media destruction for operators in a wide
range of industries.
With its transparent polycarbonate dome cover and reinforced glass safety screen users can safely view the shredding of
SSDs, flash drives, discs or phones live as they go through the destruction process. Illuminated by the latest LED lighting
technology, the MediaGone 500 is the most efficient and easy-to-use shredder developed by Verity Systems to-date.
Operated exclusively via its simple touch screen, users can access all its features including the option to choose fine or
coarse cuts for specific shredded particle sizes.
The MediaGone 500 can be ordered either as a table top mounted model or fitted with its custom designed trolley for easy
mobility. The table top version allows the operator to collect shredded material in its 1 gallon (5.3 litre) drawer which can be
simply removed and emptied when full. The trolley version comes with an infrared detection system, notifying the user via
the display screen when the collection bin is full and needs emptying. The 25 litre catch bin is accessed through a clear
polycarbonate door on the front of the unit.
Built with hardened, carbon steel cutters along with its high torque slip free drive, the unit delivers maximum power while still
being able to run on a standard office power socket. Thermal sensors protect the units drive train from malfunction or
damage.
Unlike our degaussers, which erase data through powerful magnetic fields, the MediaGone 500 shreds media into tiny
pieces, ensuring the highest security destruction and rendering data completely unusable. Shredded particles can also be
sent to specialised material companies for recycling if required.
Figure 4
Figure 5
Figure 6
Figure 7

VS Security Products LTD ZZ001234, ZZ001235 Page 8 of 15
The MediaGone 500 comes in two formats Desktop and floor mounted on wheels.
Figure 8
Figure 9

VS Security Products LTD ZZ001234, ZZ001235 Page 9 of 15
Standard Cut Fine Cut
Sengs Buon
Destroy Buon
Trolley Bin Level (not shown on
Desktop models)
Emergency Stop Switch
Touch Screen Display
Power Button
Keyswitch
Figure 10
Figure 11
Figure 12

VS Security Products LTD ZZ001234, ZZ001235 Page 10 of 15
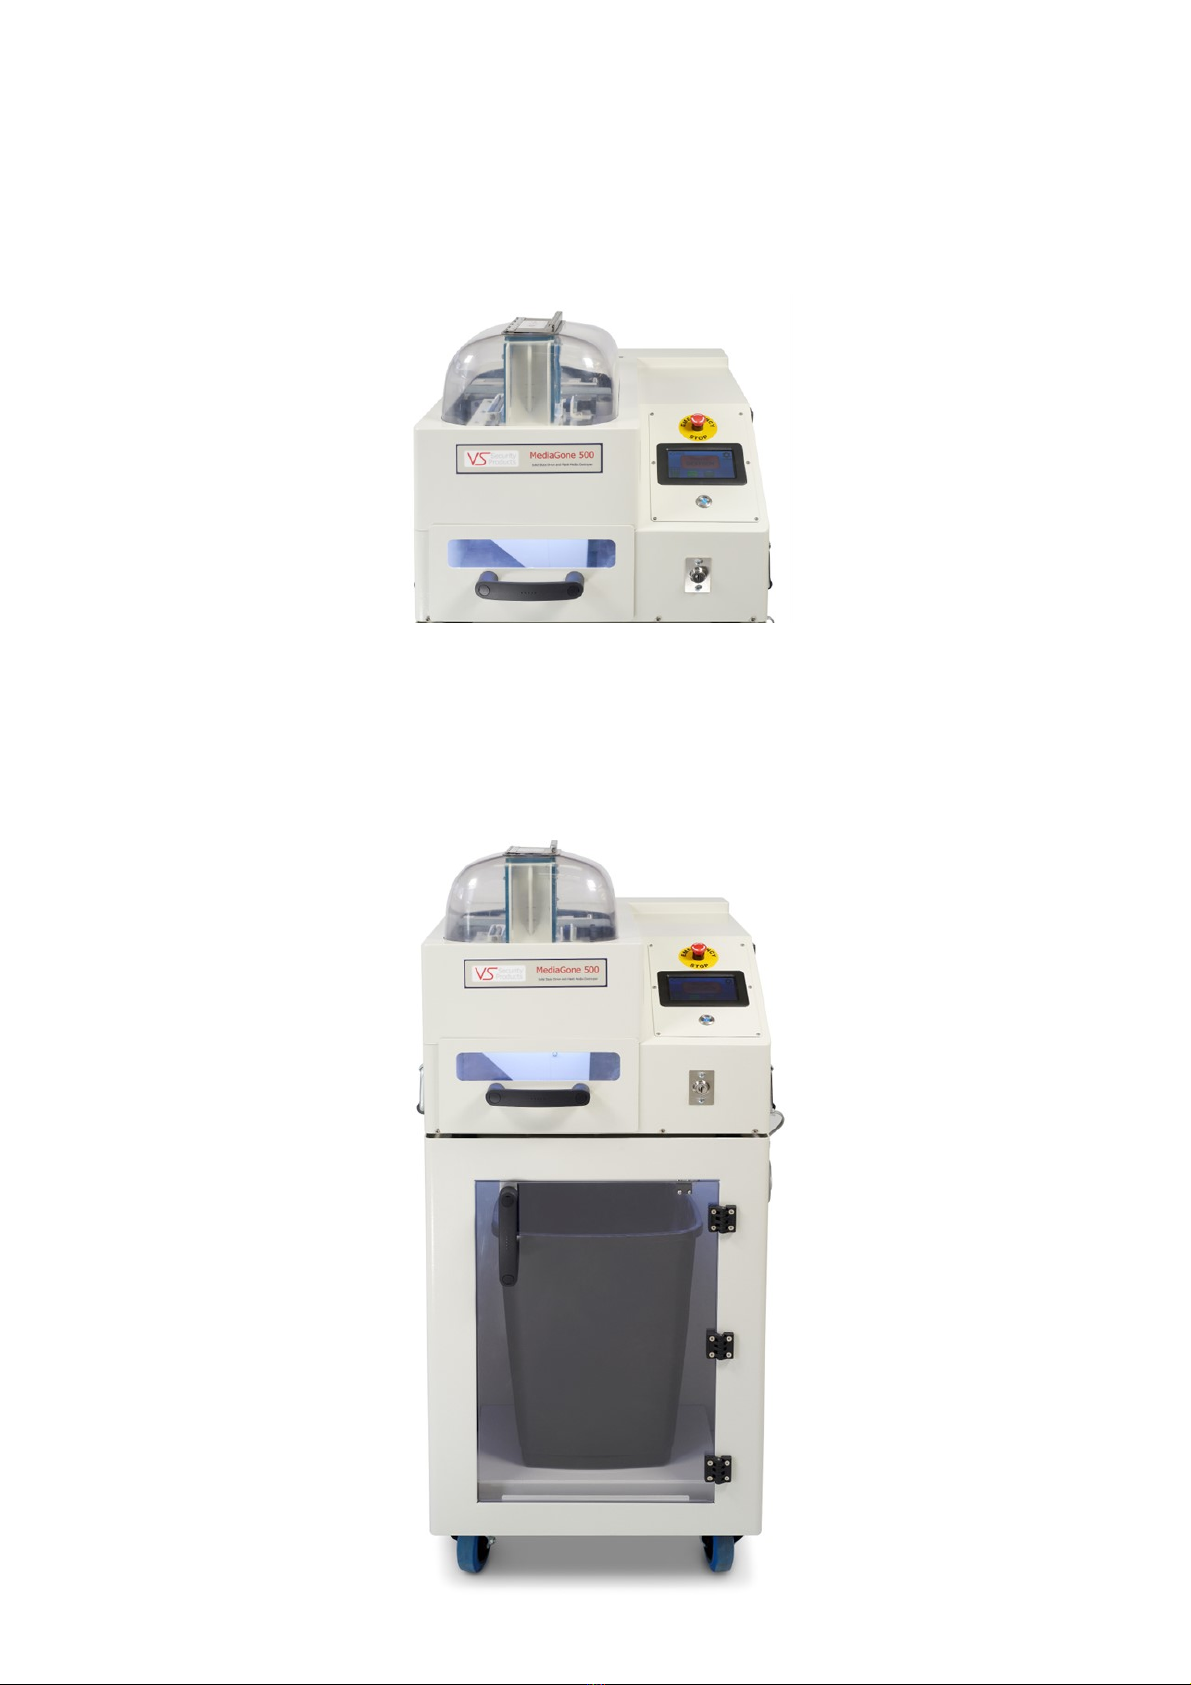
1. Press to destroy – Starts the shredding process.
2. Fine Cut, Course Cut – Selects size of shredded partials. Defaults to Standard Cut.
3. Beep on Key Press – Machine beeps when screen button pressed, touch to switch off.
1. Lid Open Please Close Lid – Lid over media feed slot is open, close to proceed with shredding.
2. Destroying Press to stop – Shredding is underway, unit can be stopped in an emergency.
3. Destruction Complete – Shredding is complete.
4. Machine Locked please use the key – use the key to switch on to proceed with shredding.
5. Machine opened during crush cycle – shredding cycle aborted as the Lid over media feed slot has been opened
during the shred cycle. Close lid press OK and restart.
6. Desktop Model only—Drawer Opened During Crush Cycle – Shredding cycle aborted as drawer has been
opened. Close drawer press OK and restart.
7. Desktop Model only—Warning Drawer Not Detected - Shredding cycle aborted as no drawer detected. Check
drawer present and press OK and restart.
8. Floor Standing Model only—Trolley Door Opened During Crush Cycle - Shredding cycle aborted as trolley door
has been opened. Close door press OK and restart.
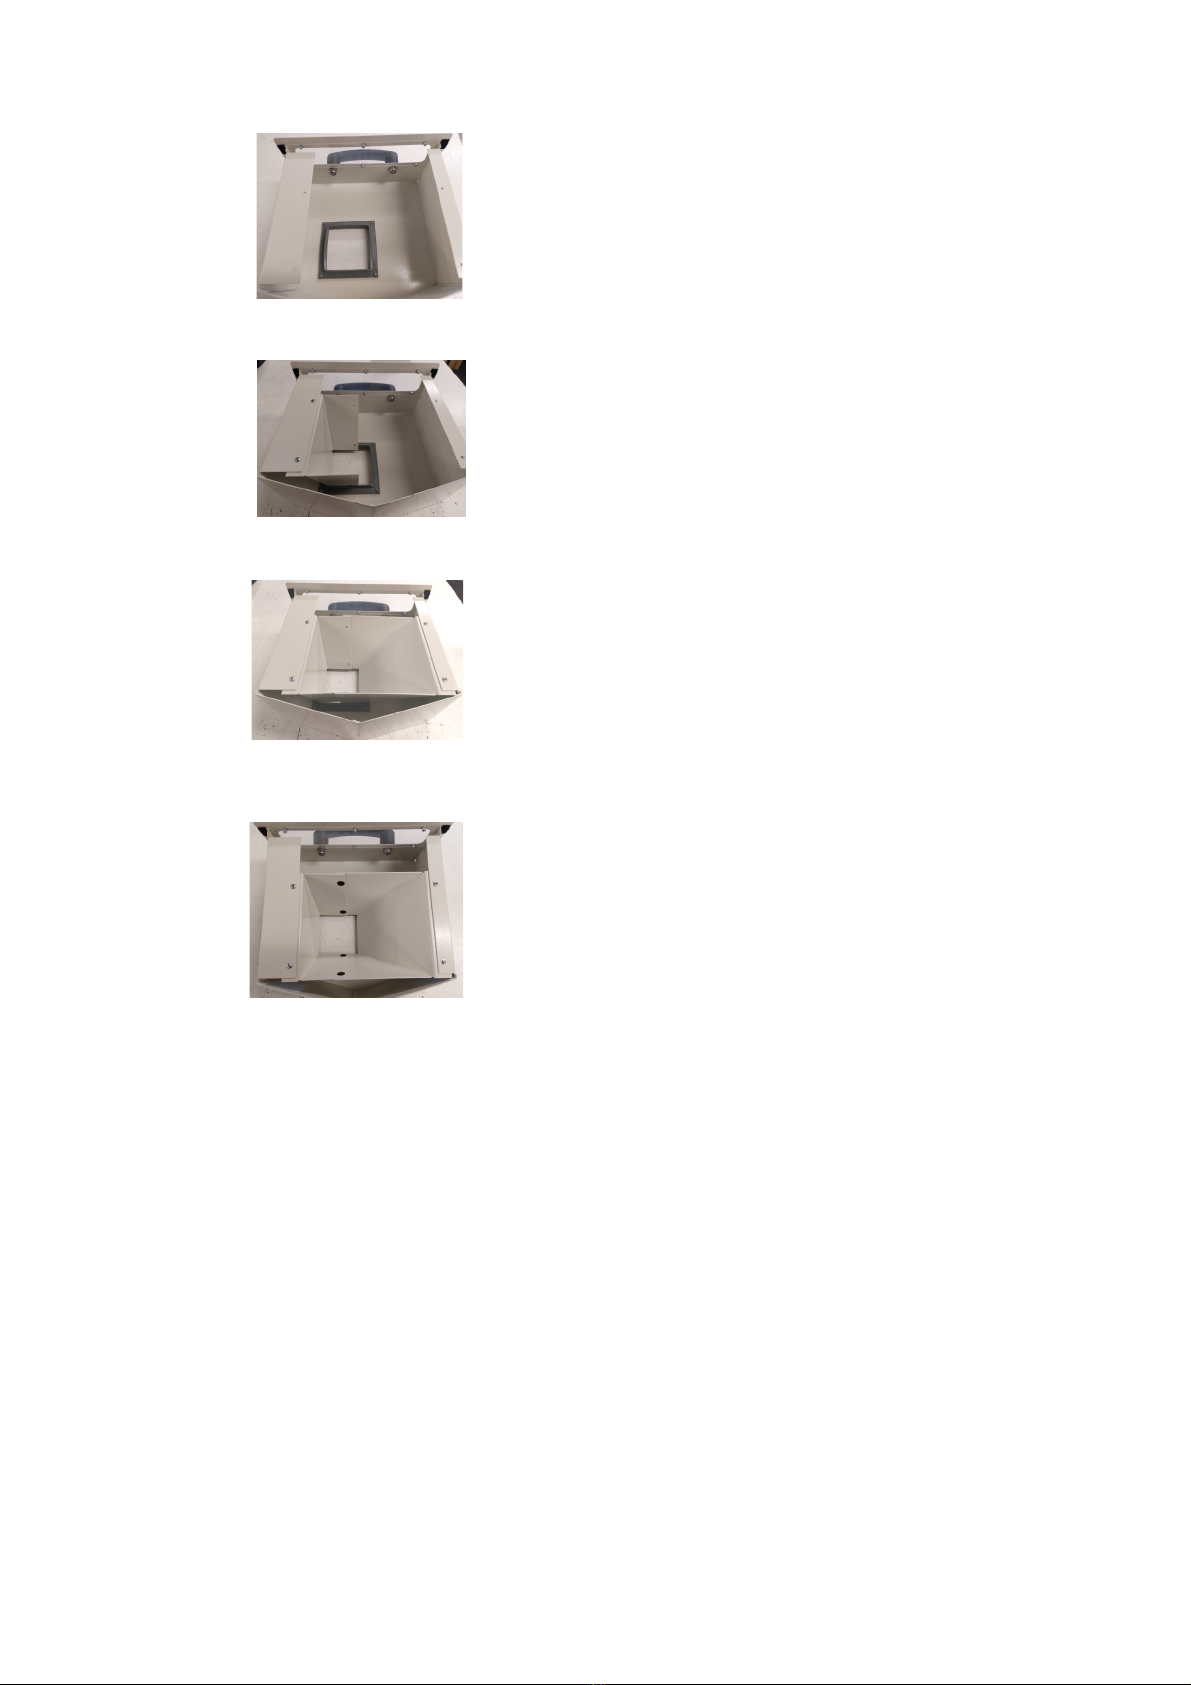
1. Connect to the mains power using the power lead provided.
2. Press the power button, the touch display lights up and the system initializes.
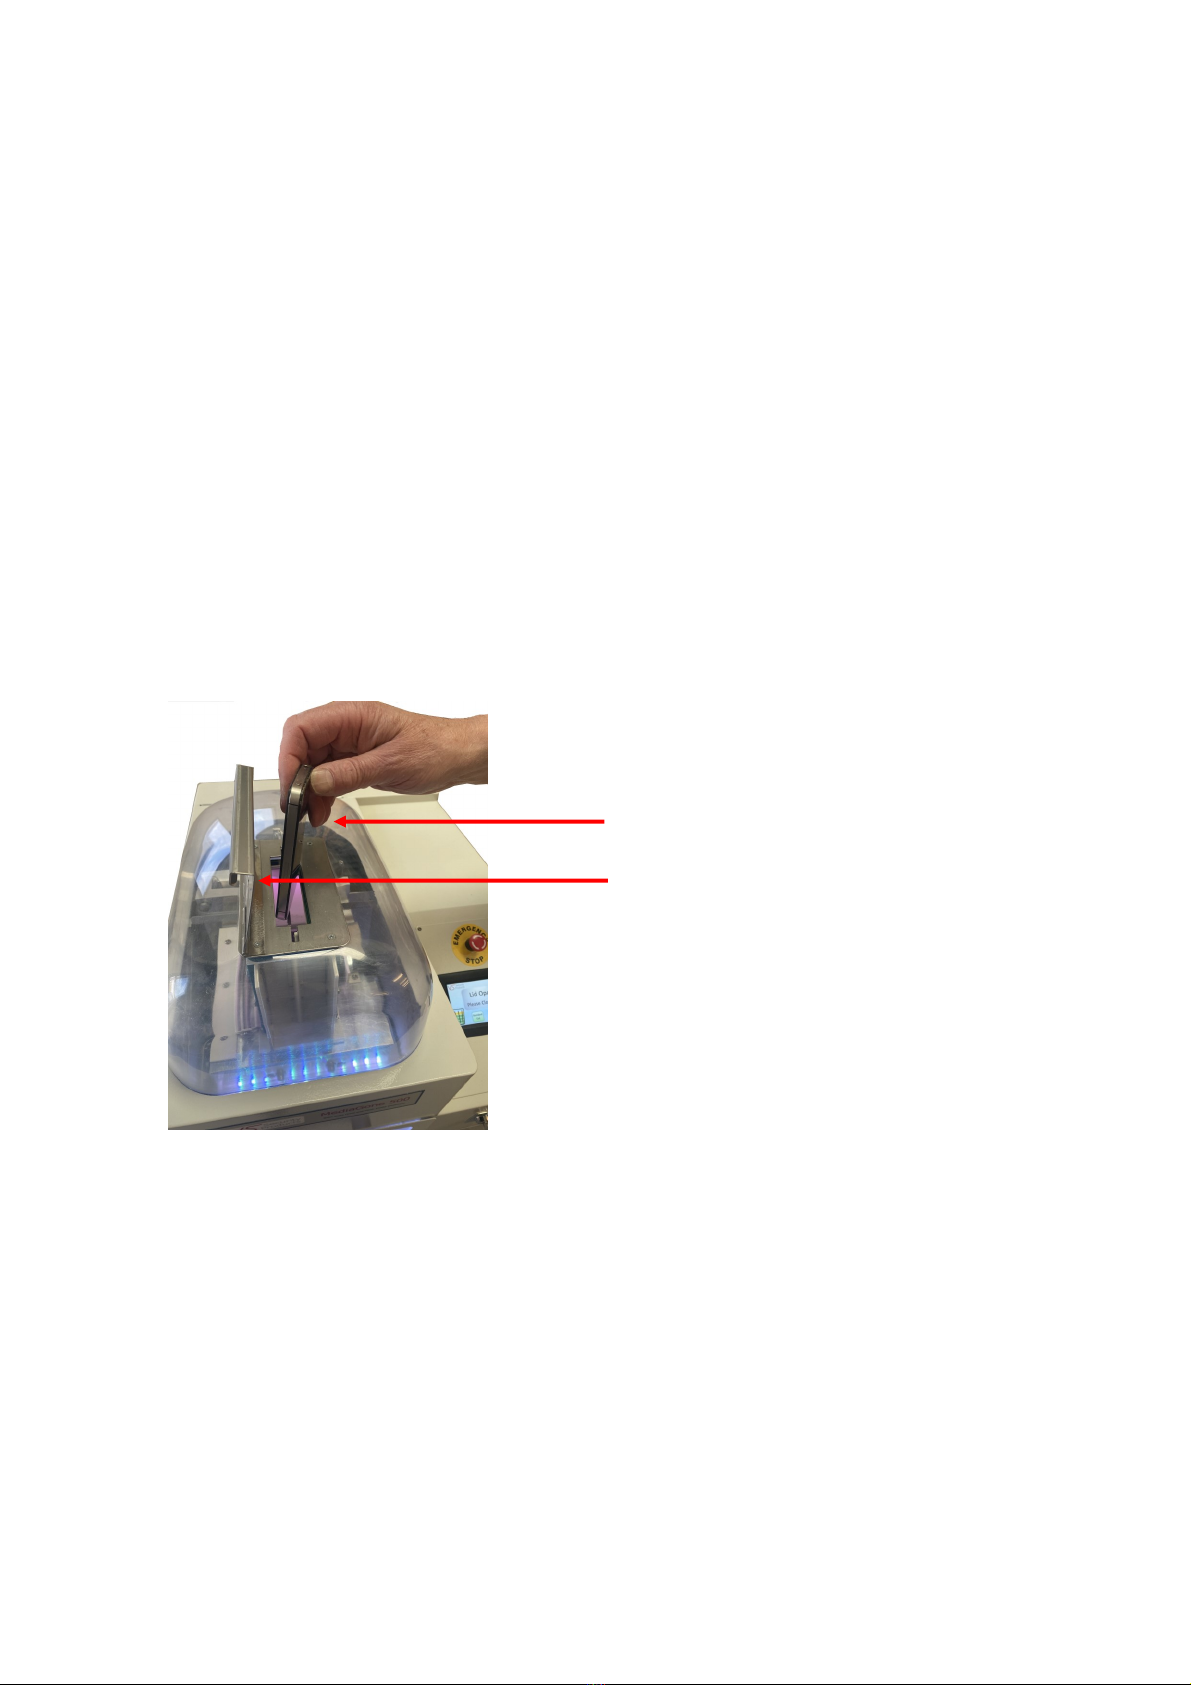
1. Open the Flap and drop the media, like USB sticks, Solid State Drives (SSD’s), flash drives, Smart Phones etc
into the destruction chamber.
2. The media should be shredded individually, one at a time (this ensure the MediaGone 500 gives its best
performance) /
3. Close the Flap and press Destroy on the Display.
1. The MediaGone 500 has 2 shred particle sizes, Course and Fine.
2. Course gives lager partials with a faster throughput.
3. The machine defaults to Course, to select fine press Fine before pressing Destroy.
1. Press the Destroy Button on the Display.
2. The cutters will be energized and shredding will commence.
3. The cutters will rotate backwards and forwards shredding the media.
4. When all the media has been shredded the cutters will stop and ‘Destruction Complete’ will be displayed.
Media
Flap
Figure 13

VS Security Products LTD ZZ001234, ZZ001235 Page 11 of 15
1. When the surface of the media is very smooth there may be rare occasions when the cutters are not able to grip a
new item or a partially destroyed one and draw it in.
2. The cutters will go through a predetermined forward and reverse sequence multiple times to try and grab the
media but if is not able to the MediaGone will stop.
3. If this occurs take the pusher supplied, open the lid and using the pusher move and turn the media.
4. Presenting the cutters with a rouge side and removing loose items will usually enable the cutters to grab the
media and continue with the destruction. The loose items can be destroyed separately.
5. Remove the pusher, close the lid and press destroy to start the shredding process again.
In isolated cased, some partial media pieces can remain on top of the cutters and are visible in the viewing window after the
cutters have stopped. These pieces should be removed as described below and re-submitted to the MediaGone.
1. Lift the plastic dome cover and lock it in the up position by pulling the center joint of the prop towards you. As
shown in figure 14.
2. The safety glass box assembly can now be hinged to the side by pulling the round knob to extract the locking pin
see figure 15 and 16.
3. Remove the piece of media from the top of the cutter’s.
4. Hinge the safety glass box back into position, pull the locking pin ant then release it to lock the assembly onto the
cutting box.
5. Lift the plastic dome slightly and push the center joint of the prop away from you (see figure 17). This will allow
you to lower the dome into its home position.
Center Joint
Round Knob
Center Joint
Figure 14
Figure 15 Figure 16
Figure 17

VS Security Products LTD ZZ001234, ZZ001235 Page 12 of 15
In the stand-alone desktop model the shredded debris is automatically collected in a 1 Gallon (5 Litre) waste drawer
accessed from the front of the unit using the black handle. The drawer simply slides out so the waste can be tipped into a
suitable container. The drawer has a clear viewing window allowing the operator to check the waste level at any time.
1. The waste level in the drawer can be seen through the viewing window.
2. When the waste level is at the top of the viewing window it should be emptied.
3. Ensure the shredder has completed its task and is on standby .
4. Pull out the drawer using the black handle and slowly remove it from the unit taking care to keep it level so as to
not spill any of the contents.
5. Place the drawer into a bag or container and tip out the contents, remove the drawer and seal the bag or
container.
6. Replace the drawer in the unit.
With the optional wheeled trolley the waste is collected in a 5 Gallon (25 Litre) catch basket which is easily accessed
though a clear Poly Carbonate door at the front of the unit. The level in the catch basket is constantly monitored and
displayed on the LCD. The catch basket is illuminated so the operator can see the level and the light colour changes to red
when full.
1. When the waste catch basket symbol on the display shows it is full, and the basket itself is illuminated with a
flashing red light, the catch basket should be emptied.
2. Ensure the shredder has completed its task and in on standby.
3. Open the clear plastic door and remove the catch basket.
4. Pull the bag out to its full length and tie the bag.
5. Remove the bag and dispose of it with the contents.
6. Fit an empty bag into the basket making sure the bag is pressed against the insides of the basket or the bin level
sensor will not state the basket level is correct.
7. Insert the basket back into the machine.
8. Close the door.
Viewing Window
Waste Drawer
Clear Plasc Door
Figure 18
Figure 19

VS Security Products LTD ZZ001234, ZZ001235 Page 13 of 15
Excess dust or debris should be regularly cleaned from the Destruction Chamber using a cloth and/or vacuuming, The
outside of the unit may be wiped with a soft cloth but no harsh cleaning agents should be used.
The Air Filter is located at the rear of the unit shown in figure 20.
The Filter element should be changed approximately every 1000 cycles to ensure it does not become clogged.
1. To change the filter element pull of the black plastic filter cover, which contains the element.
2. Dispose of the old contaminated element and fit a new one in place of the cover.
3. Press the black plastic filter cover on the housing ensuring it is fully home and clips into place.
Not: Replacement filter elements can be purchase from your local VS Security Products Supplier.
To ensure smooth running and long life of you MediaGone Shredder, approximately every 1000 cycles the cutter bearings
should be greased as described below using the grease gun provided. See figure 21.
1. Ensure the MediaGone is switched of and disconnected from the mains power supply .
2. Lift the plastic dome cover and lock it in the up position by pulling the centre joint of the prop towards you, as
shown in figure 22.
Air Filter
Grease Gun
Center Joint
Figure 20
Figure 21
Figure 22

VS Security Products LTD ZZ001234, ZZ001235 Page 14 of 15
3. Remove the grease gun from its housing and place the nozzle end onto one of the 2 grease nipples on the rear of
the cutter box shown in figure 23.
4. Push the body of the grease gun towards the nipple two times, which will pump the grease into the cutter bearings
as seen in figure 24.
5. Repeat the process for the second grease nipple.
6. Wipe of any excess grease around the nipples and replace the grease gun to its housing.
7. Use lithium based grease when the grease gun needs refilling.
The MediaGone 500 Shredder is not equipped with any on-board fuses that require replacement. All the systems within the
unit are protected by the circuit breaker which is located on the rear of the unit – this can be manually reset by the user. See
figure 25.
If the unit fails in any way, the user should verify the condition of the circuit breaker prior to contacting support.
It is recommended that suitable protective gloves are worn when handling the shredded media or debris in order to protect
hands from sharp edges.
It recommended that the Catch Tray is emptied frequently to prevent the build up of swarf inside the MediaGone 500.
Grease Nipples
Grease Gun
Circuit Breaker
Figure 23
Figure 24
Figure 25

This manual suits for next models
3
Table of contents