VTOMAN X5 User manual

User Manual
Jump Starter with Air Compressor
X5
Model No.:Epower-325

WELCOME
COMPONENTS AND FUNCTIONS
KEY POINTS
BUTTONS AND DISPLAY SCREEN
OPERATION GUIDANCE
TECHNICAL SPECIFICATIONS
FAQS
TROUBLESHOOTING
REMINDERS
MAINTENANCE AND SUPPORT
TABLE OF CONTENTS
01
02
03
05
08
11
12
13
14
17

,
s
Thank you for choosing vtoman jump starter.To ensure a
good user experience,personal safety,and property security
please read all of the instructions carefully before using thi
product,please keep this manual for reference.
While reading through the manual,you can start to charge
your X5 with type-c cable provided.
PAGE 1
Charge it first!
Warning!
WELCOME
This unit is for vehicle (equipment) with 12V batteries. It
may be dangerous if it is used with other types of batteries.
Read and understand the safety information before using
the jump starter. Failure to follow the safety information
may cause damage to the jump starter, and may also result
in electric shock, explosions, fire, property damage, and
personal injury.

1
2
3
4
5
PAGE 2
. Pressure adjustment
. Power switch / Inflating
pump starting button
. Settings
. Lamp switch
. LED display screen
6. Air inflating port
7. LED flashlight
(distress signal light)
8. 5V/9V/12V output port
9. USB-C 9V/2A input port
10. 15V 10A output port
11. 12V Automobile starting port
COMPONENTS AND FUNCTIONS
①
②
③
④
⑤
⑥⑦
⑧
⑨10 11

KEY POINTS
PAGE 3
Start Completely Dead Batteries: X5 3500A portable lithium
battery jump starter packcan instantly start your 12V vehicles (9L
gasor 8L diesel engine) - up to 50 jumps on a single charge, can
be used for vans, rv, motorcycle, dozer, tractors lawnmower
etc,especially professionalfor heavy-duty vehicles like SUVs,
trucks boats. even in extreme weather from-4℉~140℉.
Additionally, our X5battery jump starter is equipped with BOOST
FUNCTION for TOTALLY DEAD BATTERY.
All-In-One Car Battery Charger Jump Starter: The X5 jump
starter equipped with an air compressor that can inflate a typical
car tire to 20 PSI in just 2 minutes, making it the perfect and
essenciel for emergency situationson the road. ALSO we have
real-time tire pressure detection function, and will auto shut off
when reach set psi , helps you keep your tiresat the optimal
pressure for better fuelefficiency and longer tire life. It includes
an extension air hose and 3different nozzles to inflate cars, bikes,
balls, and other inflatables.
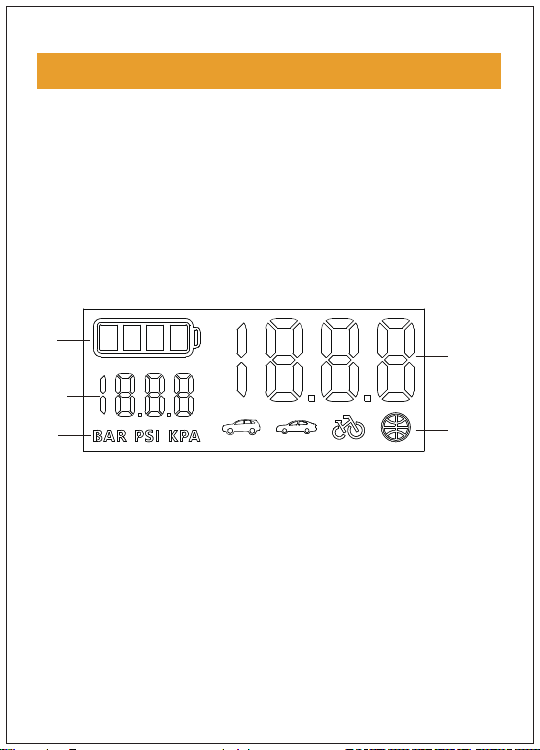
Large 5.1-InchSmart Screen: Compared with traditional jump
startersthat only have analog indicators, the X5 jump starter for
car battery featuresa 5.1-inch smart screen that displays
important information such asbattery level, inflator mode and
tire pressure in 3units (PSI, BAR, KPA), making it more easier and
clearer for you to use.
Enhanced Safety Technology: VTOMAN's car battery jump
starter packprioritizes safety and ease of use. The jump cable
indicator uses a reverse red light to notify you of incorrect usage,
eliminating any concernsabout incorrect connectionsor sparks. It
offersa comprehensive range of protection features, including
over-charge, over-current, short-circuit, reverse-polarity,
low-temp, high-temp, over-voltage, over-load, spark-proof, and
reverse-charge protection.

PAGE 4
KEY POINTS
Upgraded Thermal Design: The X5 jump starter incorporates
an upgraded thermal design that ensurescooloperation even
during prolonged use. This preventsoverheating and guaran-
tees long-lasting performance and durability.
More Than A Jump Starter: Upgraded fromtraditionalheavy
battery jump box; it is a multifunctional Portable device that
also serves asa power bankbattery pack, tire inflator, and LED
flashlight. It even supports 18W Type-Cfast charging, enabling
quick and effortless device charging. Additionally, the X5
battery starter comes equipped with a 400-lumen LED light that
offersfour lighting modes: constant lighting (white), constant
lighting (red), flash, and SOS.
Meaningful Gift Set: This jump starter kit includes1X jump
starter with air compressor, 1X smart jumper cable, 1X USB-A
to USB-C cable, 1X carrying bag, 1X pump tube, 3X air nozzle,
1X user manualand 18 monthswarranty and lifetime tech
support. It makes for a perfect gift for car owners, camping
enthusiasts, and adventure lovers. Rest assured, our customer
service team is alwaysavailable to assist you with any issuesyou
may encounter.

2. Short press the lighting button to turn on the LED light,
and the white light will remain on. Press the switch button
again, and the LED will enter the red flashing mode. Press
again to turn off the light.
3. After the load is removed, the product automatically enters
the dormant mode 30 seconds later.
PAGE 5
BUTTONS AND DISPLAY SCREEN
1. Long press the switch button for 2 seconds so that the
starter displays information on the electrical configuration
(1), preset tire pressure value (2), static air pressure value (3),
BAR, PSI & KPA (4), or icons of cars, SUVs, basketballs, bicycles
or other inflatable items (5), The electric quantity will be
displayed on the bar (see the illustration on the right), and
the charger will enter the to-be-inflated mode.
3
5
4
2
1

5. While choosing the mode for the inflating pump for SUVs,
cars, bicycles or basketballs, icon 4 will display the preset tire
pressure value. Note that the preset value serves as reference
only, and please adjust in accordance with the actual situation.
The preset values for different inflatable items are:
PAGE 6
BUTTONS AND DISPLAY SCREEN
4. When the product is in the standby mode or working
normally, press the "Set" key to enter the inflating pump
editing mode, after which the SUV icon will display; at the
same time, preset the tire pressure value (unit: BAR), where
you can short press the "+" "-" key to adjust the pressure
value, or long press the "Set" key to alter the unit (KPA, BAR
or PSI); short press the "Set" key to switch the item to be
inflated until the car icon displays, and preset the pressure
value (unit: BAR), before short pressing the "+" "-" key to
adjust the pressure value or long pressing the "Set" key to
switch the unit (KPA, BAR or PSI). Then short press the "Set"
button until the bicycle icon and the preset air pressure value
(unit: PSI) are displayed; press the "Set" button again to adjust
the air pressure value, and long press the "Set" button to switch
the unit (KPA, BAR or PSI). Press the "Set" button again to display
the basketball icon and the preset air pressure value (unit: PSI);
short press the "+" and "-" button again to adjust the air pressure
value. Long press the "Set" key to switch units between KPA, BAR
and PSI under the free mode.

Please switch the unit accordingly on the left. Only one unit
can be displayed for each item.
6. While charging, the bars at the battery icon will flash in
accordance with the actual level of remaining battery life.
7. When a product’s remaining battery life falls below 10%,
the corresponding indicator will flash.
PAGE 7
BUTTONS AND DISPLAY SCREEN
SUVs: 2.5 BAR
Cars: 2.4 BAR
Bicycles: 45 PSI
Basketballs: 8PSI

PAGE 8
Charging the host machine of the jump starter
Starting a 12V car
1. Insert the blue end of the battery clip into
the hose machine while making sure that the
indicator on the clip is off.
2. Connect the clip correctly respectively to
the positive and negative ends of the car
battery, where the red clip connects to the
positive pole of the battery (+) and the black one connects
to the negative pole (-).
3. Then operate following the instructions below in accordance
with the state of the indicator:
Green light long on: indicating that the connection
is correct and the jump starter is ready to work.
OPERATION GUIDANCE

PAGE 9
Green light flashes: indicating that the pressure
of the car battery is too low. Press the BOOST
button and finish starting within 30 seconds after
the green light is on.
indicating that the battery
may have been damaged. Make sure that the
two poles are connected correctly, and press
BOOST; when the green light is long on,finish
starting within 30 seconds.
Red light long on: indicating
po
that the
sitive/negative poles have been connected
wrongly. Reconnect, and don’t start again until
the green light is long on.
Charging electronic devices such as smartphones or tablets
1. Choose a proper charging plug to connect to the port of
the mobile phone adapter cable
2. Connect the USB plug of the mobile phone adapter cable
to the USB output port of the host machine
3. Connect the charging port to your phone/tablet
4. Press the switch button to start charging your electronic
devices
OPERATION GUIDANCE
No red or green light:

PAGE 10
Powering 12 V electronic/on-board devices
Switch LED light modes
1. Insert the adaptor end of the adaptor cable to the 15V
output port of the host machine
2. Connect the 12V device to be charged to the other end
of the adaptor cable
3. Tap the switch button to start charging the on-board
products
OPERATION GUIDANCE
No. Name of the accessory
Host machine
Inflating pump
Smartphone adapter cable
Intelligent battery clip
User manual
Multifunctional air cock
Quantity
1
2
3
4
5
6
1
1
1
1
1
3
7 1
Carrying Bag

PAGE 11
TECHNICAL SPECIFICATIONS
Technical specifications:
Size: 223*123*63mm
Weight: 1352 ±5g
Capacity: 59.2Wh
Output: Fast charging (5V 3A,9V 2A,12V 1.5A);
15V 10A, 12V car starting
Input: 9V 2A
Time taken to charge to the full: Around 4 hours
Starting current: 600A (3S)
Peak current: 3500A
Temperature: -4~140°F

PAGE 12
1. Q: How to turn off the jump starter?
A: (a) The product has an automatic detection function. Once
it has no loading or the charging process is finished, the starter
will automatically go dormant to save electricity.
(b) Press the switch button for 2 seconds to turn it off.
2. Q: How long does it take to charge the host machine?
A: It takes 4 hours to charge it to the full with a USB
9V/2A charger.
3. Q: How many times can the host machine start a car?
A: For over 50 times in a row.
4. Q: How long is the host machine’s service life?
A: 5-7 years under normal circumstances.
5. Q: How long can the host machine be shelved after charged
to the full for it to work again immediately?
A: The host machine boasts scientific design that it can be
shelved for 6-12 months. But it is suggested to charge it
every three months to protect its service life.
FAQS

instructions below cannot solve the problems you have
P
PAGE 13
Please stop using the product and contact the seller if the
encountered.
Product ingredients
Phenomenon
Tap the switch button
and EPOWER does
not react.
The EPOWER’s voltage is
excessively low that the low-
voltage protection function
is triggered to cut the circuits.
Insert the charging
plug into the 5V input
port to activate it.
Reason Instruction
TROUBLESHOOTING
roduct
name Plumbum
(pb)
Toxic and Hazardous Substances or Elements
Mercury
(Hg)
Cadmium
(Cd)
(Cr(Vi)
Chromium
VI (Cr VI)
(PBB)
Polybrominated
biphenyls (PBB)
(PBDE)
Polybrominated
diphenyl ethers
(PBDE)
Jump
starter O O O O O O

PAGE 14
1. Please carefully read through the user manual before
using this product.
2. This product can only be used to start 12V cars. It can
cause danger if used on other cars. It is prohibited on
airplanes or ships.
3. Please use it with care.
4. Please stop using the product if the battery clips or cables
are damaged.
5. It cannot be used as a replacement of car batteries.
6. It cannot be used as a portable battery charger.
7. Do not continue to clip the product to the battery after
the car has been successfully started.
8. Please use the battery clip attached with the product.
9. Make sure the blue plug of the battery clip is fully inserted
into the product starter port; otherwise, the blue plug may
melt. Before starting, make sure all battery connectors are
clean and the battery clips are properly connected. If the
battery end of the car is dirty or corroded, the product's
starting performance will be reduced.
10.Please do not start the product for more than three
consecutive times, as this may cause it to overheat and
damage the product. If you need to start the product
multiple times, please make sure to wait for two minutes
between each start-up.
REMINDERS

PAGE 15
11. Please remove the product from the car battery within
30 seconds after starting, otherwise it may cause damage.
12. Please connect the positive/negative polar of the clip
correctly.
13. Please make sure that 3-4 indicators are on before starting.
14. Please keep the product away from children.
15. Please do not use the product as a toy.
16. Keep the product dry.
17. Do not put the product in water.
18. Please do not use the product in explosive environments
such as when there are flammable liquids, dusts or gas.
19. Please do not modify or disassemble the product. It can
only be repaired by professional technicians.
20. Do not expose the product to extremely hot conditions or fire.
21. Make sure that you can be heard or helped while you use
the product.
22. Take off all metal items you wear such as such as rings,
bracelets, necklaces before using the product.
23. Please do not drop the product. In case it is damaged,
please have eligible technicians to detect and fix it.
24. Do not expose the product to heat of over 158°F.
25. Charge at room temperature (32-140°F).
26. Please charge with the charger attached.
27. Do not start the car while the host machine is charged.
REMINDERS

d
s
d
l
28.
29.
the
flus
30.
PAGE 16
In case of liquid leakage from the host machine, restore
the leaked liquid immediately with proper containers.
Under extreme conditions, battery leakage can occur. If
liquid is coming out of the product, it cannot be handle
directly by hand. In case of skin contact, wash immediately
with soap and water. If fluid comes into contact with eyes,
h the eyes with cold running water for at least 10 minute
and seek medical attention immediately.
Products based on lithium batteries shall be dispose
of at the end of their service life in accordance with loca
regulations.
REMINDERS

PAGE 17
Attention
MAINTENANCE AND SUPPORT
Do Not Place Near or Into Fire
Avoid Extreme Temperatures
Do Not Drop
Do Not Disassemble
Do Not Submerge In Water
Overcharge/discharge
Protection
Fuse Protection Against-revers
Plug
Customer Service
18 Months Limited Warranty Service
Lifetime Technical Service
Feel Free to Contact Us
For FAQ and More Information

Thank You for
Choosing Us!
Made in China
L I F E B M S
Table of contents
Other VTOMAN Remote Starter manuals