Wallpro PS-1000 User manual

OPERATING
INSTRUCTIONS
POWER SANDER
model PS-1000

Model No PS-1000
Voltage 230V /50Hz
No load speed 650 ~1600/min
Full load speed 280 ~ 950/min
Power input 550W
Sanding disc diameter 225mm
Net weight 4.7 kg (10 lbs.)
View of the Major Components & Accessories
Specifications
Sanding Head
Column
Hand Grip
On/Off Switch
Vacuum Swivel Mount
Speed Adjustor
Thumb Wheel
Vacuum Cleaner Hose with
Bayonet Mounting Adaptor
Main Handle

WARNING! Read and understand all instructions. Failure to follow all instructions listed
below, may result in electric shock, fire and / or serious personal injury. The term ‘power
tool’ in all of the warnings listed below refers to your mains-operated (corded) power
tool.
SAVE THESE INSTRUCTIONS.
1. Keep your work area clean and well lit. Cluttered worksites and dark areas invite accidents.
2. Do not operate power tools in explosive atmospheres, such as in the presence of flammable liquid,
gases, or dust. Power tools create sparks which may ignite the dust or fumes.
3. Keep bystanders, children, and visitors away while operating a power tool. Distractions can cause
you to lose control.
1. Grounded tools must be plugged into an outlet properly installed and grounded in accordance with
all codes and ordinances. Never remove the grounding prong or modify the plug in any way. Do
not use any adaptor plugs. Check with a qualified electrician if you are in doubt as to whether the
outlet is properly grounded. If the tools should electrically malfunction or break down, grounding
provides a low resistance path to carry electricity away from the user.
2. Avoid body contact with grounded surfaces such as pipes, radiators, ranges and refrigerators.
There is an increased risk of electric shock if your body is grounded.
3. Don’t expose power tools to rain or wet conditions. Water entering a power tool will increase the
risk of electric shock.
4. Don’t abuse the cord. Never use the cord to carry the tools or pull the plug from an outlet. Keep
cord away from heat, oil, sharp edges or moving parts. Replace damaged cords immediately.
Damaged cords increase the risk of electric shock.
5. When operating a power tool outside, use an outdoor extension cord marked “W-A” or “W”. These
cords are rated for outdoor use and reduce the risk of electric shock.
1. Stay alert, watch what you are doing and use common sense when operating a power tool. Do not
use tool while tired or under the influence of drugs, alcohol, or medication. A moment of inattention
while operating power tools may result in serious personal injury.
2. Use safety equipment. Always wear eye protection. Safety equipment such as dust mask, non-skid
safety shoes, hard hat, or hearing protection used for appropriate conditions will reduce personal
injuries.
3. Avoid accidental starting. Be sure switch is off before plugging in. Plugging in tools that have the
switch on invites accidents.
4. Remove adjusting keys or switches before turning the tool on. A wrench or a key that is left
attached to a rotating part of the tool may result in personal injury.
General Safety Rules
Work Area Safety
Electrical Safety
Personal Safety

5. Do not overreach. Keep a proper footing and balance at all times. Proper footing and balance
enables better control of the tool in unexpected situations.
6. Dress properly. Do not wear loose clothing or jewelry. Keep your hair, clothing and gloves away
from moving parts. Loose clothes, jewelry or long hair can be caught in moving parts.
1. Do not force tool. Use the correct tool for your application. The correct tool will do the job better
and safer at the rate for which it is designed.
2. Do not use tool if switch does not turn it on or off. Any tool that cannot be controlled with the
switch is dangerous and must be repaired.
3. Disconnect the plug from the power source before making any adjustments, changing accessories,
or storing the tool. Such preventive safety measures reduce the risk of starting the tool accidentally.
4. Store idle tools out of reach of children and do not allow persons unfamiliar with the power tool or
these instructions to operate the power tool. Tools are dangerous in the hands of untrained users.
5. Maintain tools with care. Properly maintained tools are less likely to bind and are easier to control.
6. Check for misalignment or binding of moving parts, breakage of parts, and any other condition that
may affect the tools operation. If damaged, have the tool serviced before using. Many accidents
are caused by poorly maintained tools.
7. Use the power tool, accessories and blades etc., in accordance with these instructions and in the
manner intended for the particular type of power tool, taking into account the working conditions
and the work to be performed. Use of the power tool for operations different from those intended
could result in a hazardous situation.
Have your tool serviced by a qualified repair person using only identical replacement
parts. This will ensure that the safety of the power tool is maintained.
WARNING:
To reduce the risk of injury, user must read instruction manual.
Symbols used in this manual:
V volts
A amperes
Hz hertz
W watt
~ alternating current
n0 no load speed
/min revolutions or reciprocation per minute
class II tool
Tool Use & Care
Service

1. Keep hands away from rotating sanding head area at all times!
2. Prolonged breathing of airborne dust from plasterboard sanding may effect respiratory function
or cause serious respiratory illness. To reduce exposure to dust always wear approved protective
equipment*, ensure Power Sander is connected to a vacuum approved for fine dust extraction and
operate the tool in a well ventilated area.
*Wear Eye Protection to AS/NZS1337.
*Wear Respiratory Protection to AS/NZS1716.
*Wear Hearing Protection to AS/NZS1270
3. Sanding LEAD-BASED paint is extremely toxic and should not be attempted. Only allow
professionals with special training and equipment to perform this task.
4. Maintain proper footing and balance at all times. Do not overreach. Use proper scaffolding
5. Always wear appropriate safety equipment when operating.
6. Important: After completing sanding, switch off the switch and wait for the coasting sanding head
to stop completely before putting the tool down.
7. Never operate the tool in an area with flammable solids, liquids, or gases. Sparks from the
commutator/carbon brushes could cause a fire or explosion.
8. There are certain applications for which this tool was designed. The manufacturer strongly
recommends that this tool NOT be modified and/or used for any application other than for which
it was designed. If you have any questions relative to its application DO NOT use the tool until you
have written to the manufacturer and have been advised.
9. Use the machine with both hands at all times. Loss of control can cause personal injury.
10. Keep power supply cord clear from the working range of the machine. Always lead the cable away
behind you.
11. Immediately switch off the machine if unusual vibrations or if other malfunctions occur. Check the
machine in order to find out the cause.
This Electric Plasterboard Sander is specially designed for the most efficient sanding of plasterboard
or plaster walls and ceilings for both new construction and renovation work. It is designed to work in
conjunction with a vacuum cleaner for minimum dust and best sanding results. The pivoting sanding
head allows excellent results with minimum time and effort.
Electrical connection
The network voltage must conform to the voltage indicated on the tool name plate. Under no
circumstances should the tool be used when the power supply cable is damaged. A damaged cable
must be replaced immediately by an authorized Customer Service Center. Do not try to repair the
damaged cable yourself. The use of damaged power cables can lead to an electric shock.
Extension cable
If an extension cable is required, it must have a sufficient cross-section so as to prevent an excessive
drop in voltage or overheating. An excessive drop in voltage reduces the output and can lead to failure
of the motor. The following table shows you the correct cable diameter as a function of the cable length
for this machine. Use only U.L. and CSA listed extension cables. Never use two extension cables
together. Instead, use one long one.
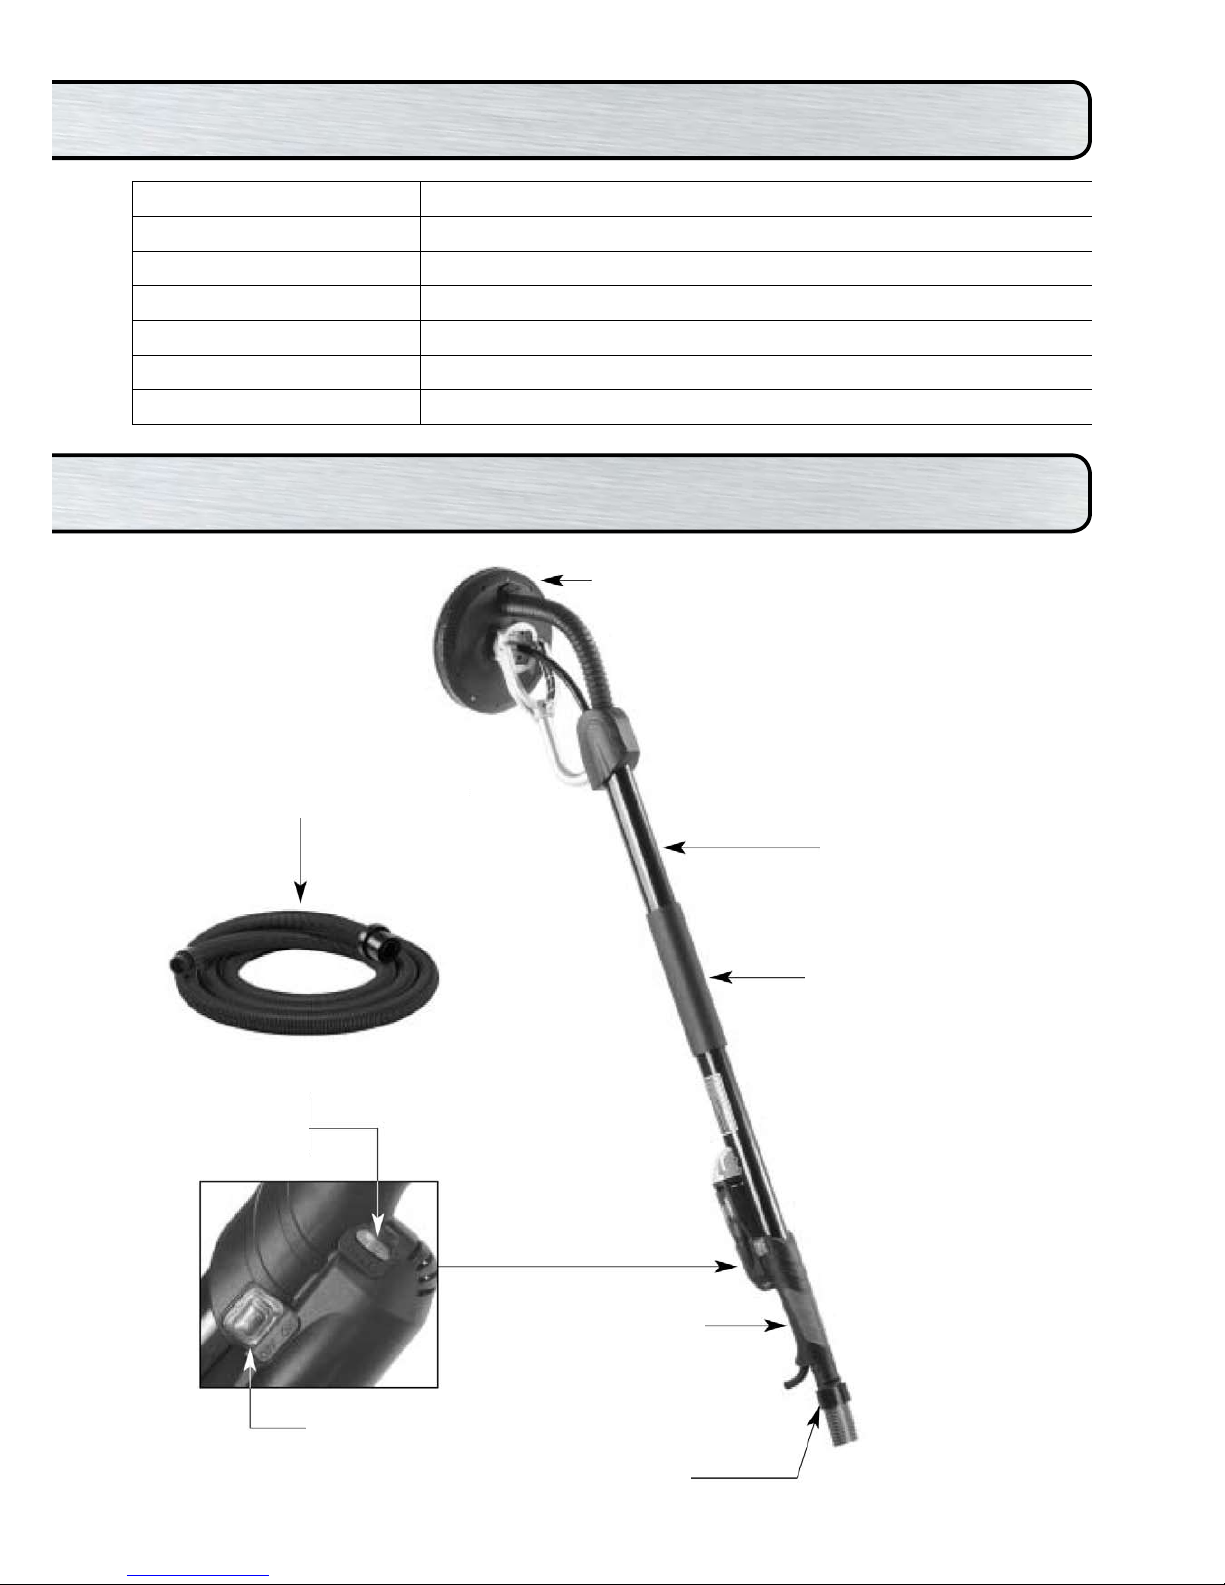
Specific Safety Rules
Functional Description

Total Extension Cord Length (feet) Cord Size (AWG)
25 16
50 12
100 10
150 8
200 6
Unpacking
Carefully remove the tool and all loose items from the shipping container. Retain all packing materials
until after you have inspected and satisfactorily operated the machine.
Carton Contents
1. Power sander
2. Vacuum cleaner hose
3. Instruction manual
DO NOT OPERATE THIS TOOL UNTIL YOU READ AND UNDERSTAND THE ENTIRE
INSTRUCTION MANUAL
To install a sandpaper disc:
1. Unplug the machine.
2. Peel away the worn out sandpaper disc, leaving the sponge backing pad in place.
3. Carefully center the new sandpaper disc and press into place. It will be held securely by the hook
and loop backing.
To replace the Hook and Loop Sponge Pad:
The sponge pad must be perfectly flat to get good sanding results. If it is deformed or damaged it will
cause very uneven sanding. Always replace it when damaged. It is hook and loop on both sides, so
to replace it, peel it away from the hook and loop on the Sanding Plate Base and, taking great care to
keep it perfectly centered, affix a new one.
The Brush Bristles on the edge of the Sanding Plate Cover:
The brush bristles on the edge of the Sanding Plate Cover serve two
purposes, they keep the sanding disc properly aligned with the work
surface without gouging and they also help the efficiency of the dust
collection by the vacuum cleaner. These brush bristles will wear with
continued use.
The Sanding Plate Cover should be replaced when the bristles are too worn
to ensure effective dust collection and stabilization of the sanding head.
To replace, hold the center bolt from turning with a slothead screwdriver
and unscrew the sanding plate. Then, using snap-ring pliers, remove the
circlip which holds the sanding plate cover to the bracket. Remove the
vacuum hose and lift sanding plate cover away.
Replacement is the opposite of removal. Entrust all repairs to an
authorized service center.
NOTE: Only use sandpaper discs which fit properly and which are designed for vacuum use.
Instructions

To install the vacuum cleaner hose:
1. Unplug the machine.
2. Plug the vacuum cleaner hose bayonet mount into the swivel mount
in the back of the machine. Once the tangs of the bayonet mount are
fully inserted in the slots, hold the swivel mount from turning and turn
the hose bayonet mount clockwise to lock.
3. Removal is the opposite of assembly.
The vacuum cleaner:
Ensure that you have a bag installed in your vacuum cleaner which is approved and rated for
plasterboard dust.
WARNING: Failure to use an approved dust bag in your vacuum will increase the level of
airborne dust in the work area. Prolonged exposure to such dust may cause respiratory harm.
Make sure that the power circuit voltage is the same as that shown on the specification plate of the
machine and that switch is “OFF” before connecting the tool to the power circuit.
Switching the machine on and off
To switch on: While holding with the left hand on the column and the right hand on the main handle,
Press the rocker switch to the right with the thumb of the right hand. Anticipate and be ready for the
start up torque when the machine first starts.
To switch off: Press the rocker switch to the left. After the machine has been switched off, the
sanding disc will still rotate for a time. Take care that parts of your body do not come into contact with
the disc and do not set the machine down while it is still rotating!
Adjusting the rotation speed:
The speed of the machine is variable to suit different tasks. It can be
adjusted from 650/min up to 1600/min by using the thumb wheel. Using
the right thumb, turn in the downward (counterclockwise) direction to
increase the speed and in the upward (clockwise) direction to decrease
the speed. Generally, you should use the higher speed for fast stock
removal and the lower speed for more precise control.
Effective control of this powerful sander requires two-handed operation for maximum safety and
control.
The proper hold is to keep one hand on the main handle and the other hand on the sponge grip on the
column. It is vitally important to keep stable footing at all times, especially when standing on scaffolding
or stilts.
Starting and Stopping Tool
How to use the tool

1. Place the two D-Handle Brackets in place on the column forward of
the grip.
2. Thread in the 4 socket cap screws and tighten with the hex wrench
located in the D-Handle.
3. The D-Handle may then be placed in any of 3 angles. Position in the
desired angle then thread in the 4 socket cap screws.
4. Tighten with the hex wrench and when done, store the wrench in its
slot in the D-Handle.
1. Once the machine and vacuum cleaner are set up and all safety measures and equipment are in
place, begin by turning on the vacuum cleaner and then the machine. (If you are using a vacuum
cleaner with integrated switching, then simply turn the machine on.)
2. Begin sanding and carefully contact the work surface as lightly as possible-just enough to keep the
sanding head flat against the surface.
3. The joints in the sanding head allow the sanding disc to follow the contours of the work surface.
4. The best technique is to use overlapping sweeps and keep the head in constant motion. Never
stop too long in any one place or there will be swirl marks. With experience it will be very easy to
create excellent results.
NOTE: Ensure that the sandpaper you are using is suited to the task. Overly coarse grit
paper may remove material too quickly to control. While overly fine grit paper may clog
too often and not shape down the surface.
CAUTION: Take care to avoid pointed projections and nails, etc. This will wipe out the
sandpaper and probably damage the sponge pad as well.
Keep Tool Clean
Periodically blow out all air passages with dry compressed air. All plastic parts should be cleaned with a
soft damp cloth. NEVER use solvents to clean plastic parts. They could possibly dissolve or otherwise
damage the material. Wear safety glasses while using compressed air. Clean the vacuum swivel
connector as too much dust will keep it from turning freely.
The carbon brushes
The carbon brushes are a normal wearing part and must be replaced when they reach their wear limit.
NOTE: Checking and replacing the carbon brushes should be entrusted to a qualified
service center.
Mounting the Optional D-Handle
Sanding Operations
Maintenance

When new, the carbon brushes will last approximately 50 hours of running time or 10,000 on/off cycles.
Replace both carbon brushes when either has less than 6mm length of carbon remaining. To inspect or
replace brushes, first unplug the machine. Carefully remove the 6 screws on the right side and 1 screw on
the left side to remove the right and left handle covers. The vacuum swivel connector will also come apart
when this is done. Remove the two screws holding on the Speed Control Unit (11) to allow access to the
Brush Holder screws (17). Unscrew the two Carbon Brush Holders and remove the Carbon Brushes.
NOTE: When putting the Carbon Brushes back into the Carbon Brush
Holders it is essential that both flanges go back inside the holder.
NOTE: To reinstall the same brushes, first make sure the brushes go
back in the way they came out. Otherwise a break-in period will
occur that will reduce motor performance and increase brush wear.
Replacing is the reverse of removal. Replace the Brush Holder screws, then
the Speed Control Unit screws. When Replacing the 2 handle cover halves
take great care that all wires are in place and not in a position to be pinched
when it is retightened. It is recommended that, at least once a year, you
take the tool to an Authorized Service Center for a thorough cleaning and
lubrication.
If the replacement of the power supply cord is necessary, this has to be done
by the manufacturer or their agent in order to avoid a safety hazard.
PS-1000 Wiring Diagram

PS-1000 Exploded View

PS-1000 Parts List
NO. PARTS NAME QTY
1 Power Supply Cable 1
2 Cord Armor 1
3 Vacuum Extension Hose 4m 1
4 Quick Release Hose Connector 1
5 Screw M4 X 16 7
6 Right Handle Cover 1
7 Left Handle Cover 1
8 Cable Clip 1
9 Screw M4 X 14 2
10 Screw M4 X 25 2
11 Speed Control 1
12 Wire Connector 1
13 Wire Leader 1
14 Wire Leader 1
15 Wire Leader 1
16 Motor Switch 1
17 Screw M4 X 10 2
18 Carbon Brush 2
19 Carbon Brush Holder 2
20 Motor Housing 1
21 Stator 1
22 Stator Screw M4 X 50 2
23 Ball Bearing 608 2rs 2
24 Armature 1
25 Gear Plate 1
26 Bushing 6 X 10 X 8 3
27 Intermediate Gear 1
28 Intermediate Gear Pinion 1
29 Internal Circlip S-8 1
30 Output Gear 1
31 Screw M5 X 10 4
32 Gear Case 1
33 Screw W/ Washer M4 X 30 3
34 Internal Circlip S-10 1
35 Ball Bearing 6200 2rs 1
NO. PARTS NAME QTY
36 Woodruff Key 3 X 8 1
37 Spindle 1
38 First Drive Shaft 254mm 1
38A First Drive Shaft 704mm 1
39 Extension Column 539.22mm 1
39A Extension Column 989.22mm 1
40 Foam Handle Grip 1
40A Foam Handle Grip 1
41 Shaft Connector 1
42 Ball Bearing 6001 2rs 1
43 Internal CirclIp S-12 1
44 Screw M4 X 20 4
45 Right Drive Cover 1
46 Left Drive Cover 1
47 Secondary Drive Shaft 1
48 Drive Shaft Cover 1
49 Holding Pin 6 X 39 1
51 Right Fork Arm 1
52 Left Fork Arm 1
53 Screw M4 X 8 2
57 Screw M5 4
58 Pivot Base 1
59 Pivot Connecting Bracket 1
60 Connecting Spindle 1
61 Ball Bearing 6002 2rs 1
62 External Circlip R-32 1
63 Spring 1
64 Vacuum Hose 1
65 Spring 1
66 Plastic Clip 1
67 Sanding Plate Cover 1
68 Internal Circlip S-40 1
69 Sanding Plate Base 1
70 PSV-225 1

Warranty
Wallboard Tool Co Pty Ltd warrants that this product will be free from any defect in materials or workmanship for twelve
(12) months from your Purchase Date (noted on your invoice or receipt).
At its discretion, Wallboard Tool Co Pty Ltd will either repair or replace your product, if it is found on inspection by
Wallboard Tool Co Pty Ltd or a registered and approved Wallpro Service Agent to have any such defect.
Warranty Claim Procedure
To make a claim under this Warranty, you must:
•First contact the Wallboard Tool Co Pty Ltd distributor where you purchased the product
•Return the product to the distributor accompanied by the proof of purchase (invoice or receipt)
You will be responsible for the delivery to and collection of the product from the distributor.
Warranty Application
This Warranty applies only:
1. To a product sold to you by Wallboard Tool Co Pty Ltd or by a Wallboard Tool Co Pty Ltd distributor
2. If you use the product for your private or business purposes
Warranty Exclusions
This Warranty will not apply if any of the following occurs during the relevant warranty period:
1. The product is serviced or repaired by anyone other than by a registered and approved Wallpro service agent
2. You use a Product contrary to the technical or operating environment guidelines recommended in its user guide
or manual;
3. Any wear parts included in your product, (for example: including but without limitation: Velcro Foam Adaptors,
Bearings, Bit Tips, Carbon Brushes, etc), reaches the end of its service life;
4. A product’s malfunction or failure to perform to Wallboard Tool Co Pty Ltd specifications results from:
1. deliberate or accidental damage; or
2. neglect or modification; or
3. incorrect voltage or a power surge; or
4. use of non-genuine replacement parts or accessories.
Non-genuine Items
If you use non-genuine replacement parts in the product, you may damage the product and may invalidate this warranty.
Our goods come with guarantees that cannot be excluded under the Australian Consumer Law. You are entitled to a
replacement or refund for a major failure and for compensation for any other reasonably foreseeable loss or damage.
You are also entitled to have the goods repaired or replaced if the goods fail to be of acceptable quality and the failure
does not amount to a major failure.
Details of the company giving this warranty:
Wallboard Tool Co Pty Ltd
30 Leda Drive, West Burleigh, Qld 4220, Australia
Phone: +61 7 5535 7655
Email: [email protected]
The Wallboard Tools and Wallpro names as well as the Wallboard Tools and Wallpro Trade Tools logos are registered
Trade Marks of Wallboard Tool Co Pty Ltd


CUSTOMER SERVICE
1300 653 177
Table of contents
Other Wallpro Sander manuals
Popular Sander manuals by other brands

Alpha tools
Alpha tools 44.192.51 operating instructions

Milwaukee
Milwaukee DG 30 QE Original instructions

Tractel
Tractel Tempo 2 Operating and maintenance instructions

Black & Decker
Black & Decker CD450 instruction manual

Rupes
Rupes RH253 Operating and maintenance instructions

Chicago Electric
Chicago Electric 96435 Set up and operating instructions