Walnutt CB2 User manual

Made in Vietnam - r05 Page 1 of 6
walnut WARDROBE
assembly hardware
wall mounting hardware
components
tools required
Thank you for purchasing the Walnut Wardrobe.This
page
lists all the contents included in the box. Please take
the time
to identify the hardware as well as the individual
components
to this product. As you unpack and prepare
for assembly, place the contents on a carpeted or padded
area to protect them from damage.
Note: 2 people are required to safely assemble this product. Missing hardware? Please call 800.606.6387 for replacements.
(We recommend the use of hand tools instead of power tools)
Customer Service 800.606.6252 | Latest instructions available at www.cb2.com
phillips head screwdriverflat head screwdriver
16 - wood
dowels
8 - cams 8 - cam
screws
8 - barrel
nuts
8 - large
bolts
4 - small
bolts
6- medium
bolts
6 - flat
washers
6 - spring
washers
12 - large
screws
8 - leg
bolts
36 - small
screws
16 - shelf
supports
6 - hinges
4 - plastic
anchors
4 - large
screws
4 - small
screws
2 - wall
straps
4 - mounting
brackets
1 - top panel 1 - bottom panel
1 - fixed shelf
1 - back panel
2 - pulls
2 - side panels
(1 right, 1 left)
2 - doors
(1 right, 1 left)
2 - large adjustable
shelves
4 - legs1 - partition
1 - rod2 - small adjustable
shelves

walnut WARDROBE
Made in Vietnam - r05 Page 2 of 6
12
Insert 4 wood dowels, 2 cams and 2 barrel nuts
into partition as shown. Make sure arrow on each
cam points toward nearest edge with holes. Using
a flat head screwdriver, align hole of each barrel
nut with hole on nearest edge.
34
Fit dowels of partition into corresponding holes of
fixed shelf as shown. Using a phillps head
screwdriver, turn each cam clockwise until it
securely engages each cam screw.
NOTE: Do not
over tighten
the cam screws
Insert 4 wood dowels, 3 cams and 3 barrel nuts
into left and right side panel as shown.
partition
fixed shelf
Insert 4 wood dowels and 2 cam screws into
fixed shelf as shown. Secure, but do not over
tighten, bolts with a phillips head screwdriver.
Customer Service 800.606.6252 | Latest instructions available at www.cb2.com
NOTE: Make sure arrow on
each cam points toward
nearest edge with holes
NOTE: Make sure hole of
each barrel nut is aligned
with hole on nearest edge

910
11 12
walnut WARDROBE
Made in Vietnam - r05 Page 4 of 6
Insert 6 cam screws into top panel as shown.
With the assistance of another adult, position unit
upright. Fit dowels of side panels into top panel,
and secure all cams.
Attach 3 hinges to left and right doors with 2
small screws per hinge as shown. Secure, but do
not over tighten, screws with a phillips head
screwdriver.
NOTE: Do not
over tighten
the screws
Customer Service 800.606.6252 | Latest instructions available at www.cb2.com
right door
left door
With assistance of another adult, position unit
upright and secure back panel with 12 large
screws as shown.

walnut WARDROBE
Made in Vietnam - r05 Page 3 of 6
56
78
Attach 4 legs to bottom panel with 2 leg bolts per
leg as shown, using a phillips head screwdriver.
Insert back panel into grooves of side and bottom
panels as shown.
Fit dowels of side panels and partition into bottom
panel, and attach with 8 large bolts as shown,
Secure bolts with a phillips head screwdriver.
Make sure bolts securely engage each barrel nut.
B
AB
left side panel
right side panel
A. With assistance of another adult, fit dowels of
fixed shelf into left and right side panels as shown.
B. Using a phillips head screwdriver, secure side
panels and fixed shelf with 6 medium bolts, 6
spring washers and 6 flat washers. Do not over
tighten the bolts.
NOTE: Do not
over tighten
the bolts
NOTE: Make sure holes in the
center of the back panel are
positioned closer to the
bottom panel as shown
Customer Service 800.606.6252 | Latest instructions available at www.cb2.com
NOTE: Make sure the
brackets for the rod are
positioned toward the top
of assembly as shown
NOTE: make sure grooves
on the back of the bottom
and side panels are
positioned on the same side

13 14
15
walnut WARDROBE
Made in Vietnam - r05 Page 5 of 6
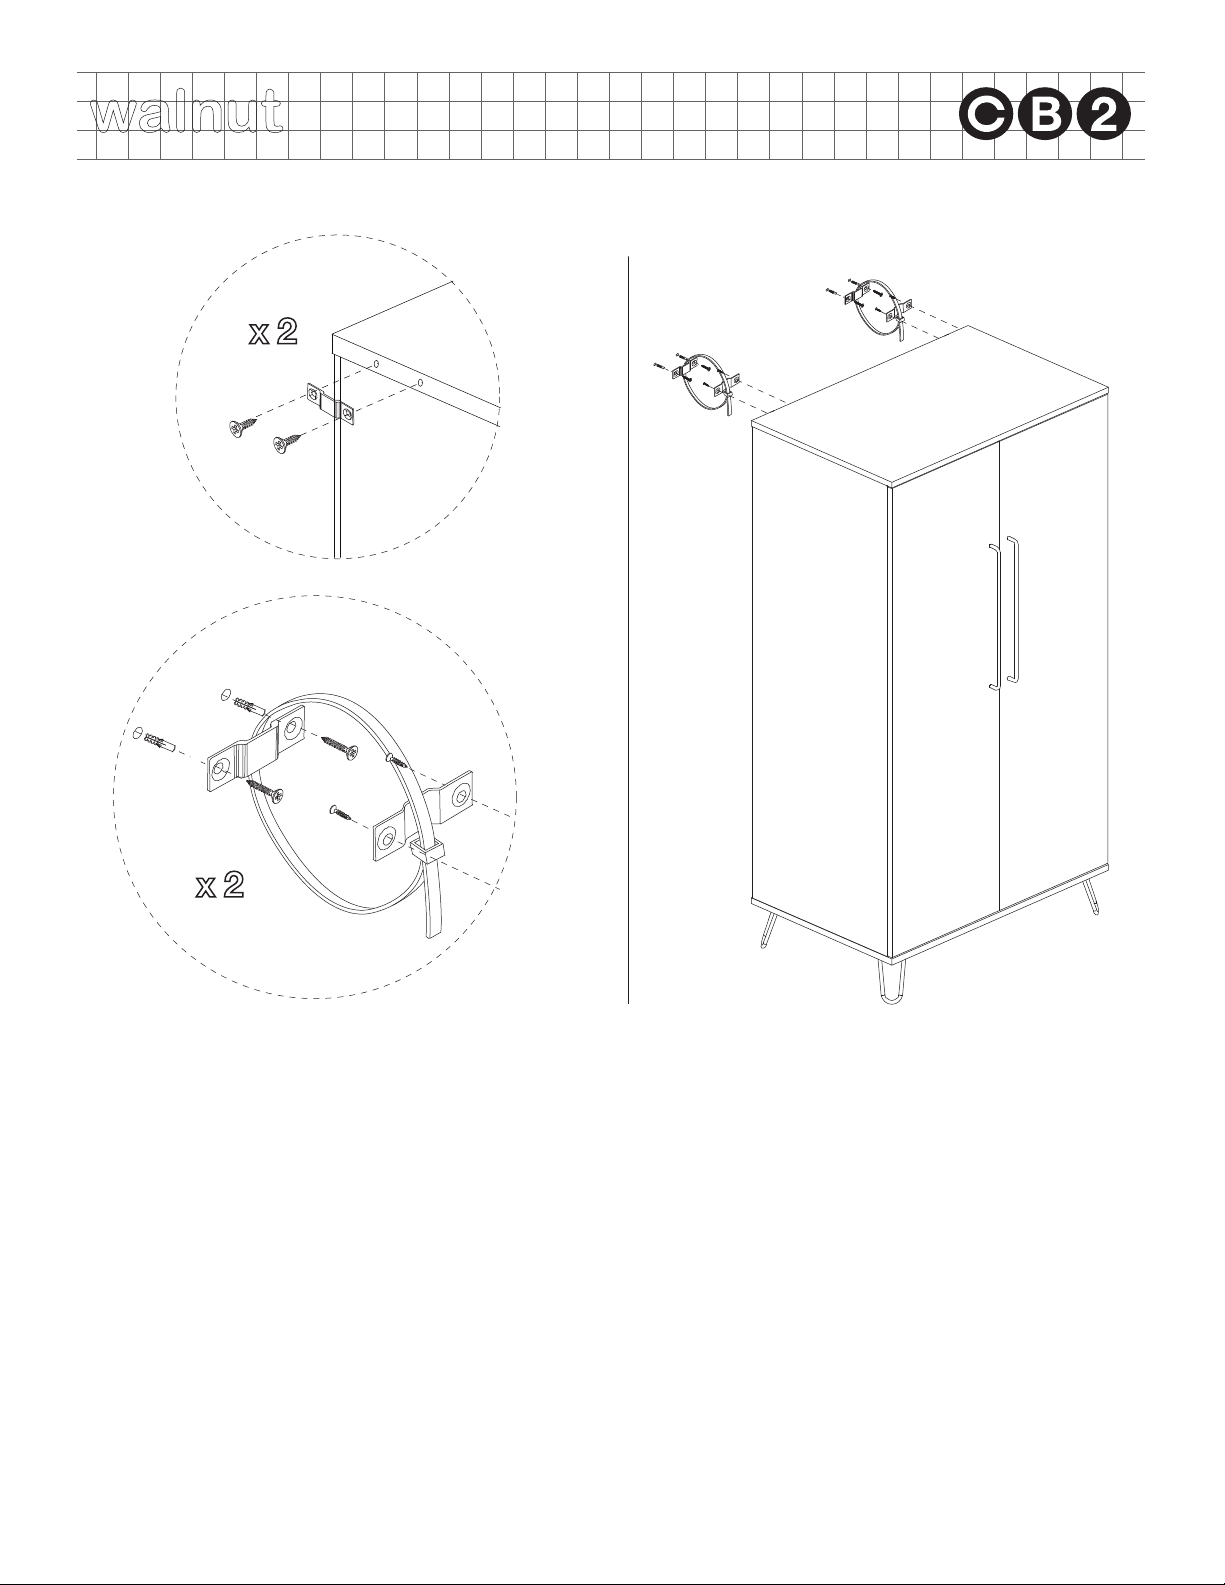
A. Place 2 large and small adjustable shelves
into assembly. Make sure each shelf is securely
supported by shelf supports.
B. Fit rod onto brackets of side panels.
Assembly is now complete.
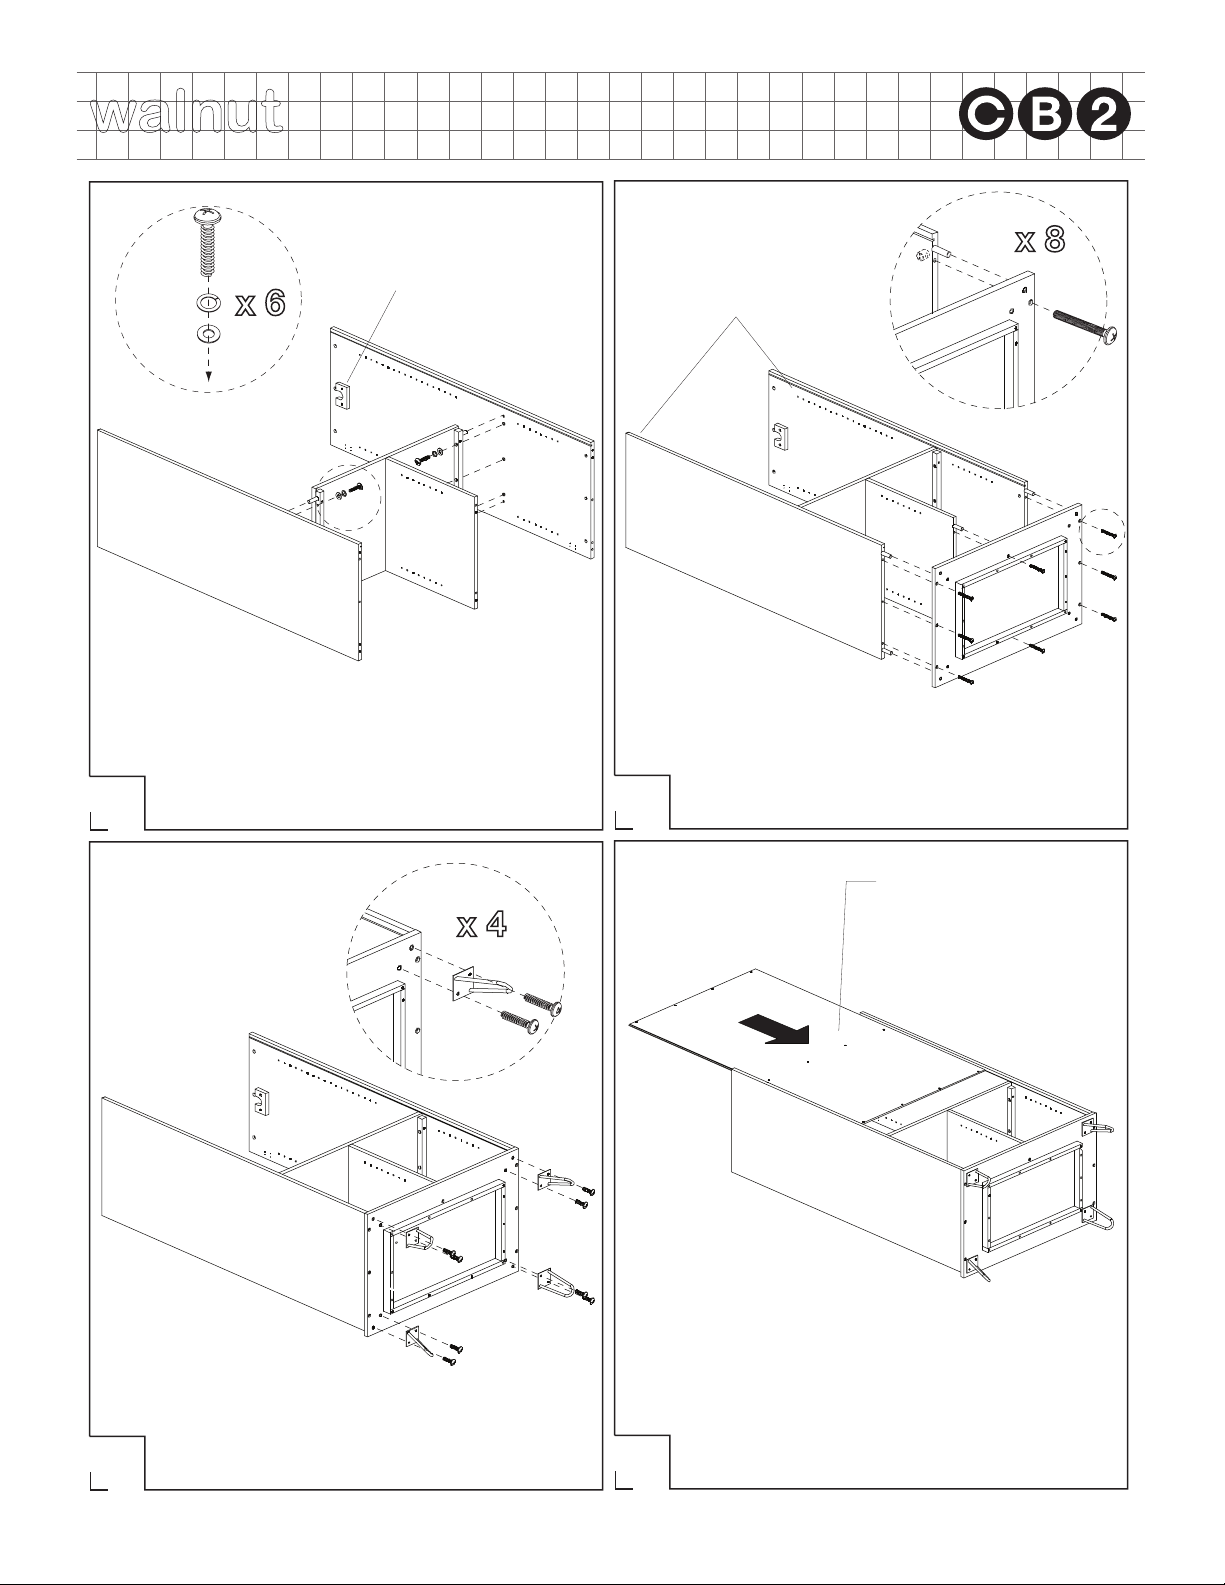
A. Attach hinges of left and right doors to side
panels with 4 small screws per hinge as shown.
B. Attach 2 pulls to left and right doors with 2
small bolts per pull as shown.
rod
large
adjustable
shelf
small
adjustable
shelf
cleaning & care
Clean surfaces with a dry or damp soft cloth. Do not use abrasive
cleaners. Do not use furniture wax or polish as the unit is finished with
a protective clear lacquer.
A
A
B
B
ANOTE: Reference diagram
for adjusting hinges
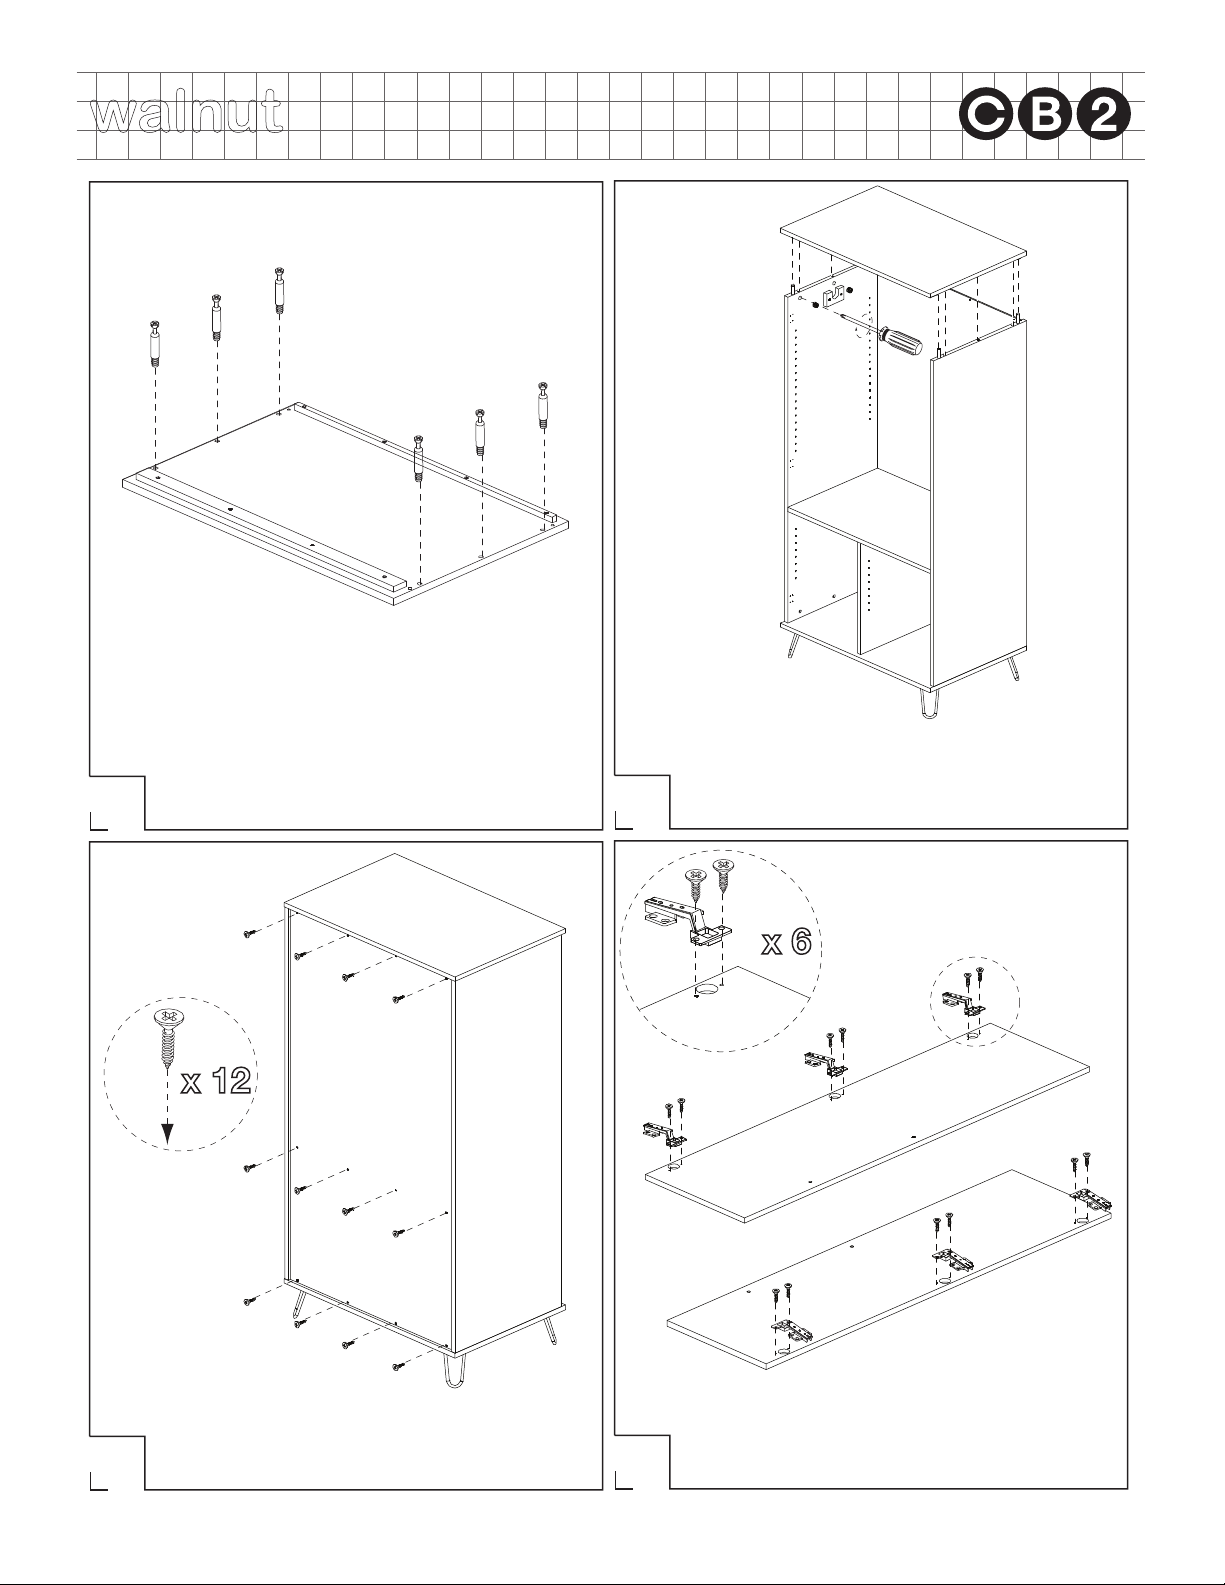
Insert 16 shelf supports into assembly at desired
shelf heights as shown. Press firmly to secure.
Customer Service 800.606.6252 | Latest instructions available at www.cb2.com
hinge adjustment
If the doors do not appear square or aligned,loosen or tighten the
appropriate screws on each case hinge as illustrated.
Depth adjustment:
Loosen screw A, push hinge arm
forwards or backwards, re-tighten
screw Aand secure screw Bwith
a 1/4 turn clockwise
Height adjustment:
Loosen screw C, adjust door
height and re-tighten screw C
A
B
1
2
3
Side to side adjustment:
Loosen screw A, adjust gap with
screw Band re-tighten screw A
A
C
C
B

walnut WARDROBE
Made in Vietnam - r05 Page 6 of 6
Customer Service 800.606.6252 | Latest instructions available at www.cb2.com
A
CD
NOTE: If you are unsure about your wall type or what mounting method you should use, consult a qualified
professional or your local hardware store.
For added safety and stability, it is recommended that the wall mounting hardware be installed. For safe mounting, it is
essential to use wall anchors appropriate to your wall type (i.e. plaster, drywall, concrete, etc.). Mount to wood studs
whenever possible.
A) Attach 2 mounting brackets to top of unit using 2 small screws per bracket.
B) Determine the final location of unit. Mark position on the wall, approximately 2" below the mounting bracket mounted to
the back of the unit.
C) Drill a hole in the wall stud. If the wall stud is not available, drill a hole in the wall that is slightly smaller in diameter than the
anchor. Gently tap the plastic anchor until the flange of the anchor is flush with the wall.
D) Attach 2 mounting brackets to the wall by inserting 2 large screws through each mounting bracket and into the wall
anchor in the wall.
E) Place the unit so the mounting brackets on the back edge are aligned with the wall brackets.
F) Lace one end of the wall strap through both brackets, and into the other end of the strap.
G) Pull the strap tightly until secure.
Wall mounting assembly is now complete.
optional wall mounting assembly
WALL
F
Table of contents
Popular Indoor Furnishing manuals by other brands

BLACK RED WHITE
BLACK RED WHITE LARGO PSZN/5/3 Assembly instructions

Weelko
Weelko Vomex 2201 quick start guide

Tennsco
Tennsco ESPC-1236 Assembly Instructions/Parts Manual

Rauch
Rauch M2659 Assembly instructions

RH Teen
RH Teen SELBY TUFTED DAYBED quick start guide

Seconique
Seconique ATHENS ROUND 3PC NEST OF TABLES Assembly instructions

fantastic furniture
fantastic furniture Hamilton Bedside 2 Drawer manual

N BROWN
N BROWN Hampstead RE451 Assembly instructions

Courtyard Creations
Courtyard Creations RTS870P Assembly instructions

Woodman
Woodman Bau 40923 Assembly instructions

IKEA
IKEA OLOFSJÖN quick start guide

Next
Next BRONX A91704 Assembly instructions