manuals.online logo
Brands
  1. Home
  2. •
  3. Brands
  4. •
  5. Wanderer
  6. •
  7. Stove
  8. •
  9. Wanderer WA1025 User manual

Wanderer WA1025 User manual

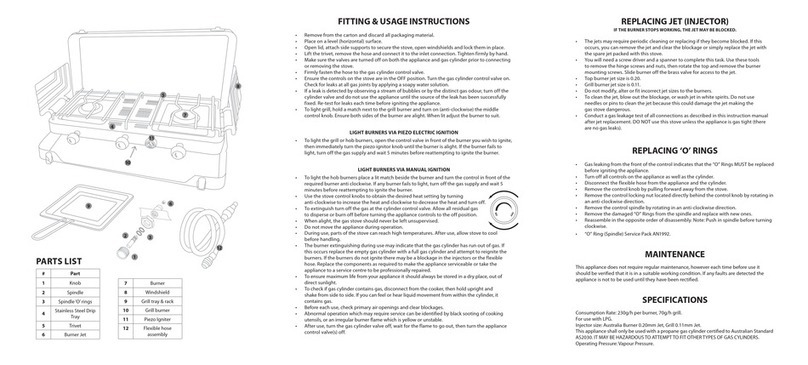
FITTING & USAGE INSTRUCTIONS
• Remove from the carton and discard all packaging material.
• Place on a level (horizontal) surface.
• Open the lid and side windshields and lock them into place.
• Lift the trivet, remove the hose and connect it to the inlet connection. Tighten firmly
by hand.
• Make sure the valves are turned off on both the appliance and gas cylinder prior to
connecting or removing the stove.
• Firmly fasten the hose to the gas cylinder control valve.
• Ensure the controls on the stove are in the OFF position. Turn the gas cylinder control
valve on. Check for leaks at all gas joints by applying a soapy water solution.
• If a leak is detected by observing a stream of bubbles or by the distinct gas odour, turn
off the cylinder valve and do not use the appliance until the source of the leak has been
successfully fixed. Re-test for leaks each time before igniting the appliance.
• Turn each burner control on individually and light the gas at the burner using a match
or by repeatedly pushing the peizo push button (if fitted) for 5 seconds or until lit. If the
burner fails to light turn off the gas supply and wait for 5 minutes before reattempting
to ignite the burner.
• Use the stove control knobs to obtain the desired heat setting by turning anti-clockwise
to increase the heat and clockwise to decrease the heat.
• When alight, the gas stove should never be left unsupervised.
• Do not move this appliance during operation.
• After use, turn the gas cylinder valve off, wait for the flame to go out, then turn the
appliance control valve(s) off.
• During use, parts of the stove can reach high temperatures. After use, allow stove to cool
before handling.
• The burner extinguishing during use may indicate that the gas cylinder has run out of
gas. If this occurs replace the empty gas cylinder with a full gas cylinder and attempt
to reignite the burners. If the burners do not ignite there may be a blockage in the
injectors or the flexible hose. Replace the components as required to make the appliance
serviceable or take the appliance to a service centre to be professionally repaired.
• To ensure maximum life from your appliance it should always be stored in a dry place, out
of direct sunlight.
• To check if gas cylinder contains gas, disconnect from the cooker, then hold upright and
shake from side to side. If you can feel or hear liquid movement from within the cylinder,
it contains gas.
• Before each use, check primary air openings and clear blockages.
• Abnormal operation which may require service can be identified by black sooting of
cooking utensils, or an irregular burner flame which is yellow or unstable.
REPLACING JET (INJECTOR)
• Should there be a problem with the stove such as difficulty in lighting the burner or
sustaining a clear blue flame, the jet may require cleaning or replacing.
• Unscrew the burner from the stove base and remove trivet.
• Using a spanner, unscrew the jet (clockwise from front of stove).
• Blow out the blockage, or wash the jet in white spirits. Do not use needles or pins to
clean the jet. Damage could result making the gas stove dangerous.
• Firmly screw the jet back in place.
• Screw on the burner, replace trivet.
• If the blockage cannot be removed, replace the injector.
• Jet Service pack AN1920J.
REPLACING ‘O’ RINGS
• Gas leaking from the front of the control indicates that the “O” Rings MUST be replaced
before igniting the appliance.
• Turn off all controls on the appliance as well as the cylinder.
• Disconnect the flexible hose from the appliance and the cylinder.
• Remove the control knob by pulling forward away from the stove.
• Remove the control locking nut located directly behind the control knob by rotating in an
anti-clockwise direction.
• Remove the control spindle by rotating in an anti-clockwise direction.
• Remove the damaged “O” Rings from the spindle and replace with new ones.
• Reassemble in the opposite order of disassembly. Note: Push in spindle before turning
clockwise.
• “O” Ring (Spindle) Service Pack AN1992.
MAINTENANCE
This appliance does not require regular maintenance, however each time before use it should
be verified that it is in a suitable working condition. If any faults are detected the appliance is
not to be used until they have been rectified.
SPECIFICATIONS
Consumption Rate: 230 g/h (11mJ/h) per burner
For use with LPG
Injector size: Australia 0.20mm
This appliance shall only be used with a propane gas cylinder certified to Australian Standard
AS2030. IT MAY BE HAZARDOUS TO ATTEMPT TO FIT OTHER TYPES OF GAS CONTAINERS.
Operating Pressure: Vapour Pressure.
Turn anti-clockwise
to turn on and
increase flame
Turn clockwise to
decrease flame and
turn off
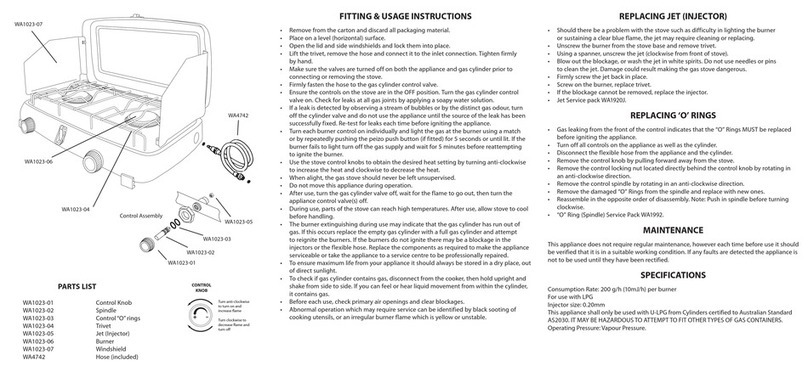
PARTS LIST
WA1025-04 Drip Tray and WA1025-10 Ignition included under trivet for model WA1025D.
*WA1025-07 foldaway legs for model WA1025 only.
WA1025-01 Knob
WA1025-02 Spindle
WA1025-03 Control “O” rings
WA1025-04 Drip Tray (Model WA1025D only)
WA1025-05 Trivet
WA1025-06 Jet (Injector)
WA1025-07 Foldaway leg (Model WA1025 only)
WA1025-08 Burner
WA1025-09 Windshield
WA1025-10 Piezo Ignition (Model WA1025D only)
WA4742 Hose (included)
Control Assembly
WA1025-01
WA1025-09
WA1025-08
WA1025-03
WA1025-02
*WA1025-07
WA1025-06
WA1025-05
WA4742
WA1025-010
CONTROL
KNOB
PLACEMENT
The figures below are diagrammatical representations of suitable outdoor areas in which this
appliance can be used.
WARNINGS
• ONLY USE IN WELL VENTILATED AREAS, USE OUTDOORS ONLY, NEVER USE INDOORS.
• CARBON MONOXIDE HAZARD – THIS APPLIANCE CAN PRODUCE CARBON MONOXIDE
WHICH HAS NO ODOUR. USING IT IN AN ENCLOSED SPACE (FOR EXAMPLE CARAVAN,
TENT, CAR, MOBILE HOME, DOMESTIC RESIDENCE) MAY CAUSE DEATH.
• Caution: Accessible parts may be very hot. Keep young children away.
• Do not modify this appliance.
• Check that the seals between the appliance and the gas cylinder are in place and in good
condition before connecting to the gas cylinder.
• Do not use this appliance if it has damaged or worn seals.
• Do not use this appliance if it is leaking, damaged or does not operate properly.
• Stove must be completely extinguished before disconnecting from cylinder.
• If there is a leak on your appliance (smell of gas), immediately attempt to turn off the
cylinder valve. DO NOT LIGHT THE APPLIANCE. Remove the appliance to a well ventilated
location away from any ignition source. Only check for leaks outdoors using soapy water.
Do not try to detect leaks using a flame.
• Never lift the appliance while it is in use.
• This appliance shall be used away from flammable materials.
• This appliance is not to be used within 1200mm from any combustible materials (i.e.
1200mm clearance in all horizontal or vertical directions).
• Wipe with a moist cloth. Do not use abrasive cleaning products or chemicals.
• This appliance must only be serviced by an authorised person.
• Gas cylinders are to be changed in a well ventilated area, outside, away from people and
from ignition sources such as naked flames, pilot lights, electric heaters/equipment.
• Only use the hose assembly supplied with the appliance for direct connection to the
cylinder – DO NOT USE ADAPTORS. When necessary only use genuine replacement hose
not exceeding 1500mm in length.
• When not in use store the appliance in the folded position in a well ventilated dry
location.
• Avoid twisting or kinking the flexible hose.
• This appliance shall only be used in an above ground open air situation with natural
ventilation, without stagnant areas, where gas leakage and products from combustion
are readily dispersed by wind and natural convection.
• When not in use store the gas cylinder outdoors in a well ventilated area out of reach of
children. Any indoor storage shall comply with AS/NZS 1596.
• Store this appliance when not in use disconnected from the gas cylinder.
Open side at least
25% of total wall area
Open side at least
25% of total wall area
30% or more in total
of the remaining wall area
is open and unrestricted
30% or more in total
of the remaining wall area
is open and unrestricted
A
or B
Minimum Enclosed Area Ventilation
TWO BURNER LPG STOVE
ASSEMBLY AND OPERATING INSTRUCTIONS
• Improper installation, adjustment, alteration, service or maintenance can cause property damage, injury
• or death. Read these instructions for use carefully.
• WARNING: Accessible parts may be very hot. Keep young children away at all times.
• Familiarise yourself with the appliance before connecting it to its gas container. Keep these instructions
for future reference.
WARNING: FOR OUTDOOR USE ONLY
WA1025 / WA1025D (Drip Tray Model)
AGA APPROVAL NO: 7095
WA1025D - 16-09-20-V4
9 336050 104261
PLU: 388508
DESC: TWO BURNER LPG STOVE WITH DRIP TRAY
CODE: WA1025D
Manufactured and packaged for
SRGS PTY LTD
ABN 23 113 230 050
751 Gympie Road, Lawnton,
Queensland 4501, Australia
MADE IN CHINA

This manual suits for next models

1

Other Wanderer Stove manuals

Wanderer WA1023 User manual

Wanderer

Wanderer WA1023 User manual

Wanderer WA1025GD User manual

Wanderer

Wanderer WA1025GD User manual

Popular Stove manuals by other brands

Optimus International Svea user manual

Optimus International

Optimus International Svea user manual

Mendip Stoves Churchill 5 SE MK5 Dual Control Operation and installation manual

Mendip Stoves

Mendip Stoves Churchill 5 SE MK5 Dual Control Operation and installation manual

MCZ THEA HYDRO 16 S1 installation guide

MCZ

MCZ THEA HYDRO 16 S1 installation guide

Salamander SEM 800 PDS instruction manual

Salamander

Salamander SEM 800 PDS instruction manual

Plamen International SP 850 N Technical instructions

Plamen International

Plamen International SP 850 N Technical instructions

SENKO P 12 WATER+AIR instruction manual

SENKO

SENKO P 12 WATER+AIR instruction manual

Astra P-10 user manual

Astra

Astra P-10 user manual

Focal Point 475 Installation and user instructions

Focal Point

Focal Point 475 Installation and user instructions

HAMPTON BAY Greenfire GC60-2 Technical manual

HAMPTON BAY

HAMPTON BAY Greenfire GC60-2 Technical manual

Austro Flamm BONO XTRA operating manual

Austro Flamm

Austro Flamm BONO XTRA operating manual

Goldmedal 4110BG instruction manual

Goldmedal

Goldmedal 4110BG instruction manual

Austro Flamm Ivy 2.0 945027 operating manual

Austro Flamm

Austro Flamm Ivy 2.0 945027 operating manual

bemodern Arteon Pryzm 10003SL Instructions for installation

bemodern

bemodern Arteon Pryzm 10003SL Instructions for installation

Austro Flamm GUSSOFEN G1 manual

Austro Flamm

Austro Flamm GUSSOFEN G1 manual

Focal Point Centurion Installation, servicing and user instructions

Focal Point

Focal Point Centurion Installation, servicing and user instructions

Vanguard SCIVFB OWNER'S OPERATION AND INSTALLATION MANUAL

Vanguard

Vanguard SCIVFB OWNER'S OPERATION AND INSTALLATION MANUAL

bemodern 2917 Instructions for use

bemodern

bemodern 2917 Instructions for use

Haas+Sohn Pelletto III 419.08 Equipment sheet

Haas+Sohn

Haas+Sohn Pelletto III 419.08 Equipment sheet

manuals.online logo
manuals.online logoBrands
  • About & Mission
  • Contact us
  • Privacy Policy
  • Terms and Conditions

Copyright 2025 Manuals.Online. All Rights Reserved.