Waring WCO250XE User manual

QUARTER-SIZE HEAVY-DUTY CONVECTION OVEN
HORNO DE CONVECIÓN DE SERVICIO PESADO
FOUR À CONVECTION COMMERCIAL
ROBUSTER UMLUFTOFEN –VIERTELGRÖSSE
KWARTMAATS CONVECTIEOVEN VOOR ZWAAR GEBRUIK
FORNO A CONVEZIONE PER IMPIEGHI PESANTI
DI METÀ DIMENSIONI
WCO
250X
E/K
25-liter capacity
/
Capacidad de 25 litros
Capacité de 25 litres / 25 liter Backraumvolumen
25 liter capaciteit
/
Capacità di 25 liter
For your safety and continued enjoyment of this product,
always read the instruction book carefully before using.
Para su seguridad y para disfrutar plenamente de este producto, siempre lea las
instrucciones cuidadosamente antes de usarlo.
Afin que votre appareil vous procure en toute sécurité beaucoup de satisfaction,
lire soigneusement le livret de directives avant de l’utiliser.
Lesen Sie bitte vor Gebrauch die Bedienungsanleitung genau durch, damit Ihre
Sicherheit und lang währende Freude an dem Gerät gewährleistet sind.
Voor uw veiligheid en doorlopende genoegen van dit product,
altijd de gebruiksaanwijzing vóór gebruik aandachtig lezen.
Per garantire la sicurezza e la continua fruizione di questo
prodotto, leggere sempre il libretto di istruzioni prima dell’uso.

2
IMPORTANT SAFEGUARDS
When using electrical appliances, basic safety precautions
should always be taken to reduce the risk of fire, electric shock
and/or injury to persons, including the following:
READ ALL INSTRUCTIONS
1.
Toprotect against risk of electricalshock, do not put
appliance in water or otherliquids.
2.
When using the handle or a knob during the cooking
process, do not touch the glass surface. It may be
very hot.
3.
This appliance can be used by children aged from 8 years
and above and persons with reduced physical, sensory or
mental capabilities or lack of experience and knowledge if
they have been given supervision or instruction concerning
use of the appliance in a safe way and understand the
hazards involved.
4.
Children should be supervised to ensure that they do not
play with the appliance.
5.
Keep the appliance and its cord out of reach of children less
than 8 years old.
6.
Cleaning and maintenance shall not be made by children
unless they are older than 8 and supervised.
7.
UNPLUGFROMOUTLETWHENNOTINUSE,BEFORE
PUTTING ON OR TAKING OFF PARTS AND BEFORE
CLEANING. Allow to cool before cleaning or handling.
8.
Avoid contact with moving parts.
9.
Must keep 11cm clearance above top surface of oven
and 1.5cm clearance on sides from other objects to avoid
damage to oven or adjacent items.
10.
Do not operate any appliance with a damaged cord or
plug or after the appliance has malfunctioned or has
been dropped or damaged in any way or is not operating
properly. Return the convection oven to the nearest
authorized service facility for examination, repair, or
mechanical or electrical adjustment.
11.
Do not let the cord hang over the edge of the table or
countertopor touchhot surfaces,as thiscoulddamage
the cord.

3
12.
The use of attachments not recommended or sold by
Waring may cause fire, electric shock, or injury.
13.
Do not use outdoors.
14.
Do not place convection oven on or near a hot gas or
electric burner or in a heated oven.
15.
Do not use this convection oven for anything other than its
intended purpose.
16.
To disconnect, turn function control knob to STANDBY (
),
then remove plug from wall outlet.
17.
Extreme caution should be exercised when using containers
constructed of the following materials in the oven: paper,
cardboard, plastic or similar products.
18.
To avoid burns, use extreme caution when removing tray or
disposing of hot grease.
19.
Do not cover any part of the oven cooking compartment
with metal foil. This will cause damage to oven. Covering
the baking tray with foil is OK. Covering the wire racks with
foil is not recommended because this will block airflow and
create uneven cooking temperatures.
20.
Oversize foods, metal foil packages and utensils must not
be inserted in the oven/broiler as they may involve a risk of
fire or electric shock.
21.
A fire may occur if the convection oven is covered or
touching flammable material.
22.
Do not store any items on top of the appliance when it is in
operation. Installing oven in a cabinet is prohibited. The unit
is designed for countertop use only.
23.
Do not clean with metal scouring pads. Pieces can break off
the pad and touch electrical parts, involving a risk of electric
shock.
24.
Donotattempttodislodgefoodwhentheconvectionoven
is plugged into electricaloutlet.
25.
Warning: To avoid possibility of fire, NEVER leave oven
unattended when using the BROIL function.
26.
Use recommended temperature settings for baking and
roasting.

4
27.
The appliance is off when the function control knob is in
STANDBY ( ) position and the timer control is in the
OFF( ) position.
28.
Do not rest cooking utensils or baking dishes on glass door.
29.
Thisapplianceisnotintendedtobeoperatedbymeansof
an external timer or separateremote-controlsystem.
30.
During use the appliance becomes hot. Care should be
taken to avoid touching heating elements inside the oven.
31.
WARNING: Accessible parts may become hot during use.
Children should be kept away.
32.
WARNING:
Ensurethattheapplianceisswitchedoffand
unplugged before replacing the lightbulb to avoid the
possibility of electric shock.
33.
Steam Cleaner is not to be used for cleaning this appliance.
Correct Disposal of this Product
This marking indicates that this product should not be
disposed of with other household wastes throughout
the EU. Toprevent possible harm to the environment or
human health from uncontrolled waste disposal, recycle
it responsibly to promote the sustainable reuse of
material resources. Toreturn your used device, please
use the return and collection systems or contact the
retailer where the product was purchased. They can
take this product for environmental-saferecycling.
SAVE THESE INSTRUCTIONS

5
CONTENTS
Important Safeguards...................................................................
2
Grounding Instructions.................................................................
5
Introduction ..................................................................................
6
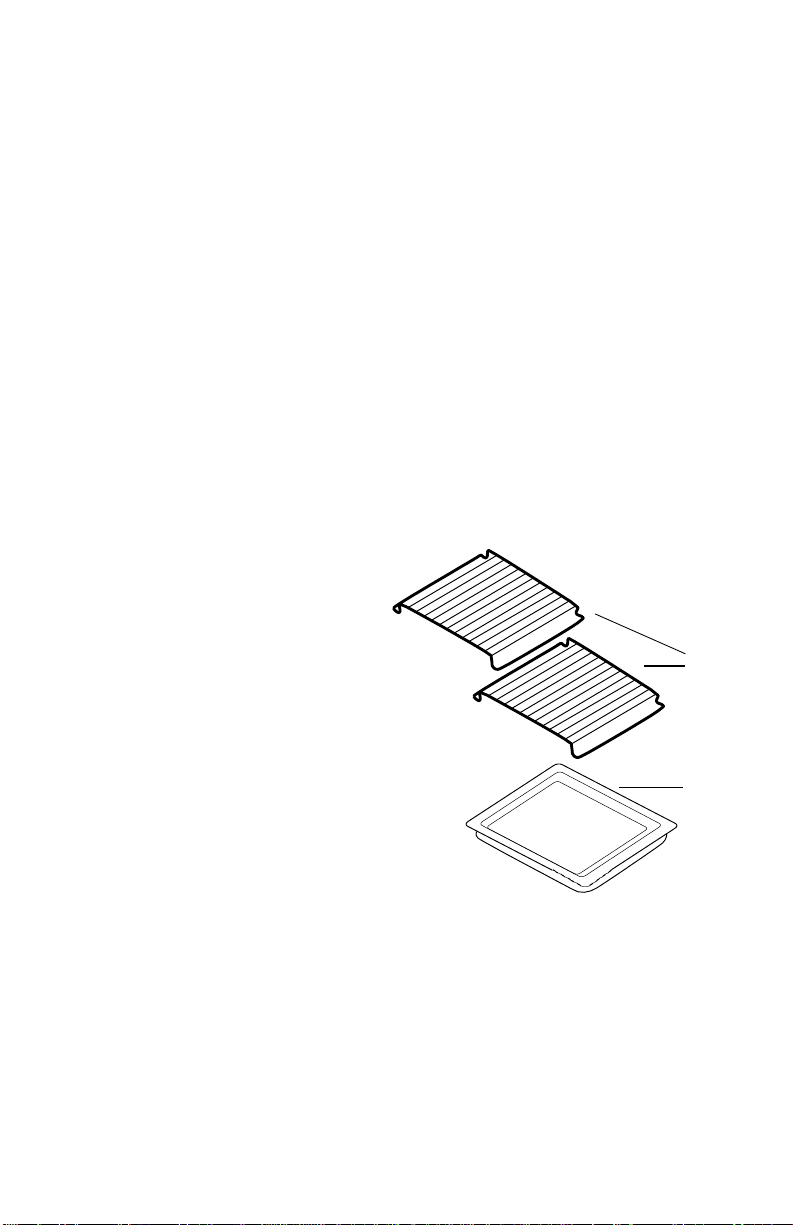
Parts.............................................................................................
6
Before Using Your Oven...............................................................
9
Function Guidelines....................................................................
10
Bake..........................................................................................
10
Convection Bake...................................................................
10
Roast.....................................................................................
11
Broil.......................................................................................12
Oven Rack Positions..................................................................12
Tips and Hints............................................................................13
Use and Care.............................................................................14
Installing & Replacing the Oven Light.........................................15
Rack Installation.........................................................................
16
Safety Feature............................................................................17
TO ENSURE PROPER USE OF THIS UNIT, PLEASE SEE IMPORTANT
GROUNDINGINSTRUCTIONSBELOW.PRIMARYCOUNTRIESUSING
THEDIFFERENT PLUGTYPESARELISTEDFOR REFERENCE ONLY.
REFER TOTHE ACTUAL UNIT TO DETERMINE WHICH PLUG TYPE IS
APPLICABLE.
TYPE F PLUG
(GERMANY, AUSTRIA, NETHERLANDS,
SWEDEN, NORWAY, FINLAND,
PORTUGAL, SPAIN, EASTERN EUROPE)
TYPE G PLUG
(UNITED KINGDOM, IRELAND,
CYPRUS, MALTA, MALAYSIA,
SINGAPORE AND HONG KONG)
This grounded plug has two round prongs and there are
two grounding clips on the side of the socket. This plug
is non-polarized so the plug can be inserted in either
direction into the socket. Grounding is accomplished
when the clip on the socket meets the contact on the
plug. Ensure that the plug is fully inserted.
This grounded plug has three rectangular prongs that
form a triangle. Line up the prongs to the socket and
ensure that the plug is fully inserted. This plug is also
fuse-protected for power surges.

6
Door
INTRODUCTION
The Waring® Commercial Convection Oven takes countertop
cooking to a whole new level. Convection baking uses a hot air
fan to circulate heated air, maintaining the selected temperature
throughout the oven cavity. This constant flow of air eliminates
the hot and cold spots often found in conventional ovens.
Therefore, cooking time is reduced by approximately 25%
to 30%. Use your convection oven to roast meat or whole
chickens, bake cakes, cookies and more. Safe and easy to use.
Exceptionally quick to clean. It’s a better way to cook!
PARTS
1.
Timer
2.
Power Indicator Light –Red
3.
Oven Temperature “Ready”
Indicator Light –Green
4.
Temperature Control Knob
5.
Function Control Knob
6.
Wire Racks
7.
Upper Heating Elements
8.
Rack Support Guides 6
9.
Lower Heating Elements
10.
Door Handle
11.
Dual Pane Tempered-Glass
12.
Baking Tray 12
13.
Interior Light (not shown)
14.
Convection Fan

7
13 2
7
CO NV E CT I ON
3
8 5
14 4
1
10
1.
Timer
11 9
The range of the timer is 120 minutes. The timer setting is
optional.Youcansetthe timereithertothedesiredcooking
timeortotheOVENON( )position,whichwillturntheoven
on. If the baking time is less than 20 minutes, first turn the
timer clockwise past the 20-minutemark and turnit back to
the desired time. If a longer time is required, turn the timer
directly to the desiredtime.
2.
Power Indicator Light –Red
•
When the red power indicator light is on, the oven is
in operation.
•
When the function control is in the STANDBY ( ) position,
and the timer is in the OFF ( ) position, the red indicator
light will be off and the oven is in the off mode.
3.
Oven Temperature “Ready” Indicator Light – Green
•
When the green oven temperature “ready” indicator light is
on, the oven has reached the indicated temperature.
•
The “ready” light will cycle on and off as the set
temperature is maintained.

8
4.
Function Control Knob and General Function
Guidelines
This selector offers four choices of cooking options:
Bake
Indicates that bottom and top heating elements are
operating. The fan is off. This mode is used for
conventional baking.
Convection Bake
Indicates that the rear heating elements, as well as the
convection fan are operating. This function is time
effective and efficient. It is perfect for baking most
types of pastries, cookies, and for baking pizza, bread,
soufflés, casseroles, as well as roasting poultry, pork
and steaks.
Roast
Indicates that the top straight heating elements and
bottom heating elements, as well as the convection fan are
operating. This function is used for roasting chicken, pork
and steaks.
Broil
Indicates that the top heating elements are operating.
Broil can be used for beef sirloin, hamburgers, chicken
breasts, lamb chops, pork chops, fish fillets and steaks.
5.
Temperature Control Knob
This thermostatic knob controls the temperature inside the
oven; it maintains the proper temperature during the various
heating, roasting and baking operations.
6.
Wire Racks
The wire racks are made of chrome-plated steel. The racks
support food during broiling, roasting and baking.
7.
Upper Heating Elements
There are two straight heating elements in the upper part of
the oven.
8.
Rack Support Guides
There are three different levels inside the oven for the
toasting rack and baking tray. Select the best position for
the food relative to the heating elements.
9.
Lower Heating Elements
There are two straight electric heating elements in the lower
part of the oven.

9
10.
Door Handle
Use this handle to safely open and close the oven door.
11.
Dual Pane Tempered-Glass Door
Be sure the safety door is closed tightly while preheating,
baking or roasting. To avoid getting burned, don’t touch the
door when the oven is in use. Wait until the oven cools before
cleaning the door with a damp cloth.
12.
Baking Tray
Can be used for baking or as a drip tray.
13.
Interior Light
Automatically turns on when unit is operating on any
function.
14.
Convection Fan
Circulates the air during convection baking and roasting.
Circular rear heating element is behind it.
BEFORE USING YOUR OVEN
Before using your oven for the first time, be sure to:
•
Wash the wire racks and baking tray with soapy water, rinse
with clear water and dry. These parts should be washed and
thoroughly dried by hand only.
•
Use a damp cloth to lightly wipe the inner walls of the oven.
Use a small amount of detergent, but don’t use a spray or
abrasive polishing agent. Do not touch the electric heating
elements and do not soak the inside of the oven with water.
•
Place the wire racks and baking tray inside the oven.
•
Preheat the oven. First close the oven door and then
preheat the oven at the highest temperature for a minimum
of 5 minutes. The oven may emit an odor. This is normal and
should dissipate. Note: This odor is not harmful.
•
Turn off the oven and allow it to cool. Remove any smoke
residue inside the oven with a damp cloth.
•
Do not block the exhaustvents.

10
FUNCTION GUIDELINES
IMPORTANT: When using smaller baking sheets, use only the
wire racks for support (see diagram, page 12). With oven racks
(concave side down) in positions 1 and 3, most quarter-size
sheets will fit snugly onto oven supports in positions 2 and 4. For
volume baking, as for larger numbers of cookies, 4 baking sheets
can fit into all 4 oven support positions. IT IS RECOMMENDED
to use baking sheets with rounded edges that are closest to the
standard quarter-size. The maximum weight capacity on a baking
sheet with no rack is 3kg. NOTE: Standard baking sheet sizes
vary. If sheets do not fit directly on the oven supports, they must
always be placed on oven racks.
Bake
Your convection oven is equipped with two wire racks and has
three rack positions (see diagram, page 12). The racks can be
easily removed and arranged at various levels. For best results
when using the oven for conventional baking, do not use more
than one rack at a time.
•
Set the function knob toBAKE.
•
Set the temperature knob to appropriate temperature.
•
Setthetimer,if desired, for upto 120 minutes. If thebaking
time is less than 20 minutes, first turn the timer clockwise
pastthe 20-minutemarkandturn itbacktothedesiredtime.
If a longer baking time is required, turn the timer directly to
the desired time.
•
If not using the timer, set timer to OVEN ON ( )position.
•
Always use a potholder or oven mitt when removing hot food
from the oven.
Convection Bake
The general rule for using most regular baking recipes with
a convection oven is to reduce the temperature given in the
recipe by 5˚C. For roasting larger items such as meats or
roasts, use the same temperature as indicated, but reduce
the cooking time.
In any case, always check your baked items 10 minutes before
cooking time indicates. For larger roasted items such as meats,
start checking 20 to 40 minutes before stated cooking time
is reached.

11
With convection baking, the key is the airflow. Avoid using baking
dishes with high sides. For example, even when baking cookies,
try to use a cookie sheet with no sides. For roasting meats use
shallow baking trays as opposed to large, high-sided roasting
pans. For the same reason you’ll want to avoid cooking anything
with a lid when you use the convection feature, as the lid blocks
the airflow.
•
Set wire rack to desired position (see page 12).
•
Set the function knob to CONVBAKE.
•
Set the temperature knob to the desired level.
•
Set the timer, if desired. If the baking time is less than
20 minutes, first turn the timer clockwise past the
20-minute mark and turn it back to the desired time.
If a longer baking time is required, turn the timer directly to
the desired time. If not using the timer, set timer to OVEN ON
( )position.
•
If required to catch drips, place the baking tray one level
below the wire rack. The tray and the rack should be set at
different levels for satisfactory air convection.
•
When you are using the baking tray, in particular in position 1
(bottom rack position), make sure the tray is centered so that
you have an air passageway in the back as well as the front
of the oven.
•
Always use a potholder or oven mitt when removing hot food
from the oven.
•
Please note that the heating elements work in conjunction
with the convection fan. They will cycle on and off
simultaneously.
Roast
•
Set wire rack to desired position (see page 12).
•
Set the function knob toROAST.
•
Set the temperature to the desired level.
•
Set the time, if desired.
•
If required to catch drips, place the baking tray one level
below the roasting rack. The tray and the rack should be set
at different levels for satisfactory air convection.

12
•
Always use a potholder or oven mitt when removing hot food
from the oven.
•
Please note that the heating elements work in conjunction
with the convection fan. They will cycle on and off
simultaneously.
Broil
•
Set rack in position #3 or desired position (see below).
•
Set the function knob toBROIL.
•
Set the timer, if desired. If the broiling time is less than
20minutes,firstturnthetimerclockwisepastthe20-minute
mark and turn it back to the desired time.
If a longer broiling time is required, turn the timer directly to
the desired time.
•
Set the temperature to 230°C or as directed in recipe.
•
Keep door ajar 2.5 to 5 centimeters.
OVEN RACK POSITIONS
The diagram below illustrates the three rack positions for your
convection oven.
25-LITER OVEN
C O N V E CT I O N
Position
3
Position
2
Position 1
Position 3
Position 2
Position 1

13
BAKEWARE REFERENCE GUIDE*
The following bakeware is suitable for our 25-liter capacity oven
when using one rack (dimensions given in inches):
13 x 9 Rectangle
12 x 7½ Rectangle
11 x 7 Rectangle
9 x 13 x 2 6 Muffin
9 x 13 12 Muffin, Traditional
8 x 8 x 2 Cake, Traditional
10 x 5 x 3½ 1½lb. Loaf Pan, Traditional
8½ x 4½ x 2¾ 1 lb. Loaf Pan, Nonstick
8
x 2 Round Cake, Nonstick
9
x 2 Round Cake, Traditional
10
x 2 Pie Plate, Nonstick
9½ x 2 Tart Pan
12–cup Bundt Pan
18 x 13 x 1 Half-Sheet Pan
*Maximum sizes
TIPS AND HINTS
•
Itis importanttorotateany item youarebakingintheoven
to ensure even cooking.
•
It is recommended to bake using one rack at a time. If you
do bake with more than one rack, be sure to rotate both the
baking trays and their rack positions halfway through bake
time.
•
To ensure even flow of air when using baking tray or other
utensils, do not slide tray to the back of oven. Leave about
2.5 to 5 centimeters of air space around all sides of each pan
for even air circulation.
•
Make sure the wire racks are in the desired position before
you turn on the oven.
•
Bake on the shortest time suggested and check for
doneness before adding more time.

14
USE AND CARE
Always allow the oven to cool completely before cleaning.
1.
Always unplug the oven from the electrical outlet
before cleaning.
2.
After the oven cools, use a damp cloth or sponge to clean
interior and exterior surfaces.
3.
Do not soak the inside of the oven or wash it in running
water, as this will cause serious damage to the appliance.
4.
Do not use any sharp or hard kitchen utensils on the oven,
as this could damage the surface of the appliance.
5.
The wire racks and baking tray should be washed and
thoroughly dried by hand only.
6.
To clean the glass door, use a glass cleaner or a damp
cloth. Wipe dry with a clean cloth.
Do not use harsh abrasive cleaners or sharp metal scrapers
to clean the oven door glass since they can scratch the
surface, which may result in shattering of the glass.
7.
If the oven has not been used for an extended period
of time, take care to remove dust and moisture before
operating.
8.
If there is something wrong with this product, please
contact your local distributor.
9.
Should the oven light located in upper back right-hand side
of the oven become loose during shipping, please
follow these steps to affix or replace lightbulb:

15
INSTALLING & REPLACING THE OVEN LIGHT
In the top right-hand corner of your oven is a halogen lightbulb,
which offers a longer lifespan than standard lightbulbs and is able
to withstand high temperatures. Purchase a new 230V/25W
G9 halogen lightbulb at your local hardware store and insert it
as follows:
1.
Be sure that the oven is unplugged and completely cooled.
2.
Removethescrewfromthecover withaPhillipsheadscrewdriver.
3.
Remove the cover.
4.
Removetheold lightbulbbypullingitoutofthesocketbase
(toward the front of theoven).
Tabof Oven Light Cover
Slot of Oven Light Compartment
Phillips Screw
Oven Light Cover
5.
Follow the guidelines on the lightbulb instructions about not
touching the lightbulb with your bare hand, as this will reduce
the lifespan. Youcan use a clean tissue or cloth glove to hold the
bulb.Installthenewbulbinthesocketbasebygentlypushingitinto
place.
6.
ReplacethecoverandsecureittightwithaPhillipsheadscrewdriver.
Anyotherservicingshouldbeperformedbyanauthorizedservice
representative.
Open Glass
Lens Covering
Then Remove.

16
RACK INSTALLATION
Inserting wire racks and drip tray in the oven
The wire rack and drip pan are provided with a locking
mechanism to prevent their unintentional removal.
1.
Insert the wire rack at a
slight angle (Fig. 1).The
rack should be installed
with the concave side
down.
2.
Slide the wire rack
slightly forward until the
edge is past POINT A
(Fig. 2).
3.
Once past POINT A,
lower the wire rack to
the horizontal position.
The rack can be slide
into position (Fig. 3
and 4).
Fig. 1
Fig. 2
Fig. 3
Fig. 4

17
4.
To remove the wire rack, proceed in the reverse order.
The drip tray is inserted and removed in the exact same
way.
SAFETY FEATURE
The Waring® Commercial Convection Oven is equipped with the
following feature to ensure safety:
Thermostat Overload Protection
If the unit heats up
beyond the recommended
temperature level, the oven
will automatically turn off. To
reset, unplug the unit from
the wall outlet and allow it to
cool down. Once the unit has
returned to a safe operating
temperature, you can now
reset the oven by locating
the reset button on the right
side of the rear panel(see
illustration). Using a toothpick
or another long, thin object,
push the reset button in. Plug
the unit back in, turn on and
continue use. If the unit still
does not operate, repeat
steps above or call a Waring
Certified Customer Service
Center for assistance.
WARNING: The appliance and its accessible parts become
hot during use. Care should be taken to avoid touching heating
elements.

18
MEDIDAS DE SEGURIDAD
IMPORTANTES
Siempre que use aparatos eléctricos, debe tomar precauciones
básicas de seguridad para reducir el riesgo de incendio,
electrocución o heridas, incluso las siguientes:
LEA TODAS LAS INSTRUCCIONES
1.
Para reducir el riesgo de electrocución, no coloque el
aparato en agua u otro líquido.
2.
Tenga cuidado de no tocar la puerta de vidrio al usar el asa
o las perillas durante el funcionamiento; puede estar muy
caliente.
3.
Este aparato puede ser usado por niños mayores de 8
años, personas que carecen de la experiencia o de los
conocimientos necesarios para manipularlo, o personas
cuyas capacidades físicas, sensoriales o mentales están
limitadas, siempre que una persona responsable por su
seguridad le haya explicado el funcionamiento y los riesgos
o supervise el uso del aparato.
4.
Asegúrese de que los niños no jueguen con este aparato.
5.
Mantenga el aparato y el cable fuera del alcance de los
niños menores de 8 años.
6.
La limpieza y el mantenimiento no deben ser llevados a
cabo por niños, a menos que sean mayores de 8 años y
supervisados por un adulto.
7.
DESCONECTE EL APARATO CUANDO NO ESTÁ EN
USO, ANTES DE INSTALAR/SACAR PIEZAS Y ANTES
DE LIMPIARLO. Permita que el aparato se enfríe antes de
limpiarlo o manipularlo.
8.
Evite el contacto con las piezas móviles.
9.
Cerciórese de dejar un espacio de por lo menos 11cm
encima y 1,5cm en los lados del aparato para evitar dañar
los objetos que se encuentran en sus alrededores o el horno
mismo.
10.
No utilice este aparato si el cordón o la clavija estuviesen
dañados, después de que hubiese funcionado mal o que se
hubiese caído o si estuviese dañado; regréselo a un centro
de servicio autorizado para su revisión, reparación o ajuste.

19
11.
No permita que el cordón cuelgue del borde de la encimera
o de la mesa, ni que haga contacto con superficies
calientes; esto podría dañar el cable.
12.
El uso de accesorios no recomendados o vendidos por
Waring presenta un riesgo de incendio, electrocución o
herida.
13.
No lo utilice en exteriores.
14.
No coloque el aparato sobre o cerca de un quemador a gas
o una hornilla eléctrica caliente, ni en un horno caliente.
15.
No utilice el aparato para ningún otro fin que no sea el
indicado.
16.
Siempre ponga el selector de función sobre STANDBY (
)
antes de desconectar el cable de la toma de corriente.
17.
Tenga mucho cuidado al poner en el horno envases de
papel, cartón, plástico o materiales semejantes.
18.
Tenga mucho cuidado al sacar la bandeja del horno o
eliminar la grasa caliente.
19.
No cubra ninguna parte del horno con papel de aluminio;
esto puede dañar el aparato. Si desea, puede cubrir la
bandeja con papel de aluminio. No se aconseja cubrir
las rejillas con papel de aluminio, ya que esto impide la
libre circulación del aire adentro del horno y produce
temperaturas disparejas.
20.
No inserte alimentos muy grandes, bandejas de aluminio ni
utensilios de metal en el aparato; esto podría provocar un
incendio o una descarga eléctrica.
21.
Podría ocurrir un incendio si el horno estuviese cubierto o
tocase materiales inflamables.
22.
No guarde ningún artículo sobre el aparato durante el
funcionamiento. No instale el horno adentro de un armario.
Este aparato ha sido diseñado para ser usado sobre una
encimera.
23.
No use estropajos metálicos para limpiar el aparato.
Partículas de metal podrían depositarse sobre sus
componentes eléctricos, presentando un riesgo de
electrocución.
24.
No intente desalojar alimentos atascados mientras el
aparato está conectado.

20
25.
Advertencia: a fin de prevenir los riesgos de incendio,
NUNCA descuide ni abandone el aparato mientras está
usando la función BROIL.
26.
Utilice las temperaturas recomendados para hornear y asar.
27.
Para apagar el aparato, ponga el selector de función sobre
STANDBY( ) y el temporizador sobre OFF ( ).
28.
No apoye utensilios de cocina o fuentes contra la puerta de
vidrio.
29.
Este aparato no ha sido diseñado para ser puesto en
marcha mediante un temporizador o control remoto
independiente.
30.
El aparato se pone muy caliente durante el uso. Cerciórese
de nunca tocar las resistencias.
31.
ADVERTENCIA: el exterior del horno puede volverse
caliente durante el uso. Manténgalo fuera del alcance de los
niños.
32.
ADVERTENCIA: para evitar el riesgo de electrocución,
cerciórese que el aparato está apagado y desconectado
antes de cambiar la bombilla de la luz interior.
33.
No limpie el aparato con un limpiador a vapor.
Reciclaje
Este símbolo indica que este producto no debe
eliminarse junto con los desechos domésticos en ningún
país de la U.E. Para proteger el medio ambiente, evitar
perjuicios a la salud pública resultantes de la eliminación
de desechos no controlada y promover la utilización
sostenible de los recursos materiales, recíclelo. Lleve el
producto a un centro de reciclaje o un punto de recogida
designado para su reciclado, o póngase en contacto con
el establecimiento donde adquirió el producto. Ellos se
asegurarán que el producto esté reciclado de manera
ecológica.
GUARDE ESTAS
INSTRUCCIONES
This manual suits for next models
1
Table of contents
Languages:
Other Waring Convection Oven manuals

Waring
Waring CO1500 Operational manual

Waring
Waring WCO250 User manual

Waring
Waring CO900B User manual

Waring
Waring WCO500 User manual

Waring
Waring WCO250X User manual

Waring
Waring PRO CO1500B Product guide

Waring
Waring PRO CO1500B Product guide

Waring
Waring CO1000 User manual

Waring
Waring WCO500X User manual
Popular Convection Oven manuals by other brands

LG
LG MJ3281CZ owner's manual

Cadco
Cadco Line Chef XAF-133 manual

DDM Novastar
DDM Novastar GF-12HC instruction manual

Bakers Pride
Bakers Pride Convection-Flo 101 parts list

NuWave
NuWave Pro Plus user manual

Electrolux
Electrolux air-o-convect LPG Gas Hybrid Convection Oven... Short form specification