Waring WTO450 User manual

WTO450
Professional
ToasTer oven
For your safety and continued enjoyment of this product,
always read the instruction book carefully before using.

2
IMPORTANT SAFEGUARDS
SAVE AND READ THESE INSTRUCTIONS
When using electrical appliances, basic safety precautions should
always be followed, including the following:
1.
READ ALL INSTRUCTIONS.
2. Do not place anything on top of the oven.
3. Close supervision is necessary when any appliance is used
by or near children.
4. To protect against electric shock, do not immerse cord,
plug, or oven in water or other liquids.
5. Do not operate appliance with damaged cord or plug, or
after the appliance malfunctions or has been damaged in
any manner. Return appliance to the nearest authorized
service center for examination, repair, or adjustment.
6. The use of accessory attachments not recommended by the
appliance manufacturer may cause hazard or injury.
7. Do not use outdoors.
8. Do not place on or near a hot gas or electric burner, or in a
heated oven.
9. Do not let the cord hang over the edge of table or counter,
or touch hot surfaces, including the stove.
10. When operating the oven, keep at least four inches of space
on all sides of the oven to allow for adequate air circulation.
11. Unplug from outlet when not in use and before cleaning.
Allow to cool before putting on or taking off parts, and
before cleaning.
12. To disconnect, turn the Timer and Function controls to OFF,
then remove the plug. Always hold the plug, never pull the
cord.
13. Extreme caution must be used when moving an appliance
containing hot oil or other hot liquids.
14. Do not clean with metal scouring pads. Pieces can break off
the pad and touch electrical parts, creating a risk of electric
shock.
15. A re may occur if the oven is covered, touching, or near
ammable material, including curtains, draperies, walls, and
the like, when in operation. Do not store any item on top of
the oven when in operation, or before the oven cools down.

3
16. Extreme caution should be used when using containers
other than metal or glass.
17. Do not cover crumb tray or any part of the oven with metal
foil. This will cause overheating. Foil can be used to cover
approved cooking containers. Do not place any of the
following materials in the oven: cardboard, plastic, paper, or
anything similar.
18. Do not put face in close proximity with the tempered safety
glass door, in case the safety glass breaks.
19. Use extreme caution when removing trays or disposing of
hot grease or other hot liquids.
20. Do not store any materials, other than manufacturer’s
recommended accessories, in this oven when not in use.
21. This appliance is off when the Timer and Function controls
are in the OFF position. When not in use, the oven should
always remain unplugged from the wall outlet.
22. Always wear protective insulated oven mitts when inserting
or removing items from the hot oven.
23. This appliance has a tempered safety glass door. The
glass is stronger than ordinary glass and more resistant to
breakage. Tempered glass can break, but the pieces will not
have sharp edges. Avoid scratching door surface or nicking
edges. If the door has a scratch or nick, contact our toll-free
customer service line at 1-800-492-7464 before using the
oven.
24. Do not use appliance for other than intended use.
25. Do not cook or warm fried foods, non-bread items or toaster
pastries in your oven. Pastries should be heated in the oven
broiler. Do not toast any food product that has been spread
with margarine, butter, jelly, frosting, syrup, or other spread.
26. Oversized foods or metal utensils must not be inserted in
the appliance, as they may create a re or risk of electric
shock.
27. Never cover oven during operation.
28. Do not operate while unattended.
29. Do not touch hot surfaces. Use handles or knobs.
SAVE THESE INSTRUCTIONS
FOR HOUSEHOLD USE ONLY

4
ADDITIONAL SAFETY INFORMATION
A short power-supply cord is provided to reduce the hazards
resulting from entanglement or tripping over a longer cord. If it is
necessary to use an extension cord, it should be positioned so
that it does not drape over the counter or tabletop where it can
be pulled on by children or tripped over.
A longer extension cord may be used if care is exercised in its
use.
NOTE: The marked rating of the extension cord must be equal to
or greater than the rating of this appliance. The electrical rating is
listed on the bottom of this unit.
Important: This oven is rated 1500 watts. Be sure this is the only
appliance operating on this circuit.
NOTICE:
This appliance has a polarized plug (one blade is wider than the
other). To reduce the risk of electric shock, this plug is intended
to t into a polarized outlet only one way. If the plug does not t
fully into the outlet, reverse the plug. If it still does not t, contact
a qualied electrician. Do not attempt to modify the plug in any
way.
The oven is equipped with thermostat overload protection. If the
unit heats up beyond the recommended temperature level, the
oven and power indicator light will automatically turn off.
To reset, unplug the unit from the wall outlet and allow it to
thoroughly cool down. Once cooled down, plug unit back into
electrical outlet and proceed accordingly.
Note: When using the broil function, the bottom oven heater will
be turned off.

5
PARTS
1. Function Selector Dial – Select cooking function by turning
knob to desired setting.
2. Temperature Control Dial – Adjust the thermostat to the
desired temperature.
3. Timer/Toast Shade Control Dial with Bell Signal –
Set cooking time up to 30 minutes. Will automatically
turn the oven off at the end of the cooking time.
4. Slide-out Oven Crumb Tray – Located at the bottom
of oven. Collects crumbs or fallen food particles. Pulls out
for easy cleaning.
5. Reversible Oven Rack – See Oven Rack Position section,
pages 9–11.
6. Tempered Glass Door – For front viewing of food.
7. Two Rack Levels – To accommodate a variety of foods.
8. Bake Tray – Use for all your baking and roasting needs.
9. Broil Pan – Use for all your broiling needs.
1. 2.
3.
8.
5.
4.
6.
7.
9.

6
BEFORE YOUR FIRST USE
Read all instructions in this manual carefully.
Place your oven on a level surface such as a countertop or table.
Be sure the sides, back and top of the oven are at least four
inches away from any walls, cabinets or objects on the counter or
table.
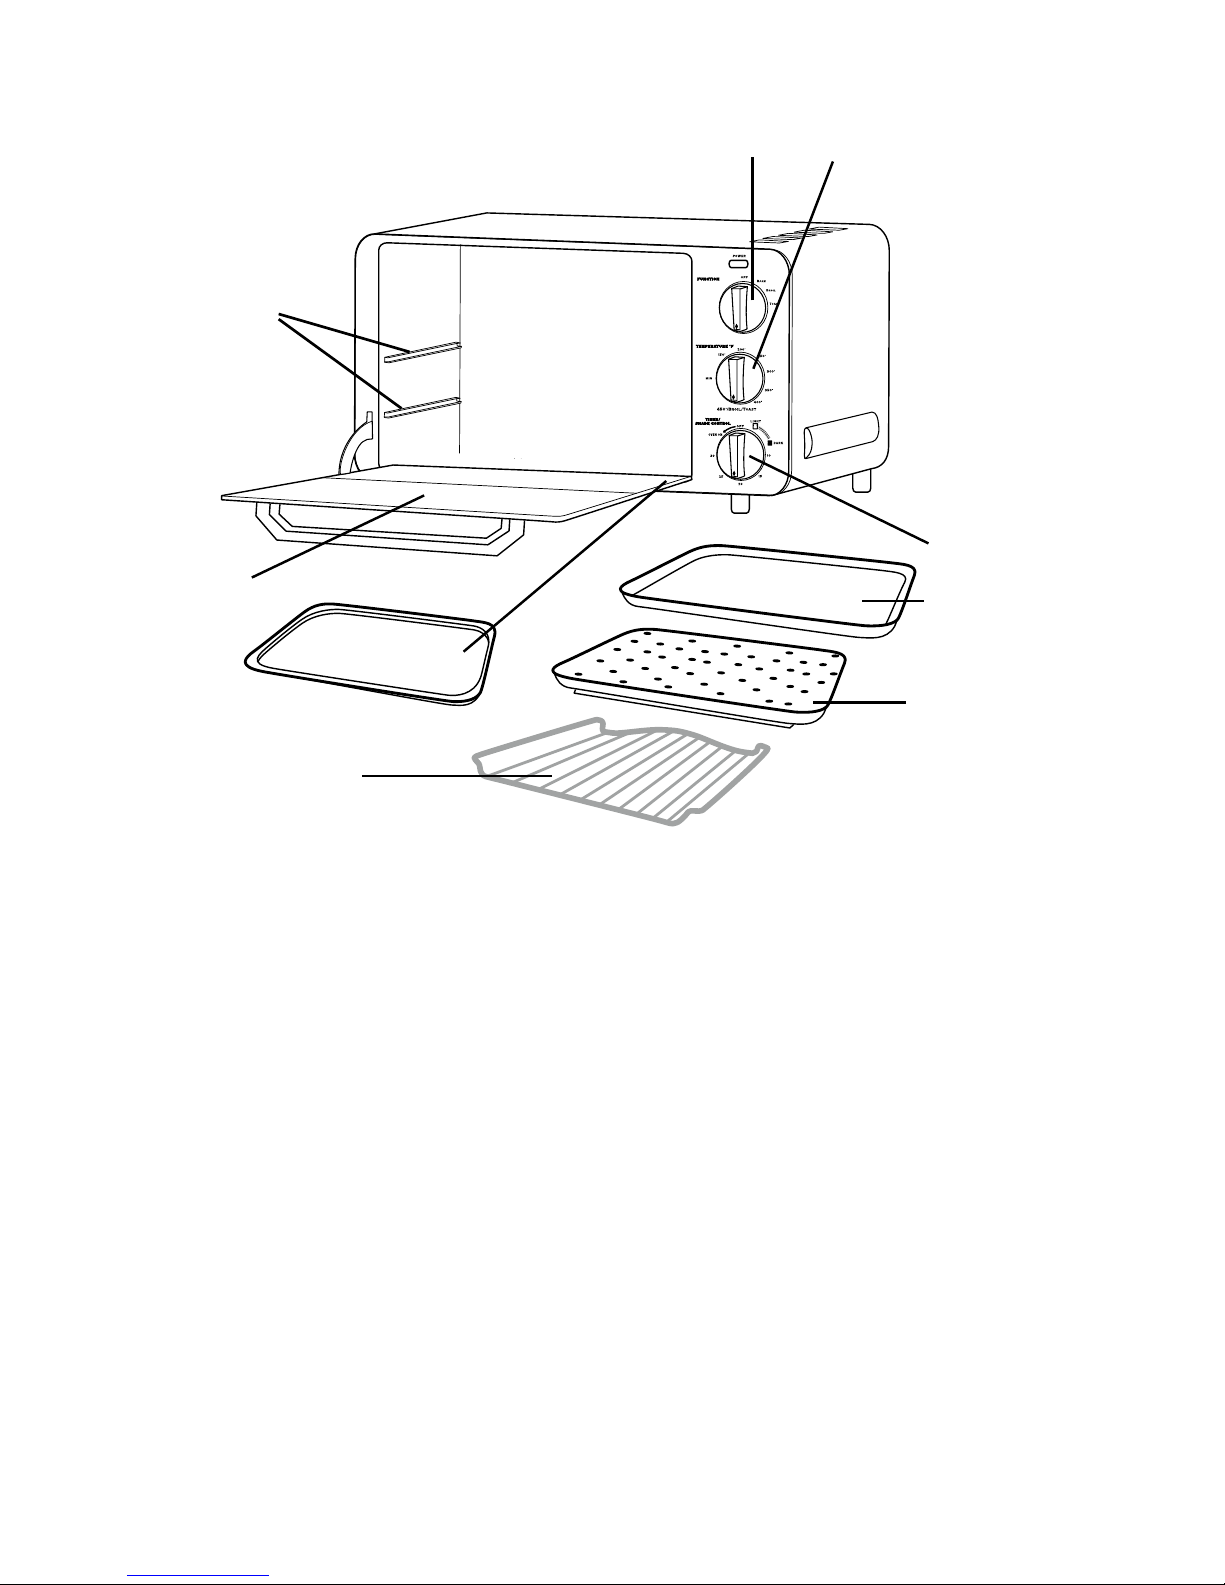
Remove oven rack, bake tray, broil pan and crumb tray. Wash in
hot, sudsy water and dry thoroughly before placing in the oven.
When you are ready to use the oven, be sure that the Function
and Timer/Toast Shade controls are in the OFF position. Plug the
cord into a 120-volt AC outlet.
We recommend a “trial run” at a high temperature to familiarize
yourself with your oven and to eliminate any protective substance
or oil that may have been used for packing and shipping. Set the
Temperature control to 400˚F, the Timer control to 15 minutes and
the Function control to Bake to activate the oven heating element.
After the rst 10 minutes, switch the Temperature control to 450˚/
Broil/Toast to activate the upper and lower heating elements. A
small amount of smoke and odor may be detected in your toaster
oven during this trial run. This is normal.
To avoid scratching, marring, discoloration or re hazard, do not
store anything on top of the oven, especially during operation.
This appliance requires 1500 watts and should be the only
appliance operating on the circuit.
GENERAL GUIDELINES
Baking: Baking function can be used as you would normally use
your large kitchen oven for roasting meats including chicken, or
baking cakes, cookies and more.
Broiling: Broiling function can be used for beef, chicken, pork,
sh and more. It also can be used to top-brown casseroles and
gratins. Caution: Aluminum foil is not recommended for covering
the bake tray and broil pan. Foil is extremely dangerous when
broiling fatty foods. Grease will accumulate and may catch re.
The use of foil is not recommended, but if foil is used to cover
baking or broiling tray, be sure foil is tucked neatly around it and
does not touch the walls or heating rods. Never cover crumb tray.

7
Toasting: Always have the rack in the UP position A, as indicated
in the diagram on page 9, for even toasting. Always center your
item/items in the middle of the rack.
WARNING: Placing the rack in the top position with the rack
upwards while toasting may result in a re. Refer to rack position
A on page 9 for proper placement.
Turning off the toaster oven: Turn the Function and Timer/Toast
Shade controls to OFF. The indicator light will turn off.
OPERATION OF YOUR OVEN
Caution: Appliance surfaces are hot during and after use! Do
not place anything on top of this appliance.
• BesurethattheFunctionandTimer/ToastShadecontrolsare
turned to OFF before plugging the cord into the outlet before
use and when unplugging the oven after use.
• Plugyourapplianceintoa120-voltACoutlet.
• SettheTemperaturecontrolandtheFunctioncontrolbefore
setting the Timer/Toast Shade control.
• TheovenwillonlyoperateiftheTimer/ToastShadecontrolis
turned to a time setting or if it is in the ON position.
Cooking Containers
• Thebaketrayincludedwiththeovenissuitableforcookies,
rolls, biscuits, nachos, pork chops, etc. It may be easier to use
a non-stick spray when using the bake tray or broil pan.
• Anyoven-safebakingpansorcasseroledishesaresuitablefor
your toaster oven.
• Choosebakewaremadeofmetal,oven-proofglassorceramic.
• Manyconveniencefoodsarepackagedinnonmetallic
containers suitable for use in microwave ovens as well as
a regular oven. Check package directions carefully to
determine if the container is suitable for use in a regular
oven.

8
USE AND CARE
Oven Rack Position
Note: Rack must be in the UP position C to accommodate
the bake tray and broil pan.
Check that the crumb tray is in place and that there is nothing in
the oven. Plug power cord into the wall outlet.
To Use the Bake Function
Step 1. Turn the Function control to Bake position and
Temperature control to desired temperature. The oven
indicator light will turn on after the timer is set. If not
using the timer, turn Timer/Shade Control Function to
Oven On.
Note: Oven rack is not required for use with baking pan.
Simply slide baking pan into position.
Timer: To use the timer, set the knob to the desired
time, up to 30 minutes. To set the timer less than 20
minutes, turn the knob past the 20-minute mark, then
back to desired bake time.
Step 2. Preheat oven for 5 minutes at desired temperature with
oven rack in place.
Step 3. Place baking pan with food inside oven.
Step 4. When baking is complete, open door completely and
remove food.
Step 5. Turn Function control to Off. Turn Temperature control to
MIN,turnTimer/ShadeControltoOFF.
To Use the Broil Function
Step 1. To broil most items, place rack in position C.
Step 2. Set Temperature and Function controls to broil.
Step 3. Set Timer/Shade Control to ON or desired time
Step 4. Preheat oven for six minutes with door closed.

9
Step 5. Place bake tray with broil pan in oven. Always leave
door ajar when broiling.
Note: never use glass oven dishes to broil.
Option: To reduce the chance of sizzling or spattering, you may
add approximately ¼ cup water to the bottom of the
bake tray.
Step 6. To stop broil function, turn Function and Timer/Toast
Shade controls to OFF, and turn Temperature control to
MIN.
Note: When broiling thicker items, it is recommended to use
just the broil pan and baking tray in position C, without the
rack.
To Use the Toast Function
No preheating is necessary for toast function.
Step 1. To toast, make sure the oven rack is in the rack position
A, as indicated in the diagram on page 9. If toasting two
items, center them in the middle of the rack. Four items
should be evenly spaced – two in front, two in back.
Close the glass door.
Step 2. Toast/Shade Selection
Set Function control to Toast. Set Turn Timer/Toast
Shade control to desired Toast/shade setting. The power
indicator light will turn on.
Step 3. Set temperature control to 450˚/Broil/Toast.
Step 4. Turn the timer past the 20-minute mark then back to
desired toast time anywhere between the toast symbols
from light to dark for your preferred toast shade.
NOTE: Consecutive multiple cycles with the Toast
Shade control set to Dark may result in the shade of the
toast being darker than desired. After the rst cycle, we
recommend toasting at a lighter setting.
Step 5. When toasting is nished, the oven bell will sound and
turn off. Turn Function control to Off, turn Timer Toast
Shade control to off.
Step 6. Open door completely and remove food.
To Stop Toasting
If you wish to stop the toasting cycle before it is nished, turn
Timer/Shade control to OFF. This will cancel the toast cycle.

10
HELPFUL HINTS
• Toastshadesareaffectedbymanythings,suchaswhetheror
not the bread has been refrigerated or is at room temperature,
the moisture content of the bread, thickness, density, bagels
vs. English mufns, etc. Some bread will require different
toasting shades or two toasting cycles to achieve your desired
results.
CARE AND CLEANING
1. Turn the Function control to OFF and the Timer/Toast Shade
control to OFF and unplug before cleaning. Wait until your
oven has completely cooled before cleaning.
2. Clean the outside of the oven with a damp cloth and dry
thoroughly. Clean stubborn stains with a nonabrasive
liquid cleaner. Rinse and dry thoroughly. Do not use metal
scouring pads or abrasive cleaners; they will scratch the
surface.
3. Clean the glass door with a cloth or sponge dampened with
warm, sudsy water and dry thoroughly.
4. Wash the oven rack, bake tray, broil pan and toaster
crumb tray in hot sudsy water. NOTE: These parts are not
dishwasher safe. Please hand wash and dry.
5. Blot dry with a paper towel or soft, dry cloth.
6. DO NOT use cleaning agents, cleansers or metal scouring
pads.
7. Any other servicing should be performed by a Waring
Authorized Service Representative, or call Waring Customer
Service at 800-492-7464.

11
NOTES

Any trademarks or service marks of third parties herein are
the trademarks or service marks of their respective owners.
©2010 Waring Consumer Products
150 Milford Road
East Windsor, NJ 08520
www.waringpro.com
Printed in China
WTO450 IB
10WR116098
IB-10209
Other manuals for WTO450
1
Table of contents
Other Waring Oven manuals
Popular Oven manuals by other brands

NEFF
NEFF C67M70S0GB - annexe 2 manual

Bush
Bush DHBES60WX instruction manual

Hotpoint Ariston
Hotpoint Ariston FH 21 /HA operating instructions

Electrolux
Electrolux WAVE-TOUCH 318205319 Use & care guide

Belling
Belling Farmhouse 932 Installation & user's instructions

LBC
LBC LRO-1G5 Installation, Service, and Parts Manual