Warpia StreamHD User manual

T
T
ro
u
St
In
u
bl
e
re
a
sta
e
sh
o
1
am
llat
i
o
ot
m
H
D
i
on
ing
D
™
&
G
u
u
id
e
P/N: S
W
e
W
P120A
Rev B

2
4.1 Audio/Video Base ................................................................................................................... 5
4.2 PC and Device Adapters ........................................................................................................ 5
4.3 Standards ............................................................................................................................... 5
4.4 General .................................................................................................................................. 5
6.1 Installation Steps .................................................................................................................... 7
6.2 Removing the Software .......................................................................................................... 9
7.1 Connect the PC Adapter ........................................................................................................ 9
7.2 Connect the Reciever Base .................................................................................................... 9
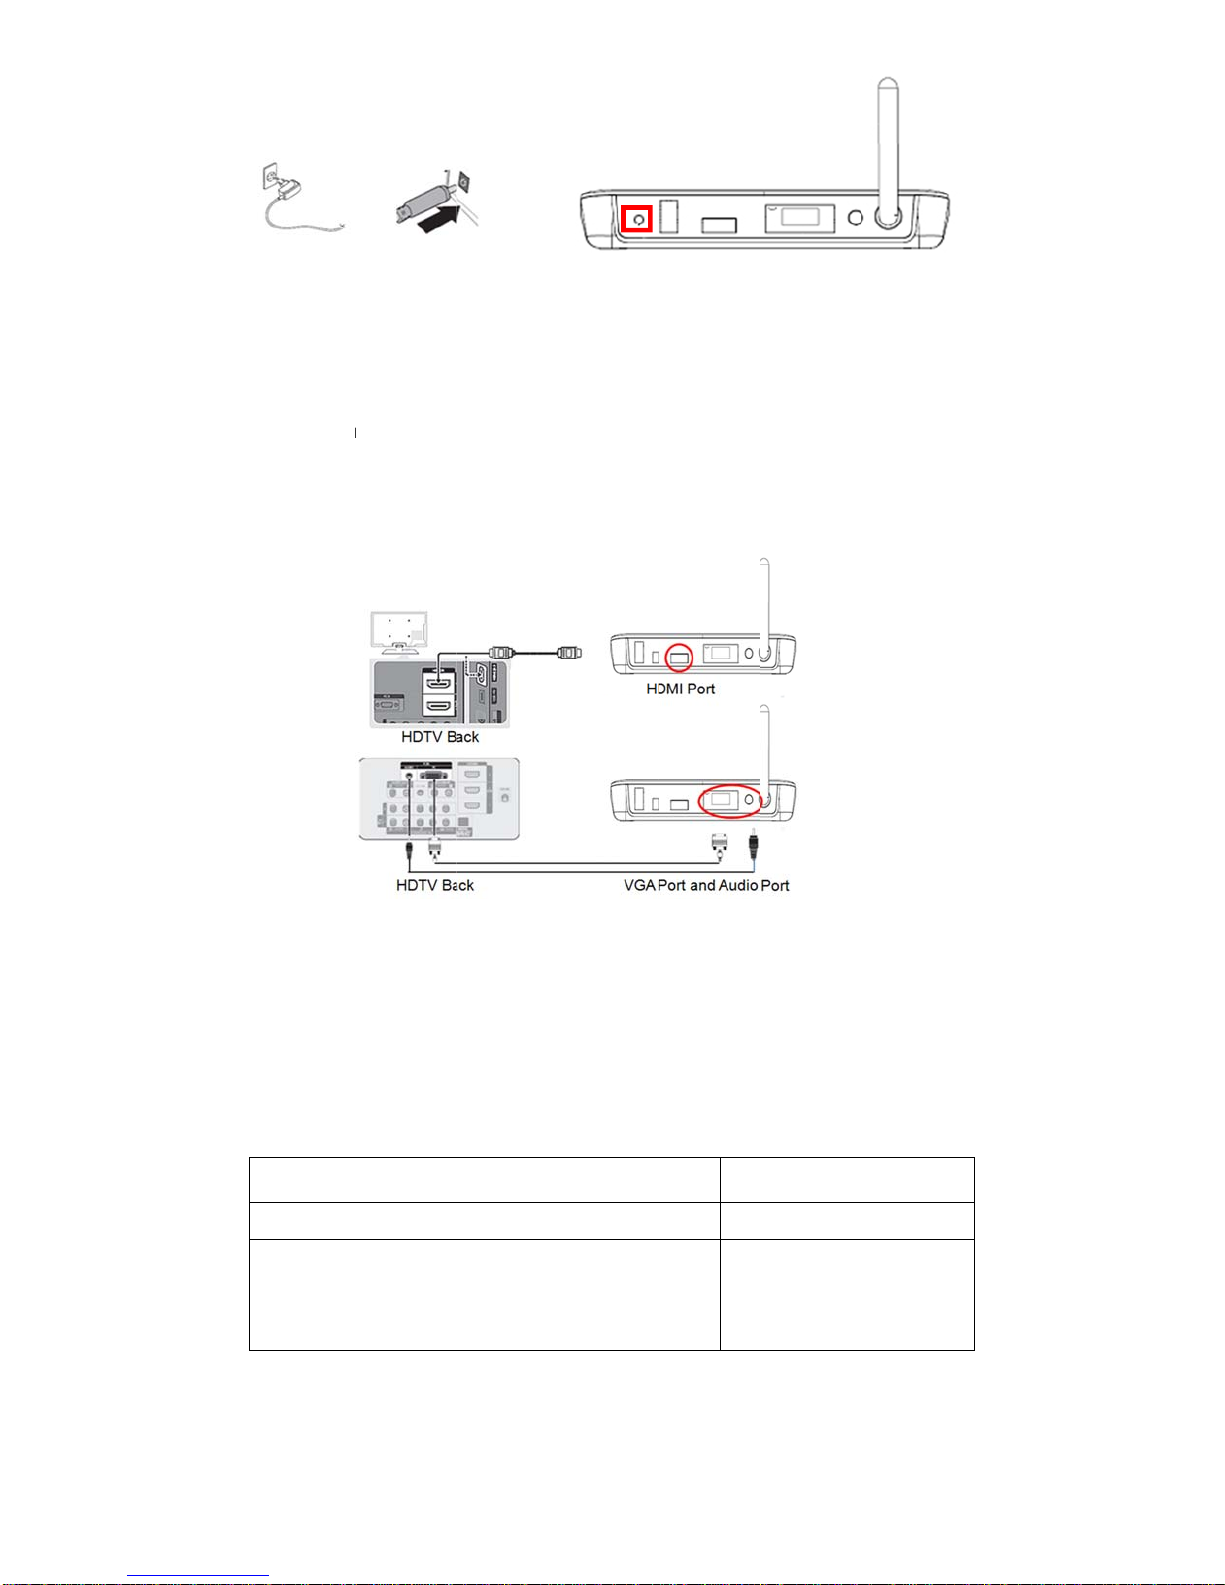
7.2.1 Connect the Power Adapter ................................................................................................ 9
7.2.2 Connecting a monitor or TV or Project .............................................................................. 10
7.2.3 Connecting Audio devices ................................................................................................ 10
7.2.4 Connecting USB devices .................................................................................................. 11
8.1 Introducing the UWB Connection Manager. ......................................................................... 11
8.2 Accessing the UWB Connection Manager ............................................................................ 11
8.3 Adjusting video settings ........................................................................................................ 14
8.3.1 Selecting Extended mode or Mirror mode ......................................................................... 14
8.4 Configuring the Display ........................................................................................................ 15
8.4.1 Setting options for the display ........................................................................................... 15
8.4.2 Configuring the Display in Windows XP/Vista ................................................................... 16
8.4.3 Configuring the Display in Windows 7 ............................................................................... 17
8.5 Adjusting audio settings ....................................................................................................... 19
8.5.1 Configuring audio ports ..................................................................................................... 19
8.5.2 Setting Audio Output Device ............................................................................................. 19
1. INTRODUCTION ........................................................................................................................... 4
2. FEATURES ................................................................................................................................... 4
3. SYSTEM REQUIREMENTS .......................................................................................................... 4
4. SPECIFICATIONS ........................................................................................................................ 5
5. PACKAGE CONTENTS. ............................................................................................................... 5
6. SOFTWARE INSTALLATION. ....................................................................................................... 6
7. SETTING UP THE ADAPTER ....................................................................................................... 9
8. USING THE STREAMHD™ ........................................................................................................ 11

3
9.1 Troubleshooting ................................................................................................................... 21
9.1.1 Display/Video .................................................................................................................... 21
9.1.2 Audio/Sound ..................................................................................................................... 25
9.1.3 Connection/Docking.......................................................................................................... 26
9.1.4 USB PORT ....................................................................................................................... 26
9.2 Warpia Support .................................................................................................................... 27
9.3 Contacting Warpia ................................................................................................................ 27
9. TROUBLESHOOTING AND SUPPORT ...................................................................................... 21

4
1. Introduction
yThe StreamHD Wireless PC to TV Display Adapter with HDMI, VGA & Stereo Audio
Outputs allows users to watch and share any notebook or PC content (such as pictures,
movies and presentations) and any Internet content on their HDTV, projector, or monitor
without cable limitations and in up to stunning 1080p HD.
yThe PC Adapter connects to a USB 2.0 port available in the notebook/ PC, and the
Receiver Base connects to either an HDMI port available in flat screen TVs or a VGA
connection in monitors & projectors. Stereo audio is supported via the HDMI port (along
with the video) or via a separate 3.5mm audio jack. Use the S/PDIF output for connection
to home audio components for a stunning wireless audio/video experience.
yThe StreamHD Wireless Display Adapter set provides full room coverage, is easy to set
up and use, and is an ideal solution for both home and office use. It delivers the best
combination of performance and cost in a variety of living room, conference room and
classroom environments.
2. Features
yWireless connectivity from notebook or PC to any HDTV, Monitor or Projector
yHDMI with audio & video support, as well as VGAvideo output
yAdditional audio support through a 3.5mm stereo jack or S/PDIF optical output
ySame room coverage, up to 30ft line of site range between PC & TV
yGraphics resolution up to 2048 x1152
y1080p Streaming Video
y6-9GHz Ultrawide Band Wireless technology – Free from Wi-Fi interference
yQuickLink™ association between Host Transmitter and Receiver
yWindows®7/ Vista SP2/ XP®32bit SP3
3. System Requirements
•CPU: Core Core2Duo or equivalent, 2.2 GHZ
•Graphics Chipsets Supported: Intel, AMD, and NVIDIA.
•2GB memory
•One Host USB 2.0 port
•30MB of available disk space
•Windows® XP SP2 or SP3, Windows Vista® SP1 or SP2 (32-bit or 64-bit), and
Windows® 7 (32-bit or 64-bit)
Note. The minimum system requirements described above support 1080p streaming video.
Lower resolution video and static graphic screens are supported with lower system specifications.

5
4. Specifications
4.1 Receiver Base
•Video Out: HDMI Connector, VGA Connector
•Audio Output: S/PDIF optical, 3.5mm Stereo Jack
•32-bit True Color support with display resolution of up to 2048 x1152 (SXGA+)
•Streaming video up to 1080p resolution
•Supports both Mirror Mode and Extended Mode (TV/monitor as a second screen)
•48 kHz, 16-bit Stereo via audio jack, S/PIF, or HDMI connector
•Whip Antenna
•5VDC Power Adapter
•LED power and Tri-color signal strength indicators
4.2 PC Adapter
•USB type-A male
•Internal transmission antenna
4.3 Standards
•Wireless USB 1.0, UWB certified
•Certified WiMedia PHY and MAC
4.4 General
•Same room, line of site range, up to 30ft
•128-bit AES security
•Regulation compliant to US, Japan, Europe, Korea
•Software drivers: Windows® 7/ Vista™SP2/ XP® SP3
•Input voltage: 100-240V, 50/60Hz
•Operating temperature range: 0-40 C
5. Package Contents.
•PC Adapter
•Receiver Base
•Power Supply Unit
•Quick Start Guide

6. So
y
y
y
•CD wit
h
Receiver B
Receiver B
ftware In
s
If your PC
perform a
p
The install
a
the comp
u
http://ww
w
AAB15C5
Anti Virus
s
It is recom
m
The install
a
requireme
n
experience
h
software d
r
ase Front Vi
e
ase Back Vi
e
s
tallation.
contains a
p
roper unins
t
a
tion softwar
e
u
ter. In cas
w
.microsoft.c
E04F5&dis
p
s
oftware set
t
m
ended to t
e
a
tion checks
n
ts of the sy
s
index) calc
u
r
ivers and us
e
w
e
w
previous
W
t
all procedur
e
e
requires
.
N
e it is not in
s
om/downloa
p
la
y
lang=en
t
o very high
e
mporarily di
s
the PC cap
a
s
tem. For Vi
s
u
lation prior
t
6
er informati
o
W
arpia or ot
h
e
using the
W
N
ET Frame
w
s
talled it ma
y
ds/details.a
s
security ma
y
s
able the A
n
a
bilities and
c
s
ta/Win7 it is
t
o installatio
n
o
n
h
er Wireles
s
W
indows Co
w
ork
version
y
be downlo
a
s
px?Famil
y
I
D
y
prevent th
e
n
ti viruses S
W
c
ompares th
recommen
d
n
.
s
USB driv
e
ntrol Panel.
2.0 (or later
)
a
ded from th
e
D
=0856EAC
B
e
installer fro
m
W
during the
em to the m
i
ed to run W
E
e
r installatio
n
)
to be instal
e
following l
o
B
-4362-4B0
D
m
running.
installation.
i
nimum syst
e
E
I (Window
s
n
, please
led on
o
cation:
D
-8EDD-
e
m
s

6.1
Install
a
yEnsur
e
yPrior t
o
prior i
n
comp
a
THE S
yGo to
C
you d
o
yIf you
s
and cli
a
tion Step
s
e
that the P
C
o
installing t
h
n
stallation
o
a
nies. IF Y
O
TREAMHD
S
C
ontrol Pan
e
o
not see eit
h
s
ee either
W
cking on the
s
C
Adapter is
u
h
e Warpia S
t
o
f Wireless
O
U HAVE T
H
S
OFTWAR
E
e
l- Program
s
h
er of the foll
W
ireless US
B
Uninstall ta
b
7
u
nplugged f
r
t
reamHD so
f
USB or Di
H
IS SOFTW
A
E
NOT TO W
s
and Featur
e
owing progr
a
B
or Display
b
.
r
om the PC.
f
tware it is i
m
splay Link
A
RE IN YO
U
ORK PROP
E
e
s and look
a
ms:
Link progra
m
m
portant to
m
software fr
o
U
R SYSTEM
E
RLY
through you
m
s, uninstall
m
ake sure th
o
m Warpia
, THIS WIL
L
r programs
t
them by hi
g
ere is no
or other
L
CAUSE
t
o ensure
g
hlighting

yNext, I
yThe in
s
yDoubl
e
•Check
•The so
f
Files f
o
the “In
s
“Optio
n
•If you
h
choice,
nsert the ins
s
tallation C
D
e
click on th
e
the “I agree
f
tware will a
u
o
lde
r
. If you
a
s
tall” tab to
c
n
s”
h
ave chosen
then click o
tallation CD
D
Autoplay m
e
StreamHD
_
to the licen
u
tomatically
a
re ok with t
h
c
ontinue. I
f
to override
t
n “OK” to co
8
in the PC C
D
enu is displ
a
_
Setup.exe f
se terms a
n
c
reate a fol
d
h
e software
c
f
you would
l
t
he Install lo
c
ntinue
D
ROM drive
a
yed
ile to install
d
n
d conditio
n
d
er and load
c
reating its
o
l
ike to manu
a
c
ation, brow
s
d
river softw
a
n
s” box.
into the C: d
o
wn folder fo
r
a
lly change
t
s
e to find th
e
a
re
rive in the P
r
r
installation,
t
he directory
e
location of
y
r
ogram
click on
, click on
y
our

6.
2
7. Se
t
7.1
7.
2
2
Remo
v
•In the
Featu
r
t
ting up
t
Conne
c
yConne
The s
y
2
Conne
c
7.2.1 Co
n
yPl
yC
o
gl
o
v
ing the
S
event you
n
r
es and Sel
e
t
he Adapt
e
c
t the Wir
e
ct the Wirel
e
y
stem will au
t
c
t the Re
c
n
nect the
ug the AC A
o
nnect the p
o
o
ws red wh
e
S
oftware
n
eed to rem
o
e
ct Warpia
S
er
e
less US
B
e
ss USB PC
t
omatically
d
c
eiver Ba
s
Power A
d
dapter cord
o
wer plug to
e
n the Recei
v
9
o
ve the sof
t
S
treamHD
&
B
PC Ada
p
Adapter to
a
d
etect and in
s
s
e
d
apter
into the DC-
I
a live electr
v
er Base is
p
t
ware, go t
o
&
ViewSpan
p
ter
a
high speed
s
tall the driv
e
I
N on the ba
ical outlet. T
p
owered on.
o
Control Pa
to uninstall.
PC USB po
e
rs.
ck of the Re
c
he power lig
nel – Progr
a
rt.
c
eiver Base
ht on the fro
a
ms and
nt panel

7.2.2 Co
n
yYou
one
m
yCon
n
yCon
n
7.2.3 Co
n
The Wi
r
illustrati
yTh
e
Headphon
e
Digital audi
o
(e.g.: Soun
d
optical inpu
t
n
necting
a
can connec
t
m
onitor can
n
ect an HD
M
n
ect the oth
e
n
necting
A
r
eless USB
D
o
ns
e
following t
a
Au
d
e
s/headsets/
s
o
equipment
d
receive
r
s
a
t
port)
a
TV, Mo
n
t
a digital (H
D
be connect
e
M
I or VGA C
a
e
r end of the
A
udio de
v
D
evice Adap
t
a
ble indicate
s
d
io Device
s
peakers
:
a
nd speaker
10
n
itor or P
r
D
MI) or anal
o
e
d to the HD
a
ble to the H
cable to the
v
ices
t
er provides
s
which port
system with
r
ojector
o
g (VGA) m
o
Adapter at
a
DMI or VG
A
TV, Project
o
two audio p
o
to use for e
a
an
o
nitor to the
a
time.
A
port on the
o
r or extern
a
o
rt, as show
n
a
ch type of
a
Use thi
s
3.5mm
J
S/PDIF
Receiver Ba
Receiver B
a
a
l monitor.
n
in the follo
w
a
udio activity
s
port
J
ack
Jack
se. Only
a
se
w
ing

8. Us
T
a
Y
8.1
8.
2
7.2.4 Co
n
yTh
e
yCo
n
su
p
ing the S
t
T
his section
a
nd adjust s
yUWB
C
yWarpi
a
yWarpi
a
Y
ou can also
Introd
u
The UWB
C
driver is au
t
The Strea
m
communic
a
UWB Con
n
perform ta
s
yConne
yChang
yDisabl
e
yDisabl
e
2
Acces
s
To sta
r
n
necting
U
e
Receiver
B
n
nection ca
n
p
ported as t
h
t
reamHD
™
provides inf
o
ettings to su
C
onnection
M
a
Multi-Cha
a
Video Doc
k
refer to this
u
cing the
U
C
onnection
M
t
omatically i
n
m
HD’s™ PC
a
te wirelessl
y
n
ection Man
a
s
ks such as
t
ct/Disconne
c
e/Select the
e
/Enable ra
d
e
/Enable po
p
s
ing the U
W
r
t the UW
B
U
SB devic
B
ase provide
s
n
be made t
o
h
ey require t
h
™
o
rmation on
it your need
s
M
anage
r
nnel Audio
D
k
utility
section to le
U
WB Con
n
M
anager is t
h
n
stalled whe
Adapte
r
con
y
with the R
e
a
ger driver s
o
t
he following
c
t the Strea
m
channel us
e
d
io communi
c
p
-up messa
g
W
B Conn
B
Connec
t
11
es
s
one USB
2
o
, Printers, E
x
h
roughput th
a
using the fo
l
s
:
D
evice utility
arn how to
u
n
ection
M
h
e driver sof
t
n you run th
e
tains a radi
o
e
ceiver Base
o
ftware ena
b
:
m
HD™ from
e
d for radio
c
c
ations
g
es
ection M
a
t
ion Mana
2
.0 port
x
ternal HDD
a
t the wirele
s
l
lowing soft
w
u
ninstall the
s
M
anger So
f
t
ware for th
e
e
StreamHD
o
transmitter
. This radio
i
b
les you to
m
your compu
t
c
ommunicati
o
a
nger
ger:
’s etc. So
m
s
s signal ca
n
w
are to man
a
s
oftware.
f
tware
e
Warpia Str
e
™ Installati
o
that enable
s
i
s known as
m
anage the
h
t
e
r
o
n
m
e Webcam’
s
n
not support
a
ge the Stre
a
e
amHD™.
T
o
n CD.
s
your comp
u
the host rad
i
h
ost radio an
d
s
are not
.
a
mHD™
T
his
u
ter to
i
o. The
d

yDoubl
e
your
W
Note : T
h
tr
a
Y
o
hi
d
c
a
M
a
The U
W
Conne
c
The Ste
a
Not Con
n
establish
connecti
o
When the
w
the Stream
e
-click the U
W
W
indows® d
e
h
e UWB Co
n
a
y/Notificati
o
o
u may nee
d
d
den icons.
a
n access th
e
a
nager icon
W
B Conn
e
c
ting the
S
a
mHD™ first
n
ected. Si
m
a connectio
o
n.
w
ireless con
n
HD Device I
c
W
B Conne
c
e
sktop.
n
nection Ma
n
o
n Area only
d
to click the
If the icon i
s
e
UWB Con
n
on your Win
e
ction Ma
n
S
treamH
D
appears on
m
ply click on
n. It will tak
e
n
ection has
b
c
on, making
12
c
tion Manag
e
n
ager icon a
p
when the P
C
Show Hidd
e
s
not displa
y
n
ection Man
a
dows® des
k
n
ager dis
p
D
™ to you
the Device
s
the Connec
e
a few minu
t
b
een made,
it the defaul
e
r icon in th
e
p
pears as G
r
C
adaptor i
s
e
n Icons butt
o
y
ed in the S
y
a
ger by dou
b
k
top.
p
lay wind
o
r comput
e
s
tab of the
U
ttab next to
t
es for the D
a yellow sta
r
t device for
f
e
System tra
r
een in your
s
connected
o
n [ ] or [
y
stem Tray
N
b
le clicking t
h
o
w appea
r
e
r
U
WB Conne
c
the Stream
H
rivers to loa
d
r
will autom
a
f
uture conne
y/Notificatio
n
System
to your com
p
], to dis
p
N
otification A
r
h
e UWB Co
n
r
s
c
tion Mana
g
H
D Device I
c
d
upon first
a
tically appe
a
ctions.
n
Area of
p
uter.
p
lay
r
ea, you
n
nection
g
e
r
as
c
on to
a
r next to

Disconn
e
Your comp
u
If you have
temporaril
y
On the De
v
StreamHD
™
default dev
“Disconne
c
Note. Y
o
W
to
n
a
Radio C
o
Chang
e
The Co
m
change r
a
radio to
a
e
cting th
e
u
ter can onl
y
more than
S
y
prevent yo
u
v
ices tab of
t
™
Device a
n
ice you can
t
c
t”. The de
o
u can chan
g
W
ireless USB
differentiat
e
a
me, select
R
o
mmunic
a
e
/Select t
h
m
municatio
n
a
dio setting
s
a
utomaticall
y
e
StreamH
y
be connec
t
S
teamHD™
w
u
r computer
f
t
he UWB C
o
n
d unselect “
S
t
hen either
a
vice will no
w
g
e the name
Manager. T
h
e
between th
e
R
ename fro
m
a
tions
h
e chann
e
n
s tab of the
s
. The defau
l
y
locate an a
v
13
D™ from
t
ed with one
w
ithin range
f
rom connec
t
o
nnection M
S
et as defa
u
a
. double cli
c
w
move back
of the each
S
h
is is especi
a
e
m. To rena
m
m
the shortc
u
e
l used fo
r
Wireless U
S
l
t channel s
e
v
ailable cha
n
your com
SteamHD™
of your com
t
ing wireles
s
anage
r
, rig
h
u
lt”. Once
t
c
k on the de
v
to Not Con
n
S
treamHD
™
a
lly useful if
m
e a Strea
m
u
t menu, an
d
r
radio co
m
S
B Manage
r
e
tting is
A
ut
o
n
nel for com
pute
r
at a time.
puter, you
m
s
ly to a parti
c
h
t - click on t
h
t
he device is
v
ice or b. rig
h
n
ected statu
s
™
listed on th
e
you have m
u
m
HD™, right
-
d
then enter
a
m
munica
t
r
enables y
o
o
matic, whic
munications
m
ay want to
c
ular Steam
H
h
e connecte
d
not longer t
h
h
t-click and
s
s
e
Devices t
a
u
ltiple Strea
m
-
click on the
a
custom na
m
t
ion
o
u to view an
h enables th
.
H
D™.
d
h
e
s
elect
a
b of the
m
HD’s,
default
m
e.
d
e host

8.3
Note. I
t
c
b
c
Disabl
e
To temp
o
Click the
Commu
n
the Stre
a
To re-en
a
Adjust
i
8.3.1 Sel
You c
a
or Mir
t
is recomm
e
c
hannel that
b
andwidth wi
c
hannel sho
u
e
/Enable
r
o
rarily disabl
Off button o
n
ication sta
t
a
mHD Icon i
n
a
ble commu
n
i
ng video
e
cting Ex
t
a
n choose t
o
ror mode.
T
e
nded to lea
v
is being use
d
ll be shared
u
ld be used f
o
r
adio com
e the host r
a
n the Com
m
t
us area of
t
n
the Syste
m
n
ications, re
v
settings
t
ended m
o
o
set the US
B
T
he default s
e
14
v
e this settin
g
d
by anothe
r
by both dev
i
o
r each Stre
municati
o
a
dio, do one
m
unications
t
he window).
m
Tray will n
o
v
erse the pr
o
o
de or Mi
r
B
to VGA A
d
e
tting is Ext
e
g
on Autom
a
r
StreamHD
™
i
ces. To ma
x
amHD™
o
ns
of the follow
tab of the
W
Theradi
o
o
w turn Oran
g
o
cedure.
r
ror mod
e
d
apter’s vide
o
e
nd mode.
a
tic. If you m
a
™
in the vici
n
x
imize perfo
r
ing:
W
ireless US
B
o
is now in
A
g
e:
e
o
output sig
n
a
nually sele
c
n
ity, the cha
n
r
mance, a s
e
B
Manager (
irplane Mo
d
n
al to Exten
d
c
t a
n
nel
e
parate
in the
d
e and
d
mode

M
m
w
b
e
o
8.
4
Extend
m
display diff
e
number of
a
•View la
r
•Multita
s
•Compa
r
•View vi
d
M
irror mo
d
m
onitor(s) c
o
w
ant to vie
w
b
uilt-in com
p
e
xternal mo
n
o
verall imag
4
Config
u
8.4.1 Set
t
The follo
w
the Base
y
y
y
y
m
ode
exten
e
rent inform
a
a
dvantages
t
r
ge spreads
h
s
k more effe
c
r
e two docu
m
d
eos/TV on
o
d
e
duplicat
e
o
nnected t
o
w
informatio
n
p
uter scree
n
n
itor’s resol
e quality b
a
u
ring the
t
ing opti
o
w
ing are the
Adapter:
Mirror Mod
e
Extend Mod
Laptop with
External Di
s
ds your des
k
a
tion on eac
h
t
o increase
p
h
eets acros
s
c
tively witho
u
m
ents simult
a
o
ne screen
a
[ E
x
e
s the ima
g
o
USB to V
G
n
on a larg
e
n
. In Mirror
ution, colo
r
a
sed on yo
u
[ Mirror
Display
o
ns for th
e
suggested
w
e
e
Lid Closed
s
play Only
15
k
top space
a
h
monitor co
p
roductivity,
s
two screen
s
u
t overlappi
n
a
neously ac
r
a
nd reviews
o
x
tend Mod
e
g
e on your
c
G
A Adapte
r
e
r, external
mode, the
A
r
quality, an
u
r
computer’
s
w
Mode ]
e
display
w
ork configu
a
cross multi
p
nnected to
y
including th
e
s
n
g windows
r
oss two scr
e
o
n the other
e
]
c
omputer s
c
r
. This mod
e
desktop m
o
A
dpater au
t
d refresh r
a
s
settings.
rations whe
n
p
le monitors,
y
our comput
e
e
ability to:
e
ens
c
reen on th
e
e
is useful i
f
o
nitor inste
a
t
omatically
a
te settings
n
connecting
so that you
c
e
r. This provi
e
external
f
, for exam
p
a
d of a sm
a
adjusts the
to provide
t
a display s
c
c
an
des a
p
le, you
a
ller,
t
he best
c
reen to

Advan
c
E
x
Set a
s
Set
Set
D
8.4.2 Co
n
1) U
2) U
c
ed Settings
x
tend to
s
Entended
as Mirror
D
isplay Off
n
figuring
s
ing Viewsp
a
s
ing Windo
w
Configur
Specify t
Extende
d
connect
e
is physic
to Right”
Extend
y
different
Duplicat
e
monitor
Turn off
t
the Displ
a
a
n icon in S
y
Click
V
w
s Display P
r
ing the Displ
he extensio
n
d
mode. Thi
s
e
d monitors
r
ally position
e
.
y
our desktop
information
o
e
the image
s
t
he external
16
a
y in Win
d
y
stem tray/N
V
iewspan ic
o
r
eperties on
ay via Wind
o
n
direction if
s
setting sho
r
elative to e
a
e
d to the rig
h
space acro
s
o
n each mo
n
s
howing on
y
display.
d
ows XP/
V
otification A
r
o
n
Windows X
P
o
ws Display
you are usi
n
uld match th
a
ch other. F
o
h
t of your co
m
s
s multiple
m
n
itor connec
t
y
our comput
V
ista
r
ea
P
/Vista
Properies in
n
g multiple
m
e physical o
o
r example, i
f
m
puter's dis
p
m
onitors, so t
t
ed to your c
o
er's screen
o
Windows X
m
onitors and
rientation of
f
the extern
a
p
lay, select“
E
hat you can
o
mputer.
o
n the exter
n
P/Vista
the
a
l monitor
E
xtend
display
n
al

ySettin
g
Mirr
o
Ext
e
y
A
djus
t
Use
y
A
djus
t
Use
ySettin
g
Sel
e
Che
c
Che
c
8.4.3 Co
n
1)
I
n
t
h
m
g
the Displ
a
o
r Mode : u
n
e
nd Mode : c
h
t
ing Screen
the Resoluti
t
ing Color
L
the Colors
d
g
the Prim
a
e
ct the scree
n
Monitor on
c
k the optio
n
Vista –Exte
n
c
k the optio
n
is my main
Click OK to
n
figuring
n
windows
7
h
e window
s
m
enu will a
p
a
y to Exten
d
n
check the o
p
h
eck the opt
Resolutio
n
on slider to
a
L
evel (Colo
r
d
rop-down b
o
a
ry Display
n
that is con
n
SMSC XDD
n
Extend m
y
n
d the des
k
n
s Use this
d
monito
r
)
save the ne
w
the Displ
a
7
, there is
a
s
key toget
h
p
pe
r
17
d
or Mirror
M
p
tion “Exten
ion “Extend
n
(Screen re
s
a
djust the d
e
r
quality)
o
x to select
a
n
ected to th
e
M Graphic
s
y
Windows
k
top onto th
i
d
evice as t
h
w
settings.
a
y in Win
d
a
built in su
p
h
er with the
M
ode
d my Wind
o
my Windo
w
s
olution)
e
sired resolu
t
a
color com
p
e
Base Ada
p
s
Drive
r
as s
desktop on
i
s monitor”)
h
e primary
m
d
ows 7
p
port for ex
t
P key(
o
ws deskto
p
w
s desktop
o
t
ion of the di
p
lexity level)
p
ter- for exa
m
hown in the
to this mon
m
onitor (in
W
t
ernal moni
+ P), and t
h
p
on to this
o
n to this
m
splay
m
ple 2.Defa
u
screen abo
v
ito
r
(in Win
d
W
indows Vis
t
tor. To use
h
en the foll
o
monito
r
”
m
onitor”
u
lt
v
e
d
ows
t
a-This
it press
o
wing

2)
U
y
y
y
1) Fo
r
2) Fo
r
U
sing Wind
o
Click the Vi
e
Click Chan
g
To configur
e
The followi
n
W
r
Mirror mod
e
r
Extend mo
d
o
ws Displa
y
e
wspan ico
n
g
e Display
S
e
screen res
n
g windows
w
W
indows 7
18
e
: choose D
d
e : choose
E
y
Prepertie
s
n
( ) in the
S
ettings
olution or a
n
w
ill appe
r
Display
S
uplicate
E
xtend
s
on Windo
w
System tray
/
n
y other disp
S
ettings
w
s 7
/
Notification
lay option, c
h
Area
h
oose Adva
n
n
ced.

8.5
y
y
y
Adjust
i
8.5.1 Co
n
y
y
y
8.5.2 Se
t
The P
C
wirele
s
does
n
In Wi
y
y
y
To chang
e
Select th
e
should se
Base Ada
Select th
e
Resoluti
o
Orientati
o
Multiple
d
Make thi
s
primary d
i
i
ng audio
n
figuring
You can
p
audio por
t
StreamH
D
By defaul
t
time you
c
audio por
t
To chang
e
settings i
n
use the P
C
default se
t
ting Audi
o
C
audio outp
s
s audio dev
i
n
ot switch au
t
ndows X
P
Right clic
k
Properti
e
In the
So
u
In the
So
u
e
any of the
e
appropriat
e
lect the nam
pter.
e
desired val
u
o
n:
your ext
e
o
n:
select ei
t
d
isplays:
s
e
s
my main
d
i
splay on wh
settings
audio po
r
p
layback au
d
t
. However,
y
D
™ at the s
a
t
, the audio
p
c
onnect. Wh
e
t
s on the PC
e
the default
n
Windows®
,
C
’s audio p
o
ttings
o
Output
D
ut device sh
i
ce when th
e
t
omatically,
i
P
:
k
the Volum
e
e
s
.
u
nds and A
u
u
nd Playba
c
19
external dis
p
e
display na
m
e of the TV
o
u
e in any of
t
e
rnal display
t
her Landsc
a
e
lect either
M
d
isplay:
mar
k
ich the desk
t
r
ts
d
io either thr
o
y
ou cannot
u
a
me time.
p
orts on the
S
e
n you disc
o
are automa
t
settings, yo
,
as describ
e
o
rts while th
e
D
evice
ould set itse
e
wireless co
i
t can be sel
e
e
icon in the
S
u
dio Devic
e
c
k > Default
p
lay settings
m
e in the
Di
s
o
r Monitor o
r
t
he availabl
e
resolution.
a
pe or Portr
a
M
irror or Exte
k
this option
t
op is displa
y
o
ugh the Str
e
u
se the audi
o
S
treamHD
™
o
nnect the S
t
t
ically re-en
a
u may need
e
d in this se
c
e
PC is dock
e
lf automatic
a
nnection is
m
e
cted manu
a
System Tra
y
e
s Propertie
s
Device
dro
p
s
play scroll
d
r
Projector c
o
e
settings
a
it.
nd mode.
to make the
y
ed
e
amHD’s au
o
ports on th
e
™
are autom
a
t
reamHD™
f
a
bled.
to manually
c
tion. For ex
a
e
d, you will
n
a
lly to the St
r
m
ade to the
R
a
lly.
y
and select
A
s
screen, se
p
-down box,
d
own option
s
o
nnected to
y
external dis
dio ports or
t
e
PC and on
a
tically enabl
f
rom the PC,
adjust the a
u
a
mple, if you
n
eed to chan
r
eamHD’s
c
o
R
eceiver Ba
s
A
djust Vol
u
lect the Aud
i
select the U
s
. You
y
our
play the
t
he PC’s
the
ed each
the
u
dio
want to
ge the
o
nnected
s
e. If it
u
me
i
o tab.
SB PnP

y
In Wind
o
y
For a
Clic
k
Sound D
e
Click OK
t
o
ws Vista/
W
Right clic
k
devices.
ll audio o
u
k
“Speakers
e
vice.
t
o save the
n
W
in7:
k
the
A
udio
u
tputs (H
D
USB PnP S
o
20
n
ew setting.
properties i
c
D
MI, 3.5m
o
und Device
”
c
on in the S
y
m or S/P
D
”
and click “
S
y
stem Tray
a
D
IF)
S
et Default”.
a
nd select
P
l
l
ayback
Other manuals for StreamHD
2
Table of contents
Other Warpia Adapter manuals