Wassermann Wamix-Classic IV User manual

Vacuum Mixers
Wamix-Classic IV and
Wamix-Injector IV
USER MANUAL
Wamix-Classic IV
Wamix-Injector IV

Dear customer,
Than you for choosing a product from the Wassermann range. Wassermann Dental-
Maschinen incorporates the highest standards of quality and the latest technology.
In order to enjoy maximum performance and years of trouble-free operation, please read
this user manual carefully before you connect this device and start wor , and operate the
device according to the recommended guidelines. The operation safety and the
functionality of this device can only be guaranteed if you follow both the general safety
guidelines and the applying laws to prevent accidents as well as the precautions given in
this user manual. We are not liable for any damages which occur due to inappropriate
usage or faulty operation of this device.
Ma e sure that anyone using this device has read and understood this user
manual.
Keep this user manual in a safe place where it can be referred to as required at
any time.
The unit complies with the relevant EU guidelines.
The unit is subject to the EU guidelines 2012/19/EU (WEEE Directive).
Company address:
Wassermann Dental-Maschinen GmbH
Rudorffweg 15-17
21031 Hamburg, Germany
Phone : +49 (0)40 730 926 -20/ -24 Fax.: +49 (0)40 730 37 24
www.wassermann.hamburg
Erstellt: 17.07.17/ms Version: 1 Wamix-Classic/Injector: IV 171979/171978
.

Contents
1 Features.............................................................................................................................4
2 Safety symbols used in this manual..................................................................................5
3 Safety guidelines................................................................................................................5
4 Responsibility for operation or damage.............................................................................6
5 Application..........................................................................................................................6
6 Before starting....................................................................................................................7
6.1 Transport.....................................................................................................................7
6.2 Installation...................................................................................................................7
6.3 Storage........................................................................................................................7
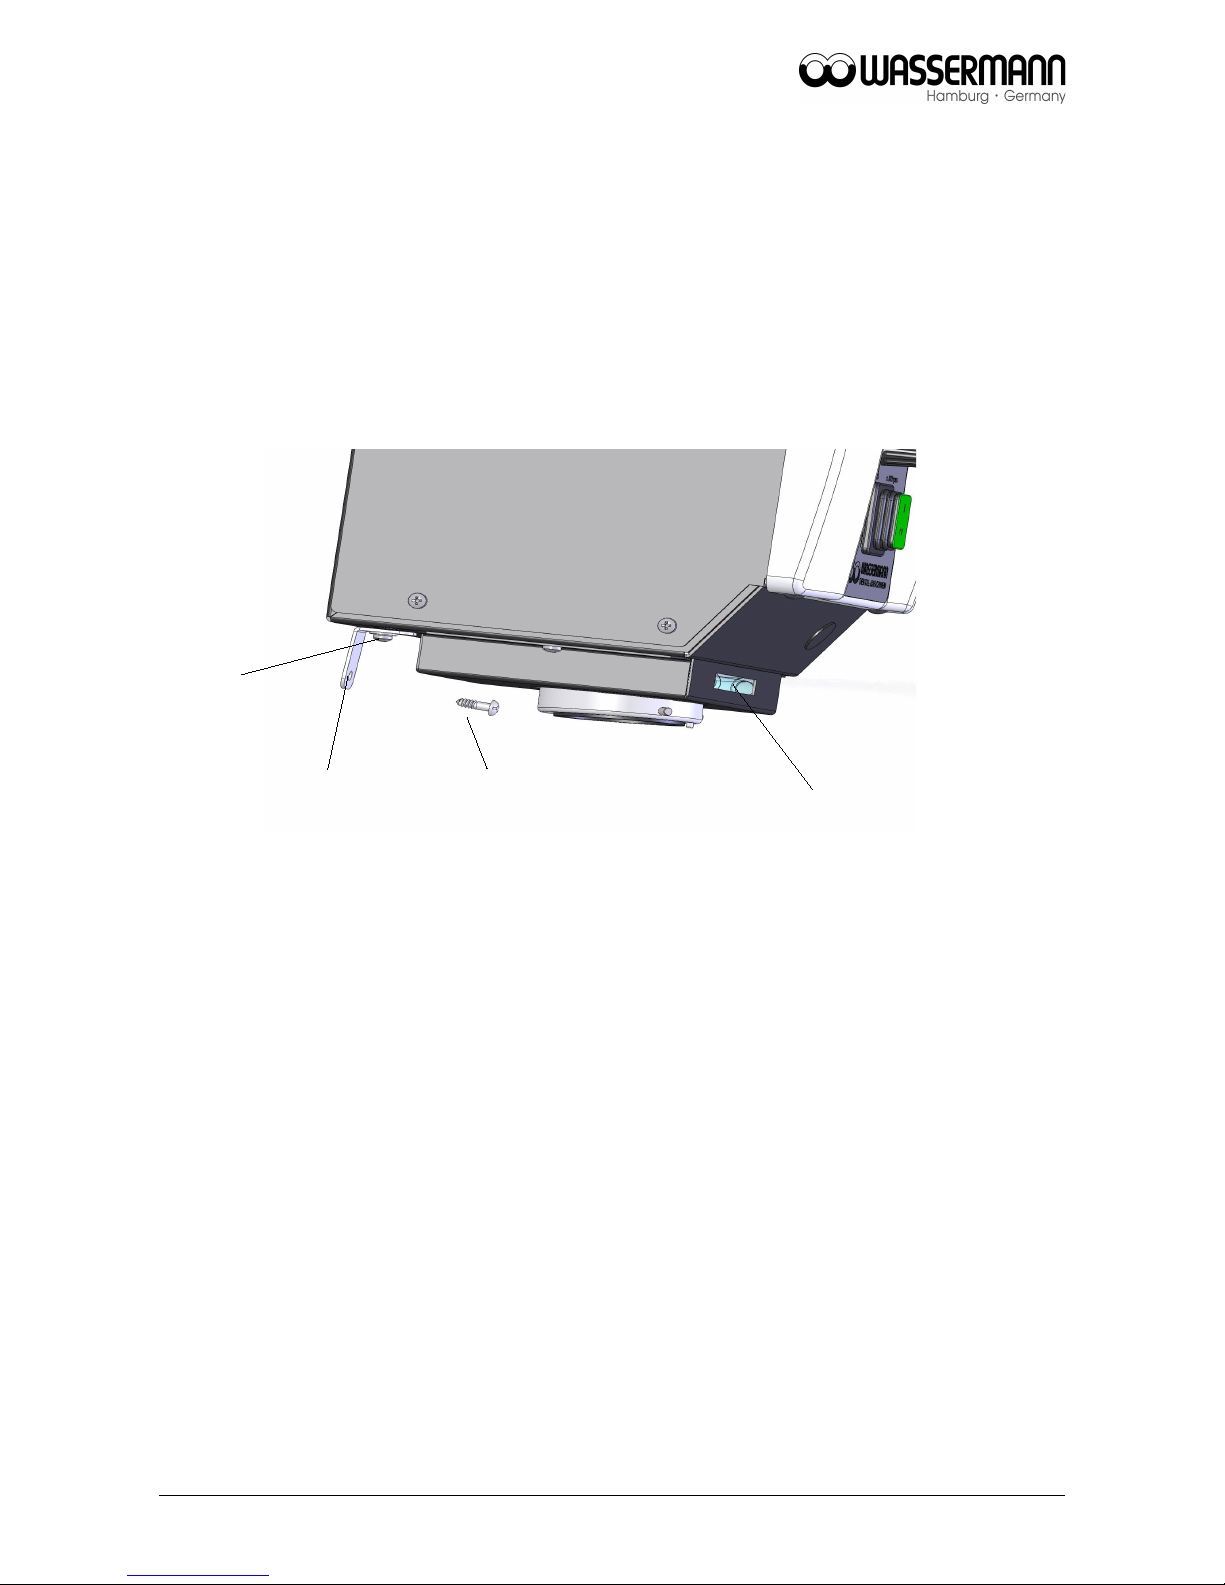
6.4 Mounting instruction fastening set for wall mounting..................................................8
7 Start-up / Installation........................................................................................................11
8 Operation.........................................................................................................................13
8.1 General operating instructions..................................................................................13
8.2 VACUUM MIXING with the Wamix...........................................................................14
9 Troubleshooting...............................................................................................................17
10 Care and maintenance...................................................................................................18
10.1 Cleaning..................................................................................................................18
10.2 Maintenance............................................................................................................19
10.2.1 Changing the filter.............................................................................................19
10.3 Warranty..................................................................................................................20
10.4 Spare Parts..............................................................................................................20
10.5 Service Hotline 0049 (0)40 730 926 -20/ -24..........................................................20
10.6 Scope of delivery/ Accessories...............................................................................20
10.7 Repairs....................................................................................................................21
11 Disposing of the Unit......................................................................................................21
11.1 Information on Disposal for Countries within the EU..............................................21
12 Technical data................................................................................................................22
13 EU Declaration of Conformity........................................................................................23

1 Features
Wamix is a manufacturer of vacuum mixers used not only for mixing all inds of plasters,
embedding media and silicones, but also designed for specialised dental procedures and
for vacuum-rinsing of prostheses.
When mixing silicones, ma e sure that the bea er is only filled to the max. hei ht for
silicone. Otherwise, silicone could penetrate the interior of the unit itself.
Units have separate drives for vacuum generation and for the mixing mechanism. The
mixer in the Wamix-Classic and -Injector IV versions can be switched on and off at any
time by pressing a button, without interruption of vacuum.
Until changed, the current preset mixing time (up to 999 sec.) becomes the default for
subsequent use. An audible signal (approx. 5 sec.) indicates the end of the mixing
process, time display flashes.
The vacuum is guaranteed because the bea er on the Wamix-Classic and -Injector IV is
held to the flange by the vacuum. Mixers are supplied as wall units, but can be converted
for tabletop use at any time. (For accessories, see 8.5)
•compact vacuum stirrers with powerful, maintenance-free motors
•perfect mixing of all inds of plaster, embedding materials and silicone
•press-button start; automatic mixing when bea er is applied
•audible signal at programme end, time display flashes
•mixing time adjustable up to 999 seconds
•Speed: 200-600 rpm
•bea er vented only after ON/OFF switch is activated
•separate motor and pump drive, the mixing mechanism can be switched on and off
at any time without interruption of vacuum
•low-maintenance
•simple cleaning than s to stay-clean surfaces
•350 ml bea er and wall brac et supplied, table stand and other bea er sizes
available as extras
4

2 Safety symbols used in this manual
Warnin !
This is a warning of ris situations and dangers.
Failure to observe this warning could be life-threatening. These warnings has to
be observed.
Information!
This symbol draws your attention to specific features that has to be observed.
3 Safety uidelines
Configuring and operating this equipment requires precise knowledge and observance
of the instructions in this user manual. The equipment is designed only for its intended
application.
WARNING:
Servicing and repairs should be carried out only by authorised specialists.
This equipment is designed to operate at 220-240V / 50/60 Hz.
Ma e sure it is always connected to the appropriate power supply.
Always remove the plug from the power soc et before underta ing maintenance
or cleaning wor .
A lockin hook underneath each unit prevents it comin loose once it has
been mounted in the bracket.
Allow the condensers to discharge before opening the unit.
5

4 Responsibility for operation or dama e
The responsibility for operating the device lies exclusively with the owner or user if said
device is incorrectly serviced, maintained or altered by persons not employed by an
authorised dealer or if the device is used in a manner contrary to its specified purpose.
The unit has to be maintained and operated in accordance with this user manual.
Wassermann Dental-Maschinen GmbH is not responsible for damage arising from the
nonobservance of these instructions.
Warranty and responsibility provisions contained in the sales and supply conditions of
Wassermann Dental-Maschinen GmbH are not extended by these instructions.
5 Application
Wamix equipment is used for mixing all inds of plasters, embedding media and silicones
under vacuum.
The vacuum can be as high as approx. 900 - 950 mbar.
This unit is also suitable for vacuum rinsing of models for special dental procedures. The
insulating layer between the model and the prosthesis cannot separate prematurely
because the model remains moister in the pressure-embedding unit than when water is
used.
Only use the device for this type of application.
6

6 Before startin
6.1 Transport
Before transporting the unit, ensure that it has been unplugged from the power soc et.
Ma e sure that it is pac ed correctly in order to avoid accidental damage.
Be sure to chec for any transport damage when unpac ing the goods. Note down
any damage if found.
6.2 Installation
Open the box, remove the pac ing materials, and carefully lift out the device and
accessories. Chec the included accessories.
The device must stand on a steady and level surface or use the supplied brac et to mount
it on the wall.
If mounting on a wall, ensure that the wall is strong enough to support the unit. For
drawing a drillin scheme to drill the dowel holes please see page 8. Leave at least 30-
35 cm free space beneath the unit.
Install the device in a place where it will not bloc the wor ing area and the
functionality (ta e the dimensions into account). Ma e sure that there are about
10 cm of free space on each side to guarantee air circulation (heat dissipation).
Do not install the unit outdoors or in places without proper ventilation.
Before start-up, be sure the device reaches room temperature.
6.3 Stora e
If the unit is to be stored for an extended period, protect it from moisture and dust.
7

6.4 Mountin instruction fastenin set for wall mountin
Please chec the included accessories:
Incl. in delivery item.-no. 174358 fastenin set
Quantity Name
1 Securing brac et
1 Phillips head screw M 4x8
1 Washer Ø 4,3
1 Serrated washer Ø 4,3
1 Slotted screw 4 x 16
2 Slotted screw 6 x 50
2 Screw anchor S8
1 Screw anchor S5
Mountin instruction :
Please drill the holes as indicated in the following drilling template. Please ma e sure
before that the wall is really suitable for mounting a device (aerated concrete walls and
drywall are problematic).
Drilling template:
Bohrung=drilling
tief=deep
8

Secure the enclosed screw anchors as shown in Figure 1. Screw the 6x50 screws into the
two upper holes; eep a distance of 6-7 mm to the wall! (Figure 2)
fig. 1
fig. 2
9

Screw the securing brac et to the Wamix as shown in Figure 3.
Do not yet fully tighten the Phillips head screw, however – you still need to be able to
move the securing brac et.
fig.3
Carefully hoo in the device. Chec , whether the device hangs loosely (i.e. moving bac
and forth on the screws). If this is the case tighten the 6x50 screws until the device hangs
securely. Finally tighten the securing brac et. First at the wall, then tighten the screw on
the device itself (Figure 3).
10
Screw 4x16
Washer
Serrated washer
Phillips head srew
Securing angle
„control window“

7 Start-up / Installation
Chec that the mains voltage and the voltage requirements of the mixer are the
same, then plug in the power cable.
Only for Wamix-Injector IV:
Install a compressed air line in accordance with the technical data. Be sure to use the
correct hose size if the line is long (inside diameter min. 6 mm). Provide a servicing unit for
each line and use a pressure regulator to maintain a constant pressure.
Accidental mixin is not possible because the motor cannot start until the
beaker is held to the rim by the vacuum. The mixin time also needs to be set.
Before you start your vacuum mixer, make sure that the safety hook has
been fastened under the unit. Push the hook to the wall usin the slot and
fasten the safety hook to the wall. Than reti hten the screw on the chassis
to prevent it comin loose.
Warnin : Use only beakers with the new curved seal (171708).
When usin the 115 V version you have to install the power pack Order no.
171976. Therefore you plu in the conductor of the Wamix into the socket
(Pos.1) of the power pack. The conductor of the power pack ( Pos.2) has to
be plu ed into the house socket. In order to mount the power pack at the
table stand please use the enclosed screws M6.
11
Pos. 2 Pos. 1

Start-up / Installation
Switch on green master switch (1) (vacuum mixing).
Only for Wamix-Injector IV:
Open compressed air valve
When the device is used for the first time, the vacuum first needs to be adjusted at the
throttle valve (for the vacuum generator) using a screwdriver. The recommended input
pressure is a minimum 5 bar. The throttle valve (see fi . 4) is located on the front lower
right of the chassis (remove the blac cover). Slowly open the valve from its zero position
(to the left = +, to the right = -), until the needle is in the green zone. The best vacuum
will not be obtained if the valve is fully open - a middle setting is best. This should be
adjusted later if the pressure changes.
Wamix-Injector IV: If the needle does not reach the big end of the green zone on
the pressure gauge during the setting, there is too little flow to the unit. Chec the
compressed-air supply.
If the equipment will not be used for an extended period, switch off the compressed-
air supply and the vacuum mixer.
12
Remove the blac cover –
the spindle of the throttle
valve for the vacuum is
located behind it.
fig. 4

8 Operation
8.1 General operatin instructions
All instructions for usin the unit, whether in verbal or written form, are based
on our own experience and experimentation and can only be re arded as
uidelines.
Fill the beaker to the Max marking. The vacuum will draw any excess material
into the system.
The beaker will come away automatically once the vacuum is removed. To
avoid dama in the seal, never remove the beaker by force.
The sealin surfaces between the beaker and the plate has to be clean -
likewise the rotor fastenin s and the beaker lid - to ensure trouble-free
operation.
13

8.2 VACUUM MIXING with the Wamix
By default, the timer is set to 60 seconds.
6.2.1 Wamix-Classic IV
1. Set the mixing time on the timer (1) (up to 999 sec.) using the buttons (4 and 5).
A: Automatic mixin = turning nob (7) you can ma e a free choice of 200 rpm until 600
rpm. – mixing time is stored until a new time is set.
B: For manual mixin = set the turning nob (7) to “0”, and switch the mixer on once
vacuum is created, turning nob (7) to the position which you need.
Please note: The timer (total time) starts countin down as soon as sufficient
vacuum is achieved (beaker securely attached to the device). As this therefore
corresponds to the mixin time, the mixer can be switched on and off any number of
times (e. . for pre- and post-vacuum). The be innin and end of the mixin time can
be read on the timer display (6).
2. Place the mixing materials in the bea er and mix by hand until the powder is well mixed
with the liquid.
3. Seal the bea er with a lid.
14
1
2
4
5
6
fig. 5
7

4. Insert the bea er in the unit from below; the vacuum will be released automatically.
Hold the bea er until the vacuum builds.
5. The mixer switches on automatically (depending on the settings – see point 1) for the set
period of time. At the end of this period, an alert si nal sounds for 5 seconds, after
which the timer display (6) flashes until the main switch (2) is switched off.
6. Ta e hold of the bea er before you switch off the master switch (1) (vacuum).
After the vacuum in the bea er drops, the bea er will no longer be clamped to the unit.
6.2.2 Wamix-Injector IV
1. Set the mixing time on the timer (1) (up to 999 sec.) using the buttons (4 and 5).
A: Automatic mixin = set switch (3) to “I”) – mixing time is stored until a new time is set.
B: For manual mixin = set the switch (3) to “0”, and switch the mixer on once vacuum is
created (set switch (3) to “I”).
Please note: The timer (total time) starts countin down as soon as sufficient
vacuum is achieved (beaker securely attached to the device). As this therefore
corresponds to the mixin time, the mixer can be switched on and off any number of
times (e. . for pre- and post-vacuum). The be innin and end of the mixin time can
be read on the timer display (6).
15
1
2
3
4
5
6
fig. 6

2. Place the mixing materials in the bea er and mix by hand until the powder is well mixed
with the liquid.
3. Seal the bea er with a lid.
4. Insert the bea er in the unit from below; the vacuum will be released automatically.
Hold the bea er until the vacuum builds.
5. The mixer switches on automatically (depending on the settings – see point 1) for the set
period of time. At the end of this period, an alert si nal sounds for 5 seconds, after
which the timer display (6) flashes until the main switch (2) is switched off.
6. Ta e hold of the bea er before you switch off the master switch (1) (vacuum).
After the vacuum in the bea er drops, the bea er will no longer be clamped to the unit.
16

9 Troubleshootin
Fault Cause Solution
Mixer does not start Blown fuse */** Replace fuse and determine cause;
otherwise, call Service Center
Set timer to "0“ */** Set mixing time
Turning nob (7) to “0” Adjust the rpm
Switch (3) to “0” Put the Switch (3) on
Vacuum too low Filter (vacuum)
bloc ed */**
Chec filter – clean and/or change (see
8.2 fig. 5)
Lea ing seal on
vacuum flange for
mixing bea er */**
Replace seal
No vacuum Bea er filled above
Max. mar , i.e., mixing
ingredients in
system/”control
window” */**
Clean system, i.e., maintenance by
Service Center
Faulty vacuum pump * Maintenance by Service Center
Set pressure regulator
to "0" (pressure
gauge).**
Chec and set pressure if necessary.
(see page 12)
Flow of airpressure too
low **
Chec airpressure / adjust
Bea er falls out Faulty seal Replace seal (171708)
Wamix-Classic IV * / Wamix-Injector IV **
If the above recommendations do not solve the problem, contact your dental
depot or our service department.
17

10 Care and maintenance
10.1 Cleanin
Disconnect the power plug before starting any maintenance wor .
The identification plate has always to be ept in easily legible condition and has
not to be removed.
Remove external dirt from time to time with some form of cold cleaner.
Use only cold cleaners to avoid damaging the paintwor or removing the lettering.
The equipment should be cleaned at regular intervals to ensure trouble-free operation.
It requires only normal cleaning (sponge, damp cloth, mild detergent) and no further
chemical additives.
Solvents must not be used to clean the front panel!
Keep the bea er clean. When not in use, fill with water to just below the mixer.
Cleaning mixing bea ers in an ultrasonic bath, especially if plaster solvents are
also used in the bea er, will inevitably result in changes to the structure of the
bea er material and will therefore damage the mixing bea er.
18

10.2 Maintenance
Allow the condensers to dischar e before you open the mixer.
Our vacuum mixers do not require servicing. Ma e sure the unit is ept clean and
that the rim seal for the bea er (vacuum seal) is not damaged.
10.2.1 Changing the filter
Fig. 5
Remove screw (1) (on the left, near the mixer mechanism on the rim under the unit). The
filter swings loose at the forward end of the screw. After changing the filter, do up the
screw finger-tight (do not forget the O-ring).
19
1

10.3 Warranty
The warranty period for our equipment is 12 months. If faults occur within the
warranty period, contact your dental depot or get in touch directly with our service
department.
Your equipment should only be operated in perfect condition. If faults occur which
could harm operators or third parties, the unit should not be used until it has been
fixed.
This warranty does not cover damage caused by improper use, external mechanical
causes, transport damage or interference with the unit by unauthorized persons.
10.4 Spare Parts
If necessary please contact our service hotline phone.
10.5 Service Hotline 0049 (0)40 730 926 -20/ -24
10.6 Scope of delivery/ Accessories
Wamix-Classic IV
Wamix-Injector IV
Item no.: 171979
Item no.: 171978*
Incl. in delivery Item no.:
Bea er, medium cpl. 350 ml 171283
Mounting set 174358
PVC hose Ø 8 x 6 textile (blue) 2 m* 320026
Accessories Item no.:
Table stand (W 219 x H 467 x D 308 mm) 171777
Bea er, extra small cpl. 75 ml 171295
Bea er, small cpl. 200 ml 171230
Bea er, medium cpl. 350 ml 171283
Bea er, large cpl. 600 ml 171237
Bea er, extra large cpl. 1000 ml 171269
PVC hose Ø 8x6 textile (blue) per meter* 320026
Vacuum washing bea er 600 ml 171275
20
This manual suits for next models
1
Table of contents
Popular Mixer manuals by other brands

Brentwood Appliances
Brentwood Appliances SM-1162BK Operating and safety instructions

Binatone
Binatone HM-155B instruction manual

SIRI
SIRI SIRIMIX Instructions for use

Wilfa
Wilfa Wilfa XPLODE 2GO WX-2GO operating instructions

Ribitech
Ribitech PREM1200 instructions

Electrolux
Electrolux 601186 Short form specification