Watec WAT-1200CS User manual

WAT-1200CS
Rev. 1.00
OSD User's Manual
2017/4/18
Watec Co., Ltd.
1

Change History
Remarks
Rev. No.
Date
Changes
1.00
Initial Release
2017/4/18
2

1. Introduction ・・・・・・・・・・・・・・・・・・・・・・・・・・・・・・・・・・・・・・・ 5
2. OSD Menu Operation
・・・・・・・・・・・・・・・・・・・・・・・・・・・・・・・・・・ 6
3. MAIN MENU/SETUP MENU ・・・・・・・・・・・・・・・・・・・・・・・・・・・・・・ 8
OSD Menu ・・・・・・・・・・・・・・・・・・・・・・・・・・・・・・・・・・・・・・ 8
Save Settings(SAVE ALL) ・・・・・・・・・・・・・・・・・・・・・・・・・・・・・・・・ 8
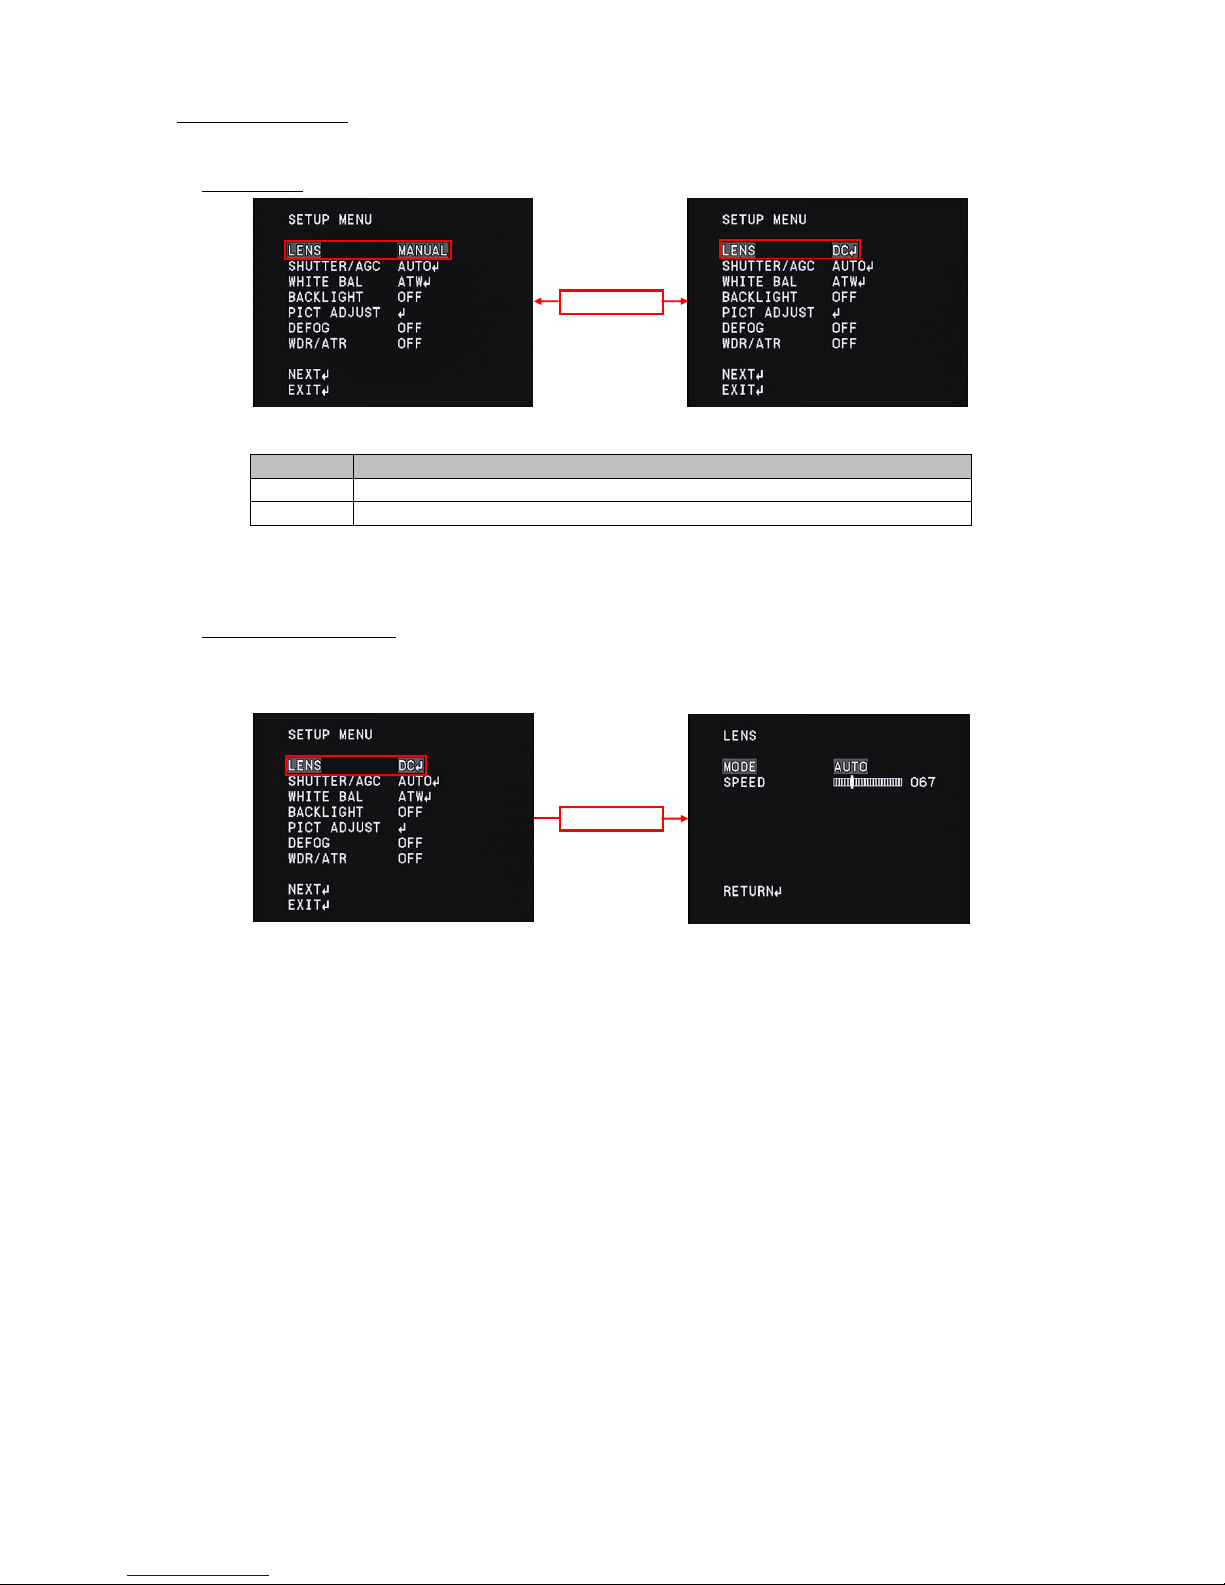
Lens Settings(LENS) ・・・・・・・・・・・・・・・・・・・・・・・・・・・・・・・・・・ 9
3.3.1 DC Iris Lens Setting(LENS) ・・・・・・・・・・・・・・・・・・・・・・・・・・・・・・ 9
DC Iris Lens Control Mode(MODE) ・・・・・・・・・・・・・・・・・・・・・・・・ 10
DC Iris Lens Control Speed(SPEED) ・・・・・・・・・・・・・・・・・・・・・・・・ 11
Shutter/Gain Settings ・・・・・・・・・・・・・・・・・・・・・・・・・・・・・・・・ 12
3.4.1 Automatic Exposure Control(AUTO) ・・・・・・・・・・・・・・・・・・・・・・・・・・・ 12
Shutter Speed(SHUTTER) ・・・・・・・・・・・・・・・・・・・・・・・・・・・・ 12
Brightness Settings, High Luminance Side(AE LEVEL) ・・・・・・・・・・・・・・・・・・ 13
Auto Gain Control(AGC) ・・・・・・・・・・・・・・・・・・・・・・・・・・・・・ 13
Brightness Settings, Low Luminance Side ((AE LEVEL) ・・・・・・・・・・・・・・・・・・ 14
3.4.2 Manual Exposure Control(MANUAL) ・・・・・・・・・・・・・・・・・・・・・・・・・・ 15
Shutter Speed (SHUTTER) ・・・・・・・・・・・・・・・・・・・・・・・・・・・ 15
Gain Value Settings(AGC) ・・・・・・・・・・・・・・・・・・・・・・・・・・・・ 15
White Balance(WHITE BAL) ・・・・・・・・・・・・・・・・・・・・・・・・・・・・・ 16
3.5.1 Auto Trace White Balance(ATW) ・・・・・・・・・・・・・・・・・・・・・・・・・・・・ 17
3.5.2 Push White Balance(PUSH) ・・・・・・・・・・・・・・・・・・・・・・・・・・・・・・ 17
3.5.3 Preset White Balance(USRE1 5100K/USER2 6300K) ・・・・・・・・・・・・・・・・・・・・ 18
3.5.4 Manual White Balance(MANUAL) ・・・・・・・・・・・・・・・・・・・・・・・・・・・・ 19
3.5.5 Push Lock White Balance(PUSH LOCK) ・・・・・・・・・・・・・・・・・・・・・・・・・・ 20
Back Light Compensation (BACKLIGHT) ・・・・・・・・・・・・・・・・・・・・・・・・ 21
Picture Adjust(PICT ADJUST) ・・・・・・・・・・・・・・・・・・・・・・・・・・・・・・ 22
3.7.1 Image Flip(FLIP) ・・・・・・・・・・・・・・・・・・・・・・・・・・・・・・・・・・・ 22
3.7.2 Brightness(BRIGHTNESS) ・・・・・・・・・・・・・・・・・・・・・・・・・・・・・・・ 22
3.7.3 Contrast(CONTRAST) ・・・・・・・・・・・・・・・・・・・・・・・・・・・・・・・・・ 23
3.7.4
Edge Enhancement(SHARPNESS)
・・・・・・・・・・・・・・・・・・・・・・・・・・・・ 23
3.7.5 Chroma Settings(HUE,COLOR GAIN) ・・・・・・・・・・・・・・・・・・・・・・・・・・ 24
Defog(DEFOG) ・・・・・・・・・・・・・・・・・・・・・・・・・・・・・・・・・・・・ 25
Wide Dynamic Range / Tone Correction (WDR / ATR) ・・・・・・・・・・・・・・・・・ 26
3.9.1 Adaptive Tone-Curve Reproduction (ATR) ・・・・・・・・・・・・・・・・・・・・・・・・ 27
3.9.2
Wide Dynamic Range (WDR)
・・・・・・・・・・・・・・・・・・・・・・・・・・・・・・ 28
Day & Night function (DAY/NIGHT) ・・・・・・・・・・・・・・・・・・・・・・・・・・ 29
3.10.1 Automatic Switching Mode (AUTO) ・・・・・・・・・・・・・・・・・・・・・・・・・・・ 29
Day / Night Switching Control (DELAY CNT / DAY→NIGHT / NIGHT→DAY)・・・・・・・ 30
3.10.2 Manual Switching Mode (MANUAL) ・・・・・・・・・・・・・・・・・・・・・・・・・・・ 32
Day / Night Setting (DAY/ NIGHT)
・・・・・・・・・・・・・・・・・・・・・・・・ 32
Burst Signal (BURST)
・・・・・・・・・・・・・・・・・・・・・・・・・・・・・ 32
3.10.2.2
3.8
3.10
3.9
3.5
3.4.1.2
3.4.1.3
3.10.1.1
3.4
3.7
3.4.1.4
3.4.2.1
3.10.2.1
【Contents】
3.1
3.3
3.6
3.3.1.1
3.3.1.2
3.4.2.2
3.4.1.1
3.2
3

IR LED Control(IR LED) ・・・・・・・・・・・・・・・・・・・・・・・・・・・・・・・・ 33
Noise Reduction(DNR) ・・・・・・・・・・・・・・・・・・・・・・・・・・・・・・・・ 34
Privacy Mask(PRIVACY) ・・・・・・・・・・・・・・・・・・・・・・・・・・・・・・ 35
CAMERA ID Setting(CAMERA ID)・・・・・・・・・・・・・・・・・・・・・・・・・・・・ 38
LANGUAGE ・・・・・・・・・・・・・・・・・・・・・・・・・・・・・・・・・・・・・・ 42
Factory Reset(CAMERA RESET)・・・・・・・・・・・・・・・・・・・・・・・・・・・・・ 42
EXIT MENU(EXIT) ・・・・・・・・・・・・・・・・・・・・・・・・・・・・・・・・・・・ 43
4. OSD Menu Tree ・・・・・・・・・・・・・・・・・・・・・・・・・・・・・・・・・・・・ 44
3.14
3.17
3.15
3.12
3.13
3.11
3.16
4

1. Introduction
・The WAT-1200CS user's manual describes the functions and the adjustment methods using the On Screen
Display (OSD).
・When the settings of the WAT-1200CS is changed according to the WAT-1200CS user's manual, check to see
that the operation and the effects of the changes made to the camera are acceptable.
・The WAT-1200CS user's manual is subject to change by design and the specifications of the product without notice.
・The copyright of the WAT-1200CS user's manual shall belong to Watec Co., Ltd.
Copying in whole or in part without the authorization of the holders permission is prohibited.
5

2.OSD MENU OPERATION
The functions and parameter settings of WAT-1200CS can be changed by OSD(On Screen Display).
Operate OSD with the controller.
a)When using the controller,vertically insert the connector fully until it clicks.
b)When disconnecting the controller, pull the connector while pinching the Lock.
The controller has 5 buttons, UP/DOWN/LEFT/RIGHT/ENTER.
1)UP
3)LEFT 4)RIGHT
2)DOWN 5)ENTER
Use 5 buttons above to operate the OSD menu.
1)UP/2)DOWN : Mainly to move the cursor up and down to select an item on the lists on the OSD menu.
3)LEFT/4)RIGHT : Mainly to adjust and change the functions on each list on the OSD menu.
5)ENTER : Mainly to execute the selected list and function on the OSD menu.
The symbol "↵" will be on some lists on the OSD menu to indicate that there are sub menus or selectable options by pressing 5)Enter.
The operation portion of the Controller
Controller Overview
How to Connect Controller
b)
Lock
a)
6

Please refer to the following model operation pictures on the basic controller usage.
The below picture shows the OSD operation when WHITE BAL(ATW) is selected as the defaulf position.
↑
*Default setting
Switching the Menu
* From the next page, each button is written as follows.
1)UP key is written as "UP" 2)DOWN key is written as "DOWN"
3)LEFT key is written as "LEFT" 4)RIGHT key is written as "RIGHT"
5)ENTER key is written as "ENTER"
Next Page
Previous Page
Going to
Go to EXIT
SETUP MENU
Going to
Going to
SUB MENU
ENTER
ENTER
ENTER
ENTER
ENTER
RIGHT
UP
DOWN
UP
DOWN
RIGHT
LEFT
LEFT
7

3. MAIN MENU/SETUP MENU
3.1 OSD Menu
SETUP menu will appear on the screen when pressing ENTER,
Move the cursor to EXIT with UP/DOWN buttoms and press the ENTER to display the EXIT page.
OSD Menu is consist of 3 pages (SETUP MENU1/2-2/2 and EXIT).
3.2 Save settings (SAVE ALL)
Saving (SAVE ALL) the changes in camera settings. After changing camera settings, you can save the changed set values by executing
SAVE ALL on the EXIT page. Move the cursor to SAVE ALL with UP / DOWN / LEFT / RIGHT and press ENTER to save the set value.
The saved settings are kept even after the camera is powered off.
*Please note that when you turn off the power without saving the setting values after changing the setting or execute CANCEL
on the EXIT page, the changed setting will not be saved.
OSD = ON
OSD = OFF
EXIT
ENTER
SETUP MENU 2/2
ENTER
SETUP MENU 1/2
8

3.3 Lens Settings (LENS)
Change the lens setting according to the lens to be used. Move the cursor to LENS with UP/DOWN and use the
LEFT/RIGHT to switch MANUAL and DC.
Default : MANUAL
*When you select DC in the LENS setting while using a manual lens, ordinary exposure control may not be available.
Please change the LENS setting according to the lens to be used.
3.3.1 DC Iris Lens Setting (LENS)
Display the setting menu of the DC iris lens. Move the cursor to LENS and use the LEFT/RIGH to select DC.
After selecting DC, press ENTER to display the LENS menu. Move the cursor up and down and adjust items with LEFT/RIGHT.
Select this mode when using a DC iris lens.
MANUAL
DC
LENS
Select this mode when using a manual iris lens.
LEFT/RIGHT
MANUAL
LENS MENU
OPERATION
DC
ENTER
9

3.3.1.1 DC Iris Lens Control Mode (MODE)
Set the DC iris lens control mode (MODE). Use LEFT/RIGHT to select the MODE (lens aperture control)
Default : AUTO
* This function will be the following control state by combining with SHUTTER/AGC of "3.4 SHUTTER /AGC setting( SHUTTER / AGC)"
OPEN
OPEN
DC Iris lens
Controls the lens aperture automatically.
Open the lens aperture fully.
OPEN
Control the lens aperture automatically.
AUTO
CLOSE
Open the lens aperture fully.
Control the lens aperture automatically.
Close the lens aperture fully.
SHUTTER/AGC
(LENS)
AUTO
Close the lens aperture fully.
*For ordinary imaging, use AUTO mode.
Close the lens aperture fully.
CLOSE
*AUTO is recommended for using DC iris lens.
Open the lens aperture fully.
LEFT/RIGHT
AUTO
OPERATION
CLOSE
MANUAL
CLOSE
AUTO
MODE
Lens in use
MODE
OPERATION
OPEN
AUTO
10

3.3.1.2 DC Iris Lens Iris Control Speed(SPEED)
Set the lens apperture control speed of auto iris lens(SPEED). Use LEFT/RIGHT to adjust the control speed of the lens apperture by moving the cursor.
Default : 67
○DC iris lens adjustment procedures
When mounting the DC iris lens, adjust the lens apperture according to the following procedures.
The procedures for adjusting the DC iris lens is as follows.
(1) Mount the DC iris lens to the 1200CS
(2) Set the OSD settings as follows;
· Set 『3.3 Lens setting (LENS)』settings to DC
· Set 『3.4 Shutter / gain setting (SHUTTER / AGC)』settings to AUTO.
· Set 『3.4.1.1 Shutter speed (SHUT)』settings to DC IRIS.
(3) When hunting occurs in which the screen continually brightens or darkens in the actual
imaging environment, proceed to step(4). When you get the image properly, please proceed to step(5).
OK (4) When hunting occurs, the control speed of the lens aperture might be too fast, reduce
the set value of 『3.3.1.2 auto iris lens aperture control speed (SPEED)』until the hunting stops.
NG
(5) Adjust the lens aperture. Adjust the lens aperture with 『3.4.1.2 Brightness Setting (AE LEVEL)』.
Adjust 『3.4.1.2 Brightness Setting (AE LEVEL)』to optimumize brightness while checking the monitor.
(6) The adjustment is completed. Save the setting.
(5)Lens aperture
setting
The smaller the set value, the slower the control speed, and the larger the set value, the faster the control
(3) Hunting
speed.
SPEED
OPERATION
000-255
(1)Mount the DC iris lens
(4) Lens aperture control
speed setting
(2) camera
configuration
*When the set value is too large, the control speed will be faster, but it will cause hunting and overshoot.
(6) Adjustment
Completed
And please note that when the set value is too small, the operation will be delayed and it may stop.
11

3.4 Shutter/Gain Settings(SHUTTER/AGC)
Set the exposure control. There are two modes of exposure control: the automatic exposure control (AUTO) and the manual exposure control (MANUAL).
When AUTO is selected, shutter speed and gain are automatically controlled according to the imaging environment. When MANUAL is selected, shutter
speed and gain can be set to arbitrary fixed values. Move the cursor to SHUTTER/AGC with UP/DOWN and use the LEFT/RIGHT to select AUTO or
MANUAL. After selecting the mode, press ENTER to open each advanced setting sub menu.
3.4.1 Automatic exposure control(AUTO)
3.4.1.1 Shutter Speed(SHUTTER)
Set the shutter speed (SHUTTER). Use the LEFT/RIGHT to select the shutter mode.
*Default : SHUT
* In this function, selectable MODE deffers by combining with LENS setting of『3.3 DC iris lens control setting (LENS)』. When the LENS
setting is MANUAL, the selectable MODE is only SHUT. When the LENS setting is DC, select from either SHUT + DC IRIS or DC IRIS.
AUTO
DC iris lens. *Electric iris does not operate in this mode.
Automatic exposure control by electric iris. Depending on the brightness of the shooting
object, exposure will be controlled within the range of 1/60s(1/50s) to 1/100000s
for getting the appropriate brightness. *(1/50s) : Defalt in PAL
MANUAL
electric iris preferentially and when it is still too bright, it will controlled by DC iris lens.
DC
Automatic exposure control by combining electric iris and DC iris. This mode uses
ENTER
DC IRIS
OPERATION
MODE
SHUT+DC IRIS
Automatic exposure control by DC iris. The exposure is only controlled with aperture of
LENS
SHUTTER/AGC
SHUT
AUTO
MANUAL SETUP Menu
LEFT/RIGHT
AUTO SETUP Menu
ENTER
12

3.4.1.2 Brightness settings, high luminance side(AE LEVEL)
Set the brightness in the screen (AE LEVEL). Use the LEFT / RIGHT to adjust the brightness.
*Default: Vary depending on the fine adjustment at factory
3.4.1.3 Auto Gain Control(AGC)
Set the auto gain control setting (AGC). Gain controls exposure at low luminance when electric shutter and DC Iris lens could not acheieve
the full exposure. Use the LEFT / RIGHT to select AGC ON or OFF.
*Default : ON
OPERATION
speed (SPEED)』
OFF
SHUTTER/AGC
AUTO
(HIGH LUMINANCE)
LEFT/RIGHT
AGC = ON
AE LEVEL = 0
LEFT/RIGHT
AE LEVEL = 255
*When the auto iris lens is mounted, we will use the AE LEVEL to adjustment the lens aperture.
Default*
AE LEVEL
Brightness can be set within the range of 0 (dark) -255 (bright).
0-255
ON
For the details, see the auto iris lens adjustment procedures in 『3.3.2 Auto iris lens aperture control
AGC = OFF
AGC
AUTO
SHUTTER/AGC
Automatic exposure control with gain at low luminance. *Gain range is 0 to 54 dB.
OPERATION
Exposure control at low luminance does not operate.
13

3.4.1.4 Brightness Settings, Low Luminance Side (AE LEVEL)
Set the brightness of exposure control at low luminace side(AE LEVEL) . Apart from 『3.4.1.2 Brightness Adjustment (AE LEVEL)』, the brightness at
the time of gain operation can be set independently. For dark subjects, you could reduce the noise instead of darkening the image.
Use the LEFT / RIGHT to select from x0.25, x0.5, x0.75, x1.0.
*Default : x1.0
○AGC Operation
Small Large
Low High
The lower the value, the lower the sensitivity, the S/N ratio improves instead.
SHUTTER/AGC
x1.0
(LOW LUMINANCE)
x0.75
AUTO
x0.5
x0.25
The higher the value, the lower the S/N ratio, the sensitivity improves instead.
x0.25
Sensitivity
OPERATION
x0.25
x1.0
S/N ratio
LEFT/RIGHT
x0.75
AE LEVEL
x0.5
14

3.4.2 Manual Exposure Control(MANUAL)
3.4.2.1 Shutter Speed (SHUTTER)
Set the shutter speed (SHUTTER) settings. Use the LEFT/RIGHT to select the shutter speed.
3.4.2.2 Gain value settings (AGC)
Set the gain value (AGC) settings. Use the LEFT/RIGHT to set the gain value.
*Default : MIN (0dB)
OPERATION
LEFT/RIGHT
*(1/50s) : PAL setting
Fix the gain to an arbitrary value regardless of the brightness of the subject. The setting value can be
MANUAL
SHUTTER/AGC
1/4000s, 1/8000s, 1/10000s, 1/20000s, 1/50000s, 1/100000s
OPERATION
the image. The smaller the setting value, the darker the image.
MODE
AGC = MIN (0dB)
*Default : 1/60s(1/50s)
SHUTTER/AGC
AGC
MIN-MAX
SHUT
AGC = 30dB
Selectable shutter speed : 1/60s(1/50s), 1/100s,1/120s, 1/125s, 1/250s, 1/500s, 1/1000s, 1/2000s,
MANUAL
AGC = MAX (54dB)
selected from 18dB, 24dB, 30dB, 36dB, 42dB, 48dB, MAX(54dB). The higher the setting value, the brighter
15

3.5 White Balance(WHITE BAL)
Set the white balance (WHITE BAL) settings. This function is to correct white colored subjects to be shown as white under the illumination
environment of various color temperatures . Use the LEFT / RIGHT to select the WHITE BAL from ATW, PUSH, USER1, USER2, MANUAL, PUSH LOCK.
*Default : ATW
scenes where monochrome occupies a large proportion in the screen.
ATW
even if the color temperature is unknown.
PUSH LOCK
range than ATW, but the pull-in control operates even in the imaging scene where monochrome
USER1 (5100K):(Fluorescent mode 2)Correct and fix the white balance based on the white
operates regardless of the preset pull-in range, the pull-in operates in a wider color temperature
LEFT/RIGHT
change in surrounding color temperature. Pull-in range is set in advance, it controls only when the
the lighting environment close to sunlight and fix it.
deterioration of color reproduction can be reduced without taking in pull-in operation in imaging
PUSH
under the lighting environment close to the bluish fluorescent light and fix it.
While pressing the ENTER, PUSH LOCK corrects the white balance according to the color temperature
ATW automatically controls the white balance and maintains color reproducibility by following the
USER2 (6300K):(Sunlight mode) Correct and fix the white balance based on white under
It is effective if the color temperature of illumination to be used is known beforehand.
MANUAL corrects the white balance with arbitrary setting values. Adjust the setting according to the
PRESET
MANUAL
PUSH controls the white balance irrespective of subject conditions. Since the pull-in control always
The correction value of each preset white balance can be changed arbitrarily and respectively.
WB
ATW
PUSH
USER1 (5100K)
the predetermined color temperature of USER 1 (5100 K) or USER 2 (6300).
OPERATION
surrounding color temperatures judged to be within the pull-in frame.By setting the pull-in frame,
For the preset white balance, you can select the white balance correction value from
occupies a large proportion on the screen and color reproduction may be impaired.
When it is necessary to change, adjust the set value according to the usage environment.
under the use environment and fixes the operation with the white balance correction amount at that
moment of the Enter is released.Since it matches the actual lighting, it can correct accurately
PUSH LOCK
LEFT/RIGHT
USER2 (6300K)
MANUAL
usage environment.
16

3.5.1 Auto Trace White Balance(ATW)
ATW maintains color reproducibility even when the color temperature of the light source changes.
When ATW is selected, press the ENTER to display the WHITE BAL menu. Move the cursor up or down with the UP / DOWN and
use the LEFT / RIGHT to adjust items.
3.5.2 Push White Balance(PUSH)
PUSH controls the white balance over a wider color temperature range than ATW and maintains color reproducibility regardless of subject conditions.
*Speed control setting is not available.
ENTER
DELAY CTL
Set the time from the changes in color temperature to the start of white balance control.
*Default : 128
Set the pull-in speed. The lead-in speed can be set in the range 1-255.
LEFT/RIGHT
ATW
Light source color temperature = 2800K
SPEED
*Default : 008
WB
Light source color temperature = 4700K
The lower the set value, the faster the pull-in speed, and the larger the set value, the slower the pull-in speed.
OPERATION
(ATW SETUP Menu)
Light source color temperature = 6600K
Selectable in the range 1-255. The lower the set value, the faster to start WB control, the higher the set
*Note : Color oscillation is likely to occur if the pull-in speed is set too fast.
value, the slower to start WB control.
17

3.5.3 Preset White Balance(USRE1 5100K/USER2 6300K)
For the preset white balance, you can select the white balance correction value from the predetermined color temperature of USER 1 (5100 K) or
USER 2 (6300 K). When selecting either USER 1 (5100 K) or USER 2 (6300 K), pressing the ENTER will display the SETUP menu for each WB.
Move the cursor up or down with the UP / DOWN and use the LEFT / RIGHT to adjust items.
○B-GAIN
○R-GAIN
Set B-GAIN of the white balance correction value. B-GAIN can be set in the range of 000-255.
When the set value is decreased, the screen will be corrected to the yellow side, and when it is increased
the screen will be corrected to the blue side.
*The factory default value may vary.
Set the R-GAIN of the white balance correction value. R-GAIN can be set in the range of 000 - 255.
When the set value is decreased, the screen will be corrected to the cyan side, and when it is increased
R-GAIN = 208
*The factory default value may vary.
LEFT/RIGHT
R-GAIN = 150
OPERATION
the screen will be corrected to the red side.
B-GAIN
5100K/6300K
(SUB MENU)
PRESET WB
B-GAIN = 030
R-GAIN
LEFT/RIGHT
R-GAIN = 220
B-GAIN = 190
B-GAIN = 149
18

3.5.4 Manual White Balance(MANUAL)
MANUAL WB enables to set the white balance correction value arbitrarily.
When MANUAL is selected, press the ENTER to display the manual white balance setting menu. Please use the LEFT / RIGHT to adjust items.
POSITION = 46
POSITION = 60
When the set value is decreased, the screen will be corrected to the blue side, and when it is increased
the screen will be corrected to the red side.
*Default : 41
LEFT/RIGHT
OPERATION
Set the manual white balance correction value POSITION. POSITION can be set in the range of 000-063.
WHITE BAL
MANUAL
POSITION
(SUB MENU)
POSITION = 30
19

3.5.5 Push Lock White Balance(PUSH LOCK)
PUSH LOCK adjusts the white balance under actual illumination and it can be corrected accurately even if the color temperature is unknown.
○PUSH LOCK adjustment method
Image a achromatic object such as white paper under the actual lighting in the entire screen and press the ENTER.
Confirm the correction and release the ENTER. It will be completed when the paper is corrected to white.
Step (1) Before
Step (2) Place the white paper in the entire screen
Step (3) Press the ENTER to start the correction
Step (4) Confirm the correction and release the ENTER
(*When it is succeeded, the white paper becomes white in the screen.)
Step (5) After
Before
ENTER
ENTER
After
20
Table of contents
Other Watec Camcorder manuals