Water Well MB18 User manual

USERS MANUAL
MODEL: MB18
18lt Filter Bottle
PLEASE READ USER MANUAL CAREFULLY
BEFORE USE, STORE IN A SAFE PLACE
The Water Well (Pty) Ltd
Address: P.O. Box 1854, Pinetown, 3600
Sharecall No.: 0860 099355
Warranty Term: 12 Months
NOTE: This product's warranty is applicable only if the product has a valid
proof of purchase document
B
e
W
e
l
l
,
D
r
i
n
k
W
e
l
l
,
W
a
t
e
r
W
e
l
l
The Water Well
Q
u
e
n
c
h
i
n
g
t
h
e
N
a
t
i
o
n
’
s
T
h
i
r
s
t

1
Table of Contents
1. Important Safety Instructions 1
2. How the Filters Work 2
3. Filter Bottle Parts Diagram 3
4. Installation 4/5
5. Installation onto a Water Dispenser 5/6
6. Cleaning and Maintenance 6
7. Troubleshooting 7
1. Important Instructions
- Please ensure that you read these instructions carefully, keep these
instructions on hand.
- Do not filter hot water (water above 40°C) through the Filter Bottle.
- Do not filter ice water (water below 5°C) through the Filter Bottle.
- Keep your Filter Bottle in a stable upright position.
- Clean your Filter Bottle before use, or if it has not been used for a long
period, discard the water before drinking.
- It is recommended to replace your filter cartridges every 4000lt
(4-6 months)
- The Filter Bottle should be cleaned on a regular basis, to prevent
any residue build up inside the storage tank. Follow the instructions
in Section 4 of this manual
- Keep the Filter bottle away from Direct Sunlight and open windows.
- Please note that the first few filtrations may be slow as the filters are
being saturated.
- The filtration will always be slow as the filters are gravity fed and the
water will not pour throught the filters unless forced
CAUTION: Plastic bags can be dangerous. To avoid danger of
suffocation, keep this bag away from babies and young
children.
IMPORTANT! - Please note that it is not recommended that the
Filter Bottle be used to filter water that is of an
unknown quality, it is recommended that the unit is
used with municipal water or water that has been
quality tested, this unit does not sterilise water and
should not be used as a steriliser

3
2
Filter Fabric
Removes large suspended particles
from your tap water
Layered Cartridge :
Layer 1 - Active Carbon absorbs
various chemicals
including Chlorine
Layer 2 - Mineral Stones reduce
bacteria and release
various minerals into
the water.
Layer 3 - Quartz Sand reduces
iron and Manganese in
the water.
Layer 4 - Mineral Balls release
minerals into the water.
Layer 5 - Ceramic Disc removes
large suspended particles
from your tap water
NOTE: Filters may vary
2. How the Filters Work 3. Parts Diagram
LID
DOME
UPPER CONTAINER
2 X LAYERED FILTER CARTRIDGE
WITH O RINGS & FILTER FABRIC
LOWER CONTAINER
SINGLE CHECK VALVE
These filters work with gravity allowing the water to flow slowly
over the absorbant materials inside the filter and letting the materials
remove and reduce various chemicals and suspended materials as
well as replacing minerals in your filtered water. This filter improves
the quality and taste of your tap water.

5
4
4. Filter Bottle Installaton
1. Remove all parts from the packaging.
2. Clean all parts (except for the 2 x Layered Filter Cartridge) with a mild
detergent and water (ensure to rinse thoroughly to remove all soapy
residue).
3. Remove all packaging from the 2 x Layered Filter Cartridges.
4. Place the 2 x Layered Filter Cartridges in a bowl and cover with water,
allow to soak for at least 30 minutes (this is to ensure that the filters
are thoroughly soaked).
5. Ensure the Dome is secure in the Upper Container.
6. Remove the nut from the Single Check Valve
(See Image 1), insert the exposed thread of
the Single Check Valve into the hole on the
base of the Lower Container and secure it
with the nut (always ensure that the flat
surface of the nut is facing down towards the
base of the Lower Container) (See Image 2)
7. Remove the 2 x Layered Filter Cartridges
from the bowl of water and allow the
water to drain slightly, screw each filter
into the threads under the Upper Container.
Ensure that the O-Rings do not bulge.
(See Image 3)
8. Insert the Upper Container into the Lower
Container
(See Image 4)
5. Install the Filter Bottle onto a Water
Dispenser.
1. Once you have assembled your Filter Bottle, set to one side. Look
at the top of your Water Dispenser. Twist the Bottle Support to the
left until it unlocks. Remove and place in a safe place.
(See Image 5 & 6)
2. Insert the Filter Bottle, with the Single Check Valve attached into
the open area (Reservoir Tank) and rest the Filter Bottle on top of
the Water Dispenser. ensure that the Filter Bottle sits level on the
top of the water dispenser. (See Image 7 & 8)
Image 4
Image 3
Image 1
Image 2
Image 5
Bottle Support
Image 6
Image 7 Image 8
NOTE: For any technical assistance, please
contact our service centre on
0860 099355 (available only in
South Africa)

7
6
6. Maintenance and Cleaning
1. It is recommended that your Filter Bottle is cleaned at least once a
month.
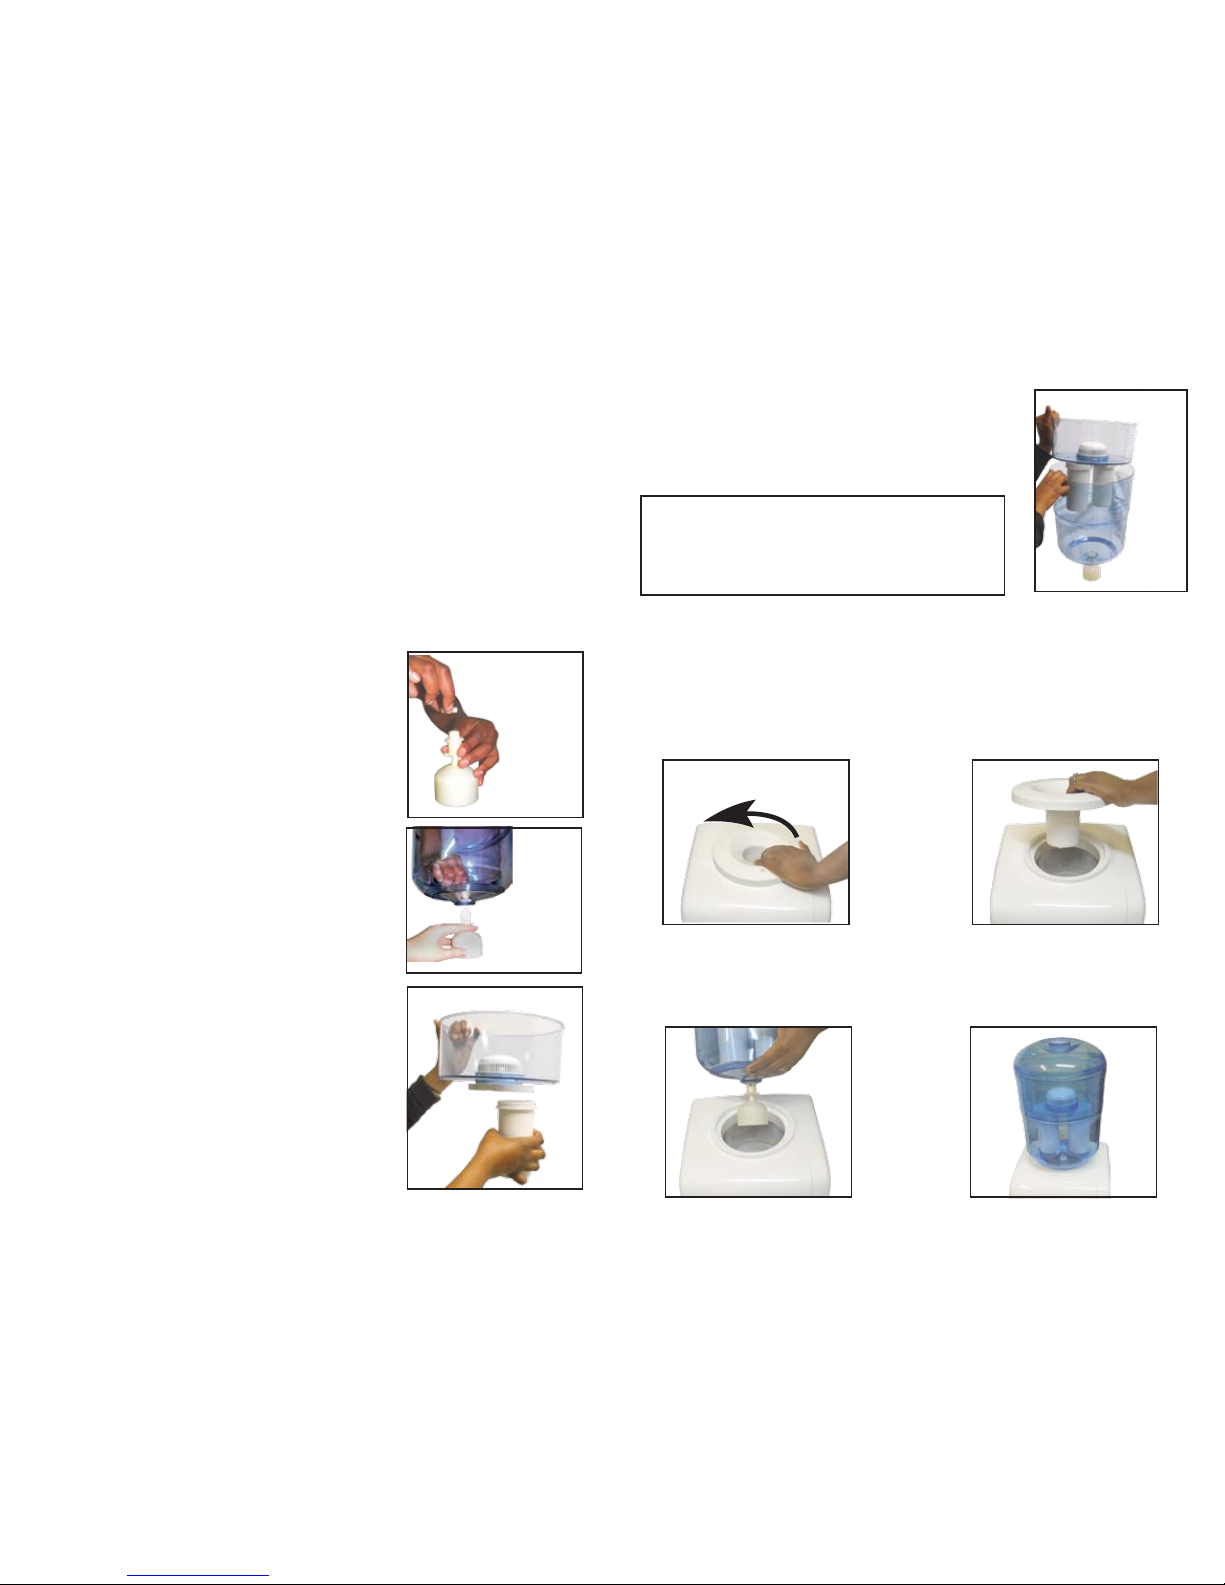
2. Remove the Filter Bottle from the Water Dispenser and allow any
water in the Upper and Lower Compartments to drain out.
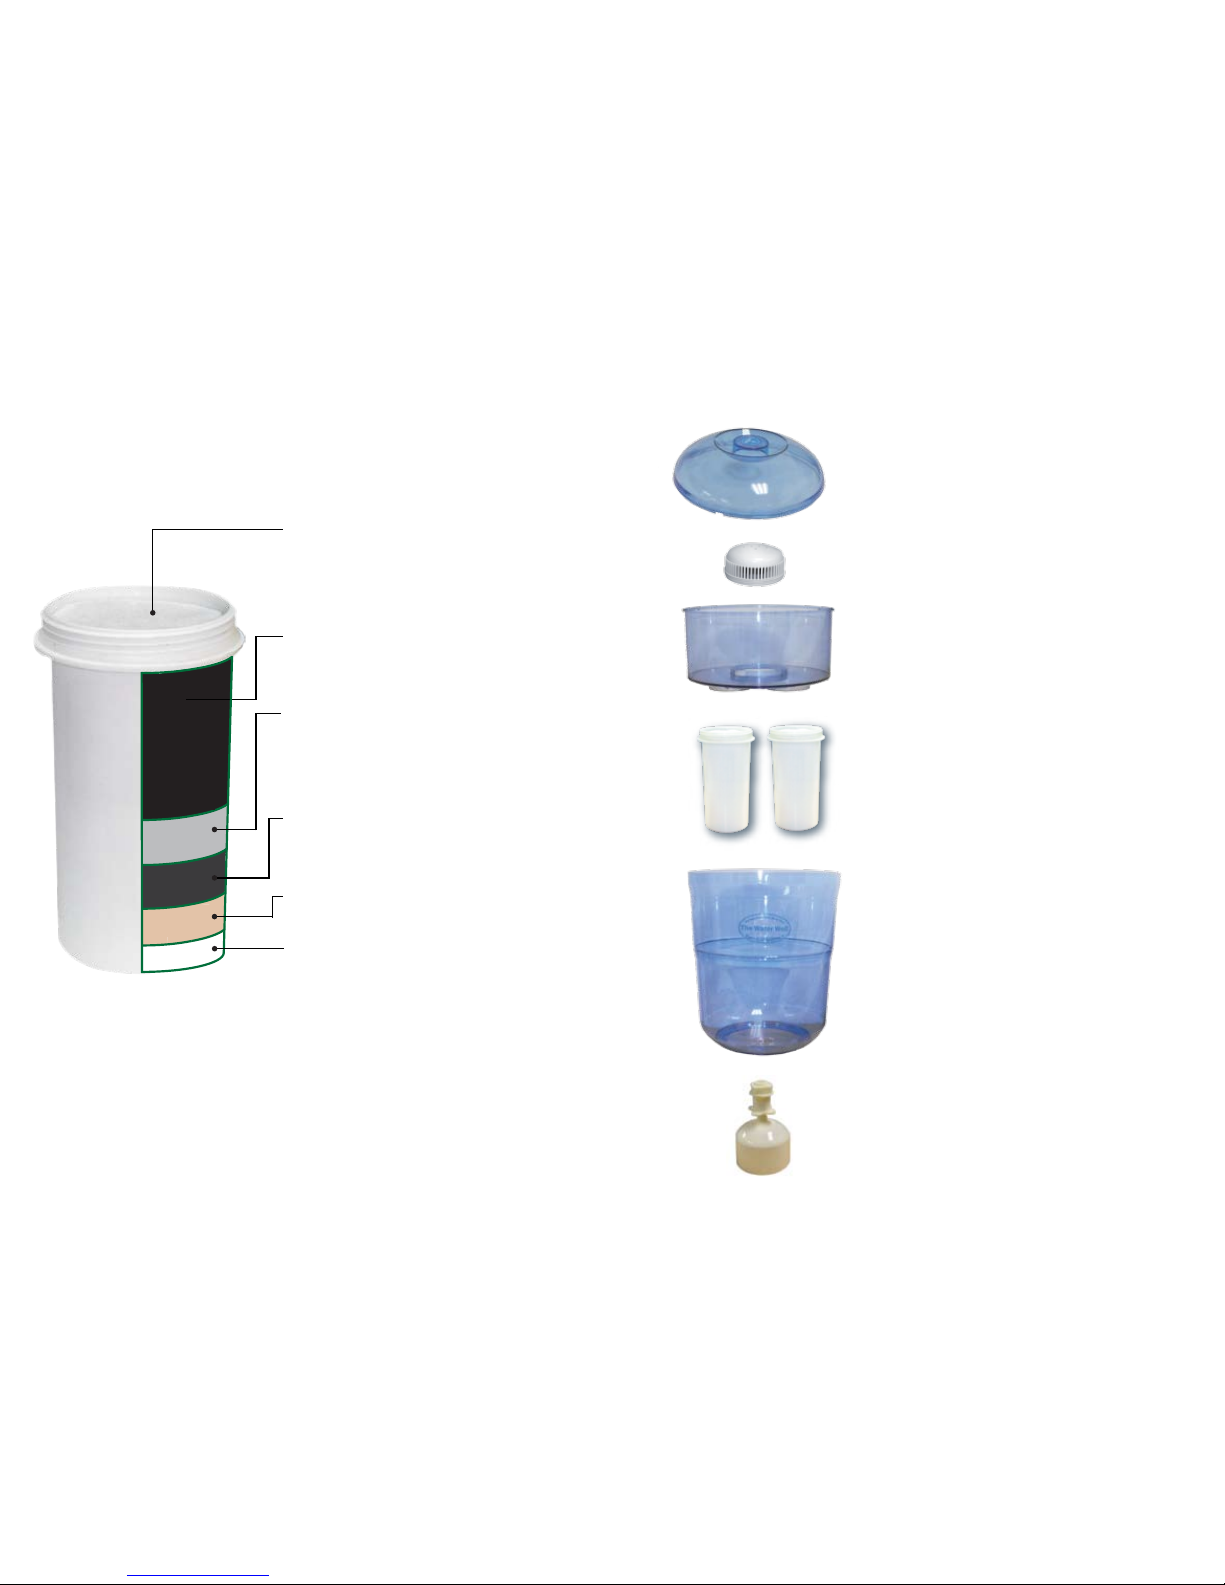
3. Unscrew the Layered Filter Cartridges from the Upper Container and
place in a bowl of water along with the Filter Fabric to keep moist.
4. Unscrew the Dome from the Upper Container.
5. Remove the Single Check Valve from the Lower Container.
6. Clean all the components (besides the Layered Filter Cartridges) with
a mild detergent.
7. Rinse thoroughly to remove all soap from the Filter Bottle parts and
dry.
8. Wipe the Layered Filter Cartridges with a clean damp cloth to remove
any residue build up on the cartridges.
9. Run Cold water over the Filter Fabric and rub gently to release any
dirt trapped in the fabric.
10. Re-assemble the Filter Bottle as per Section 4 & 5 of the User Manual.
NOTE: Keep the Filter Bottle out of direct sunlight and away from open
windows, this reduces residue build-up inside the Filter Bottle.
NOTE: Ensure that the Filter Bottle is cleaned regularly. If you are not using
your filter bottle for any extended period of time, drain all the water
from the Filter Bottle and the Water Dispenser. When you are using
the unit again, presoak the Layered Filter Cartridges and follow
Section 5.
7. Troubleshooting
PROBLEM POSSIBLE CAUSE SOLUTION
The Water is
filtering very
slowly
1. It is the first filtration
2. The filters may be
depleted
3. There may be a dry
section in the filters
4. The Dome may be
blocked
1. The first filtration may be very slow,
but will become faster over time as
this is a gravity fed filtration system
2. The Layered Filter Cartridges should
be changed every 4 - 6 months,
please replace your Layered Filter
Cartridges
3. Remove the Layered Filter Cartridges
from the Upper Container and hold
under fast running water to push
water through the Layered Filter
Cartridge and re-install.
4. Remove the Dome from the Upper
Container hold the Dome upside down
under fast running water to clear any
blockage in the fine grid, use a
scrubbing brush to clean if required.
3. Fill the Filter Bottle with 2lt of water and allow to filter into the Water
Dispenser.
4. Drain and discard the water from the Water Dispenser using both taps
and repeat point 3 twice more. (until water is clear in the Lower
Compartment of the Filter Bottle.
5. Follow instructions 5 & 6 of your Water Dispenser installation
instructions.
NOTE: Results and Filtration times may vary. For further technical
assistance please contact our call centre on 0860 099355
(available only in South Africa), or send us an e-mail enquiry
The biuld up
of residue in
the Lower
Compartment
is very fast
Unit is in Direct Sunlight
and near a window
Move unit away from Direct Sunlight and
any open windows. Follow the cleaning
and maintenance proceedure
There is a
discolouration
and residue
biuld-up on the
Layered Filter
Cartridge
1. Mineral Pot is in
direct sunlight
2. Filter is saturated
1. Move out of direct sunlight
2. Replace the filter Cartridge
Table of contents
Popular Water Filtration System manuals by other brands

Reo-Pure
Reo-Pure EC9052545 Installation, operation and maintanance manual

Kongskilde
Kongskilde RVS 75-II manual

Greenfield
Greenfield TS3 install guide

Allied Motion
Allied Motion TCI HarmonicGuard Series Installation, operation and maintenance manual

Fahl
Fahl LARYVOX HME Instructions for use

THORLABS
THORLABS TLV-U-MF2 user guide