Cintroclear UF 400 User manual

PURIFIER UF 400
Installation instructions
Cintroclear is a product of the Airwatec company – www.cintropur.com
1

ACKNOWLEDGEMENT
We would like to thank you for purchasing the CINTROCLEAR UF 400 water purifier. This
product has been manufactured using solely optimised, quality components in order to
ensure reliable, long-term operation. We are convinced that it will fulfil your expectations
and we would like to take this opportunity of wishing you long and pleasant use of your
CINTROCLEAR purifier.
Unwrapping
When unwrapping your purifier do not put it down vertically, it is unstable in this position. Lie it
down flat on its rear face. Your purifier has been subjected to several air tests during its
manufacture. To remove the plug on the blue pipe connector, hold down the locking ring and
pull the plug out, as for a pipe (see "disconnection" paragraph in the booklet "using quick
connectors" on page 6).
PUTTING INTO SERVICE
Read these instructions before operating your Cintroclear UF 400 purifier. The few minutes
that this takes will mean that installation is simplified.
Keep these instructions carefully and, as the case may be, hand them on to the next owner.
This unit is designed solely to purify public water. Any other unapproved usage may be
dangerous. The manufacturer declines any responsibility for damage caused to persons or goods
in the event of this unit being used incorrectly or in an unapproved manner.
2

INSTALLATION OF CINTROCLEAR UF 400 WATER PURIFIER
WATER PRESSURE
For optimal operation of your purifier, the minimum water inlet pressure must be 3,5 bars. For any lower
pressure, please consult your distributor to determine the most suitable solution in your situation. The
maximum permitted pressure is 5,5 bars. Above this value a pressure reducing valve must be installed to
prevent damage to and leakage from the unit.
Contents of installation kit supplied with
your Cintroclear UF 400 purifier
1 special pure water tap with mounting base 2 fixing screws – 4.8 x 19mm
2,40 m of water inlet pipe 3/8" red polyethylene 2 fixing screws - 4.8 x 50 mm
2 m of pure water outlet pipe 1/4" blue polyethylene 1 connection accessory Ref: RAC - 01
1 connection accessory Ref: DIR - 01
1 connection accessory Ref: SEP - 01
1Installationinstructions
Connecting purifier to water supply
The installation kit for your CINTROCLEAR purifier contains three accessories to provide
alternate ways in which to connect the purifier to the water supply.
RAC - 01: this automatic connector with a standard 3/4" thread can be screwed directly on to
an unused washing machine or dishwasher tap or any other tap with a standard threaded
outlet such as a laundry room tap, etc. The purifier can be connected directly to the
automatic outlet.
DIR - 01: this self-tapping valve can connect directly to a copper water supply pipe of 10, 12,
14 or 16 mm diameter without any special tools other than a simple screwdriver. It is then
fitted with the RAC - 01 automatic connector for direct connection of the purifier.
SEP - 01: this “Y” splitter connector allows the purifier to be connected in parallel to a tap
with a threaded outlet that is already being used by other equipment. It can be placed in
parallel with a washing machine or dishwasher or any other equipment. One of the outlets
supplies the existing household equipment, while the other is fitted with the RAC - 01
automatic connector for direct connection of the purifier.
3
INSTALLATION OF THE CINTROCLEAR UF 400 WATER PURIFIER
Tools :
Your Cintroclear purifier can be connected very quickly and simply, all the hydraulic connections are carried
out using automatic push-in connectors that require no tools other than a cutter. Two other tools are required: a
screwdriver for mounting the purifier and a small drill fitted with a 14 mm drill bit for drilling the hole for installing
the pure water tap.
Positioning :
The purifier is usually positioned beneath the kitchen sink or in one of the nearby kitchen units, these places
are often the most simple to use. It may also be installed in any other position, as dictated by the layout of the
house: room next to the kitchen, cellar, laundry room, etc. The various accessories for connecting the water
supply and the small diameter of the inlet and outlet piping allow for many installation options. The purifier must
always be installed in a clean and easily accessible position that allows the meter to be read and maintenance
operations to be carried out simply.
IMPORTANT : for correct operation, the purifier must be installed and attached vertically. It must never
be operated when inclined or lying flat; this may give rise to operating problems.
Fixation :
The installation kit for your Cintroclear purifier contains two sets of fixing screws, allowing the unit to be
installed against a wall or in a kitchen unit for example. The shape of the attachment holes in the purifier
mounting plate allows it to be easily removed later for carrying out maintenance operations.
Piping:
Your Cintroclear purifier is equipped with automatic
connectors throughout. These connectors are very
simple to use and they are totally reliable. When cutting
the polyethylene pipes, take care to make clean, square
cuts without any burrs. Do not use any tool other than
the tube cutter, never use shears or cutting pliers,
the piping will not be cut cleanly and you risk
damaging the seal and causing leaks.
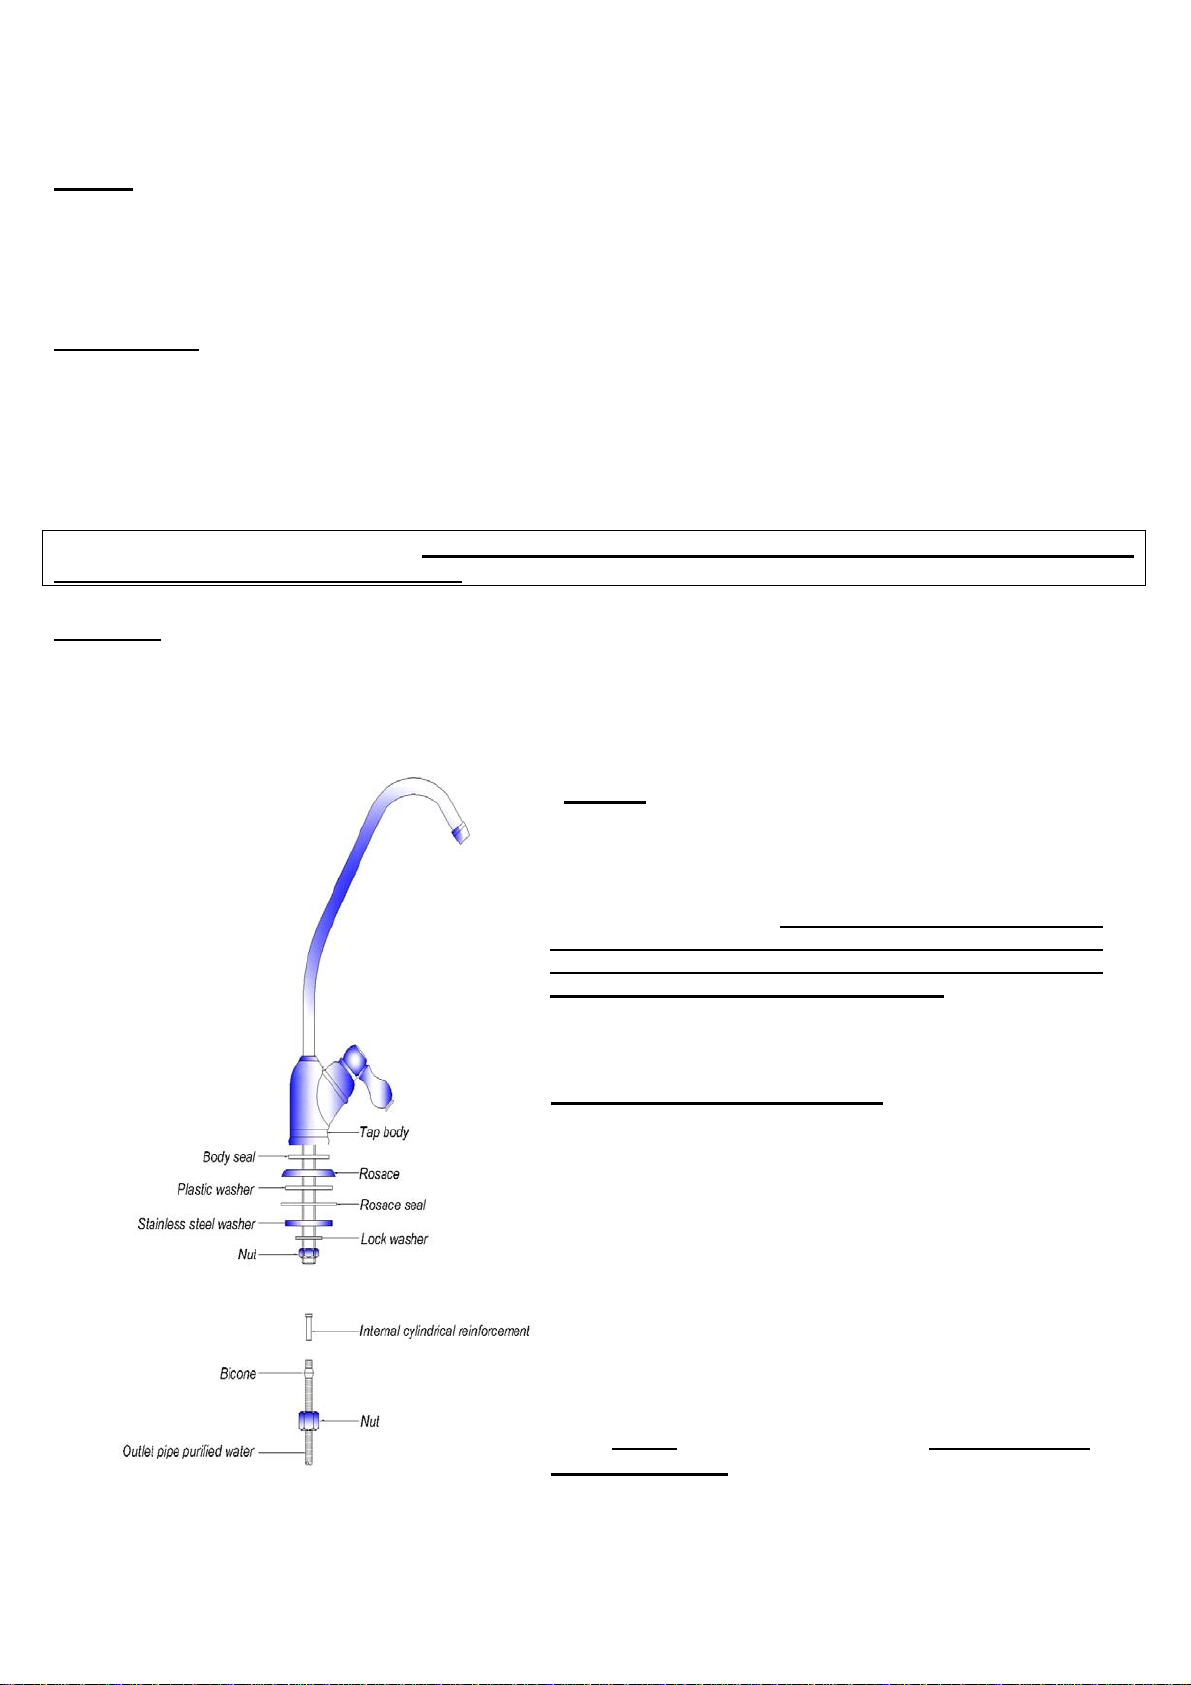
Attaching the pure water tap:
Position the components on the threaded tube : body
seal, rosace, plastic washer and rosace seal. Then
pass the threaded tube through the hole drilled
previously in the wash basin or work surface. Then
place the lower components on the threaded tube :
st/st washer, lock wascher, the nut, the internal
cylindrical reinforcement, the bicone and the nut (these
last 3 components are put on the blue outlet pipe) and
tighten down.
Generally it will seal when tightened on hard by hand.
Nevertheless, if this is not sufficient it may be tightened
down lightly with a tool. In all cases, stop tightening
once it is sealed.
4
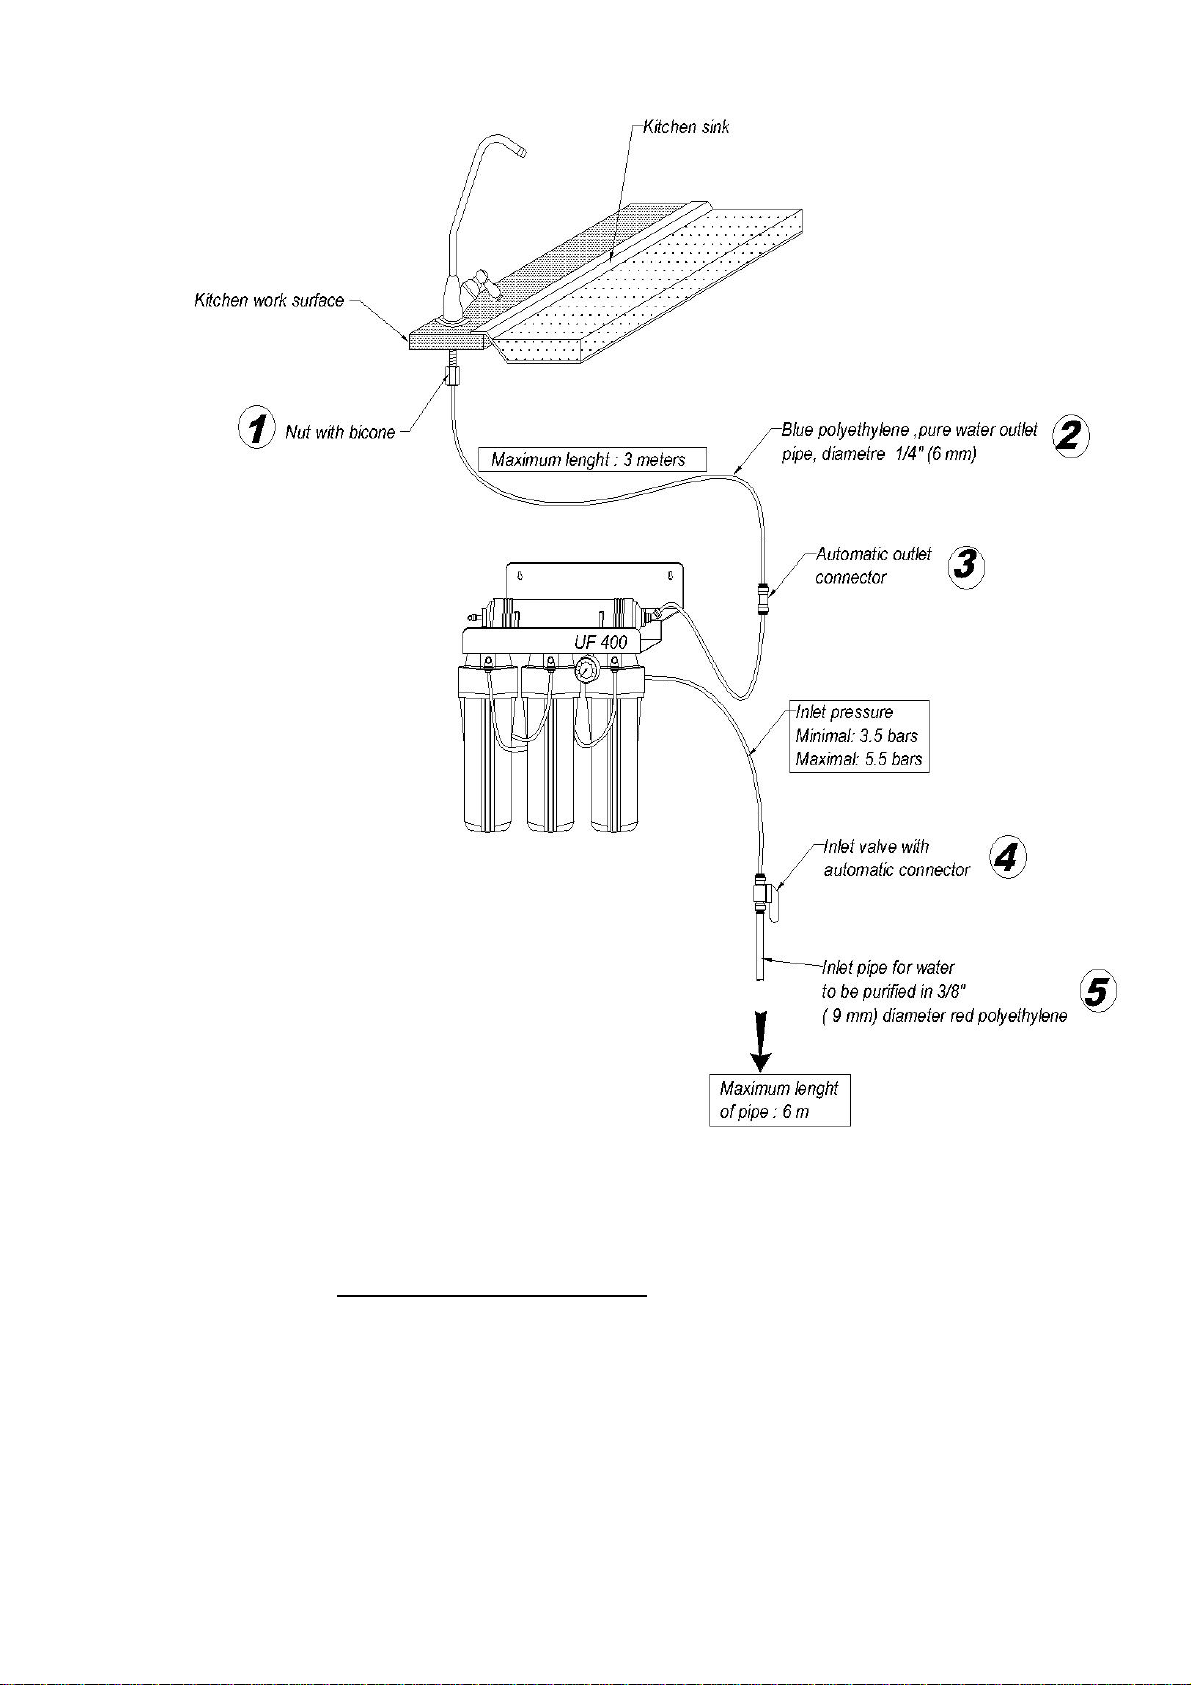
1.The nut with bicone must be tightened on to the tap gently. As a rule, it is sufficient to tighten hard
by hand on to the tap stem to provide sealing. Should this not be sufficient, it may be tightened
gently using a tool. In all cases, stop tightening once it is sealed.
2. The total length of piping between the purifier outlet connector and the pure water outlet tap must not be greater than 4
metres, with a maximum head differential of 3 metres (these figures are based on an entering pressure of 4,0 bars)
3. The automatic outlet connector allows the purifier to be disconnected later from the pure water tap so that maintenance
operations may be carried out easily.
4. The inlet valve with automatic connectors allows the water supply to the purifier to be disconnected without shutting
down the water supply line. This function is useful to disconnect your purifier from the water supply when carrying out
maintenance operations.
5. The total length of the 3/8’’ (9 mm) polyethylene inlet pipe must not exceed 6 metres.
5
Use of instantaneous automatic connectors
In order for you to be able to install your Cintroclear purifier very quickly and simply, the unit is fitted entirely
with automatic connectors. These special connectors allow all the purifier pipework and accessories to be
connected without using any tools. They are particularly easy to use, they can be fitted in a few seconds
and they are completely reliable.
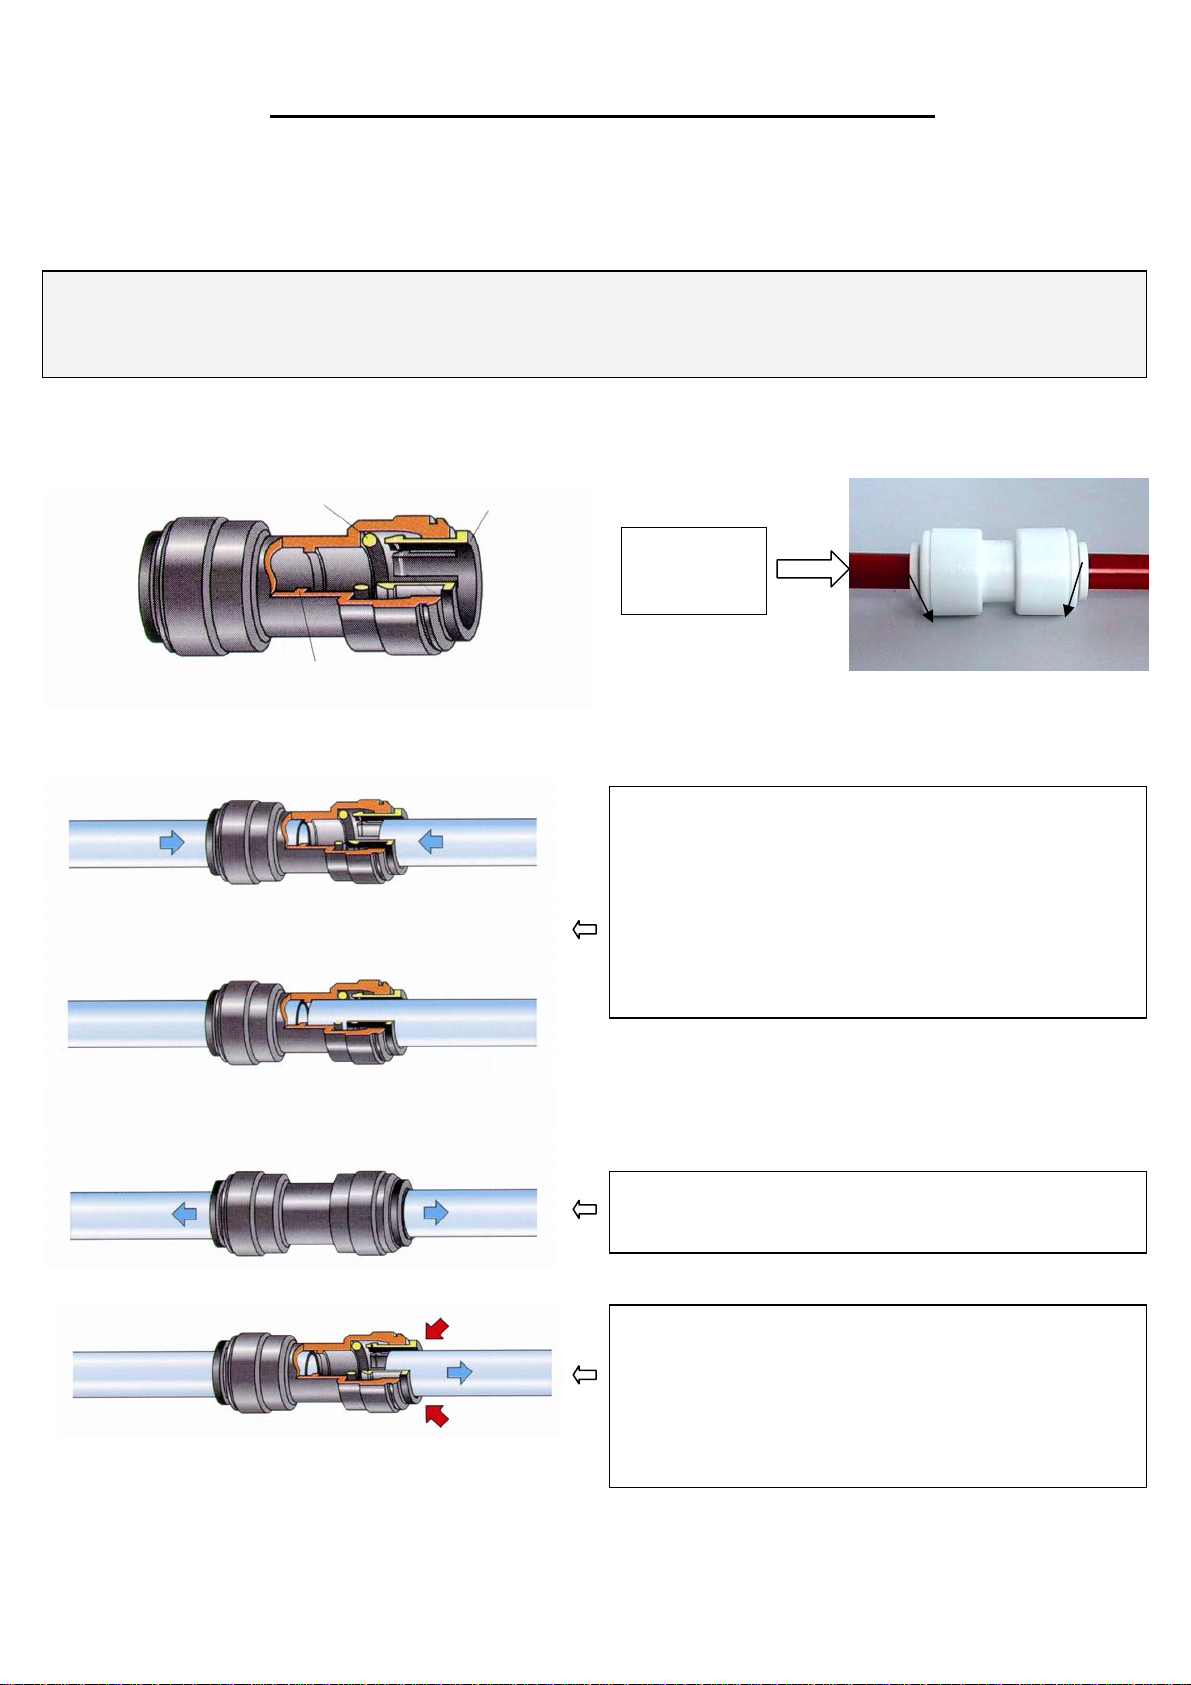
PLEASE NOTE : To cut the pipes you may only use a snap-off knife with a new blade. Cut the pipe off on a
softwood board. The cut must be straight, neat and free of burrs. Never use a kitchen knife, scissors or
wire-cutters. If so, the cut edge will not be even and you run the risk of damaging the O ring when you slide the
pipe into the coupling or that leaks occur.
CONNECTING :
Position the pipe in the connector and push it right
home. The depth of penetration is approximately 16
mm.
Once the pipe is right home, the stainless steel teeth
hold it in position and the O-ring seal ensures a
perfect seal. The connection is definitive, no further
operation is required.
VERIFICATION :
Pull gently on the pipe to check that it is held
correctly in position.
DISCONNECTING :
To disconnect the pipe, push the ring right in on
the connector (red arrows) and pull the pipe out
while still pressing the ring in. Disconnection may
be carried out several times without harming the
pipe. Before each disconnection, check that the
pipe is not under pressure.
6
Cut …
Pusch …
Finished !
O-ring seal Locking ring
Stop
Locking rings

Commissioning the purifier UF 400
Pressurisation of the purifier :
Follow the pressurisation procedure described below carefully, this will ensure that the purifier is
completely purged and all trapped air is removed. During this purge operation, the unit may briefly produce
some slightly coloured water, this is perfectly normal.
1) Open the pure water tap to the permanent flow position (lever locked in the raised position).
2) Slowly open the purifier inlet valve until it is fully open.
3) Let the tap with purified water run for 6 minutes (this period of time is essential for proper
functioning).
4) Leave the pure water tap open and close the inlet valve for approximately 1 minute.
5) Open the tap at the entrance to the purification device again and let the water run from the tap
with purified water for at least 2 minutes.
6) Close the pure water tap.
7) Open the pure water tap to the permanent flow position and allow it to run for 1 minute.
8) Purging and commissioning of your Cintroclear purifier is now completed.
Maintenance
The card that hangs on your purifier reminds you that its maintenance is essential to keep a good water quality
with the passing years. The maintenance of your CINTROCLEAR UF 400 must be done once a year. On this
card bellow with pre-printed calender you can put a cross to mark the next maintenance.
Your Cintroclear UF400 is meant for domestic use. The period of time between 2 maintenances is based
thereon.
7

SELF-TAPPING ACCESSORY Ref: DIR – 01
This accessory allows the CINTROCLEAR water purifier to be supplied from a copper pipe with diameter
between 10 and 16 mm.
SELF-TAPPING VALVE
Installing the self-tapping valve on piping is a simple operation for
which the only tool required is a screwdriver. The valve may be
installed on a pipe with a diameter of 10, 12, 14 or 16 mm.
IMPORTANT: before installing the self-tapping valve, close the
water supply tap to the house and open some taps to ensure that
the system is depressurised and partially drained.
INSTALLATION INSTRUCTIONS
1. Unscrew the tap body to separate it completely from the flanges as
shown in Diagram N°1.
2. Place the flanges on the pipe. Ensure that the round side of the
seal is turned in the right direction as indicated in Diagram N°2.
3. Tighten the 2 fastening screws firmly, but without exaggerating.
That is why it is best to systematically change sides when
tightening the screws.
4. Once the flanges are solidly tightened down on to the pipe, screw
the valve body on to the flange assembly. Before screwing the valve
body on to the flange, do not forget to fit the locking ring as
shown in Diagram N° 1,if not it will impede during the tapping
operation. The valve must be tightened down hard on to the seal but
not excessively since overtightening is useless and may deform the
seal. When you have finished with the screws, turn the tap in the
desired direction and block it by turning the lock nut up the flange
as shown in Diagram N°3.
5. Check that the self-tapping valve is in the “closed” position,
pressurise the water system again, purge the air from the pipes by
opening the valves slowly and check that the installed assembly does
not leak. If a leak should occur on pressurisation, check that the seal
is correctly orientated and that the valve is correctly tightened against
the flange.
Suggestion: when the drill tip touches the copper pipe, tighten
down one turn and then back off half a turn, then tighten down a full
turn and back off half a turn and so on until the pipe is drilled right
through. Drilling in this way will avoid burrs and crushing the copper
pipe.
8
Dia
g
ram N°1
Mounting flanges
Seal
Automatic connector ref. RAC-
01 (outlet of water purifier)
Drill tip
Locking nut in the
drilling position
Dia
g
ram N°2
Check the correct orientation of the curve
of the seal before tightening down the
assembl
y
usin
g
the two screws.
Dia
g
ram N°3
Locking nut tightened
down against the
flange in its definitive
position
View of completed
assembly. The valve
may be locked at any
angle using the locking
nut

SPLITTER ACCESSORY Ref: SEP - 01
This accessory allows the CINTROCLEAR water purifier to be supplied with water from a washing machine
or dishwasher tap.
USING
1) Unscrew the washing machine or dishwasher pipe from its supply tap
2) Screw the splitter connector directly on to the tap
3) Screw the washing machine or dishwasher pipe on to one of the outlets of the splitter
4) Screw the automatic connector on to the second outlet of the splitter and connect the purifier supply pipe
to this connector by simply pushing the pipe right home. Sealing is immediate and definitive. If it is necessary
to disconnect the pipe, see page 6 ‘’use of instantaneous automatic connectors’’.
9
Component to be screwed on to the
water supply tap of the washing machine
dishwashe
r
Splitter connector
for paralled supply
Supply pipe to
washing machine
or dishwasher
Automatic connector
ref. RAC-01
Supply
pipe to
purifier
Table of contents
Other Cintroclear Water Filtration System manuals

Popular Water Filtration System manuals by other brands


Marine Depot
Marine Depot KleanWater RO user manual

Water Right
Water Right Impression Series Installation instructions & owner's manual

H2O International
H2O International UF-010 installation manual

NTF
NTF AL Series instruction manual

BKI
BKI FKF-H Operation and maintenance

Behringer
Behringer 904B quick start guide

Parker
Parker Racor 800D-5REC-D Installation and service instructions

BWT
BWT SOLIFLOW Instructions for installation and recommendation

Antunes
Antunes VZN-441VC owner's manual

flamco
flamco FlexBalance EcoPlus C Series Installation and operating instructions

Premier
Premier RO-PURE Installation, operation and maintenance manual

Gecko
Gecko in.clear 0605-500002 user manual