Waterco R120 Installation guide
This equipment is to be installed and serviced by a qualified technician. Improper installation may result in
property damage, serious injury or death. Improper installation and/or operation will void the warranty.
Notice to Installer
This manual contains important information about the installation, operation & safe use of this product.
Once the product has been sold or installed this manual must be given to the owner/operator of this equipment.
ROBOTIC POOL SCRUBBER CLEANER
Installation - Operation - Warranty Manual
www.waterco.com
WARNING
120

Table of Contents
Safety Information 2-3
General Instructions 3
Installation 4
RCD Operation 4
Removing Cleaner from Pool 5-6
Cleaning Filter Bags 5-6
Power Cord Maintenance 6-7
CONGRATULATIONS
Congratulations and thank you for choosing our Waterco R120 Robotic Pool Cleaner the most technologically advanced automatic Robotic Pool
Cleaner available.
We are sure you will find your new R120 a pleasure to use. Before you use the cleaner, we recommend that you read through the relevant
sections of this manual, which provides a description of your cleaner and its functions.
To avoid the risks that are always present when you use a Robotic Pool Cleaner, it is important that the cleaner is installed correctly and that
you read the safety instructions carefully to avoid misuse and hazards.
We recommend that you keep this instruction booklet for future reference and pass it on to any future owners.
After unpacking the R120, please check it is not damaged. If in doubt, do not use the cleaner but contact the store that you purchased the
cleaner.
WARNING
1. DO NOT RUN THE R120 OUT OF THE WATER. OPERATING THE CLEANER OUT OF THE WATER WILL DAMAGE THE MOTORS AND VOID THE WARRANTY
2. THE R120 SHOULD NOT BE CONNECTED TO A TIMING DEVICE AND LEFT CONTINUOUSLY WITHIN A POOL OR SPA.
3. DON’T USE EXTENSION CORDS OR ADAPTER PLUGS WITH R120 – AS THIS MAY AFFECT THE CLEANER’S PERFORMANCE AND
EXPOSURE TO ELECTROCUTION (EXPOSURE TO PERSONAL INJURY OR DEATH).
SAFETY INFORMATION
1. Waterco’s R120 Robotic Pool Cleaner is designed to work with water at a temperature greater than 13ºC (55ºF) and less than 45ºC (113ºF).
The cleaner should never be operated outside of these temperatures or damage may occur.
2. The installation should be carried out in accordance to local safety standards and bylaws.
3. Any modification of the R120 requires the prior consent from Waterco. Original replacement parts and accessories
authorised by the manufacturer ensure a high level of safety. Waterco assumes no liability for the damage and injuries caused by
unauthorised replacement parts and accessories.
4. The user should make sure that the installation is carried out by qualified authorised persons and that these persons have first carefully
read the following instructions.
5. The operating safety of the R120 is only guaranteed if the installation and operation instructions are correctly followed.
6. In the event of defective operation or fault, contact Waterco or its nearest authorised service agent.
2
Storing The Power Cord 8
General Maintenance 8
Winter Storage 8
Warranty 8-11
Trouble Shooting 12-13
Notes 14-15

7. To reduce the risk of injury, do not permit children to use this product.
8. Incorrectly installed equipment may fail, causing severe injury or property damage.
9. Chemical spills and fumes can weaken the R120. Corrosion can cause the cleaner and other equipment to fail, resulting in severe
injury or property damage. Do not store pool chemicals near your equipment.
10. Do not play with the R120 or power cable as potential entrapment of hair or body parts may result. The power cord can
trip or entangle swimmers which could result in drowning.
11. Your R120 should not be used while people are swimming in the pool.
GENERAL INSTRUCTIONS
nMaximum Recommended Pool Size: 9m x 12m x 2.6m depth.
Minimum Recommended Pool Size: 3m x 3m.
nIf ambient air temperature exceeds 46ºC (115ºF), protect the R120’s power supply from direct sunlight. However, ensure power
supply has adequate ventilation.
nDo not connect the R120’s power supply (transformer) to AC power until installation has been completed.
nDo not use if unit is damaged in any way.
nMake sure the R120 is unplugged from its power supply before opening the unit or performing any other maintenance.
nTo avoid damage to the power supply & power cord, never carry the power supply by the power cord or pull on the
power cord to disconnect from an outlet. Disconnect by pulling the plug, itself, from the outlet.
nDo not pull power cord around sharp corners or edges.
nDo not operate with a damaged power cord or power supply.
nBefore installing the R120, understand the cleaner’s coverage. The cleaner was not designed to automatically clean steps or to work
under solar covers. It was also not designed to do an initial clean up for a new pool installation.
nThe power supply must be at least 4m (12ft) from the pool’s edge at all times!
nIt is recommended that you clean your R120 filter bag and check the impeller to make sure it is free and clear of debris
after every use.
nDisconnect the power supply supply from the outlet when not in use.
nDO NOT switch the R120 to “ON” if it is not immersed in water. Operating the cleaner out of water may cause severe damage & will
result in loss of warranty. Always remember to turn the power supply “OFF” and unplug it from the power outlet before removing the
cleaner from the pool.
3

INSTALLATION
nEnsure power supply (transformer) is in the off position.
nPlug the power supply lead into its own dedicated 220-240V, 50Hz AC electrical outlet.
It is essential the power point is properly connected to an earth leakage circuit breaker and
properly earthed to ground. Consult a qualified electrician if you are unsure.
IMPORTANT NOTE:
The cleaners power supply is also equipped with a Residual-Current Device (RCD). This device
disconnects the power circuit whenever it detects that there is not a balance between the power and the return neutral conductor. Such an
imbalance is sometimes caused by current leakage through the body of a person who is grounded and accidentally touching the powered
part of the circuit and will prevent injury caused by such shocks. They are not intended to provide protection against overload or short circuit
conditions, the earth leakage circuit breaker below will handle this situation.
WARNING:
It is strongly recommended that you test the RCD prior to using the cleaner power supply.
RCD OPERATION:
1. Plug power supply lead into dedicated electrical outlet.
2. Press RESET button and the indicator light should be on “Lite”.
3. Press TEST button and the indicator light should be on “Off”.
4. Press RESET button for use of the cleaner, do not use if TEST fails and indicator is on “Lite”.
n This RCD is not an overload protection device.
n This RCD device complies SAA AS/NZS3190, Approval No A/10643EA.
n Do not plug the power supply lead into an extension cord.
n Plug in the connector of the power cord from the cleaner into the power supply. The connector is keyed so that it will
only plug into the power supply one way. Make sure that the plug is pushed all the way onto the power supply.
Slide the connector lock (strain relief) onto the connector and turn the connector lock clockwise until it is tight (Do not over tighten).
WARNING:
1. DO NOT RUN THE CLEANER OUT OF THE WATER. OPERATING THE CLEANER OUT OF THE
WATER WILL DAMAGE THE MOTORS AND VOID THE WARRANTY
2. THE R120 SHOULD NOT BE CONNECTED TO A TIMING DEVICE
AND LEFT CONTINUOUSLY WITHIN A POOL OR SPA.
nPlace the R120 into the pool and rock the cleaner side to side to
release any trapped air. The cleaner will sink to the bottom of the pool.
nPlace a sufficient length of the power cord into the water that will enable the R120 to easily reach
all areas of the pool. (Do not place ALL of the power cord into the pool unless required).
nTurn on power supply at dedicated 220-240V, 50Hz AC electrical outlet and switch
power supply to the on position, and the R120 will begin its cleaning program.
nThe R120 will automatically shut itself down after three hours.
nIf a second cleaning is required or the R120 is accidentally shut off, you should wait one minute
before switching the cleaner on again. The cleaner has an automatic lock out period to protect the
electronic intelligent navigation devices.
4

IMPORTANT NOTE:
During normal operation, the R120 may appear to shut off for a few seconds. This is a normal part of the pool cleaning program. The cleaner
has multiple ways of cleaning the pool walls. It may climb to the top of the pool wall, scrub, then make a turn and drive back down the pool wall
to the bottom of the pool. It may also climb to the top of the pool wall, shut down for a few seconds, remove itself from the pool wall, turn its
pump motor on again, pushing itself down to the bottom of the pool away from the wall.
The R120 may also climb the pool wall, scrub to the waterline, turn the pump motor off, and float away from the pool wall down to the bottom
of the pool. All of these variations have been programmed into the cleaner and are designed to quickly and efficiently clean your entire pool.
The R120 has also been designed to clean all areas of your pool. It will climb the pool walls, and occasionally break the pool water surface.
In the process of climbing the pool walls it may stay on the pool water surface and continue to operate from several seconds to a few minutes.
This is a normal operation procedure and the cleaner will eventually make its way to the bottom of the pool to continue its cleaning program.
Generally, most of the dirt is concentrated on the floor of a pool the cleaner will spend the majority of cleaning program on the pool floor.
REMOVING THE CLEANER FROM THE POOL
nSlowly pull the R120’s power cord to retrieve the cleaner to the water surface and pool edge.
(DO NOT PULL THE CLEANER OUT OF THE POOL BY THE POWER CORD).
nReach down and grasp the handle of the R120 and remove it from the pool as shown in Fig 1 and Fig 2.
Note: The unit should be stored in an area that will afford some protection from the elements to insure that it retains its finish.
CLEANING THE ROBOTIC POOL CLEANER’S FILTER BAG
Note: It is strongly recommended that the R120’s filter bag should be cleaned after every use.
nTurn the R120 upside down and place on the ground or stable surface so the bottom lid is exposed.
nLocate the front and rear red retaining clips and unlock by turning as directed by the directional arrows as shown Figure 3.
nPress the two red tabs inward towards the centre of the R120 as shown in Figure 4. Lift the cleaner’s bottom lid with the filter bag
up and out of the cleaner.
nGrip the bottom lid of the R120 firmly, with one hand and use your other hand to grab the filter bag material and pull it away from
and up from the bottom lid of the cleaner. Remove all large debris from the filter bag. Refer Figure 5.
nTurn filter bag inside out and hose out all remaining debris as shown in Figure 6. If filter bag is very dirty it may be washed in a
washing machine.
Note: When using a washing machine it is recommended to turn the filter bag inside out and wash using cold water (only) and a mild detergent
without any other item within the wash.
Note: Do NOT use a clothes dryer.
nHose all debris out of the R120’s bottom lid being sure to remove all dirt from the fine filters situated on the intake doors as
shown in Figure 7.
nTo reinstall the R120’s filter bag, first place cleaner bottom lid facing up wards.
nPlace the R120’s filter bag outer frame onto the cleaner bottom lid and ensure the filter bag frame seats fully into the retaining channels.
Note: Visually ensure the R120’s filter bag is correctly seated into cleaners bottom lid retaining channels particularly the corners. Refer Figure 8.
nOnce the filter bag frame is correctly positioned into the R120’s bottom lid retaining the filter bag is complete.
nPick up the R120’s bottom lid and turn it over so the bag hangs down wards. Refit the cleaner’s bottom lid back into the cleaner
being careful to feed the cleaners filter bag back into the body of the cleaner.
5
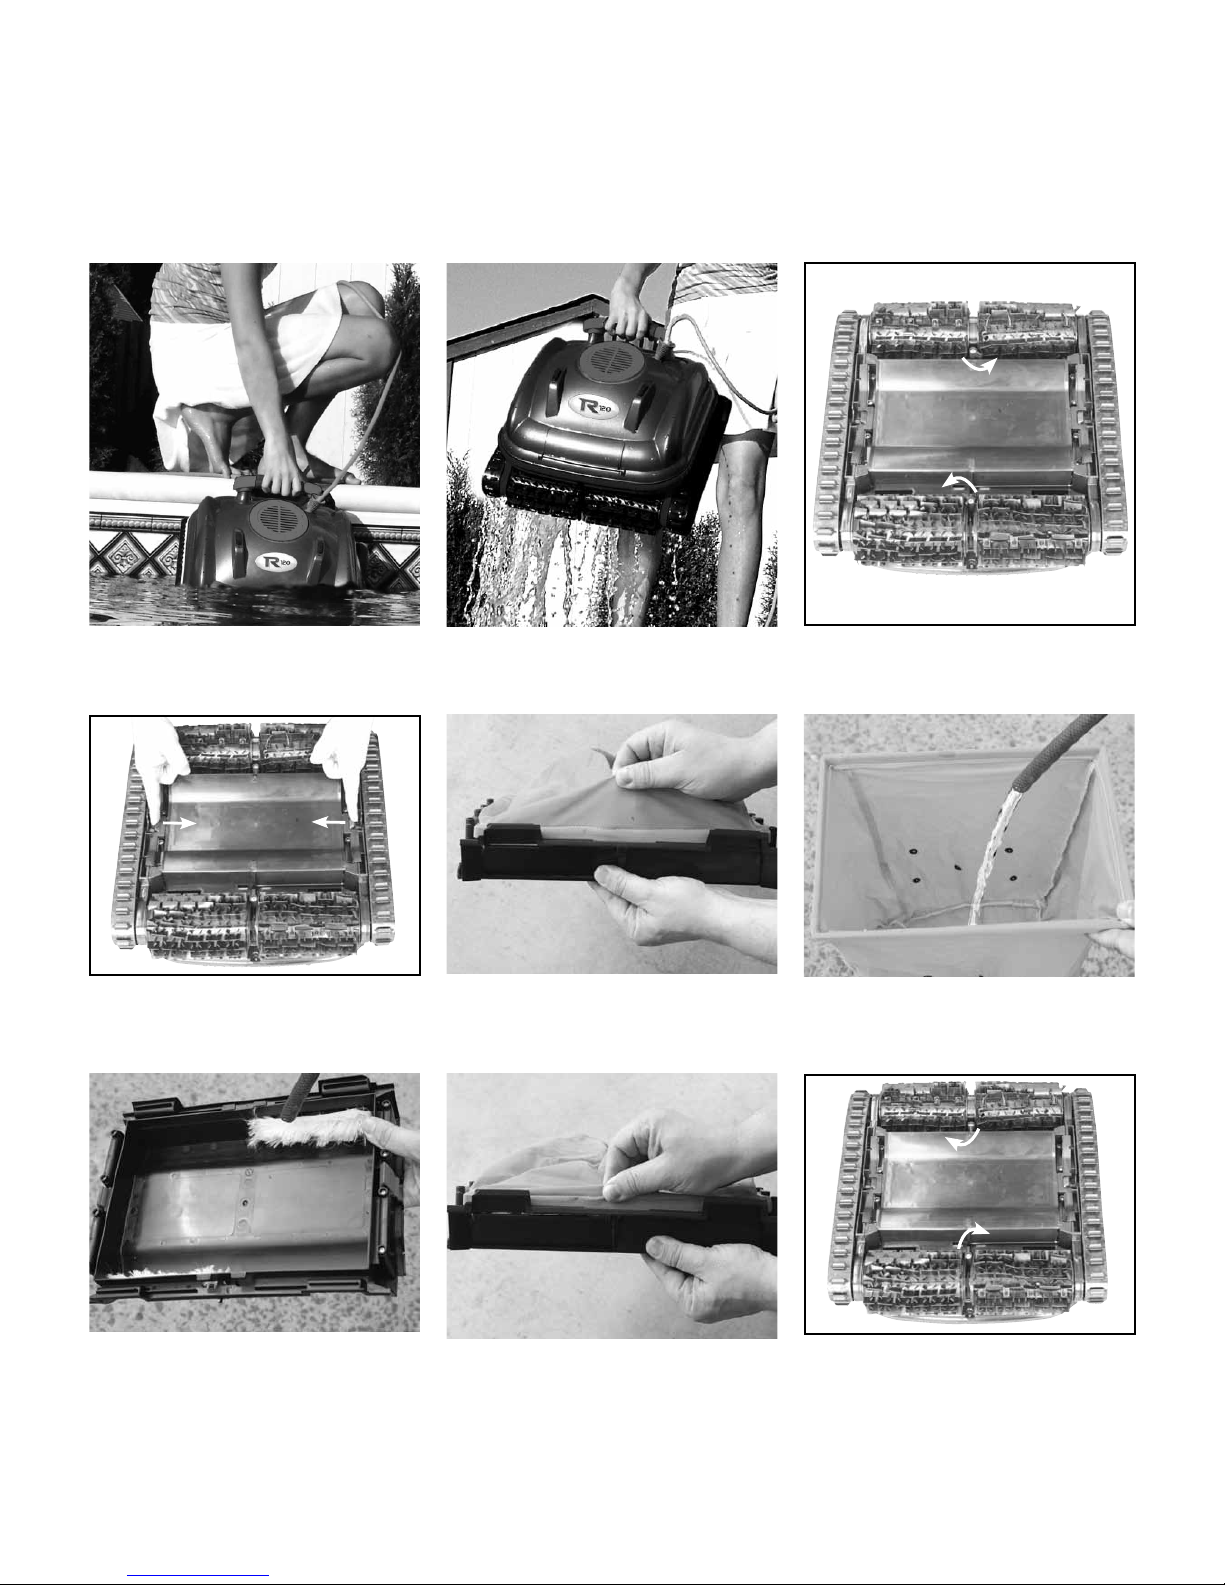
nOnce the R120’s bottom lid is seated press it firmly into the cleaner, the two red side tabs should click into place and turn the front and rear
red retaining clips as indicated by the directional arrows into the locked position, refer Figure 9. Gently pull on the cleaner bottom lid to
insure that it is properly locked in. The cleaner’s bottom lid is now correctly installed.
Note: Ensure the R120’s filter bag is completely enclosed within the cleaner housing as the bottom lid will not close properly, and the
cleaner will not operate.
6
Figure 8Figure 7
Figure 6
Figure 1 Figure 2 Figure 3
Figure 4 Figure 5
Figure 9
POWER CORD MAINTENANCE
In the course of using your R120, the power cord may become twisted or tangled.
The R120 Power Kink Resistant Cord Advantage
The R120 Robotic Pool Cleaner has a specifically designed power kink resistant cord using a one piece extruded technology that prevents the
cord from delaminating, protecting the internal wires from shorting out and extending it’s operating life.
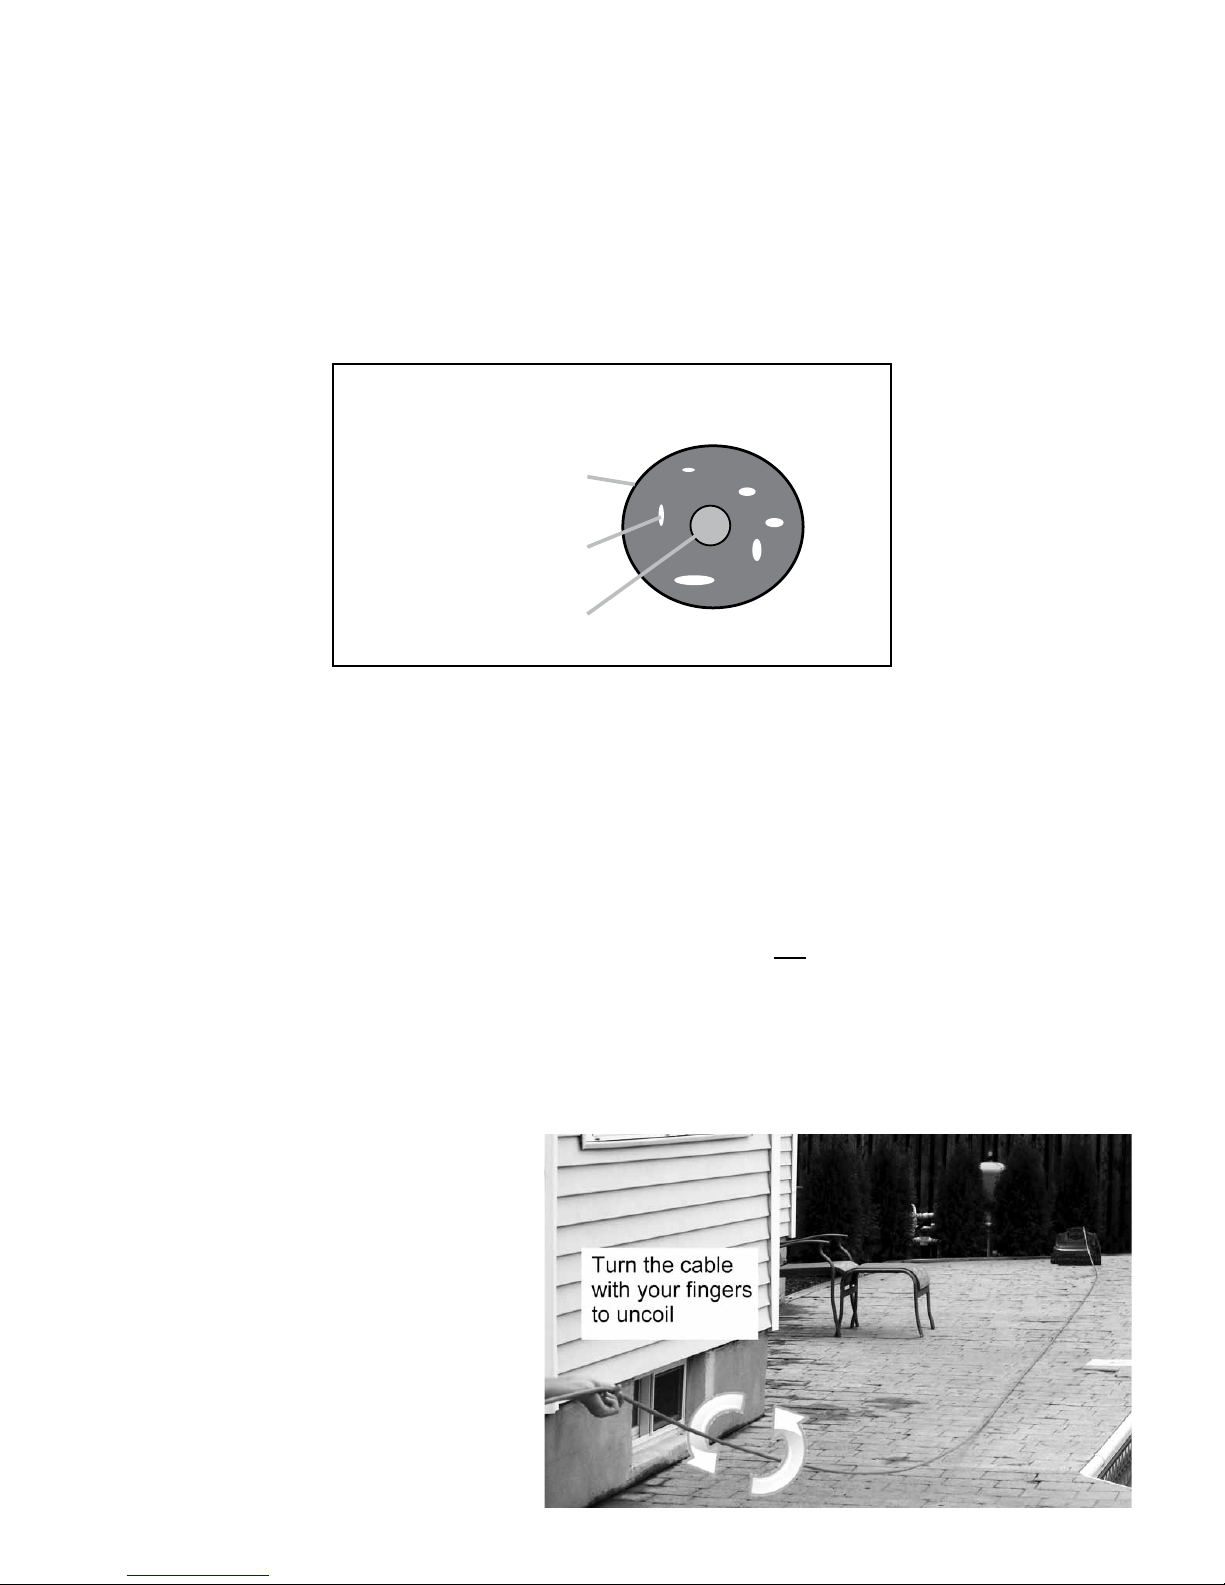
If you refer to the power cord (Fig 10 below), there are no layers as the cable & wires are manufactured simultaneously. The coating of the
cable is injected with air to form small pockets that allow it to float, so the outer layer takes the place of (3) layers of a typical cable.
The following five points can prevent or greatly reduce the tangling of the power cord:
1) Make sure there are no objects in the pool during the cleaning cycle for the power cord to get caught on (pool ropes, toys, etc).
2) Only allow enough power cord in the pool for full coverage/do not put excess power cord in the pool
(Example 8m pool doesn’t need 18m of power cord).
3) The R120 should not be connected to a timing devise and left continuously within a pool or spa.
4) Remove the R120 from the pool and uncoil the power cord from the power supply after every cleaning cycle to release
the tension in the power cord.
5) The R120 is designed to work with water at a temperatures greater than 13ºC (55ºF) and less than 45ºC (113ºF).
The cleaner should never be operated outside of these temperatures or damage may occur.
To uncoil the power cord, it is best that the cord is wet:
1. Place the cleaner on the ground as shown in Fig 11.
2. Unplug the power cord from the power supply.
3. Be sure to use a clear area that will allow the
power cord to stretch out in a straight line.
4. Pull the power cord so it is off the ground.
5. Using your fingers, roll the power cord in the
opposite direction that it is coiled in.
6. When straight, loop power for storage as shown
in Fig C.
7
R120 Robotic Cleaner Cable
Foam Casing
Air Pockets
(Enlarged in diagram)
Wire Inner Core
(+/- coated in non-conductive material)
Fig 10
Figure 11
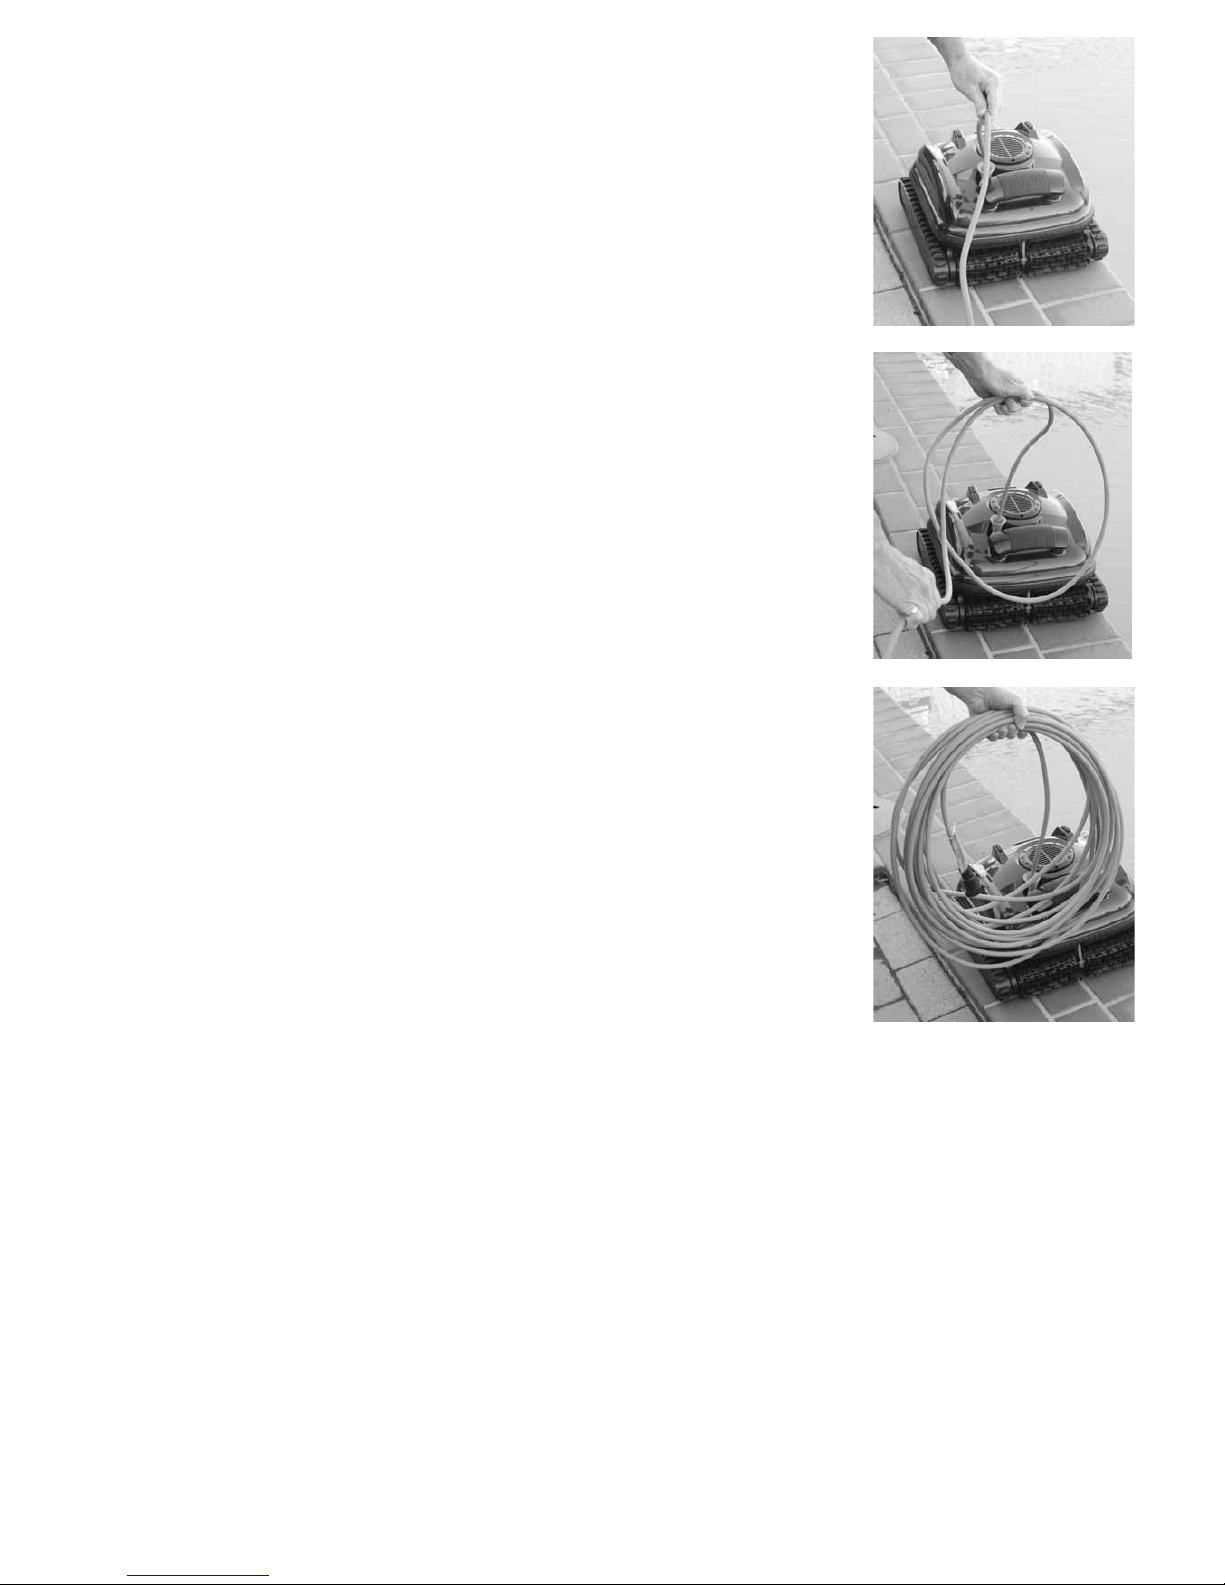
STORING THE POWER CORD
1. Unplug the power cord from the power supply.
2. Hold the power cord close to the cleaner. Refer Figure A.
3. Make a roughly half metre (two feet) loop with the power cord as shown. Refer Figure B.
4. When making loops, roll the power cord slightly in a counter clockwise manner
to maintain form as shown in Fig C.
Note: Do not loop the power cord tightly around objects.
Note: When looping the power cord for storage it is best to start close to the cleaner rather
than at the power connection end. Refer Figure A. Hold the power cord as close to the cleaner as possible
and loop the power cord to the cleaner. Refer Figure B & C
GENERAL MAINTENANCE GUIDE
To ensure the maximum life of the R120, please follow the procedures below:
1. Clean The R120’s filter bag after every use.
2. Maintain a correct chemical balance of your pool/spa water. The chemical balance of water
is a relationship between its pH, total alkalinity, calcium hardness and water temperature.
The water must be maintained at all times to the following:
PH LEVEL: BETWEEN 7.2 & 7.8.
TOTAL ALKALINITY: BETWEEN 80 & 150ppm.
CALCIUM HARDNESS: BETWEEN 150 & 300ppm.
Also, within these tolerances be balanced to the Langelier Saturation Index within a range of -0.2 to +0.2.
Note: Testing kits are available to test the water yourself or alternately bring a sample of the water to
a professional pool and spa shop.
nMains water and rural water supplies need to be monitored. Saturation (life) in mains water or
bore (rural) will vary depending on water quality.
WINTER STORAGE
If temperatures will regularly be below 5ºC (41ºF) or over 45ºC (113ºF), the cleaner and power supply
(transformer) should be stored indoors.
WARRANTY
The R120 has been manufactured, tested and inspected in accordance with carefully specified engineering requirements. It is warranted to
be free from defects in materials and workmanship under normal use and service, subject to qualifications, conditions and limitations
described below.
1 Year Limited Warranty:
One year full warranty, this includes drive motor and pump motor. This warranty applies only while using this product in Australia & New Zealand.
This warranty extends to the first consumer/purchaser for a period of 1 year from the original date of purchase.
This warranty covers only normal and reasonable use. Any damage, defects, malfunctions or other failures arising from its use without the
original transformer or any use which does not comply with the instructions in this manual, including failure of the purchaser to provide
reasonable and necessary maintenance, will void this warranty.
The warranty obligations of Waterco Ltd shall be limited to repair or replacement of the product or any defective component, at the discretion
of Waterco Ltd. The repair or replacement may include the use of refurbished components and/or units. Waterco Ltd will not be liable or
responsible under any circumstances or in any amount for any consequential or incidental damages, for any injury or damages to persons or
property using or used in connection with this product, or for loss of profits or other costs or expenses of any kind or character.
8
Figure A
Figure B
Figure C

This warranty does not include replacements of the filter bag, bottom lid, brushes and tracks.
CAUTION:
Some pool vinyl liners are more susceptible to surface wear and pattern removal than others, caused by objects such as brushes, toys, floats,
chlorine dispensers, and automatic pool cleaners coming into contact with the pool vinyl surface.
Such patterns can be easily scratched or abraded merely by rubbing the surface with a brush. Pattern ink can also rub off when they come
into contact with objects in the pool. Waterco Ltd is not responsible for, nor does this limited warranty cover pattern removal, abrasion, and
markings on or damage to any kind of pool vinyl liner.
[Important note: you may have additional rights under warranties mandated by the Trade Practices Act or similar legislation].
PLEASE READ
1. These terms and conditions carefully, as failure to comply may affect your legal rights under this warranty; and
2. Any operation instructions carefully before commencing use of any product manufactured/Distributed by Waterco Limited (“Waterco”).
Waterco manufactures quality pool and spa products to the highest standards using the most advanced technology and production
procedures available.
WARRANTY COVER
If a defect occurs in any Waterco product during the warranty period, Waterco will at its discretion, repair the product or replace and install
the defective part, free of charge provided that the defect results solely from poor workmanship or materials and subject to these terms and
conditions.
Labour is covered by this warranty for a period of 1 year from the date of purchase or installation, within a 25 km (15 miles) radius of an
authorised Waterco Service Agent.
The purchaser is responsible for any freight incurred.
Warranties are valid only within the original country of purchase. Our goods come with guarantees that cannot be excluded under the Australian
Consumer Law [applicable only to Australian States and Territories]. You are entitled to a replacement or refund for a major failure and
compensation for any other reasonably foreseeable loss or damage. You are also entitled to have the goods repaired or replaced if goods fail to
be of acceptable quality and the failure does not amount to a major failure.
WARRANTY PERIOD
Waterco R120 Robotic Pool Cleaners are covered by a one year warranty.
All warranty periods commence on the date of purchase by the end user.
The provisions of this warranty are not transferable and are in addition to and not in modification of or subtraction from any applicable
statutory warranties, rights or remedies.
CONDITIONS OF WARRANTY
This warranty only applies where:
1. The products requiring installation have been sold with installation included and have been installed by a licenced plumber, electrician or
person who has completed an accredited course in swimming pool care and maintenance or a person with more than 1 year on the job
learning or a person supervised by one of these people, in accordance with any written installation instructions provided.
2. The products have been installed and operated in accordance with written instructions supplied by Waterco;
3. The purchaser is able to provide proof of purchase that specifies the date of purchase;
4. The product has been serviced or maintained regularly. (at least once a month).
5. Any pool and spa equipment has been used in water:
a. With a temperature not exceeding 40 degrees Celsius;
b. With a pH range maintained between hte pool water chemistry above mentioned 7.2 to 7.8;
c. That has been chemically balanced in accordance with the Langelier saturation index within a range of -0.2 to + 0.2 to ensure that it is
not corrosive or scale forming;
d. That is not salt water (other than mild saline water conditions which are compatible with swimming pool salt water chlorination systems) –
unless otherwise stated by Waterco in both the respective product labels and brochures that it is suitable for seawater applications; and
9

e. That has been regularly treated with a sanitising system using bromine, chlorine in one of its compound forms, or generated in-situ,
in concentrations (doses) recommended by the relative state or territory health departments. (In areas outside of Australia please refer to
the local health department recommendations before use);
6. Electrical equipment has been adequately protected from salt air environments and from salt water; and
7. All repairs and replacements shall be carried out by Waterco or its authorised service dealer, unless otherwise authorised in writing
by Waterco.
8. If an authorised service dealer is not available within 25 km (15 miles) of the purchaser’s area:
• The purchaser must contact the place of purchase or Waterco for further instructions and;
• The purchaser is responsible for any freight or infield labour costs.
EXCLUSIONS
This warranty does not cover, and Waterco will not be responsible for, any defect or damage caused or contributed to by:
(a) installation or use of the product other than in accordance with Waterco’s written instructions, any statutory requirements and these
terms and conditions;
(b) use of the product for a purpose other than for which it was designed or sold;
(c) abuse, misuse, corrosion, internal and external, or normal wear and tear;
(d) any repairs or modifications whatsoever carried out by any person, other than a Waterco authorised service dealer;
(e) exposure to water not caused by a defect in the product; and
(f) transit of the product over which Waterco has no control.
(g) inadequate ventilation
(h) cement, pebbles, render or other pool surface finishes blocking the pump’s impeller
(i) insect and/or vermin infestation
To the extent permitted by law Waterco excludes all liability it may have to the purchaser for indirect, special or consequential loss arising from
or related to any defect in any Waterco product, or any act or omission, including negligence of Waterco, including, but not limited to, loss of
business, loss of profit, loss of revenue, lost opportunity, inconvenience, and damage to any property other than the Waterco product.
To the extent permitted by law, Waterco excludes all other conditions, guarantees, liabilities or representations that are not expressly set out in
this agreement. These terms and conditions do not attempt to exclude, restrict or modify any applicable statutory rights, or any exercise of any
statutory rights, or any liability imposed on Waterco by any law (including the Competition and Consumer Act 2010), if to do so would contravene
that law or make any part of these terms and conditions void.
To the extent permitted by law, Waterco excludes all conditions and warranties implied into these terms and conditions and limits its liability for
breach of any such condition or warranty that it cannot exclude to the greater of (at Waterco’s option);
(a) for goods:
• Repairing or replacing those goods; or
• Paying the cost of having those goods repaired or replaced; and
(b) for services:
• Resupplying the services; or
• Paying the cost of having those services resupplied.
TEST YOUR WATER REGULARLY
The chemical balance of the water is a relationship between total alkalinity, pH, Calcium hardness and temperature. Waterco recommends that
you have your water tested regularly by your local pool professional. A record of testing should always be kept for reference.
Some jurisdictions do not allow the exclusion or limitation of incidental or consequential damages, so any such limitation may not apply.
This warranty gives specific legal rights. The purchaser may have other rights depending on the jurisdiction in which the Waterco product was
purchased or the purchaser is located.
10

Warranty Limitations:
The provisions of this warranty are not transferable from the original purchaser and are in addition to and not in modification of or subtraction
from any applicable statutory warranties, rights or remedies.
Labour is covered by this warranty for a period of 1 year from the date of purchase or installation, within a 25 km (15 mile) radius of an
authorised Waterco Service Agent.
Spare parts used in the repair of products are covered by a 1 year warranty and are not covered by the original warranty from date of purchase
or installation.
The purchaser is responsible for any freight incurred.
NOTE:
Most pool cleaner problems are caused by incorrect installation, poor water chemistry and wear and tear. Please regularly check the condition
of the R120 filter bag, bottom lid, brushes and tracks, as these are like the tyres on a car & need replacement from time to time.
11
Product Warranty Exclusions
R120 Robotic Pool Cleaner 1 Year 1. Leaving cleaner in direct sunlight & out of water
2. Human intervention damaging the cleaner
3. Normal wear & tear
4. Colour fading due to sun
5. Water chemistry out of normal range
Drive Motor and Pump Motor 1 Year 1. Human intervention damaging the cleaner
2. Water chemistry out of normal range
Filter bag, bottom lid, brushes & tracks Excluded 3. Normal wear & tear component

Symptom Possible Reasons
Potential Solution
Cleaner Dead in water/Will not Restart
Is time being allowed for the unit to reset? At least 1 minute is needed between cycles to reset the power supply.
Turn power supply off and allow 30 seconds for cleaner to reset.
Is the outlet working? Earth Leakage Circuit Breaker or breaker may have tripped
Check Earth Leakage Circuit Breaker or breaker and try a different outlet.
Is an extension cord being used? Extension cord may be defective
Try running the cleaner without an extension cord. Using a Electrical Extension cord is not recommended.
Cleaner not Moving
Is there anything caught in the drive motor/brush area? Debris could prevent the drive motor(s) from moving.
Check for debris and remove if found.
Is the bottom lid/filter bag installed correctly? The bottom lid may be dragging on the pool surface.
Make sure the filter bag/bottom lid is properly installed or test cleaner without bottom lid. (Red Clips)
Are the brushes spinning? Drive motors may not be operational.
Check to see if the brushes are rotating during the cleaning cycle.
No Suction/Not Picking up Debris?
Is the filter bag clean? Large amounts of debris will reduce cleaner suction. (filter bag full)
Thoroughly rinse the filter bag. Dirty pools may require the bag to be cleaned part way through cycle.
Is there debris caught in the impeller? Debris around the impeller may reduce cleaner suction.
Check for debris and remove if found.
Is the bottom lid/filter bag installed correctly? An improperly installed filter bag may inhibit cleaner efficiency.
Make sure the filter bag is correctly installed ("PUSH IN" label should be covered by tab on bottom lid).
Is there water coming through the top of the cleaner? The pump may not be operational.
Check to see if there is water coming through the impeller during operation.
Back and Forth in One Spot/Standing on End/Wheelies
Is the bottom lid/filter bag installed correctly? The bottom lid may be dragging on the pool surface.
Make sure the filter bag/bottom lid is properly installed or test cleaner without bottom lid. (Red Clips)
Is there debris caught in wheels or brushes? Debris may inhibit cleaner movement.
Check for debris and remove if found.
Is there enough cord in the pool? The cleaner may not have enough cable for full pool coverage.
Make sure enough cable is in the pool to cover all areas.
Spinning in One Spot
Is there debris caught in the tracks, brushes or wheels? Debris may inhibit cleaner movement.
Check for debris and remove if found.
Is the bottom lid/filter bag installed correctly? The bottom lid may be dragging on the pool surface.
Make sure the filter bag/bottom lid is properly installed or test cleaner without bottom lid. (Red Clips)
Are both drive motors rotating (NC71)? If one side of the drive motor isn't rotating then the unit will rotate in one area.
Check to see if the brushes are rotating during the cleaning cycle.
Cleaner floating
Is there air caught in the filter bag? Trapped air will cause the unit to float.
Hold the cleaner under water and rock back and forth before starting the cycle.
Is the filter bag clean? Large amounts of debris will reduce cleaner suction.
Thoroughly rinse the filter bag. Dirty pools may require the bag to be cleaned part way through cycle.
Is there water coming through the top of the cleaner? The pump may not be operational.
Check to see if there is water coming through the impeller during operation.
Cleaner Not Climbing
Is there algae present in water? Algae will create slick surfaces.
Brush walls and check water chemistry.
Are the brushes worn? Wear and tear on brushes or tracks will reduce traction.
Replace worn brushes or tracks.
Is the filter bag clean? Large amounts of debris will reduce cleaner suction.
Thoroughly rinse the filter bag. Dirty pools may require the bag to be cleaned part way through cycle.
Is there water coming through the top of the cleaner? The pump may not be operational.
Check to see if there is water coming through the impeller during operation.
Power Cord Tangling
How much power cord is in the pool? Too much power cord in the pool will increase chances for cable tangling.
Only allow enough power cord in the pool for the cleaner to have full coverage.
Is the power cord being unplugged after every cycle? Tension will build in the power cord during the cleaning cycle.
Make sure to unplug the power cord from the power supply frequently to reduce risk of cable tangling.
Are there objects in the pool? Toys/floats/pool rope lines may cause the power cord to tangle.
Remove any obstructions from the pool to prevent the power cord from becoming entangled.
Cleaner Trapped on Steps
Is there air caught in the filter bag? Trapped air will cause the unit to float.
Hold the cleaner under water and rock back and forth before starting the cycle.
Has the pool water level gone down? Water levels may have changed and the unit may be taking in air.
Hold the cleaner on the steps (while off) and see if the top of the unit is above the water line.
12

Symptom Possible Reasons
Potential Solution
Cleaner Dead in water/Will not Restart
Is time being allowed for the unit to reset? At least 1 minute is needed between cycles to reset the power supply.
Turn power supply off and allow 30 seconds for cleaner to reset.
Is the outlet working? Earth Leakage Circuit Breaker or breaker may have tripped
Check Earth Leakage Circuit Breaker or breaker and try a different outlet.
Is an extension cord being used? Extension cord may be defective
Try running the cleaner without an extension cord. Using a Electrical Extension cord is not recommended.
Cleaner not Moving
Is there anything caught in the drive motor/brush area? Debris could prevent the drive motor(s) from moving.
Check for debris and remove if found.
Is the bottom lid/filter bag installed correctly? The bottom lid may be dragging on the pool surface.
Make sure the filter bag/bottom lid is properly installed or test cleaner without bottom lid. (Red Clips)
Are the brushes spinning? Drive motors may not be operational.
Check to see if the brushes are rotating during the cleaning cycle.
No Suction/Not Picking up Debris?
Is the filter bag clean? Large amounts of debris will reduce cleaner suction. (filter bag full)
Thoroughly rinse the filter bag. Dirty pools may require the bag to be cleaned part way through cycle.
Is there debris caught in the impeller? Debris around the impeller may reduce cleaner suction.
Check for debris and remove if found.
Is the bottom lid/filter bag installed correctly? An improperly installed filter bag may inhibit cleaner efficiency.
Make sure the filter bag is correctly installed ("PUSH IN" label should be covered by tab on bottom lid).
Is there water coming through the top of the cleaner? The pump may not be operational.
Check to see if there is water coming through the impeller during operation.
Back and Forth in One Spot/Standing on End/Wheelies
Is the bottom lid/filter bag installed correctly? The bottom lid may be dragging on the pool surface.
Make sure the filter bag/bottom lid is properly installed or test cleaner without bottom lid. (Red Clips)
Is there debris caught in wheels or brushes? Debris may inhibit cleaner movement.
Check for debris and remove if found.
Is there enough cord in the pool? The cleaner may not have enough cable for full pool coverage.
Make sure enough cable is in the pool to cover all areas.
Spinning in One Spot
Is there debris caught in the tracks, brushes or wheels? Debris may inhibit cleaner movement.
Check for debris and remove if found.
Is the bottom lid/filter bag installed correctly? The bottom lid may be dragging on the pool surface.
Make sure the filter bag/bottom lid is properly installed or test cleaner without bottom lid. (Red Clips)
Are both drive motors rotating (NC71)? If one side of the drive motor isn't rotating then the unit will rotate in one area.
Check to see if the brushes are rotating during the cleaning cycle.
Cleaner floating
Is there air caught in the filter bag? Trapped air will cause the unit to float.
Hold the cleaner under water and rock back and forth before starting the cycle.
Is the filter bag clean? Large amounts of debris will reduce cleaner suction.
Thoroughly rinse the filter bag. Dirty pools may require the bag to be cleaned part way through cycle.
Is there water coming through the top of the cleaner? The pump may not be operational.
Check to see if there is water coming through the impeller during operation.
Cleaner Not Climbing
Is there algae present in water? Algae will create slick surfaces.
Brush walls and check water chemistry.
Are the brushes worn? Wear and tear on brushes or tracks will reduce traction.
Replace worn brushes or tracks.
Is the filter bag clean? Large amounts of debris will reduce cleaner suction.
Thoroughly rinse the filter bag. Dirty pools may require the bag to be cleaned part way through cycle.
Is there water coming through the top of the cleaner? The pump may not be operational.
Check to see if there is water coming through the impeller during operation.
Power Cord Tangling
How much power cord is in the pool? Too much power cord in the pool will increase chances for cable tangling.
Only allow enough power cord in the pool for the cleaner to have full coverage.
Is the power cord being unplugged after every cycle? Tension will build in the power cord during the cleaning cycle.
Make sure to unplug the power cord from the power supply frequently to reduce risk of cable tangling.
Are there objects in the pool? Toys/floats/pool rope lines may cause the power cord to tangle.
Remove any obstructions from the pool to prevent the power cord from becoming entangled.
Cleaner Trapped on Steps
Is there air caught in the filter bag? Trapped air will cause the unit to float.
Hold the cleaner under water and rock back and forth before starting the cycle.
Has the pool water level gone down? Water levels may have changed and the unit may be taking in air.
Hold the cleaner on the steps (while off) and see if the top of the unit is above the water line.
TROUBLE SHOOTING
13

14
NOTES

15
NOTES
NEW ZEALAND
7 Industry Road,
Penrose, 1061
Auckland, New Zealand
Tel: + 64 9 525 7570
USA
1864 Tobacco Rd
Augusta, GA 30906, USA
Tel: + 1 706 793 7291
CANADA
2645, Jacques-Cartier East
boulevard
Longueuil, Québec
Canada, J4N 1L7
Tel: + 450 796 1421
CHINA
No.132 Buling Road,
Yonghe District, GETDD
Guangzhou 511356, PR China
Tel: + 86 20 3222 2180
INDONESIA
Inkopal Plaza Kelapa Gading
Blok B no. 31-32
Jl. Raya Boulevard Barat
Jakarta Utara 14240,
Indonesia
Tel: + 62 21 4585 1481
Offices - Australia ABN 62 002 070 733
Offices - International
NEW SOUTH WALES
(Head Office)
36 South Street,
Rydalmere NSW 2116
Tel: + 61 2 9898 8600
QUEENSLAND
77 Nealdon Drive,
Meadowbrook QLD 4131
Tel: + 61 7 3299 9999
VICTORIA
Unit 1, 6 Samantha Court,
Knoxfield Vic 3180
Tel: + 61 3 9764 1211
WESTERN AUSTRALIA
2 Stretton Place,
Balcatta WA 6021
Tel: + 61 8 9273 1900
SOUTH AUSTRALIA
580 Torrens Road,
Woodville North SA 5012
Tel: + 61 8 8244 6000
SINGAPORE
24 Peck Seah Street,
#05-02/04 Nehsons Building
Singapore 079314
Tel: + 65 6344 2378
MALAYSIA
Lot 832, Jalan Kusta,
Kawasan Perindustrian SB Jaya,
47000 Sungai Buloh,
Selangor Darul Ehsan
Tel: + 60 3 6145 6000
UNITED KINGDOM
Radfield, London Road,
Teynham Sittingbourne,
Kent, ME9 9PS, UK
Tel: + 44 1795 521733
FRANCE
Parc d’Activité ENTRIMMO
3 rue Paul Rieupeyroux
69800 SAINT PRIEST
Tel: + 33 4 72 79 33 30
www.waterco.com
ZZM1451 6-13
Table of contents
Popular Vacuum Cleaner manuals by other brands

Panasonic
Panasonic MC-CL433 operating instructions

GreenWorks
GreenWorks VUG403 Operator's manual

FXA
FXA CP-T299-3 instruction manual

Miele
Miele STB 305 TurboTeQ operating instructions

cecotec
cecotec CONGA ROCKSTAR 7500 ASTRAL ERGOWET ANIMAL instruction manual

CleanMax
CleanMax CMNR-QD operating instructions


